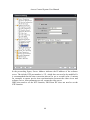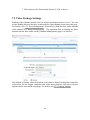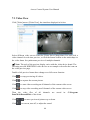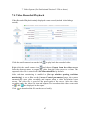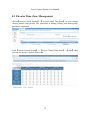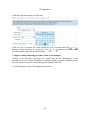
1
ZKAccess User Manual Document Version: 1.4 Software Version: ZKAccess 5.2.20 or above Version Date: December, 2012 About This Manual This document introduces the main functions, the user interface and operations of the system. Table of Contents Table of Contents Definitions ........................................................................................................... i 1. System Instruction...........................................................................................1 1.1 Functions Instruction................................................................................1 1.2 Basic Operation Flow...............................................................................3 2. System Management........................................................................................4 3. My Work Panel................................................................................................6 4. Personnel System Management .......................................................................8 4.1 Department Management..........................................................................8 4.2 Personnel Management.............................................................................9 4.2.1 Add Personnel .................................................................................9 4.2.2 Personnel Information Maintenance ...............................................13 4.2.3 Personnel Adjustment....................................................................17 5. Device Management.......................................................................................18 5.1 Area Settings..........................................................................................18 5.2 Device Management...............................................................................19 5.2.1 Add Access Control Panel..............................................................19 5.2.2 Add Video Recorder (For Professional Version 5.2.20 and above) ...23 5.2.3 Device Maintenance ......................................................................24 5.3 Device Communication Management......................................................24 5.4 Daylight Saving Time.............................................................................25 6. Access Control Management .........................................................................27 6.1 Access Control Time Zones ....................................................................28 6.2 Access Control Holidays.........................................................................30 6.3 Door Settings .........................................................................................31 6.3.1 Door Management.........................................................................31 6.3.2 FirstCard Normal Open ................................................................39 6.3.3 MultiCard Opening ......................................................................40 6.3.4 Interlock Settings ..........................................................................41 6.3.5 Antipassback Settings...................................................................42 6.3.6 Linkage Setting .............................................................................43 6.3.7 Wiegand Card Format....................................................................46 6.4 Access Levels ........................................................................................47 6.5 Personnel Access Levels.........................................................................48 6.6 Realtime Monitoring.............................................................................48 6.7 Access Control Reports ..........................................................................59 I Table of Contents 6.8 Access Control Parameter Settings..........................................................61 7. Video System (For Professional Version 5.2.20 or above) ..............................63 7.1 TimeServer Settings ...............................................................................63 7.2 Video Linkage Settings...........................................................................65 7.3 Video View ............................................................................................66 7.4 Video Recorded Playback .......................................................................67 7.5 Video Parameter Settings........................................................................68 7.6 Exclusion and Solutions of Exception .....................................................69 8. Elevator Control System................................................................................70 8.1 Adding Elevator Equipment....................................................................70 8.2 Elevator Parameter Settings ....................................................................70 8.3 Elevator Time Zone Management ...........................................................72 8.4 Elevator Level Management ...................................................................73 8.5 Personal Elevator Levels Distribution .....................................................74 8.6 Personnel adding....................................................................................75 8.7 Description (realtime surveillance and report of the elevator control system) .75 9. Visitor System................................................................................................76 9.1 List........................................................................................................76 9.2 Reservation Management .......................................................................77 9.3 Visitor Management ...............................................................................78 9.4 Visitor History........................................................................................81 10. System Settings ............................................................................................82 10.1 User Management ................................................................................82 10.2 Database Management..........................................................................84 10.3 System Parameters ...............................................................................87 10.4 Log Records.........................................................................................87 11. Appendices ...................................................................................................88 Appendix 1 Common Operation ...................................................................88 Appendix 2 EndUser License Agreement for This Software...............................95 Appendix 3 FAQs ........................................................................................98 II Definitions Definitions Super User: The user who has all operation levels of the system, who can assign new users (such as company management personnel, registrar, and access control administrator) in the system and configure the roles of corresponding users. Role: During daily use, the super user needs to assign new users having different levels. To avoid setting individual levels for each user, roles having certain levels can be set in Role Management, and then be assigned to specified users. Access Control Time Zone: It can be used for door timing. The reader can be made usable during valid time periods for certain doors and unusable during other time periods. Time zone can also be used to set Normal Open time periods for doors, or set access control levels so that specified users can only access specified doors during specified time periods (including access levels and FirstCard Normal Open settings). Door Status Delay: The duration for delayed detection of door sensor after the door is opened. Detection is performed only after the door is opened and the delay duration expired. When the door is not in the “Normally Open” period, and the door is opened, the device will start timing. It will trigger alarm when the delay duration expired, and stop alarm when you close the door. The door status delay should be longer than the lock drive duration. Close and Reverselock: Set whether or not to lock after door closing. Lock Drive Duration: Used to control the delay for unlocking after card punching. FirstCard Normal Open: During a specified interval, after the first verification by the person having FirstCard Normal Open level, the door will be Normal Open, and will automatically restore closing after the valid interval expires. MultiCard Opening: This function needs to be enabled in some special access occasions, where the door will open only after the consecutive verification of multiple people. Any person verifying outside of the defined combination (even if the person belongs to other combinations) will interrupt the procedure, requiring a 10 seconds wait to restart verification. It will not open by verification of only one of the combination. Interlock: Can be set for any two or more locks belonging to one access control panel, so that when one door is opened, the others will be closed, allowing only one door to be open at a time. Antipass Back: The card holder who entered from a door by card punching must exit from the same door by card punching, with the entry and exit records strictly consistent. Linkage Setting: When an event is triggered at an input point of the access control system, a linkage action will occur at the specified output point to control such events as verification, opening, alarming and exception of the system and list them in the corresponding monitored report for view by the user. i 1. System Instruction 1. System Instruction 1.1 Functions Instruction Security Management has increasing concerns for modern enterprises. This management system helps customers to integrate operation of safety procedures on one platform, making access control management easier and more practical so as to improve efficiency. ] System Features 1. Powerful data processing capacity, allowing the management of the access control data for 30,000 people. 2. Visible and reasonable work flows come from abundant experience in access control management. 3. Automatic user name list management. 4. Multilevel management rolebased level management secures user data confidentiality. 5. Realtime data acquisition system ensures prompt feedback of access control data to the management. ] Configuration Requirements: CPU: Master frequency of 2.0G or above; Memory: 1G or above; Hardware: Available space of 10G or above. We recommend using NTFS hard disk partition as the software installation directory (NTFS hard disk partition has the better performance and higher security). ] Operating System: Supported Operating Systems: Windows XP/Windows 2003/Windows Vista/Windows7 Supported Databases: MySQL/MS SQL Server2005 or later version Recommended browser version: IE 8.0 or later version (Using fingerprint registration, matching, and visit video related page, you must use IE browser and Firfox5.0 or later version.) 1 Access Control System User Manual ] System Modules: The system includes five major functional modules: Personnel System: Primarily two parts: first, Department Management settings, used to set the Company’s organizational chart; second, Personnel Management settings, used to input personnel information, assign departments, maintain and manage personnel. Device System: Set communication parameters for device connection, including system settings and machine settings. After successful communication, the information of connected devices can be viewed and operations such as remote monitoring, uploading and downloading can be performed in the system. Access Control System: WEBbased management system, enabling normal access control functions, management of networked access control panel via computer, and unified personnel access management. The access control system sets door opening time and levels for registered users, so that some users are permitted to unlock some doors through verification during certain intervals. Video System (for professional version): The system provides the video linkage function, to manage the network video recorder, view the realtime video, and query the video records. It opens the Realtime Video when the linkage events happen. Elevator control system (function in the professional edition): The elevator control function is added to the system and it helps manage network elevator controllers over the computer network. In the elevator control system, the time and rights are set for registered users to use elevator controllers so that only certain users can reach the specified floor within a period of time after authentication. Visitor system (function in the professional edition): The visitor management function is added to the system. The visitor system, a webbased management system, implements functions such as certificate registration, card registration, onsite snapshot capture, and visitor quantity statistics. It is highly integrated with the access control system and elevator control system to manage visitors safely and efficiently. System Settings: Primarily used to assign system users and configure the roles of corresponding modules; database management such as backup, initialization and recovery; and set system parameters and manage system operation logs. 2 2. System Management 1.2 Basic Operation Flow The following are the basic steps to use the system, based on the role of a super user. Different users have different operation levels, so the steps may slightly differ. The user just needs to follow the steps below and skip the items which are not displayed on their interface. Step 1: Log in to the system to modify the default password of the account; Step 2: Assign accounts and roles to system users (such as management personnel, registrar, access control administrator); Step 3: Set system parameters, database, notice, reminder and other frequently used system information; Step 4: Add devices to the system, and configure the basic information of devices; Step 5: The user sets departmental organization chart (refer to the organizational chart of your company) ; Step 6: Input company personnel and conduct daily maintenance of the personnel; Step 7: Set access control time zones and access control holidays (as access control exceptions); Step 8: Set parameters for access controlled doors; Step 9: Set access levels to establish access control based on doors group and time zones; Step 10: Set the access levels of personnel by assigning personnel to access levels to decide which people can open which doors during which time zones. 3 Access Control System User Manual 2. System Management 1. Log in to the System After installing the server on the computer, the user can access the server through the network and use this system. Open the browser and enter the server’s IP address in the address bar. Press [Enter] to access the system homepage. If you use the program at the server computer, please open the [Server Controller] first, and start the service. Then double click the [Access Security System] shortcut on the desktop, the following the homepage pops up. ?Note: Right clicks [Server Controller] and select [Run as Administrator] in Windows 7/Vista system. For system security, it is required to verify identity before accessing the system. We will provide a super user (having all operation levels) for the beginner of this system. Enter user name and password, and click [login], or click [Fingerprint Login], and then press the administrator fingerprint on the fingerprint sensor (need to install the fingerprint sensor driver first), to enter the system. ? Note: The user name of the super user is [admin], and the password is [admin]. After the first login to the system, for system security, please use the [Modify password] function to modify the password. The super user can assign company personnel as system users to (such as company management personnel, registrar, and access control administrator) and configure the roles of corresponding modules. For details, see 10.1 User Management. 2. Quit the system: 4 2. System Management Click the [Logout] button on the upper right corner of the interface to return to the homepage or close the browser directly to quit the system. After that, enter the [Server Controller] and stop the server, then quit the [Server Controller]. 3. Customize Settings: The user can use this function to customize the main interface. Click [Setting] to activate the Setting interface, and enter the following information: Email address, First Name, Last Name, and Language. Click [Confirm] to complete setting. The modified system interface will change accordingly, such as the desired language. 4. System User Manual: Press the help icon to view the system help file. On each operation interface, a “ ” icon will appear on the right top of the interface, indicating the help for the current page. Click it to view the help file, as shown below. 5. Modify Password: The super user and the new user created by the super user (the default password for the new user is “111111”) can use the [Modify password] function to modify the login password for system security. Click [Modify password], it pops up the Edit Page. Enter the old password and the new password, confirm the new password and click [Confirm] to complete the modification. ? Note: The user name is caseinsensitive, but the password is casesensitive. 5 Access Control System User Manual 3. My Work Panel After the user logs in to the system, it will show the [My Panel] main interface, displaying common operations and other important information. The default work panel includes the following modules: ] Common Operation: The user can rapidly perform some common operation here, as shown below. Add Person please refer to 4.2.1 Add Personnel; Card Issue please refers to 4.2.2 Personnel Information Maintenance; Add Department please refers to 4.1 Department Management; Add Area please refers to 5.1 Area Settings; For details on fingerprint registration, see to4.2.2 Personnel Information Maintenance View Reports please refers to 6.7 Access Control Reports; Device Monitoring please refers to 5.3 Device Communication Management; For details on controller event record acquisition, see to 6.3.1 Door Management ] Access Control Quick Start: Follow the steps to enter corresponding modules for related operation, thus basically fulfilling access control functions. 6 3. My Work Panell Device Management please refers to 5.2 Device Management; Personnel Management please refers to 4.2 Personnel Management; Time Zone Settings please refer to 6.1 Access Control Time Zones; Holidays Settings please refer to 6.2 Access Control Holidays; Door Configuration please refers to 6.3 Door Settings; Create Access Levels please refer to 6.4 Access Levels; Personnel Access Levels Settings please refer to 6.5 Personnel Access Levels; Realtime Monitoring please refers to 6.6 Realtime Monitoring; Customize Work Panel: Click [Customize Work Panel] in the upper right corner to open a dialog box. Cancel the tick of the undesired modules (all ticked by default), and click [OK] to complete setting. Now customized modules are displayed; Or directly click the “ ” icon on a module to minimize, and click the “ close the module. Click the upper bar to drag and adjust its position; ” to To restore the original panel, click [Restore Work Panel] to refresh and return to the system default work panel. 7 Access Control System User Manual 4. Personnel System Management Before using the system’s access control management functions, first access the personnel system for configure: First, Department Management settings, used to set the company’s organizational chart; Second, Personnel Management settings, used to input personnel, assign departments, and maintain and manage personnel. Then set Access Control. 4.1 Department Management Before managing company personnel, it is required to describe and manage the company departmental organization chart. Upon first use of the system, by default it has a primary department named [Company Name] and numbered [1]. This department can be modified but can’t be deleted. Main functions of Department Management include Add Department and Department Maintenance. 1. Add Department: Click [Personnel] [Department] [Add] to show the add Department edit interface. The fields are as follows: Department name: Any character, up to a combination of 100 characters; Department number: If required, it shall not be identical to another department. The length shall not exceed 100 digits. Click [Verify] to see if repeated or not; Parent department: Select from the pulldown menu and click [OK]; After editing, click [OK] to complete adding, or click [Cancel] to cancel it. 8 4. Personnel System Management4. Personnel System Management To add a department, you can also use [Import] to import department information from other software or another document into this system. For details, see Appendix 1 Common Operation. [Upper Department] is an important parameter to determine the Company’s organizational chart. On the right of the interface, the Company’s organizational chart will be shown in the form of a department tree. 2. Department Maintenance: Department Maintenance includes department Edit and Delete: Upon a change to the department or organizational structure, the user can use the [Edit] function to modify such items as Department Name, Department Number or Upper Department. Click Department Name directly or click the [Edit] button behind the department to access the edit interface for modification. To delete a department, click the check box before the department, and click [Cancel Department], or directly click the [Delete] button behind the department. ? Note: A department can not be deleted freely. If so, the personnel under the department will be pending, and some historical data will not be able to be queried. If deletion is required, please first transfer the departmental personnel to another department. 4.2 Personnel Management When starting to use this management program, the user shall register personnel in the system, or import personnel information from other software or document into this system. For details, see Appendix 1 Common Operation. 4.2.1 Add Personnel Click [Personnel] [Personnel] [Add] to show personnel profile edit interface: 9 Access Control System User Manual 10 4. Personnel System Management4. Personnel System Management The fields are as follows: Personnel No.: By default, the length can not exceed 9 digits. A number with a length of less than 9 digits will be preceded with 0 automatically to complete 9 digits. Numbers can not be duplicated. Click [Verify] to see if it is duplicated or not; Department: Select from the pulldown menu and click [OK]. If the department was not set previously, you can only select the default [Company Name] department; Card number: You can add a card number through manual entry or a card issuer. There are two manual entry modes: Actual Card Number and Internal Card Number mode. In Actual Card Number mode (by default), you must enter both the actual card number and the site code, then the software converts the numbers to the internal card number for access control system verification. In Internal Card Number mode, 11 Access Control System User Manual enter the numbers directly. For details on card issue operations, see personnel card issue in 4.2.2 Personnel Information Maintenance. Password: Set personnel password. An access control panel only supports 6digit passwords. If a password exceeds the specified length, the system will truncate it automatically. If you need to modify the password, please clear the old password in the box and input the new one; Personal Photo: The best size is 120×140 pixels, for saving space. For details, see Upload Personal Photo in 4.2.2 Personnel Information Maintenance; Employment Date: By default it is the current date. Register Fingerprint: Enroll the Personnel Fingerprint or Duress Fingerprint. If the person presses the Duress Fingerprint, it will trigger the alarm and send the signal to 12 4. Personnel System Management4. Personnel System Management the system. ? Note: If you have not installed the fingerprint sensor driver, the system will prompt to download and install the driver when you click “Register Fingerprint” (Fingerprint function is only available for version 5.0.8 and above version). Access Control Settings Superuser:In access controller operation, a super user is not restricted by the regulations on time zones, antipassback and interlock and has extremely high dooropening priority. In elevator controller operation, a super user is not restricted by the regulations on time zones, holidays and has extremely high dooropening priority. Select access levels, start and end dates of access validity time and multicard opening personnel groups (Presetting is required. For details, see 6.3.3 MultiCard Opening); Select elevator level, start and end dates of elevator validity time; Validity time is set for temporary access control and temporary elevator control where the door can be opened only during this time period. If not ticked, the setting will be always valid. After editing personnel information, click [OK] to save and quit. The added personnel will be shown in the personnel list. ? Note: The number of a person, whether departed or in service, must be unique. The system, when verifying, will automatically search the number in the departure library. The Personnel Information List, by default, is displayed as a table. If Graphic Display is selected, photos and numbers will be shown. Put the cursor on a photo, details about the personnel will be shown. 4.2.2 Personnel Information Maintenance The operations include Personnel Card Issue, Upload Personal Photo, and etc. For such functions, you can directly click the personnel number in the personnel list to enter the edit interface for modification, or click the [Edit] button under “Related Operation” to enter the edit interface for modification. After modification, click [OK] to save and quit. 1. Personnel Card Issue: 13 Access Control System User Manual Batch card issue and assign card numbers to personnel. (1) How to use the card issuer: The card issuer is connected to the PC through a USB port. When the cursor is on the Card Number Input box, punch the card on the card issuer, then the card number will display in the input box. (2) Batch Card Issue: Click [Personnel] [Issue Card] [Batch Issue Card] to show the Batch Issue Card edit interface; Enter Start and End Personnel Numbers (not longer than the system support max digits) to generate personnel list and show this all personnel without cards within this number series; Select [The way to get card NO.]: Card Reader or Access Control Panel. In using of the card reader. When you swipe the card near to the card reader. The System will get the card number and issue it to the user in the left list. Using of the access control panel, you need to select the position of swiping card, such as a card reader connected with an access control panel. Click [Start to read], the system will read the card number automatically, and issue it to the user in the left list one by one. After that, click [Stop to read]. Click [OK] to complete card issue and return. Personnel and corresponding card numbers will be shown in the list. 14 4. Personnel System Management4. Personnel System Management 2. Register fingerprint (1) Click [Personnel] [Personnel], click Personnel No or Edit to show the Personnel Profile edit interface, and you can see Register Fingerprint interface from the Personnel Profile edit interface: ↓ If you have enrolled the fingerprints, the number of enrolled fingerprints will show after corresponding item. (2) Click [Register] to open the Fingerprint Registration interface. ? Note: If there is no fingerprint driver installed, the system will prompt to download and install the driver by clicking. 15 Access Control System User Manual (3) Click the finger for the fingerprint to be enrolled. After the finger finishes 3 times press on the FP Sensor, the system prompt “Succeed in fingerprint registration”, is shown, as blow: (4) The enrolled fingerprint will be indicated in this diagram. Click [OK] to save and close the current interface, return to the previous window. 16 4. Personnel System Management4. Personnel System Management To delete the fingerprints, please click on the enrolled finger once. The system prompts the following confirmation for the deletion. If you want to enroll a Duress Fingerprint, just tick the Duress Fingerprint option before enrolling. 3. Upload Personal Photo: Click [Personnel] [Personnel], click Personnel No or Edit to show the Personnel Profile edit interface, and you can see Upload Personal Photo interface from the Personnel Profile edit interface, click [Browse] and select a photo, and click [OK] to save and exit. 4.2.3 Personnel Adjustment Personnel Adjustment is daily maintenance of existing personnel, primarily including: Personnel Adjust Department and Delete Personnel. 1. Personnel Adjust Department: Operation steps are as follows: (1) Click [Personnel] [Personnel], and select the person subject to department adjustment from the personnel list, click the [Adjust Department] button, and the following interface appear; (2) Select the department to be transferred to (3) After editing, click [OK] to save and quit. 2. Delete Personnel: Click [Personnel] [Personnel], select personnel, click [Delete], and click [OK] to delete, or directly click [Delete] under “Related operation” of the personnel to delete. ? Note: Deleting personnel also results in deleting the personnel in the database. 17 5. Device Management 5. Device Management The access control panel to be connected to this system provides access control system functions, or the elevator control panel to be connected to this system provides elevator control system functions. To use these functions, the user must first install devices and connect them to the network. Second, set corresponding parameters in the system so as to manage these devices via the system, upload user access control data (or elevator control data), download configuration information, output reports and achieve digital management of the enterprise. Device Management primarily includes Area Setting, Device Management, and Device Monitoring. 5.1 Area Settings Area is a spatial concept, enabling the user to manage devices in a specific area. In the access system, after area setting, devices (doors) can be filtered by area upon realtime monitoring. The system, by default, has set an area named [Headquarters] and numbered [1]. Area Setting include Add Area and Delete area. 1. Add area: Click [Device] [Area Settings] [Add] to activate the Add Area edit interface: 18 5. Device Management The fields are as follows: Area Number: Repetition not allowed; Area Name: Any character, up to a combination of 30 characters; Parent Area: Decides the regional organization structure of the company. After setting, click [OK]. 2. Delete area: Select area, click or [delete area] under “related operation”, and then click [OK]. 5.2 Device Management Set the communication parameters of connected devices. Only when communication parameters, including system settings and device settings, are correct, normal communication with devices will be possible. When communication is successful, you can view the information of connected devices, and perform remote monitoring, uploading and downloading data. It includes Add Access Control Panel and Add Network Video Recorder. Click [Device] [Device] [Add], the system will prompt to select the device type. To add Access Control Panel, search and view devices connected to the network, and directly add from the searching result. 5.2.1 Add Access Control Panel There are two ways to add Access Control Panel. 1. Add Device: (1) In the Device Type Selection interface, select Add Access Control Panel. The communication modes are TCP/ IP or RS485. The following interface will be shown: TCP/ IP: 19 Access Control System User Manual IP Address: Please enter the IP Address of the access control panel; IP Port No.: In Ethernet mode, the default is 4370; RS485: Serial Port Number: COM1COM254; 485 Address: The machine number. When serial port numbers are the same, there will be no repeated 485 addresses; Baud Rate: Same as the baud rate of the device (9600/ 19200/ 38400/ 57600/115200). The default is 38400; Device Name: Any character, up to a combination of 20 characters; Communication Password: Any character, up to a combination of 15 characters (No blank). You need to input this field only when you add a new device with the communication password. It can not be modified when you edit the device information except in [Modify communication password] operation. Please refer to 6.3.1 Door 20 5. Device Management Management. ? Note: You do not need to input this field if the device has no communication password, such as when it is a new factory device or just after the initialization. Panel Type: Onedoor panel, twodoor panel, fourdoor panel, access control device. Switch to Twodoor Twoway: When fourdoor panel is selected, this box will appear. By default, it is not ticked. This parameter is used to switch the fourdoor oneway access control panel to twodoor twoway access control panel (For changes of extended device parameters before and after switching, see relevant files of access control panel). ? Note: After the four door oneway access control panel is switched to two door twoway access control panel, to switch back, you need delete the device from the system and add it again. When adding, do not tick the check box before this parameter. Auto Synchronizes Device Time: By default it is ticked, namely, it will synchronize device time with server time each time connecting to the device. If it is not ticked, the user can manually synchronize device time; Area: Specify areas of devices. After Area Setting, devices (doors) can be filtered by area upon RealTime Monitoring. Clear Data in the Device when Adding:If this option is being ticked, after adding device adding, the system will clear all data in the device, except the event logs. If you add the device just for demonstration or testing of the system, there is no need to tick it. (2) After editing, click [OK], and the system will try connecting the current device: If connection is successful, it will read the corresponding extended parameters of the device. At this time, if the access control panel type selected by the user does not meet the corresponding parameters of the actual device, the system will remind the user. If the user clicks [OK] to save, it will save the actual access control panel type of the device; Extended Device Parameters: includes serial number, device type, firmware version number, auxiliary input quantity, auxiliary output quantity, door quantity, device fingerprint version, and reader quantity. If device connection fails, while the user still needs to add the device to the system, corresponding device parameters and extended parameters, such as the serial number, will not be written into the system and settings such as antipassback and linkage will not be impossible. These settings can be created only when the device is reconnected successfully and corresponding parameters are acquired. ? Note: When you add a new device to the system, the software will clear all user information, time zones, holidays, and access control levels settings (including access 21 Access Control System User Manual control group, antipass back, interlock settings, linkage settings, etc.) from the device, except the events record in the device. Unless the information in the device is unusable, we recommend that you not to delete the device in used, to avoid the loss of information. Access Control Panel Settings: ] TCP/ IP Communication Requirements: To support and enable TCP/ IP communication, directly connect the device to the PC or connect to the Internet, get the device IP address and other device information of the device; ] RS485 Communication Requirements: To support and enable RS485 communication, connect to PC through RS485, get the serial port number, RS485 machine number (address), baud rate and other device information of the device. 2. Add Device By Searching Access Control Panels: Search the access control panels in the Ethernet. (1) Click [Device] [Device] [Search Panels], to show the Search interface; (2) Click [Start Search], and it will prompt [searching……]; (3) After searching, the list and total number of access control panels will be displayed; 22 5. Device Management ? Note: Here we use UDP broadcast mode to search the access controller, this mode can not exceed the HUB scale. The IP address can exceed the net segment, but must belong to the same subnet, and needs to configure the gateway and IP address in the same network segment. (4) Click [Add to device list] behind the device, and a dialog box will open. Enter selfdefined device name, and click [OK] to complete device adding. (5) The default IP address of the access control panel may conflict with the IP of a device on the Internet. You can modify its IP address: Click [Modify IP Address] behind the device and a dialog box will open. Enter the new IP address and other parameters (Note: Must configure the gateway and IP address in the same network segment); 5.2.2 Add Video Recorder (For Professional Version 5.2.20 and above) (1) In Device Type Selection interface, select to Add Video Recorder. The following interface appears. Click [Next] and set the server information. IP Address: The IP address of the device. IP Port: IP port of the device. User Name: The user name to login the device. Communication Password: The password to login the device. (2) After edition, click [OK] and the new video server will display on the device list. 23 Access Control System User Manual Currently, the system only supports Hikvision network video recorder. 5.2.3 Device Maintenance Synchronize All Data: The system will synchronize the data to the device, including door information, access control levels (personnel information, access control time zones), antipass back settings, interlock settings, linkage settings, firstcard normal open settings, multicard normal open settings and so on. Select device, click [Synchronize All Data] and click [OK] to complete synchronization. ? Note: The operation of Synchronize All Data is mainly to delete all data in the device first (except event record). Download all settings again, please keep the net connection stable and avoid power down situations, etc. If the device is working normally, please use this function with caution. Execute it in rare user situations to avoid impact on normal use of the device. Delete: Select device, click [Delete], and click [OK]. Edit: Click device name, or click [Edit] under “Related operation” behind the device to open the edit interface. For the meanings and settings of the parameters, see the relevant chapters for details. The gray items are not editable. The device name cannot be identical to the name of another device. Since device type cannot be modified, if the type is wrong, the user need manually delete the device and add it again. 5.3 Device Communication Management 1. Commands Sent By Server Shows the list of commands sent to the device by the current system. If the return value is ≥0, execution is successful. If it is a negative, the execution failed. 24 5. Device Management Clear Command List: Click it to open the Confirm interface. Click [OK] to clear all items in the list of commands sent by the server; Delete: Tick the check box before the command to be deleted, and click [Delete]. Confirm to delete the command. 2. Device Monitoring By default it monitors all devices with the current user’s level, and lists the operation information of the devices: device name, serial number, operation type, current status, commands to be executed, and progress, etc. 5.4 Daylight Saving Time DST, also called Daylight Saving Time, is a system that prescribes the local time setting principle in order to save energy. The unified time adopted during the system date is called “DST”. Usually, the time will be one hour forward in summer. It encourages people to go to bed early and wake up early in order to reduce lighting and save energy. In autumn, the time will be recovered. The regulations are different in different countries. To meet the demand of DST, a special option can be customized on this system. Set the time one hour forward at XX (minute) XX (hour) XX (day) XX (month), and make the time one hour backward at XX (minute) XX (hour) XX (day) XX (month) if necessary. 25 Access Control System User Manual ? Note: If a DST setting is in use, it can not be deleted. First stop the DST then delete it again. 1. DST Adding: Mode 1: Set as “Monthday hour: minute” format, Start Time and End Time is in needed. For example, the Start Time can be set as “311 00:00”, when the start time arrives, the system will be advanced one hour. When the end time arrives, the system will turn back to the original time. Mode 2: Set as "MonthWeeksweek hour: minute" format. The start time and end time is in need. For example, the start time can be set “second Monday in March, 00:00” When the start time arrives, the system will be advanced one hour. When the end time arrives, the system will turn back to the original time. 2. DST Using: The user can enable the DST setting on a device, by the following ways: In the DST interface, select a DST setting, and click [Daylight saving time setting], select the device to apply the DST setting to and click [OK] to confirm. Otherwise, in the [Access Control] – [Door Configuration] interface, select the device, and click [Enable Daylight Saving time] or [Disable Daylight Saving Time] to set. If a DST setting is in use, the latest modification will be sent to the device. The device disconnect will lead to transmission failure, and it will continue transmit at the next connection. In the Door Management module of the access control system, you can enable or disable DST function. If you enable DST setting, when the start time arrives, the system will be advanced one hour. When the end time arrives, the system will turn back to the original time. If you have not set a DST in the device, when you disable DST, the system will prompt “The Daylight Saving Time hasn’t been set in this device”. 26 Access Control System User Manual 6. Access Control Management 1. Work principle of the access control system: The System is a WEBbased management system, providing normal access control functions, management of networked access control panel via computer, and unified personnel access management. The access control system can set the opening levels of registered users, namely, allowing some personnel to open some doors by verification during a time period. Otherwise, the system supports the use of data from the access control panel for attendance purpose, to save the device resource. It facilitates the management and support of multiple databases, including MySQL, SQL Server. Designed based on multibusiness convergence, it supports service extension, such as attendance, patrol, and visitor management, etc., and supports multiple languages. 2. Access control system parameters: ] 255 time zones; ] Unlimited access levels; ] Three holiday types and 96 holidays total; ] Antipassback function; ] Interlock function; ] Linkage function; ] Wiegand Card Format; ] FirstCard Normal Open function; ] MultiCard Opening function; ] Remote door opening and closing; ] Realtime monitoring via Web browser; 3. Operation functions of access control system: Click to enter the [Access Control System] and the main interface is [RealTime Monitoring]. Access Control System Management primarily includes Access Control Time Zones, Access Control Holiday, Door Settings, Access Levels, Personnel Access Levels, 27 Access Control System User Manual RealTime Monitoring, and Reports, etc. 6.1 Access Control Time Zones Access Control Time Zone can be used for door timing. The reader can be made usable during valid time periods of certain doors and unusable during other time periods. Time Zone can also be used to set Normal Open time periods for doors, or set access control levels so that specified users can only access specified doors during specified time periods (including access levels and FirstCard Normal Open settings). The system controls access according to Access Control Time Zones. The system can define up to 255 time zones. For each time zone, you can define, During a week, you can define up to three intervals for each day and three holiday types for each time zone. Each interval is the valid interval in 24 hours of each day. The format of each interval for a time zone: HH: MMHH: MM, this is accurate to minutes in the 24hour system. Initially, by default the system has access control time zone named [Accessible 24 hours]. This time period can be modified but cannot be deleted. The user can add Access Control Time Zones that can be modified. 1. Add Access Control Time Zone: (1) Click [Access Control System] [Time zones] [Add] to access the time zone setting interface; 28 6. Access Control Management The parameters are as follows: Time Zone Name: Any character, up to a combination of 30 characters; Remarks: Detailed description of the current time zone, including an explanation of the current time zone and primary applications, facilitating the user or other users with same level to view time zone information. The field is up to 70 characters; Interval and Start/ End Time: One Access Control Time Zone includes 3 intervals for each day in a week, and three intervals for each of the three Access Control Holidays. Set the Start and End Time of each interval; Setting: If the interval is Normal Open, just enter 00:0023:59 as the first interval, and 00:0000:00 as the second and third intervals. If the interval is Normal Close: All are 00:0000:00. If only using one interval, the user just need to fill out the first interval (such as: Normal Open), and the second and third intervals will use the default value of 00:0000:00. Similarly, when the user only uses the first two intervals, the third interval will use the default value of 00:0000:00. When using two or three intervals, the user needs to ensure two or three intervals have no time intersection, and the time shall not span days. Otherwise, the system will prompt error. Holiday Type: There are three holiday types in the time zone. They are unrelated to the day of the week. If a certain date is set to a certain holiday type, the three intervals of the holiday type will be used for access. The holiday type in a time zone is optional. However, if the user does not enter one, the system will give the default value. For example, set the access control interval of Holiday Type 1 as 820, the Access Control Time Period of Holiday Type 2 as Normal Open, and the Access Control Time Zone of Holiday Type 3 as Normal Close. (2) After time zone setting, click [OK] to save, and the time zone will appear in the list. 2. Maintenance of Access Control Time Zone: Edit: In the time zone list, click the [Edit] button under “Related operation” to access the time zone modification interface, and modify the time zone setting. After modification, click [OK], and the modified time zone will be saved and shown in the time zone list. Delete: In the time zone list, click the [Delete] button under “Related Operation”. Click [OK] to delete the time zone, or click [Cancel] to cancel the operation. A time zone in use can not be deleted. Tick the check boxes before one or more time zones in the time zone list. Click the [Delete] button over the list, and click [OK] to delete the selected time zones, or 29 Access Control System User Manual click [Cancel] to cancel the operation. 6.2 Access Control Holidays The Access Control Time of a holiday may differ from that of a weekday. For easy operation, the system provides holiday settings to set access control time for holidays. Access Control Holiday Management includes Add, Modify and Delete Access Control Holiday. 1. Add Access Control Holiday: Three holiday types are supported, each including up to 32 holidays. To conduct special access level configuration on special dates, the user can select special holidays for setting. The operation steps are as follows (1) Click [Access Control System] [Holidays] [Add] to access Add Access Control Holiday edit interface: The fields are as follows: Holiday Name: Any character, up to a combination of 30 characters; Holiday Type: Holiday Type 1/2/3, namely, A current holiday record belongs to these three holiday types and each holiday type includes up to 32 holidays; Start/ End Date: Must meet the date format as “201011”. The Start Date cannot be later than the End Date otherwise the system will prompt an error. The year of the start date Start Date cannot be earlier than the current year, and the holiday can not 30 6. Access Control Management span years; Recurring: Yes or No. The default is “No”. Annual cycle means that a holiday does not require modification in different years. For example, the Near Year’s Day is on January 1 each year, and can be set as “Yes”. For another example, the Mother's Day is on the second Sunday of each May, so its date is not fixed and should be set as “No”; For example, the date of the holiday “Near Year’s Day” is set as January 1, 2010, and the holiday type is 1, then on January 1, Access Time Control will not follow the time of “Friday” in the week, but the Access Control Time of Holiday Type 1. (2) After editing, click the [OK] button to save, and it will appear in the holiday list. 2. Modification of Access Control Holiday: To modify the original Access Control Holiday, click [Edit] behind the Access Control Holiday to access the edit interface. After modification, click [OK] to save and quit. 3. Deletion of Access Control Holiday: In the access control holiday list, click the [Delete] button under “Related Operation”. Click [OK] to delete the holiday, or click [Cancel] to cancel the operation. An Access Control Holiday in use cannot be deleted. Tick the check boxes before one or more holidays in the holiday list. Click the [Delete] button over the list, and click [OK] to delete the selected holiday, or click [Cancel] to cancel the operation. 6.3 Door Settings Currently the system supports the connection and control of up to 50 access control panels. The access control system is primarily for the management of personnel restriction and admission. For security, a company will set personnel admission time zones, restriction time zones and combinations of time zones. For door opening verification, FirstCard Normal Open, MultiCard Opening, antipassback, linkage, and interlock can be set to enhance security. This system can provide realtime monitoring of doors and output of exception, access control events and access level reports. 6.3.1 Door Management Click [Access Control System] [Door configuration], and by default it will access the [Door Management] interface, showing the list of all control panels. When 31 Access Control System User Manual unfolded, it can show all doors under the control of the control panel. Upon first entry into the access interface or successful query, if the system currently has access control panels or the query result is not null, by default it will unfold the doors of the first access control panel. Click corresponding button for relevant parameter settings. Door Management operations include: Control Panel Management and Door Management. 1. Access Control Panel Operation For communication between the system and the device, data uploading, configuration downloading, device and system parameters shall be set. The user can see access control panels within his levels in the current system, and can edit the devices here. The user can to add or delete devices in Device if needed. Control Panel Management includes: Modify IP Address, Close Auxiliary Output, Disable, Enable, Modify Communication Password, Synchronize Time, Upload Event Record, Upgrade Firmware, and Get Event Eentries. (1) Device Profile: Select device, click [Edit] under “Related operation”. For Related details, see 5.2.2 Device Maintenance. 32 6. Access Control Management (2) Modify IP Address: Select device and click [Modify IP address] to show the Modification interface. It will obtain realtime network gateway and mask from the device. If it is fails because the network is unavailable, then the IP address cannot be modified. Enter new IP address, gateway, and subnet mask. Click [OK] to save settings and quit. This function the same as [Modify IP Address Function] in 5.2.1 Add Access Control Panel. The difference is when searching control panels, the devices have not been added into the system, while the current [Modify Device IP Address] is regarding added devices. (3) Disable/Enable: Select device, click [Disable/ Enable] to stop/ start using the device. When the device’s communication with the system is interrupted or the device fails, the device may automatically appear in disabled status. At this time, after adjusting Internet or device, click [Enable Device] to reconnect the device and restore device communication. ? Note: If the current device is in enabled status and the connection is not successful, if the user performs the enable operation, the system will immediately reconnect the device. (4) Modify Communication Password: Enter the old communication password before modification. After verification, input the same new password twice, and click [OK] to modify the communication password. ? Note: The communication password can not contain space, it is recommended that a combination of numbers and letters be used. The communication password setting can improve the device security. It is recommended to set communication password for each device. 33 Access Control System User Manual (5) Synchronize Time: Synchronize device time with current server time. (6)Get Event Entries: Get event records from the device into the system. Three options are provided for this operation, Get New Entries, Get All Entries, and Get Entries from SD Card. Get New Entries: The system only gets the new event entries since the last time event entries were collected and records them into the database. Repeated Entries. Get All Entries: The system will get all of the event entries again. Repeated Entries will not be rewritten. Get Entries from SD Card: The system will get the event entries from the SD card in the device. When the network status is normal and the communication status between the system and the device is normal, the system will acquire event records in the device in realtime and save them into the system database. However, when the network is interrupted or communication is interrupted for any reasons, and the event records in the device have not been uploaded into the system in realtime, the operation can be used to manually acquire event records in the device. In addition, the system, by default, will automatically acquire event records in the device at 00:00 each day. ? Note: The access controller can restore up to 100 thousands of event entries. When the entries exceed this number, the device will automatically delete the oldest restored entries (the default delete number is 10 thousands). (7) Upgrade Firmware: To upgrade firmware in the device, tick the device for which you want to upgrade the firmware, click [Upgrade firmware], enter edit interface, click [Browse] to select the firmware upgrade file (named emfw.cfg) provided by ZKAccess, and click [OK] to start upgrading. ? Note: The user shall not upgrade firmware without authorization. Contact the distributor before upgrading firmware, or upgrade it when instructed by the distributor. Unauthorized upgrading may bring problems that affect your normal use. (8) Change the fingerprint identification threshold (Ensure that the access controller supports the fingerprint function): The user can change the fingerprint identification threshold in the device. The scale is 3570 and 55 by default. In device adding, the system will get the threshold from 34 6. Access Control Management the device. If the operation succeeds, user can view the threshold in all of the devices. Batch operation is permitted; the user can change multiple devices concurrently. (9) Enable Daylight Saving Time: Select the Daylight Saving Time being set, click [Enable Daylight Saving Time]. (10) Disable Daylight Saving Time: Disable the Daylight Saving Time in used. (11) Get Information of Personnel: Renew the current number of personnel and fingerprints in the device. The final value will be displayed on the device list. (12) Close Auxiliary Output: Close the auxiliary device connected to the device auxiliary output interface. (13) Rename auxiliary input: Rename the auxiliary input for the device. (14) Rename auxiliary output: Rename the auxiliary output for the device. 2. Door management: The device list will show all access control devices. Click the “+” button before the device name to show the door list under a device. When adding a device, it will automatically add doors (corresponding device name and door numbers can not be edited) according to the number of doors. Before using the device (including doors), the user must edit door information one by one (or apply current settings to other doors). After editing, they will be sent to the device, which can be used after successful setting. Door parameter modification: Select the door to be modified, and click [Edit] under “Related operation” to show the Edit interface: 35 Access Control System User Manual ↓ The fields are as follows: Device Name: It is not editable (must be edited in 5.2.1 Add Access Control Panel); Door Number: The system automatically named the numbers of doors according to how many doors of the device (for example, the four doors of a fourdoor control panel are numbered 1, 2, 3 and 4). The number will be consistent with the door number on the device. ? Note: Although by default the number following the underline in the door name is consistent with the door number, but 1/2/3/4 in antipassback and interlock refers to door serial number rather than the number following the door name, and they have no necessary relation, and the system allows the user to modify the door name, so they can not be confused; Door Name: The default Door Name is “device name_door number”. The field allows the user to modify as required. Up to 30 characters can be entered; 36 6. Access Control Management Door Active Time Zone, Passage Mode Time Zone: By default both are null. Initialized and added access control time zones will be shown for the user to select. Upon door editing, door valid time zone is needs to be input. Only after setting the door valid time zone, the door can be opened and closed normally. We recommend to set the door Normal Open time period within the door valid time zone, only in this situation, the door normal open time zone is valid. ? Note: Consecutive punching of a card having access level of the door for 5 times can release the Normal Open status for one day (including FirstCard Normal Open), and close the door immediately. Lock Drive Duration: Used to control the delay for unlocking after card punching. The unit is second, and the default is 5 seconds. The user can enter a number between 0254; Punch Interval: The unit is seconds (range: 010 seconds), and the default is 2 seconds; Entryonceonly restriction duration: Only one entry is allowed with a reader in this duration. The duration ranges from 0 to 120 minutes (default duration: 0). the password is an integer with less than six characters. Door Sensor Type: NO (door sensor not detected), Normal Open, Normal Close. The default is NO. When editing doors, the user can select the door sensor type to be Normal Open or Normal Close. If Normal Open or Normal Close is selected, it is required to select door status delay and whether close and reverselock is required. By default, once door sensor type is set as Normal Open or Normal Close, the default door status delay will be 15s, and by default it will enable close and reverselock. Door Status Delay: The duration for delayed detection of the door sensor after the door is opened. Detection is performed only after the door is opened and the delay duration expired. When the door is not in the “Normally Open” period, and the door is opened, the device will start timing. It will trigger an alarm when the delay duration expired, and stop alarm when you close the door. The default door status delay will be 15seconds. The door status delay should be longer than Lock Drive Duration. Close and Reverse State: Set locking or not after door closing. Tick it for lock after door closing. Verify Mode: Identification modes include Only Card, Card plus Password, Only Password, Card plus Fingerprint, and Only Fingerprint verify. The default is Only Card or Only Fingerprint. When Card plus Password mode is selected, make sure the door uses a reader with keyboard (the fingerprint verify modes are only available for version 5.0.8 and above version); 37 Access Control System User Manual Wiegand card format: Select the Wiegand card format that can be identified by the Wiegand reader in the door. If the scanned card format is different with the setting format, the door cannot be opened. The software is embedded with 9 formats, and it is set to automatic matching to Wiegand card format by default. After automatic matching, the multiple Wiegand card formats (except for the card format name with a, b or c) embedded in the software can be identified. Request to Exit: Lock status indicates that the door is locked after the exit button is pressed. Unlocking status indicates that the door is unlocked after the exit button is pressed. It is set to unlocking by default. Alarm delay: Alarm delay indicates the alarm delay time for door detection after the exit button is locked. When the door is unlocked forcibly, the system detects the door status after a period of time. The delay time is set to 10s by default. You can set it to any integral between 1 and 254. Duress Password, Emergency Password: Upon duress, use Duress Password (used with legally card) to open the door. When opening the door with Duress Password, it will alarm. Upon emergency, the user can use Emergency Password (named Super Password) to open the door. Emergency Password allows normal door opening. Emergency password is effective in any time zone and any type of verify mode, usually used for the administrator. Duress Password Opening (used with legally card): When Only Card verify mode is used, the password is a number not exceeding 6 digits (integer), you need to press [ESC] first, and then press the setting password plus [OK] button. Finally swipe your card. The door opens and triggers the alarm. When Card Plus Password verify mode is used, please swipe your card first, then press the password number plus the [OK] button (same to normal door open in card plus password verify mode), the door open and trigger the alarm. Emergency Password Opening: The password must be 8 digits (integer). The door can be opened just by entering the password. Please press [ESC] every time before entering password, and then press OK to execute. When using Duress Password or Emergency Password, the interval for entering each number shall not exceed 10 seconds, and these two numbers should not be the same. Copy the settings to doors of the current panels: Click to apply to all doors of the current access control panel; 38 6. Access Control Management Copy the settings to doors of all the panels: Click to apply to all doors of all access control panels within the current user’s level; Userdefined name of the reader: You can userdefined name of the reader. The new name will be displayed in the status column in the realtime monitoring report and access control report. Binding Video Channel: Before selecting a video channel to be bound with the reader, you must select a video device firstly. You can select a video channel among Channel 1 to Channel 8. At present, two reader of a door cannot bind the same video channel. If process this operation, the page will display the prompt corresponding information. Choose to the binding of video channel, after parameter editing, click [OK] to save and quit. You can also cancel it. 6.3.2 FirstCard Normal Open FirstCard Normal Open: During a specified interval, after the first verification by the person having FirstCard Normal Open level, the door will be Normal Open, and will automatically restore closing after the valid interval expired. The user can set FirstCard Normal Open for a specific door. The settings include door, door opening time zone and personnel with FirstCard Normal Open level. A door can have FirstCard Normal Open settings for multiple time zones. The interface of each door will show the number of existing FirstCard Normal Open settings. For FirstCard Normal Open setting, when adding or editing each record, it is not required to modify the “current door”, but to select time zone. When record adding is successful, add personnel that can open the door for a FirstCard Normal Open setting record. On the right of the interface, you can browse door opening personnel in a FirstCard Normal Open setting and delete current personnel, so that some personnel will not have FirstCard Normal Open level any more. The operation steps are as follows: 1. Click [Set] under “FirstCard Normal Open” of a door to show FirstCard Normal Open setting interface; 2. Click [Add], select the time zone of FirstCard Normal Open, and click [OK] to save the settings; 3. Click [Add an opening person] under “Related operation” to set personnel having FirstCard Normal Open level. Click [OK] to save and quit editing. 39 Access Control System User Manual ? Note: For a door currently in Normal Open time period, consecutive verification of a person having access level for the door for 5 times (the person verification interval should be within 5 second.) can release the current Normal Open status and close the door. The sixth person verification will be a normal verification. This function is only effective at the valid door valid time zone. Normal Open intervals set for other doors within the day and FirstCard Normal Open settings will not take effect anymore. 6.3.3 MultiCard Opening This function needs to be enabled in some special access occasions, where the door will open only after the consecutive verification of multiple people. Any person verifying outside of this combination (even if the person belongs to other combination) will interrupt the procedure, and you need to wait 10 seconds wait to restart verification. It will not open by verification by only one of the combination. 1. MultiCard Opening Personnel Groups: It is personnel grouping used to set MultiCard Opening groups. (1) Click [Access Control System] [Door Configuration] [MultiCard Opening Personnel Groups] [Add] to show the following edit interface: Group name: Any combination of up to 30 characters that cannot be identical to an existing group name; After editing, click [OK], return and the added MultiCard Opening Personnel Groups will appear in the list; (2) Select a group, and click [Add personnel] to add personnel to the group: (3) After selecting and adding personnel, click [OK] to save and return. ? Note: A person can only belong to one group, and can not be grouped repeatedly. 2. MultiCard Opening: Set levels for personnel in [MultiCard Opening Personnel Groups]. If currently [MultiCard Opening Personnel Groups] is not configured, the system will prompt, and the user can only add combination name. The system permits the user to add a nameonly combination, and to edit MultiCard Opening combination when [MultiCard Opening Personnel Groups] is added. MultiCard Opening combination is a combination of the personnel in one or more MultiCard Opening Personnel Groups. When setting the number of people in each 40 6. Access Control Management group, you can configure one group (such as combined door opening by two people in one group) or multiple groups (such as combined door opening by four people, including 2 people in group 1 and 2 people in group 2), and at least one group shall be entered a number of door opening people not being 0, and conversely the total number of door opening people shall not be greater than 5. In addition, if the number of people entered by the user is greater than the number of people in the current group, the MultiCard Opening function will be unable to be realized normally. MultiCard Opening settings: (1) Click [Access Control System] [Door configuration] [Door management], click [Set] under “MultiCard Opening” of a door in the door list to show the MultiCard Opening setting interface; (2) Click [Add] to open Add MultiCard Opening setting interface; (3) For MultiCard Opening, the number of people for combined door opening is up to 5. That in the brackets is the current actual number of people in the group. Select the number of people for combined door opening in a group, and click [OK] to complete editing. 6.3.4 Interlock Settings Interlock can be set for any two or more lock belong to one access control panel, so that when one door is opened, the others will be closed. And you can open one door only when others are closed. Before interlock setting, please make sure the access controller is connected with door sensor according to the Installation Guide, and the door sensor has been set as NC or NO state. Add interlock settings: 1. Click [Access Control System] [Door configuration] [Interlock settings] [Add] to enter the interlock setting edit interface; 2. Select device to show interlock settings. Since one device can only correspond to one interlock setting record, when adding, interlocked devices can not be seen in the dropdown list of the device. When deleting established interlock information, the corresponding device will return to the dropdown list. The setting page will vary with the number of doors controlled by the selected device: A onedoor control panel has no interlock settings; A twodoor control panel: 12 twodoor interlock settings; A fourdoor control panel: 12 twodoor interlock, 34 twodoor interlock, 123 threedoor interlock, 1234 fourdoor interlock; 41 Access Control System User Manual 3. Select interlock settings, tick an item (multiple interlocks can be selected as long as doors are not repeated), click [OK] to complete setting, and then the added interlock settings will be shown in the list. For example, select 1234 fourdoor interlock, if you want open door 3, doors 1, 2 and 4 needs to be closed. ? Note: When editing, the device can not be modified, but the interlock setting can be modified. If interlock setting is not required for the device any more, the interlock setting record can be deleted. When deleting a device record, its interlock setting record, if exist, will be deleted. 6.3.5 Antipassback Settings Currently antipassback settings support in and out antipassback. In some special occasions, it is required that the card holder who entered from a door by card punching must exit from the same door by card punching, with the entry and exit records strictly consistent. One who followed another to enter the door without card punching will be denied when trying to exit by card punching, and one who followed another to exit without card punching will be denied when trying to enter by card punching. When a person enters by card punching, and gives the card to another to try entering, the other person will be denied. The user can use this function just by enable it in the settings. This function is normally used in prisons, the army, national defense, scientific research, bank vaults, etc. Add antipassback settings: 1. Click [Access Control System] [Door configurations] [Antipassback settings] [Add] to show antipassback setting edit interface; 2. Select device (Ndoor control panel), because one device can only correspond to one antipassback setting record, so when adding, devices with antipassback settings cannot be seen in the dropdown list. When deleting established antipassback information, the corresponding device will appear in the dropdown list. The settings vary with the number of doors controlled by the device: Antipassback can be set between readers and between doors. The card holder enter from door A, he must exit from door B, this function is used for channel or ticket management. Antipassback settings of onedoor control panel: Antipassback between door readers; Antipassback settings of a twodoor control panel: Antipassback between readers of door 1, antipassback between readers of door 2, antipassback between doors 1/2; 42 6. Access Control Management Antipassback settings of a fourdoor control panel: Antipassback of doors 12, antipassback of doors 34, antipassback of doors 1/23/4, antipassback of doors 12/3, antipassback of doors 12/3/4, Antipassback between readers of door 1, antipassback between readers of door 2, Antipassback between readers of door 3, antipassback between readers of door 4. ? Note: The reader mentioned above includes Wiegand reader that connected with access control panel and inBIO reader. The single door and two door control panel with Wiegand reader include out reader and in reader. There is only in reader for four door control panel. The reader number of 1, 2 (that is RS485 address or device number, the same below) is for door 1, the reader number of 3, 4 is for door 2, etc. No need to consider if it is Wiegand reader or inBIO reader in setting of antipassback between doors or between readers, just make sure the in or out state (means it is the in reader or out reader) and set according to the actual need. For the reader number, odd number is for in reader, and even number is for out reader. 3. Select antipassback settings, and tick one item (antipassback without repetition of doors or readers can be subject to multichoice). Click [OK] to complete setting, and the added antipassback settings can be shown in the list. ? Note: When editing, you can not modify the device, but can modify antipassback settings. If antipassback setting is not required for the device any more, the antipassback setting record can be deleted. When deleting a device record, its antipassback setting record, if exist, will be deleted. 6.3.6 Linkage Setting Linkage setting means when an event is triggered at an input point of the access control system, a linkage action will occur at the specified output point to control such events as verification, opening, alarm and exception of the system and list them in the corresponding monitored report for view by the user. Add linkage setting: 1. Click [Access Control System] [Door configurations] [Linkage setting] [Add] to show the linkage setting interface; 2. Input linkage setting name (input linkage setting name before selecting device). After selecting device, corresponding linkage setting will appear (The system will first determine whether or not the device is successfully connected and has read extended device parameters such as auxiliary input quantity, auxiliary output quantity, door quantity and reader quantity. If the system has no available extended device parameters, it will remind the user of failing to set antipassback. Otherwise, it will, shows linkage setting options according to the currently selected device, such 43 Access Control System User Manual as the door quantity, auxiliary input and output quantity): The fields are as follows: Trigger Condition: Please refer to 6.6 Realtime Monitoring for the Real Time Events Description. Except Linkage Event Triggered, Cancel Alarm, Open Auxiliary Output, Close Auxiliary Output, and Device Start, all events could be trigger condition. Input Point Address: Any, Door 1, Door 2, Door 3, Door 4, Auxiliary Input 1, Auxiliary Input 2, Auxiliary Input 3, Auxiliary Input 4, Auxiliary Input 9, Auxiliary Input 10, Auxiliary Input 11, Auxiliary Input 12 (the specific input point please refer to specific device parameters, If the device firmware version supports the read head linkage, it will list each door’s Reader options); Output Point Address: Lock 1, Lock 2, Lock 3, Lock 4, Auxiliary Output 1, Auxiliary Output 2, Auxiliary Output 3, Auxiliary Output 4, Auxiliary Output 6, Auxiliary Output 8, Auxiliary Output 9, Auxiliary Output 10 (the specific output point please refer to specific device parameters); Action Type: Close, Open, Normal Open. By default it is closed. To open, delay time shall be set, or Normal Close can be selected; Delay: Ranges from 1254s (This item is valid when the action type is Open) Send to mailbox (Output Point Address) : For multiple email addresses of linkage event recipients, separate them with semicolon (;). When a linkage action is triggered, send an email (linkage event record and video linkage snapping picture) to the recipient. 44 6. Access Control Management Video Linkage: Video Linkage contains popup video function and record function. If you enable the popup video function, the video is played on the [RealTime Monitoring] window, come to set a time, video box would automatically shut off. Set the display time to an integral between 5 and 60. If you enable the video recording function, the triggering procedure is recorded. Set the record time to an integral between 10 and 180. (Should ensure video server maintain normal connection.) ? Note: The video linkage function is only available for 5.2.20 and above professional version, if you need to use, please contact with our commercial representative or forsale supporter. 3. After editing, click [OK] to save and quit, and the added linkage setting will be shown in the linkage setting list. For example: If select “Normal Punching Card Open” as the trigger condition, and the input point is Door 1, the output point is Lock 1, the action type is Open, the delay is 60s, then when “Normal Punching Card Open” occurs at Door 1, the linkage action of “Open” will occur at Lock 1, and door will be open for 60s. ? Note: When editing, you can not modify the device, but can modify linkage setting name and configuration. When deleting a device, its linkage setting record, if exist, will be deleted. If system has set that the input point is a specific door or auxiliary input point under a trigger condition of a device, it will not allow the user to add (or edit) a linkage setting record where the device and trigger condition are the same but the input point is ‘Any’. On the contrary, if the device and trigger condition are the same, and the system has linkage setting record where the trigger point is ‘Any’, the system will not permit the user to add (or edit) a linkage setting record where the input point is a specific door or auxiliary input. In addition, the system does not allow the same linkage setting at input point and output point in specific trigger condition. The same device permits consecutive logical (as mentioned above) linkage settings. Video Linkage is classified into Hard Linkage and Soft linkage. Hard Linkage is consistent with the preceding linkage. The system synchronizes the settings information to the access control panels, and then the access controller (whatever offline or online) can implement the current linkage settings. Soft linkage is only applicable to video linkage. After the system acquires a specific realtime event from the access controller, the software queries video data in the video server, and then plays the video on the software window. 45 Access Control System User Manual 6.3.7 Wiegand Card Format Wiegand card format is the card format that can be identified by Wiegand reader. The software is embedded with 9 Wiegand card formats. You can set the Wiegand card format. Adding a Wiegand card format: 1. [Click Access Control] [Door Settings] [Wiegand Card Format] [Add], and then the Wiegand card format setting window is displayed. 2. Set the card format, including Wiegand card format name (no repeat), total bit, even parity bit, odd parity bit, CID (cannot be null) and company code. 3. Click [OK] to complete and exit the settings, and then the newly added Wiegand card format name is displayed in the list. 46 6. Access Control Management 6.4 Access Levels Access levels means in a specific time period, which door or door combination can be opened through verification. However, the personnel combination that can open these doors via verification shall be set in personnel access levels settings. Please refer to 6.5 Personnel Access Levels settings. Add access levels: 1. Click [Access Control System] [Access levels] [Add] to enter Add access levels edit interface; 2. Set parameters: access level name (no repetition), access control time zones, door combination; 3. Click [OK] to complete setting and quit, and added access levels will appear in the list. ? Note: (1) Select the doors in the access levels as multichoice, so you can select different doors in different control panels; (2) Two levels with the same time zone and door combination are not allowed in the system. 47 Access Control System User Manual 6.5 Personnel Access Levels To assign access levels for the personnel to verify and get through, personnel access levels have two display modes: Show by Access levels: Add/delete personnel for specific access levels. Show by personnel: Add specified personnel into specified access levels, or delete specified personnel from specified access levels; 1. Add/delete personnel to levels: (1) Click [Access Control System] [Personnel access levels] [Shown by Access levels], and click a level, then personnel having opening levels in the access level will be shown in the list on the right; (2) Click [Add personnel] to open the Add personnel interface, select personnel to create the list on the right, and click [OK] to complete adding, and added personnel will appear in the list on the right; (3) Select personnel, click [Delete from access level] to delete the personnel from the access level. ? Note: When adding personnel, if selected personnel exist in the current access level, the system can not add again. 2. Edit access level for personnel: (1) Click [Access Control System] [Personnel access level settings] [Shown by personnel] interface, click a person, and the list on the right will show the access level of the person; (2) Click [Add access level] to open edit interface, select access level, click [OK] to complete editing, and the list on the right will show the access level; (3) Select access level and click [Delete access level] to the person from the access level. 6.6 Realtime Monitoring Monitor the statuses and realtime events of doors under the access control panels in the system in realtime, including normal events and exceptional events (including alarm events). 48 6. Access Control Management 1. Monitoring all: The system will, by default, show the monitoring of all doors under the control panels within the current user’s access level. The user can monitor one (or more) door(s) by [Area], [Control panel] or [Door]. Remote Opening/Closing: involved in control on single door and all doors. In singledoor control, move the cursor to the door icon, click [Remote opening/closing] in the displayed dialog box. In all current doors control, directly click [Close all current doors] in the main interface to fulfill the operation. For remote unlock, you can selfdefine the open time duration in the displayed dialog box (the default unlock duration is 15s); or you can select [Enable Intraday Normal Open Time Zone], and then the intraday normalopen time segment set by the system becomes effective; furthermore, you can set the door status to normalopen, and then the door is open without time restriction (that is, the door is 24hour open). If you want to close the door, you must select [Disable Intraday Normal Open Time Zone] firstly to prevent door opening from other normalopen time segment enabling, and then select [Remote Closing] to fulfill the operation. ? Note: If the operations of remote opening/closing always return failure, please check the current list of devices. If there are too many offline devices, you need to check the network to ensure the operation proceed normally. Cancel the alarm: Once an alarming door is displayed on the interface, you can hear the alarm sound. Alarm cancellation is involved in control on single door and all doors. In singledoor control, move the cursor to the icon of the door, and then click [Cancel the alarm] in the displayed dialog box. In alldoor control, directly click [Cancel all alarms]. If the alarm is cancelled successfully, the alarm sound is disappeared automatically. ? Note: If the system reports that alarm cancellation fails, check whether too many devices in the device list are disconnected. If yes, check the network status; otherwise, you cannot operate on the system. Upon Door Status Monitoring, if the number of doors on the current interface <=64, 49 Access Control System User Manual the system will, by default, show the doors in pictures to monitor door statuses. Once the number exceeds 64, the system will automatically list the doors. When putting the cursor on a door, it will show relevant parameters and operations: device, door number, door name, door status, relay status and alarm type, remote opening, remote closing and cancel alarm. Icons in different colors represent statuses as follows: Icon Door sensor unset Status Device banned Door Offline Relay closed /Without relay status Door sensor unset Relay opened /Without relay status Online status : Door closed Relay closed /Without relay status Online status : Door closed Relay opened /Without relay status Icon Status Online status : Door opened Relay closed /Without Online status : Door opened Relay opened Door opened alarming /Without relay status Relay closed 50 Door opened alarming Relay opened Door opening timeout Door opening timeout Relay closed Relay opened /Without relay status /Without relay status 6. Access Control Management relay status Icon Door closed alarming Status Door closed alarming Relay closed Relay opened /Without relay status /Without relay status Door sensor unset Door sensor unset Door alarming Door alarming Relay closed Relay opened ? Note: Without relay status, denotes that the current firmware does not support "detect relay status" function. Personnel photo display: If the RealTime Monitoring is involved in a person, the monitor displays the personal photo (if no photo is registered, No photo displays). The event name, time and name are displayed on the personal photo. Event monitoring: The system automatically acquires monitored device event records, including normal access control events and exceptional access control events (including alarm events). Alarm events appear in red. Exceptional events excluding alarm events appear in orange. Normal events appear in green. On the current event monitoring interface, the recent records are on the top, enabling 51 Access Control System User Manual the user to see without dragging the scrollbar. Meanwhile, the interface will show up to some 50 records. 2. Alarm Events: Actually, Alarm Events indicates monitoring the alarm status of the doors. If a door sends an alarm, and the page will always display the alarm status. A door may have multiple alarm states, which represent different alarm types. In the descending severity order, the alarm types are as follows: tamperresistant alarm > intimidation alarm (password + fingerprint) > intimidation password or finger print alarm > unexpected opening alarm > opening timeout alarm. Note: The alarm type is displayed only when the firmware version of the device supports alarm type description. Notification: Enter the recipient email address (separate multiple addresses with semicolon (;)), and then send all door alarm records in the alarm event monitoring list to the recipient. Cancel alarm: Select the door in alarm status, and then click [Cancel alarm] to cancel the alarm status. Cancel all alarms: Click [Cancel all alarms] to cancel the alarm status of all doors. The alarm event monitoring list is shown below: 3. ElectroMap Before using the electromap, user needs to add the map in the system first. After success adding, user can add door, camera, zoomin, zoomout the map (and the door on the map), etc. If the user changes the position of icon or the map, click [Save Position] to save the current position, then the user can view the setting at the next time access. 52 6. Access Control Management Add Map and Delete Map: User can add or delete the map as needed. Edit Map: User can change the map name, change map or change the area it belongs to. Adjust map (includes door): User can add a door or a camera on the map, or delete an exist one (right click the door icon or camera, and select [Remove Door]or [camera]), or adjust the map or position of the door or camera icon (by drag the door or camera icon), adjust the size of the map (click [Zoom in] or [Zoom out]or click on [Full Screen] ). Realtime door status monitoring: Except to display the electromap, the system can view the realtime event monitoring (same data source with door status monitoring, include alarm sound, etc.). Door operation: Move the mouse icon to the door position, the system will automatically filter the operation according to the door status and display them on the popup menu. User can remote open or close the door, cancel alarm, and etc. Camera Operation: Doubleclick the [camera icon], can be realtime preview video monitor screen. ? Note: Camera function only supports 5.2.20 or above version. User right control: (1) In adding process, user needs to select the belonging area for map. The area set here is relevant to the user management rights, that is, the user can only view or manage the map under his rights. If the user modify the belonging area of a map, all door on that map will be cleared, and need to add again. (2) When the administrator add a new user, he can manage the user operation rights by role 53 Access Control System User Manual setting, such as the operation of [Save door position], [Zoom in], [Zoom out], etc. ? Notes: (1) In map modification, the user can select to modify the map name but not the path, only need to cancel the tick before [Modify Path]. (2) The system supports to add multi door at the same time. After door adding, user needs to set the door position on the map, and click [Save] after setting. (3) In door position modifying, especially zoom in the map, the margin of upward and leftward should be smaller than 5 pixels. The system will prompt error if the margin smaller than this value. (4) The system recommend adding map size under 1120 pixels * 380 pixels. If the multi clients access the same server, the display effect will be differed according to the resolution of screen and the setting of the browser. Appendixes: RealTime Event Description (the fingerprint events are only available for 5.2.20 and above version): 1. Normal Events: Normal Punch Open: In [Card Only] verification mode, the person has open door permission punch the card and trigger this normal event of open the door. Press Fingerprint Open: In [Fingerprint Only] or [Card plus Fingerprint] verification mode, the person has the open permission, press the fingerprint at the valid time period, and the door is opened, and triggers the normal event. Card plus Fingerprint Open: In [Card plus Fingerprint] verification mode, the person has the open permission, punch the card and press the fingerprint at the valid time period, and the door is opened, and triggers the normal event. Exit button Open: User press the exit button to open the door within the door valid time zone, and trigger this normal event. Trigger the exit button (locked): indicates the normal event triggered by pressing the exit button when the exit button is locked Punch during Normal Open Time Zone: At the normally open period (set to normally open period of a single door or the door open period after the first card normally open), or through the remote normal open operation, the person has open door permission punch the effective card at the opened door to trigger this normal events. Press Fingerprint during Normal Open Time Zone: At the normally open period (set to normally open period of a single door or the door open period after the first card normally open), or through the remote normal open operation, the person has 54 6. Access Control Management open door permission press the effective fingerprint at the opened door to trigger this normal events. First Card Normal Open (Punch Card): In [Card Only] verification mode, the person has first card normally open permission, punch card at the setting first card normally open period but the door is not opened, and trigger the normal event. First Card Normal Open (Press Fingerprint): In [Fingerprint Only] or [Card plus Fingerprint] verification mode, the person has first card normally open permission, press the fingerprint at the setting first card normally open period but the door is not opened, and triggers the normal event. First Card Normal Open (Card plus Fingerprint): In [Card plus Fingerprint] verification mode, the person has first card normally open permission, punch the card and press the fingerprint at the setting first card normally open period but the door is not opened, and triggers the normal event. Normal Open Time Zone Over: After the setting normal open time zone, the door will close automatically. The normal open time zone include the normal open time zone in door setting and the selected normal open time zone in first card setting. Remote Normal Opening: Set the door state to normal open in the remote opening operation, and trigger this normal event. Cancel Normal Open: Punch the valid card or use remote opening function to cancel the current door normal open state, and triggers this event. Disable Intraday Normal Open Time Zone: In door normal open state, punch the effective card for five times near to the card reader (must be the same user), or select [Disable Intraday Normal Open Time Zone] in remote closing operation, and trigger this normal event. Enable Intraday Normal Open Time Zone: If the intraday door normal open time zone is disabled, punch the effective card for five times near to the card reader (must be the same user), or select [Enable Intraday Normal Open Time Zone] in remote opening operation, and trigger this normal event. MultiCard Open (Punching Card): In [Card Only] verification mode, multicard combination can be used to open the door. After the last piece of card verified, the system trigger this normal event. MultiCard Open (Press Fingerprint): In [Fingerprint Only] or [Card plus Fingerprint] verification mode, multicard combination can be used to open the door. After the last fingerprint verified, the system trigger this normal event. MultiCard Open (Card plus Fingerprint): In [Card plus Fingerprint] verification mode, multicard combination can be used to open the door. After the last card plus fingerprint verified, the system trigger this normal event. 55 Access Control System User Manual MultiCard Open (Press Fingerprint): In [Card Only] verification mode, multicard combination can be used to open the door. After the last fingerprint verified, the system trigger this normal event. MultiCard Open (Card plus Fingerprint): In [Card Only] verification mode, multicard combination can be used to open the door. After the last card plus fingerprint verified, the system trigger this normal event. Emergency Password Open: The password (also known as the super password) set for the current door can be used for door open. It will trigger this normal event after the emergency password verified. Open during Normal Open Time Zone: If the current door is set a normally open period, the door will open automatically after the setting start time, and trigger this normal event. Linkage Event Triggered: After the system linkage configuration take effect, trigger this normal event. Cancel Alarm: When the user cancel the alarm of the corresponding door, and the operation is success, trigger this normal event. Remote Opening: When the user opens a door from remote and the operation is successful, it will trigger this normal event. Remote Closing: When the user close a door from remote and the operation is successful, it will trigger this normal event. Open Auxiliary Output: In linkage action setting, if the user select Auxiliary Output for Output Point Address, select Open for Action Type, it will trigger this normal event when the linkage setting is take effect. Close Auxiliary Output: In linkage action setting, if the user select Auxiliary Output for Output Point Address, select Open for Action Type, it will trigger this normal event when the linkage setting is take effect. And if the user closes the opened auxiliary output through the [Close Auxiliary Output] operation in [Door Setting], trigger this normal event too. Door Opened Correctly: When the door sensor detects that the door has been properly opened, triggering this normal event. Door Closed Correctly: When the door sensor detects that the door has been properly closed, triggering this normal event. Auxiliary Input Disconnected: When the auxiliary input point disconnected, trigger this normal event. Auxiliary Input Shorted: When the auxiliary input point short circuit, trigger this normal event. 56 6. Access Control Management Device Start: When the device start trigger this normal event, and this event can not display on the realtime monitor, but you can check it in the event report. 2. Abnormal Events Too Short Punch Interval: When the interval between two card punching is less than the set time interval, trigger this abnormal event. Too Short Fingerprint Pressing Interval: When the interval between two card punching is less than the set time interval, trigger this abnormal event. Door Inactive Time Zone (Punch Card): In [Card Only] verification mode, the user has the door open permission, punch card but not at the door effective period of time, and trigger this abnormal event. Door Inactive Time Zone (Press Fingerprint): The user has the door open permission, press the fingerprint but not at the door effective period of time, and trigger this abnormal event. Door Inactive Time Zone (Exit Button): The user has the door open permission, punch card but not at the access effective period of time, and trigger this abnormal event. Illegal Time Zone: The user with the permission of opening the current door, punches the card during the invalid time zone, and triggers this abnormal event. Access Denied: The registered card without the access permission of the current door, punch to open the door, trigger this abnormal event. AntiPassback: When the antipass back setting of the system takes effect, triggers this abnormal event. Interlock: When the interlocking rules of the system take effect, trigger this abnormal event. MultiCard Authentication (Punching Card): Use multicard combination to open the door, the card verification before the last one (whether verified or not), trigger this normal event. MultiCard Authentication (Press Fingerprint): Use multicard combination to open the door, the fingerprint verification before the last one (whether verified or not), trigger this normal event. MultiCard Authentication (Punching Card): Use multicard combination to open the door, the card verification before the last one (whether verified or not), trigger this normal event. MultiCard Authentication (Press Fingerprint): In [Fingerprint Only] or [Card plus Fingerprint] verification mode, use multicard combination to open the door, the fingerprint verification before the last one (whether verified or not), trigger this 57 Access Control System User Manual normal event. Unregistered Card: Refers to the current card is not registered in the system, trigger this abnormal event. Unregistered Fingerprint: Refers to the current fingerprint is not registered or it is registered but not synchronized with the system, trigger this abnormal event. Opening Timeout: The door sensor detect that it is expired the delay time after opened, if not close the door, trigger this abnormal event. Card Expired: The person with the door access permission, punch card to open the door after the effective time of the access control, can not be verified and will trigger this abnormal event. Fingerprint Expired: The person with the door access permission, press fingerprint to open the door after the effective time of the access control, can not be verified and will trigger this abnormal event. Password Error: Use card plus password, duress password or emergency password to open the door, trigger this event if the password is wrong. Failed to Close during Normal Open Time Zone: The current door is in normal open state, but the user can not close the door through [Remote Closing] operation, and trigger this abnormal event. 3. Emergency Events Duress Password Open: Use the duress password of current door verified and triggered alarm event. Opened Accidentally: Except all the normal events (normal events such as user with door open permission to punch card and open the door, password open door, open the door at normally open period, remote door open, the linkage triggered door open), the door sensor detect the door is opened, that is the door is unexpectedly opened. Duress Fingerprint Open: Use the duress fingerprint of current door verified and triggered alarm event. Dooropen times out: indicates the alarm event triggered when the locked door is not locked after timeout 58 6. Access Control Management 6.7 Access Control Reports Includes [All access control events], [Access control exception events] and [Personnel access levels] reports. You can select Export all and Export after query. The user can generate statistics of relevant device data from access control reports, including card verification information, door operation information, and normal card punching information, etc. About the Normal event and abnormal event please refer to 6.6 Realtime Monitoring for details. Verify mode: Only Card, Only Password, Only Fingerprint, Card plus Password, Card plus Fingerprint, Card or Fingerprint and etc. ? Note: Only event records generated when the user uses emergency password to open doors will include [Only password] verification mode. ] All access control events Because the data size of access control event records is large, you can view access control events as specified condition when querying. By default, the system shows the report of all access control events: Clear all event records: Click [Clear all event records] to open a prompt. Click [OK] to clear records. 59 Access Control System User Manual ] Access control exception events You can view access control exception events in specified condition. The options are same as those of [All access control events]. Clear access control exception event records: Clear the list of all access control exception events. ] Personnel access level View all access levels according to access level group, door or personnel. Select the query mode, and the condition in the left data list, the corresponding result will display on the right data list. For example, select “By Access Level”, the data list on the left side show all access levels, select a access level, the personnel under this access level will display on the right data list. 60 6. Access Control Management 6.8 Access Control Parameter Settings Set some of the software functions, including [Set the time for obtaining new events], [Configure real time monitoring], [Set retry interval after the device is offline], [Configure the Mailbox Server]. After the settings are completed, manually restart the software service through the service console; otherwise, the setting will not become effective. Set the time for obtaining new events: Select interval for new events: Set the record download interval upon the setting becomes effective. Set the time for obtaining new events: The system downloads the record at the specified time points automatically. Configure real time monitoring: If select [Yes], when the software service is enabled, the software automatically acquires the realtime event record from the device whether the browser is open for realtime monitoring or not, and the software saves the record in the database. If select [No], only when the browser is open and monitors in real time, the software can acquire the realtime event record from the device. Set retry interval after the device is offline: 61 Access Control System User Manual The software attempts to reconnect the disconnected devices at a default interval of 60s. If you want to reconnect the devices faster, you can advisably modify the value. The smaller value occupies more resources of the server. Configure the Mailbox Server: Set the information of the mail server sending emails. The email addresses receiving emails should be set in linkage settings. ? Note: In mail server setting, the email address and mail server (SMTP) must have the same domain name. For example, if the email address is [email protected], the mail server address must be smtp.gmail.com. 62 7. Video System (For Professional Version 5.2.20 or above) 7. Video System (For Professional Version 5.2.20 or above) The system provide video linkage function, to manage the Video Server, view the RealRime Video, and query the Video Record, popup the RealTime Video when the linkage events happened. When using the video linkage function, the user need to add Video Server firstly, for detailed operation, please refer to 5.2.2 Add Network Video Recorder. After adding, the user fill in the video linkage corresponding setting, can use video linkage function. The detailed setting, please refer to 7.2 Video Linkage Settings. ? Note: The current software version only supports ZKiVision IPC and Hikvision embedded network DVR. 7.1 TimeServer Settings The TimeServer function is used to ensure time synchronization between the video server and the software server. The computer where the software is installed has the TimeServer function. The function becomes available only after the following settings are completed: 1. Start the system service Windows Time on the server where the software is installed, and set the startup type to auto. 2. Setting NTP function of Video Server. It can be directly set up on Video Server., also through browser visit Video Server, at Web interface to set. There is NTP function of Video Server in Web following: 63 Access Control System User Manual In the proceeding figure, Server Address indicates the IP address of the software server. The default NTP port number is 123, which does not need to be modified. It is recommended that the time correction interval be set to a small value (1 minute for example) to ensure precise time synchronization between the video server and software server. After parameters are set, restart the video server. HiKVision need to set the NTP function, ZKiVision IPC does not need to set the NTP function. 64 7. Video System (For Professional Version 5.2.20 or above) 7.2 Video Linkage Settings Bind the video channel and the door for which association needs to be set. You can set the binding between the door reader and the video channel on the door edit page. For details, see 6.3.1 Door Management. Alternatively, bind the door reader and the video channel in [Channel Management]. The operation flow of binding the video channel and the door reader on the [Channel Management] page is as follows: ↓ The method of setting video association is the same as that of setting door controller association. Set the trigger condition and video input position, and select relevant options on the association setup page. For details, see 6.3.6 Linkage Setting. 65 Access Control System User Manual 7.3 Video View Click [Video] menu[Video View], the interfaces displayed as below: Select different video servers from the [Video Server] dropdown list, and click a video channel for realtime preview, or click the button similar to the mesh shape in the video frame for synchronous preview of multiple channels. ? Note: The style of the preview display varies with the video device brand. The following uses the HIKVISION video device as an example to describe the icons on the video preview page. Doubleclick preview frames have changeover full screen function. Click to stop previewing all videos. Click to capture the current picture. Click to start video recording on all channels of the current video server. Click to stop video recording on all channels of the current video server. Then the video files of all channels are stored in: C:\Program Data\Web\RecordFiles\ of the client. Click Click to move previewed pictures up or down. to turn on, turn off, or adjust the sound. 66 7. Video System (For Professional Version 5.2.20 or above) 7.4 Video Recorded Playback Video Recorded Playback mainly displayed events record (include video linkage record). Click the small camera icon on the left to play back the recorded video. Rightclick the small camera icon and choose Export from the video server from the shortcut menu, to export the video from the video server to a client. The exported video file is stored in C:\OCXDownloadFiles by default. After realtime monitoring is enabled or [Set up whether opening realtime monitoring] is set to Yes on the [Access Control parameters] page, the system automatically start video recording and capture when a video association event occurs. The video file is saved to the preset path of the server. After the video recording ends, the video file icon and capture file icon about this video event such as and are displayed in the report. Click to download the file on the server locally. 67 Access Control System User Manual 7.5 Video Parameter Settings You can set the size of the video popup box and processing mode when the space of the hard disk where the current video file is saved is insufficient. l Video popup window size Set up pop up box size of [Realtime Monitoring] or Video Recorded Playback of [Access Control Reports]. l Set whether to continue video recording The software checks the available space of the hard disk where the current video file is saved when recording videos. If the available space is less than 1 GB, you can select automatic overwriting or no recording. If you select automatic overwriting, the software deletes the earliest 100 video files and continues video recording. If you select no recording, video recording is stopped. 68 7. Video System (For Professional Version 5.2.20 or above) 7.6 Exclusion and Solutions of Exception 1. Client browser can not playback video, preview or RealTime Monitoring page has no video popup: Firstly, make sure to use IE8 and above browser, client and Video Server on the same network segment and the video AxtiveX installation is successful. If the ActiveX installation fails, above all, uninstall the video ActiveX that were originally installed, run the "regsvr32u NetVideoActiveX23.ocx"command, and then in the browser, set all the options in "Tools > Internet Options > Security > Custom Level" on the ActiveX to "Enable or Prompt", reopen the browser, relogin screen and open the video preview page, run the button "all add items of the site". 2. In the EMap, no video popup after you click the small camera icon: Above all, make sure to use IE8 and above browser, client and Video Server on the same network segment and the video AxtiveX installation is successful. Also, view whether the browser is preventing the temporary window pops up, if so, changed to allow window pops up to the site. 3. Video linkage is triggered, the video server does not have video or size of the video file that the client downloads from the Video Server is 0kb: First, make sure that the software server has set TimeServer (keep the Windows time service and has set the NTP function of the video server), it is recommended to set the time interval of the video server smaller to ensure accurate synchronization software server and video server time, so as to keep the time consistent between software server and controllers. You'd better set Linkage Recording Time more than 5 seconds, to avoid executing video linkage commands delay, which may lead to the downloaded 0kb video file. 69 Access Control System User Manual 8. Elevator Control System The Elevator Control System is mainly used to set device parameters (such as the swiping interval for taking elevators and elevator key drive duration), manage personnel's rights to floors and elevator control time, and supervise elevator control events. You can set registered users' rights to floors. Only authorized users can reach certain floors within a period of time after being authenticated. 8.1 Adding Elevator Equipment Choose [Add] to add device. At Device Type Selection interface, select to Add Elevator Control Panel. The following interface appears. Click [Next] and set the device information. 8.2 Elevator Parameter Settings Choose【Access Control System】→【Floor Settings】, click a floor No. to set the swiping interval for taking elevators, elevator key drive duration, floor available time, and verification mode. 70 8. Elevator Control System ↓ 71 Access Control System User Manual 8.3 Elevator Time Zone Management Choose【Access Control System】→【Access Control Time Zone】 , to view existing elevator control time periods. The operations of adding, editing, and deleting time periods are supported. Click【Access Control System】→【Access Control Time Zone】→【Add】, then you can see the new elevator Time Zone. 72 8. Elevator Control System 8.4 Elevator Level Management Choose 【Elevator Control】→【Elevator Level】, to view existing elevator control rights groups. The operations of adding, editing, and deleting elevator control rights groups are supported. Click → , then you can see the data 【Elevator Control 】→ 【Elevator Level】 【Add】 as shown below. 73 Access Control System User Manual 8.5 Personal Elevator Levels Distribution Choose【Elevator Control System】→ 【Personal Elevator Levels】→【Show by Access Levels】, to view all elevator control rights groups. Select a rights group to view all members in the group, and add or delete members to or from the group. Click【Elevator Control System】→【Personal Elevator Levels】→【Show by Personal】, click【Show by Personal】, to view all personnel. Select an employee to view the rights group to which the employee belongs and add or delete the employee to or from a group. 74 8. Elevator Control System 8.6 Personnel adding Click【Personnel】 → 【Personnel】→【Add】, you can assign personal elevator level,as shown in figure. 8.7 Description (realtime surveillance and report of the elevator control system) The elevator controller is a type of access controller. Its realtime surveillance and the realtime surveillance of the access control system are both set in RealTime Monitoring displayed when you choose Access Control. For an elevator controller, Normal Punch Open indicates Floor Button Release and Remote Opening indicate Remote Unlock Floor Button. In summary, a door in the elevator controller corresponding to the floor key and opening a door means releasing a floor key. 75 Access Control System User Manual 9. Visitor System The visitor system is a webbased management system that implements entry registration, exit registration, snapshot capture, visitor quantity statistics, and reservation management, as well as shares information among registration sites. It is highly integrated with the access control system and elevator control system and generally used at reception desks and gates of enterprises, to understand and manage visitors. 9.1 List The List tab page covers Add Entry/Exit and Add Reason. Define relevant information based on the requirements of a site, for collecting statistics and querying visitor information. Set Add Entry/Exit and Add Reason before registering visitor information on the Visitor Manage tab page. Otherwise, the registration function is unavailable. Choose Visitor System → List and click Add Entry/Exit and Add Reason separately on the left to complete the settings, as shown in the following figure. 76 9. Visitor System 9.2 Reservation Management Make recent visit plans in advance for registered users in the system, enter visitor information into the system, and summarize all appointmentbased visit plans to the registry so that personnel at the visitor registration sites timely understand information about visitors to come and make reception arrangements. Choose Visitor System → Reservation Manage, as shown in the following figure. Registered users log in to the system and click Reservation Login on the login page. Username is the personnel No. and Password is the reservation password set after you choose Personnel → Personnel Profile. Registered users can modify only their own reservation information. See the following figures. 77 Access Control System User Manual 9.3 Visitor Management Choose Visitor System → Visitor Manage, as shown in the following figure. Visitor Manage covers Enroll visitor and Exit visitor. Click Enroll visitor when a visitor comes to have a visit and click Exit visitor when the visitor exits. Both card registration and onsite snapshot capture are supported during registration. Choose Visitor System → Visitor Manage → Enroll visitor to access the entry registration page, as shown in the following figure. 78 9. Visitor System Choose Visitor System → Visitor Manage → Exit visitor to access the exit registration page, as shown in the following figure. The visitor system is highly integrated with the access control system and elevator control system. Door access rights must be granted to visitors. To grant rights to visitors, grant some rights to visitors in the rights group of the access control system or elevator control system, and then grant specific rights to the visitors in Enroll visitor, as shown in the following figure. 79 Access Control System User Manual ?Note: Complete the following settings before using the USB camerabased capture function: Rightclick Capture in the capture frame and choose Global Settings from the shortcut menu. On the Storage tab page, click Local Storage Settings by Site to add a website address. Add 127.0.0.1 if the computer is a server, and add the IP address of the server such as 192.168.8.12 if the computer is a client. Set the website to be allowed on the Camera and Mic and Playback tab pages. The settings need to be completed only once as long as history records of the browser are not deleted. If the camera does not capture any pictures, check whether the settings are correct and whether the camera indicator is on, close and then open the browser again. ?Note: The camera can be loaded and invoked only by one page at a time. 80 9. Visitor System 9.4 Visitor History The visitor history records means operation logs when visitors are registered. The entry registration and exit registration comprise one complete record. You can click the record for view. Choose Visitor System → Visitor History, as shown in the following figure. Click the link in the Visitor column or Details to view details, as shown in the following figure. 81 Access Control System User Manual 10. System Settings System settings primarily include assigning system users (such as company management personnel, registrar, access control administrator) and configuring the roles of corresponding modules, managing database, such as backup, initialization, and setting system parameters and operation logs, etc. 10.1 User Management 1. Role management: During daily use, the super user needs to assign new users having different levels. To avoid individual setting for each user, roles having certain levels can be set in role management, and then be assigned to specified users, including the levels set for seven major functional modules of personnel, device, access control, video system, elevator control system and system setting. The system’s default super user has all levels, and can create new users and set corresponding levels as required. Role setting steps: (1) The elevator controller can be directly added, the process is the same as adding controller. ; (2) Set role name, select your desired role setting item, and tick levels to be configured for users of different levels; (3) After setting, click [OK] to save and return to the list, and added role settings 82 10. System Settings will be shown in the list. 2. User management: Add new users to the system, and assign user roles (levels). Add user: 1. Click [Add], enter new user information, where items with [*] are mandatory. The parameters are as follows: Username: Not more than 30 characters, only using letters, numbers or characters; Password: The length must be more than 4 digits and less than 18 digits. The default password is 111111; Authorize Department: If you select no department, you will possess all department rights by default; Authorize Area: If you select no area, you will possess all area rights by default; Enter First Name, Last Name and Email Address; Staff Status: Indicates if this user can access the administrator site; Super user status: Designates that this user has all permissions without explicitly assigning them. Tick it to be a super user without selecting a role; Select Role: Nonsuper user needs to select a role. By selecting a preset role configuration, this user will have the levels configured for the role. Fingerprint Registration: Enroll the user fingerprint or duress fingerprint. The user can login the system by pressing the enrolled fingerprint. If the user presses the 83 Access Control System User Manual duress fingerprint, it will trigger the alarm and send the signal to the system. 2. After editing, click [OK] to complete user adding, and the user will be shown in the list. To modify existing user, click [Edit] behind the user name, and enter edit interface. After modification, click [OK] to save and return. 10.2 Database Management The homepage of the system shows database backup history. The system allows database backup, restoration and initialization. 1. Database backup path configuration: Select [Database backup path configuration] in the [Server Controller] operation menu, the edit interface appears. Click [Browse] to select the backup path, click [Save] to save the selection and quit. ? Note: (1) In software installation process, it will prompt to set the database backup path. If you haven’t set the backup path, the operation of backup database can’t be executed (The server for other computer to access, need to set the backup path in the server firstly). (2) Proposal that the database backup path and the present system installed path not be under the same disk. Don’t set the path to the root of a disk, and no blanket permitted. 2. Backup database: Periodically backup the system’s database to ensure data security. To use the backed up data, just restore the data. (1) Click [Backup database] to enter the backup interface; (2) Select the operation: backup now, scheduled backup and cancel scheduled backup. Scheduled backup can set backup every several days since a start time; (3) Click [OK], the system will open the database backup path prompt. For Backup now, it will return after backup. For scheduled backup, it will backup as scheduled. 84 10. System Settings ? Note: (1) After database backing up, the value under “Whether backup successful” will change to “Yes” or “No”. “Yes” indicates database backing up successfully, otherwise, the back up operation is failed. (2) We recommended backing up the database after you create the personnel file, device information or part of access control level settings. (3) The system not support to backup Oracle database, if you need to backup, please uses the specific Oracle backup tools. 3. Restore Database Select [Restore Database] in the [Server Controller] operation menu, the following interface appears. Click [Browse] to select a successfully backed up database from the backup database list, click [Start] begin the database restoration. ? Note: (1) Don’t close any command window prompt during the database restore process. (2) On the same server, please don’t plan multiple scheduled backup to avoid adding to the server load. 4. Initialize database: Initialize database is to restore data to system initialization status. Initialized data in the database will be deleted. Please operate with care. Click [Initialize database] to enter edit interface, select one or several datasheets to initialize, and click [OK] to complete initialization and return. 85 Access Control System User Manual For example: Select to initialize access level: After selection, it will initialize access control time periods, access control holidays and access levels. All contents on these three pages will restore initial statuses; Select to initialize door settings: After selection, it will initialize all interlock settings, antipassback settings, linkage settings, firstcard opening settings, and multicard opening settings (including personnel group of multicard verification); Select to initialize events: After selection, it will initialize all realtime monitoring records; Select to initialize access control: After selection, it will initialize all settings and information in the access control system, including the above three items, and only reserve system default settings; Select to initialize devices: After selection, it will initialize all device information in the system (including access control). If the device is an access control panel, corresponding device parameters and door information will be deleted. ? Note: If the device is still in normal use, please initialize database cautiously, 86 10. System Settings especially when involving access levelrelated departments and personnel, access levels, door settings, areas, devices, users and roles. It is recommended that if there are still devices in use after database initialization, the user shall [Synchronize all data] for the setting to avoid unexpected errors. 10.3 System Parameters The system homepage shows the system parameter list: Parameter name, Parameter value, Description, and Related operation. Data format: Set the data format displayed on the software. 10.4 Log Records The default homepage of system log records shows log records of all operations. Since large data size, you can use query function to search desired log records. For details, see Appendix 1 Common Operation. 87 11. Appendices 11. Appendices Appendix 1 Common Operation 1. Personnel selection In this system, this dialog box is used for all modules using personnel selection: You can search personnel in two ways: 1) Search by department. Tick the check box before a department in the department list of the pulldown menu to select all personnel of the department. If [Select all personnel under the department] is ticked, all personnel in the department will be selected and shown in the list box of the currently selected personnel; 2) Search by personnel number/name. Enter the name or employee number of the person to be selected in the query box, and click query to show the eligible person in the list box. When personnel are selected into the list box, if it is required to delete one or more persons, just cancel the tick of the check box before the personnel. To select or unselect all personnel in the list, click the ‘Select all’ check box under the list. To cancel all personnel for reselection, click Clear. 2. Select date 88 10. Appendices Click the pulldown menu to select date: Click on year to activate the scroll button for year selection, and click or button to select an earlier or a later year. Click or button to select an earlier or a later month, and click the desired date. 3. Import (taking importing personnel table as an example): If there is an electronic personnel file, which may be the information of the personnel or access control, attendance or human resources system of another brand, you can import it into this system through the [Import] function. (1) Click [Import] to show the import edit interface: 89 Access Control System User Manual Description of items: Select import table: Currently the system supports the import of department table and personnel table; Import file: Click [Browse] to select the file to be imported; File format: Select the format of the file to be imported; Delimiter: The user select from smart search or others, such as comma, semicolon or blank; Title: Select and set whether or not the original file contains a title. If so, enter which row the title is in; Start row: The row from which importing starts (namely, which row of the original file the data in the first row is in); File code: Select the code that the original file uses, being Simplified Chinese, Traditional Chinese or utf8; Data error processing way: Select “skip the erroneous row, and continue to import”, or “interrupt import and clear imported entries”; 90 10. Appendices Associated entry processing: Select “auto add to associate table” or “skip the current entry without adding associated entry”. (2) Click [Browse] to select the file to be imported; (3) Click [Open] button, and the file format will be automatically shown. Determine delimiter, title, start row and file code, and click [Upload] to display the uploaded file items. (4) In the table [correspondence between entries and table fields], [file header] is an item row in the original file, [file record] is a data row in the original file, [table field] is an item in the current system. Select corresponding fields in the system from pulldown menus, and unwanted data can be unchecked. (5) Select data error processing way and associated entry processing, click [Import], and the system will automatically start importing data. When the system prompts that data import is successful, the newly imported data will be shown in the personnel list. ? Note: (1) When importing department table, repeated numbers do not affect import, and can be modified manually; (2) When importing personnel table, if there is no personnel number or personnel number is “0”, the import operation can’t execute. If you need import the personnel gender, please use “M” represent male and “F” represent female, then execute import operation. 4. Export data (taking exporting personnel list as an example): (1) Click [export] to show the edit interface; When the data size is large, it is recommended to select [Select number of entries to export] to expedite export and reduce system load. (2) Select the format of exported file: If PDF format is selected there will be no file code option (namely, no differentiation between Simplified and Traditional Chinese). Click [Export] to directly show the exported file. If TXT or CSV format is selected, then file codes include Simplified and Traditional Chinese, but Traditional Chinese code can be completely exported only in the operating system in Traditional Chinese. The system prompts Open or Save: Select [Open] to directly show the list. Select [Save] to open the [Save as] dialog box. Determine file name and save type, and select save path. Select [Cancel] to return. 91 Access Control System User Manual (3) Return to the initial edit interface, and click [Return] to return to the personnel interface. ? Note: (1) When importing department table, repeated numbers do not affect import, and can be modified manually; (2) Exported table is the list currently shown, being the list of queried or displayed result; (3) Up to 10,000 latest records can be exported. 5. View log records (taking personnel log as an example): (1) Click log records to show the following: (2) Enter query condition, click [query] to show the list, click [Clear], clear query condition, and return to the initial interface. ? Note: 1. The log records only show the operation log in the current operation module; 2. Log records under some operation menus can be viewed only when entering the edit interface. For example, from [Access Control System] [Door Configuration] [Door Management], click [Edit] under “Related operation” of a device to enter the edit interface, and click [Log records] on the upper right corner of the interface to view the operation log. 6. Query function (taking personnel information query as an example): 92 10. Appendices Common query: The user can directly select the item to be queried from [Common query] on my work panel, or enter a module for specific query. Take personnel query as an example: Enter query condition, click Query, and the query result will be shown below: Advanced query: Click [Advanced] icon to show advanced query interface (taking personnel information advanced query as an example). 93 Access Control System User Manual (1) Select the query field in the [Select query field] pulls down menu; (2) Select the condition in the pull down menu such as equal to null, contain, meet any, equal to etc. (3) Input the query value in the [Range] field; (4) Click [Add] to add this query information to the [Selected condition] list, the multiple choice of query condition is allowed. But one field and one condition can be selected only once. Click [Query], the query result display on the list. The query functions of each menu in the system are similar, differing in that query conditions are different, and the user can enter as prompted. 94 Access Control System User Manual Appendix 2 EndUser License Agreement for This Software Important read carefully: This EndUser License Agreement ("EULA") is a legal agreement between you (either an individual or a single entity) and the mentioned author of this Software for the software product identified above, which includes computer software and may include associated media, printed materials, and "online" or electronic documentation ("SOFTWARE PRODUCT"). By installing, copying, or otherwise using the SOFTWARE PRODUCT, you agree to be bound by the terms of this EULA. If you do not agree to the terms of this EULA, do not install or use the SOFTWARE PRODUCT. SOFTWARE PRODUCT LICENSE The SOFTWARE PRODUCT is protected by copyright laws and international copyright treaties, as well as other intellectual property laws and treaties. The SOFTWARE PRODUCT is licensed, not sold. 1. GRANT OF LICENSE. This EULA grants you the following rights: Installation and Use. You may install and use an unlimited number of copies of the SOFTWARE PRODUCT. Reproduction and Distribution You may reproduce and distribute an unlimited number of copies of the SOFTWARE PRODUCT; provided that each copy shall be a true and complete copy, including all copyright and trademark notices, and shall be accompanied by a copy of this EULA. Copies of the SOFTWARE PRODUCT may be distributed as a standalone product or included with your own product. 2. DESCRIPTION OF OTHER RIGHTS AND LIMITATIONS. Limitations on Reverse Engineering, Decompilation, and Disassembly You may not reverse engineer, decompile, or disassemble the SOFTWARE PRODUCT, except and only to the extent that such activity is expressly permitted by applicable law notwithstanding this limitation. Separation of Components The SOFTWARE PRODUCT is licensed as a single product. Its component parts 95 Access Control System User Manual may not be separated for use on more than one computer. Software Transfer You may permanently transfer all of your rights under this EULA, provided the recipient agrees to the terms of this EULA. Termination Without prejudice to any other rights, the Author of this Software may terminate this EULA if you fail to comply with the terms and conditions of this EULA. In such event, you must destroy all copies of the SOFTWARE PRODUCT and all of its component parts. Distribution The SOFTWARE PRODUCT may not be sold or be included in a product or package which intends to receive benefits through the inclusion of the SOFTWARE PRODUCT. The SOFTWARE PRODUCT may be included in any free or nonprofit packages or products. 3. COPYRIGHT. All title and copyrights in and to the SOFTWARE PRODUCT(including but not limited to any images, photographs, animations, video, audio, music, text, and "applets" incorporated into the SOFTWARE PRODUCT), the accompanying printed materials, and any copies of the SOFTWARE PRODUCT are owned by the Author of this Software. The SOFTWARE PRODUCT is protected by copyright laws and international treaty provisions. Therefore, you must treat the SOFTWARE PRODUCT like any other copyrighted material except that you may install the SOFTWARE PRODUCT on a single computer provided you keep the original solely for backup or archival purposes. LIMITED WARRANTY NO WARRANTIES. The Author of this Software expressly disclaims any warranty for the SOFTWARE PRODUCT. The SOFTWARE PRODUCT and any related documentation is provided "as is" without warranty of any kind, either express or implied, including, without limitation, the implied warranties or merchantability, fitness for a particular purpose, or noninfringement. The entire risk arising out of use or performance of the SOFTWARE PRODUCT remains with you. NO LIABILITY FOR DAMAGES. In no event shall the author of this Software be liable for any damages whatsoever 96 10. Appendices (including, without limitation, damages for loss of business profits, business interruption, loss of business information, or any other pecuniary loss) arising out of the use of or inability to use this product, even if the Author of this Software has been advised of the possibility of such damages. Acknowledgment of Agreement I have carefully read and understand this Agreement, Radiate, Inc.’s Privacy Policy Statement. IF YOU ACCEPT the terms of this Agreement: I acknowledge and understand that by ACCEPTING the terms of this Agreement. IF YOU DO NOT ACCEPT the terms of this Agreement I acknowledge and understand that by refusing to accept these terms, I have rejected this license agreement and therefore have no legal right to install, use, or copy this Product or the Licensed Software that it incorporates. 97 Access Control System User Manual Appendix 3 FAQs Q: How can my work panel be unique? A: The user can customize the work panel: 1. Click [Custom work panel] to open a dialog box, cancel the tick of your undesired module (by default the system ticks all), and Confirm. Then the custom module will appear; 2. Or directly click the “ ” icon on a module to minimize, and click “ ” to close the module. Click the column bar to drag and adjust the module’s position; 3. If required to return to the default work panel, click [Restore work panel] to refresh and return to the system default. Q: How to use a card issuer? A: Connect the card issuer to PC through USB port, and then select individual personnel card issue or batch card issue. Move the cursor to the card number input box, and punch the card on the card issuer, then the card number will be automatically shown in the input box. Q: What is the use of role setting? A: Role setting has the following uses: 1. To set unified level for the same type of users newly added, just directly select this role when adding users; 2. When setting system reminder, and determine which roles can be viewed. Q: How to operate if I want to set accounts for all personnel of the Company’s Financial Department? A: First, create a new role in system setting and configure the functions to be used for this role. Then add a user, set user information, and select the user’s role, thus adding a new account. For other accounts, do the same. Q: What is the use of blacklist? A: A blacklisted personnel can not achieve departure restoration, namely, this person can not be employed by the Company any longer. To modify, just modify departure information on the departure interface. Q: How to adjust the department of a person? A: There are the following ways to adjust personnel department: 1. In personnel list, click personnel number or click “Edit” under related operation item to show personnel details, and modify personnel department in the department item; 2. In personnel list, check the personnel requiring department adjustment, click “Adjust department”, and a dialog box will open, then modify the department; 3. On personnel transfer interface, click Add to open the edit interface, select personnel, and check department in the transfer field, and complete other information, thus 98 10. Appendices completing transfer. Q: How to set access levels for visitors? A: Setting access levels is as follows: 1. In the system, add these personnel, and enter relevant information; 2. Select access levels suitable for them. If there are no suitable levels, it is required to enter the access control system to add relevant settings; 3. Set valid time, namely, the start and end dates when they need to use access levels. Q: What are the ways to cancel personnel access control settings? A: There are the following ways to cancel personnel access control settings: 1. Close access control only: In the personnel list, click personnel number or click “Edit” under related operation item to show personnel details, and delete access levels and Personnel Group of MultiCard Verification in access control settings; 2. Delete personnel: In the personnel list, click “Delete” under related operation item of personnel, or tick a personnel and click the “Delete” above to delete this person from the system. Corresponding access control information will be deleted; 3. In “Personnel access levels settings”, delete access levels of personnel, and in “Personnel Group of MultiCard Verification”, delete MultiCard Opening levels. Q: How to set access control holidays? A: Access control holidays have three types of 1, 2 and 3. Take New Year’s Day as an example: 1. In access control holidays, add a holiday of “New Year’s Day”. Set the holiday type as 1, and the start and end dates of the holiday are both January 1; 2. During the access control time period, add an access control time zone, set the three access control intervals of this holiday type 1. For example, set access control interval 1 as 8:0020:00, and intervals 2 and 3 as null, namely Normal Close; 3. Apply this access control time zone to access levels; 4. Set personnel with levels for the access levels. Q: In Windows Server 2003, why the IE browser displayed error when access the system, how to solve it? A: This problem occurs because that Server 2003 has [Security Configuration Option] settings. If you want access the system, please configure it as follows: click Start – Control Panel – Add or Remove Program, select [Add and remove Windows components] in the interface and click [Internet Explorer Enhanced Security Configuration] option, cancel the tick before it. Then click [Next] to remove it from the system. Open the system again the browser will access the system properly. Q: If backing up or restoring the database fails, the possible reason? A: Please check the system environment variables [path], if the database installation path (For example, MS SQL Server installation path maybe is: C:\Program Files\Microsoft SQL Server\90\Tools\Binn; For MySQL, it is like: C:\Program 99 Access Control System User Manual Files\MySQL\MySQL Server 5.1\bin) is exist. If not, you need to add it manually. Otherwise, the antivirus or firewall software may stop the execution of backing up or restoring command, if the security prompt pops up, please select “Always Permitted”. And the damaged database can also lead to backup error, please repair or restore the database. 100