1
WIRELESS DISPLAY
CONFIGURATION MANUAL
CF-VDW07M & CF-VDW07HM
Windows 2000 and Windows XP
INTRODUCTION
Thank you for purchasing the Panasonic Toughbook CF-VDW07 series Wireless
Display. You are just steps away from the freedom of mobility and the power of
staying in touch. With Panasonic's Toughbook Wireless Display, you can enjoy the
constant connectivity to your laptop/desktop without being tied down to your office
chair. This configuration manual explains how to set up the Wireless Display with
your computer.
DISCLAIMER
No part of this manual may be reproduced in any form without the prior written
permission of Matsushita Electric Industrial Co., Ltd.. No patent liability is assumed with respect to the use of the information contained herein. Some of the
illustrations included with the text may differ slightly in shape from the actual
items in order to make the explanation easier to understand.
Computers, computer devices, and manuals are subject to change without notice. Matsushita Electric Industrial Co., Ltd. assumes no liability for damage incurred directly or indirectly from errors, omissions, or discrepancies between the
computer and the manuals.
Because of the nature of wireless communications, transmission and reception
of data can never be guaranteed. Matsushita Electric Industrial Co., Ltd. assumes
no liability for any inconvenience or potential loss of business which occurs as a
result of lost communication opportunities arising from external causes, such as
incorrect operation, or malfunction of the device or from loss of power, and for
damage of any kind resulting from delay or errors in data transmitted or received
using Panasonic Toughbook CF-VDW07 series Wireless Display, or for failure of
Panasonic Toughbook CF-VDW07 series Wireless Display to transmit or receive
such data. Panasonic Toughbook CF-VDW07 series Wireless Display should not
be used in situations where failure to transmit or receive data could result in
damage of any kind to the user or any other party, including but not limited to
personal injury, death, or loss of property.
TRADEMARKS
Microsoft and Windows are either registered trademarks of Microsoft Corporation
in the United States and/or other countries.
Panasonic is registered trademark of Matsushita Electric Industrial Co., Ltd..
All other brand or product names, logos, trademarks, etc. mentioned in this manual
are owned by their respective companies.
i
Panasonic Wireless Display Configuration Manual
TABLE
OF
CONTENTS
Illustrations in this Manual
...........................................
First-time Operation
......................................................
Software Installation
......................................................
AdHoc Mode Configuration
............................................
Infrastructure Mode Configuration
................................
Using the MeiWDS Setup Utility
................................
Changing Wireless Display Settings
................................
Using the Software Keyboard
...........................................
Uninstall the Software
...........................................
Limitation of Wireless Display Serial Port
.....................
Usage Precautions
......................................................
Limited Use License Agreement
................................
ii
1
1
3
10
16
18
21
23
23
24
25
Illustrations in this Manual:
NOTE :
CAUTION :
The Note icon points out items of interest or importance.
The Caution icon warns you about problems should be watched out for or precautions
WARNING :
should be taken.
The Warning icon indicates the existence of a hazard that could result in damage to
[Start]-[Shut Down]:
equipment or property if the safety instruction is not observed.
This illustration means to click [Start], then to click [Shut Down]. (For some
[Enter]:
aplications, you may need to double-click.)
This illustration means to press the [Enter] key.
[Ctrl] + [Alt]:
Windows 2000 :
This illustration means to press and hold the [Ctrl] key, then press the [Alt] key.
Information for Microsoft Windows 2000 Professional users.
Windows XP :
[
P.x-(x)]:
Information for Microsoft Windows XP users.
This illustration means to refer to a certain instruction at certain page as indicated. For
example [
P.5-(1~3)] means please refer to instructions (1) through (3) at page 5.
* Some of the illustrations in this manual may differ slightly in shape from the actual items.
Panasonic Wireless Display Configuration Manual
ii
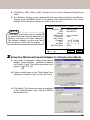
First-time Operation
This manual will walk you through the configurations of the Wireless Display with your
computer. In the package, please find the following items as shown in the figure below. If
any of these items is missing or not working properly, please contact Panasonic Technical
Support.
NOTE
When installing software in a computer without the CD-ROM drive or PCMCIA slot,
copy all files in the Wireless Display Software CD to the hard disk, then install the
software from the hard disk.
In this manual, "L" is the CD-ROM drive letter and "x" denotes a numeral. You can
change these letters to suite your preference.
When using Windows 2000 and Windows XP please logon as the administrator.
NOTE
Depending on the wireless network card you use, the Wireless Display might not
function properly with you computer. The following wireless network cards are recommended when using with the Wireless Display.
- Intel(R) PRO/Wireless LAN 2100 3B Series
- Proxim Orinoco 802.11b Silver/Gold Series
- Cisco Aironet 340/350 Series
- Symbol Spectrum24 Series
Depending on the capability of your computer's video chip-set, the Wireless Display
might not function properly with your computer. Please consult this with your system
administrator or the reseller.
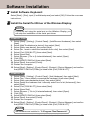
Install the necessary Software
I
Install MeiWDS program:
1. Select [Start] - [Run], input [L:\meiwds\setup.exe] and select [OK]. Follow the onscreen instructions.
2. Restart the computer.
3. After restart, the Wireless Display Setup Utility (MeiWDS) icon
the System Tray.
1
Panasonic Wireless Display Configuration Manual
will appear on
Software Installation
II Install Software Keyboard:
Select [Start] - [Run], input [L:\softkb\setup.exe] and select [OK]. Follow the on-screen
instructions.
III Install the Serial Port Driver of the Wireless Display:
NOTE
If your are not using the serial port on the Wireless Display, you
can skip the installation of the serial port driver.
Windows 2000
1. Select [Start] - [Setting] - [Control Panel] - [Add/Remove Hardware], then select
[Next].
2. Select [Add/Troubleshoot a device], then select [Next].
3. Select [Add a new device], then select [Next].
4. Select [No, I want to select the hardware from a list], then select [Next].
5. Select [Port (COM & LPT)], then select [Next].
6. Select [Have Disk].
7. Select [Browse..]. Go to [L:\wlserial\wdseral], then select [Open].
8. Click [OK].
9. Select [WDSP COM Port], then select [Next].
10. Select [Next], then select [Finish].
11. Restart the computer.
12. Select [Start] - [Setting] - [Control Panel] - [System] - [Device Manager], and confirm
that [WDSP COM Port (COMx)] is listed under [Port (COM & LPT].
Windows XP
1.
2.
3.
4.
5.
6.
7.
8.
9.
10.
11.
12.
Select [Start] - [Setting] - [Control Panel] - [Add Hardware], then select [Next].
Select [Yes, I have already connected the hardware], then select [Next].
Select [Add a new hardware device], then select [Next].
Select [Install the hardware that I manually select from a list (Advanced)], then
select [Next].
Select [Port (COM & LPT)], then select [Next].
Select [Have Disk].
Select [Browse...]. Go to [L:\wlserial\wdseral], then select [Open].
Click [OK].
Select [WDSP COM Port], then select [Next].
Select [Next], then select [Finish].
Restart the computer.
Select [Start] - [Setting] - [Control Panel] - [System] - [Device Manager], and confirm
that [WDSP COM Port (COMx)] is listed under [Port (COM & LPT].
NOTE
The softwares are installed in "C:\Program Files\Panasonic\".
Panasonic Wireless Display Configuration Manual
2
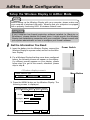
AdHoc Mode Configuration
Setup the Wireless Display in AdHoc Mode
NOTE
Before setting up the Wireless Display with your computer, please make sure
your computer is wireless LAN ready. Meaning that your computer is equipped
with a properly functioning 802.11b wireless network card.
CAUTION
If your computer has firewall protection software installed (ie. Black-Ice or
ZoneAlarm), please disable the firewall since it might prevent the Wireless
Display from establishing connection with your computer. Please consult with
your system administrator on how to configure your firewall software.
I
Get the Information You Need:
1. Insert the battery into the Wireless Display, connect the
Wireless Display to a power outlet, and turn on the Wireless Display.
Power Switch
2. For a Wireless Display that has never been configured
before, the following screen will appear on the display.
If a different screen appears on your display, please
follow step 3 to get to this screen; otherwise, please
skip to step 6.
<Wireless display screen>
Menu Button
Select network type.
AdHoc
Infrastructure
Cancel
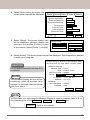
3. Press the MENU button on the Wireless Display. The
following screen is displayed.
General Wireless
Mode :
Backlight :
Profile:
81%
3
Battery
Connect
LOW
Option
Version
OfflineView
MID
HIGH
Profile 1
OK
Cancel
Panasonic Wireless Display Configuration Manual
4. Select [Option] using the stylus. The
screen shown here will be displayed.
General
Wireless Battery
Wireless Connection
Power on Password
Supervisor Password
Touchscreen
LCD Off Timer
LCD Off Mode
Power Off Timer
Version
Setup
Change
Change
Calibration
1 min
Quick Resume
1 min
OK
84%
5. Select [Setup]. The screen shown here
will be displayed. Wireless Display can
save up to four profiles. [Profile 1] is used
in this manual. Select [Profile 1]. Hit [OK].
:
:
:
:
:
:
:
Option
Cancel
Select profile.
Profile 1
Profile 2
Profile 3
Profile 4
OK
Cancel
6. Select [AcHoc]. The screen shown here will be displayed. This information is needed
to setup your computer.
Change setting on host PC to the following value,
reboot the host PC, then select "Connect" below.
CAUTION
Wireless LAN card
Do not select [Connect] until step 21 is
completed.
NOTE
The Wireless Display will turn off automatically after 10 minutes have
elapsed. In this case, start the procedure from step 1.
Network Type :
SSID :
WEP Encryption :
TCP/IP
Class A
IP Address :
NetMask :
MeiWDS
AES Encryption :
Password :
AdHoc
cfvdw07-xxxxx
disable
Class B
Class C
10.57.148.205
255.0.0.0
disable
wdsp
Connect
Cancel
NOTE
In this screen, you can setup the Wireless Display to work on address class A, B, or
C by selecting one of the Class A , Class B , or Class C tabs.
* Class A is used in this manual.
Panasonic Wireless Display Configuration Manual
4
AdHoc Mode Configuration
II Create a Profile for the 802.11b Network Adapter:
7. At your computer, launch the configuration utility of your 802.11b wireless network card. Following is a
sample window that could appear
on your computer's monitor/LCD.
This screen is a sample.
NOTE
Depending on the brand of network card you use, the utility will appear differently.
Throughout this manual, the configuration utility, Client Manager from Orinoco
Wireless, is used as an example. Please match the settings accordingly with
your utility.
If you are using a CISCO Aironet 340/350 series wireless adapter, please disable LEAP.
NOTE
Windows XP has the ability to manage profile settings for wireless network
adapters. Users can either use the Windows XP's management or the adapter's
configuration utility to create / edit profiles. In general, a utility bundled with the adapter
provides additional functionality.
This manual choose NOT to use the Windows XP's wireless network adapter management as examples. For how to use Windows XP's wireless network adapter
management, please refer to Windows XP user manual.
To ensure the adapter's utility is the primary management utility, please make sure
Windows XP's management is disabled:
i) Click [Start] - [Control Panel] - [Network Connections].
ii) Right click on [Wireless Network Connection x]
of the wireless network card using with the Wireless Display, and select [Properties].
iii) Select [Wireless Networks] tab. The window as
shown on the right side is displayed.
iV) Uncheck the "Use Windows to configure my
wireless network settings" box.
V) Click [OK] to exit out of the "Wireless Network
Connection Properties" window.
5
Panasonic Wireless Display Configuration Manual
8. First, create a profile that will be used for communicating with the Wireless Display. Select [Actions]
- [Add/Edit Configuration Profile]. The following window is displayed.
This screen is a sample.
9. Click [Add]. The following window is displayed.
Create a name for this profile in the "Profile Name"
box, and change the "Network Type" to [Peer-toPeer Group].
This screen is a sample.
10. Click [Next]. The following window is displayed. In
"Network Name" box, input the SSID as shown on
your Wireless Display.
[
P.4-(6)]
CAUTION
For use in Canada, set the "Channel
Numebar" to [Channel 11] only.
This screen is a sample.
11. Click [Next]. The following window is displayed.
Do not enable the data security for the initial setup.
The data security can be enabled after the communication between the computer and the Wireless Display is established.
This screen is a sample.
Panasonic Wireless Display Configuration Manual
6
AdHoc Mode Configuration
12. Click [Finish] to exit out the profile setting.
Please make sure to exit out of the network
adapter configuration utility so the settings
take effect immediately.
This screen is a sample.
III Input the IP Address:
13.
Windows 2000
Select [Start] - [Settings] - [Control Panel] - [Network] - [Dial-Up Connection] - [Local
Area Connection x]. The following window is displayed.
NOTE
Please select the [Local Area Connection x]
of the wireless network card that will be used
with the Wireless Display.
14. Select "Specify IP Address", and enter the IP
Address and Subnet Mask as shown on the
Wireless Display. [
P.4-(6)]
15. Click [OK] - [OK] - [Close]. Please make sure
to exit out of the "Local Area Connection x"
window so that settings take effect immediately.
This screen is a sample.
16.
Windows XP
Select [Start] - [Control Panel] - [Network Connections]. Right click on [Wireless
Netwoking Connection X] and then select [ Properties]. The window as shown on
next page is displayed.
7
Panasonic Wireless Display Configuration Manual
NOTE
Please select the [Wireless Network Connection x] of the wireless network card that will be
used with the Wireless Display.
17. Highlight [Internet Protocol (TCP/IP)], and then
click [Properties].
This screen is a sample.
18. Select "Use the following IP address:". Enter the
IP Address and Subnet Mask as shown on the
Wireless Display. [
P.4-(6)]
19. Click [OK] - [OK] to exit out of the setting window.
This screen is a sample.
IV Ready to Connect:
20. Left click the MeiWDS icon
in the "System Tray".
The pop-up menu as shown on the right will appear.
Select [Password]. The following window will appear.
This screen is a sample.
This screen is a sample.
21. Please enter the password as shown on the Wireless Display in the "Enter password" field above. The default password is "wdsp". [
P.4-(6)]
Panasonic Wireless Display Configuration Manual
8
AdHoc Mode Configuration
NOTE
The Wireless display can not connect to the computer if the password is
entered incorrectly.
The user can change the password after the initial connection is established. The new password will be updated automatically in the "Password"
field on the system tray.
22. The setting is completed. Select [Connect] on the Wireless Display. The display will
attempt to establish connection with the computer. If the connection is successful,
the MeiWDS icon in the "System Tray" will change from
to
.
NOTE
Once the communication is established, the
"Wireless Display Setup Utility" will be become
accessible. User will then be able to launch
the "Wireless Display Setup Utility", which can
be used to modify the display's settings.
To access the utility:
Windows 2000
Click [Start] - [Programs] - [Panasonic] - [Wireless Display Setup Utility].
Windows XP
Click [Start] - [All Programs] - [Panasonic] - [Wireless Display Setup Utility].
NOTE
Windows XP
Windows XP's "Fast User Switching" function is not supported by the Wireless Display. A warning message as
shown on the right side will appear if the "Fast User
Switching" function is enabled. Click [OK] to close the
warning massage.
To disable the "Fast User Switching" function:
Click [Sart] - [Control Panel] - [User Accounts]. Click on "Change the way user log on or
off". The following window will appear.
- Uncheck "Use Fast User Switching".
- Click [Apply Options].
- Close the "User Accounts" window.
- Close the "Control Panel".
9
Panasonic Wireless Display Configuration Manual
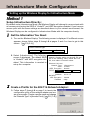
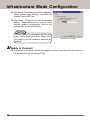
Infrastructure Mode Configuration
Setting up the Wireless Display for Infrastructure Mode
Method 1
Setup Infrastructure Directly:
By default under Infrastructure Mode, the Wireless Display will attempt to communicate with
an access point having the SSID of "cfvdw07" and WEP encryption disabled. If you have an
access point with the same settings as described above in your network environment, the
Wireless Display can be configured in Infrastructure Mode with the computer directly.
I
Get the Information You Need:
1. Turn on the Wireless Display. The following screen is displayed. If a different screen
appears, please follow steps 3 through 6 at pages 3 and 4 on how to get to this
screen. [
P.3-(3~6)]
Select network type.
AdHoc
Infrastructure
2. Select [Infrastructure]. The following
screen is displayed. The default SSID
is "cfvdw07" with WEP encryption disabled. This information is needed to
setup the computer.
Cancel
Isolate host PC and Accress Point (AP) from
network. Change setting on the host PC and
AP to the following value, reboot the host
PC, then select "Connect" below.
Wireless LAN card
Network Type
SSID
WEP Encryption
TCP/IP Class A
IP Address
NetMask
MeiWDS
AES Encryption
Password
: Infrastructure
: cfvdw07
: disable
Class B
Class C
: 10.57.148.205
: 255.0.0.0
: disable
: wdsp
Connect
Cancel
II Create a Profile for the 802.11b Network Adapter:
3. Follow steps 7 through 9 on page 5 to launch the
configuration utility of the network adapter and create a new profile. Create a profile name and change
the "Network Type" to [Access Point]. [
P.5-(7~9)]
This screen is a sample.
Panasonic Wireless Display Configuration Manual
10
Infrastructure Mode Configuration
4. Enter the SSID as shown on the Wireless Display. [
P.10-(2)]
5. Follow steps 11 and 12 on page 6 and 7 to
exit out of the configuration utility. [
P.6(11~12)]
This screen is a sample.
III Input the IP Address:
6. Follow steps 13 through 19 on pages 7, and 8 on how to enter the IP address. [
P.7-(13~19)]
IV Ready to Connect:
7. The Wireless Display is now ready. Follow steps 20 through 22 on page 8 on how
P.8-(20~22)]
to establish connection with the computer. [
Method 2
Configure from AdHoc mode to Infrastructure mode:
If the SSID of your Access Point is not "cfvdw07", you should first configure the Wireless
Display with the computer in AdHoc mode. Secondly, use the "Wireless Display Setup
Utility" to modify the Wireless Display to match the settings of the Access Point. Finally,
change the wireless network adapter's profile to Infrastructure mode.
I
Setup the Wireless Display in AdHoc Mode:
1. Follow the instructions on pages 3 through 8 on how to setup the display in AdHoc
mode.
II Match the Display's Settings with the Access Point:
NOTE
Please have the information of your Access Point ready. The necessary information includes the SSID of the Access Point, and it's WEP encryption key, if WEP is enabled.
Throughout this manual, an Access Point with
SSID = OfficeAP001
64 Bit WEP Key = A24BE4190C
is used as an example. Please match the settings accordingly with your Access Point.
11
Panasonic Wireless Display Configuration Manual
2. Select [Connect] on the Wireless Display. The display will attempt to establish
connection with the computer. If the connection is successful, the MeiWDS icon in
the "System Tray" will change from
to
.
3. Click [Start] - [Programs] - [Panasonic] - [Wireless Display Setup Utility] to launch
the "Wireless Display Setup Utility". The following window will appear and prompt
for password.
This screen is a sample.
4. No default password is set for the
"Wireless Display Setup Utility".
Leave the field blank and click [OK].
The wndow as shown on the right
will appear. Settings changed in this
window will be updated in the Wireless Display.
The check in this box indicates that
[Profile 1] is the current active profile.
This screen is a sample.
5. [Profile 1], which is the current active profile, contains settings for the AdHoc Mode.
Please write down the IP addresses in both "PC IP Addess" and "Display IP Address" fields as they will be need later.
In the "Profile" drop-down menu, select [Profile 2], the window as shown below will
appear. We will setup [Profile 2] for Infrastructure Mode and then enable [Profile 2]
as the current active profile.
NOTE
It is also possible to modify [Profile
1] to become Infrastructure Mode;
however, doing so, the AdHoc Mode
settings will be lost.
This screen is a sample.
Panasonic Wireless Display Configuration Manual
12
Infrastructure Mode Configuration
C
A
B
F
D
G
E
H
This screen is a sample.
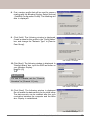
5. A
B
C
D
Enter the SSID of your Access Point.
Change the network type to [Infrastructure].
Enter the PC IP address, Display IP address, and Subnet mask. [
P.12-(4)]
Enable the WEP to [64 bits]. (If your Access Point does not uses WEP or use
128 bits encryption, change the "WEP" to [Disabled] or [128 bits] respectively.)
E Click the [Key(s)...] button. The window shown below will appear. Enter the
WEP key of your Access Point here. Set the "Default Key" to the one you wish to
use. Click [OK] to exit out of the window.
F Enable the AES to [128 bits]. (If you do not want to use AES encryption, use 192
bits encryption, or use 256 bits encryption, change the "AES" to [Disabled], [192
bits], or [256 bits] respectively. )
G Click the [Key...] button. The window as shown below will appear. To use phrase
generated AES key, select "Phrase" and enter a phase in the box. To enter the
AES key directly, select "Binary" and enter your AES key in the box. Click [OK] to
exit out of the window.
H Check the "Use this profile now" box so that "Profile 2" will become the active
profile after the setup is completed.
13
Panasonic Wireless Display Configuration Manual
6. Click [Next] - [OK] - [Next] - [OK] - [Finish] to exit out of the "Wireless Display Setup
Utility".
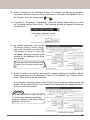
8. The Wireless Display is now updated with the new settings. Restart the Wireless
Display, press the MENU button on the display, then select [Wireless]. The current
settings of the Wireless Display are listed in this screen.
General
NOTE
At this stage, the display can not establish
connection with the computer because the
display's settings have been changed.
The network adapter's profile must also
be changed to match with the display.
Wireless Battery
Network Type
SSID
Channel
TxRate mode
Encryption
Rate (Tx/Rx)
Display IP
PC IP
Net Mask
AES Encryption
:
:
:
:
:
:
:
:
:
:
Option
Infrastructure
OfficeAP001
Fully Automatic
64bit
/
10. 57.151.206
10. 57.151.205
255. 0. 0. 0
128bit
OK
84%
Version
Cancel
III Setup the Wireless Network Adapter to Infrastructure Mode:
9. Launch the Configuration Utility of the network
adapter. Select [Action] - [Add/Edit Configuration Profile] - [Add]. The following window is displayed. [
P.5-(7~9)]
10. Create a profile name in the "Profile Name" box.
Change the "Network Type" to [Access Point].
This screen is a sample.
11. Click [Next]. The following window is displayed.
In the "Network Name" box, enter the SSID of
the Access Point.
This screen is a sample.
Panasonic Wireless Display Configuration Manual
14
Infrastructure Mode Configuration
12. Click [Next]. The following window is displayed.
Check "Enable Data Security," and enter the
Access Point's WEP key.
13. Click [Next] - [Finish] to exit out of the profile
setting. Please make sure to exit out of the
network adapter configuration utility so the
settings take effect immediately.
NOTE
Some adapters' Configuration Utilities can
store more than one profile. Make sure
the profile you just created is selected as
default.
This screen is a sample.
IV Ready to Connect:
14. The setting is complete. Restart the display, and the computer will now connect to
the display through the Access Point.
15
Panasonic Wireless Display Configuration Manual
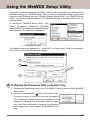
Using the MeiWDS Setup Utility
Unlike the "Wireless Display Setup Utility", which is used to modify the settings of the
Wireless Display, the "MeiWDS Setup Utility" is used to modify the settings on the host
computer side. Different from the "Wireless Display Setup Utility", the "MeiWDS Setup
Utility" can be launched regardless if the Wireless Display is communicating with the
host computer.
To launch the "MeiWDS Setup Utility", click
[Start] - [Programs] - [Panasonic] - [MeiWDS
setup Utility]. The following window will appear
and prompt for the supervisor password.
This screen is a sample.
This screen is a sample.
The default supervisor password is "supervisor", all lower case. Enter the password.
Click [OK]. The following window will appear.
A
B
D
C
A
To Disable the Password field on System Tray:
1. Uncheck the "Enable tray menu" box. Click [Next] - [Finish] to exit out of the "MeiWDS
Setup Utility".
2. Left click on the MeiWDS
icon on the system tray.
The pop-up menu as shown on the right will appear.
The "Password" selection has been disabled. The
purpose of disabling the "Password" field is to prevent user from accidentally changing the password
and stopping the communication to the Wireless Display.
Panasonic Wireless Display Configuration Manual
This screen is a sample.
16
Using the MeiWDS Setup Utility
B
To change the MeiWDS Setup Utility Password:
1. The default supervisor password for the "MeiWDS Setup Utility" is "supervisor". To
change the password, click the [Change Supervisor Password] button. The following window will appear.
This screen is a sample.
2. Enter the current password in the "Enter Current Password" field. Enter the new
password in both of the "Enter New Password" and "Confirm New Password" fields.
Click [OK] - [Next] - [Finish] to exit out of the utility.
C To change the AES Encryption Key Lifetime:
1. If AES encryption is enabled in "Wireless Display Setup Utility", the AES key length
and AES key will be automatically updated in the "Key Length :" and [AES Key...]
fields in the "MeiWDS Setup Utility".
Use the drop-down menu to select a different key lifetime. Click [Next] - [Finish].
The default AES key lifetime is [ 1 hour ].
D
To change the AES key of the host PC side:
1. User can select [Disable], [128 bits], [192 bits] or [256 bits] AES encryption using
the "Key Length :" drop-down menu.
2. Click the [AES Key...] button. the window as shown on
the right will appear. Enter the AES key in this screen.
Click [OK] - [OK] - [Finish].
NOTE
The Wireless Display's default setting is with AES encryption disabled. If the Wireless Display has been reset to factory default. Please select [Disable] in the
"Key Length :" field at D .
17
Panasonic Wireless Display Configuration Manual
This screen is a sample.
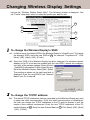
Changing Wireless Display Settings
Launch the "Wireless Display Setup Utility". The following window is displayed. Use
the "Profile" drop-down menu to select the profile you want to edit.
B1
E1
A1
C1
D1
This screen is a sample.
I
To change the Wireless Display's SSID:
a1. In AdHoc mode, the default SSID of the Wireless Display is "cfvdw07-xxxx." To change
the display's SSID, enter the new SSID at A1 , for example "Toughbook-07". Click
[Next] - [OK] - [Next] - [OK] - [Finish].
a2. Since the SSID of the Wireless Display has been changed, the wireless network
adapter in the PC must also be updated with the new SSID. Launch the configuration utility of the network adapter. Select [Action]
- [Add/Edit Configuration Profile]. Select the profile for the Wireless Display. Select [Edit] - [Next].
The window as shown on the right hand side is
Toughbook-07
displayed. Enter the new SSID in the "Network
Name" box. Go to step d1.
This screen is a sample.
II To change the TCP/IP address:
b1. The default TCP/IP addresses that are generated by the Wireless Display are used
to setup the initial communication. Once the initial communication is established,
the user can change the TCP/IP addresses of the PC and the display to suit the
needs of their network environment. Enter the new TCP/IP addresses of the PC
and the Display at B1 . Enter the new Subnet Mask at C1 . Click [Next] -[OK] - [Next]
- [OK] - [Finish].
Panasonic Wireless Display Configuration Manual
18
Changing Wireless Display Settings
b2. The Wireless Display's TCP/IP address is changed to the new TCP/IP address as
shown in "Display's IP address" at B1 , and it only communicates to a computer
with the new TCP/IP address as shown in the "PC's IP address". The user must
change the wireless network adapter's TCP/IP address to the new TCP/IP address. Please follow instructions 13 to 19 on pages 7 and 8 to change the TCP/IP
address. Go to setp d1.
III To change MeiWDS System Tray Password:
c1. Enter the new password at D1 . Click [Next] - [OK] - [Next] - [OK] - [Finish].
c2. Your new password will be automatically updated in the password field of the
MeiWDS utility,
, on the System Tray.
If the Wireless Display has been reset to default settings, please make
sure the default password, which is "wdsp", is entered in this field.
NOTE
Communication cannot be established if the
password in this field does not match with
your setting.
This screen is a sample.
d1. Check the Wireless Display's new settings. Restart the Wireless Display, press the
MENU button on the display, then select [Wireless]. The following screen is displayed. The current settings of the Wireless Display are listed in this screen.
General Wireless
New TCP/IP
Address
Battery
Network Type
SSID
Channel
TxRate mode
WEP Encryption
Rate (Tx/Rx)
Display IP
PC IP
Net Mask
AES Encryption
84%
:
:
:
:
:
:
:
:
:
:
Option
Version
AdHoc
Toughbook-07
Fully Automatic
64bit
/
172.181. 34.199
172.181. 34.198
255.255. 0. 0
128bit
OK
New SSID
New
Subnet Mask
Cancel
IV To change the Profile Name:
e1. Click the [Change Name...] button at E1 . At the "Enter profile name." box, enter the
new profile name, for example "MyOffice". Click [OK] to exit out of the "Change profile
name" window. Click [Next] - [OK] - [Next] - [OK] - [Finish] to exit out of the "Wireless
Display Setup Utility". The Wireless Display is now updated with the new profile
name.
19
Panasonic Wireless Display Configuration Manual
e2. Check to see if the Wireless Display's profile name has been updated. On the
Wireless Display, press the MENU button. The screen as shown below will be
displayed. The "Profile:" name should have been updated with the new name.
General Wireless Battery
Mode :
Backlight :
Profile:
Connect
LOW
MID
Version
OfflineView
HIGH
New
Profile Name
MyOffice
84%
V
Option
OK
Cancel
To change Wireless Display Setup Utility's Password:
f1.
By default the "Wireless Display Setup Utility" is not set
with password protection. To set a password for the
"Wireless Display Setup Utility", press the MENU button
on the Wireless Display. Select the [Option] tab using
you stylus. The following screen will appear.
This screen is a sample.
f2.
On the "Supervisor Password :" section, hit the [Change]. The following
screen will appear.
General
Wireless Battery
Wireless Connection
Power on Password
Supervisor Password
Touchscreen
LCD Off Timer
LCD Off Mode
Power Off Timer
Using the on-screen keyboard, enter
your new "Wireless Display Setup Utility" password.
Version
Setup
Change
Change
Calibration
1 min
Quick Resume
1 min
OK
84%
f3.
:
:
:
:
:
:
:
Option
Cancel
Change Supervisor Password
Enter New Password [
Confirm New Password [
Cancel
Panasonic Wireless Display Configuration Manual
]
]
20
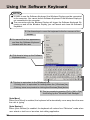
Using the Software Keyboard
NOTE
In order to use the Software Keyboard, the Wireless Display must be connected
to the computer. You cannot launch Software Keyboard if the Wireless Display is
not connected to the computer.
The connection with the Wireless Display will trigger the Software Keyboard. By
turning on and off the Wireless Display, you can launch and close the Software
Keyboard.
C. Use these keys to move the keyboard to the four corners of the
screen.
B. You can set the size, appearance,
and how the Software Keyboard
interacts with the user.
A. Click here to bring up the Software
Keyboard menu.
D. This key is equivalent to the [Windows] key.
- Clicking once is equivalent to holding down the [ Windows] key.
- Clicking twice is equivalent to clicking the Windows [Start] button.
E. This key equals to pressing [Crtl] + [Alt] + [Del].
It will bring up the "Windows Task Manager".
[Auto Move]
When [Auto Move] is enabled, the keyboard will automatically move away from the area
the user is typing.
[Auto Restore]
When [Auto Restore] is enabled, the keyboard will restore from "Minimize" mode when
user selects a text box or launches text editing application.
21
Panasonic Wireless Display Configuration Manual
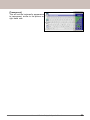
[Transparent]
This will set the keyboard's appearance
to transparent, similar to the picture on
right hand side.
Panasonic Wireless Display Configuration Manual
22
Uninstalling the Software
I Uninstalling the Software Keyboard:
1. Close the software keyboard.
2. Select [Start] - [Settings] - [Control Panel] - [Add/Remove Programs]. Select [Software Keyboard] - [Add/Remove]. Follow the on-screen instructions.
If [Locked File Detected] is displayed, please select [Reboot].
II Uninstalling the MeiWDS program:
3. Close the MeiWDS program by left clicking on the MeiWDS icon
. Select [Exit
MeiWDS].
4. Select [Start] - [Settings] - [Control Panel] - [Add/Remove Programs]. Select [MeiWDS]
- [Add/Remove]. Follow the on-screen instructions.
III Uninstalling the Wireless Display Serial Port driver:
6.
Windows 2000
Select [Start] - [Settings] - [Control Panel] - [System] - [Device Manager] - [Ports
(COM&LPT)]. Remove [WDSP COM Port (COMx)].
7.
Windows XP
Select [Start] - [Settings] - [Control Panel] - [System] - [Device Manager] - [Ports
(COM&LPT)]. Remove [WDSP COM Port (COMx)].
Limitation of the Wireless Display Serial Port
When the Wireless Display is not connected to the computer, the serial port of the Wireless Display can not be used.
There are some serial devices and applications that will not work. This is because the
serial port of the Wireless Display operates through a virtual serial port.
• Devices or device drivers that start up and carry out port operation confirmation before
connection establishment of the Wireless Display.
For example:
- Serial mouse devices
• Non-virtual port applications
For example:
- MS-DOS applications
- 16-bit applications
• A modem
• Direct cable connection
In the above cases, the computer may freeze.
23
Panasonic Wireless Display Configuration Manual
Usage Precautions
Do not maximize the MS-DOS screen. Once maximized, the connection with the Wireless
Display is interrupted and the screen cannot be returned to its original size. In this case,
press [ Alt ] + [ Enter ] on the computer.
If a computer establishes a connection with the Wireless Display while operating in a
display mode other than those shown below. The display mode of the computer will
automatically change to 800 x 600 (16-bit).
Resolution: 800 x 600 or 640 x 480
Color Mode: 16-bit color
If the connection with the Wireless Display is cut, the computer will return to its original
display mode. In this case, the colors displayed on the screen may change if the color
mode is changed.
If any changes are made to the display mode of the computer connecting to the Wireless
Display, the connection will be cut.
The contents displayed on the Wireless Display may not be the same as what was
displayed on the monitor/LCD of the computer.
Applications that use hardware-based drawing functions, etc., might not be displayed
on the Wireless Display.
Some applications that perform frequent screen updating (such as video playback applications) might not be shown on the Wireless Display or might be shown as static
images.
Some 16-bit applications may not work properly.
The screen display may be unable to reflect a change in the cursor's shape.
When [Always On Top] setting is released, the software keyboard does not remain on top
even if the character input box is selected (except during logon and password input).
When the LCD/external display is turned off by the [Turn off monitor] setting in [Control
Panel] - [Power Management], the screen on the Wireless Display may remain displayed.
Communications may be affected when there is a high load on the computer.
The mouse cursor on the LCD of the computer may flicker when the computer is connected with the Wireless Display.
When removing the wireless LAN card after starting Windows, an error may occur.
Panasonic Wireless Display Configuration Manual
24
LIMITED USE LICENSE AGREEMENT
THE SOFTWARE PROGRAM(S) ("PROGRAMS") FURNISHED WITH THIS PANASONIC®
PRODUCT ("PRODUCT") ARE LICENSED ONLY TO THE END-USER ("YOU"), AND MAY
BE USED BY YOU ONLY IN ACCORDANCE WITH THE LICENSE TERMS DESCRIBED
BELOW. YOUR USE OF THE PROGRAMS SHALL BE CONCLUSIVELY DEEMED TO CONSTITUTE YOUR ACCEPTANCE OF THE TERMS OF THIS LICENSE.
Matsushita Electric Industrial Co., Ltd. ("MEI") has developed or otherwise obtained the
Programs and hereby licenses their use to you. You assume sole responsibility for the
selection of the Product (including the associated Programs) to achieve your intended
results, and for the installation, use and results obtained therefrom.
LICENSE
A.
MEI hereby grants you a personal, non-transferrable and non-exclusive right and
license to use the Programs in accordance with the terms and conditions stated in
this Agreement. You acknowledge that you are receiving only a LIMITED LICENSE
TO USE the Programs and related documentation and that you shall obtain no title,
ownership nor any other rights in or to the Programs and related documentation nor
in or to the algorithms, concepts, designs and ideas represented by or incorporated
in the Programs and related documentation, all of which title, ownership and rights
shall remain with MEI or its suppliers.
B.
You may use the Programs only on the single Product which was accompanied by
the Programs.
C.
You and your employees and agents are required to protect the confidentiality of the
Programs. You may not distribute or otherwise make the Programs or related documentation available to any third party, by time-sharing or otherwise, without the prior
written consent of MEI.
D.
You may not copy or reproduce, or permit to be copied or reproduced, the Programs
or related documentation for any purpose, except that you may make one (1) copy of
the Programs for backup purposes only in support of your use of the Programs on
the single Product which was accompanied by the Programs. You shall not modify,
or attempt to modify, the Programs.
E.
You may transfer the Programs and license them to another party only in connection
with your transfer of the single Product which was accompanied by the Programs to
such other party. At the time of such a transfer, you must also transfer all copies,
whether in printed or machine readable form, of every Program, and the related
documentation, to the same party or destroy any such copies not so transferred.
F.
You may not remove any copyright, trademark or other notice or product identification
from the Programs and you must reproduce and include any such notice or product
identification on any copy of any Program.
25
Panasonic Wireless Display Configuration Manual
YOU MAY NOT REVERSE ASSEMBLE, REVERSE COMPILE, OR MECHANICALLY OR ELECTRONICALLY TRACE THE PROGRAMS, OR ANY COPY THEREOF, IN WHOLE OR IN
PART.
YOU MAY NOT USE, COPY, MODIFY, ALTER, OR TRANSFER THE PROGRAMS OR ANY
COPY THEREOF, IN WHOLE OR IN PART, EXCEPT AS EXPRESSLY PROVIDED IN THE
LICENSE.
IF YOU TRANSFER POSSESSION OF ANY COPY OF ANY PROGRAM TO ANOTHER PARTY,
EXCEPT AS PERMITTED IN PARAGRAPH E ABOVE, YOUR LICENSE IS AUTOMATICALLY
TERMINATED.
TERM
This license is effective only for so long as you own or lease the Product, unless earlier
terminated. You may terminate this license at any time by destroying, at your expense, the
Programs and related documentation together with all copies thereof in any form. This
license will also terminate effective immediately upon occurrence of the conditions therefore set forth elsewhere in this Agreement, or if you fail to comply with any term or condition
contained herein. Upon any such termination, you agree to destroy, at your expense, the
Programs and related documentation together with all copies thereof in any form.
YOU ACKNOWLEDGE THAT YOU HAVE READ THIS AGREEMENT, UNDERSTAND IT AND
AGREE TO BE BOUND BY ITS TERMS AND CONDITIONS. YOU FURTHER AGREE THAT
IT IS THE COMPLETE AND EXCLUSIVE STATEMENT OF THE AGREEMENT BETWEEN
US, WHICH SUPERSEDES ANY PROPOSAL OR PRIOR AGREEMENT, ORAL OR WRITTEN, AND ANY OTHER COMMUNICATIONS BETWEEN US, RELATING TO THE SUBJECT
MATTER OF THIS AGREEMENT.
Panasonic Wireless Display Configuration Manual
26
Matsushita Electric Industrial Co., LTD. All Rights Reserved.