1
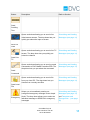
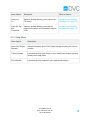
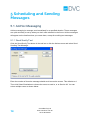
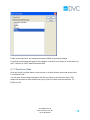
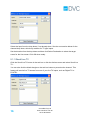
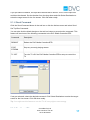
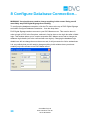
DVC Digital
Signage User
Manual 2.1.x
Revision: 3
Date: 14-Sep-2015 15:32
Table of Contents
1
Introduction
4
2
Overview of DVC Digital Signage
5
2.1
Messages
5
2.2
Zones
5
2.3
Scheduling and the Timeline
5
2.4
Communication Mechanism
5
2.5
Connecting DVC Media Controllers/STBs to Digital Signage
6
2.6
Connecting Windows PCs Clients to Digital Signage
6
3
Logging In
8
4
DVC Digital Signage Menus and Tool Bar
10
4.1
Tool Bar
10
4.2
4.2.1
Menus
File Menu
12
12
4.2.2
Actions Menu
12
4.2.3
Help Menu
13
5
Scheduling and Sending Messages
14
5.1
5.1.1
Ad-Hoc Messaging
Send Scrolly Text
14
14
5.1.2
Send Live Video
15
5.1.3
Send Live TV
16
5.1.4
Send Command
17
5.1.5
Send Local File
17
5.1.6
Emergency
18
5.2
5.2.1
Scheduled Messaging
Creating a Scheduled Message
18
19
5.2.2
Basic Configuration
20
5.2.3
Using a Template
20
5.2.4
Repeating Messages
21
5.2.5
Sending Multiple Items
21
5.2.6
Split Mode
21
5.2.7
Save as Template
22
5.2.8
Deleting a Scheduled Message
22
5.3
Microsoft Powerpoint
22
6
Configure Zones...
24
6.1
Known Locations
24
6.2
Creating, Renaming and Deleting Zones
25
6.3
Adding and Removing Zone Members
25
7
Templates and Emergencies...
26
7.1
Creating Templates
26
7.2
Managing Templates
26
7.3
Managing Emergencies
26
8
Configure Database Connection...
28
9
Appendix A: Supported Media Types
29
10
Index
31
1 Introduction
DVC Digital Signage allows you to push digital media, such as video, slide shows,
documents, text, photos etc, to DVC Media Controllers/STBs and to Windows machines with
the DVC Administrator Pack or DVC Client Pack installed. This lets you publish important
notices to displays placed at strategic locations around your campus, and even directly to
users on their Windows PCs. Messages can be broadcast to all, or targeted at a select
locations giving you full control over your digital signage.
This manual covers DVC Digital Signage, the control centre for your digital signage needs. It
is part of the DVC Administrator Pack. A guide to installing the DVC Administration Pack can
be found in the DVC Administrator User Manual 2.0.
CommBox Pty Ltd
4
www.commbox.com.au
+61 2 9975 6001
2 Overview of DVC Digital Signage
2.1 Messages
DVC Digital Signage works on the principle of sending messages to signage clients. A
message might be a video, some text, a presentation, for example. See Scheduling and
Sending Messages (see page 14) for more information.
2.2 Zones
DVC Digital Signage uses the concept of zones to direct signage to the correct clients. Each
zone can contain one or more signage client (DVC Media Controller/STB or Windows PC). A
message can only be directed to one zone, or to a special built-in zone, ALL, to broadcast a
message to all clients.
See Configure Zones... (see page 24) for more information on setting up and managing
zones.
2.3 Scheduling and the Timeline
DVC Digital Signage uses a timeline to manage message schedules. Messages can be sent
on an ad-hoc basis, or scheduled in the future either as a one-off or on a recurring basis.
Every zone has a row on the timeline. See Scheduling and Sending Messages (see page
14) for more information.
2.4 Communication Mechanism
DVC Digital Signage sends instructions to a Messenger service running on your DVC Master
Server, which in turn pushes the messages to the grouped/zoned DVC Media Controllers
/STBs or Windows PCs that you have chosen. On a Windows PC, digital signage is received
by the DVC Launcher and displayed using the DVC Live Player.
CommBox Pty Ltd
www.commbox.com.au
+61 2 9975 6001
5
2.5 Connecting DVC Media Controllers/STBs to
Digital Signage
New DVC Media Controllers/STBs are designed to automatically detect the DVC Master
Server (See note below). You can also configure the server address manually if auto
detection is not available or there are multiple subnets involved. Once configured, a DVC
Media Controller/STB will automatically register itself as a signage client.
To configure a DVC Media Controller/STB, see the Configure Media Retrievers section of
the DVC Administrator User Manual 2.0. The configuration screen is self documenting.
DVC Media Controllers/STBs can be configured to automatically turn the TV on when they
receive a message.
Note: Auto detection of the DVC Server requires a service to be set-up on the DVC Master
Server and only works within a single subnet. All new servers ship with this service, but older
ones will need to have it installed by the DVC Support Team.
2.6 Connecting Windows PCs Clients to Digital
Signage
On a Windows PC, there is a Launcher service running that can be found in the task tray in
the lower right corner.
CommBox Pty Ltd
6
www.commbox.com.au
+61 2 9975 6001
You can either double click the icon, or right click and select Configure DVC. On this popup
menu, you can also launch the DVC Live Player, show an about box and exit the Launcher.
The configuration window allows you to select which network adapter to use, which is
usually auto detected. If the auto detection does not work, simply un-tick the Choose adapter
automatically check box and choose the correct adapter from the drop down.
The other thing you might change is the Server IP, which should be the address of your DVC
Master Server. This setting is normally configured during installation of the DVC Client Pack
(not the DVC Administration Pack) when the PRESEED_SERVER is specified. If not, it can
be set manually here. See the Installation seciton of the DVC Administrator User Manual 2.0
for installation instructions.
My Name is set automatically using your computer name, and is normally left as it is. Port
must always be 8000.
As long as DVC Launcher is running in the task tray, the Windows PC will respond to
signage messages.
CommBox Pty Ltd
www.commbox.com.au
+61 2 9975 6001
7
3 Logging In
When you launch DVC Digital Signage, you will be asked to login. Simply enter your
personal username and password into the dialog, as shown below:
If you supply the correct login details and it fails to login, it may be because it does not know
the address of the DVC Master server. Click retry when prompted and the login dialog will
look slightly different this time. If the DVC Server IP is missing or incorrect, tick the
Advanced check-box and correct the DVC Server IP. Supply your login details again and
click OK.
If it still fails to login, the DVC server is not reachable for some reason. Please consult your
local IT department to check that the DVC server is running and is reachable across your
network from the PC you are using. In particular, it is recommended to make sure that it
does not use a proxy. If your IT department has verified that the server can be reached from
your PC and you still cannot login, contact DVC Support.
CommBox Pty Ltd
8
www.commbox.com.au
+61 2 9975 6001
Note: As of DVC 2.1.0, it is not possible to log into the DVC Server unless your DVC Digital
Signage has a version that is compatible with the server. If there is a version compatibility
issue, an error will notify you. Please note that if you try to use an older version of DVC
Digital Signage from before 2.1.0 with the 2.1.0 server, it will appear to fail to authenticate,
but will not show an error explaining the compatibility issue.
CommBox Pty Ltd
www.commbox.com.au
+61 2 9975 6001
9
4 DVC Digital Signage Menus and
Tool Bar
DVC Digital Signage is used to send digital signage messages to sigange clients on your
local network.
4.1 Tool Bar
DVC Digital Signage uses a large tool bar at the bottom of the window giving quick access to
create and schedule messages. The small black triangle to the right of the buttons opens a
drop down with short-cuts. Below is a table summarising those tool bar buttons to get you
started.
Button
Description
Refer to Section
Opens a window allowing you to schedule a
new signage message. This is the only way to
send a file from your DVC library.
Scheduling and Sending
Messages (see page 14)
Opens a window allowing you to send a
scrolling text message
Scheduling and Sending
Messages (see page 14)
Schedule
Item(s)
CommBox Pty Ltd
10
www.commbox.com.au
+61 2 9975 6001
Button
Description
Refer to Section
Opens a window allowing you to send a live
video/camera stream. The drop down lets you
quickly pre-select the input to stream
Scheduling and Sending
Messages (see page 14)
Opens a window allowing you to send a live TV
stream. The drop down lets you quickly preselect the channel
Scheduling and Sending
Messages (see page 14)
Opens a window allowing you to send a control
command to a DVC Media Controller/STB. The
drop down lets you pre-select the command
Scheduling and Sending
Messages (see page 14)
Opens a window allowing you to send a file
from your local PC. The drop down lets you
choose from recently sent files
Scheduling and Sending
Messages (see page 14)
Allows you to immediately send a preconfigured emergency message in two simple
clicks. The drop down allows you to select an
individual message or SEND ALL emergency
messages
Scheduling and Sending
Messages (see page 14)
and Templates and
Emergencies... (see page
26)
Send
Scrolling
Text
Send Live
Video
Send Live
TV
Send
Command
Send Local
File
Emergency
CommBox Pty Ltd
www.commbox.com.au
+61 2 9975 6001
11
4.2 Menus
Below is an overview of the menus available at the top of the main window. The ... notation
indicates that a dialog will open when that menu item is clicked.
4.2.1 File Menu
Menu Option
Description
Refer to Section
Configure
Zones...
Opens a window allowing you to select
a media file to import
Configure Zones... (see
page 24)
Templates and
Emergencies...
Opens a window allowing you to
restore recently deleted media items
Templates and
Emergencies... (see page
26)
Configure
Database
Connection...
Opens a window allowing you to create
a new timed recording
Configure Database
Connection... (see page 28
)
Exit
Closes DVC Digital Signage
4.2.2 Actions Menu
Menu Option
Description
Refer to Section
New
Scheduled
Item...
Opens a window allowing you to schedule a
new signage message
Scheduling and Sending
Messages (see page 14)
Send Scrolling
Text
Message...
Opens a window allowing you to send a
scrolling text message
Scheduling and Sending
Messages (see page 14)
Send Live
Camera
Feed...
Opens a window allowing you to send a live
video/camera stream
Scheduling and Sending
Messages (see page 14)
CommBox Pty Ltd
12
www.commbox.com.au
+61 2 9975 6001
Menu Option
Description
Refer to Section
Send Live
TV...
Opens a window allowing you to send a live
TV stream
Scheduling and Sending
Messages (see page 14)
Send Set Top
Box
Command...
Opens a window allowing you to send a
control command to a DVC Media Controller
/STB
Scheduling and Sending
Messages (see page 14)
4.2.3 Help Menu
Menu Option
Description
About DVC Digital
Signage...
Shows information about DVC Digital Signage including the version
number
Training Guides...
Launches the DVC Web Player in your default web browser jumping
directly to the help folder
DVC Website...
Launches the DVC website in your default web browser
CommBox Pty Ltd
www.commbox.com.au
+61 2 9975 6001
13
5 Scheduling and Sending
Messages
5.1 Ad-Hoc Messaging
Ad-hoc messaging is message sent immediately for a specified duration. These messages
are quick and easy to set-up when you don't need schedule in the future. Ad-hoc messages
will appear on the timeline when you create them, except for scrolling text messages.
5.1.1 Send Scrolly Text
Click the Send Scrolly Text button in the tool bar or click the Actions menu and select Send
Scrolling Text Message...
Enter the number of times the message should scroll across the screen. This defaults to 4.
Then click Select Destination to choose the zones to send to, or to Send to All. You can
select multiple zones as shown below.
CommBox Pty Ltd
14
www.commbox.com.au
+61 2 9975 6001
Finally, enter the text for the message and press SEND to send the message.
A scrolling text message will appear at the bottom of the DVC Live Player or at the bottom of
the TV screen on a DVC Media Controller/STB.
5.1.2 Send Live Video
Click the Send Live Video button in the tool bar or click the Actions menu and select Send
Live Camera Feed...
You can also click the black triangle on the tool bar button to pre-select the input. This
feature will send a live video stream from any of your live inputs, such as cameras, TV,
DVDs or VHS.
CommBox Pty Ltd
www.commbox.com.au
+61 2 9975 6001
15
Select the Input from the drop down, if not already done. See the next section below for the
channel drop down, which only enables for TV type inputs.
Set the duration from the drop down and then click Select Destination to select the target
zones for the live stream. Click OK when ready.
5.1.3 Send Live TV
Click the Send Live TV button in the tool bar or click the Actions menu and select Send Live
TV...
You can also click the black triangle on the tool bar button to pre-select the channel. This
feature will send a live TV stream from one of your live TV inputs, such as Digital TV or
FOXTEL.
CommBox Pty Ltd
16
www.commbox.com.au
+61 2 9975 6001
If you pre-select a channel, the Input and Channel will be filled in. If not, set the input first
and then the channel. Set the duration from the drop-down and click Select Destination to
select the target zones for the live stream. Click OK when ready.
5.1.4 Send Command
Click the Send Command button in the tool bar or click the Actions menu and select Send
Set Top Box Command...
You can also click the black triangle on the tool bar button to pre-select the command. This
feature will send one of the following commands to the DVC Media Controller/STB:
Command
Description
REBOOT
Reboot the DVC Media Controller/STB
STOP
STREAM
Stop any currently playing stream
TV OFF
Turn the TV off if the DVC Media Controller/STB is setup to control the
TV
If not pre-selected, select the desired command. Click Select Destination to select the target
zones for the live stream. Click OK when ready.
Tip: You might use this feature to turn the TV off every night to save energy.
5.1.5 Send Local File
CommBox Pty Ltd
www.commbox.com.au
+61 2 9975 6001
17
5.1.5 Send Local File
Click the Send Local File button in the tool bar.
You can also click the black triangle on the tool bar button to pre-select a recently used file.
This feature will send a the file to the client and open if for the selected duration.
Click the button and choose a file from the file Open window if no file was pre-selected. You
can change the file using the Change button if you chose the wrong file.
Select the duration and click Select Destination to select the target zones for the live stream.
Click OK when ready.
Note: The file must be a supported type. See Appendix A: Supported Media Types (see
page 29).
5.1.6 Emergency
Click the Emergency button in the tool bar and click an option from the drop-down. This can
be one emergency message or SEND ALL, which will send all messages at the same time.
If using SEND ALL, you should make sure that the messages do not conflict with each other,
i.e. the messages should apply to different zones.
The messages execute immediately using the emergency template. This allows you to send
an emergency message at the click of a button without wasting valuable time.
5.2 Scheduled Messaging
Scheduled messaging allows you to set-up signage messages to occur in the future, and on
a recurring basis. You can see your scheduled messages or create new ones on the
timeline.
CommBox Pty Ltd
18
www.commbox.com.au
+61 2 9975 6001
5.2.1 Creating a Scheduled Message
Click the Scheduled Item(s) button in the tool bar or click the Actions menu and select New
Scheduled Item... You can also right click anywhere on the timeline and select New
Scheduled Item.
CommBox Pty Ltd
www.commbox.com.au
+61 2 9975 6001
19
5.2.2 Basic Configuration
Enter a name for your message, or see below for using a template.
Set the Start Time for the message and duration.
Click Select Destination to select the target zones for the live stream.
See the sections below for other configuration that you can do. Click OK when ready.
5.2.3 Using a Template
Use the Name drop-down to select a template. This will pre-populate the other fields. Simply
configure the Start Time and click OK.
CommBox Pty Ltd
20
www.commbox.com.au
+61 2 9975 6001
5.2.4 Repeating Messages
Set the Repeat drop-down to the desired cycle. The set the UNTIL date and time to tell it
when to stop repeating.
5.2.5 Sending Multiple Items
You can send multiple items as one message using the file list at the the right. These could
be streams, vidoes, documents etc. Each has a duration that you can change by double
clicking it, or right click and select Edit or click the Edit button on the tool bar below. Note the
default duration for any file is 5 hours, so you may want to reduce this.
You can add an item in various ways:
1. Use the file browser in the lower half of the window to find a file and either drag it in or
double click it.
2. Click the Add Local File button and browse to the file.
3. Click the black triangle on the Add Local File button to add other types of media, such
as files on the DVC Server, live streams, text, URLs or server commands.
Each will appear in the list. Select an item and use the Move Up and Move Down buttons to
re-arrange the list. To remove an item, select it and click the Remove button below or Right
click and select Delete.
When the message plays, it will run through each item in the list for the set duration of each.
If the list completes before the master duration of the message has elapsed, the list will loop
and start again. If the master duration finishes before the list completes, it will simply stop at
that point.
5.2.6 Split Mode
Split mode will only work on DVC Media Controllers/STBs.
You can partition the screen into sections and play content in each. Always bear in mind the
aspect ration of each section of the screen and choose contant accordingly.
The image below shows the supported splits.
CommBox Pty Ltd
www.commbox.com.au
+61 2 9975 6001
21
Note: When the screen is split, hardware video acceleration is not used. Using Full HD
video in this mode is not advised.
5.2.7 Save as Template
Once you have configured a message, you can click Save as Template before clicking OK to
save it as a template that can be used again. It can also be used as an Emergency
Template. See Templates and Emergencies... (see page 26)
Editing a Scheduled Message
Right click a future message on the timeline and select Edit Item, or double click it. Make
any changes and click OK to complete the changes.
5.2.8 Deleting a Scheduled Message
Right click the message and select Delete Item. If the message was sent to multiple zones, it
will disappear from all zones on the timeline.
5.3 Microsoft Powerpoint
Microsoft Powerpoint advances so quickly that it is impossible for the DVC Media Controller
/STB to keep up. Whilst Powerpoint files are supported, many features used in Powerpoint
are not, such as certain animations. In some cases with animations, while it may be
supported, it may not run smoothly due to the complexity of the animation and its demands
on the hardware. DVC Media Controllers/STBs are very good at playing video, and new
ones can play Full HD video smoothly using hardware acceleration.
CommBox Pty Ltd
22
www.commbox.com.au
+61 2 9975 6001
For this reason, CommBox recommend that you export your Powerpoint presentation as a
WMV video. This will ensure that you see exactly what you expected on the DVC Media
Controller/STB.
CommBox Pty Ltd
www.commbox.com.au
+61 2 9975 6001
23
6 Configure Zones...
A zone is a group of individual signage clients (DVC MediaController/STB or Windows PC).
All messages are either sent to a specific zone, or to all connected clients. Zones allow you
to target messages at specific groups of clients.
To configure your zones, click the File menu at the top of DVC Digital Signage and select
Configure Zones... from the drop down.
6.1 Known Locations
On the right hand side is a list of known locations. These are signage clients. The list
contains all clients that are currently connected to the signage system, and any previously
known clients. This allows you to add known clients to a zone when their PC maybe be
currently turned off.
If you click Delete inactive locations, it will reduce the list to only those clients that are
currently connected or have been in the last hour. This will not remove any clients from
already configured zones, regardless of their current status. If you do this, the clients that
are removed will not appear again in the known location until the reconnect to the signage
system.
CommBox Pty Ltd
24
www.commbox.com.au
+61 2 9975 6001
6.2 Creating, Renaming and Deleting Zones
The left box shows the list of zones that you can send messages to. Simply click Create
Zone and enter the zone name in the pop-up window, clicking OK, to create a new zone.
The new zone is initially empty.
You can select a zone and click Rename to change the name, whilst keeping all members of
the zone.
Select the zone and click Delete to permanently remove the zone. This cannot be undone.
6.3 Adding and Removing Zone Members
To add or remove members, first select the zone you want to edit from the zone box on the
left. This will show you all of the members currently in that zone in the centre members box.
To add members to a zone, select one or more clients from the known locations and click <<
ADD. If a member is already added, it will not be added again.
To remove members to a zone, select one or more clients from the members box and click
REMOVE >>.
CommBox Pty Ltd
www.commbox.com.au
+61 2 9975 6001
25
7 Templates and Emergencies...
For details on using templates and emergency templates, see Scheduling and Sending
Messages (see page 14).
7.1 Creating Templates
To create a template, you must use the Schedule Item window. See Save as Template (see
page ) for more details.
7.2 Managing Templates
To manage templates, click the File menu and select Templates and Emergencies...
Select the template you want to rename, click Rename and edit the name in the pop-up
window, clicking OK to commit the change.
Similarly, select the template you want to delete and click the Delete button to delete it. If the
template was used as an Emergency Template, it will also be removed from the Emergency
Template list.
7.3 Managing Emergencies
To add an Emergency Template, simply select an existing template on the left and click the
>> button to add it to the Emergency Templates.
CommBox Pty Ltd
26
www.commbox.com.au
+61 2 9975 6001
To remove an Emergency Template, select it from the list on the right and click the Remove
button. This will remove it from the Emergency Template list, but leave it in the All Templates
list on the left.
CommBox Pty Ltd
www.commbox.com.au
+61 2 9975 6001
27
8 Configure Database Connection...
WARNING: You should never need to change anything in this screen. Doing so will
most likely stop DVC Digital Signage from working.
To configure the database connection, click the File menu at the top of DVC Digital Signage
and select Configure Database Connection... from the drop down.
DVC Digital Signage needs to connect to your DVC Master server. This must be done in
order to login to DVC in the first place, and can in fact be done on the login box after a failed
login. This window allows you to connect at another DVC Master server and to change the
database login details (not to be confused with user logins). Changing the database login
details here will not change them on the server end; it will just cause it to fail to authenticate.
It is very unlikely that you will need to change anything in this window since you almost
certainly only have access to one DVC Master server.
CommBox Pty Ltd
28
www.commbox.com.au
+61 2 9975 6001
9 Appendix A: Supported Media
Types
DVC supports the following formats for inclusion in messages:
Video formats
MPEG 1, 2 & 4 including MPEG, MPG, M2V and M2P files
Microsoft ASF
Microsoft WMV
DivX
Audio formats
MPEG Audio (MP2 and MP3)
Microsoft WMA
WAV
Still image formats
GIF
JPEG
PNG
Text formats
Plain text
HTML
Office formats
Microsoft Word
Microsoft Excel
Microsoft PowerPoint (See note below)
Adobe Acrobat (PDF)
Notes:
1. If a PC is to receive an office document (word, excel or power point), the PC must
have Microsoft Office installed. Set top boxes have built-in support for Microsoft Office
documents via OpenOffice.
2.
CommBox Pty Ltd
www.commbox.com.au
+61 2 9975 6001
29
2. If a PC is to receive a PDF file, it must have Acrobat Reader installed. Set top boxes
have built-in support for PDF documents.
3. Microsoft Powerpoint advances so quickly that it is impossible for the DVC Media
Controller/STB to keep up. Whilst Powerpoint files are supported, many features used
in Powerpoint are not, such as certain animations. In some cases with animations,
while it may be supported, it may not run smoothly due to the complexity of the
animation and its demands on the hardware. DVC Media Controllers/STBs are very
good at playing video, and new ones can play Full HD video smoothly using hardware
acceleration. For this reason, CommBox recommend that you export your Powerpoint
presentation as a WMV video. This will ensure that you see exactly what you expected
on the DVC Media Controller/STB.
CommBox Pty Ltd
30
www.commbox.com.au
+61 2 9975 6001
Index
A
Adding An Emergency 26
Adding Members To A Zone 24
Ad Hoc Messages 14
Available Locations 24
C
Commands 14
Communication Mechanism 5
Compatibility Error 8
Connecting Signage Clients 5
Creating A Zone 24
D
Database Connection 28
Deleting A Scheduled Message 14
Deleting A Template 26
Deleting A Zone 24
Dvc Launcher 5
E
Emergency 14
F
Failed Login 8
I
Interface 10
Introduction 4
Ip Accress 28
CommBox Pty Ltd
www.commbox.com.au
+61 2 9975 6001
31
K
Known Locations 24
L
Launcher 5
Live Tv 14
Live Video 14
Local Files 14
Locations 24
Logging In 8
Login Error 8
M
Managing Emergencies 26
Managing Templates 26
Members 24
Menus 10
Messages 5
Microsoft Powerpoint 14, 29
O
Overview 10
P
Powerpoint 14, 29
Preseed Server 5
R
Removing An Emergency 26
Removing A Template 26
Removing A Zone 24
Renaming A Template 26
Renaming A Zone 24
Repeating Messages 14
CommBox Pty Ltd
32
www.commbox.com.au
+61 2 9975 6001
S
Save As Template 14
Scheduling Messages 5, 14
Scrolling Text 14
Sending Commands 14
Sending Messages 5
Sending Multiple Items 14
Server Ip 8
Split Mode 14
Supported File Types 29
T
Timeline 5, 14
Tool Bars 10
Tour 10
U
Using Templates 14
V
Version Error 8
Z
Zone Members 24
Zones 5, 24
CommBox Pty Ltd
www.commbox.com.au
+61 2 9975 6001
33