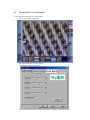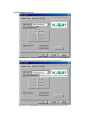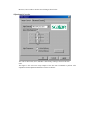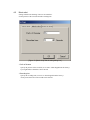
1
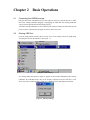
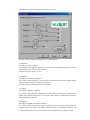
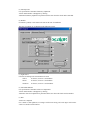
USB Microscope
“USB Shot”
User’s Manual
for Windows
Table of Contents
Chapter 1 Introduction ...................................................................1
1-1
1-2
1-3
About This Manual .................................................1
Operating Environment...........................................1
Software Installation ...............................................2
Chapter 2 Basic Operations...........................................................3
2-1
2-2
2-3
2-4
2-5
2-6
2-7
2-8
2-9
2-10
2-11
2-12
2-13
2-14
2-15
2-16
2-17
Connecting the USB Microscope............................3
Starting USB Shot...................................................3
USB Shot Window..................................................4
Shooting Still Images..............................................5
Shooting Movies .....................................................5
Interval Shooting.....................................................6
Displaying Still Images...........................................6
Displaying Movies ..................................................6
Displaying Sequential Still Images.........................7
Displaying File Name and Shooting Date/Time.....7
Save Location for Still Images and Movies............7
Selecting the Save Destination Folder ....................8
Scrolling Thumbnails..............................................8
Deleting an Image from a Thumbnail .....................8
Attaching a Memo...................................................9
Minimizing USB Shot.............................................9
Quitting USB Shot ..................................................9
Chapter 3 Image Settings ............................................................ 10
3-1
3-2
Setting dialog ........................................................10
Example of color adjustment ................................14
Chapter 4 Preferences .................................................................. 18
4-1
4-2
4-3
Snap shot...............................................................18
Movie shot.............................................................19
Interval shot...........................................................20
Chapter 1
1-1
Introduction
About This Manual
Thank you for purchasing our Scalar USB Microscope.
This manual explains the USB Shot application, which runs on a Windows-based PC when the
USB Microscope is connected.
For those wishing to start using your USB Microscope right away, read Section 1.3, “Software
Installation" and install the necessary software. After installing the software, read Chapter 2,
"Basic Operations," which describes (in a sequential flow of actions) the procedures for taking
still images and movies using USB Shot.
Once you are familiar with the procedures for shoot still images and movies, read Chapter 3,
"Image Settings," and Chapter 4, "Preferences" Chapter 3 explains how to adjust hue and image
quality, as well as other settings related to taking pictures. Chapter 4 explains how to set the file
save directory, the file format of still images, and other settings.
1-2
Operating Environment
USB Shot and the USB Microscope operate in the following hardware and software
environment.
Machine
PC with Pentium MMX or AMD K6 - 200MHz or better
Built-in memory
Minimum 32MB (80MB or more recommended)
Display capability
Monitor and PC capable of a minimum resolution of 800 x 600
(SVGA) at 24-bit or more color depth (True Color)
OS
Windows 98 / Windows 98 Second Edition
Windows 2000 Professional / Windows Me
The OS must be preinstalled in the PC at the factory before shipment.
(Compatibility of this product is not guaranteed within upgraded
environments.)
(Note)
If you are running early Windows 98(First Edition), fault may occur at the time of driver
installation.
Please update your System to top shape by Custommer Service Pack (Microsoft).
Please refer :
http://www.microsoft.com/windows98/downloads/default.asp
- When multiple USB devices are connected to one PC, product compatibility is not
guaranteed, depending on the types of USB devices being used simultaneously.
- Product compatibility is not guaranteed when using this product through a hub.
- Product compatibility is not guaranteed for all PCs operating in the specified operating
environment.
- The operating environment and specifications of this product are subject to change without
prior notice.
- The product names used in this manual are the brand names or registered trademarks of their
respective companies.
1-3
Software Installation
Depending on how the OS is installed in your PC, the Installer may ask you to insert the CRROM containing the OS. Keep this CD-ROM on hand.
The driver must be installed first.
Plug the cable of the USB Microscope into the USB port on the PC main unit. The "Add New
Hardware Wizard" appears in the window. Follow the instructions provided.
When the "What do you want Windows to do?" window appears, select "Display a list of…"
When the "Select the manufacturer and model…" window appears, insert the CD-ROM supplied
with the USB Microscope into the CD-ROM drive, then click the [Have disk] button.
Next, designate the CD-ROM as the copy source of the distributed files and select [Driver] from
the CD-ROM. ([pcam2.inf] appears in the list on the left.)
Once driver installation is completed, install the application.
Insert the CD-ROM supplied with the USB Microscope into the CD-ROM drive, then doubleclick the [Setup] icon(Computer icon).
After a while, the Installer will start up. Then specify the directory where you want the
application installed, name of the program folder, and other information according to instructions
appearing on the window.
When installation is completed normally, Restart your computer.
Chapter 2
2-1
Basic Operations
Connecting the USB Microscope
Plug the cable of the USB Microscope into the USB port on the PC main unit. Be sure to make
this before starting USB Shot. Plugging or unplugging the USB cable after starting USB Shot
will prevent the application from functioning properly.
Also before starting USB Shot, set the resolution of the monitor to 800 pixels (horizontal) by 600
pixels (vertical) or greater and color depth to 24-bit or more True Color.
2-2
Starting USB Shot
Click the [Start] button located at the lower-left corner of the window and select [USB Shot]
from [Program] to start up USB Shot. (See Figure 1.)
[ Figure 1. Start menu ]
If a warning dialog box (shown in Figure 2) appears on the window immediately after starting
USB Shot, the USB Microscope may not be properly connected to the PC main unit, or the
driver may not be installed properly. In this case, USB Shot will be immediately deactivated.
[ Figure 2. Warning dialog ]
2-3
USB Shot Window
When USB Shot is started, a window (shown in Figure 3) will be displayed.
[ Figure 3. USB Shot window ]
- [Preferences] button (3-A)
Displays the Preferences dialog box.
- [Image setting] button (3-B)
Displays the image setting dialog box.
- [Thumbnail/Memo] selector button (3-C)
Switches the display area at the bottom of the
window between thumbnails and memos.
- [Folder] selector button (3-D)
Displays the folder selection dialog box.
- [Snap shot mode] button (3-E)
Switches the capture mode to still images.
- [Movie shot mode] button (3-F)
Switches the capture mode to movies.
- [Interval shot mode] button (3-G)
Switches the capture mode to sequential still images.
- [Mode] icon (3-H)
Indicates the current capture mode.
- [Shoot] button (3-I)
Initiates shooting in the current capture mode.
- [File name display] selector button (3-J)
Displays the file names and shooting dates/times of
images.
- [Scroll] button (3-K)
Scrolls thumbnails and memos.
- Thumbnail/Memo display area (3-L)
Area in which images in the thumbnails and memos
attached to those images are displayed and/or edited.
- Microscope image display area (3-M)
This area displays in real time an image acquired
through the USB Microscope or photograph selected
in a thumbnail.
- [Minimize] button (3-N)
Minimizes USB Shot to the task bar.
- [Close] button (3-O)
Closes USB Shot.
2-4
Shooting Still Images
An image displayed in the Capture window is saved as a still image file.
Click the [Snapshot] button on the right side of the window to switch the capture mode to
Snapshot. This will change the mode icon shown on the center-right part of the window to
[Snapshot]. (See Figure 4.)
[ Figure 4. Snapshot icon ]
Pressing the [Capture] button on the USB Microscope or clicking the [Shoot] button at the right
side of the window saves the current image and adds it to a thumbnail at the bottom of the
window.
Still images are saved at a size of 640 pixels (horizontal) by 480 pixels ( vertical) at a color depth
of 24-bit True Color.
Moreover, the file save format is JPEG (set when shipped from the factory). This format can be
changed to BMP format in the Preferences. (See 4-1 for details.)
2-5
Shooting Movies
Images displayed in the Capture window are saved as a movie file. Click the [Movie Shot]
button on the right side of the window to switch the capture mode to Movie Shot. This will
change the mode icon at the center-right part of the window to [Movie Shot]. (See Figure 5.)
[ Figure 5. Movie Shot icon ]
Pressing the [Capture] button on the USB Microscope or clicking the [Shoot] button on the right
side of the window initiates image recording, and displays the image recording progress dialog
box. (See Figure 6.)
[ Figure 6. Image recording progress dialog box ]
Image recording ends when you click the [Stop] button in the image recording progress dialog
box, or when the preset maximum recording time elapses. The first image is added to a
thumbnail at the bottom of the window.
The maximum recording time can be specified in the Preferences. (See 4-2 for details.)
Movies are saved in a size of 320 pixels (horizontal) by 240 pixels (vertical) at 24-bit True Color
depth.
The file save format is AVI.
2-6
Interval Shooting
Images displayed in the Capture window are shot sequentially and saved as a movie file. Click
the [Interval Shot] button on the right side of the window to switch the capture mode to Interval
Shot. This will change the mode icon shown on the center-right part of the window to [Interval
Shot]. (See Figure 7.)
[ Figure 7. Interval Shot icon ]
Pressing the [Capture] button of the USB Microscope or clicking the [Shoot] button on the right
side of the window starts shooting still images at the specified interval, and displays the image
recording progress dialog box. (See Figure 8.)
[ Figure 8. Image recording progress dialog box ]
Image recording ends when you click the [Stop] button in the image recording progress dialog
box, or when the preset recording time elapses. The first image is added to a thumbnail at the
bottom of the window.
The shooting interval and maximum shooting time can be specified in the Preferences. (See 4.3
for details.)
The sequential still images are saved as a movie file in AVI format.
The movies are saved in a size of 320 pixels (horizontal) by 240 pixels (vertical) at 24-bit True
Color depth.
2-7
Displaying Still Images
Clicking an image shown in a thumbnail at the bottom of the window displays a still image of
the image clicked.
Photographed still images are saved in JPEG or BMP file format (which can be switched in the
Preferences)
Images can also be displayed using another application with a function to display JPEG or BMP
files.
2-8
Displaying Movies
Clicking an image shown in a thumbnail at the bottom of the window displays the movie of the
image clicked.
Use the three buttons that appear under the movie to reproduce, stop the movie.
The buttons (from left to right) activate Reproduce, Pause, Stop operations.
The movies are saved in AVI file format.
This reproduction can also be done using another application with a function to reproduce AVI
files, such as Microsoft Media Player.
2-9
Displaying Sequential Still Images
Clicking an image shown in a thumbnail at the bottom of the window displays sequential still
images of the image clicked.
Use the three buttons that appear under the movie to reproduce, stop the movie.
The buttons (from left to right) activate Reproduce, Pause, Stop operations.
The photographed still images are saved in AVI file format.
This reproduction can also be achieved using another application with a function to reproduce
AVI files, such as Microsoft Media Player.
2-10 Displaying File Name and Shooting Date/Time
Clicking the [File name display] button at the lower-right part of the window displays the file
name, shooting date, and time in the lower-right part of the Microscope image display area.
Clicking the [File name display] button again closes file name and shooting day/time display.
2-11
Save Location for Still Images and Movies
Photographed still images and movies are saved to the hard disk.
You can specify the save location to the hard disk can be specified in the folder selection dialog
box. (See 2-12 for details.)
The product is shipped from the factory with the default save location set to the same directory
as the USB Shot application.
Saved files are named in a format consisting of a 4-digit sequence number preceded by prefixes.
The application is shipped from the factory with the settings shown below.
The prefixes (e.g., "Pic," "Mov") can be changed in the Preferences. (See Chapter 4 for details.)
- Still images
- Movies
- Sequential still images
"Pic" + Sequence Number
"Mov" + Sequence Number
"Int" + Sequence Number
(e.g., Pic0001)
(e.g., Mov0001)
(e.g., Int0001)
[ Caution ]
A saved image file can be moved to any desired location (directory). An image file with a memo
attached will lose the memo data, however, when its location is changed. Be aware of this when
relocating an image file.
2-12 Selecting the Save Destination Folder
The folder for the save destination of photographed still images or movies is specified.
Clicking the [Folder selection] button at the lower-left part of the window displays the dialog
box for selecting a folder. (See Figure 9.)
Select a folder and click the [OK] button. The folder for the save destination is then changed.
[ Figure 9. Folder selection dialog box ]
2-13 Scrolling Thumbnails
The thumbnails at the bottom of the window display eight images at the same time.
Clicking the [Scroll] button located at the lower- right part of the window scrolls through the
thumbnails from right to left, thus showing the images hidden beyond the window.
2-14 Deleting an Image from a Thumbnail
Click an image displayed in a thumbnail at the bottom of the window, then click the [Delete]
key. The deletion confirmation dialog box (shown in Figure 10) then appears.
Clicking the [Yes] button there deletes the selected image.
[ Figure 10. Deletion confirmation dialog box ]
2-15 Attaching a Memo
A memo (text) can be entered to accompany a photographed still image or movie.
Pressing the [Thumbnail/Memo] selector button at the lower- left part of the window converts
the thumbnail part into a memo display/edit area. If the image already has a memo attached, its
text will be displayed.
In the memo display/edit area, you can enter or edit text from the keyboard.
For text extending over several lines beyond the edit area, the entire memo can be scrolled up
and down by using the [Scroll] button located on the right.
Once you have entered or edited a memo, click the [Thumbnail/Memo] selector button. The
memo display/edit area will revert to thumbnails, and the memo entered will be defined.
2-16 Minimizing USB Shot
Clicking the [_] button at the upper-right part of the window moves USB Shot to the task bar .
Clicking the [USB Shot] button on the task bar displays the window again.
2-17 Quitting USB Shot
Clicking the [X] button at the upper-right part of the window quits USB Shot.
Chapter 3
3-1
Image Settings
Setting dialog
Clicking the [Image setting] button on the left side of the window displays the setup dialog .
The method of the color adjustment to the camera of a USB Microscope is explained.
Please click the button of the above screen.
The brightness of a camera is adjusted on the following screen.
The above dialog is displayed. Each parameter is explained below.
(1) Saturation
The purity of a color is adjusted.
If it is made to slide rightward, the purity of a color will become high, and the purity of a color
will become low if it is made to slide leftward.
It will become gray if purity is too low.
(2) Brightness
The brightness of a picture is adjusted.
If it is made to slide rightward, a screen and the whole picture will become whitish, and the
whole will become dark if it is made to slide leftward.
It becomes effective when AutoExposure is turned on.
(3) Contrast
The contrast of a picture is adjusted.
If it is made to slide rightward, a highlight portion and a shadow portion will be emphasized and
middle color gradation will decrease. If it is made to slide leftward, a middle tone will increase
and it will become a flat screen.
(4) Sharpness
The degree of emphasis of a picture is adjusted.
If it is made to slide rightward, the degree of emphasis will become strong, and the degree of
emphasis will become weak if it is made to slide leftward. If it strengthens too much, it will
become the touch which spread, and it will become the blurred touch if it weakens too much.
(5) Auto Exposure
It is specification of automatic luminosity adjustment.
A check mark attaches or disappears by clicking.
Automatic luminosity adjustment is performed in the state where the check mark is attached.
(6) Default
If a button is pushed, it will return to the state at the time of installation.
The tone of a camera etc. is adjusted on the following screens.
(1) Light Source
It chooses according to the environment to be used.
- Office:
It chooses, in case it is used indoors.
- Home:
It chooses, in case it is used indoors.
- Outdoors:
It chooses, in case it is used outdoors.
(2) Auto White Balance
It is specification of automatic white level adjustment.
A check mark attaches or disappears by clicking.
Automatic white level adjustment is performed in the state where the check mark is attached.
(3) Red
A red level is adjusted.
If it is made to slide rightward, a red degree will become strong, and a red degree will become
weak if it is made to slide leftward.
(4) Green
A green level is adjusted.
If it is made to slide rightward, a green degree will become strong, and a green degree will
become weak if it is made to slide leftward.
(5) Blue
A blue level is adjusted.
If it is made to slide rightward, a blue degree will become strong, and a blue degree will become
weak if it is made to slide leftward.
(6) Light Frequence
Optical synchronous frequency is set up.
In order to avoid optical synchronous frequency, such as a fluorescent light, it recommends
checking to 220VAC(50Hz).
If optical synchronous frequency suits, flickering may occur on a picture.
(7) Default
If a button is pushed, it will return to the state at the time of installation.
3-2
The example of color adjustment
< Color adjustment in the case of seeing the skin >
First, a setting dialog is displayed.
The button of the above screen is clicked.
The following dialogs are displayed.
The inside of the above circle is clicked and a dialog is indicated "Advanced Control".
A white balance is set up.
If a dialog is set to "Advanced Control", a check will be put into "AutoWhiteBalance".
Where a check is put in in the above circle, a camera is stuck to the skin.
The check of "AutoWhiteBalance" is removed where a camera is stuck to the skin.
A dialog is changed into "Image Control"
A setup of brightness and contrast
As mentioned above, brightness is set as 45 and contrast is set as 48.
Please perform a setup of brightness, where "AutoExposure" is on.
Finally
a
setup
is
above.
Moreover, how to make it into the color of liking is shown below.
Adjustment of a color
The value of above Red, Green, and Blue is tuned finely, sticking a camera to the skin.
Note:
This figure is the color tone ready example of the skin. We recommend to perform color
adjustment for this adjustment method to reference to the hair.
Chapter 4
Preferences
Clicking the [Preferences] button on the left side of the window displays the setup dialog box.
Select items from the three tabs in the dialog box to enter or change settings affecting shooting
parameters.
4-1
Snap shot
Settings related to the shooting of still images are made here.
Set the prefixes of the saved file and its file format.
[ Figure 12. [Snap shot] Tabs in setting dialog box ]
- Prefix of filename
Specify the prefixes of the saved file (set to "pic" when shipped from the factory).
Up to eight half-size characters can be entered.
- Saving file type
Specify the format of the saved file (set to JPEG when shipped from the factory).
Select either JPEG or BITMAP.
4-2
Movie shot
Settings related to the shooting of movies are made here.
Set the prefixes of the saved file and the recording time.
[ Figure 13. [Movie shot] Tabs in setting dialog box]
- Prefix of filename
Specify the prefixes of the saved file (set to "Mov" when shipped from the factory).
Up to eight half-size characters can be entered.
- Recording time
Specify the recording time (set to 10 sec when shipped from the factory).
A time period from one to 999 seconds can be entered.
4-3
Interval shot
Settings related to interval shooting are made here.
Set the prefixes of the saved file, shooting intervals, and other necessary information.
[ Figure 14. [Interval shot] Tabs in setting dialog box]
- Prefix of filename
Specify the prefixes of the saved file (set to "Int" when shipped from the factory).
Up to eight half-size characters can be entered.
- Recording count
Specify the number of shots (set to 10 shots when shipped from the factory).
A number of one to 999 shots can be entered.
- Recording Interval
Specify the shooting interval (set to one minute when shipped from the factory).
Enter the interval in units of hours, minutes, and seconds (from left to right).
- Recording time
Displays the total recording time (no entry is permitted).
This time is calculated by multiplying the number of shots by the shooting interval.
USB Microscope “USB Shot” User's Manual for Windows
Copyright by SCALAR Corporation. All rights reserved. 2001