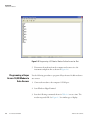
1
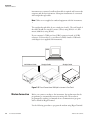
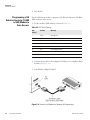
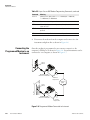
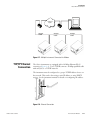
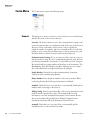
iPort
Instruction Manual
Communications Software for
iSeries and C Series Instruments
Part number 102606-00
22Apr2014
© 2007 Thermo Fisher Scientific Inc. All rights reserved.
Specifications, terms and pricing are subject to change. Not all products are available in all countries. Please consult
your local sales representative for details.
Thermo Fisher Scientific
Air Quality Instruments
27 Forge Parkway
Franklin, MA 02038
1-508-520-0430
www.thermo.com/aqi
Contents
Thermo Fisher Scientific
Chapter 1
Introduction...................................................................................... 1-1
Chapter 2
Installation ....................................................................................... 2-1
Software Installation................................................................ 2-1
System Requirements ........................................................... 2-1
Installation ........................................................................... 2-1
Hardware Installation.............................................................. 2-2
Serial Direct Connection...................................................... 2-2
Modem Connection............................................................. 2-4
Programming a US Robotics Sportster (14,400 to 56K) Modem
to Auto-Answer.................................................................... 2-6
Programming a Hayes Accura 14,400 Modem
to Auto-Answer.................................................................... 2-8
Programming a Hayes Accura 56K Modem to Auto-Answer 2-9
Connecting the Programmed Modem to an Instrument..... 2-10
TCP/IP Ethernet Connection ............................................... 2-11
Multiple Instruments Connected Via Hub/Router................ 2-12
Chapter 3
Configuration ................................................................................... 3-1
Configuring iPort for a Direct Serial Connection.................... 3-1
Configuring iPort for a Modem Connection........................... 3-3
Configuring for a TCP/IP Connection ................................... 3-4
Chapter 4
Operation .......................................................................................... 4-1
Simulated Local Control ......................................................... 4-1
Diagnostics Mode ................................................................... 4-2
Coefficients .......................................................................... 4-3
Backgrounds ........................................................................ 4-3
Ranges ................................................................................. 4-3
Averaging Time.................................................................... 4-4
Gas Mode ............................................................................ 4-4
Mode ................................................................................... 4-4
Graphing Mode ...................................................................... 4-4
Graph Controls.................................................................... 4-7
Graphing Multiple Parameters ............................................. 4-7
iPort Instruction Manual
iii
Contents
Backup/Restore ....................................................................... 4-8
Backup................................................................................. 4-8
Restore ................................................................................. 4-8
iv
iPort Instruction Manual
Chapter 5
Menu System.................................................................................... 5-1
File Menu ............................................................................... 5-1
Console................................................................................ 5-1
Console Log......................................................................... 5-1
Preferences ........................................................................... 5-2
Print Preview ....................................................................... 5-5
Print..................................................................................... 5-5
Print Graph.......................................................................... 5-5
Print Setup........................................................................... 5-5
Exit ...................................................................................... 5-5
Comm Menu .......................................................................... 5-6
Connect ............................................................................... 5-6
Dial...................................................................................... 5-7
Redial................................................................................... 5-7
Hangup................................................................................ 5-7
Utilities ................................................................................ 5-7
Instrument Menu.................................................................... 5-8
Poll Serial............................................................................. 5-8
TCP/IP Connect.................................................................. 5-9
Refresh............................................................................... 5-10
Load Records ..................................................................... 5-11
Backup/Restore .................................................................. 5-11
Log File.............................................................................. 5-11
Size .................................................................................... 5-11
Window Menu ..................................................................... 5-12
Cascade .............................................................................. 5-12
Tile .................................................................................... 5-12
Arrange Icons ..................................................................... 5-12
Iconify Instruments............................................................ 5-12
Close Instruments .............................................................. 5-12
Firmware Update .................................................................. 5-12
TCP/IP Update ................................................................. 5-13
Serial Update ..................................................................... 5-14
Help Menu ........................................................................... 5-15
Button Bar ......................................................................... 5-15
Chapter 6
Dynamic Data Exchange ................................................................ 6-1
Instruments Are DDE Topics ................................................. 6-1
Data Are Items........................................................................ 6-2
ERECS Are Diagnostic Information ....................................... 6-3
Thermo Fisher Scientific
Contents
Chapter 7
Thermo Fisher Scientific
Troubleshooting ..............................................................................7-1
Establishing a Direct Connection............................................7-1
Establishing a Modem Connection .........................................7-1
Establishing a TCP/IP Connection .........................................7-2
Service Locations.....................................................................7-3
iPort Instruction Manual
v
Contents
vi
iPort Instruction Manual
Thermo Fisher Scientific
Chapter 1
Introduction
iPort is a program designed to communicate exclusively with the iSeries and
C Series product line. The instruments in these product lines feature
electronic sensors, internal data storage, and an extensive command set. The
iSeries has TCP/IP ethernet connectivity as well as RS-232. These features
enable full control of instruments by a remote device, such as a computer.
iPort takes advantage of the instruments' rich command set and of
Microsoft Windows to provide a robust remote interface. Major features
include:
•
Easy Remote Control
•
Extensive Diagnostic Information
•
Graphing and Downloading Capability
•
Dynamic Data Exchange (DDE) Capability
•
Control Multiple Instruments
•
Print Capability
•
Firmware Upgrade
Easy Remote Control. With iPort, you can control instruments remotely as
easily as you can in person. The pushbuttons and display used to control the
instrument are simulated in the program. Simply press the program
pushbuttons to control the instrument as you would normally. Many
frequently used parameters such as ranges, can be set by using designated
buttons. These buttons provide direct control of parameters without having
to navigate the menu-driven instrument software.
Extensive Diagnostic Information. iPort provides easy access to the
extensive diagnostic information available in each instrument. Diagnostic
information and concentration readings are stored in the instruments as
records. These records can be graphically displayed, printed, or downloaded
as an ASCII text file, for importing to other programs.
Thermo Fisher Scientific
iPort Instruction Manual
1-1
Introduction
Graphing and Downloading Capability. iPort can graph any item stored
in an instrument record including concentration readings, temperatures,
flows, and voltages. This enables you, for example, to observe how a
changing flow rate affects the concentration reading.
Dynamic Data Exchange (DDE) Capability. With DDE you can link
iPort to other applications that support DDE, such as Microsoft Excel.
Control Multiple Instruments. iPort can control one or more instruments
at the same time. Using a daisy-chain configuration, a suite of instruments
can be connected to one computer (via modem or direct cable connection).
Multiple instruments can also be connected via Ethernet TCP/IP
connection for iSeries. Each instrument is displayed within iPort in its own
window. An instrument ID, or address, is used to identify each instrument
on the serial line, and TCP/IP address for Ethernet.
Print Capability. With print capability, you can print the contents of
internal data downloaded from any instrument. The records are printed in a
graphical or tabular format.
Firmware Upgrade. iSeries firmware can be upgraded using iPort.
1-2
iPort Instruction Manual
Thermo Fisher Scientific
Chapter 2
Software Installation
System Requirements
Installation
This chapter discusses the installation of iPort. After installing the program,
follow the instructions in this chapter to connect the instrument(s) to the
computer.
Table 2-1 describes the iPort hardware and software requirements.
Table 2-1. System Requirements
Installation
Component
Description
Computer
A 486 or higher computer. The iPort program is qualified to run on
Windows 98, Windows 2000 and Windows XP.
Disk Drives
A CD-ROM and a hard drive with at least 3 megabytes free space
available
RAM
A minimum of 64 megabytes
Video
SVGA or better resolution
Mouse
A mouse is not required to run the program, however, any pointing
device supported by Windows will make iPort much easier to use.
Modem
Internal or external Hayes-compatible modem. A direct connection
between computer and instrument does not require a modem;
however, a serial connection does require a null-modem cable.
Ethernet
RJ-45, 10 Mbps (optional)
The Install program automatically installs iPort onto your computer and
creates the Thermo program group. Use the following procedure to install
the program.
1. Insert the iPort Installation Disk into the CD-ROM drive.
2. If the CD does not autostart, run setup.exe from the CD.
The Welcome dialog box appears.
3. Choose Install.
Thermo Fisher Scientific
iPort Instruction Manual
2-1
Installation
Hardware Installation
The Target Directory dialog box appears.
4. Enter the drive and directory where the iPort program will be installed.
5. Choose OK or press the Enter key.
After the iPort files have been installed on the target drive and directory,
the Program Group screen appears.
6. Select a program group where the iPort program will be installed.
7. Choose OK.
The Installation Completed dialog box appears.
8. Choose OK.
The iPort installation is now complete. The desktop displays the iPort
icons, and the iPort program will also be installed in the
Start Menu > Programs. Double click on the iPort icon to begin the
program.
Hardware Installation
iPort can control remote instruments serially with a null-modem cable
(direct connection) or through a modem (over telephone lines). iPort can
also connect to iSeries instruments over Ethernet using the RJ-45 connector.
This chapter describes all types of connections.
Serial Direct Connection
With a direct connection to a single instrument, a null-modem cable is
connected between the instrument's COM port and the computer's COM
port, as shown in Figure 2-1 and Figure 2-2. In the null modem cable, pins
2 and 3 are switched, so that pin 2 in the connector at one end of the cable
is connected to pin 3 in the connector at the other end of the cable.
2-2
iPort Instruction Manual
Thermo Fisher Scientific
Installation
Hardware Installation
PC
COM Port
Instrument
COM Port
Null Modem Cable
Figure 2-1. Direct Connection to iSeries
Instrument
COM Port
PC
COM Port
Null Modem Cable
Figure 2-2. Direct Connection to C Series
The instrument's COM port has two connectors, as shown in Figure 2-1
and Figure 2-2. Both connectors are identical; therefore, either one can be
connected to the computer. The remaining connector can be used to daisy
chain multiple instruments, as shown in Figure 2-3. When several
Thermo Fisher Scientific
iPort Instruction Manual
2-3
Installation
Hardware Installation
instruments are connected, a null-modem cable is required only between the
computer and the first instrument. Subsequent instruments are connected
with straight-through cables.
Note Cables are not supplied as standard equipment with the instruments.
The straight-through cables do not switch pins 2 and 3. The total length of
the cables should not exceed 15 meters (50 feet) using RS-232 or 1,800
meters (6000 feet) using RS-485.
If your computer's COM port has a DB25 connector instead of a DB9
connector (as shown above), you will need a DB25 female to DB9 male
serial adapter (not supplied with instrument).
Null Modem Cable
Straight Cable
Straight Cable
Figure 2-3. Direct Connection of Multiple Instruments Over Serial
Modem Connection
Before you connect a modem to the instrument, the modem must first be
programmed to automatically answer incoming calls. The modem is
programmed by sending it commands from a communications program
such as Windows HyperTerminal.
Use the following procedure to program the modem using HyperTerminal.
2-4
iPort Instruction Manual
Thermo Fisher Scientific
Installation
Hardware Installation
1. Open HyperTerminal.
2. Enter name in the Connector Description menu.
3. Cancel out of “Connect To.”
4. From the File menu, choose Properties.
5. From the Phone Number tab or the Connect To tab:
a. Either uncheck Area Code or check Area Code and place digits in
the Area Code box (do not place digits in the Phone Number box).
b. Choose selection from the “Connect Using” drop down list.
c. Press the Configure button and set Maximum Speed (1200 to
115200) to the maximum speed of the modem. The instrument
should be set to the same baud rate.
Data bits = 8
Parity = None
Stop bits = 1
Flow control = None
6. From Properties choose the Settings tab, check the Terminal Keys
radio button, and set Emulation to VT100.
7. Press the ASCII Setup button:
a. Check Send Line Ends With Line Feeds.
b. Check Echo Typed Character Locally.
c. Set Line Delay to 0.
d. Set Character Delay to 0.
e. Check Wrap Lines That Exceed Terminal Width.
Thermo Fisher Scientific
iPort Instruction Manual
2-5
Installation
Hardware Installation
8. Save the file.
Programming a US
Robotics Sportster (14,400
to 56K) Modem to
Auto-Answer
Use the following procedure to program a US Robotics Sportster (14,400 to
56K) modem to auto answer.
1. Set the modem's DIP switches as shown in Table 2-2.
Table 2-2. DIP Switch Settings
DIP
Switch
Position
Meaning
1
Down
Override DTR
2
Up
Verbal result codes
3
Down
Display result codes
4
Up
Echo offline commands
5
Up
Auto answer on first ring or higher, if specified
6
Up
Carrier detect normal
7
Up
Load NVRAM defaults
8
Down
Smart mode
2. Connect the modem to the computer's COM port (no telephone line is
needed). See Figure 2-4.
3. Start Windows HyperTerminal.
Figure 2-4. Connecting a Modem to a Computer for Programming
2-6
iPort Instruction Manual
Thermo Fisher Scientific
Installation
Hardware Installation
4. Issue the following commands (Table 2-3) one at a time. The modem
responds OK (Figure 2-5).
Note These commands must be sent to the modem at the same baud rate
that the instrument is programmed for. After typing the ATE0 command to set local echo OFF, the screen will not
display the other keyboard entries, although these subsequent entries will be
in effect. Table 2-3. US Robotics Modem Programming Commands
Thermo Fisher Scientific
Command
Meaning
AT&F
Sets modem parameters to factory default
ATQ0
Displays result codes
AT&C0
Assumes presence of carrier detect signal
AT&D0
Ignores status of DTR signal
AT&K3
Enables RTS/CTS local flow control
AT&R1
Ignores RTS; assumes presence of CTS
ATS0=1
Sets the number of rings on which to answer to 1
ATE0
Sets local Echo OFF
ATQ1
Suppress results code
AT&A0
Suppress ARQ results codes
AT&B1
Fixed serial port rate
AT&W0
Writes storable parameters of current configuration in memory as
profile 0
AT&W1
Writes storable parameters of current configuration in memory as
profile 1
iPort Instruction Manual
2-7
Installation
Hardware Installation
Figure 2-5. Programming a US Robotics Modem To Auto Answer for iPort
5. Disconnect the modem from the computer and connect it to the
instrument and phone line as shown in Figure 2-6.
Programming a Hayes
Accura 14,400 Modem to
Auto-Answer
Use the following procedure to program a Hayes Accura 14,400 modem to
auto answer.
1. Connect the modem to the computer's COM port.
2. Start Windows HyperTerminal.
3. Issue the following commands shown in Table 2-4 one at a time. The
modem responds OK. See Figure 2-5 for similar type of display.
2-8
iPort Instruction Manual
Thermo Fisher Scientific
Installation
Hardware Installation
Table 2-4. Hayes Accura 14,400 Modem Programming Commands
Command
Meaning
AT
Tells the modem that modem commands follow
AT&F
Sets the modem parameters to factory default
AT&C0
Assumes presence of carrier detect signal
AT&D0
Ignores status of DTR signal
AT&Q0
Communicates in asynchronous mode
AT&R1
Ignores RTS, assumes presence of CTS
ATS0=1
Sets the number of rings on which to answer to 1
AT&W0
Writes storable parameters of current configuration in memory as
profile 0
AT&W1
Writes storable parameters of current configuration in memory as
profile 1
4. Disconnect the modem from the computer and connect it to the
instrument and phone line as shown in Figure 2-6.
Programming a Hayes
Accura 56K Modem to
Auto-Answer
Use the following procedure to program a Hayes Accura 56K modem to
auto answer.
1. Connect the modem to the computer's COM port.
2. Start Windows HyperTerminal.
3. Issue the following commands (Table 2-5) one at a time. The modem
responds OK. See Figure 2-5 for similar type of display.
Table 2-5. Hayes Accura 56K Modem Programming Commands
Thermo Fisher Scientific
Command
Meaning
AT
Tells the modem that modem commands follow
AT&F
Sets the modem parameters to factory default
AT&C
Assumes presence of carrier detect signal
AT&D
Ignores status of DTR signal
AT&K
Disable local flow control
iPort Instruction Manual
2-9
Installation
Hardware Installation
Table 2-5. Hayes Accura 56K Modem Programming Commands, continued
Command
Meaning
ATS37=x
Maximum DCE speed, where x = 5 -> 1200 baud, 6 -> 2400 baud,
7 -> 4800 baud, 9 -> 9600 baud
ATS0=1
Sets the number of rings on which to answer to 1
ATN0
When originating or answering modem, will only handshake at the
value set in S37
AT&W
Writes storable parameters of current configuration in memory as
profile 0
AT&Y
Selects stored profile 0 as the current configuration
4. Disconnect the modem from the computer and connect it to the
instrument and phone line as shown in Figure 2-6.
Connecting the
Programmed Modem to an
Instrument
Once the modem is programmed to auto-answer, connect it to the
computer's COM port as shown in Figure 2-6. Several instruments can be
connected to one computer, as shown in Figure 2-7.
C Series
COM Port
AT Modem Cable
DB9 Female to DB25 Male
Standard
Telephone Wire
Telephone
System
i Series
COM Port
AT Modem Cable
DB9 Female to DB25 Male
Standard
Telephone Wire
Figure 2-6. Programmed Modem Connected to Instrument
2-10
iPort Instruction Manual
Thermo Fisher Scientific
Installation
TCP/IP Ethernet Connection
Telephone
System
Straight
Cable
Straight
Cable
Straight
Cable
Figure 2-7. Multiple Instruments Connected via Modem
TCP/IP Ethernet
Connection
The iSeries instruments are equipped with a 10 Mbps Ethernet RJ-45
connection (Figure 2-8). To use TCP/IP, connect a 10 Mbps qualified cable
with an RJ-45 to a TCP/IP network.
The instrument must be configured to a proper TCP/IP address for use on
the network. This can be done using a static IP address or using DHCP
services. See the instrument manual for details on configuring the address.
Figure 2-8. Ethernet Connection
Thermo Fisher Scientific
iPort Instruction Manual
2-11
Installation
Multiple Instruments Connected Via Hub/Router
Multiple Instruments
Connected Via
Hub/Router
If more than one instrument must be connected over Ethernet, a hub,
switch or router must be used. This may be connected to a single PC or to a
larger network so users from different locations may connect to the
instruments.
Hub / Switch / Router
Figure 2-9. Multiple Instruments Connected Via Hub/Switch/Router
2-12
iPort Instruction Manual
Thermo Fisher Scientific
Chapter 3
Configuration
This chapter explains how to configure iPort for direct Serial connections,
modem connections, and TCP/IP.
Configuring iPort for a
Direct Serial
Connection
Use the following procedure to configure iPort for a direct connection.
1. Start iPort by double clicking on the iPort icon.
Note Be sure ESC 8832 Enable and Direct TCP/IP Enable are unchecked in
the Preferences menu. See the “Menu System” chapter. 2. Select Comm > Connect.
The Communications Settings dialog box appears.
3. Click on New to add a new location to the location directory.
Thermo Fisher Scientific
iPort Instruction Manual
3-1
Configuration
Configuring iPort for a Direct Serial Connection
The location directory contains the information necessary to
communicate with a remote instrument such as the COM port, baud
rate, and instrument ID. Additional locations can be added and edited.
4. Click on Edit to modify the settings.
5. Enter the following information:
•
The name of the location
•
The computer's COM port being used to communicate with the
remote instrument
•
The baud rate of the remote instrument
•
Clear the Enable Modem check box
•
Under Polling Config, enter the instrument ID of each instrument
(separated by spaces)
The instrument ID for each instrument is set in the instrument's
Instrument Controls menu. Be sure that the instrument ID you specify
under Polling Config matches the instrument ID on the instrument. To
check the current instrument ID setting, press
(Menu) to display
the Main Menu, then choose Instrument Controls > Communication
Settings > Instrument ID.
If there are multiple instruments in a configuration, make sure there are
no duplicate IDs.
6. If you wish to have iPort automatically poll for the remote instrument(s)
upon connecting this location, check the Autopoll check box. The
recommended setting is to have this box checked.
7. Click on OK to add the location to the location directory.
8. Click on Yes to connect with the remote instrument.
If you did not enable Autopoll, you must poll for the instrument
manually once the connection has been successfully made. Select
Instrument > Poll Serial > Config to do this.
3-2
iPort Instruction Manual
Thermo Fisher Scientific
Configuration
Configuring iPort for a Modem Connection
The program polls (searches) for instruments connected to the
computer’s COM port. The program opens each instrument window
maximized as it is discovered during the poll.
Configuring iPort for a
Modem Connection
Use the following procedure to configure iPort for a modem connection.
1. Start iPort by double clicking on the iPort icon.
2. Select Comm > Connect.
The Communications Settings dialog box appears.
3. Click New to add a new location to the location directory, or click Edit
to modify the settings.
4. Enter the following information:
Thermo Fisher Scientific
•
The name of the location
•
The COM port of the modem being used to communicate with the
remote instrument
•
The baud rate of the remote instrument
•
Check the Enable Modem check box
iPort Instruction Manual
3-3
Configuration
Configuring for a TCP/IP Connection
•
The phone number of the remote modem
•
Under Polling Config, enter the instrument ID of each instrument
(separated by spaces)
The instrument ID for each instrument is set in the instrument's
Instrument Controls menu. Be sure that the instrument ID you specify
under Polling Config matches the instrument ID on the instrument. To
check the current instrument ID setting, press the Menu button to
display the Main Menu, then choose Instrument Controls >
Communication Settings > Instrument ID.
If there are multiple instruments in a configuration, make sure there are
no duplicate IDs.
5. If you wish to have iPort automatically dial the phone number when
connecting to this location, check the Autodial check box.
6. If you wish to have iPort automatically poll for the remote instrument(s)
once a connection has been made to this location, check the Autopoll
check box.
7. Click on OK to add the location to the directory.
8. Click on Yes to connect with the remote instrument.
If you did not enable Autopoll, you must poll for the instrument
manually. There are two types of manual polling. By selecting
Instrument > Poll Serial > Config, the program polls for the chosen
instruments, and connects to those it finds. By selecting Instrument >
Poll > All, the program polls for all possible IDs, from 1 to 99, and
connects to those it finds.
The program polls (searches) for instruments connected to the
computer’s COM port. The program opens each instrument window
maximized as it is discovered during the poll.
Configuring for a
TCP/IP Connection
3-4
iPort Instruction Manual
Use the following procedure to configure iPort for a TCP/IP connection.
1. Start iPort by double clicking on the iPort icon.
Thermo Fisher Scientific
Configuration
Configuring for a TCP/IP Connection
Note Be sure Direct TCP/IP Enable is checked first in the Preferences
menu. See the “Menu System” chapter. 2. Select Instrument > TCPIP Connect > addresses.
A popup box will appear requesting the TCP/IP addresses of the
instruments to connect to. Enter up to 25 IP addresses in the form
xxx.xxx.xxx.xxx or xxx.xxx.xxx.xxx:ppppp (where ppppp is the port to
connect to) separated by spaces. The addresses entered will be saved in
the ini file on disk and will be restored when the program is restarted.
When including a port value in the IP address, the instruments must be
connected to the network via a device which allows the mapping of the
provided address and port to the instument’s IP address at port 9880.
The provided port value +8 and +9 must be mapped to ports 9888 and
9889 on the instrument as well, in order for the configuration
backup/restore and firmware update functions to work correctly.
The program attempts to connect to instruments at the IP addresses in
the list. The program opens each instrument window maximized as it is
connected.
Note Instrument ID is not used for TCP/IP connections. Be sure that the Enable TCP/IP is checked in the Preferences box. See
the “Menu System” chapter.
Thermo Fisher Scientific
iPort Instruction Manual
3-5
Configuration
Configuring for a TCP/IP Connection
3-6
iPort Instruction Manual
Thermo Fisher Scientific
Chapter 4
Operation
iPort enables complete remote control of a suite of iSeries and C Series
instruments. This chapter shows how to use the various modes of iPort.
Simulated Local
Control
Each instrument being controlled by iPort has its own window as shown
below. Use the pushbuttons to control an instrument just as it is controlled
locally.
Multiple instruments can be displayed at one time on the screen. To change
the size of the instrument's window, select Instrument > Size > Small,
Medium, Large or Full.
Table 4-1 describes the various front panel pushbuttons and the expected
key actions for each.
Table 4-1. Front Panel Pushbuttons
Thermo Fisher Scientific
Button
Description
RUN
Used to display the Run screen. The Run screen normally displays the
concentrations.
MENU
Used to display the Main Menu when in the Run screen, or back up one
level in the menu system.
ENTER
Used to select a menu item, accept/set/save a change, and/or toggle
on/off functions.
HELP
Used to display the context-sensitive help that provides additional
information about the screen that is being displayed.
iPort Instruction Manual
4-1
Operation
Diagnostics Mode
Table 4-1. Front Panel Pushbuttons, continued
Diagnostics Mode
Button
Description
↑ Up
↓ Down
← Left
→ Right
The arrow pushbuttons move the cursor up, down, left, and right or
change values and states in specific screens.
The diagnostics mode displays extensive diagnostic information about the
instrument. To display the diagnostic information, select Instrument > Size
> Full. Each instrument has its own window as follows.
Note that it may be necessary to close and re-run iPort after changing the
instrument screen size.
Although each instrument's window is slightly different, they function the
same way. Each window shows concentrations, pressures, temperatures,
flows, calibration coefficients, ranges, gas units, control mode, and gas
mode. The pop-up boxes used to control these common parameters are the
same.
4-2
iPort Instruction Manual
Thermo Fisher Scientific
Operation
Diagnostics Mode
Coefficients
Backgrounds
Ranges
To set the coefficient, click on the button to the right of the coefficient,
enter the new value for the coefficient, and click OK.
To set the background, click on the button to the right of the background
value. Enter the new value for the background and click OK.
To set a range, click on the button to the right of the displayed value.
The code numbers of each available range are listed in Appendix B of the
manual for each instrument. Select the desired code and click OK.
Thermo Fisher Scientific
iPort Instruction Manual
4-3
Operation
Graphing Mode
Averaging Time
To set the averaging time, click on the button to the right of the displayed
value. The averaging time box is displayed. Select the averaging time and
click OK.
Gas Mode
To set the gas mode, click on the button to the right of the gas mode. For
example, select sample and click OK.
Mode
To set the control mode, click on the button to the right of the displayed
mode. Select the new mode and click OK.
If the instrument is in local mode, no parameters can be changed remotely,
except for the control mode. To set any other parameters when in local
control mode, first change to remote mode.
Graphing Mode
To graph the contents of an instrument's internal data storage, first be sure
the instrument window is set to Full (select Instrument > Size > Full).
Next, click on the Term mode of the Term/Graph toggle button. An empty
graph is displayed.
4-4
iPort Instruction Manual
Thermo Fisher Scientific
Operation
Graphing Mode
To download records for graphing, select Instrument > Load Records.
Select the type of records you wish to download, long records or short
records. Either short or long records may be selected.
In the Fetch text box, enter the number of records you wish to retrieve. In
older C Series instrument versions the maximum number of long records is
1,792 and the maximum number of short records is 4,096. In newer
firmware versions, the number of records that can be downloaded is
dependent upon the model of the instrument.
In the Starting Records Back text box, enter how many records back you
wish to go. The newer instruments also allow selection of records according
to a starting time and date. Select Real Time to graph data points as they are
output from the instrument. To store records in a file as they are being read
from the instrument, click on Save to File. You may enter any valid filename
for the ASCII file.
Downloading may take several minutes depending on the number of
records being downloaded, the baud rate, and the number of instruments
connected to the computer. Progress is shown in a gauge shown in the lower
right. To abort a download, press Escape. As records are read, they are
displayed on the graph.
When communicating with a Partisol instrument (2000i, 2000iD, 2025i,
2025iD), the user is also given the option to download filter records from
the analyzer, as shown above. When downloading filter records, the
“starting at” and “Real time” options are not available.
Thermo Fisher Scientific
iPort Instruction Manual
4-5
Operation
Graphing Mode
To maximize the graph click on in the lower right corner. The maximized
graph is displayed. The button changes to a . To switch back, click it
again.
4-6
iPort Instruction Manual
Thermo Fisher Scientific
Operation
Graphing Mode
Graph Controls
The following buttons are used to control the graph:
Use this button to select which items to graph. Up to sixteen graphs can be
shown at once.
Use these buttons to shrink or stretch the horizontal scale, increasing or
decreasing, respectively, the number of records displayed per screen. The
number of records displayed depends upon the time setting of the
horizontal scale. Horizontal scales of 5 to 1,000,000 minutes are available.
For example, if records are stored every 5 minutes and the horizontal scale is
at 100 minutes, then 20 records are displayed per screen.
Moves the graph(s) left and right.
Maximizes the graph (shown only when the graph is minimized).
Minimizes the graph (shown only when the graph is maximized).
Graphing Multiple
Parameters
Thermo Fisher Scientific
iPort can graph up to sixteen parameters at one time. The exact number
available depends on the instrument. Click
to choose the diagnostic
items to be graphed.
iPort Instruction Manual
4-7
Operation
Backup/Restore
Backup/Restore
The Backup/Restore menu allows configuration and calibration information
to be saved to a file on the PC for archival purposes and for restoration to
the instrument when necessary.
Note This information is specific to a particular instrument and should not
be used to restore to any other instrument. Backup
Use the following procedure to backup configuration and calibration
information to a PC via iPort.
1. Open a window to the instrument and select it.
2. From the Instrument menu, choose Backup/Restore > Backup Config.
iPort will show an open file dialog.
3. Chose an existing destination file or create a new one, and click Open.
iPort will read the data from the instrument and save the data to the file
on the PC.
Restore
Use the following procedure to restore the previously created backup file.
1. Open a window to the instrument and select it.
2. From the Instrument menu, choose Backup/Restore > Restore Config.
An open file dialog appears and displays files with the TBF extension
(this is the default extension for backup files).
4-8
iPort Instruction Manual
Thermo Fisher Scientific
Operation
Backup/Restore
3. Click Open.
The instrument changes to the Restore screen similarly to when the
firmware is upgraded. Do not use the system until the update completes
and the instrument re-boots.
Thermo Fisher Scientific
iPort Instruction Manual
4-9
Operation
Backup/Restore
4-10
iPort Instruction Manual
Thermo Fisher Scientific
Chapter 5
Menu System
There are two ways to access pull-down menus: by clicking on the menu
with the mouse, or by pressing the correct Alt + key sequence. A menu item
remains down until a command is selected. To escape the menu without
making a selection, click an area outside the menu or press Esc. Menu items
are grayed out (disabled) when they cannot be used due to system settings or
program state. For example, if a printer is not installed on the system, the
File > Print and Print Preview selections are disabled.
File Menu
Thermo Fisher Scientific
The File menu contains the following items:
Console
This command opens the console. The console is a window that displays
status and error messages. If the console is already open, invoking this
command prompts you to close the current console and reopen a new
console. If the console window has been closed, error messages are displayed
in pop-up message boxes.
Console Log
Console log opens a log file for the console. All messages displayed in the
console are stored in a log file named “tei.log” in the tei.exe home directory.
Invoke this command again to close the log file. A checkmark by the menu
item indicates that the log file is currently open.
iPort Instruction Manual
5-1
Menu System
File Menu
Preferences
Selecting Preferences invokes the Preferences dialog box.
The Preferences dialog box lets you customize iPort. The preferences are
divided into three blocks: General, Modem, and Instrument. The Default
button restores the preferences to factory default values.
The General block contains the following:
Automatic. You can have iPort automatically Connect (dial the modem and
poll for instruments) on program startup and automatically Hangup the
modem upon program exit by checking the appropriate boxes.
Console Log. You can Enable the console log function. If you do, you can
choose to have a new console log created each time the program is started, or
an existing log append each time the program is started.
Messages. You can have iPort display warnings and/or errors. In addition,
you can select whether the messages are displayed in the console or in
pop-up boxes.
Report Traffic. You can choose to display the commands sent to the
modem and the commands sent to the instrument (traffic). If console
message reporting is checked, then this information is sent to the console.
The Modem block contains standard Hayes compatible modem commands.
In most cases, there is no need to change these commands. For more
information about modem commands, see your modem user guide.
5-2
iPort Instruction Manual
Thermo Fisher Scientific
Menu System
File Menu
Command Prefix. The Command Prefix begins each command sent to the
modem. AT tells the modem that modem commands follow. This prefix is
attached to all of the commands sent to the modem, including the ones
below.
Command Suffix. The Command Suffix determines how modem
commands are terminated. ASCII 13 is a carriage return.
Reset String. A code that tells the modem to reset. Z tells the modem to
reset.
Init String. The Initialization String configures the modem. The following
modem commands are set as defaults:
&F
Sets the modem to its factory default settings.
X4
Tells the modem to use an extended set of result messages. The number
after the x specifies which set of result messages the modem sends to iPort.
V1
Tells the modem to use words, rather than numbers for the result messages.
E0
Tells the modem to echo what is sent.
F1
Sets online local echo of transmitted data off.
L2
Controls the speaker volume of internal modems. L2 sets the volume to
medium.
S0=0
Tells the modem to not answer incoming calls.
&C1
Controls the Carrier Detect (CD, a serial port status line) signal. &C1 sets
normal CD operations.
&D2
Tells the modem to use normal Data Terminal Ready (DTR, another serial port
status line) operations.
Dial String. The Dial String tells the modem how to dial. DT tells the
modem to dial using touch tones.
Hangup String. The Hangup String tells the modem how to hangup. The
following modem commands are set as defaults:
Thermo Fisher Scientific
+++
Tells the modem to switch into the command mode. In the command mode,
data sent to the modem is not transmitted, but rather is used to control the
modem.
~~
Delays the modem for 1 second.
AT
Tells the modem that modem commands follow.
HO
Tells the modem to hangup the line.
iPort Instruction Manual
5-3
Menu System
File Menu
Dialing Timeout. The length of time that iPort waits after dialing for a
response before it hangs up. For long-distance calls, you may have to
increase the wait time.
The Instrument block lets you set the instrument Size, Log File, Message
Termination, Screen Refresh, and Data Record Loading options for
instrument windows.
Size. Sets the starting size of the instrument windows. Use Small, Medium,
and Large to display the instrument window at different sizes. Full includes
complete diagnostic information, such as temperatures, pressures, and
calibration coefficients. In addition, records from the internal datalogger can
be downloaded and graphed. Instrument windows can be recognized after
correction by using the Select > Range option.
Log File. All messages sent to and received from the instrument can be
stored in a log file. The instrument log file is named according to the
Instrument model; for example, a 43C SO2 instrument would have a log file
named “43.log.” You can choose to have the instrument log disabled, have a
new instrument log created each time the program is started, or have the
existing log file appended, that is, continue to add new messages to the end
of a log file that had been created previously.
Msg Sep, Terminator, Timeout. These items control how the commands
are sent to the instrument and replies are read. Msg Sep (ASCII 10) inserts a
line feed between commands. Terminator (ASCII 13) terminates each
command with a carriage return. Timeout (500 msec) is the amount of time
iPort waits for the instrument to respond to a command.
Scrn Ref every. Data displayed on the instrument window such as
concentrations, temperature readings, pressure readings, and so on, must be
regularly updated or refreshed. You can choose how often the instrument
window is refreshed. If only one instrument is connected, then a short
refresh interval is useful. If several instruments are connected, then choosing
a slower refresh interval may speed up other functions, such as graphing.
System response decreases when many instruments are connected with short
refresh intervals. iSeries instruments take much longer to transfer screen
data than C Series instruments so the polling interval must be increased.
Remote Display. iSeries instruments communicating over the serial port
can cause iPort to perform slowly at slow baud rates. If this is a problem, the
remote display can be disabled by unchecking the Remote Display Enable
box.
5-4
iPort Instruction Manual
Thermo Fisher Scientific
Menu System
File Menu
Data Record Loading. You can choose to have instrument internal records
downloaded to iPort saved by appending to an existing file or by creating a
new file. The Raw Flags setting will store the hex representation of all the
instrument flags if checked or the decoded high/low alarms if unchecked.
ESC 8832. Check this box to connect to an instrument via the ESC 8832
datalogger over Ethernet. Enter the IP address of the datalogger in the IP
Address field. This selection disables communication over the serial port.
TCP/IP Enable. Check this box to enable use TCP/IP to connect to the
instruments. If this is set, the serial port will not be used. This selection
disables communication over the serial port.
Print Preview
Print
If you have a printer installed, you can print the data that has been
downloaded. Set the standard Windows print options and choose OK.
Print Graph
Prints a graph of the contents of downloaded records.
Print Setup
Lets you choose a printer other than the default printer, specify the paper
orientation, and select the paper size.
Exit
Thermo Fisher Scientific
Displays a preview of the downloaded data before printing. The menu bar
controls are:
Terminates the program and returns you to Windows. If the modem is still
connected to a remote location, iPort asks you whether or not you wish to
disconnect before exiting.
iPort Instruction Manual
5-5
Menu System
Comm Menu
Comm Menu
Connect
The Comm menu contains the following items:
This dialog box is used to connect to a remote location over serial and create
and edit the entries in the location directory.
Location. The location directory stores the communications settings of the
remote instruments that you communicate with. Each entry in the location
directory consists of the name of the location, com port, baud rate,
telephone number (if required), and a list of instrument IDs. Use the New
button to create a new entry, the Edit button to edit an existing entry, and
the Delete button to delete an entry from the location directory.
Communications Settings. If you are using a modem, select the com port
that the modem is using. If you are communicating directly, select the com
port that the instrument is connected to. Set the baud rate of the serial port.
Be sure the baud rate setting matches the baud rate of the instrument. The
Handshaking, Data Word Length, Stop Bits, and Parity are set to match
that of the instruments as designed and cannot be changed.
Enable Modem. Check this box when communicating via modem.
Uncheck it when communicating directly.
Phone Number. Enter the phone number of the remote modem. When
connecting directly, this field is ignored and can be left blank.
Autodial. Check this box if you want iPort to automatically dial the phone
number when connecting to this location.
Polling Config. Enter the instrument IDs of the remote instruments. Each
number must be separated by a space. The instrument ID for each
instrument is set in the instrument’s Instrument Controls menu. Be sure
that every instrument ID specified in the Polling Configuration box
matches the instrument ID in the Instrument Controls menu.
Autopoll. Check this box if you want iPort to automatically poll for
instruments after a connection has been made.
5-6
iPort Instruction Manual
Thermo Fisher Scientific
Menu System
Comm Menu
Dial
Redial
iPort prompts you to enter the phone number to call.
This command redials the last phone number entered in the Dial dialog
box.
Hangup
This command hangs up the modem.
Utilities
The Utilities menu contains the following items which can be useful when
internally setting up your system, or when changing configurations:
Status. This command displays a status string in the console that identifies
the state (on or off ) of the CD (Carrier Detect) line, RTS (Request to Send)
line, CTS (Clear to Send) line, DTR (Data Terminal Ready) line, and DSR
(Data Set Ready) line. In addition, it reports whether any errors were
detected.
Clear TX Buffer. This command clears the transmit buffer. Commands
waiting to be sent to the instrument are discarded.
Clear RX Buffer. This command clears the receive buffer. Messages waiting
to be processed by iPort are discarded.
Toggle RTS. This command toggles the RTS line and displays the new
value in the console.
Toggle DTR. This command toggles the DTR line and displays the new
value in the console.
Break. This sends a break, forcing a low level interruption of
communications.
Reset. This command sends the reset string to the modem.
Thermo Fisher Scientific
iPort Instruction Manual
5-7
Menu System
Instrument Menu
Instrument Menu
Poll Serial
The Instrument menu contains the following items:
The Poll menu contains the following items:
Config. Polls (searches) the com port for the Instrument ID numbers
defined using Edit Config. An icon for each instrument detected is
displayed in the lower-left corner of the screen. If you do not have the
automatic poll function enabled (preferences), invoke this command each
time you start iPort.
All. Polls the comm port for all possible instrument IDs (0 to 99). This
command is useful if the instrument ID of a remote instrument is
unknown.
Set Config. Used after the All command to set the Config with the
instrument IDs detected by the All command.
5-8
iPort Instruction Manual
Thermo Fisher Scientific
Menu System
Instrument Menu
Edit Config. Sets the local list of instrument IDs of the remote
instruments. Each number must be separated by a space. The instrument
IDs for each instrument is set in the instrument's Instrument Controls
menu. Be sure that the instrument ID you specify in the Polling
Configuration dialog box matches the instrument ID set in the Instrument
Controls menu.
TCP/IP Connect
The TCP Connect menu contains the following items:
Connect. iPort will attempt to connect to instruments at the IP addresses in
the address list. A dialog box for each instrument successfully connected to
is displayed.
Address. Enter the addresses to attempt to connect to in the popup box.
The addresses are in the form xxx.xxx.xxx.xxx or xxx.xxx.xxx.xxx:ppppp
(where ppppp is the port value) separated by spaces. Up to 25 addresses can
be entered.
Thermo Fisher Scientific
iPort Instruction Manual
5-9
Menu System
Instrument Menu
Refresh Interval. Each time an instrument window is created, the refresh
interval setting found under the Preferences dialog is used to set the initial
value for each window. In circumstances where specific instrument windows
should be updated more or less frequently than the default, the Instrument
> Set Timer command can be used.
If using a serial port baud rate less than 19200, the remote display can take
more than 10 seconds per instrument to update. Refer to Table 5-1.
Table 5-1. Typical Update Speeds
Refresh
5-10
iPort Instruction Manual
Baud Rate
Update Time per Instrument
19200
10 seconds
9600
15 seconds
4800-1200
Not Recommended. Disable remote
screen in Preferences screen.
This command immediately updates the readings displayed in an
instrument window. This is useful if the update interval is set to a high
number or has been turned off.
Thermo Fisher Scientific
Menu System
Instrument Menu
Load Records
Backup/Restore
This dialog box enables you to download long records or short records from
an instrument’s internal datalogger. In addition, you can save the records to
file by selecting Save to File. You can enter a new filename or use the default
filename.
The Backup/Restore menu contains the following items:
The Backup menu allows configuration and calibration information to be
saved to a file on the PC for archival purposes and for restoration to the
instrument when necessary.
The instrument stores configuration and calibration information in the
flash memory on the CPU card. Prior to changing the CPU board or
upgrading firmware, this information should be backed up to a PC using
iPort. This information is restored to the instrument after replacing the
CPU board or upgrading firmware.
Note This information is specific to a particular instrument and should not
be restored to any other instrument. Log File
Size
Thermo Fisher Scientific
All messages sent to and received from an instrument can be stored in log
file. The instrument log file is named according to the instrument model
and ID. For example, the filename for a Model 42C with an ID of 10 would
be “42C/10.dat”. You can choose to have the instrument log disabled, have
a new instrument log created each time the program is started, or have the
existing log file appended, that is, continue to add new messages to a log file
that was created previously. Use this menu command to temporarily change
the setting selected in the Preferences menu for an individual instrument.
You can set the size of the currently selected instrument window to Small,
Medium, Large, and Full. Small displays the instrument window in the
smallest possible size. Medium displays the instrument window in an
iPort Instruction Manual
5-11
Menu System
Window Menu
intermediate size. Large displays the instrument window in the largest size
using a large font. Full displays the instrument window with complete
diagnostic information.
Window Menu
Cascade
The Cascade command causes instrument windows to overlap so that each
title bar is visible. This way, all open instrument windows can be displayed
at the same time on the screen.
Tile
The Tile command arranges open instrument windows next to each other. If
there are several instruments connected, this works best with small
instrument windows.
Arrange Icons
The Arrange Icons command arranges instrument icons along the lower
edge of the screen.
Iconify Instruments
The Iconify Instruments command reduces each open instrument window
to an icon along the bottom edge of the screen.
Close Instruments
The Close Instruments command closes all open instrument windows
severing communications with all instruments. If using serial holding open
the line. To reopen instrument windows, select Instrument > Poll > Config
For TCP/IP use tcp/ip / connect.
Firmware Update
5-12
The Window menu contains the following items:
iPort Instruction Manual
The firmware can be updated by the user in the field using iPort over the
Ethernet or via the serial port. This includes both the main processor
firmware and the firmware in all low-level processors.
Thermo Fisher Scientific
Menu System
Firmware Update
Obtain the desired firmware file from Thermo Scientific and note what
directory it is in and what it is named.
TCP/IP Update
Use the following procedure to update the firmware by TCP/IP.
1. Select Instrument > Update Firmware > TCP/IP.
2. Enter the TCP/IP address for the instrument you want to update in the
form xxx.xxx.xxx.xxx or xxx.xxx.xxx.xxx:ppppp. See the instrument
manual for details on configuring the address, if necessary.
3. Select the firmware update file using the file select window to where you
noted the file was placed.
A message box describing the version of software and instrument type
will be displayed. If this is OK, select OK and the firmware will start to
be updated.
The instrument will show a message that the firmware is being updated
and when it is done, it will automatically reset and run the new
firmware.
Thermo Fisher Scientific
iPort Instruction Manual
5-13
Menu System
Firmware Update
Serial Update
Use the following procedure to update the firmware by Serial port.
1. Select Instrument > Update Firmware > Serial.
2. Enter the instrument ID for the instrument you want to update. See the
instrument manual for details on configuring the ID, if necessary.
3. Select the firmware update file using the file select window to where you
noted the file was placed.
A message box describing the version of software and instrument type
will be displayed. If this is OK, select OK and the firmware will start to
be updated.
The instrument will show a message that the firmware is being updated
and when it is done, it will automatically reset and run the new
firmware.
5-14
iPort Instruction Manual
Thermo Fisher Scientific
Menu System
Help Menu
Help Menu
Button Bar
Thermo Fisher Scientific
The online Help system provides access to information about iPort and
contains all of the information found in this manual.
The button bar provides shortcuts to the most often used commands.
iPort Instruction Manual
5-15
Menu System
Help Menu
5-16
iPort Instruction Manual
Thermo Fisher Scientific
Chapter 6
Dynamic Data Exchange
Dynamic Data Exchange (DDE) provides an alternate method to transfer
data from iPort to spreadsheet or database applications that support DDE
conversations. These applications can be used to structure and manipulate
the data.
This following description uses Microsoft Excel™, and presumes some
experience with this program and a general understanding of DDE.
Note In Excel, use the Ctrl-Shift-Enter key combination to enter a formula
into an array of cells. Before starting Excel, be sure iPort is running, and the appropriate data
(long or short records) has been loaded from the instrument of interest.
Although in the example commands are displayed in a combination of
upper and lower case letters, DDE is not case-sensitive.
Instruments Are DDE
Topics
To display the available instrument(s):
•
Select an entire row of cells (click on the row number)
•
Enter =TEI|System!Topics into the a cell array in the first row.
In addition to the “System” topic, each instrument appears as a Topic. In the
example shown in Figure 6-1, cell B-1 indicates that a 43C High Level
instrument is connected. If more than one instrument were connected, these
would be displayed in subsequent cells in row 1. Note that cells to the right
of the last instrument have the entry “#N/A” because Excel does not leave
blank cells in an array.
Thermo Fisher Scientific
iPort Instruction Manual
6-1
Dynamic Data Exchange
Data Are Items
Figure 6-1. iPort Data in an Excel Spreadsheet Format
Data Are Items
To display the items that an instrument supports:
•
Select an entire row of cells (click on the row number)
•
Enter =TEI|’43C-HL’!TopicItemList in a cell array.
Note that the instrument name must be enclosed in single quotes. The
supported items are shown in row 3 of Figure 6-1.
To display lrec and srec fields:
•
Select an entire row of cells (click on the row number)
•
Enter =TEI|’43C-HL’!LrecFields or =TEI|’43C-HL’!SrecFields
Note that the instrument name must be enclosed in single quotes. The
supported items are shown in row 5 of Figure 6-1.
To display lrec and srec data:
6-2
iPort Instruction Manual
•
Select an entire row of cells (click on the row number)
•
Enter =TEI|’43C-HL’!Lrec or =TEI|’43C-HL’!Srec
Thermo Fisher Scientific
Dynamic Data Exchange
ERECS Are Diagnostic Information
Note that the instrument name must be enclosed in single quotes. The data
is shown in row 6 of Figure 6-1.
To display multiple short or long records:
•
Select a number of spreadsheet rows equal to the number of records to
be displayed.
•
Enter =TEI|’43C-HL’!’Lrec(0,10)’ or =TEI|’43C-HL’!’Srec(0,10)’
Note that the lrec command, as well as the instrument name, is enclosed in
quotes. In the example shown in Figure 6-1, ten records were requested.
This was done by selecting ten rows (rows 8 through 17). These records
correspond the first ten long records in the iPort storage, and do not
necessarily coincide with the first ten records in the instrument.
ERECS Are Diagnostic
Information
Erec fields and erecs are similar in most ways to the long and short record
data items just described. The data corresponds to the diagnostic
information displayed on the left portion of the instrument window. The
difference is that there is only one erec record. Excel updates the
information in the spreadsheet, at intervals of about 10 seconds, for as long
as iPort is running and communicating with the instrument.
To display erec fields:
•
Select an entire row of cells (click on the row number)
•
Enter =TEI|’43C-HL’!ErecFields
Note that the instrument name must be enclosed in single quotes. The
supported items are shown in row 19 of Figure 6-1.
To display erec data:
•
Select an entire row of cells (click on the row number)
•
Enter =TEI|’43C-HL’!Erec
Note that the instrument name must be enclosed in single quotes. The data
is shown in row 20 of Figure 6-1.
Thermo Fisher Scientific
iPort Instruction Manual
6-3
Dynamic Data Exchange
ERECS Are Diagnostic Information
6-4
iPort Instruction Manual
Thermo Fisher Scientific
Chapter 7
Troubleshooting
This chapter provides information designed to help isolate and identify
iPort problems.
The Technical Support Department at Thermo Scientific can also be
consulted in the event of problems. See “Service Locations” at the end of
this chapter for contact information.
Establishing a Direct
Connection
Problem: iPort does not communicate via direct cable connection with
an instrument.
For direct communication, you must use a null-modem cable.
Verify that you have correctly specified the computer's communication port
(see Comm > Connect). This port must be free, that is, it is not being used
by a mouse or modem.
Check that the instrument address in the program and in the instrument
match. Use Instrument > Poll > Edit to change the program address; use the
instrument's front panel buttons to set the address via Instrument Controls
menu.
Check that the Modem is disabled (see Comm > Connect). To disable the
Modem, unchecked the box.
Check that the baud rate defined in the Comm > Connect dialog box
matches the instrument's baud rate (Instrument Controls menu).
Establishing a Modem
Connection
Problem: iPort is not dialing the modem.
Verify that you have correctly specified the communications port (see
Comm > Connect) that the modem is connected to.
If the modem is external, check that it is on and that the cable connected to
the modem is working.
Check that the modem is properly connected to the telephone line and that
the line is ready to dial.
Thermo Fisher Scientific
iPort Instruction Manual
7-1
Troubleshooting
Establishing a TCP/IP Connection
Check that the modem is enabled (see Comm > Connect). The Modem
Enable box must have a check.
Problem: The modem dials the phone number but a connection is not
made.
Check that the baud rate of the local modem matches the baud rate of the
remote modem.
Verify that the remote modem is configured to answer incoming calls. For
more information about programming modems, see the “Installation”
chapter.
Check that the remote modem is on.
If the call is long-distance, you may need to increase the Dial Timeout (see
File > Preferences). Long-distance calls take longer to connect than do local
ones.
The line may be busy.
Problem: A connection is made, but the instrument does not
communicate.
Check that the Instrument ID number defined in Instrument > Poll
matches the Instrument ID number defined in the instrument's Instrument
Controls menu. Use Poll > All if you cannot verify the instrument ID
setting.
Check that the baud rate of the remote instrument(s) matches the baud rate
of the remote modem. With a modem connection, iPort, the remote
modem, and the remote instrument(s) must all have the same baud rate.
Establishing a TCP/IP
Connection
Problem: iPort does not communicate via TCP/IP connection with an
instrument.
Be sure the cable is the correct type for the TCP connection. A straight thru
cable for a router and a crossover cable for a direct computer connection.
Be sure the IP address of the instrument is set correctly, as well as the
gateway and mask.
If using DHCP, be sure an IP address was gotten by looking at the
instrument communications TCP menu to verify the license.
7-2
iPort Instruction Manual
Thermo Fisher Scientific
Troubleshooting
Service Locations
Try to ping the instrument address from a computer on the same local
node.
Service Locations
For additional assistance, service is available from exclusive
distributors worldwide. Contact one of the phone numbers below
for product support and technical information or visit us on the web
at www.thermo.com/aqi.
1-866-282-0430 Toll Free
1-508-520-0430 International
Thermo Fisher Scientific
iPort Instruction Manual
7-3
Troubleshooting
Service Locations
7-4
iPort Instruction Manual
Thermo Fisher Scientific