1
User’s Guide
RS-232 to I2C Host Adapter
ASCII Fast Mode
with iPort Utility Pack Software
www.mcc-us.com
Introduction
The MCC iPort/AFM™ RS-232 to I2C Host Adapter with ASCII Fast Mode
(#MIIC-203) allows any PC, Host Computer, or Data Terminal with an RS-232 port
to become an I2C Master or Slave device, transmitting or receiving I2C messages
between the PC and one or more I2C devices across an I2C Bus.
This user’s guide describes the installation and operation of the iPort/AFM host
adapter and the iPort Utility Pack Software for Windows, and includes the
Programmers Reference for creating custom applications.
Are you new to I2C? Want to know more? We suggest you review “What is I2C?” at
www.mcc-us.com/I2CBusTechnicalOverview.pdf.
MCC products use Philips components and are licensed to use the I²C Bus.
“Purchase of Philips I²C components conveys a license under the Philips’ I²C patent
to use the components of the I²C system, provided the system conforms to the I²C
specifications defined by Philips.”
I²C is a trademark of Philips Corporation.
09-JAN-07
Copyright© 2004 by Micro Computer Control Corporation. All rights reserved. No
part of this publication may be reproduced by any means without the prior written
permission of Micro Computer Control Corporation, PO Box 275, Hopewell, New
Jersey 08525 USA.
DISCLAIMER: Micro Computer Control Corporation makes no representations or
warranties with respect to the contents hereof and specifically disclaims any implied
warranties of merchantability or fitness for any particular purpose. Further, Micro
Computer Control Corporation reserves the right to revise the product described in
this publication and to make changes from time to time in the content hereof
without the obligation to notify any person of such revisions or changes.
WARNING - Life Support Applications: MCC products are not designed for use
in life support appliances, devices, or systems where the malfunction of the product
can reasonably be expected to result in a personal injury.
WARNING - Radio Frequency Emissions: This equipment can radiate levels of
radio frequency energy that may cause interference to communications equipment.
Operation of this equipment may cause interference with radio, television, or other
communications equipment. The user is responsible for correcting such interference
at the expense of the user.
WARNING - Electrostatic Discharge (ESD) Precautions: Any damage caused by
Electrostatic Discharge (ESD) through inadequate earth grounding is NOT covered
under the warranty of this product. See the “Electrostatic (ESD) Precautions”
section of this guide for more information.
Printed in the United States of America
Table of Contents
Part 1 - iPort/AFM RS-232 to I2C Bus Host Adapter . . . . . . . . . . . . . . . . . . . . . 1
1 Overview . . . . . . . . . . . . . . . . . . . . . . . . . . . . . . . . . . . . . . . . . . . . . . . . . . . . . . .
iPort/AFM RS-232 to I2C Bus Host Adapter . . . . . . . . . . . . . . . . . . . . . . . . . . . .
iPort Utility Pack Software . . . . . . . . . . . . . . . . . . . . . . . . . . . . . . . . . . . . . . . . .
iPort/AFM Programmer’s Reference . . . . . . . . . . . . . . . . . . . . . . . . . . . . . . . . . .
Packing Slip . . . . . . . . . . . . . . . . . . . . . . . . . . . . . . . . . . . . . . . . . . . . . . . . . . . . .
System Requirements . . . . . . . . . . . . . . . . . . . . . . . . . . . . . . . . . . . . . . . . . . . . .
2
2
2
2
3
3
2 Interconnects . . . . . . . . . . . . . . . . . . . . . . . . . . . . . . . . . . . . . . . . . . . . . . . . . . . .
RS-232 Serial Port Connector . . . . . . . . . . . . . . . . . . . . . . . . . . . . . . . . . . . . . . .
DB-25 Serial Port Pinout . . . . . . . . . . . . . . . . . . . . . . . . . . . . . . . . . . . . . . . .
DB-9 Serial Port Pinout . . . . . . . . . . . . . . . . . . . . . . . . . . . . . . . . . . . . . . . . .
+5VDC Power Jack . . . . . . . . . . . . . . . . . . . . . . . . . . . . . . . . . . . . . . . . . . . . . . .
I2C Interface Connector . . . . . . . . . . . . . . . . . . . . . . . . . . . . . . . . . . . . . . . . . . . .
Interrupt (/INT) Signal Connector . . . . . . . . . . . . . . . . . . . . . . . . . . . . . . . . . . . .
3
3
4
4
4
4
5
3 Hardware Configuration . . . . . . . . . . . . . . . . . . . . . . . . . . . . . . . . . . . . . . . . . . .
Pull-up Resistors . . . . . . . . . . . . . . . . . . . . . . . . . . . . . . . . . . . . . . . . . . . . . . . . .
Connecting to a 3.3 Volt Target System . . . . . . . . . . . . . . . . . . . . . . . . . . . . . . .
Connecting to an SMBus Target System . . . . . . . . . . . . . . . . . . . . . . . . . . . . . . .
6
6
6
6
4 ESD (Electrostatic Discharge) Precautions . . . . . . . . . . . . . . . . . . . . . . . . . . . . . 7
Host Computer Grounding . . . . . . . . . . . . . . . . . . . . . . . . . . . . . . . . . . . . . . . . . 7
Grounding Solutions . . . . . . . . . . . . . . . . . . . . . . . . . . . . . . . . . . . . . . . . . . . . . . 8
5 Hardware Set-Up . . . . . . . . . . . . . . . . . . . . . . . . . . . . . . . . . . . . . . . . . . . . . . . . . 8
Part 2 - iPort Utility Pack for Windows . . . . . . . . . . . . . . . . . . . . . . . . . . . . . . . 11
1 iPort Utility Pack for Windows . . . . . . . . . . . . . . . . . . . . . . . . . . . . . . . . . . . . . 13
iPort Message Center . . . . . . . . . . . . . . . . . . . . . . . . . . . . . . . . . . . . . . . . . . . . . 13
iPort Message Manager . . . . . . . . . . . . . . . . . . . . . . . . . . . . . . . . . . . . . . . . . . . 14
2 System Requirements . . . . . . . . . . . . . . . . . . . . . . . . . . . . . . . . . . . . . . . . . . . . 15
3 iPort Utility Pack Installation . . . . . . . . . . . . . . . . . . . . . . . . . . . . . . . . . . . . . . 15
Installing from CD . . . . . . . . . . . . . . . . . . . . . . . . . . . . . . . . . . . . . . . . . . . . . . . 15
Installing from the Web . . . . . . . . . . . . . . . . . . . . . . . . . . . . . . . . . . . . . . . . . . . 15
4 iPort Message Center . . . . . . . . . . . . . . . . . . . . . . . . . . . . . . . . . . . . . . . . . . . .
Message Center Operations . . . . . . . . . . . . . . . . . . . . . . . . . . . . . . . . . . . . . . . .
Starting the Message Center . . . . . . . . . . . . . . . . . . . . . . . . . . . . . . . . . . . . .
Selecting the Adapter . . . . . . . . . . . . . . . . . . . . . . . . . . . . . . . . . . . . . . . . . .
Select the Communications Port . . . . . . . . . . . . . . . . . . . . . . . . . . . . . . . . . .
Options Menu . . . . . . . . . . . . . . . . . . . . . . . . . . . . . . . . . . . . . . . . . . . . . . . .
Establish Adapter Communications Link . . . . . . . . . . . . . . . . . . . . . . . . . . .
Entering or Editing I2C Messages . . . . . . . . . . . . . . . . . . . . . . . . . . . . . . . . .
Set I2C Address . . . . . . . . . . . . . . . . . . . . . . . . . . . . . . . . . . . . . . . . . . . . . . .
Set Message Read/Write Direction . . . . . . . . . . . . . . . . . . . . . . . . . . . . . . . .
Specify Repeated Start Messages . . . . . . . . . . . . . . . . . . . . . . . . . . . . . . . . .
Set Time Delay . . . . . . . . . . . . . . . . . . . . . . . . . . . . . . . . . . . . . . . . . . . . . . .
Specify Write Data or Read Byte Count . . . . . . . . . . . . . . . . . . . . . . . . . . . .
Inserting and Deleting Messages . . . . . . . . . . . . . . . . . . . . . . . . . . . . . . . . . .
Saving or Loading Message Lists . . . . . . . . . . . . . . . . . . . . . . . . . . . . . . . . .
Send the Message List . . . . . . . . . . . . . . . . . . . . . . . . . . . . . . . . . . . . . . . . . .
Special Event Handling . . . . . . . . . . . . . . . . . . . . . . . . . . . . . . . . . . . . . . . . .
Slave Not Acknowledging . . . . . . . . . . . . . . . . . . . . . . . . . . . . . . . . . . . . . .
Command Line Arguments . . . . . . . . . . . . . . . . . . . . . . . . . . . . . . . . . . . . . . . .
Set Adapter Type . . . . . . . . . . . . . . . . . . . . . . . . . . . . . . . . . . . . . . . . . . . . . .
Set RS-232 Communication Port . . . . . . . . . . . . . . . . . . . . . . . . . . . . . . . . .
Set RS-232 Baud Rate . . . . . . . . . . . . . . . . . . . . . . . . . . . . . . . . . . . . . . . . . .
Set I2C Bus Clock Rate . . . . . . . . . . . . . . . . . . . . . . . . . . . . . . . . . . . . . . . . .
Enable /INT Signal Monitor . . . . . . . . . . . . . . . . . . . . . . . . . . . . . . . . . . . . .
Stop On Busy . . . . . . . . . . . . . . . . . . . . . . . . . . . . . . . . . . . . . . . . . . . . . . . .
Stop On Arbitration Loss . . . . . . . . . . . . . . . . . . . . . . . . . . . . . . . . . . . . . . .
Stop On Slave Negative Acknowledgment . . . . . . . . . . . . . . . . . . . . . . . . . .
Beep On Busy . . . . . . . . . . . . . . . . . . . . . . . . . . . . . . . . . . . . . . . . . . . . . . . .
Beep On Arbitration Loss . . . . . . . . . . . . . . . . . . . . . . . . . . . . . . . . . . . . . . .
Beep On Slave Negative Acknowledgment . . . . . . . . . . . . . . . . . . . . . . . . .
Beep On /INT Assert . . . . . . . . . . . . . . . . . . . . . . . . . . . . . . . . . . . . . . . . . . .
Load I2C Message List File . . . . . . . . . . . . . . . . . . . . . . . . . . . . . . . . . . . . . .
Saved I2C Message List File . . . . . . . . . . . . . . . . . . . . . . . . . . . . . . . . . . . . .
Auto Open . . . . . . . . . . . . . . . . . . . . . . . . . . . . . . . . . . . . . . . . . . . . . . . . . . .
Auto Send . . . . . . . . . . . . . . . . . . . . . . . . . . . . . . . . . . . . . . . . . . . . . . . . . . .
Auto Exit . . . . . . . . . . . . . . . . . . . . . . . . . . . . . . . . . . . . . . . . . . . . . . . . . . . .
16
17
17
17
18
18
18
18
19
19
19
20
20
21
21
21
21
22
23
24
24
24
24
25
25
25
25
25
26
26
26
26
27
27
27
27
5 iPort Message Manager . . . . . . . . . . . . . . . . . . . . . . . . . . . . . . . . . . . . . . . . . . 28
Message Manager Operations . . . . . . . . . . . . . . . . . . . . . . . . . . . . . . . . . . . . . . 29
Starting the Message Manager . . . . . . . . . . . . . . . . . . . . . . . . . . . . . . . . . . .
Select the Adapter . . . . . . . . . . . . . . . . . . . . . . . . . . . . . . . . . . . . . . . . . . . . .
Establish Adapter Communications Link . . . . . . . . . . . . . . . . . . . . . . . . . . .
Basic Setup . . . . . . . . . . . . . . . . . . . . . . . . . . . . . . . . . . . . . . . . . . . . . . . . . .
Advanced Setup . . . . . . . . . . . . . . . . . . . . . . . . . . . . . . . . . . . . . . . . . . . . . .
Adapter’s Own I2C Slave Address . . . . . . . . . . . . . . . . . . . . . . . . . . . . . .
General Call Enable . . . . . . . . . . . . . . . . . . . . . . . . . . . . . . . . . . . . . . . . .
I2C Bus Master Bit Rate . . . . . . . . . . . . . . . . . . . . . . . . . . . . . . . . . . . . . .
I2C Bus Time-Out . . . . . . . . . . . . . . . . . . . . . . . . . . . . . . . . . . . . . . . . . . .
Enable INT Signal Monitor . . . . . . . . . . . . . . . . . . . . . . . . . . . . . . . . . . .
Diagnostic Setup . . . . . . . . . . . . . . . . . . . . . . . . . . . . . . . . . . . . . . . . . . . . . .
Log File Level . . . . . . . . . . . . . . . . . . . . . . . . . . . . . . . . . . . . . . . . . . . . .
Log File Name . . . . . . . . . . . . . . . . . . . . . . . . . . . . . . . . . . . . . . . . . . . . .
Log File Size . . . . . . . . . . . . . . . . . . . . . . . . . . . . . . . . . . . . . . . . . . . . . . .
Sending I2C Messages . . . . . . . . . . . . . . . . . . . . . . . . . . . . . . . . . . . . . . . . . .
Master Operations . . . . . . . . . . . . . . . . . . . . . . . . . . . . . . . . . . . . . . . . . . . . .
Specifying the Destination Address . . . . . . . . . . . . . . . . . . . . . . . . . . . . . . .
Repeated Start Messages . . . . . . . . . . . . . . . . . . . . . . . . . . . . . . . . . . . . . . . .
Auto Repeat . . . . . . . . . . . . . . . . . . . . . . . . . . . . . . . . . . . . . . . . . . . . . . . . . .
Master Transmitting Data . . . . . . . . . . . . . . . . . . . . . . . . . . . . . . . . . . . . . . .
Specifying Master Tx Message Bytes . . . . . . . . . . . . . . . . . . . . . . . . . . .
Sending Master Transmit Messages . . . . . . . . . . . . . . . . . . . . . . . . . . . . .
Master Receive Data . . . . . . . . . . . . . . . . . . . . . . . . . . . . . . . . . . . . . . . . . . .
Specifying Data to Read . . . . . . . . . . . . . . . . . . . . . . . . . . . . . . . . . . . . . .
Negative Acknowledge Last Byte . . . . . . . . . . . . . . . . . . . . . . . . . . . . . .
Master Transmit and Receive . . . . . . . . . . . . . . . . . . . . . . . . . . . . . . . . . . . .
Slave Operations . . . . . . . . . . . . . . . . . . . . . . . . . . . . . . . . . . . . . . . . . . . . . .
Slave Transmit Data . . . . . . . . . . . . . . . . . . . . . . . . . . . . . . . . . . . . . . . . . . .
Slave Receive Data . . . . . . . . . . . . . . . . . . . . . . . . . . . . . . . . . . . . . . . . . . . .
29
29
30
30
31
31
31
31
31
31
32
32
32
32
33
33
33
33
34
34
34
35
35
35
36
36
36
36
36
6 Uninstalling iPort Utility Pack . . . . . . . . . . . . . . . . . . . . . . . . . . . . . . . . . . . . . . 37
Part 3 - iPort/AFM Programmer’s Reference . . . . . . . . . . . . . . . . . . . . . . . . . . 39
Quick Start . . . . . . . . . . . . . . . . . . . . . . . . . . . . . . . . . . . . . . . . . . . . . . . . . . . . . . . 40
ASCII Command Interface . . . . . . . . . . . . . . . . . . . . . . . . . . . . . . . . . . . . . . . . . .
Synchronous Interface Events . . . . . . . . . . . . . . . . . . . . . . . . . . . . . . . . . . . . . .
iPort/AFM Reset . . . . . . . . . . . . . . . . . . . . . . . . . . . . . . . . . . . . . . . . . . . . . .
Status Display . . . . . . . . . . . . . . . . . . . . . . . . . . . . . . . . . . . . . . . . . . . . . . . .
RS-232 Baud Rate . . . . . . . . . . . . . . . . . . . . . . . . . . . . . . . . . . . . . . . . . . . . .
41
42
42
43
43
Close I2C Connection . . . . . . . . . . . . . . . . . . . . . . . . . . . . . . . . . . . . . . . . . .
Set Destination I2C Slave Address . . . . . . . . . . . . . . . . . . . . . . . . . . . . . . . .
Echo/Prompt Control . . . . . . . . . . . . . . . . . . . . . . . . . . . . . . . . . . . . . . . . . .
RS-232 Flow Control . . . . . . . . . . . . . . . . . . . . . . . . . . . . . . . . . . . . . . . . . .
I2C General Call Control . . . . . . . . . . . . . . . . . . . . . . . . . . . . . . . . . . . . . . . .
Hex Only Display Control . . . . . . . . . . . . . . . . . . . . . . . . . . . . . . . . . . . . . . .
Set iPort/AFM’s Own I2C Slave Address . . . . . . . . . . . . . . . . . . . . . . . . . . .
I2C Bus Clock Rate Control . . . . . . . . . . . . . . . . . . . . . . . . . . . . . . . . . . . . .
Command Menu Display . . . . . . . . . . . . . . . . . . . . . . . . . . . . . . . . . . . . . . .
Interrupt Signal Control/Status . . . . . . . . . . . . . . . . . . . . . . . . . . . . . . . . . . .
Open I2C Connection . . . . . . . . . . . . . . . . . . . . . . . . . . . . . . . . . . . . . . . . . .
Master Read Message . . . . . . . . . . . . . . . . . . . . . . . . . . . . . . . . . . . . . . . . . .
Slave Transmit Message . . . . . . . . . . . . . . . . . . . . . . . . . . . . . . . . . . . . . . . .
Master Transmit Message . . . . . . . . . . . . . . . . . . . . . . . . . . . . . . . . . . . . . . .
Set I2C Bus Time-oUt in msec . . . . . . . . . . . . . . . . . . . . . . . . . . . . . . . . . . .
Display Firmware Version . . . . . . . . . . . . . . . . . . . . . . . . . . . . . . . . . . . . . .
eXtended Commands . . . . . . . . . . . . . . . . . . . . . . . . . . . . . . . . . . . . . . . . . .
Display Tx bYte Count . . . . . . . . . . . . . . . . . . . . . . . . . . . . . . . . . . . . . . . . .
Asynchronous Interface Events . . . . . . . . . . . . . . . . . . . . . . . . . . . . . . . . . . . .
Slave Transmit Request . . . . . . . . . . . . . . . . . . . . . . . . . . . . . . . . . . . . . . . . .
Slave Receive Complete . . . . . . . . . . . . . . . . . . . . . . . . . . . . . . . . . . . . . . . .
General Call Receive Complete . . . . . . . . . . . . . . . . . . . . . . . . . . . . . . . . . .
iPort/AFM Ready . . . . . . . . . . . . . . . . . . . . . . . . . . . . . . . . . . . . . . . . . . . . .
Slave Not Acknowledging . . . . . . . . . . . . . . . . . . . . . . . . . . . . . . . . . . . . . .
iPort/AFM Busy . . . . . . . . . . . . . . . . . . . . . . . . . . . . . . . . . . . . . . . . . . . . . .
I2C Bus Arbitration Loss . . . . . . . . . . . . . . . . . . . . . . . . . . . . . . . . . . . . . . . .
I2C Bus Error Detected . . . . . . . . . . . . . . . . . . . . . . . . . . . . . . . . . . . . . . . . .
I2C Bus Time-out Detected . . . . . . . . . . . . . . . . . . . . . . . . . . . . . . . . . . . . . .
iPort/AFM Connection Closed . . . . . . . . . . . . . . . . . . . . . . . . . . . . . . . . . . .
Invalid Command Argument . . . . . . . . . . . . . . . . . . . . . . . . . . . . . . . . . . . . .
Slave Transmit Request Not Active . . . . . . . . . . . . . . . . . . . . . . . . . . . . . . .
Invalid iPort/AFM Command . . . . . . . . . . . . . . . . . . . . . . . . . . . . . . . . . . . .
iPort/AFM RS-232 Receive Buffer Overflow . . . . . . . . . . . . . . . . . . . . . . . .
43
44
44
44
45
45
46
46
46
47
47
48
49
50
51
51
51
54
55
55
55
55
56
56
56
56
56
57
57
57
57
57
58
Example Code . . . . . . . . . . . . . . . . . . . . . . . . . . . . . . . . . . . . . . . . . . . . . . . . . . . .
iPort/AFM Reset . . . . . . . . . . . . . . . . . . . . . . . . . . . . . . . . . . . . . . . . . . . . . . . .
iPort/AFM Initialization . . . . . . . . . . . . . . . . . . . . . . . . . . . . . . . . . . . . . . . . . .
Master Transmit Message . . . . . . . . . . . . . . . . . . . . . . . . . . . . . . . . . . . . . . . . .
Master Receive Message . . . . . . . . . . . . . . . . . . . . . . . . . . . . . . . . . . . . . . . . .
Communication Event Processing . . . . . . . . . . . . . . . . . . . . . . . . . . . . . . . . . . .
59
59
59
59
59
60
iPort/AFM Revision Report . . . . . . . . . . . . . . . . . . . . . . . . . . . . . . . . . . . . . . . . 63
Additional Information . . . . . . . . . . . . . . . . . . . . . . . . . . . . . . . . . . . . . . . . . . . . 63
Appendix A - I2C Connector Information . . . . . . . . . . . . . . . . . . . . . . . . . . . . . 64
Part 1 - iPort/AFM RS-232 to I2C Bus Host Adapter
Part 1
RS-232
to
2
I C Bus Host Adapter
with
ASCII Fast Mode
User’s Guide
Model: MIIC-203
1
1 Overview
The MCC iPort/AFM RS-232 to I2C Bus Host Adapter with ASCII Fast Mode
(#MIIC-203) allows any PC, Host Computer, or Data Terminal to become an I2C
Master or Slave device, transmitting or receiving I2C messages between the PC and
one or more I2C devices across an I2C Bus.
Product Features:
• Turn ANY Computer’s RS-232 Serial Port into an I2C Port.
• Supports Bus Master and Slave, Transmit and Receive, and /INT signal
generation and detection.
• Compatible with 3.3V to 5V I2C at bit rates up to 400 KHz.
• High Performance I2C Bus Co-Processor.
• Optimized for Maximum Bus Throughput with Low Overhead.
• Get on the I2C Bus in Seconds. Includes our free I2C Message Center and
Message Manager Windows Applications.
• Simple ASCII Text Commands makes building your own custom I2C
applications quick and easy. Programmer’s Reference and Sample Programs
included.
• Fully Compatible with iPort/AI applications.
The I2C adapter system consists of the following components:
1.1
iPort/AFM RS-232 to I2C Bus Host Adapter
This adapter plugs into an RS-232 Port on any host computer and generates I2C Bus
signals.
1.2
iPort Utility Pack Software
This free software package includes the iPort Message Center and Message
Manager applications to help you easily send and receive I2C Bus messages.
1.3
iPort/AFM Programmer’s Reference
This section of the iPort/AFM User’s Guide provides a programmer’s guide to
creating custom I2C Bus applications. Find additional sample programs and
complete projects on our web site’s Sample Program page.
2
1.4
Packing Slip
This package includes the following items:
•
•
•
•
•
•
•
1.5
iPort/AFM RS-232 to I2C Bus Host Adapter (#MIIC-203).
I2C Interface Cable.
Interrupt (/INT) Signal Clip Lead Wire.
RS-232 Serial Port Cable, 9F/25M.
iPort/AFM User’s Guide.
iPort Utility Pack for Windows software.
Power Supply.
System Requirements
a. A host computer with one free RS-232 port.
b. Windows 95 OS or higher to run iPort Utility Pack applications.
2 Interconnects
The iPort/AFM includes four interconnections:
RS-232 Serial Port Connector
2.1
RS-232 Serial Port Connector
The RS-232 connector provides connection from the I2C adapter to the serial port
on the host computer. For computers with DB-9 connectors, use the DB-9 to DB-25
(#C9F25M1) cable provided with the adapter, or equivalent.
3
The I2C adapter implements the RS-232 interface using the following pins:
2.1.1 DB-25 Serial Port Pinout
DB-25 Pin 2, Transmit Data from the Host Computer to the iPort
DB-25 Pin 3, Receive Data from the iPort to the Host Computer.
DB-25 Pin 4, Request to Send from the Host Computer to iPort.
DB-25 Pin 5, Clear to Send from the iPort to the Host Computer.
DB-25 Pin 7, Ground between Host Computer and iPort
2.1.2 DB-9 Serial Port Pinout
DB-9 Pin 3, Transmit Data from the Host Computer to the iPort
DB-9 Pin 2, Receive Data from the iPort to the Host Computer.
DB-9 Pin 7, Request to Send from the Host Computer to iPort.
DB-9 Pin 8, Clear to Send from the iPort to the Host Computer.
DB-9 Pin 5, Ground between Host Computer and iPort
2.2
+5VDC Power Jack
The I2C adapter requires 50ma of REGULATED +5 volt power. This power can be
supplied in one of two ways:
• Via the power jack.
If the I2C adapter is powered via its +5VDC power jack, excess power is
available via the +5V wire in the I2C connector to power external devices.
• Via the I2C interface connector.
If 50ma of regulated +5V power is available in the target system, the I2C adapter
can be powered via the +5V wire in I2C interface connector.
2.3
I2C Interface Connector
The I2C adapter includes a four wire, positive locking, modular receptacle connector
(see Appendix A) for interfacing to an external I2C Bus. Lines provided include I2C
Clock (SCL), I2C Data (SDA), Ground, and +5VDC.
Use of the +5V wire is optional. Connect this wire to the target system to power the
I2C adapter and the target system from a common regulated 5V power supply.
4
Receptacle Connector
An I2C Interface Cable (White=SCL, Red=+5VDC, Green=SDA, Black=Ground) is
provided to connect to an external I2C Bus. Since there is no standard I2C Bus
connector, you may want to cut off one end of the cable and add a connector
compatible with your target system.
Additional I2C Interface Cables (4 ft., 8 ft., or 16 ft.), and modular connectors are
available from MCC. Clip Lead cables are also available. (see Appendix A)
2.4
Interrupt (/INT) Signal Connector
The Interrupt (/INT) signal is an extra pin found on some I2C devices. The /INT
signal allows a slave-only device to attract the attention of a bus master device by
lowering the /INT signal voltage level.
The iPort/AFM provides an open-drain /INT signal which can be connected to a
corresponding pin on a master or slave device. The /INT signal allows the
iPort/AFM to participate in interrupt signaling between master or slave devices.
An interrupt output (/INT=low) is generated upon receiving an iNterrupt Assert
command from the host computer. The interrupt signal is released (/INT = high)
when the iPort/AFM is addressed as an I2C Bus slave device, or a iNterrupt Release
command is received from the host computer.
Interrupt monitoring is enabled upon receiving an Enable /INT Monitor command
from the host computer. Interrupt monitoring causes the iPort/AFM to monitor the
5
/INT signal level, and send a notification to the host computer when the /INT signal
changes state.
3 Hardware Configuration
3.1
Pull-up Resistors
The I2C adapter includes a slide switch used to enable or disable internal +5VDC
I2C Bus 1.8K ohm pull-up resistors attached to the SCL, SDA, and /INT lines.
Every I2C Bus system must have at least one pull-up on the signal lines. Use this
switch to configure the pull-up resistors for your system.
3.2
Connecting to a 3.3 Volt Target System
If you are connecting the I2C adapter to a 3.3 volt target system, you should follow
these steps BEFORE applying power:
• Shut off the I2C adapter’s internal pull-ups (See Pull-up Resistor section). Use
external pull-ups to the target system’s 3.3V power. These pull-ups may already
be present in the target system.
• Disconnect the I2C connector +5V wire from the target system. The I2C adapter
will be powered from its own +5V power supply, and the target system will be
powered by its own 3.3V power supply.
The I2C adapter is a 5-volt device. Any signal above 3.3V on the SCL and SDA
lines is high enough for the adapter to see a Logical 1.
3.3
Connecting to an SMBus Target System
If you are connecting the I2C adapter to a SMBus target system, you should follow
these steps BEFORE applying power:
• Shut off the I2C adapter’s internal pull-ups (See Pull-up Resistor section).
• Use external SMBus rated (approx. 15k ohm) pull-up resistors. These pull-ups
may already be present in the target system.
• Visit the I2C .vs. SMBus FAQ page (www.mcc-us.com/I2CSMBusFAQ.htm).
• See the SMBus Specification for additional details.
Special Note for SMBus Users: MCC’s I2C adapters are designed to be I2C Bus
compatible, not SMBus compatible. Some features of the SMBus protocol not
6
supported include time-outs, device reset, and Packet Error Check byte processing.
The non-supported SMBus features may, or may not, permit the use of the I2C
adapter in your SMBus application. Consult the MCC FAQ web page and SMBus
Specification for details.
4 ESD (Electrostatic Discharge) Precautions
Electrostatic discharge is defined as the transfer of charge between bodies at
different electrical potentials. Electrostatic discharge can change the electrical
characteristics of a semiconductor device, degrading or destroying it. Electrostatic
discharge also may upset the normal operation of an electronic system, causing
equipment malfunction or failure.
When connecting the I2C adapter to a host computer and a target system, extreme
care must be taken to avoid electrostatic discharge. Failure to follow ESD protection
procedures when using the I2C adapter could damage the host computer, I2C
adapter, or the target system, and void product warranty coverage.
4.1
Host Computer Grounding
Case 1 - Desktop and Single-board Computers. The chassis on a desktop or
single-board host computer must be connected to earth ground to comply with
safety regulations. If the computer chassis is NOT connected to earth ground for
some reason (i.e., use of a two-prong power mains plug), the host computer power
supply ground will float to some unknown voltage potential.
Case 2 - Laptop Computers. Laptop computers present special ESD problems. Most
laptop computers use an external double-insulated mains power supply which is
NOT connected to the mains earth ground. This means that the laptop chassis is
floating at some unknown voltage potential.
In either case, upon connection to the I2C adapter and the target system, the host
computer will discharge energy through its RS-232 port to the I2C adapter, and on
to the target system. This discharge could damage the host computer, I2C adapter,
and the target system.
4.2
Grounding Solutions
To avoid damage to the host computer, I2C adapter, or target system, follow these
instructions:
7
• Wear an earth grounded wrist strap, or discharge any static charge build-up,
when handling the I2C adapter or any target system devices.
• Ensure that both the host computer and target system are connected to a common
earth ground point.
• Make sure that all interconnections are made BEFORE applying power to the
host computer, I2C adapter, and target system.
• If you are using a laptop computer or host computer that is NOT connected to
mains earth ground, make a hard-wired connection from the host computer (i.e.,
RS-232 port D-connector shell) and the target system ground connector to a
common earth ground point.
• Avoid plugging and unplugging system components while the host computer or
target system is powered.
• Ensure that any devices connected to the target system are properly grounded to
the common earth ground point.
• If unsure how to properly ground system components, seek electrical expert help.
WARNING: Any damage caused by Electrostatic Discharge (ESD) through
inadequate earth grounding is NOT covered under the warranty of this product.
5 Hardware Set-Up
This section provides information on connecting the I2C adapter to your host
computer and I2C Bus target system.
1. Attach the I2C adapter to a free RS-232 port on your host computer. If your
RS-232 port has a DB9 connector, use DB-9F to DB-25M serial port cable
included with the I2C adapter.
2. Connect the I2C Bus cable to the I2C adapter and your I2C device. If your
device does not have the matching I2C connector, you can cut the end of the
cable and attach the individual wires via any appropriate connector (See the
“I2C Interface Connector” section for details). MCC also offers an I2C
clip-lead cable (#CABCL) that is compatible with our adapters. You may not
need to, or want to, connect the +5V wire to your target system. Refer to the
“+5VDC Power Jack” and “Hardware Configuration” sections for details on
pull-up resistors and connecting the optional +5V wire.
3. Connect I2C adapter power via the power jack or I2C Bus connector. See
“+5VDC Power Jack” section for details.
8
If you have any questions on I2C adapter setup and configuration, please contact our
technical support department via our web site.
9
10
Part 2 - iPort Utility Pack for Windows
Part 2
iPort Utility Pack
for
Windows
V5.2
11
12
1 iPort Utility Pack for Windows
The iPort Utility Pack for Windows is your express lane to I2C Bus
communications. The Utility Pack includes two (2) Windows-based applications
(Message Center and Message Manager) that will help you get started sending and
receiving I2C Bus messages quickly and easily.
1.1
iPort Message Center
The iPort Message Center, our most popular application, operates with all versions
of our I2C Bus Host Adapters. With the Message Center, you can create, save, and
automatically execute scripts of I2C Bus messages. I2C Bus message activity
includes:
• Master Transmit
• Master Receive
13
1.2
iPort Message Manager
The iPort Message Manager operates with all versions of our I2C Bus Host
Adapters. Using the Message Manager, you can perform all four (4) modes of I2C
Bus message activity, including:
•
•
•
•
Master Transmit
Master Receive
Slave Transmit
Slave Receive
14
2 System Requirements
One of the following MCC I2C Bus adapters:
1.
2.
3.
4.
iPort (#MIIC-201) Windows to I2C Bus Host Adapter.
I2C Bus Host Adapter Variable Clock Rate (#MIIC-201-V).
iPort/AI (#MIIC-202) RS-232 to I2C Bus Host Adapter with ASCII Interface
iPort/AFM (#MIIC-203) RS-232 to I2C Bus Host Adapter with ASCII Fast
Mode Interface.
Windows 95 OS or higher.
1 free RS-232 Serial Port.
3 iPort Utility Pack Installation
3.1
Installing from CD
1. Insert a software distribution CD into your CD drive.
2. If the install program does not start automatically, select Start*Run and type
“D:SETUP.EXE.” Click OK.
3. Follow instructions on screen.
3.2
Installing from the Web
Visit MCC’s web site (www.mcc-us.com), and click on the Upgrades/Updates link.
1
2
3
4
Click to download the .ZIP file.
Unzip the downloaded file, storing the files in a temporary folder.
Click on "Setup.exe.”
Follow the instructions on screen.
15
4 iPort Message Center
The iPort Message Center supports I2C Master Transmit and Master Receive
activities for all MCC I2C Bus host adapters. With this program you can create,
save, and execute scripts of I2C Master messages.
Main Application
The iPort Message Center allows a PC to become an I2C Master transmitter or
receiving device, sending I2C messages between the PC and one or more I2C
devices across an I2C Bus.
The iPort Message Center is designed to be a simple application for experimenting
with I2C messages. It provides methods to:
1. Enter/Edit a list of I2C Master Transmit or Receive Messages.
2. Save and/or Load a list of I2C Master messages to/from disk.
3. Transmit the current list of I2C Master messages, with the option to
auto-repeat upon completion, send on INT signal assertion (with INT signal
supported adapters only), and beep or stop on special I2C Bus events.
4. Use command line arguments to automatically load, send, and save I2C
messages from a batch file or another program.
Each I2C message can transfer up to 32 bytes of 8-bit data, with Repeated Start and
Time Delay options.
16
4.1
Message Center Operations
Communicating with another device on the I2C Bus is easy. Just install the software
as described in Section 3, then following these simple steps:
4.1.1 Starting the Message Center
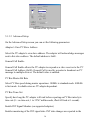
Click, Start *Programs *iPort Utility Pack*iPort Message Center
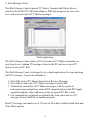
4.1.2 Selecting the Adapter
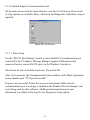
Select the I2C adapter you are using by clicking the corresponding adapter image
(see Opening Screen), or the Device Select checkbox (see Main Application
Screen).
Opening Screen
Main Application
17
4.1.3 Select the Communications Port
Use the “Using Com:” control to select the RS-232 communication port connected
to the I2C adapter. Message Center supports USB and network connected local or
remote RS-232 ports via the Windows Com driver.
4.1.4 Options Menu
Use the Options menu to override default Baud Rate and I2C Bus Clock rate
settings. Default settings and options are adapter dependant.
4.1.5 Establish Adapter Communications Link
Establish the communications link to the I2C adapter by clicking the Open Link
button.
The Message Center sets the adapter’s own I2C Slave address to 0xFE. Once the
link has opened successfully, you are an active I2C node. I2C messages entered into
the message spreadsheet can be transmitted upon request. If the link open is not
successful, follow the on-screen directions. Make sure the communications port is
working, is enabled in the Windows Device Manager, and is not being used by
other software.
4.1.6 Entering or Editing I2C Messages
I2C messages can be entered with the Message Editor, or a previously recorded
message list can be loaded from the File menu.
To enter or edit a message, open the “I2C Message Editor” screen by double
clicking on a message row in the spreadsheet.
18
Use the I2C Message Editor to:
1. Set I2C Address.
The I2C Address is the I2C slave address of the slave device being addressed
on the bus. All slave addresses are displayed as even numbers (00...FE),
representing the 7 most significant bits of the 8-bit slave address transmitted
on the bus (aaaa aaa0).
The I2C adapter automatically supplies the 8th, least significant, Read/Write bit
when it sends the slave address across the bus. For master write operations,
the Read/Write bit is always transmitted as a logical 0 (aaaa aaa0). For master
read operations, the Read/Write bit is always transmitted as a logical 1 (aaaa
aaa1).
Use the I2C Address control to set the slave address of the slave device you
want to address on the bus.
2. Set Message Read/Write Direction.
As a bus master device, the I2C adapter can write data to, or read data from,
any device on the bus. Use the Msg Direction control to specify if the current
message is a master write, or master read, operation. Upon making your
selection, additional Write or Read parameters appear.
3. Specify Repeated Start Messages.
I2C Bus communications support an operation called Repeated Start. In this
operation, a message is sent across the bus beginning with a Start Condition,
but without a Stop Condition at the end of the message. The next message sent
across the bus begins with a Start Condition, in this case a Repeated Start.
An I2C Bus master, that successfully sends a message on the bus, owns the bus
until that master sends a message with a terminating Stop Condition. The
Repeated Start operation allows the bus master to retain control of the bus
while sending one or more messages on the bus. This prevents other bus
masters, in a multi-master system, from accessing the bus and interfering with
message sequences.
The Message Center supports Repeated Starts with the doStop control.
19
Sending an I2C message with doStop enabled will cause the message to be
terminated with a Stop Condition. Sending an I2C message with doStop
disabled will cause the message to end without a Stop Condition, allowing the
next message to be sent with a Repeated Start.
4. Set Time Delay.
Message Center supports time delays after the completion of a message. Time
delays can be used to synchronize or sequence bus messages with the activity
of external devices.
5. Specify Write Data or Read Byte Count.
Enter the hexadecimal data you want to write to a slave receiver device, or the
number of data bytes to read from a slave transmitter. Message Center
supports up to 32 bytes of 8-bit data per message.
NOTE: The data you send may have special meaning to the receiving slave
device, but to the Message Center, and the I2C adapter, message data has no
special meaning. Consult your slave device’s data sheet for details.
Click OK to accept the message and enter it into the spreadsheet.
Master Write messages display the message data in the spreadsheet. Master Read
messages display 0xFF placeholders in the spreadsheet. Upon execution, actual data
received from a slave transmitter replaces the placeholders in the message
spreadsheet.
Repeat above steps for additional messages. The Message Center supports up to
32,000 messages in a list.
4.1.7 Inserting and Deleting Messages
You can insert a new message between existing messages by clicking once on a
message below where you want to insert, then press the “Insert” key on your
keyboard. The Message Editor also remembers the last message displayed, so
double clicking on a blank spreadsheet row will allow you to copy a message.
Delete a message by single clicking on the message row and pressing the “Delete”
key on your keyboard.
20
4.1.8 Saving or Loading Message Lists
Message Center I2C message lists can be saved to, or loaded from, a disk file. To
save the current message list, click File|Save on the menu bar. To open an existing
message list, click File|Open List on the menu bar.
Message lists are maintained in ASCII text files (*.IML) that can be edited
manually or created with a customer-developed program. See message list files for
details.
4.1.9 Send the Message List
An I2C message list can be sent manually, or automatically in response to an INT
signal assertion (with INT signal supported adapters only). To send the list
manually, click the Send button on the main application screen. To send the list in
response to an INT signal assertion (low), enable the “/INT Signal Monitoring”
checkbox, and check the “Send on /INT” checkbox. The list will be sent each time
the INT signal is asserted.
The Message Center also supports the repeated sending of a message list. If the
Auto Repeat checkbox is checked, a message list will automatically repeat upon
completion.
4.1.10 Special Event Handling
The Message Center supports the early termination of a message list, and beep on
special events. See the “Stop On” and “Beep On” controls on the main application
screen of available options.
4.1.11 Slave Not Acknowledging
If you get a “Slave Not Acknowledging” message in the Status window, this could
indicate you have the wrong address in the I2C Destination Address, or the device is
not answering to its address. Some slave devices temporarily stop acknowledging
their address. Consult the slave device’s data sheet for details.
21
4.2
Command Line Arguments
The Message Center can be controlled via command line arguments. This feature
allows the Message Center to be accessed from a batch file or another program.
Message Center
Command Line Arguments
Command
Description
iPort, iPort/AI, iPort/AFM, Variable
Specify I2C adapter type.*
COM1...COM20
Specify RS-232 communication port.
BAUD19200, BAUD57600, BAUD115200
Set RS-232 Baud Rate.*
CLOCK12.5K, CLOCK23K, CLOCK86K,
CLOCK100K, CLOCK400K, VCLOCK
Set I2C Bus Clock Rate.*
Monitor/INT
Enable /INT Signal Monitor.*
StopOnBusy
Stop sending on I2C adapter busy.
StopOnArbLoss
Stop sending on I2C Bus Arbitration Loss.
StopOnNak
Stop on Slave Negative Acknowledgment.
BeepOnBusy
Beep on I2C adapter busy.
BeepOnArbLoss
Beep on I2C Bus arbitration loss.
BeepOnNak
Beep on Slave Negative Acknowledgment.
BeepOn/INT
Beep on /INT signal assert (low).*
AutoLoad
Load I2C message list file.
AutoSave
Save I2C message list file.
AutoOpen
Open link to I2C adapter.
AutoSend
Send I2C message list.
AutoExit
Exit after sending message list.
* Adapter specific commands. See command details below.
Command Line Syntax: imsgctr.exe AdapterType argument-list
Example: imsgctr.exe iPort/AFM adctest01.iml AutoOpen AutoSend AutoExit
22
4.2.1 Set Adapter Type
iPort
iPort/AI
iPort/AFM
Variable
iPort (#MIIC-201)
iPort/AI (#MIIC-202)
iPort/AFM (#MIIC-203)
Variable Clock (#MIIC-201-V)
The Adapter Type argument should be the first argument in the argument list as it
controls the availability of other arguments. If the Adapter Type is not specified, the
startup adapter selection screen will be presented.
4.2.2 Set RS-232 Communication Port
COM1 (Default)
COM2...COM20
Set the RS-232 communications port attached to the I2C adapter.
4.2.3 Set RS-232 Baud Rate
BAUD19200 (Default)
BAUD57600 (iPort/AFM ONLY)
BAUD115200 (iPort/AFM ONLY)
Set the RS-232 Baud Rate.
4.2.4 Set I2C Bus Clock Rate
CLOCK12.5K
CLOCK23K
CLOCK86K
CLOCK100K
CLOCK400K
VCLOCK=nnnHz
(iPort ONLY)
(iPort/AFM ONLY)
(iPort/AFM ONLY)
(iPort, iPort/AI, iPort/AFM, Default)
(iPort/AFM ONLY)
(Variable ONLY. nnn=451...57787)
Set the I2C Bus Clock Rate to the specified value. The defaults rate for the Variable
Clock the adapter is 451Hz. The Variable Clock adapter does not support all rates
within the specified range. The Message Center will adjust the specified rate to the
nearest available supported rate.
23
4.2.5 Enable /INT Signal Monitor
Monitor/INT (on INT supported adapters only. Default=OFF)
Enable /INT signal monitoring.
4.2.6 Stop On Busy
StopOnBusy (Default=OFF)
Stop sending I2C messages if the adapter returns a "Busy" response to the host
computer.
4.2.7 Stop On Arbitration Loss
StopOnArbLoss (Default=OFF)
Stop sending I2C messages if the adapter returns a "Bus Abritration Loss" response
to the host computer. Bus Arbitration Loss occurs when another I2C Bus master
wins arbitration while the adapter is attempting to become a bus master.
4.2.8 Stop On Slave Negative Acknowledgment
StopOnNak (Default=OFF)
Stop sending I2C messages if the adapter returns a "Slave Not Acknowledging"
response to the host computer. Slave Not Acknowledging occurs when the adapter
is attempting to become a bus master and no slave device acknowledges the
transmitted slave address.
4.2.9 Beep On Busy
BeepOnBusy (Default=OFF)
Generate a host computer beep if the adapter returns a "Busy" response to the host
computer.
4.2.10 Beep On Arbitration Loss
BeepOnArbLoss
(Default=OFF)
24
Generate a host computer beep if the adapter returns a "Bus Arbitration Loss"
response to the host computer. Bus Arbitration Loss occurs when another I2C Bus
master wins arbitration while the adapter is attempting to become a bus master.
4.2.11 Beep On Slave Negative Acknowledgment
BeepOnNak (Default=OFF)
Generate a host computer beep if the adapter returns a "Slave Not Acknowledging"
response to the host computer. Slave Not Acknowledging occurs when the adapter
is attempting to become a bus master and no slave device acknowledges the
transmitted slave address.
4.2.12 Beep On /INT Assert
BeepOn/INT (on INT supported adapters only. Default=OFF)
Generate a host computer beep if the adapter returns a "/INT Signal Assert"
response to the host computer. /INT Signal Assert occurs if /INT Signal Monitoring
is enabled and a high to low transition is detected on the adapter /INT signal
connector.
4.2.13 Load I2C Message List File
AutoLoad=filename
AutoLoad="file name"
filename.iml
"file name.iml"
Automatically open file with extension .IML and load messages into Message
Center spreadsheet.
4.2.14 Saved I2C Message List File
AutoSave=filename
AutoSave="file name"
Automatically save message list to the specified file upon executing AutoExit. Use
to save message data read from a slave transmitter device.
25
4.2.15 Auto Open
AutoOpen
Auto Open Link to I2C Adapter
Open link to adapter.
4.2.16 Auto Send
AutoSend
Auto Send I2C Message List
Send I2C messages loaded with the AutoLoad command.
4.2.17 Auto Exit
AutoExit Auto exit after sending the message list.
Message Center will auto exit after sending the last message in the I2C message list.
26
5 iPort Message Manager
The iPort Message Manager supports I2C Master and Slave, Transmit and Receive
activities for all MCC I2C Bus host adapters, allowing a PC to become an I2C
Master or Slave device, transmitting or receiving I2C messages between the PC and
one or more I2C devices across an I2C Bus.
Main Application
The Message Manager is designed to be a simple application for experimenting
with I2C messages. Message Manager provides methods to:
1. Set the I2C adapter’s own I2C Slave address, General Call Enable, and other
operating parameters.
2. Master Transmit ASCII text or Hex (00...FF) data to a specified I2C Slave
Receiver device.
3. Master Receive data from a specified I2C Slave device.
4. Perform Master Read after Write operations.
5. Slave Transmit data to a requesting I2C Master device.
6. Display Master or Slave Receive data in hexadecimal or ASCII.
7. Display I2C Bus communication events.
8. Assert or release the INT signal (on supported adapters only).
27
5.1
Message Manager Operations
Communicating with another device on the I2C Bus is easy. Just install the software
as described in Section 3, then following these simple steps:
5.1.1 Starting the Message Manager
Click, Start *Programs *iPort Utility Pack*iPort Message Manager
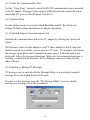
5.1.2 Select the Adapter
Select the I2C adapter you are using by clicking the corresponding adapter image
(see Opening Screen), or the Device Select checkbox (see Main Application
Screen).
Opening Screen
Main Application
28
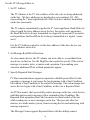
5.1.3 Establish Adapter Communications Link
On the main screen, click the Open button to view the Set Up Screen. Three levels
of setup options are available, Basic, Advanced, and Diagnostic. Only Basic setup is
required.
Basic Set Up Screen
5.1.3.1 Basic Setup
Use the “RS-232 Port Settings” control to select the RS-232 communication port
connected to the I2C adapter. Message Manager supports USB and network
connected local or remote RS-232 ports via the Windows Com driver.
Select from the list of available baud rates. Then click OK.
After a few moments, the Communication Events window on the Main Application
screen should report “I2C Open Successful.”
If open is not successful, follow the on-screen instructions. Make sure the
communications port is working, is enabled in the Windows Device Manager, and
is not being used by other software. Additional communication port open
information is available in the log file. See Diagnostic Setup options.
29
Advanced Set Up Screen
5.1.3.2 Advanced Setup
On the Advanced Setup screen you can set the following parameters:
Adapter’s Own I2C Slave Address
Select the I2C adapter’s own slave address. The adapter will acknowledge messages
sent to this slave address. The default address is 0x6E.
General Call Enable
General Call Enable allows the I2C adapter to respond as a slave receiver to the I2C
General Call Address (0x00). General Call is used by a master to broadcast an I2C
message to multiple devices. The default value is enabled.
I2C Bus Master Bit Rate
Select I2C Bus speed during master operations. 100kHz is standard mode. 400kHz
is fast mode. Available rates are I2C adapter dependant.
I2C Bus Time-Out
Specify how long the I2C adapter will wait before reporting an I2C Bus intra-byte
time-out (0 = no time-out, 1 to 32767 milliseconds, iPort/AI fixed at 1 second).
Enable INT Signal Monitor (on supported adapters)
Enables monitoring of the INT signal state. INT state changes are reported in the
30
main screen Communications Events window.
Diagnostic Set Up Screen
5.1.3.3 Diagnostic Setup (on supported adapters)
On the Diagnostic Set-up screen you can set the following parameters:
Log File Level
A log file is available to troubleshoot RS-232 communication problems with the
selected communication port. The log file is an ASCII text file viewable with any
text editor. Select logging level. Level 1 provides minimum information. Level 4
provides maximum information.
Log File Name
Specify a log file name. Unless a path is specified, the log file will be created in the
current working directory.
Log File Size
Specify log file length in lines. The log file overwrites earlier entries upon reaching
the specified number on lines.
31
5.1.4 Sending I2C Messages
5.1.4.1 Master Operations
5.1.4.1.1
Specifying the Destination Address
The Destination Address is the I2C slave address of the slave device being
addressed on the bus. All slave addresses are displayed as even numbers (00...FE),
representing the 7 most significant bits of the 8-bit slave address transmitted on the
bus (aaaa aaa0).
The I2C adapter automatically supplies the 8th, least significant, Read/Write bit
when it sends the slave address across the bus. For master write operations, the
Read/Write bit is always transmitted as a logical 0 (aaaa aaa0). For master read
operations, the Read/Write bit is always transmitted as a logical 1 (aaaa aaa1).
On the main screen, use the I2C Destination Address list control to set the slave
address of the slave device you want to address on the bus.
5.1.4.1.2
Repeated Start Messages
I2C Bus communications support an operation called Repeated Start. In this
operation, a message is sent across the bus beginning with a Start Condition, but
without a Stop Condition at the end of the message. The next message sent across
the bus begins with a Start Condition, in this case a Repeated Start.
An I2C Bus master, that successfully sends a message on the bus, owns the bus until
that master sends a message with a terminating Stop Condition. The Repeated Start
operation allows the bus master to retain control of the bus while sending one or
more messages on the bus. This prevents other bus masters, in a multi-master
system, from accessing the bus and interfering with message sequences.
The Message Manager supports Repeated Starts with the doStop checkbox. Sending
an I2C message with doStop checked will cause the message to be terminated with a
Stop Condition. Sending an I2C message with doStop unchecked will cause the
message to end without a Stop Condition, allowing the next message to be sent with
a Repeated Start.
32
5.1.4.1.3
Auto Repeat
The situation often arises, where you would like to automatically repeat a master
message operation.
The Message Manager supports auto-repeat with the Auto Repeat checkbox. You
can automatically repeat a master operation by checking the Auto Repeat control
before clicking the Master Tx, Master Rx, or Master TxRx buttons. The master
operation repeats until the Auto Repeat control is unchecked.
5.1.4.1.4
Master Transmitting Data
Specifying Master Tx Message Bytes
Master Tx Message Bytes is the ASCII or Hexadecimal data you want to transmit to
a slave receiver device. With the Message Manager, entering master transmit data is
easy. On the main application screen, click on the Master Tx Message Bytes box to
open the data editor.
In the data editor, enter one or more ASCII text characters or hexadecimal data
bytes. Each hexadecimal byte is entered as two ASCII-Hex characters (00 to FF)
preceded by a tilde (~) character. ASCII text and hex data can be intermixed, as
long as each hex byte is preceded by a tilde.
For example, to enter hex data bytes 0x00, 0x01, and 0x02, enter the characters
~00~01~02 into the text box.
Each iPort Message Manager I2C message can include up to 80 bytes of 8-bit ASCII
binary data.
NOTE: The data you send may have special meaning to the receiving slave device,
but to the Message Manager, and the I2C adapter, message data has no special
meaning. Consult your slave device’s data sheet for details.
33
Click OK to accept the data.
Sending Master Transmit Messages
Click the Master Tx button to write the specified Master Tx Data Bytes to the
selected destination slave device. If Auto Repeat is checked, the message will
automatically repeat upon completion.
The Communications Events window on the main screen should report “Master Tx
Complete.” If this message does not appear, check the slave device address,
connections, and power.
If you get a “Slave Not Acknowledging” message in the Communications Events
window, this could mean you have the wrong address in the I2C Destination
Address, or the device is not answering to its address. Consult your slave device’s
data sheet for details.
5.1.4.1.5
Master Receive Data
Specifying Data to Read
On the lower part of the main screen, set the Bytes to MasterRx edit box to the
number of bytes you want to read. For example: Set this to 1 to read a single byte.
Click on the MasterRx button to read the data from the selected slave device.
Data received from the slave is displayed in the Received Messages text box on the
main screen. The Communications Events window should report “Master Rx
Transfer Complete.” If this message does not appear, check the slave device
address, connections, and power.
If you get a “Slave Not Acknowledging” message in the Communications Events
window, this could mean you have the wrong address in the I2C Destination
Address, or the device is not answering to its address. Consult your slave device’s
data sheet for details.
34
Negative Acknowledge Last Byte
On supported adapters, the doNak checkbox gives you the option to acknowledge,
or negatively acknowledge, the last byte read from a slave device. Some Slave
Transmitter Devices require a negative acknowledgment on the final byte read from
the slave device. I2C adapters not supporting this option automatically negatively
acknowledge the last byte read.
5.1.4.1.6
Master Transmit and Receive
The Master TxRx button send a master write message with no Stop Condition,
immediately followed by a Repeated Start master read message with Stop.
5.1.4.2 Slave Operations
In addition to performing I2C Bus master operations, the Message Manager can also
perform I2C bus slave transmit and receive operations.
5.1.4.2.1
Slave Transmit Data
Slave transmit data is entered in the Slave Tx Message Bytes text box control on the
main screen. Data in this text box is automatically sent to a requesting master upon
receiving a slave transmit request.
Like Master Transmit data, Slave Transmit data is entered with the data editor. To
enter data to be transmitted, click on the Slave Tx Message Bytes text box to open
the data editor. See “Specifying Master Tx Message Bytes” section for data entry
details.
5.1.4.2.2
Slave Receive Data
Data bytes received from a Master Transmitter are automatically displayed in the
main application screen Received Message window. Received data is displayed in
ASCII printable, or hexadecimal (~00 to ~FF) formats. Use the Hex-Display
checkbox to force ASCII printable data to display in hexadecimal format .
35
6 Uninstalling iPort Utility Pack
Click, Start | Programs | iPort Utility Pack | uninstall.
Follow the on screen instructions.
36
Part 3 - iPort/AFM Programmer’s Reference
Part 3
Programmer’s Reference
ASCII Command Interface
Definitions
37
Programmer’s
Quick Start
Creating a custom iPort/AFM program is easier if you know what to expect. Follow
these steps to manually control the iPort/AFM from your computer’s keyboard and
screen.
1 Install the iPort/AFM as directed in the “Hardware Set-Up” section of this User’s
Guide.
2 Use a terminal emulator program, like Windows’ Hyperterminal, to start
communicating with the I2C adapter. Remember to select the correct Com Port
(COM1, COM2,…) and set the communication parameters to 19200 Baud, 8 Data
Bits, No Parity, and 1 Stop Bit.
3 Enter //[CR] to get an iPort/AFM Status Report. Note: All iPort/AFM
commands are terminated with a Carriage Return ([CR]) character. On most
terminal emulators, press the Enter key.
4 Enter /F0[CR] (XON/XOFF) or /F1[CR] (RTS/CTS) to set iPort/AFM’s
communications Flow Control to match your terminal.
5 Enter /Ixx[CR] (xx = 02…FE even) to set iPort/AFM’s Own I2C Slave Address.
6 Enter /O[CR] to Open the iPort/AFM Connection. The iPort/AFM does not
need to be connected to an I2C Bus to open a connection.
7 Enter /Dxx[CR] (xx = 00…FE even) to select a Destination I2C Slave Address
8 Enter /Ttext[CR] (text = ASCII or Hex-Equivalent ~00…~FF) to Master
Transmit a message to the current Destination I2C Slave device
9 Enter /Rn[CR] (n = 0…32767) to Master Read a message from the current
Destination I2C Slave device.
38
iPort/AFM
ASCII Command Interface
Note: [CR] = Carriage Return Code or Enter Key.
Syntax: [Select], (Optional), xx = [00..FE], n = [0..32767]
Command
Description
Ctrl/R,Ctrl/R,Ctrl/R
iPort/AFM Reset
This command resets the iPort/AFM to its default state.
//[CR]
Status Display
Display iPort/AFM status information.
/B[0|1|2][CR]
RS-232 Baud Rate Control
Set the RS-232 Baud rate (0 = 19.2, 1 = 57.6, 2 = 115.2 Baud)
/C[CR]
Close I2C Connection
Disconnect from the I2C Bus.
/Dxx[CR]
Set Destination I2C Slave Address
Set the destination I2C Slave Address for subsequent Master Transmit or
Receive operations.
/E[0|1][CR]
Echo/Prompt Control [0 = Off, 1 = On]
Enable/Disable data entry echo and prompts.
/F[0|1][CR]
Flow Control [0 = XON/XOFF, 1 = RTS/CTS]
Select RS-232 communication handshaking protocol.
/G[0|1][CR]
I2C General Call Control [0 = Disabled, 1 = Enabled]
Enables/Disables iPort/AFM response to I2C Bus General Call (00) messages.
/H[0|1][CR]
Hex Only Display Control [0 = Disabled, 1 = Enabled]
Controls display format of received message data.
/Ixx[CR]
Set iPort/AFM’s Own I2C Slave Address
Sets iPort/AFM's own I2C Slave Address. iPort/AFM will respond to I2C Bus
messages sent to this address.
/K[0|1|2|3][CR]
I2C Bus Clock Rate Control
Set I2C Bus Clock Rate Control (0=23, 1=86, 2=100, 3=400 KHz)
/M[CR]
Command Menu Display
Displays iPort/AFM’s Command Menu
/N([0|1|A|R])[CR]
iNterrupt Signal Monitor/Control/Status
Sets Monitor/Control/Status of INT line.
[0 = Disable, 1 = Enable, A = Assert, R = Release, CR=Status]
/O[CR]
Open I2C Connection
Activates iPort/AFM as an I2C device attached to the bus.
/(*)Rnnnn[CR]
Master Read Message
Read the specified number of data bytes from the current Destination I2C Slave
device. * = No Stop for Repeated Start.
39
/Stext[CR]
Slave Transmit Message
Write the specified data bytes to a requesting I2C Master Receiver device.
/(*)Ttext[CR]
Master Transmit Message
Master Transmit the specified data bytes to the current Destination I2C Slave
device. * = No Stop for Repeated Start.
/Un[CR]
I2C Bus Time-oUt
Set I2C Bus Time-oUt in msec (0=Disable)
/V[CR]
Display Firmware Version
(Major XX.XX Minor) (Requires Firmware V2.0 or later)
/X[CR]
eXtended Commands
(See Prompt or User’s Guide) (Requires Firmware V2.0 or later)
/Y[CR]
Display Tx bYte Count (Requires Firmware V2.0 or later)
Synchronous Interface Events
Synchronous Events are those iPort/AFM interface activities initiated by the Host
computer.
iPort/AFM Reset
Reset iPort/AFM to its default state.
The reset command consists of three (3) sequential Ctrl/R characters. Ctrl/R is the
character code Decimal 18 and Hexadecimal 0x12. When using a terminal emulator
program, you can generate a Ctrl/R by holding down the Ctrl key and pressing the R
key.
Note: It is recommended that the Host computer turn off all serial port flow control
before sending this command to override any flow control from the I2C adapter that
could block the transmission. Flow control should be enabled once the response is
received.
Command: Ctrl/R,Ctrl/R,Ctrl/R ‘iPort Reset
Response. *
‘iPort/AFM Ready
Default Setting:
None
Status Display
Display iPort/AFM status.
40
Command: //[CR] 'Status Display
Response:
iPort/AFM I2C Host Adapter w/ASCII Fast Mode Interface Vxx.xx
Copyright © xxxx, Micro Computer Control Corp.
Visit our Web Site at: http://www.mcc-us.com
RS-232 Baud Rate (19.2kHz)
Destination I2C Slave Address (xxH)
Echo/Prompt (Disabled)
Flow Control (XON/XOFF)
Hex Only Display (Enabled)
I2C Connection (Closed)
General Call (Enabled)
iPort’s own Slave Address (xxH)
I2C Bus Clock Rate (100kHz)
iNterrupt Signal (Released)
I2C Bus Time-oUt (10000 msec)
RS-232 Baud Rate
This command sets the RS-232 Baud Rate. (0=19.2k, 1=57.6k, 2= 115.2k)
Command: /B[0|1|2][CR]
Response 1: /BC0[CR]
Response 2: /BC1[CR]
Response 3: /BC2[CR]
Response 3: /I89[CR]
'Set RS-232 Baud Rate
'Baud Change Complete
'Baud Change Complete
'Baud Change Complete
'Invalid Command Argument
Default Setting: /B0[CR]
Close I2C Connection
Disconnect iPort/AFM from the I2C Bus.
Command: /C[CR]
Response: /CCC[CR]
Default Setting:
'Close I2C Connection
'Close Connection Complete
'Closed
Set Destination I2C Slave Address
Set the destination I2C Slave Address (Hex 0,2...FE) for all subsequent Master
41
Transmit or Receive operation.
Command: /Dxx[CR]
Response 1: *
Response 2: /I89[CR]
Default Setting: 00
'Set Destination I2C Slave Address
'iPort/AFM Ready
'Invalid Command Argument
Echo/Prompt Control
This command enables or disables data entry echo and prompts used as feedback to
manual operations from a computer terminal.
Command: /E[0|1][CR] 'Echo/Prompt Control [0 = Off, 1 = On]
Response: *
'iPort/AFM Ready
Default Setting:
Off
RS-232 Flow Control
Select the serial communication handshaking protocol to be use in communicating
with the Host computer.
iPort/AFM implements either XON/XOFF (by default) or RTS/CTS flow control
protocols. Flow control is used by the iPort/AFM to limit character flow to and
from the Host computer to avoid overflowing internal communication buffers and
lost data.
The XON/XOFF protocol inserts characters directly into the ASCII data stream.
XON (Hexadecimal 0x11) is used to enable the flow of data. XOFF (Hexadecimal
0x13) is used to stop the flow of data.
The RTS/CTS protocol uses two additional wires in the cable connecting
communicating devices. The RTS wire is an output signal. It indicates that the
device generating the signal has buffer space available, and can receive data. The
CTS wire is an input signal. It indicates that the other device has buffer space
available, and can receive.
In general, XON/XOFF requires a minimal three-wire connection, Ground,
Transmit Data, and Receive Data. This protocol does insert control characters into
the stream of data, and may not be appropriate for all Host systems. If supported,
these control characters are normally automatically stripped out of the data stream
42
by Host communication driver software, and are not visible at the application
program level.
The RTS/CTS protocol requires a serial port, cabling, and Host communication
driver software that supports the additional control signals.
Command: /F[0|1][CR] Flow Control [0 = XON/XOFF, 1 = RTS/CTS]
Response: *
'iPort/AFM Ready
Default Setting:
XON/XOFF
I2C General Call Control
Enables or disables iPort/AFM response to I2C Bus General Call (Address x00)
messages.
Command: /G[0|1][CR] 'I2C General Call [0 = Disabled, 1 = Enabled]
Response: *
'iPort/AFM Ready
Default Setting:
Enabled
Hex Only Display Control
Controls Hex Only (~00...~FF) output of Master or Slave received data.
When enabled, all received I2C message data bytes are displayed in Hex
(~00…~FF) format. When disabled, received I2C message data bytes representing
ASCII printable characters (x20...x7F) are displayed as their ASCII printable
character. Non-ASCII printable data bytes are always displayed in Hex (~00…~FF)
form.
Command: /H[0|1][CR] 'Hex Only Display [0 = Disabled, 1 = Enabled]
Response: *
'iPort/AFM Ready
Default Setting:
Enabled
Set iPort/AFM’s Own I2C Slave Address
Sets iPort/AFM's own I2C Slave Address (Hex 2...FE). Subsequent I2C messages to
this address will cause iPort/AFM to become an active Slave device on the bus.
Command: /Ixx[CR]
Response 1: *
'Set iPort/AFM’s Own I2C Slave Address
'iPort/AFM Ready
43
Response 2: /I89[CR]
Default Setting: 6E
'Invalid Command Argument
I2C Bus Clock Rate Control
Set the I2C Bus master clock rate. (0=23, 1=86, 2=100, 3=400 KHz)
Command: /K[0|1|2|3][CR] 'Set iPort/AFM's Clock Rate
Response 1: *
'iPort/AFM Ready
Default Setting: /K2[CR]
The iPort/AFM I2C Bus master clock rate is controlled by the frequency of the
oscillator used in the adapter. The oscillator frequency has been selected to give
accurate RS-232 baud rates, as the RS-232 baud rate must exactly match the rate
used by the host computer. Actual master I2C clock rates are close to, but not faster
than, the stated rates. Slave I2C clock rates are driven by the external master device,
with possible clock-stretching as required to store or retrieve message data.
Command Menu Display
Display iPort/AFM’s command menu.
Command: /M[CR]
'Command Menu Display
Response:
iPort/AFM Command Menu Syntax: [Select], (Optional), xx=[00..FE],
n=[1..32767]
//
/B[0|1|2]
/C
/Dxx
/E[0|1]
/F[0|1]
/G[0|1]
/H[0|1]
/Ixx
/K[0|1|2|3]
/M
/N([0|1|A|R])
Status Display
RS-232 Baud Rate Control (0=19.2, 1=57.6, 2=115.2KHz)
Close I2C Connection
Set Destination I2C Slave Address
Echo/Prompt Control (0=Disable, 1=Enable)
Flow Control (0=XON/XOFF, 1=RTS/CTS)
General Call Control (0=Disable, 1=Enable)
Hex Only Display Control (0=Disable, 1=Enable)
Set iPort/AFM’s Own I2C Slave Address
I2C Bus Clock Rate Control (0=23, 1=86, 2=100, 3=400 KHz)
Menu Display
iNterrupt Signal Monitor/Control/Status
(0=Disable, 1=Enable / A=Assert, R=Release / <CR>=Status)
44
/O
/(*)Rn
/S(text)
/(*)T(text)
/Un
/V
/X[...]...
/Y
Open I2C Connection
Master Rx Message *=No Stop
Slave Tx Message
Master Tx Message *=No Stop
Set I2C Bus Time-oUt in msec 0=Disable)
Display Firmware Version (Major XX.XX Minor)
Extended Cmds (See Prompt or User's Guide)
Display Tx bYte Count
Interrupt Signal Control/Status
The INT signal allows the iPort/AFM to participate in INT master and/or slave
communications.
Control
Command: /N0[CR] Disable Monitor
/N1[CR] Enable Monitor
/NA[CR] Assert INT Signal
/NR[CR] Release INT Signal
Command:
Response:
Status
/N[CR] Status
/NSA INT Asserted
/NSR INT Released
Response: *
'iPort/AFM Ready
Default Setting: /N0, /NR
Open I2C Connection
Activates iPort/AFM as an active device on the I2C Bus.
Command: /O[CR]
Response: /OCC[CR]
Default Setting:
'Open I2C Connection
'Open Connection Complete
Closed
Master Read Message
This command causes iPort/AFM to read the specified number of data bytes from
the currently selected Destination I2C Slave Address with or without generating an
I2C Stop condition after the last byte is received.
45
Enter Byte Count (Decimal 0...32767) then Press Enter, or ESCape to Cancel. A
Byte Count of Zero (0) represents a Variable Length message, where the first byte
read from the I2C Slave device indicates the number of additional trailing bytes that
are available to read. The iPort/AFM automatically reads the first byte, then the
additional bytes as specified by the first byte. All message bytes including the
Length byte are returned to the Host computer.
The received text is a representation of the data bytes within the Master Receive
message. The format of this data is controlled by the current setting of the Hex Only
Display Control .
If the slave device acknowledges its I2C Slave Address, the specified number of
bytes are read. The iPort/AFM acknowledges all bytes read except the last. If not
disabled, the message is then terminated with an I2C Stop condition.
Sending Master Receive messages with No Stop allows the Master to retain
exclusive control of the I2C Bus until it finally sends a Stop. During this time, the
Master can send additional (Repeated Start) Master Transmit or Master Receive
messages to the same or other I2C Slave devices.
Command: /(*)Rnnnn[CR]
'Master Read Message (* = No Stop)
Response 1: /MRCtext[CR]
Response 2: /SNA[CR]
Response 3: /I81[CR]
Response 4: /I83[CR]
Response 5: /I88[CR]
Response 6: /I89[CR]
Default Setting:
'Master Read Complete
'Slave Not Acknowledging
'iPort/AFM is Busy, Command Ignored
' I2C Arbitration Loss Detected
'iPort Connection Not Open
'Invalid Command Argument
None
Slave Transmit Message
This command should be issued to iPort/AFM in response to a Slave Transmit
Request (/STR). This command causes iPort/AFM to write the specified data bytes
to the requesting I2C Master Receiver device.
Enter Message Bytes (1 or more Printable ASCII or Hex-equivalent ~00..~FF), then
Press Enter, or ESCape to Cancel.
Note 1: Upon receiving a Slave Transmit request from a Master Receiver device on
46
the I2C Bus, the iPort/AFM outputs a Slave Transmit Request to its Host device,
and initiates an I2C Clock Stretch (SCL Low) until a Slave Transmit command is
received from the Host computer. While clock stretching, no other messages can be
transmitted on the I2C Bus.
Note 2: The tilde (~) character and the Carriage Return (CR) characters are used as
special marker characters within all iPort/AFM RS-232 transmitted text messages.
These characters may not be used within the text of a message, but must be replaced
by the following "Hex equivalent" characters:
Tilde replaced by "~7E"
Carriage Return replaced by "~0D"
iPort/AFM automatically translates "Hex equivalent" characters to their single-byte
value for transmission across the I2C Bus.
All entered data bytes are transmitted to the requesting Master Receiver device.
Slave Transmit stops upon receiving the first negative acknowledgment (Nack)
from the Master Receiver.
Command: /Stext[CR]
Response 1: /STC[CR]
Response 2: /I88[CR]
Response 3: /I8A[CR]
Default Setting:
'Slave Transmit Message
'Slave Transmit Complete
'iPort Connection Not Open
‘Slave Transmit Request Not Active, Cmd Ignored
None
Examples:
/Sabcd1234[CR]
/S~00~01~02[CR]
/Sab~7Ecd[CR]
/S12~0D24[CR]
‘ASCII Printable characters "abcd1234"
‘Binary data bytes 00, 01,02
‘Tilde embedded in ASCII Printable characters
‘Carriage Return embedded in ASCII Printable
characters
Master Transmit Message
Write the specified data bytes to the currently selected Destination I2C Slave
Address with or without generating an I2C Stop condition after the last byte is
transmitted.
47
Enter Message Bytes (0 or more Printable ASCII or Hex-equivalent ~00..~FF), then
Press Enter, ESCape to Cancel.
Note: The tilde (~) character and the Carriage Return (CR) characters are used as
special marker characters within all iPort/AFM RS-232 transmitted text messages.
These characters may not be used within the text of a message, but must be replaced
by the following "Hex-equivalent" characters:
Tilde replaced by "~7E"
Carriage Return replaced by "~0D"
iPort/AFM automatically translates "Hex equivalent" characters to their single-byte
value for transmission across the I2C Bus.
All entered data bytes are transmitted to the Destination I2C Slave Receiver device.
Master Transmit stops upon receiving the first negative acknowledgment (Nack)
from the Slave Receiver. If not disabled, the message is then terminated with an I2C
Stop condition.
Sending Master Transmit messages with No Stop allows the Master to retain
exclusive control of the I2C Bus until it finally sends a Stop. During this time, the
Master can send additional (Repeated Start) Master Transmit or Master Receive
messages to the same or other I2C Slave devices.
Command: /(*)Ttext[CR]
Response 1: /MTC[CR]
Response 2: /SNA[CR]
Response 3: /I81[CR]
Response 4: /I83[CR]
Response 5: /I88[CR]
Default Setting:
'Master Transmit Message (* = No Stop)
'Master Transmit Complete
'Slave Not Acknowledging
'iPort/AFM is Busy, Command Ignored
' I2C Arbitration Loss Detected
'iPort Connection Not Open
None
Examples:
/Tabcd1234[CR]
/T~00~01~02[CR]
/*T~00~01~02[CR]
/Tab~7Ecd[CR]
/T12~0D24[CR]
‘ASCII Printable characters "abcd1234"
‘Binary data bytes 00, 01,02
‘Binary data bytes 00, 01,02 with No Stop
‘Tilde embedded in ASCII Printable characters
‘Carriage Return embedded in ASCII Printable
characters
48
Set I2C Bus Time-oUt in msec
Set bus time-out in milliseconds.
The iPort/AFM reports a bus time-out if no intra-byte bus activity for the specified
time occurs within an I2C Bus message.
Command: /Unnnnn[CR] 'I2C Bus time-oUt (nnnn = 0 (disable)...32000 msec)
Response: *
'iPort/AFM Ready
Default Setting: 10000 msec (10 seconds)
Display Firmware Version (requires firmware V2.00+)
Display firmware version
Command: /V[CR]
'Firmware Version
Response: /VCCXX.XX[CR] '(Major XX.XX Minor)
eXtended Commands (requires firmware V2.00+)
The eXtended commands are used to generate "out-of-spec" signaling. eXtended
commands cannot use the adapter’s I2C hardware to control the SCL and SDA lines,
as the I2C hardware only generates I2C compatible signals. The eXtended
commands use firmware to "bit-bang" the SCL and SDA lines. This firmware
cannot operate as fast as the hardware, and it can be interrupted at any time by
adapter internal interrupts. The eXtended commands run directly off the command
characters as they are received on the RS-232 link. Speed of execution of eXtended
commands is controlled by the RS-232 baud rate, the execution speed of the
firmware, delays caused by execution interruptions that may occur while a
command is executing, and I2C Bus clock-stretching by external slave devices.
The following commands manipulate the I2C Clock (SCL) and data (SDA) lines.
Command: /X[S|~xx|R|r|P|0|1|?|D|d|C|c|L|A| |"]..., then Press Enter or ESCape
Enter /X followed by zero or more sub-commands, the [CR]
Response: /XCC(see commands below)[CR]
High Level Sub-Commands:
49
S = Send Start
~xx = Send Byte (xx = 00...FF)(response = A or N)
R = Read Byte with Ack (response = ~xx)
r = Read Byte with Nak (response = ~xx)
P = Send Stop
Mid Level Sub-Commands:
0 = Send 0 Bit
1 = Send 1 Bit
? = Read Bit (response = 0 or 1)
Low Level Sub-Commands:
D = Set SDA High
d = Set SDA Low
C = Set SCL High
c = Set SCL Low
L = Read SCL (response = 0 or 1)
A = Read SDA (response = 0 or 1)
Miscellaneous Sub-Commands:
space = no action
"comment" = no action
Examples:
Master transmit three bytes to slave address 0x4e using high level, mid level, and
low level sub-commands.
High Level Command:/X S ~4e ~01 ~02 ~03 P [CR]
High Level Response: /XCCAAAA[CR]
Mid Level Command:/X S 01001110 ? 00000001 ? 00000010 ? 00000011 ? P [CR]
Mid Level Response: /XCC0000[CR]
Low Level Command:/X dc dCcDCcdCcdCcDCcDCcDCcdCc DCAc
dCcdCcdCcdCcdCcdCcdCcDCc DCAcdCcdCcdCcdCcdCcdCcDCcdCc DCAc
dCcdCcdCcdCcdCcdCcdCcDCc DCAc dCD[CR]
50
Low Level Response: /XCC0000[CR]
Master read three bytes from slave address 0x4F. First two bytes are acknowledged
by master.
Command: /X S ~4f Rrr P [CR]
Response: /XCCA~xx~xx~xx[CR] ‘(xx = 00...FF)
Master transmit a Write WCR command to a Xicor X9241 at slave address 0x50.
WCR data is 0x00.
Command: /X S ~50 ~a0 ~00 P [CR]
Response: /XCCAAA[CR]
Master transmit a Write WCR command to a Xicor X9241 at slave address 0x50.
WCR data is 0x3f.
Command: /X S ~50 ~a0 ~3f P [CR]
Response: /XCCAAA[CR]
Issue a Read WCR command to a Xicor X9241 at slave address 0x50.
Command: /X S ~50 ~90 ~R P [CR]
Response: /XCCAA~xx[CR]
‘(xx = 00...FF)
Issue an Increment Wiper command to a Xicor X9241 at slave address 0x50.
Command: /X S ~50 ~20 1 P [CR]
Response: /XCCAA[CR]
Issue an Decrement Wiper command to a Xicor X9241 at slave address 0x50.
Command: /X S ~50 ~20 0 P [CR]
Response: /XCCAA[CR]
Display Tx bYte Count (requires firmware V2.00+)
Returns the number of bytes received by the slave device in the last master transmit
message.
51
Command: /Y[CR]
Response: /TBCn[CR]
'Tx bYte Count
'n =00000...32767
52
Asynchronous Interface Events
Asynchronous Events are those iPort/AFM interface activities initiated by the
iPort/AFM I2C Host Adapter in response to activities on the I2C Bus.
Slave Transmit Request
This event is caused by the reception of an I2C Bus Slave Transmit message
directed at the current iPort/AFM’s own Slave address.
Prompt: /STR[CR]
Command: /Stext[CR]
‘Slave Transmit Request
‘Slave Transmit Text
The normal Host computer response is to send a Slave Transmit (/Stext[CR])
command.
Note: Upon receiving a Slave Transmit request from a Master Receiver device on
the I2C Bus, iPort/AFM outputs a Slave Transmit Request to its Host device, and
initiates an I2C Clock Stretch (SCL Low) until a Slave Transmit Text command is
received from the Host computer. While clock stretching, no other messages can be
transmitted on the I2C Bus.
Slave Receive Complete
This event is caused by the reception of an I2C Bus Slave Receive message directed
at the current iPort/AFM’s own Slave address.
The received text is a representation of the data bytes within the Slave Receive
message. The format of this data is controlled by the current setting of the Hex Only
Display Control .
Prompt: /SRCtext[CR]
Command:
‘Slave Receive Complete
None Required
General Call Receive Complete
This event is caused by the reception of an I2C Bus Slave Receive message directed
at the I2C General Call Address (00), when iPort/AFM’s General Call recognition is
enabled.
53
The received text is a representation of the data bytes within the Slave Receive
message. The format of this data is controlled by the current setting of the Hex Only
Display Control .
Prompt: /GRCtext[CR] ‘General Call Receive Complete
Command:
None Required
iPort/AFM Ready
Prompt: *
‘iPort/AFM Ready
Cause: iPort/AFM is ready for the next Host command.
Slave Not Acknowledging
Prompt: /SNA[CR]
‘Slave Not Acknowledging
Cause: There is no response (I2C Slave Address Acknowledgment) during a Master
Transmit or Receive operation from an I2C Slave device at the current Destination
I2C Address.
iPort/AFM Busy
Prompt: /I81[CR]
‘iPort/AFM Busy
Cause: The host computer attempted a Master operation while iPort/AFM was busy.
The host computer should wait for any previously issued command to complete,
process any pending slave events, and retry the last command.
I2C Bus Arbitration Loss
Prompt: /I83[CR]
‘I2C Arbitration Loss Detected
Cause: iPort/AFM lost I2C Bus Arbitration to another bus master device while
Master Transmitting or Master Receiving an I2C message. Host should process any
active slave events and repeat the last command.
I2C Bus Error Detected
Prompt: /I84[CR]
‘I2C Bus Error Detected
54
Cause: iPort/AFM has detected an error condition on the I2C Bus. The host
computer should retry the last command or issue an iPort/AFM Reset command.
I2C Bus Time-out Detected
Prompt: /I85[CR]
‘I2C Bus Time-out Detected
Cause: iPort/AFM issues this response when it detects a byte transfer delay greater
than the specified I2C Bus Time-oUt period. No corrective action is taken by the
iPort/AFM regarding I2C Bus activity. No host computer response is required, but
this event can be used to detect possible bus problems.
iPort/AFM Connection Closed
Prompt: /I88[CR]
‘iPort/AFM Connection is Closed.
Cause: The host computer is attempting to perform an I2C Bus message operation
while the iPort/AFM Connection is Closed. The host computer should issue an
Open I2C Connection command before attempting to perform I2C Bus message
operations.
Invalid Command Argument
Prompt: /I89[CR]
‘Invalid Command Argument Detected
Cause: This event normally indicates the value of a host command argument was
out of range. The host should reissue command with correct arguments.
Slave Transmit Request Not Active
Prompt: /I8A[CR]
‘Slave Transmit Request Not Active
Cause: This event indicates the host attempted to issue a Slave Transmit Text
command when no Slave Transmit Request was present.
Invalid iPort/AFM Command
Prompt: /I8F[CR]
‘Invalid iPort/AFM Command
Cause: This event normally indicates that an invalid command was issued by the
55
host. The host should reissue the correct command.
iPort/AFM RS-232 Receive Buffer Overflow
Prompt: /I90[CR]
‘iPort/AFM RS-232 Receive Buffer Overflow
Cause: This event normally indicates that data sent to the iPort/AFM via the RS-232
serial port has been lost. Check the host computer’s RS-232 Serial Port Flow
Control (XON/XOFF, or Hardware) to make sure it matches current iPort/AFM
Flow Control. Also, check if the host computer’s FIFO buffers in its 16550 UART
are enabled. If so, reduce or disable Transmit Data Buffering. On Windows-based
host computers, see the Device Manager, COM port, Advanced Settings. You may
need to power down the host computer for any FIFO change to take effect.
56
Example Code
The following examples are written in MS Visual Basic V3 for Windows using the
serial communications control (MSCOMM.VBX). It can be used as a guide in
implementing iPort/AFM interface programs in other programming languages and
operating environments.
Note:
Sample code is also available online at: www.mcc-us.com
iPort/AFM Reset
Comm1.Output = Chr$(18)
Comm1.Output = Chr$(18)
Comm1.Output = Chr$(18)
'Ctrl/R
'Ctrl/R
'Ctrl/R
iPort/AFM Initialization
Comm1.Output = "/f0"
'Set iPort/AFM XON/XOFF Flow Control
Comm1.Output = Chr$(13)
Comm1.Output = "/i70"
Comm1.Output = Chr$(13)
'Set iPort/AFM’s Own Slave Address
Comm1.Output = "/d4e"
Comm1.Output = Chr$(13)
'Set Destination Slave Address
Comm1.Output = "/o"
Comm1.Output = Chr$(13)
'Open I2C Connection
Master Transmit Message
Comm1.Output = "/T~00~01" 'Send Master Tx Command
Comm1.Output = Chr$(13) 'Terminate Command
Master Receive Message
Comm1.Output = "/R10"
Comm1.Output = Chr$(13)
'Send Master Rx Command
'Terminate Command
57
Communication Event Processing
Static Sub Comm1_OnComm ()
Static LineBuf$
While Comm1.InBufferCount
Msg$ = Comm1.Input ' Get Comm input character
CharIn$ = Msg$
If Msg$ = Chr$(13) Then Msg$ = "" ' Remove CR
If Msg$ = Chr$(10) Then Msg$ = "" ' Remove LF
If Msg$ = "*" Then
' if iPort/AFM Ready
Msg$ = "****"
‘ Substitute Token
CharIn$ = Chr$(13)
‘ Terminate Line
End If
LineBuf$ = LineBuf$ + Msg$
'Add new text to line buffer
If CharIn$ = Chr$(13) Then
' if Carriage Return detected
iPortResp$ = Left$(LineBuf$, 4) 'Isolate Response Code
' Test for iPort/AFM Synchronous Interface Events
If (StrComp(iPortResp$, "/OCC") = 0) Then
' Open Connection Complete Processing
TextBox.Text = "/OCC Open Connection Complete"
ElseIf (StrComp(iPortResp$, "/MTC") = 0) Then
' Master Transmit Complete Processing
TextBox.Text = "/MTC Master Tx Complete"
ElseIf (StrComp(iPortResp$, "/MRC") = 0) Then
' Master Rx Complete Processing
TextBox.Text = LineBuf$ 'Update Display
ElseIf (StrComp(iPortResp$, "/STC") = 0) Then
' Slave Tx Complete Processing
TextBox.Text = "/STC Slave Tx Complete"
ElseIf (StrComp(iPortResp$, "/CCC") = 0) Then
' Close Connection Complete Processing
TextBox.Text = "/CCC Close Connection Complete "
58
ElseIf (StrComp(iPortResp$, "/BC0") = 0) Then
' iPort/AFM Baud Change 0 {19.2K}
TextBox.Text = "iPort/AFM Baud Change 0 {19.2K} "
ElseIf (StrComp(iPortResp$, "/BC1") = 0) Then
' iPort/AFM Baud Change 1 {57.6K}
TextBox.Text = "iPort/AFM Baud Change 1 {57.6K} "
ElseIf (StrComp(iPortResp$, "/BC2") = 0) Then
' iPort/AFM Baud Change 2 {115.2K}
TextBox.Text = "iPort/AFM Baud Change 0 {115.2K} "
' Test for iPort/AFM Asynchronous Interface Events
ElseIf (StrComp(iPortResp$, "/SRC") = 0) Then
' Slave Rx Complete Processing
TextBox.Text = LineBuf$
'Update Display
ElseIf (StrComp(iPortResp$, "/GRC") = 0) Then
' General Call Rx Complete Processing
TextBox.Text = LineBuf$
'Update Display
ElseIf (StrComp(iPortResp$, "/STR") = 0) Then
' Slave Tx Request Processing
Comm1.Output = "/S~00~01" 'Send Slave Tx Msg
Comm1.Output = Chr$(13) 'Terminate Command
TextBox.Text = LineBuf$
'Update Display
' Test for iPort/AFM Response Messages
ElseIf (StrComp(iPortResp$, "****") = 0) Then
TextBox.Text = "* iPort/AFM Ready" 'Update Display
ElseIf (StrComp(iPortResp$, "/SNA") = 0) Then
TextBox.Text = "/SNA Slave Not Acknowledging"
ElseIf (StrComp(iPortResp$, "/I81") = 0) Then
TextBox.Text = "/I81 iPort/AFM Busy" 'Update Display
ElseIf (StrComp(iPortResp$, "/I83") = 0) Then
59
TextBox.Text = "/I83 Arbitration Loss" 'Update Display
ElseIf (StrComp(iPortResp$, "/I84") = 0) Then
TextBox.Text = "/I84 I2C Bus Error Detected"
ElseIf (StrComp(iPortResp$, "/I85") = 0) Then
TextBox.Text = "/I85 I2C Bus Time-out Detected"
ElseIf (StrComp(iPortResp$, "/I88") = 0) Then
TextBox.Text = "/I88 iPort/AFM Connection Closed"
ElseIf (StrComp(iPortResp$, "/I89") = 0) Then
TextBox.Text = "/I89 Invalid Command Argument"
ElseIf (StrComp(iPortResp$, "/I8A") = 0) Then
TextBox.Text = "/I8A Slave Tx Request Not Active"
ElseIf (StrComp(iPortResp$, "/I8F") = 0) Then
TextBox.Text = "/I8F Invalid iPort/AFM Command"
ElseIf (StrComp(iPortResp$, "/I90 = 0) Then
TextBox.Text = "/I90 iPort/AFM Rx Buffer Overflow”
Else
TextBox.Text = LineBuf$ 'Other Update Display
End If
LineBuf$ = ""
End If
Wend
End Sub
60
iPort/AFM Revision Report
This section defines revisions and changes made to the iPort/AFM interface:
Revision: 2.00
1. Add Firmware Version command.
2. Add eXtended commands.
3. Add Tx bYte Count command.
Revision: 1.02
1 Initial Release
Additional Information
For additional information on the I2C Bus, please refer to the following:
“What is I2C?”
www.mcc-us.com/I2CBusTechnicalOverview.pdf
“Frequently Asked Questions (FAQ)”
www.mcc-us.com/faq.htm
"The I2C and How to Use It"
www.mcc-us.com/i2chowto.htm
"80C51-Based 8-Bit Microcontroller" Data Handbook.
Philips Semiconductors, Tel. (800)227-1817
"I2C Peripherals for Microcontrollers" Data Handbook.
Philips Semiconductors, Tel. (800)227-1817
61
Appendix A - I2C Connector Information
Interface Connector and Plug Information
MCC uses two (2) different connectors and plug assemblies. We have found these
parts to be compatible.
I2C Receptacle Connectors
Molex SEMCONN ACCESS.bus Receptacle Connector
Molex Part # 15-83-0064
AMP SDL (Shielded Data Link) Connectors for ACCESS.bus
AMP Part # 4-943197-1
I2C Plug Connectors
Molex SEMCONN ACCESS.bus Plug
Molex Part # 15-83-1564
AMP SDL (Shielded Data Link) Plug for ACCESS.bus
Bush
Amp Part # 520851-1
Ferrule
Amp Part # 520433-1
SDL (Shell) Amp Part # 520461-1
SDL (Shell) Amp Part # 520460-1
SDL
Amp Part # 4-520424-1
The following I2C Cables are available from MCC
MCC Part #
MCC Part #
MCC Part #
MCC Part #
CAB4
CAB8
CAB16
CABCL
I2C Interface Cable, 48inches (4ft)
I2C Interface Cable, 96 inches (8ft)
I2C Interface Cable, 192 inches (16ft)
I2C and SMBus Clip Lead Cable
62
Declaration of Conformity
This Declaration of Conformity is issued by the indicated company which is solely responsible
for the declared compliance.
Product(s): iPort, iPort/AI, and iPort/AFM
Product Part Number(s): MIIC-201, MIIC-202, MIIC-203
Product Description: I2C Bus Host Adapter
Applicable Directive(s): EC Directive 89/336/EEC
Compliant Standards:
EN 55022 : 1998
Emissions Standard
Conducted Emissions (Class B)
Radiated Emissions (Class B)
EN 55024 : 1998
Immunity Standard
Immunity to Radiated Electromagnetic Fields
Immunity to Fast Transient Bursts - AC Power Lines
Immunity to Conducted Field - AC Power Lines
Immunity to Voltage Dips - AC Power Lines
Immunity to Electrostatic Discharge
Test Laboratory Information:
Cass Industries Ltd., Blackbrook Trading Estate, Weybrook Road, Manchester M19 2QD,
ENGLAND.
Test Report Number: CI02486a
Test Report Date: April 29th, 2005
Technical file held by: Micro Computer Control Corporation, 17 Model Avenue / PO Box 275,
Hopewell, New Jersey 08525 USA, or its applicable authorized distributor or representative.
Responsible Company: Micro Computer Control Corporation, 17 Model Avenue / PO Box 275,
Hopewell, New Jersey 08525 USA, or its applicable authorized distributor or representative.
Signature of Authorized Representative:
Name: Edward Thompson
Title: President, Micro Computer Control Corporation
Date: 09-JAN-07
63