1
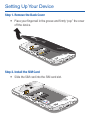
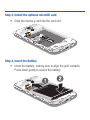
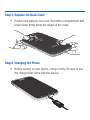
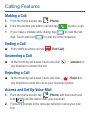
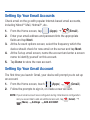
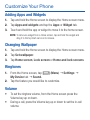
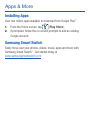
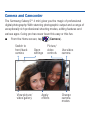
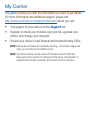
My Carrier
This guide provides you with the information you need to get started.
For more information and additional support, please visit
http://www.uscellular.com/support/index.html where you can:
• Get support for your device via the Support tab.
• Register to check your minutes, pay your bill, upgrade your
phone, and change your rate plan.
• Review your device’s User Manual and troubleshooting FAQs.
NOTE: Devices and software are constantly evolving—the screen images and
icons you see here are for reference only.
NOTE: This device should only be used with firmware versions that have
been approved for use by US Cellular and the device manufacturer. If
unauthorized firmware is placed on the device it will not function.
Device Functions
Front
facing
camera
Headset jack
Power/lock
Volume
Menu* Home
Back*
*Menu and Back illuminates when navigating through the device.
Camera lens
Flash
Speaker
Charging port
Setting Up Your Device
Step 1. Remove the Back Cover
• Place your fingernail in the groove and firmly “pop” the cover
off the device.
Step 2. Install the SIM Card
• Slide the SIM card into the SIM card slot.
Step 3. Install the optional microSD card
• Slide the memory card into the card slot.
Step 4. Insert the Battery
• Insert the battery, making sure to align the gold contacts.
Press down gently to secure the battery.
Step 5. Replace the Back Cover
• Position the battery cover over the battery compartment and
press down firmly along the edges of the cover.
Step 6. Charging the Phone
• Before turning on your phone, charge it fully. Be sure to use
the charger that came with the device.
WARNING: Please use only an approved charging accessory to charge your
device. Improper handling of the charging port, as well as the use
of an incompatible charger, may cause damage to your device and
void the warranty.
NOTE: This device requires a SIM card. Please insert the SIM card included in
the package prior to turning on the device. This SIM card will only work
with this device. Once the SIM card has been inserted, do not remove!
Make sure that the card’s gold contacts face into the device and that the
upper-left angled corner of the card is positioned as shown.
If your SIM card is ever separated from the device or damaged, your
device will not function. If you experience any issues with your device,
contact Customer Service at 888-944-9400 (or dialing 611 on Your U.S.
Cellular ® handset) or visit your nearest U.S. Cellular retail location.
Turning Your Phone On and Off
1. To turn ON, press and hold the Power/Lock key.
2. To turn OFF, press and hold Power/Lock key and follow the
prompts.
Locking and Unlocking Screen
1. To Lock, press the Power/Lock key.
2. To Unlock, press the Power/Lock key then swipe your finger
across the screen.
Initial Device Configuration
1. Select a language and tap Next or tap Accessibility if you
are visually impaired or hard of hearing.
2. Tap the ON/OFF slider to activate Wi-Fi and tap Next.
3. Set Date and Time and tap Next.
4. At the Samsung account screen, select Create new
account, Sign in or tap Skip.
5. At the Got Google? screen, select Yes to log into Google™
account or No to continue.
6. At the Make it Google screen, select either Get an
account or Not now to continue.
7. Select Google & location services and tap
Next.
8. Enter a First and Last name and tap
Next.
9. At the Dropbox screen, select Create account, Sign in,
Disclaimer, or tap Skip.
10. At the Learn about key features screen, tap the ON/OFF
slider to activate feature and tap Next.
11. Accept or rename the current device and tap Finish.
Calling Features
Making a Call
1. From the Home screen, tap
(Phone).
2. Enter the number you wish to call and tap
• If you make a mistake while dialing, tap
digit. Touch and hold
to place a call.
to clear the last
to clear the entire sequence.
Ending a Call
¬¬ From within an active call, tap
(End Call).
Answering a Call
¬¬ At the incoming call screen, touch and slide
any direction to answer the call.
(Answer) in
Rejecting a Call
¬¬ At the incoming call screen, touch and slide
(Reject) in
any direction to route the call to your voicemail system.
Access and Set Up Voice Mail
1. From the Home screen, tap
(Phone) and then touch and
hold
until the device dials your voicemail.
2. Follow the prompts in the new user tutorial to set up your mail
box.
Contacts
Creating a New Contact
1. From the Home screen, tap
(Phone).
2. Enter a phone number using the on-screen dialpad.
3. Tap Add to Contacts g Create contact or select the Contact
entry from the on-screen list.
4. Select OK (to save new contact in your “my device contacts”
area or Add new account to select a different destination
type (Samsung account, Google, or Microsoft Exchange
ActiveSync) (depending on where you want to save the new
contact information).
5. Enter the desired information into the appropriate fields.
6. Tap Save to store the new entry.
Deleting an Existing Contact
1. From the Home screen, tap
(Contacts).
2. Touch and hold a contact name from the list and select
Delete g OK.
Messaging
Create and Send a Message
1. From the Home screen, tap
(Compose).
(Messaging) g
2. Enter either the recipient’s phone number or e-mail address.
NOTE: If adding a recipient from among Logs, Contacts, or Group, tap the
contact to place a checkmark alongside the entry and tap Done. The
contact will be placed in the recipient field.
3. Tap the Enter message field and use the on-screen keypad to
enter a message.
4. Add more recipients by tapping the recipient field.
5. Tap
(Attach) to insert various file types to your message
(such as images, videos, or audio).
6. Select the file and complete the on-screen instructions to insert it
to the current message.
7. Review your message and tap
Send.
Setting Up Your Email Accounts
Check email on the go with popular Internet-based email accounts,
including Yahoo!® Mail, Hotmail®, etc..
1. From the Home screen, tap
(Apps) g
(Email).
2. Enter your email address and password into the appropriate
fields and tap Next.
3. At the Account options screen, select the frequency which the
device should check for new email on the server and tap Next.
4. At the Set up email screen, name the account and enter a screen
name to identify yourself on this account.
5. Tap Done to store the new account.
Setting Up Your Gmail Account
The first time you launch Gmail, your device will prompt you to set up
an account.
1. From the Home screen, touch
(Apps) g
(Gmail).
2. Follow the prompts to sign in, or create a new account.
NOTE: If your Gmail account was configured during initial device configuration
and you would like to add an additional account, tap
(Gmail) g
(Menu) g Settings g ADD ACCOUNT.
Customize Your Phone
Adding Apps and Widgets
1. Tap and hold the Home screen to display the Home screen menu.
2. Tap Apps and widgets and tap the Apps or Widget tab.
3. Touch and hold the app or widget to move it to the home screen.
NOTE: To remove a widget from a Home screen, tap and hold the widget and
drag it to the top trash can icon to remove.
Changing Wallpaper
1. Tap and hold the Home screen to display the Home screen menu.
2. Tap Set wallpaper.
3. Tap Home screen, Lock screen or Home and lock screens.
Ringtones
1. From the Home screen, tap
(Menu) g Settings g
My Device tab g Sound.
2. Tap the feature you would like to customize.
Volume
• To set the ringtone volume, from the Home screen press the
Volume key up or down.
• During a call, press the Volume key up or down to set the in-call
volume.
Connections
Connecting to Bluetooth
1. From the Home screen, tap
(Menu) g Settings g
Connections tab g Bluetooth.
2. In a single motion touch and slide the Bluetooth slider to the
ON ).
right to turn it on (
3. Tap Scan. Review the list of discovered in-range Bluetooth®
devices.
4. Tap a device from the list to initiate pairing.
5. Enter the passkey/PIN code, if needed, and tap OK.
6. The external device will then have to also accept the connection
and enter your device’s PIN code. Once successfully paired to an
external device,
appears within the Status area.
Connecting to Wi-Fi
1. From the Home screen, tap
(Menu) g Settings g
Connections tab g Wi-Fi.
2. In a single motion touch and slide the Wi-Fi slider to the right to
ON ).
turn it on (
3. Tap Scan to display a list of Wi-Fi networks in-range.
4. Tap a network to connect and enter the password if prompted.
When connected you will see
in the status bar.
Apps & More
Installing Apps
Over one million apps available to download from Google Play™.
1. From the Home screen, tap
(Play Store).
2. If prompted, follow the on-screen prompts to add an existing
Google account.
Samsung Smart Switch
Easily move over your photos, videos, music, apps and more with
Samsung Smart Switch™. Get started today at
www.samsungsmartswitch.com
Camera and Camcorder
The Samsung Galaxy S® 4 mini gives you the magic of professional
digital photography. With stunning photographic output and a range of
exceptionally rich professional shooting modes, editing features and
various apps. Going pro has never been this easy or this fun.
¬¬ From the Home screen, tap
Switch to
front/back
camera
View picture/
video gallery
Open
settings
(Camera).
Picture/
video
controls
Apply
effects
Use video
camera
Change
camera
modes
Your Navigator Deluxe
With Your Navigator Deluxe, get all of the features of an advanced
car navigation system on your mobile phone with voice turn-by-turn
navigation enabled by GPS. Search for any destination including gas
stations, ATMs, restaurants, and more. Get detailed maps of any
location.
1. In order to use Your Navigator Deluxe, you must first turn on your
phones location and GPS settings.
• From the Home screen, press
(Menu) and then tap
Settings g Location services.
• Tap the box to activate the Use GPS satelites.
2. From the applications menu select the Your Navigator Deluxe
application.
From the Your Navigator Deluxe Home screen you can select
• “Drive To” for turn by turn direction to an address, airport,
contacts addresses and more
• “Places” to search for nearby businesses, the cheapest gas
prices and more
• “Maps & Traffic” to see where you currently are located on a
map and what traffic is in the area
Internet
Take the Internet on the go. You can reach the latest news, get the
weather and follow your stocks.
¬¬ From the Home screen, tap
To enter a URL:
(Internet).
You can access a website quickly by entering the URL. Websites are
optimized for viewing on your device.
¬¬ From the homepage tap the URL field at the top of the screen,
enter the URL and tap
.
To add a new window:
1. From your browser window, tap
(Windows) g
(New window). A new browser window displays.
NOTE: The number of currently open windows is displayed at the bottom of the
Windows screen.
2. Scroll across the screen to view the currently active windows and
tap an entry to launch the selected Internet window.
S Beam
Share large video files, photos, documents and music with S Beam by
touching two compatilble device back-to-back.
1. From the Home screen, press
(Menu) and then tap
Settings g Connections tab g S Beam.
2. Touch and slide the S Beam slider to the right to turn it on.
Lock Screen
This menu contains features that allows you to configure the device’s
security parameters.
To secure data and limit phone access, set the phone to require a
screen unlock pattern each time you turn on the device, or every time
the phone wakes up from sleep mode (when the screen automatically
turns off).
¬¬ From the Home screen, press
(Menu) and then tap
Settings g My device tab g Lock screen g Screen lock.
The Screen lock menu allows to choose from a variety of locking
features.
SIM Card Limited Warranty
Subject to the exclusions contained below, United States Cellular
Corporation (“U.S. Cellular®”) warrants to the original purchaser (“You”
or “Your”) of the handset with which the SIM card was provided that
the SIM card will be free from defects in material and workmanship for
a period of one (1) year from the date you purchased the handset (the
“Warranty Period”).
This warranty is not transferable. Should a defect appear during the
Warranty Period, U.S. Cellular will send a replacement SIM card to
Your address within the United States without charge provided that
you request the replacement SIM card during or within thirty (30) days
following the Warranty Period by calling U.S. Cellular Customer Service
at 888-944-9400 (or dialing 611 on your U.S. Cellular handset) or by
visiting a U.S. Cellular retail store.
REPLACEMENT OF THE SIM CARD AS PROVIDED HEREIN IS YOUR
EXCLUSIVE REMEDY UNDER THIS LIMITED WARRANTY, AND IS IN
LIEU OF ALL OTHER WARRANTIES, EXPRESS OR IMPLIED INCLUDING,
WITHOUT LIMITATION, ANY WARRANTIES OF TITLE, FITNESS FOR A
PARTICULAR PURPOSE, MERCHANTABILITY, NON-INFRINGEMENT OR
ARISING FROM COURSE OF DEALING OR USAGE OF TRADE. NEITHER
U.S. CELLULAR NOR ANY OF ITS AFFILIATES OR RETAILERS SHALL
BE LIABLE TO YOU FOR ANY DIRECT, INDIRECT, INCIDENTAL, SPECIAL,
ECONOMIC, EXEMPLARY, PUNITIVE OR CONSEQUENTIAL DAMAGES
(INCLUDING, WITHOUT LIMITATION, LOSS OF DATA, LOSS OF
REVENUE OR PROFITS, DAMAGE TO PROPERTY OR LOSS OF USE).
IN NO EVENT SHALL U.S. CELLULAR’S, ITS AFFILIATES’ OR
RETAILERS’ LIABILITY TO YOU OR ANY THIRD PARTY WITH RESPECT
TO THE SIM CARD EXCEED THE COST OF REPLACING THE SIM CARD.
THIS LIMITED WARRANTY SHALL BE CONSTRUED UNDER THE LAWS
OF THE STATE OF ILLINOIS, EXCLUDING ITS CONFLICTS OF LAW
PROVISIONS. SOME STATES AND JURISDICTIONS DO NOT ALLOW
LIMITATIONS ON HOW LONG AN IMPLIED WARRANTY LASTS, OR THE
DISCLAIMER OR LIMITATION OF INCIDENTAL OR CONSEQUENTIAL
DAMAGES, SO THE ABOVE LIMITATIONS AND DISCLAIMERS MAY
NOT APPLY TO YOU.
No agent, employee, dealer, retailer, representative or reseller is
authorized to modify or extend the terms of this Limited Warranty.
Notes
________________________________________________
________________________________________________
________________________________________________
________________________________________________
________________________________________________
________________________________________________
________________________________________________
________________________________________________
________________________________________________
________________________________________________
________________________________________________
________________________________________________
________________________________________________
________________________________________________
________________________________________________
________________________________________________
________________________________________________