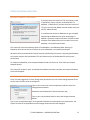
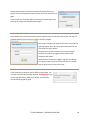
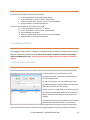
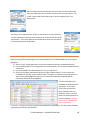
1
VERSION 1.28.0 TTS USER MANUAL CONTRACTOR EDITION TTS USER MANUAL- CONTRACTOR EDITION TABLE OF CONTENTS TTS User Manual- Pro Edition ....................................................................................................................... 2 Table of Contents ...................................................................................................................................... 2 Quick Start Overview .................................................................................................................................... 7 Getting Started.............................................................................................................................................. 9 Registration ................................................................................................................................................... 9 Setup Options ............................................................................................................................................... 9 Tool Setup ................................................................................................................................................. 9 Application Settings ................................................................................................................................ 10 Allow Delete Tool & Purge History ..................................................................................................... 11 Auto-Populate Tool Find Tabs ............................................................................................................. 11 Cascade Master Changes To Tools ...................................................................................................... 11 Auto-Generate Tool Barcode .............................................................................................................. 11 Display Employee Barcodes Before Names ........................................................................................ 11 Display Account Numbers Before Descriptions .................................................................................. 11 Show Bin Tools Below Reorder Point Report After Log In .................................................................. 11 Require Check In Before Another Check Out ...................................................................................... 12 Show Transfer ..................................................................................................................................... 12 Allow Users to Change Their Password .............................................................................................. 12 Allow Duplicate Asset Numbers .......................................................................................................... 12 Auto Commit Downloaded Data Upon Sync ....................................................................................... 12 Printer Assignment ..................................................................................................................................... 13 Employee Administration ........................................................................................................................... 14 Employee Information ............................................................................................................................ 15 Employee Access Levels ...................................................................................................................... 15 Employee Assigned Facility ................................................................................................................. 16 Other File Menu Functions ......................................................................................................................... 17 TTS USER MANUAL – CONTRACTOR EDITION 2 Backup/Compact Database..................................................................................................................... 17 Change Password .................................................................................................................................... 17 Login Temporarily ................................................................................................................................... 18 Purge History........................................................................................................................................... 18 Handheld Configuration.......................................................................................................................... 19 Imports .................................................................................................................................................... 19 Label Menu Functions ................................................................................................................................. 20 Label Designer ......................................................................................................................................... 20 Adding a Text Element ........................................................................................................................ 20 Adding a Database Field Text Element ............................................................................................... 21 Adding a Barcode Element .................................................................................................................. 21 Adding a Horizontal Line Element....................................................................................................... 21 Adding a Vertical Line Element ........................................................................................................... 21 Adding a Box Element ......................................................................................................................... 21 Adding a Graphic Element .................................................................................................................. 22 Deleting a Label Element .................................................................................................................... 22 Deleting a Label Design ....................................................................................................................... 22 Save an Existing Design as a New Design ............................................................................................ 22 Viewing/Printing a Label ..................................................................................................................... 22 Save As Default ................................................................................................................................... 22 Label Quick Start ..................................................................................................................................... 23 Help Menu Functions .................................................................................................................................. 23 Check For Update.................................................................................................................................... 23 Support Menu Functions ............................................................................................................................ 23 Account Administration .......................................................................................................................... 23 Condition Administration........................................................................................................................ 24 Facility Administration ............................................................................................................................ 25 Funding Source Administration .............................................................................................................. 25 Location Administration.......................................................................................................................... 26 Export List to File................................................................................................................................. 27 TTS USER MANUAL – CONTRACTOR EDITION 3 Change Responsible Individual ........................................................................................................... 27 Print Barcode List ................................................................................................................................ 27 Print Location Label ............................................................................................................................ 27 Tool Support Administration .................................................................................................................. 28 Classification: ...................................................................................................................................... 28 Type:.................................................................................................................................................... 29 Tool Master Screen ..................................................................................................................................... 30 Find Master/Catalog (F1) ........................................................................................................................ 32 Search Field ......................................................................................................................................... 32 Add To List........................................................................................................................................... 32 Print List .............................................................................................................................................. 33 Print Barcode List ................................................................................................................................ 33 Export List To File ................................................................................................................................ 33 Master/Catalog Information ................................................................................................................... 33 Tools Screen ................................................................................................................................................ 34 Find Tool.................................................................................................................................................. 34 Show Thumbnail Images ..................................................................................................................... 35 Search Field ......................................................................................................................................... 35 Add To List........................................................................................................................................... 35 Change Status ..................................................................................................................................... 36 Change Storage Location .................................................................................................................... 36 Print List .............................................................................................................................................. 36 Print Barcode List ................................................................................................................................ 36 Print Tool Label ................................................................................................................................... 37 Export List to File................................................................................................................................. 37 Tool Information ..................................................................................................................................... 37 Primary Data Sub-tab .......................................................................................................................... 38 Purchase / Warr. Sub-tab.................................................................................................................... 38 Images & Docs Sub-tab ....................................................................................................................... 38 Binned and Consumable Items ........................................................................................................... 39 TTS USER MANUAL – CONTRACTOR EDITION 4 Adding a New Tool .............................................................................................................................. 40 Editing an Existing Tool ....................................................................................................................... 40 Copying an Existing Tool’s Information to a New Tool ....................................................................... 40 Tool History ............................................................................................................................................. 41 Check In/Check Out Tools Screen ............................................................................................................... 42 Check Out ................................................................................................................................................ 42 Check In By Tool (F2) ............................................................................................................................... 43 Check In By Container / Person / Location (F3) ...................................................................................... 44 Transfer Tools Screen.................................................................................................................................. 44 Transfer Out (F1) ..................................................................................................................................... 45 Cancel Transfer (F2) ................................................................................................................................ 45 Transfer In (F3) ........................................................................................................................................ 46 Reserving Tools Screen ............................................................................................................................... 46 Find Reservations .................................................................................................................................... 46 Reservation Admin (F2)........................................................................................................................... 47 Reports Screen ............................................................................................................................................ 48 Auto E-Mail Reports ................................................................................................................................ 48 Other Reports ......................................................................................................................................... 48 Custom Reports....................................................................................................................................... 48 TTS Mobile Handheld Application............................................................................................................... 50 Batch vs. Wireless Handhelds ................................................................................................................. 50 Communication With Host PC ................................................................................................................ 50 Microsoft Active Sync Installation (For Windows XP) ......................................................................... 50 Windows Mobile Device Center Installation (For Windows Vista or Windows 7).............................. 50 Install GigaTrak Handheld Application .................................................................................................... 51 Sync With Host PC ................................................................................................................................... 51 Sync Manually via SD Card ...................................................................................................................... 51 Sync Manually with Terminal Services / Citrix ........................................................................................ 51 TTS Handheld Application Functions ...................................................................................................... 53 Handheld Application Login ................................................................................................................ 53 TTS USER MANUAL – CONTRACTOR EDITION 5 Wireless Application Login .................................................................................................................. 53 Wireless Application Admin ................................................................................................................ 53 Check Out ............................................................................................................................................ 54 Check In ............................................................................................................................................... 54 Audit .................................................................................................................................................... 55 Count Bin............................................................................................................................................. 56 Identify ................................................................................................................................................ 56 Add New Tools .................................................................................................................................... 56 Assign Barcode (Batch application only) ............................................................................................. 57 Download Data Back to the Host Application......................................................................................... 58 Download Screen ................................................................................................................................ 59 Commit Download Data to the Database ........................................................................................... 60 Support ....................................................................................................................................................... 60 TTS USER MANUAL – CONTRACTOR EDITION 6 QUICK START OVERVIEW Now that you have installed TTS, you are ready to begin using the system. This brief Quick Start Overview and the following User’s Manual provide the general information needed to begin entering data into the system and using TTS for the first time. TOOL CLASSIFICATIONS, TYPES, USER DEFINED FIELDS, AND MAINTENANCE This function allows you to create classifications and types. Classifications (i.e. Power Hand Tools) and their (sub-) Types (i.e. Drills, Saws, etc.) are used to categorize tools within the system. On the menu bar select SupportTool Support Administration. You can rename the Class and Types designators in the system’s “Setup Options” function if desired. You can also add User Defined fields and Maintenance tasks to a specific type of tool. See Tool Support Administration in this Manual for more information. CONDITIONS This allows you to add any number of tool conditions that you desire (Excellent, Good, Poor, Needs Repair, etc.) This is a searchable field and can be invaluable to locate equipment based upon their current condition. See the section on Condition Administration for more information. FUNDING SOURCE AND ACCOUNTS Funding Source is a standalone field that can be set up to use as needed. The Accounts screen allows you to tie each tool to an account number for added filtering. You can also rename the Funding Source and Account in the system’s “Setup Options” function, if desired. See Funding Source Administration and Account Administration for more information. MANUFACTURERS The Manufacturer is a standalone field that can be set up to help filter on equipment by manufacturer. See Manufacturer Administration for more information. FACILITIES This function allows you to enter facilities, which are used to organize tool locations. On the menu bar select Support Facility Administration. See Facility Administration in this Manual for a detailed explanation. LOCATIONS This function allows the user to create locations where tools are stored or to which tools are checked out. Locations can be classified as “Storage,” “Check Out/Usage,” or “Transfer” locations and are always tied to facilities. Storage locations are typically where materials are centrally located until checkout. On the menu bar select SupportLocation Administration. See Location Administration in this Manual for a detailed explanation. TTS USER MANUAL – CONTRACTOR EDITION 7 EMPLOYEES This function allows you to create users in TTS. A user may be an individual that will be using the TTS system, or a person to which tools may be checked out. You can also set TTS Access Rights for each user. On the menu bar select FileEmployee Administration. See Employee Administration in this Manual for a detailed explanation. NOTE: The user must be logged in as “Admin” to access this option. MEMBERS This function allows you to create Members other than employees. A member is an individual to which tools may be checked out. You can set Member Categories in the Setup Options screen, and then add new members under the Members button. PRINTER ASSIGNMENT This function allows the user to specify which windows printer will be used for report printing, and which one will be used for label printing. This function must be set on each workstation before printing. On the menu bar select FilePrinter Assignment. See Printer Assignment in this Manual for a detailed explanation. LABEL DESIGN The system allows the user to design labels for tools, locations, and employees. These labels typically have barcodes and can be used to audit, check in, and check out tools. Several sample label designs are included and can be modified. You must select a DEFAULT label design before printing is allowed. On al for a detailed explanation. TOOLS AND MASTER The tool administration screen allows for the creation of tools which are tracked by this system. On the main button bar select the Tools button. The Master function is used to enter in common tools in a master data set that can be selected when adding tools – saving time and effort. See Tool Management in this Manual for a detailed explanation. Once you have setup your initial data, you are ready to start using TTS. Check out tools to employees or locations and create reservations. You can also check tools back “in” to storage. Be diligent on how you use the system, and it will provide years of reliable tracking of all of your tools! Backup your database daily! TTS USER MANUAL – CONTRACTOR EDITION 8 GETTING STARTED Upon opening the program, the screen at left will appear. You will be prompted to enter a User Name and Password. If it is the first time logging in, you will use the Admin User’s data: Username: ADMIN Password: ADMINUSER Other users may be added to the system after setup. After users are entered into the system, they should each log in under their own User Name and Password. REGISTRATION After logging in as Admin, click File on the menu and select Registration Form. This step is important because it assigns licensing rights to you. Entering the information will unlock the program for your licensed use. The Four Digit Customer Identifier and the 16 digit License Key will be provided by Gigatrak when the product is purchased. SETUP OPTIONS After registering your product, click File on the menu and select Setup Options. TOOL SETUP This option can be used to change the names of the parameters to fit your needs. This makes up the structure of the system. Classification, Type, Facility, Location, and Funding Source are parameters tied to tools. Model Number, Serial Number, Account, Condition, Master, Miscellaneous, Asset Number, and Container can be renamed to suit your needs. If you would like to alter any of the names, type in the desired value and then click the OK button. TTS USER MANUAL – CONTRACTOR EDITION 9 The root image folder is the default location for images that you wish to tie to a tool. If the image is in the default location, only the file name is required in the tool screen to identify the image. The Custom Report Folder is the location for custom report files. If a custom report is ordered, the report file should be placed in a folder, and the path to the folder should be set in this option. The Report Logo allows the display of a company logo on reports. You can select a .bmp, .gif, or .jpg file. To clear a logo after it is selected, click the “Select” button and click Cancel on the selection screen. APPLICATION SETTINGS Application Settings control various functions in the tool tracking application. If Show Depreciation is checked, then the depreciation information will be visible on the Tool information screen. The Tool Depreciation Report will also be available on the Reports screen. If the checkbox is not checked, the depreciation information will not be visible and the depreciation report will not be shown. The checkbox cannot be checked until you accept the disclaimer. After accepting the disclaimer, the Preferred Depreciation Type selection will be enabled. This will be the default selection when adding new tools on the Tool Information screen. TTS USER MANUAL – CONTRACTOR EDITION 10 ALLOW DELETE TOOL & PURGE HISTORY If checked, then the Delete button will be displayed on the Tool screen, and the Purge History button will be displayed on the Tool History screen. If the checkbox is not checked, the Delete button and the Purge buttons will not be displayed. AUTO-POPULATE TOOL FIND TABS When checked, the system will automatically display information when a Find screen is opened. If not checked, you must first click “Extract Data” to view a listing. CASCADE MASTER CHANGES TO TOOLS This selection gives you the option to push any changes from the Master Catalog function to each respective Tool assigned to the Master Number. CAUTION: Changes to the Master Catalog may RESET User-Defined data to the values set within the Master Catalog. AUTO-GENERATE TOOL BARCODE This option creates a new barcode ID when adding new tools IF NO BARCODE is assigned. Use this option if you intend to design and print your own barcodes. If you have chosen to use pre-printed barcodes or are switching from an existing system do not select this option. DISPLAY EMPLOYEE BARCODES BEFORE NAMES This applies to several report selection filters. If you view employees primarily by their names, leave this unchecked. If you prefer tracking employees by the Barcode ID, then check the checkbox. DISPLAY ACCOUNT NUMBERS BEFORE DESCRIPTIONS The same rules apply to this option. Select how you prefer to view your report filters here. If you will view accounts by descriptions, leave this unchecked. If you prefer tracking accounts by numbers, check the box. AUTO-CREATE REPAIR MAINTENANCE TYPE This option type will insert a repair maintenance item anytime a new Classification and Type of equipment is created. SHOW MAINTENANCE DUE REPORT AFTER LOG IN When this box is selected, the system will automatically display the report of any upcoming maintenance items immediately following log in. SHOW BIN TOOLS BELOW REORDER POINT REPORT AFTER LOG IN By selecting this option, the system will automatically display the report of any binned items below the reorder point immediately following log in. TTS USER MANUAL – CONTRACTOR EDITION 11 REQUIRE CHECK IN BEFORE ANOTHER CHECK OUT Checking this box will require a checked out tool to be checked back in to the storage location before it can be checked out again. Leaving this unchecked will allow a tool to be checked out from person to person (or location to location) without being returned to the storage location. SHOW TRANSFER This option can be activated if you would relocate tools from one Facility/Location to another. Once you check this and click the OK button, the Transfer tab will appear on the toolbar. ALLOW USERS TO CHANGE THEIR PASSWORD Selecting this option will give access for users within the system to change their own password. If not selected, the Admin will be the only one with authority to create or change a password for a specific user. ALLOW DUPLICATE ASSET NUMBERS The Allow duplicate Asset Numbers gives the option to have multiple of the same Asset Numbers, but if selected, the Asset Number field cannot be used for check out/check in of a tool. SHOW MAINTENANCE ON HANDHELD This option allows maintenance records to be seen on tools when using the handheld scanning device. AUTO E-MAIL EMPLOYEE UPON CHECKOUT Selecting this option will automatically generate a Check Out report to be sent to an employee if email is set up through Microsoft Outlook and this is checked. AUTO COMMIT DOWNLOADED DATA UPON SYNC If checked, this option will result in the data from the handheld being automatically committed to the PC database upon docking the handheld. If unchecked, the process to sync & commit data will be “Sync” “Commit” “Sync”. On the right side of the Application Settings box, there is an area for Log In Password Settings. You can choose to Enforce Password Policy, by choosing a Minimum number of characters, Miminimum number of upper case characters, Minimum number of lower case characters, Minimum number of numeric characters, Minimum number of symbols, and Number of attempts before lockout (inactivates users). To save the changes for both tabs on the screen, select the OK button. A confirmation message will appear, listing the items that you altered. Selecting “Yes” will save the changes and close the screen. Selecting “No” will reset the changes back to the original values. To leave the screen without changing any values, select the in the upper right corner of the screen. TTS USER MANUAL – CONTRACTOR EDITION 12 MEMBER SETUP The third tab of Setup Options creates members that you would check out tools to, or it could be used for jobs to which you check out tools. The Show Members checkbox will display the Member button on the main toolbar if checked. If unchecked, the Member button will not be displayed. You can rename Member to whatever is appropriate for your company, such as “Contractor”. There are 3 categories available to be used as needed. Categories are searchable fields on the Member screen. There are 4 Additional Information fields that can be used as needed. These are also searchable fields on the Member screen. JOB SETUP The Jobs feature is only available in the Contractor’s Edition of the Tool Tracking System. The “Jobs” radio button will display the Jobs feature if selected. You can rename Jobs to whatever is appropriate for your company. There are 3 categories available to be used as needed. Categories are searchable fields on the Jobs screen. There are 4 Additional Information fields that can be used as needed. These are also searchable fields on the Jobs screen. To save the changes on all 3 tabs of the screen, select the OK button. A confirmation message will appear, listing the items that you altered. Selecting “Yes” will save the changes and close the screen. Selecting “No” will reset the changes back to the original values. To leave the screen without changing any values, select the in the upper right corner of the screen. TTS USER MANUAL – CONTRACTOR EDITION 13 PRINTER ASSIGNMENT The printer assignment process is used to set the printer the system will use for printing reports and barcode labels. Select Printer Assignment from the File menu and the screen below will be displayed. The Available Printers list will display all the printers that are on the Windows printer list. To select the report printer, select the printer of choice and then click the Assign Default Printer button. The Default Printer label will indicate the printer you selected. Any reports printed by the system will be directed to this printer. This does not affect the windows default printer selection. To select the label printer, select the printer of choice and then click the Assign Label Printer button. The Label Printer label will indicate the printer you selected. Any labels printed by the system will be directed to this printer. If you do not have a label printer, assign the default printer to act as the label printer. EMPLOYEE ADMINISTRATION Employees are either people that have access to the TTS system or people whom tools will be assigned. To manage employees, select Employee Administration under the File menu. Upon initial setup, the only employee will be the Admin user. You may Add, Edit, or Delete employee information. To Add a new employee, select the Add button. The form will change as indicated. The items in bold text are required for all employees. The system will not allow editing of the last name, first name, middle initial, or user name for Admin User. To delete an employee, select the employee and then select the delete button. If an employee is assigned a tool or has an outstanding reservation or is involved in a history record, the system will not allow the employee to be deleted. Set the Status to inactive to prevent further use. To print employee labels, select the employee(s) to be printed and then select the Print Label button. If a label printer has been selected and if a default employee label has been designated (see Label Designer in this manual), the label(s) will be printed. TTS USER MANUAL – CONTRACTOR EDITION 14 For label printing, multiple employees may be selected. To select multiple employees, do one of the following: Drag the mouse over the employees desired while holding down the left mouse button. Select the first employee by left clicking with the mouse. Select the last employee in a range by holding down the Shift key and the left clicking on the last employee. All employees in between will be selected. Hold down the Control (Ctrl) key and select the employees you wish to print by left clicking on each one with the mouse. EMPLOYEE INFORMATION Enter the appropriate employee information. A few fields have special requirements: The barcode entry must be unique. A barcode for a tool, location, or employee cannot be the same. Keep the barcode as simple as possible, only using a short combination of capital letters and numbers. If you use the supplied barcode labels, the employee's barcode must match the label placed on their badge. If the employee will be using the TTS system, he will require a Log in Name and Password. The Log in Name must be between 5 and 10 characters long. It must be unique; no two employees may have the same log in name. Log in names are not case sensitive. A password must be between 5 and 10 characters long. Passwords are not case sensitive. TTS USER MANUAL – CONTRACTOR EDITION 15 EMPLOYEE ACCESS LEVELS Once the employee information is entered, set the employee's access levels. The default access level is for no access to TTS. Master (or Catalog) – applies to activities associated with creating and editing master data. Tools - applies to activities associated with creating and editing tool data. Check In/Out – applies to activities associated with assigning tools to an individual or location, or returning tools to storage. Transfer – applies to activities associated with transferring tools to facilities. Reserve – applies to activities associated with creating and editing tool reservations. Employee Administration – applies to activities associated with managing employee information. Tool Status Administration – applies to activities associated with editing tool status. Support Administration – applies to activities that support the overall tool process. This will include managing facilities, locations, tool types, classifications, and conditions. EMPLOYEE ASSIGNED FACILITY If you have multiple Locations/Facilities, you can select which ones an employee can check out/check in tools from. You can check “All Facility(s)” to allow access to them all, or you can select individual facilities. Change the information or access levels as required and then select the Save button to save the changes, or the Cancel button to leave the Edit process without saving. If the user logged into the system only has view rights to employees, the Add, Edit, and Delete buttons will not be available. Instead, a View button will be available to allow the user to look at but not change employee information. TTS USER MANUAL – CONTRACTOR EDITION 16 OTHER FILE MENU FUNCTIONS BACKUP/COMPACT DATABASE If you have the Access version of TTS, this option is used to periodically repair, compact, and backup the TTS database. To determine if you have the Access version of TTS, go to the Help tabAbout and the header of the box will say “About (Access)” It is possible that the Access database can get corrupted. Compacting the database may repair the damage. In addition, a previous compact operation will have created a backup of the database that can be used if the current database is corrupted beyond repair. The system will retain three backup copies of the database in the dbbackup folder. Backing up frequently will minimize the loss of data if the current database is corrupted beyond repair. MS Access does not automatically remove data that is deleted by the system. Compacting the database will remove data that has been deleted. This will reduce the size of the database file and improve performance. To compact the database, select Compact Database under the File menu. Then select the Compact Database button. The system will compact, repair, and backup the database and when complete, the Compact Database screen will disappear. CHANGE PASSWORD A user currently logged into TTS may change their password at any time. Select Change Password from the File menu and the screen at left appears. Type in your current user name and password and then select the Change password button. Passwords must be between 5 and 10 characters long. Type in your new password and then select the Change Password button. Type in your new password again. If the password matches the new password you typed earlier, the system will save the new password and the Change Password screen will disappear. TTS USER MANUAL – CONTRACTOR EDITION 17 If the password does not match the password typed in earlier, the system will state the passwords do not match and ask if you wish to try again. If you answer yes, the screen will be returned to the state above and you may try to type the second password again. LOGIN TEMPORARILY Log in temporarily is a function used in order to perform some function that the current user may not complete without the current user having to exit the program. Select Log In Temporarily under the file menu. The screen at right will appear. Enter your user name and password, and then select the Log In button. The banner on the main screen will turn red. As long as someone is temporarily logged into the system these conditions will remain. When the user temporarily logged in logs out by selecting the Log Out button, the main screen will return to normal and the original user is the current user. PURGE HISTORY If you would like to purge all history before a certain date, you can enter a specific date and then click OK. WARNING!! Be very careful with this feature, when you click OK, all tool history records will be purged for good. TTS USER MANUAL – CONTRACTOR EDITION 18 HANDHELD CONFIGURATI ON The Handheld Configuration screen is used to select the handheld device. This version of TTS currently supports Windows Pocket PC and CE handhelds. To view the Handheld Configuration screen, click the File menu item and select Handheld Configuration. Pocket PC devices require Microsoft ActiveSync (for Windows XP) or Windows Mobile Device Center (for Windows Vista or Windows 7) to communicate with TTS. IMPORTS Each import has specific instructions included on the import screen that delineates data formatting requirements along with any special instructions you may need. Imports are available for the following: Import Accounts: Allows the import of account data into the Account Administration table. Import Employees: Allows the import of employee data into the Employee Administration table. The import even allows for the granting of specific access rights to the various functions in TTS. Import Funding Sources: Allows the import of funding source data into the Funding Source Administration table. Import from ToolWatch®: ToolWatch® is a product of ToolWatch Corporation and licensed and copyrighted specifically for their own purpose. As with any software product, you the user have specific rights to your own data. We at GigaTrak have been requested to accept data from ToolWatch® so an import for specific data is made available. You must be careful when moving data from one system to another and make sure that all procedures are followed to avoid data problems. Contact GigaTrak for additional information. Import Locations: Allows the import of location data into the Location Administration function. Careful – Locations are Facility Specific so the data must be accurate. TTS USER MANUAL – CONTRACTOR EDITION 19 Import Master/Catalog Items: Allows the import of master/catalog data from outside sources. Additional data may be desired but requires user editing after the import is completed. Import Tools: If you have spent years managing your inventory in an Excel formatted file, this can help you save time by importing your existing tool inventory quickly and safely. It is critical to ensure that the data is accurate and formatted properly to avoid bad data upon import! LABEL MENU FUNCTIONS LABEL DESIGNER The Label Designer process is used to design labels for the various processes in the system that prints barcode labels. The processes that will print labels are: Tools Employee Administration Location Administration These processes can be selected in the Design Type section of the form, which is located in the upper left corner. To design a label, first select the design type. The Data Source List will contain the possible fields that may be included in the label. The list on the example contains the possible data sources for an Employee label. The Current Label Designs list will contain any labels that have already been created for the design type. The list currently contains a sample employee label. When one of these labels is selected, the box on the right will display the label design, as indicated above for the sample employee label. To create a new label, select the Design type and then select New Design button. Set the label size (Width and Height in inches). Set the label orientation (Portrait or Landscape). For Portrait, the height is vertical on the screen. For Landscape the Height is Horizontal on the screen. There are 6 different elements that may be placed on the label. They are from left to right: text, barcode, horizontal line, vertical line, box, and a graphic. ADDING A TEXT ELEMENT Select the Text button in the Element Options panel. Select (Label Caption only) in the Data Source box, and type a label caption in the Label Caption textbox. You can select Wrap Text or Center. To set the font style and size, click the Font button. Click the Add to Label button. The text element will appear in the upper left corner of the label design. Drag it to the desired position on the label. TTS USER MANUAL – CONTRACTOR EDITION 20 To edit the text caption or font after a text element has been placed in a label design, right click on the element and choose the option desired. ADDING A DATABASE FIELD TEXT ELEMENT In the Data Source box, select the desired database field. You can select Wrap Text or Center. To set the font style and size, click the Font button. Click the Add to Label button. A sample of the data will appear in the upper left corner of the label design. Drag it to the desired position on the label. When the label is printed, the actual data for that field will be printed on the label. To edit the text caption or font after a database field text element has been placed in a label design, right click on the element and choose the option desired. ADDING A BARCODE ELEMENT Select the Barcode button in the Element Options panel. Select (Label Caption only) in the Data Source box, and type a label caption in the Label Caption textbox. You can select Center. Select the barcode font and size desired. Click the Add to Label button. The text will be added to the label in the barcode font. Drag it to the desired position on the label. If a database field is needed as a barcode, select the field from the Data Source box, and add it to the label. When the label is printed, the actual data for that field will be printed on the label as a barcode. ADDING A HORIZONTAL LINE ELEMENT Select the Horizontal Line button in the Element Options panel. Click the Add to Label button. A horizontal line segment will be added to the label design in the upper left-hand corner. Drag it to the desired position on the label. To change the size of the line, place the mouse cursor over the right end of the line. When the cursor changes to a double arrow, click and drag the endpoint to the desired length. ADDING A VERTICAL LINE ELEMENT Select the Vertical Line button in the Element Options panel. Click the Add to Label button. A vertical line segment will be added to the label design in the upper left-hand corner of the label. Drag it to the desired position on the label. To change the size of the line, place the mouse cursor over the bottom of the line. When the cursor changes to a double arrow, click and drag the endpoint to the desired length. ADDING A BOX ELEMENT Select the Box button in the Element Options panel. Click the Add to Label button. A box will be added to the label design in the upper left-hand corner. Drag it to the desired position on the label. To change the size of the box, place the mouse cursor over the lower right-hand corner of the box. When the cursor changes to a double arrow, click and drag the endpoint to the desired size. TTS USER MANUAL – CONTRACTOR EDITION 21 ADDING A GRAPHIC ELEMENT Select the Graphic button in the Element Options panel. Click the Find Graphic File button to find a file on your computer to place on the label. File types supported are bmp, gif, jpg, wmf, and ico. Click the Add to Label button. The graphic will be added to the label design in the upper left-hand corner. Drag it to the desired position on the label. Graphic elements are resizable. Save the label design before attempting to resize a graphic element. Right click on the graphic in the label and select Resize Graphic. A Resize Graphic box will appear above the Label Size box. Enter the desired Height and Width (in inches) and click the OK button. It may be possible to enter a size that causes the graphic to disappear from the label design. If this happens, select a different label design. When prompted to save changes, respond NO to the prompt. Then go back to the label design and try again. DELETING A LABEL ELEMENT Select the element to be deleted from the label design. Click the Delete Element button, or press the Delete key on the keyboard. Elements can also be deleted by right-clicking on the element and selecting Delete from the popup menu. DELETING A LABEL DESIGN To delete an entire label design, select the design from the Current Label Designs list. Click the Delete Design button at the bottom of the screen. SAVE AN EXISTING DESIGN AS A NEW DESIGN Time may be saved by copying an existing label design and modifying it. Select the design from the Current Label Designs list, and click the Save Design As button at the bottom of the screen. Enter a new design name and click the OK button. Design names must be unique. VIEWING/PRINTING A LABEL The work space on the right-hand side of the screen provides a feel for how your label will print. If you need to view exactly how your label will print, click on the View button with the Mode setting set to Design. An exact replica of the label will appear. To print the label on your label printer, change the Mode setting to Print, enter the number of labels you want to print and click the Print button. SAVE AS DEFAULT To save a label design as default for a specified process, select the Design Type (process), and select the label design from the Current Label Designs list. Then select the Save as Default button. When a label is set as the default label, the word "Default" will appear after the label design. TTS USER MANUAL – CONTRACTOR EDITION 22 LABEL QUICK START To put the tool barcode on your label as a barcode: a. In “Element Options” select the barcode button. b. In the “Data Source” list box, select “Tool Barcode”. c. Click the “Add to Label” button to put it in your label design. d. Drag the element to the desired position. To put the tool barcode on your label as a text field: 1) In “Element Options” select the “T” button. 2) In the “Data Source” list box, select “Tool Barcode”. 3) Set the desired Font options. 4) Click the “Add to Label” button to put it in your label design. 5) Drag the element to the desired position. HELP MENU FUNCTIONS CHECK FOR UPDATE After logging in, select Check for Update on the Help menu. Major updates may require you to contact GigaTrak and receive a special download. Access to the Check for Update function is only available when the ADMIN login is used. You must have a current Support Agreement in place to download updates. SUPPORT MENU FUNCTIONS ACCOUNT ADMINISTRATI ON Account Administration is used to keep track of the account numbers that are used to purchase tools. Account numbers are not required to use TTS. To begin the process, select Account Administration from the Support menu. To Add a new account, select the Add button. Enter the Account Number (required field) and a description (optional), then select the Save button. To Edit an Account, select the Account of interest and then select the Edit button. Modify the information as desired. Select the Save button to save the Account changes. To Delete an Account, select the Account to be deleted and then select the Delete button. The system will check to see if the account is tied to a tool. If so, the system will not allow the Account to be deleted. You may inactivate the Account to prevent it from being assigned to a tool in the future if you desire. TTS USER MANUAL – CONTRACTOR EDITION 23 CONDITION ADMINISTRAT ION Tools may be assigned a Condition, which indicates the usefulness of the tool. To access this process, select Condition Administration under the Support menu. Each Condition has a name and Description. In addition a Condition may be designated as Active or Inactive. Condition name may be up to 20 characters and is required. This name must be unique. Description may be up to 80 characters long and is not required A Condition set as active may be assigned to a tool; a Condition set as inactive will not be available for assignment to a tool. Setting a condition as “inactive” minimizes clutter, but retains historical information tied to each condition. To add a new Condition, select the “add” button, enter the new Condition (name) and Description, and click “save” button to save the new condition. To edit an existing Condition, select the Condition to be edited and then select the Edit button. Modify the Condition (name), Description, or Status (Active vs. Inactive). Select the Save button to save the changed Condition. To delete a Condition, select the Condition to be deleted and then select the Delete button. The system will check to see if the Condition is assigned to a tool. If so, the system will not allow the Condition to be deleted. You may inactivate the Condition to prevent it from being assigned to future tools if you desire. TTS USER MANUAL – CONTRACTOR EDITION 24 FACILITY ADMINISTRAT ION Facilities are the upper hierarchy of locations. In other words, locations are tied to a facility. Due to this structure, at least one facility is required by the system. To begin the process, select Facility Administration from the Support menu. To Add a new facility, select the Add button. Enter the facility information as desired: Unique Name: Up to 40 characters and is required. Address: Up to 40 characters, but it is not required. City: Up to 40 characters, but it is not required. State: Up to 2 characters, but it is not required. Zip Code: Up to 10 characters, but it is not required. Notes: Up to 255 characters, but it is not required. Select the “Save” button to save the new Facility. To Edit a Facility, select the Facility of interest and then select the Edit button. Modify the information as desired. Select the Save button to save the Facility changes. To Delete a Facility, select the Facility to be deleted and then select the Delete button. The system will check to see if a location is tied to the Facility. If so, the system will not allow the Facility to be deleted. You may inactivate the Facility to prevent a location from being assigned to it in the future if you desire. FUNDING SOURCE ADMIN ISTRATION Funding Source Administration is used to keep track of the agency that provided funding for the tool. To begin the process, select Funding Source Administration from the Support menu. To Add a new Funding Source, select the Add button. Enter the description, then select the Save button. To Edit a Funding Source, select the Funding Source of interest and then select the Edit button. Modify the information as desired. Select the Save button to save the Funding Source changes. To Delete a Funding Source, select the Funding Source to be deleted and then select the Delete button. The system will check to see if the Funding Source is tied to a tool. If so, the system will not allow the Funding Source to be deleted. TTS USER MANUAL – CONTRACTOR EDITION 25 LOCATION ADMINISTRAT ION Location Administration is used to manage the locations to which tools may be assigned. It displays all the locations that exist in the system that are tied to the facility selected. To add a new Location, select the Facility to which it is to be added and then select the Add button. Enter the location information as desired: Facility - defaults to the facility selected on the main form but may be changed. Location - may be up to 50 characters and is required. Must be unique to each location. Barcode - may be up to 20 characters long and is required. A barcode for a tool, location, or employee cannot be the same. Checkout/Usage Location -location that tools can be checked out to. Storage Location - location used for storage rather than usage. Transfer Location - location that tools transfer to. Responsible Individual - employee that is responsible for the tools at the location. This is not required. If the responsible individual is not in the system, you may go directly to the Employee Administration process by selecting the Add New Employee button. Notes - may be up to 255 characters long and is not required. TTS USER MANUAL – CONTRACTOR EDITION 26 To edit a Location, select the Facility containing the Location, select the Location of interest and then select the Edit button. Modify the information as desired. Select the Save button to save the Location changes. To delete a Location, select the Location to be deleted and then select the Delete button. The system will check to see if a tool is tied to the location or the Location is being used in a history record. If so, the system will not allow the Location to be deleted. You may inactivate the Location to prevent a tool from being assigned to the Location in the future if you desire. EXPORT LIST TO FILE This button will export information for the displayed locations to a tab delimited text file. CHANGE RESPONSIBLE INDIVIDUAL Change Responsible Individual will change the responsible individual for all selected locations on the screen. Display and select the locations that you want to change. To select multiple locations, do one of the following: Drag the mouse over the locations desired while holding down the left mouse button. Select the first location by left clicking with the mouse. Select the last location in a range by holding down the Shift key and then left clicking on the last location. All locations in between will be selected. Hold down the Control (Ctrl) key and select the locations you wish to change by left clicking on each one with the mouse. After the locations are selected, click the Change Responsible Individual button. A screen will appear where you can select a new Employee. Select the new Employee and click the OK button. PRINT BARCODE LIST Print Barcode List will print a list of the displayed location barcodes that can be used for scanning. When the Print Barcode List button is selected, a pop-up window will appear where you can set the barcode row height. This allows you to control the space between barcodes on the list. The minimum row height is 0.5 inch. PRINT LOCATION LABEL To print a Location label, select the location(s) to be printed and then select the Print Label button. If a label printer has been selected and if a default location label has been designated (see Label Designer in this manual), the label(s) will be printed. For label printing, multiple locations may be selected. To select multiple locations, do one of the following: Drag the mouse over the locations desired while holding down the left mouse button. Select the first location by left clicking with the mouse. Select the last location in a range by holding down the Shift key and then left clicking on the last location. All locations in between will be selected. TTS USER MANUAL – CONTRACTOR EDITION 27 Hold down the Control (Ctrl) key and select the locations you wish to print by left clicking on each one with the mouse. MAINTENANCE/REPAIR P ROVIDER ADMINISTRATION A simple Maintenance / Repair Provider screen allows you to standardize the name of each provider who services your equipment. Select Maintenance/Repair Provider Administration on the Support menu. You can Add new provider names, edit the name, and delete those providers not already used for prior maintenance. You can also inactivate a provider who is no longer on your list of approved maintenance providers. TOOL SUPPORT ADMINISTRATION Tool Support Administration is used to administer Classifications and Types. Tool Support Administration screen has two (2) tabs: Classification and Type. CLASSIFICATION: The first tab is Classification. Tools may be assigned a Classification to organize them in groups. Each Classification has a name (Classification) and Description. In addition, a Classification may be designated as Active or Inactive. Classification (name) may be up to 20 characters and is required. The Classification (name) must be unique (i.e., no other Classifications may have the same Classification (name). Description may be up to 80 characters long and is not required. TTS USER MANUAL – CONTRACTOR EDITION 28 A Classification set as active may be assigned to a tool. A Classification set as inactive will not be available for assignment to a tool. Setting a Classification to inactive reduces clutter in the system but retains historical information that is tied to that classification. To add a new Classification, select the Add button. 1. Enter the new Classification (name) and Description (optional). 2. Select the Save button to save the new Classification. To edit an existing Classification, select the Classification to be edited from the listing and then select the Edit button. 1. Modify the Classification (name), Description, or Status (Active vs. Inactive). 2. Select the Save button to save the changed Classification. To delete a Classification, select the Classification to be deleted and then select the Delete button. The system will check to see if the Classification is assigned to a tool. If so, the system will not allow the Classification to be deleted. You may inactivate the Classification to prevent it from being assigned to future tools if you desire. TYPE: Type is a subclass of Classification. Each Classification can have several Types. In addition to grouping tools under a Type, the Type will also set the default depreciation period for tools assigned to it. Each Classification has one or more Types. Each Type has a name (Type), Description, and Depreciation period in years. A type may be designated as active or inactive. Set as inactive to reduce clutter & retain historical data tied to the type. Type (name) may be up to 20 characters and is required. The Type (name) must be unique (i.e., no other Types may have the same Type (name)). Description may be up to 80 characters long and is not required. Depreciation may be up to 255 years and is not required. Tools of this Type can be flagged as reservable by checking the checkbox. This will make them available when using the Reservation function. A Type set as active may be assigned to a tool. A Type set as inactive will not be available for assignment to a tool. TTS USER MANUAL – CONTRACTOR EDITION 29 To add a new Type, select the Add button. 1. Select the appropriate Classification for the new Type. 2. Enter the new Type (name), Description, and depreciation period. 3. Select if the type is reservable. 4. Select the Save button to save the new Type. To edit an existing Type, select the Type to be edited and then select the Edit button. 1. Modify the Type (name), Description, Depreciation, or Status (Active vs. Inactive). 2. Select the Save button to save the changed Type. To delete a type, select the Type to be deleted and then select the Delete button. The system will check to see if the Type is assigned to a tool. If so, the system will not allow the Type to be deleted. You may inactivate the type to prevent it from being assigned to future tools if you desire. USER DEFINED FIELDS (F3) The third tab is the User Defined Fields. Fields can be added specific to a tool “Type”. When new tools are added to the system, the added fields are displayed in the Tool Information screen for user entry. After selecting the appropriate Classification and Type for the tool, a listing of the current User Defined Fields is displayed. Each field has a name and may be designated as Active or Inactive. Setting a User Defined Field to inactive does NOT remove the data already recorded for any tool of that type. It will not be displayed on the Tool Information screen. Returning the tool to active will restore prior data for each tool of that type. The Field Name may be up to 50 characters and is required. A Field Name set as active will be assigned to each tool of that Type. A Field Name set as inactive will not be available. TTS USER MANUAL – CONTRACTOR EDITION 30 MAINTENANCE (F4) The forth tab is Maintenance. Each “Type” of equipment may be assigned a group of specific Maintenance items with a preset interval in days, months, operating hours, or mileage for required performance. In addition, a “Repair” maintenance item may automatically be inserted when a new “Type” is created. The “Repair” setting is set in the Setup Options screen. Maintenance is tied to classes and types of tools. Each maintenance has a Description and Special Instructions. In addition, a maintenance item may be designated as Active or Inactive. Setting as inactive reduces clutter but retains historical information tied to the maintenance. The Maintenance Description may be up to 50 characters and is required. The Description must be unique (i.e., no other Description may be the same). Special Instructions may be up to 255 characters long and is not required. Interval is the length of time between performing the maintenance activity (i.e., do a Safety Inspection every 3 Months). Service Reminder Interval will determine if the maintenance item is displayed on the “Maintenance Due Report”, which can be displayed after log in. The setting for displaying the report is on the Setup Options screen. The checkbox “Prevent Check Out/Transfer if Past Due”, if checked, will not allow the tools of this type to be checked out or transferred when the maintenance item is past due. A Maintenance item set as active may be assigned to a tool of that type. A Maintenance item set as inactive will not be available. To add a new Maintenance Item, select the Add button. 1. Enter the new Maintenance Description. 2. Enter any Special Instructions. 3. Select the Save button to save the new Maintenance Item. To edit an existing Maintenance Item, select the Maintenance Item to be edited and then select the Edit button. 1. Modify the Maintenance Description, Special Instructions or Status (Active vs. Inactive). 2. Select the Save button to save the changed Maintenance Item. To delete a Maintenance Item, select the Maintenance Item to be deleted and then select the Delete button. The system will check to see if the Maintenance Item is assigned to a tool. If so, the system will not allow the Maintenance Item to be deleted. You may inactivate the Maintenance Item to prevent it from being assigned to future tools if you desire. TTS USER MANUAL – CONTRACTOR EDITION 31 TOOL MASTER SCREEN The Tool Master Screen is used to ensure that like items are entered into TTS the exact same way. This helps when searching for tools and items within your inventory. The goal is to establish a standardized way of entering your equipment that utilizes a “Master Number” to track each tool. A Model Number can commonly be used as the Master Number since it uniquely identifies the manufacturer and model being tracked. This master list can also be called a Part Master, Item Master, Lot Number, or other common term. FIND MASTER/CATALOG (F1) Two tabs are displayed. The first is the “Find” tab allowing you to filter and view those items within the master by: Manufacturer Classification Type Status And a search by Master Number, Description, or Model Several key aspects are available on the form. As an example, selecting the Reset button will return all selections to All. In addition, the Master list can be sorted by one of its columns by clicking on the heading of that column. A second click will reverse the sort order of the items in the listing. SEARCH FIELD Groups of master records can also be displayed by selecting Description in the Search Field dropdown list, typing words in the Search box, and then selecting the Extract Data button. For example, type the word “drill” into the box and click Extract Data. Only tools that have the word “drill” in the description will be displayed. ADD TO LIST The Add To List button can be used to build a custom list of tools. When selected, it will appear to remain depressed. When in this mode, tools that are extracted will be added to the list of tools already shown on the screen, rather than clearing the screen first. You can continue to change the selection filters and extract the tools you need to build your list. The list can then be printed or exported. Clicking the Add To List button a second time will return the Extract Data function to its normal mode. TTS USER MANUAL – CONTRACTOR EDITION 32 PRINT LIST To print the Tools in the list, select the Print List button. A report is displayed and if the default printer is set, the Tools displayed on the screen will be printed when Print is selected. You may also PDF or Email the report directly. PRINT BARCODE LIST Print Barcode List will print a list of the displayed tool barcodes that can be used for scanning. The list will include the Master Number, Master Barcode, Description, Model, and Status. When the Print Barcode List button is selected, a pop-up window will appear where you can set the barcode row height. This allows you to control the space between barcodes on the list. The minimum row height is 0.5 inch. EXPORT LIST TO FILE Export List To File will export information for the displayed tools to a tab delimited text file. MASTER/CATALOG INFOR MATION Any highlighted Master tool can then be viewed in the Master Information by double-clicking the record or selecting the tab. With selected fields included, you are able to standardize the parameters for the Master tool item being entered. NOTE: If you edit or change any information in the Master Information, you will be prompted as below: Do you want to update all matching Tools’ data with the Master Information? This could result in any custom changes to individual tools to be lost. TTS USER MANUAL – CONTRACTOR EDITION 33 This allows any change to be updated in every record tied specifically to this Master Record. REMEMBER – You only need to add a specific model of tool ONCE in the master. The COPY function just saves you time to create a similar record but still make appropriate changes to differentiate the tools. TOOLS SCREEN The Tool management process is started by selecting the Tool button on the main toolbar, which displays the screen below. The Tool management form is composed of four tabs: Find Tool Tool Information Tool History Tool Maintenance FIND TOOL The first tab is used to view tools, print a list of tools, and print tool labels. The list of Tools on the screen is controlled by the multiple selections on the upper part of the form. These selections are: Facility Location Funding Source Account Manufacturer Condition Search (by barcode, asset number, description, in service date, model number, notes, and serial number) Master Number (or Catalog) Classification Type Status Other Search (Binned Tools, Consumable Only, Assigned to Employee Barcode, Assigned to Location Barcode, and Assigned to Container Barcode) TTS USER MANUAL – CONTRACTOR EDITION 34 All of these selections are administered under the support menu of the main form. Each is tied to a tool in the Tool Information tab of this form. Select the parameters of choice and then select the Extract Data button to change the tool display. Several key aspects are available on the form. As an example, selecting the Reset button will return all selections to All. In addition, the Tool list can be sorted by one of its columns by clicking on the heading of that column. A second click will reverse the sort order of the items in the listing. SHOW THUMBNAIL IMAGES If an image is assigned to a tool, a thumbnail picture will be displayed in the Description column of the grid. The thumbnail display can be turned on or off by right-clicking in the grid and selecting “Show Thumbnail Images” in the popup menu. NOTE: Some images may be incompatible with this application. This can cause errors when data is extracted on the Find Tool tab. If errors occur, find a tool that does not have an image (or add a new tool without an image) and display it in the grid. Rightclick the item in the grid, and uncheck Thumbnail Images. A larger view of the image can be displayed by selecting “View Image” from the popup menu. SEARCH FIELD Groups of tools can also be displayed by typing words in the Search box, and then selecting the Extract Data button. For example, select Description in the Search Field dropdown list, type the word chair into the Search box and click Extract Data. Only tools that have the word chair in the description will be displayed. If a Location is also selected, only tools that are located at that location and have the word chair in the description will be displayed. To find a specific Tool by its barcode: Select Barcode on the Search Field drop-down list Select the Barcode text box (background turns yellow) Type in the barcode and select the Enter key on the keyboard, or scan the barcode with a wedge type barcode scanner attached to the PC If the barcode matches that of a tool, the Tool will appear on the list ADD TO LIST The Add To List button can be used to build a custom list of tools. When selected, it will appear to remain depressed. When in this mode, tools that are extracted will be added to the list of tools already shown on the screen, rather than clearing the screen first. You can continue to change the selection filters and extract the tools you need to build your list. The list can then be printed or exported. Clicking the Add To List button a second time will return the Extract Data function to its normal mode. TTS USER MANUAL – CONTRACTOR EDITION 35 CHANGE STATUS The Change Status function is used to change the Status of a group of tools all at once. Display and select the tools that you want to change. To select multiple Tools, do one of the following: Drag the mouse over the Tools desired while holding down the left mouse button. Select the first Tool by left clicking with the mouse. Select the last Tool in a range by holding down the Shift key and then left clicking on the last Tool. All Tools in between will be selected. Hold down the Control (Ctrl) key and select the Tools you wish to change by left clicking on each one with the mouse. After the tools are selected, click the Change Status button. A screen will appear where you can select a new Status. Select the new Status and click the OK button. CHANGE STORAGE LOCATION The Change Storage Location function is used to change the storage location of a group of tools all at once. Display and select the tools that you want to change. To select multiple Tools, do one of the following: Drag the mouse over the Tools desired while holding down the left mouse button. Select the first Tool by left clicking with the mouse. Select the last Tool in a range by holding down the Shift key and then left clicking on the last Tool. All Tools in between will be selected. Hold down the Control (Ctrl) key and select the Tools you wish to change by left clicking on each one with the mouse. After the tools are selected, click the Change Storage Location button. A screen will appear where you can select a new Facility and Storage Location. Select the new Facility and Storage Location and click the OK button. PRINT LIST To print the Tools in the list, select the Print List button. A report is displayed and if the default printer is set, the Tools displayed on the screen will be printed when Print is selected. You may also PDF or Email the report directly. PRINT BARCODE LIST Print Barcode List will print a list of the displayed tool barcodes that can be used for scanning. The list will include the tool descriptions, model numbers, and serial numbers. When the Print Barcode List TTS USER MANUAL – CONTRACTOR EDITION 36 button is selected, a pop-up window will appear where you can set the barcode row height. This allows you to control the space between barcodes on the list. The minimum row height is 0.5 inch. PRINT TOOL LABEL To print tool labels: Select one or more Tools in the list, Select the Print Label button. For label printing, multiple Tools may be selected. To select multiple Tools, do one of the following: Drag the mouse over the Tools desired while holding down the left mouse button. Select the first Tool by left clicking with the mouse. Select the last Tool in a range by holding down the Shift key and then left clicking on the last Tool. All Tools in between will be selected. Hold down the Control (Ctrl) key and select the Tools you wish to print by left clicking on each one with the mouse. EXPORT LIST TO FILE Export List to File will export information for the displayed tools to a tab delimited text file. TOOL INFORMATION Selecting a tool and then selecting the Tool Information tab, or double-clicking on a tool, will bring up the Tool Information screen below. Tool information with bold text above is required. Many of the fields listed below are included in the sub-tabbed section in the lower portion of the form. The available tool information is: Master Number is a selection to pull down general Tool information from the Master screen Classification is a method of grouping Tools Type is a subset of Classification and a second method of grouping Tools Description is up to 80 characters describing the Tool Facility is the building in which the Tool is located Storage Location is the default storage location for the Tool In Service Date is the date the tool was put into service (defaults to current date) Barcode is the barcode that identifies the Tool. You must enter the first tool’s barcode number manually in a format that all barcodes will use (i.e. A00001). The system will then automatically TTS USER MANUAL – CONTRACTOR EDITION 37 increment the numerical portion of the barcode number one at a time. If you are using pre-printed barcodes, enter the number seen on the barcode. Asset Number is the tools asset number, up to 30 characters Condition is the physical condition of the Tool. Condition does not apply to binned items. Manufacturer is the manufacturer of the tool (data entered on the Manufacturer Administration screen) Model is the model number of the Tool Serial Number is the Serial Number of the Tool Funding Source is the agency that provided the Tool (User Definable Field) Account is the account number used to purchase the Tool Status. An Active tool may be checked out, A Retired Tool may not be checked out. PRIMARY DATA SUB-TAB Note is up to 255 characters of information about the Tool Container allows other tools to be checked out to the container itself (i.e. tool box) Binned Item is used for small items that cannot be individually bar coded. If the Binned Item checkbox is checked, an option will appear to mark the tool as a Consumable. Boxes will also appear to enter a Storage Bin Quantity and a Reorder Point. Check Out shows who or where the tool is checked out to (employee or location) Due Date is the date the Tool is due to be checked in PURCHASE / WARR. SUB-TAB Purchased From allows entry of general supplier information Warrant Expiration Date tracks when a warranty period expires Depreciation period in years (does not apply to bin items) o NOTE: fields relating to Depreciation will not be visible unless the “Show Depreciation” checkbox is checked on the Setup Options screen. Depreciation Type. The system will calculate depreciation based on five methods: Standard Straight Line, MACRS Half-Year, MACRS Mid-Quarter, MACRS Double Declining Half Year, and MACRS Double Declining Mid Quarter o MACRS means Modified Accelerated Cost Recovery System Original Value is the cost basis for depreciating the Tool Salvage Value is the remaining value of the tool after it has been fully depreciated Current Value is the current depreciated value of the Tool (calculated) Date for Current Value is the date used to calculate the current value Miscellaneous is a user definable field that can be used as desired IMAGES & DOCS SUB-TAB Tool Image is the path to a file that contains a picture of the tool. If the image information is entered and a file is at the proper location, the picture will be displayed in the area to the right of the sub-tab TTS USER MANUAL – CONTRACTOR EDITION 38 section. Double clicking on the image will display a full sized image of the picture. In addition, linked documents, PDF, URLs, and other related files can be assigned to the Tool. USER DEFINED DATA SUB-TAB User Defined Fields stores additional information specific to the type of Tool If a tool with user defined data is edited and the Type is changed, it is possible that duplicate user defined fields will appear. This can happen if the new Type has the same user defined field names as the previous Type. The new field will be blank and the old field will have data. To correct this, Edit the tool and enter the user defined data into the blank field. Then blank out the data in the old field. When the tool is Saved, a message will appear to indicate that user defined fields were found that do not belong to the selected Class and Type. It will ask if you want to delete the fields. Respond “Yes” to the prompt. MILES / HOURS SUB-TAB Miles and Hours can be entered along with associated dates. This is used in the Tool Maintenance section. BINNED AND CONSUMABLE ITEMS Binned and Consumable items must be selected at the time the tool is entered via the Add button. Due to the different methods that bin and consumable data is tracked in the system, the Bin selection cannot be changed with the Edit function. Binned items are small items that would not be individually bar coded, such as screwdrivers. They would be located in a common bin with a single barcode. When they are checked out, they are expected to be returned. Consumable items are a subset of binned items. Consumables are items that are checked out but not expected to be returned, such as gloves. Binned and Consumable items have a Reorder Point. This is the minimum quantity that you want to keep in inventory. When the Storage Bin Quantity reaches the Reorder Point, the item will appear on the “Bin Tools Below Reorder Point” report. TTS USER MANUAL – CONTRACTOR EDITION 39 ADDING A NEW TOOL To add a new Tool, select the Add button. All information is cleared and the Save and Cancel buttons appear. You can pre-enter in information by selecting a Master Number or enter in all information without referencing the Master Number. If turned on in System Setup, the system will automatically generate a unique barcode for the tool if the barcode field is blank. If a specific barcode number is needed, just enter the number manually. Each barcode number must be unique. Select or enter the required information (bold labels). Enter the nonrequired information if desired. Save the Tool by selecting the Save button. The screen will return to the original state with the new Tool information. Cancel the process without saving by selecting the Cancel button. The screen will return to the original state with the information displayed that was present prior to selecting the Add button. EDITING AN EXISTING TOOL To edit an existing Tool, select the Edit button. The Save and Cancel buttons appear. Change the Tool's information as desired. Information with bold labels is required. Save the Tool by selecting the Save button. The screen will return to the original state with the changed Tool information. Cancel the process without saving by selecting the Cancel button. The screen will return to the original state with the Tool information unchanged. COPYING AN EXISTING TOOL’S INFORMATION TO A NEW TOOL This is one of the most helpful features when multiples of the same type of tool needs to be entered. To Copy an existing Tool's information to use in creating a new tool, select the Copy button. The majority of data is copied to a new record. The exception is that the barcode number, serial number and checkout information is cleared and the Save and Cancel buttons appear. The system will automatically generate a unique barcode for the tool. If this barcode is unacceptable, it can be typed over by the user. The barcode entry must be unique. A barcode for a tool, location, or employee cannot be the same. Change the Tool's information as desired and add the new barcode. Save the Tool by selecting the Save button, the screen will return to the original state with the new Tool information. Cancel the process without saving by selecting the Cancel button. The screen will return to the original state with the Tool information unchanged. To delete an existing Tool, select the Delete button. After asking if you are sure, the system will delete the tool. TTS USER MANUAL – CONTRACTOR EDITION 40 TOOL HISTORY Selecting a tool and then selecting the Tool History tab will bring up the Tool History screen below. The screen displays the history of the selected tool for the date range selected. The system defaults the date range to the last 12 months. Change one of the dates and select the Enter key or select a new date with one of the calendar controls and the list will change to reflect the new date range. To print the history displayed on the screen, select the Print List button. To remove all history records prior to a specified date, enter the date in the Date text box and then select the Purge button. All history records prior to the date specified will be delete. TOOL MAINTENANCE Selecting a tool and then selecting the Tool Maintenance tab will bring up the Maintenance Items/History screen below. The Maintenance Items tab lists the Maintenance/Repair Type(s) setup on the Tool Support Administration screen. Special instructions, the interval required and the dates last done and due are shown. If the type is due in the next 30-days it will be shown in blue. Past due types are in red. Double-click to select a maintenance action and select the Repair Provider then save. The system will offer to print Maintenance Request form to send with the item to the provider. An “open” maintenance record is then inserted into Maintenance History. When the item is returned, select the open record on the Maintenance History tab by double-clicking. Now enter the Completed Date along with Notes and a Repair Cost if appropriate. Once saved, it is now a completed record in history. To print the history, select the Maintenance History tab and then select the Print Maintenance History button. TTS USER MANUAL – CONTRACTOR EDITION 41 CHECK IN/CHECK OUT TOOLS SCREEN The Check Out process is used to check tools out to an employee or location. The Check In process is used to check tools into storage from an employee or location. Check Out and Check In can also be performed on the handheld unit. To start these processes, select the Check In/Out button. CHECK OUT The Check In/Check Out process is composed of three (3) tabs. The first tab is the Check Out process as shown below. To check out tools: Select a Container, Location, Employee or Member Category to which the tool will be checked out If desired, enter the due date for the return of the Tool. Enter a date in the Due Date box, or enter a Default Interval (number of days from today) Scan the Tool barcode If the Tool is a binned item, a box will appear below the barcode to enter the quantity being checked out The tool checkout information will be displayed in the grid. To check out another tool to the same location/employee and with the same due date, scan another tool barcode. If no scanner is available, you may enter the barcode information into the barcode text boxes and then press the enter key on the keyboard. You may also select the find button next to the textboxes to display a list to choose from. Items that are entered into the grid by mistake can be removed by selecting the item and clicking the Remove Item button. Once items are displayed in the grid, the Out Date/Time can be changed by clicking the Change Out Date/Time button. A confirmation box will appear to indicate that the date/time will be changed for ALL items shown in the grid. Responding “Yes” will display a calendar where you can select the desired date and time. When all desired tools have been checked out, select the Save or Save/Print button. The check out information will be saved and, if Save/Print was selected, the system will ask if you wish to print the check-out report. The system will then clear the check-out list. To cancel the check-out process, select the Reset/Clear button. After confirming you wish to reset the check-out process, the system will clear the check-out list without saving it. TTS USER MANUAL – CONTRACTOR EDITION 42 CHECK IN BY TOOL To check in an individual tool, select the Check In by Tool tab. The screen will change as indicated below. To check a tool into storage, scan the tool barcode or enter the tool barcode and then press the Enter Key on the keyboard. If the tool is a binned item, a box will appear to enter the quantity being checked in. The check in information will be entered in the list. Condition, Facility, and Storage Location may be changed. Select the column you wish to change, select the Enter key and pick the new Condition, Facility, or Storage Location from the list. Once items are displayed in the grid, the In Date/Time can be changed by clicking the Change In Date/Time button. A confirmation box will appear to indicate that the date/time will be changed for ALL items shown in the grid. Responding “Yes” will display a calendar where you can select the desired date and time. When all tools have been checked in, select the Save or Save/Print button. The check in information will be saved and, if Save/Print was selected, the system will ask if you wish to print the check in report. The system will then clear the check in list. To cancel the check in process, select the Reset/Clear button. After confirming you wish to reset the check in process, the system will clear the check in list without saving it. Check In can also be performed on the handheld unit. TTS USER MANUAL – CONTRACTOR EDITION 43 CHECK IN BY CONTAINE R / PERSON / LOCATIO N/MEMBER To check in tools assigned to either a container, an employee or a location select the Check In by Container / Person / Location tab. The screen will change as indicated below. To check a tool into storage, first select or scan the container, employee or location barcode the items are being returned from. A listing of all items checked out to the container/employee/location will be displayed. You can then click the check box for each line item being returned. Binned item quantities can also be changed in the grid if desired. A Check All option box will check or uncheck all checkboxes for each line item listed. Alternately, you can scan individual tool barcodes to check the checkbox. You can also change the status to Lost or Broken for any items checked. The change occurs on Save. If someone returns multiple tools but has lost others, check-in the returned items first and Save. Then, do a new check-in for the individual and confirm that the remaining items listed are lost. Check All and Change Status to Lost then Save. The COPY ROW function allows you to split up binned items being returned so that alternate locations can be assigned. Verify the QUANTITY is correct before saving! Once items are displayed in the grid, the In Date/Time can be changed by clicking the Change In Date/Time button. A confirmation box will appear to indicate that the date/time will be changed for ALL items shown in the grid. Responding “Yes” will display a calendar where you can select the desired date and time. When all tools have been checked in, select the Save or Save/Print button. The check in information will be saved and, if Save/Print was selected the system will ask if you wish to print the check in report. The system will then clear the check in list. To cancel the check in process, select the Reset/Clear button. After confirming you wish to reset the check in process, the system will clear the check in list without saving it. Check In can also be performed on the handheld unit. TTS USER MANUAL – CONTRACTOR EDITION 44 TRANSFER TOOLS SCREEN Transferring Tools is a process used to relocate tools from one Facility/Location to another. To start this process, select the Transfer Tools button. Keep in mind that only Facility/Locations designated as a Transfer Location on the Location Administration screen will be displayed in this form. Understanding the basic transfer process is important. Just because an originating location transfers “Out” tools to a destination location does not mean that all of the tools arrive as intended. To manage this process requires BOTH the sender and receiver to acknowledge the items being transferred. If the sender lists ten (10) tools that they sent, but the receiver only acknowledges eight (8) tools – two (2) tools are now unaccounted for. It becomes the responsibility of both parties to resolve the discrepancy. The remaining two (2) tools will still be shown in the Transfer Out screen of the sender and must be reconciled at some point. If lost, the best method to correct the problem is to: 1. The sender selects the lost tools in the Cancel Transfer screen and saves the transaction. The tools are now in the sender’s inventory. 2. The sender then selects the individual record for each lost tool and changes the tool status to “Lost”. Inventory is now accurate until the lost tools are found. TRANSFER OUT The Transfer Out process allows the user to select a Location Barcode that the selected tools will be transferred to. Once a location is selected, the user then scans all of the tool barcodes being transferred. You must enter the quantity being transferred for binned items. CAUTION: When transferring binned items, the system will try and match up barcode IDs based on the Master ID of the item being transferred. Adjustments to inventory may be necessary should IDs not match. CANCEL TRANSFER The Cancel Transfer process allows the sender to cancel items being sent, and returns them to inventory. Select the Cancel Transfer tab on the Transfer form to proceed. To cancel a transfer, the user needs to first select the destination location where the tools were “Transferred Out” to. It is important to note that only those inventory items not yet “Transferred In” by TTS USER MANUAL – CONTRACTOR EDITION 45 the receiving location will be listed. The user only needs to check off the line items being cancelled and save the transaction. TRANSFER IN The Transfer In process allows the receiver to acknowledge receipt of transferred items being sent to their inventory. If all items are receipted, just select Check All and Save. If you desire to change the receipted location, select the Change Location dropdown. Any checked items will be relocated to the designated location upon Save. RESERVING TOOLS SCREEN Reserving Tools is a process used to reserve the use of a tool for a specified period of time. To start this process, select the Reserve button. The screen below will be displayed. FIND RESERVATIONS The Reserving Tools process is composed of two (2) tabs. The first tab is the Find Reservations process. This is used to find the current reservations for a tool or employee/location. To view the reservations for a User/Location, scan the User/Location barcode into the User/Location Barcode textbox and the reservations for the User/Location in the date range specified will be listed. TTS USER MANUAL – CONTRACTOR EDITION 46 To view the reservations for a tool, scan the Tool barcode into the Tool Barcode text box and the reservations for the Tool in the date range specified will be listed. If no scanner is available, you may also enter the barcode in the barcode text boxes followed by pressing the Enter key on the keyboard. Another option is to select one of the find buttons, to display a list from which you may select. To change the date range for the reservation list, enter a new date and then select the Enter key or set the date using the calendar control. The list will change to reflect the new date range. RESERVATION ADMIN The second tab is the Reservation Admin process. The Reservation Admin process is used to add new reservations and edit or delete existing reservations. To add a new reservation: Select the Reservation Admin tab, Select the Add button, the screen changes as indicated. Scan the Location or Employee barcode or select the Find button. Scan the Tool barcode or select the tool. Set the date and time range for the reservation. Select a Priority. High Priority items cannot be checked-out to any person or location except the one holding the reservation. Low/Medium Priority settings alert the person checking out the tool if it is to a different location/user than the one holding the reservation. If you desire, add a note and set the priority, then select the Save button. To edit an existing reservation: Find the reservation in the Find Reservation tab, Select the Reservation of interest, Select the Reservation Admin tab, Select the Edit button, Modify the information as desired, Save the reservation. To delete an existing reservation: Find the reservation in the Find Reservation tab, Select the Reservation Admin tab, TTS USER MANUAL – CONTRACTOR EDITION 47 Select the Delete button. After verifying the deletion, the system will delete the reservation. REPORTS SCREEN Each report has a different set of Report Filters that the user can select to create the report results they desire. When the filters are set, the user then selects the Print Report button. A print preview screen will be displayed from which the report may be printed, PDF’d or Email(ed) (only if Microsoft Outlook is used). AUTO E-MAIL REPORTS The Tool Assignment and History Reports (see screen above) give you the ability to Auto E-Mail the report when desired. Select “Email Report(s)” so that each person gets their own email with their information. Only employees with an email address record will receive their email report. OTHER REPORTS All other reports follow a similar selection process depending on the report selected. Make sure to select all settings necessary to generate the report you desire. CUSTOM REPORTS If desired, Gigatrak can provide custom reports at your request. These reports will be quoted separately and automatically added to the Select Report listing when installed. TTS USER MANUAL – CONTRACTOR EDITION 48 MEMBERS/JOBS SCREEN MEMBERS/JOBS FIND MEMBER/JOB The ‘Find Member/Job’ tab resembles the ‘Find Tools’ tab in the Tools screen. The first tab is used to view members/jobs, print a list of member/jobs, and print member/job labels. The list of members/jobs on the screen is controlled by the multiple selections on the upper part of the form. Several key aspects are available on the form. As an example, selecting the Reset button will return all selections to All. In addition, the Member/job list can be sorted by one of its columns by clicking on the heading of that column. A second click will reverse the sort order of the items in the listing. MEMBER/JOB INFORMATION The ‘Member/Job Information’ tab resembles the ‘Tool Information’ tab in the Tools screen. The second tab is used to add, edit, and delete information on various members/jobs in the system. Member/Job Information that is bolded is required. Users can also print information regarding each member/job in the system. The information in these screens will be either member-related or job-related depending upon which option is selected in the “Setup Options” screen. The information will carry over from one function to the other. TTS USER MANUAL – CONTRACTOR EDITION 49 TTS MOBILE HANDHELD APPLICATION Two types of handheld applications are available, batch mode and wireless. BATCH VS. WIRELESS HANDHELDS Batch handheld units hold data in a mobile database file that gets transferred back and forth between the handheld and the host PC. These units will work with both Microsoft Access and Microsoft SQL Server host databases. The handheld must be docked with the host PC to perform the transfer. The tool data on the handheld is a snapshot of the data on the host PC. If there are multiple users changing data on the host database, the handheld data may be outdated in a short period of time. Therefore, it is important to synchronize the handheld with the host PC often, so that it has current information. Wireless handheld units communicate with the host database in real time. This requires the host database to be Microsoft SQL Server. Your facility will have to have a wireless infrastructure in place for communication. No data is stored on the handheld. COMMUNICATION WITH H OST PC Communication software must be installed on the host computer. Choose the correct software based on the operating system of the host computer. MICROSOFT ACTIVE SYNC INSTALLATION (FOR WINDOWS XP) 1) Locate a copy of the latest version of Active Sync for your computer system. The correct version is available from Microsoft’s WEB site. Version 4.5 is the latest from Microsoft as of this printing. 2) Look for the installation file (i.e. activesync_setup.msi) and run it. We recommend that you follow the installation instructions and accept the standard default settings during your install. 3) Leave Active Sync running to install and connect your handheld computer. NOTE: Some users may use a single PC to connect multiple handheld computers. If this is the case, it is best to setup your PC to recognize each handheld as a “Guest”. This avoids having Active Sync loading shared data from your Outlook and other PC applications. To set all connected handhelds as a Guest, please double-click and run the provided “GuestOnly.reg” file. It will instantly update your system for future connections. WINDOWS MOBILE DEVICE CENTER INSTALLATION (FOR WINDOWS VISTA OR WINDOWS 7) 1) Locate a copy of the latest version of Windows Mobile Device Center for your computer system. The correct version is available from Microsoft’s WEB site. 2) Look for the installation file (i.e. drvupdate-x86.exe) and run it. We recommend that you follow the installation instructions and accept the standard default settings during your install. TTS USER MANUAL – CONTRACTOR EDITION 50 INSTALL GIGATRAK HAN DHELD APPLICATION The handheld application can be found in the Handheld folder of your installation CD or download. 1) Connect the handheld docking station to your computer (typically a USB connection) and plug in the AC power cable. 2) Put the handheld in the dock and wait for it to sync with the PC. 3) On the PC, double-click the handheld setup file for the application you are installing (e.g., setup_honeywell_hh.exe). SYNC WITH HOST PC The batch handheld must be synchronized with the Tool Tracking application on the host computer before it can be used. This will load the current tool information onto the handheld. 1) Start the Tool Tracking application on the host computer and select the Download button. 2) If your handheld device is not displayed on the screen title bar, click the Select Handheld button and select it. 3) Put the handheld in the dock and wait for it to sync with the PC. 4) Select the Sync Data Automatically button to begin the data transfer. Do not remove the handheld from the dock until the data transfer is complete. SYNC MANUALLY VIA SD CARD 1) Install the handheld application to the SD card. The SD card will display on the handheld in My Device as \SDCard (the actual folder name will vary between handheld models.) 2) Remove the SD card from the handheld, and place it into the card reader in the PC. Determine 3) the drive letter assigned to the SD card (i.e. E:\). 4) In TTS on the PC, go to the Download screen, and click Export Data File Manually. Select E:\ and click OK. 5) When the process is complete, safely remove the SD card from the PC and re-insert into the handheld. 6) Collect your data, and when finished, repeat step 2. 7) In TTS on the PC, go to the Download screen, and click Import Data File Manually. Select E:\ and click OK. 8) Only committed data gets exported back to the handheld. Therefore, Commit the data on the Download screen and then follow steps 3 and 4 to Export the most recent data back to the handheld. SYNC MANUALLY WITH T ERMINAL SERVICES / C ITRIX This is an overview of syncing data with the handheld manually. ActiveSync/WMDC running Terminal Services/Citrix can't sync with a remotely connected handheld. This assumes you already have a data file on the device and will begin by importing it. (Otherwise, start by exporting the data, later in the overview.) 1. Close the TTS software on the handheld. From a PC with a locally connected handheld via ActiveSync/WMDC (these instructions assume ActiveSync but WMDC works similiarly): TTS USER MANUAL – CONTRACTOR EDITION 51 1. Double-click the ActiveSync icon in the system tray. Click Explore. Navigate to the path containing the TTS database file, tts_mob.sdf, (on an LXE, this is \System. On a Memor, this is \Backup. On a Honeywell, this is \Honeywell.) 2. Open a second window that points to a folder that can be accessed via the terminal server session (i.e. a file server share, local C: drive, etc.) 3. Drag the tts_mob.sdf file from the handheld window to the other window to copy the file. 2. Run the TTS software from the terminal server session. Click Download, then Import Data File Manually. Point at the folder where the file was copied to. Import the data, and commit as usual. 3. After commiting, the new data must be exported back to the handheld. Click Export Data File Manually, select the same folder that was used for import, overwriting the file. 4. Essentially, reverse the copy procedure used for import. Switch back to the local PC, and: 1. Double-click the ActiveSync icon in the system tray. Click Explore. Navigate to the path containing the TTS database file, tts_mob.sdf, (on an LXE, this is \System. On a Memor, this is \Backup.) 2. Open a second window that points to a folder that can be accessed via the terminal server session (i.e. a file server share, local C: drive, etc.) 3. Drag the tts_mob.sdf file from the server-accessible window to the handheld window to copy the file. TTS USER MANUAL – CONTRACTOR EDITION 52 TTS HANDHELD APPLICATION FUNCTIONS The following describes basic operation of the Mobile Tool Tracking application. HANDHELD APPLICATION LOGIN When the handheld application is first started, a user login will be required. Scan an employee barcode, or type in an employee barcode and press the Enter key. If the barcode matches an employee in the data file, the employee name will appear under the scan box, and buttons for the application functions will appear. The user barcode is tied to the records recorded by the handheld. If a different employee uses the handheld, he/she should enter their barcode before recording records. To change the user barcode, select “Log Out” and enter in a different employee barcode. WIRELESS APPLICATION LOGIN When starting the wireless handheld application for the first time, you will be prompted to enter the server name in Admin. Select the Admin button to display the Admin screen. You will be prompted to enter a password when you select this function. The password is gigatools. If you are entering the password on the handheld keypad, be sure you are in alpha mode. WIRELESS APPLICATION ADMIN Display the on-screen keyboard and enter the SQL Server Name or IP Address, the database name (typically win_tts), the DB User ID (typically tts_user) and the database password. Select the Save button when finished. A message will be displayed to indicate that the settings have been saved. Select the Back to Menu button. Scan or enter your employee barcode to log into the application. The main menu buttons will be displayed as shown above. TTS USER MANUAL – CONTRACTOR EDITION 53 CHECK OUT The Check Out function is used to assign tools to employees, locations or containers. Scan the barcode of the employee/location/container that is receiving the tools. If the barcode matches a record in the data file, the appropriate name will be displayed under the scan box. If a Due Date is desired, check the Due Date checkbox. No due date will be recorded if the checkbox is not checked. A popup calendar can be displayed by selecting the drop-down arrow, or enter the number of days the employee will have the tool. Scan the tool barcode. If the barcode matches a record in the data file, the tool description will be displayed under the scan box. If the tool is not a binned item, the check out record is saved. If the tool is a binned item, the Qty box will appear, with a default quantity of one. Enter the appropriate quantity and press the Enter key to save the check out record. Continue to scan the tool barcodes that will be assigned to the employee/location/container. The Reset button will clear data from the screen without saving it. It will not reset data that has already been saved. CHECK IN The Check In function is used to return tools from an employee/location/container back to a storage location. The user can change the Tool Status from a drop-down list at the time of check in. The options are No (change), Lost, or Broken. Scan the tool barcode being returned. If the barcode matches a record in the data file, the appropriate name will be displayed under the scan box. The current storage location will be displayed. If the tool is being returned to this location, just press the Enter key. If it is being returned to a different storage location, scan the barcode of the new storage location. If the tool is not a binned item, the check in record is saved. If the tool is a binned item, the Qty box will appear, with a default quantity of one. Enter the appropriate quantity and press the Enter key to save the check in record. TTS USER MANUAL – CONTRACTOR EDITION 54 If the tool is set up for Miles and/or Hours in the host database, the Miles and/or Hours boxes will appear, with the current readings filled in. Enter the appropriate values and press the Enter key to save the check in record. Continue to scan the tool barcodes that will be checked in from the employee/location/container. Note: Consumable items cannot be checked in. Scanning the barcode of a consumable item will display the message “Cannot Check In a Consumable”. The Reset button will clear data from the screen without saving it. It will not reset data that has already been saved. AUDIT The Audit function is used to verify tools that have been checked out to an employee/location/container. Scan the barcode of the employee/location/container that is being audited. If the barcode matches a record in the data file, the appropriate name will be displayed under the scan box, and a list of the tools that are currently assigned to that barcode will appear in the listbox. Note: Binned tools are not audited, and will not be displayed. If you audit a container, scan the barcodes of the tools in the container. If the scanned barcode matches one of the barcodes in the list, that item will be removed from the list. Continue to scan the tool barcodes, including barcodes that do not appear in the list. When all tools have been scanned, there may be some items still on the list. Those items can be reconciled when the data is downloaded back to the host PC. The Reset button will clear data from the screen. Tools that were audited will have been saved. TTS USER MANUAL – CONTRACTOR EDITION 55 COUNT BIN The Count Bin function is used to count the number of binned items in a storage location. Scan the tool barcode. If the barcode matches a record in the data file, the appropriate name will be displayed under the scan box. If the barcode does not match a bin item, the message “Not a binned item” is displayed. Enter the number of binned items counted for that barcode in the Qty box and press the enter key to save the record. The Reset button will clear data from the screen without saving it. It will not reset data that has already been saved. IDENTIFY The Identify function is used to display the description of a tool when the barcode is scanned. It will also show the last known location or employee that has it. This is only a lookup function, it does not save data. ADD NEW TOOLS The Add New Tools function is used to add tools that have not been added to the host PC database. You will be prompted to enter a password when you select this function. The password is gigatools. If you are entering the password on the handheld keypad, be sure you are in alpha mode. After entering the password, a warning message will be displayed indicating that the new tool will not be available for use until the data is downloaded and committed back to the host PC application. A Master (or Catalog) Number for the new tool must exist in the host PC database. You will also need to assign a new tool barcode to the tool to save the record. Note that you cannot add new binned items with this function. Scan or enter your employee barcode. If the barcode matches a record in the data file, the appropriate name will be displayed under the scan box. Enter a Master Number (or scan a Master Barcode). If the barcode matches a record in the data file, the appropriate tool description will be displayed under the scan box. TTS USER MANUAL – CONTRACTOR EDITION 56 Scan or enter a new tool barcode. If an existing tool barcode is entered, a message will appear stating that the tool BC already exists, and ask is you want to check out the tool instead. Responding “Yes” to the prompt will check out the tool to the employee/location/container shown on the screen. Asset # and Serial # are optional fields, which can be left blank. When the focus is on the Serial # field, press the Enter key to save the record. A message will appear at the bottom of the screen to indicate that the new tool barcode was added successfully. The Reset button will clear data from the screen without saving it. It will not reset data that has already been saved. ASSIGN BARCODE (BATCH APPLICATION ONLY) The Assign Barcode function is used to assign barcodes to existing tools in the database. You will be prompted to enter a password when you select this function. The password is gigatools. If you are entering the password on the handheld keypad, be sure you are in alpha mode. After entering the password, a warning message will be displayed indicating that the new tool will not be available for use until the data is downloaded and committed back to the host PC application. A second warning message will be displayed indicating that if there is more than one batch handheld, changing a tool barcode may result in data loss. Download and commit data from the other handhelds before committing the barcode change. Scan the existing tool barcode, asset number, or serial number. If the barcode matches a record in the data file, the appropriate name will be displayed under the scan box. Enter a new barcode. If the new barcode is unique, the data will be saved. If it is not unique, a message will be displayed prompting you to enter a unique barcode. The Reset button will clear data from the screen without saving it. It will not reset data that has already been saved. MAINTENANCE The Maintenance Function allows users to either select a tool to Send to Maintenance, or record a tool that has been Return(ed) From Maintenance. TTS USER MANUAL – CONTRACTOR EDITION 57 When sending a tool for maintenance the user must scan the tool barcode, select the repair type, pick a provider, and enter any notes they prefer. The record is then saved and the status set to “Out for Maintenance” once downloaded. The “Return From Maintenance” allows the user to scan in items previously sent for maintenance and record the maintenance results and the cost of the maintenance. This is then added to the Maintenance History for the specific tool upon download to the database. DOWNLOAD DATA BACK TO THE HOST APPLICATI ON When you have finished collecting data, the batch handheld must be downloaded back to the host PC application. 1) Start the Tool Tracking application on the host computer and select the Download button. 2) If your handheld device is not displayed on the screen title bar, click the Select Handheld button and select it. 3) Put the handheld in the dock and wait for it to sync with the PC. 4) Select the Sync Data Automatically button to begin the data transfer. Do not remove the handheld from the dock until the data transfer is complete. If checked in the Setup Options to Auto Commit Downloaded Data upon Sync this step will already be completed and the information below can be disregarded. The data collected on the handheld will be displayed on the screen. At this point, none of the tool data has been changed in the host database. Click the Commit button to commit the data to the host database. Only the rows that are checked in the first column will be committed. The user can check or uncheck the checkboxes as appropriate. This will prevent bad data from being committed to the database. TTS USER MANUAL – CONTRACTOR EDITION 58 Some data can be modified before using the Commit function. For a count record, the Qty counted can be changed by double-clicking the Qty. For a check in record, the Status can be changed by doubleclicking the Status Change column and selecting from the dropdown list. Be sure to check the checkbox in the first column if you want the data to be changed. After the Commit function has been performed, it changes data in the host database. The background of the checkbox will turn yellow for committed items. All handhelds should be synced with the host to update the data on the handhelds. DOWNLOAD SCREEN The system provides a function for a batch handheld scanner. The user must first configure the PC for the handheld in use. Click the Select Handheld button on the Download screen to select the handheld device you are using. You can also select Handheld Configuration on the File menu to select a handheld. The mobile Tool Tracking application must be installed on the handheld (See TTS Mobile Handheld Application). Before using the handheld, it must be synced with the PC application to transfer data to the handheld. Dock the handheld to the PC and select the Sync Data Automatically button on the Download screen. Handhelds should be synced with the PC before each use to ensure that they have the latest data. Check in/out records can be mixed with audit records and count records on the handheld unit. When the unit is downloaded, the records will be shown with the appropriate type displayed. The records displayed can be limited to a specific type by clicking the appropriate Display Type button. When a handheld unit is ready for download, select the Download button from the main screen. Dock the handheld to the PC and select the Sync Data Automatically button. If a memory card is being used, insert the card into the PC card reader and select the Import Data File Manually button. If the download is successful, the system will display a successful message and the grid will be rebuilt with the new records. If the records were downloaded successfully but there were some problems, the system will provide a message and the problems will be documented in a log file. This file can be viewed and printed by selecting the View Log File button. If there are audit records stored in the temporary database table, the grid will display the existing audit records. If the handheld contains records that are part of the existing audit, you may add its records to the existing audit as long as the existing audit has not started the commitment process. If commit has TTS USER MANUAL – CONTRACTOR EDITION 59 been started or the handheld audit is separate from the existing audit, then the existing audit must be completed and cleared from the database prior to uploading the new audit records. If a checkout record is recorded on the handheld for an item that has a high priority reservation for a different employee than the one entered on the handheld, the text will be displayed in blue. The Chk column can be manually checked to allow the checkout of the item to the scanned employee, but this is not recommended. Always check with the employee who originally reserved the item on the Reservation screen before allowing the item to be checked out. COMMIT DOWNLOAD DATA TO THE DATABASE There could be some erroneous data in the grid. Therefore the system will only commit those records that have the Chk column checked. This allows the user to control what records will be loaded into the database. The Save Changes button will save the changes in the Chk column to the temporary audit table in the database. This does not change any tool data. The Commit button will save the information in the audit records that have been checked to the permanent portion of the database. The background color of the checkbox will turn yellow after those records have been committed. An audit may be committed several times. Records that were previously committed will be skipped. Once an audit has started the commitment process, no further downloads will be accepted from a handheld until the audit records are cleared. IMPORTANT! -- The Commit function changes tool data. A message will appear to alert the user to sync all handhelds with the PC to update the reference file on the handheld. The Clear button will remove all records from the temporary audit table in the database, making way for new audit information. The system displays a warning message prior to clearing the records. The Report button will print a report of the records displayed on the grid. SUPPORT GigaTrak provides 90-days of telephone support for TTS from the date of purchase. GigaTrak will advise on installation issues but the customer is responsible for network and SQL Server installation. Our hours are 9am to 5pm central time Monday through Friday. During this time you are entitled to any updates or new releases issued by GigaTrak. By purchasing an extended support one, two or three year agreement, these services are extended. Onsite support is available at additional cost. Please call 262657-5500 Option 2 with any questions. TTS USER MANUAL – CONTRACTOR EDITION 60