1
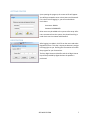
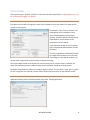
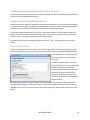
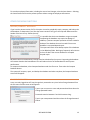
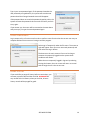
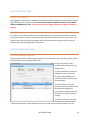
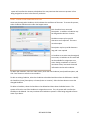
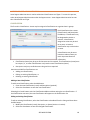
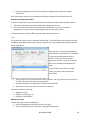
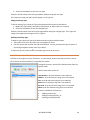
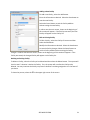
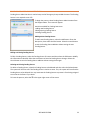
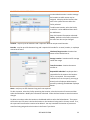
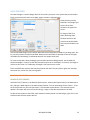
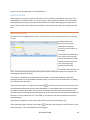
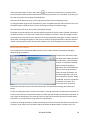
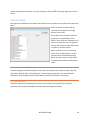
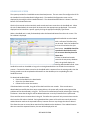
VERSION 4.20.1 ATS USER MANUAL BASIC EDITION ATS USER MANUAL- BASIC EDITION TABLE OF CONTENTS ATS User Manual- Basic Edition ................................................................................................................... 2 Table of Contents ...................................................................................................................................... 2 Quick Start Overview ................................................................................. Error! Bookmark not defined. Asset Types and Classifications ............................................................................................................. 5 Conditions ............................................................................................................................................. 5 Funding Source and Accounts ............................................................................................................... 5 Facilities................................................................................................................................................. 5 Locations ............................................................................................................................................... 5 Employees ............................................................................................................................................. 5 Printer Assignment................................................................................................................................ 6 Assets .................................................................................................................................................... 6 Getting Started ............................................................................................................................................. 7 Registration .................................................................................................................................................. 7 Setup Options ............................................................................................................................................... 7 Asset Setup ............................................................................................................................................... 8 Application Settings .................................................................................................................................. 8 Show Depreciation ................................................................................................................................ 9 Allow Delete Asset & Purge History ...................................................................................................... 9 Relocate Assets ..................................................................................................................................... 9 Auto-Populate Asset Find Tabs ............................................................................................................. 9 Display Employee Barcodes Before Names .......................................................................................... 9 Display Account Numbers Before Descriptions .................................................................................... 9 Show Bin Assets Below Reorder Point Report After Log In ................................................................ 10 Require Check In Before Another Check Out ...................................................................................... 10 Printer Assignment ..................................................................................................................................... 10 Employee Administration .......................................................................................................................... 10 Employee Information ............................................................................................................................ 12 ATS BASIC EDITION 2 Employee Access Levels ...................................................................................................................... 12 Other File Menu Functions......................................................................................................................... 13 Backup/Compact Database..................................................................................................................... 13 Change Password .................................................................................................................................... 13 Login Temporarily ................................................................................................................................... 14 Purge History........................................................................................................................................... 14 Handheld Configuration.......................................................................................................................... 15 Imports .................................................................................................................................................... 15 Help Menu Functions ................................................................................................................................. 16 Check for Update .................................................................................................................................... 16 About....................................................................................................................................................... 16 Support Menu Functions............................................................................................................................ 16 Account Administration .......................................................................................................................... 16 Asset condition Administration .............................................................................................................. 17 Asset Support Administration ................................................................................................................. 18 Classification ....................................................................................................................................... 18 Type..................................................................................................................................................... 19 Facility Administration ............................................................................................................................ 20 Funding Source Administration .............................................................................................................. 22 Location Administration.......................................................................................................................... 23 Export List to File................................................................................................................................. 24 Change Responsible Individual ........................................................................................................... 24 Print Barcode List ................................................................................................................................ 24 Print Location Label ............................................................................................................................ 24 Assets Screen .............................................................................................................................................. 25 Find Asset ................................................................................................................................................ 29 Search Field ......................................................................................................................................... 29 Add To List........................................................................................................................................... 29 Print List .............................................................................................................................................. 30 Print Barcode List ................................................................................................................................ 30 ATS BASIC EDITION 3 Export List To File ................................................................................................................................ 30 Asset Image ......................................................................................................................................... 30 Asset Information ................................................................................................................................... 31 Primary Data Sub-tab .......................................................................................................................... 32 Purchase / Warr. Sub-tab.................................................................................................................... 32 Images & Docs Sub-tab ....................................................................................................................... 32 Adding a New Asset ............................................................................................................................ 33 Editing an Existing Asset ..................................................................................................................... 33 Copying an Existing Asset’s Information to a New Asset .................................................................... 33 Asset History ........................................................................................................................................... 34 Check In/Check Out Assets Screen ............................................................................................................ 35 Check Out ................................................................................................................................................ 35 Check In By Asset .................................................................................................................................... 36 Check In By Container / Person / Location ............................................................................................. 37 Reports Screen ........................................................................................................................................... 40 Auto E-Mail Reports ................................................................................................................................ 40 Custom Reports....................................................................................................................................... 40 Support ....................................................................................................................................................... 41 ATS BASIC EDITION 4 QUICK START OVERVIEW Now that you have installed ATS, you are ready to begin using the system. This brief Quick Start Overview and the following User Manual provide the general information needed to begin entering data into the system and using ATS for the first time. ASSET TYPES AND CLASSIFICATIONS This function allows you to create classifications and types within each classification. Classifications (i.e. Office Equipment) and (sub-) Types (i.e. Desks, Chairs, etc.) are used to categorize assets. On the menu bar select Support Asset Support Administration. You can rename the Classifications and Types designators in the Setup Options function if desired. See Asset Support Administration in the User Manual for more information. CONDITIONS Add any number of Conditions that you desire (Excellent, Good, Poor, etc.) This is a searchable field and can be invaluable to locate equipment needing replacement, etc. See SupportCondition Administration for additional information. FUNDING SOURCE AND ACCOUNTS The Funding Source is a standalone field that can be setup by you to use as needed. You can also rename the Funding Source in the Setup Options function if desired. The Accounts screen allows you to tie each Asset to an account number for added filtering. See SupportFunding Source Administration and Account Administration for more information. FACILITIES This function allows you to enter facilities, which are used to organize asset locations. On the menu bar select SupportFacility Administration. See Facility Administration in the User Manual for a detailed explanation. LOCATIONS This function allows the user to create locations where assets are stored or to which assets are checked out. Locations can also be classified as “Storage” locations. Storage locations are typically where materials are centrally located until checkout. On the menu bar select Support Location Administration. See Location Administration in the User Manual for a detailed explanation. EMPLOYEES This function has you enter employees. An employee may be an individual that will be using the ATS system or a person to which assets may be checked out. You can set ATS Access Rights for each employee here also. On the menu bar select FileEmployee Administration. See Employee Administration in the User Manual for a detailed explanation. ATS BASIC EDITION 5 PRINTER ASSIGNMENT This function allows the user to specify which windows printer will be used for report printing and which one will be used for label printing. This function must be set on each workstation before printing. On the menu bar select FilePrinter Assignment. See Printer Assignment in the User Manual for a detailed explanation. LABEL DESIGN The system allows the user to design labels for assets, locations, and employees. These labels typically have barcodes and can be used to audit, check in, and check out assets. Several sample label designs are included and can be modified. You must select a default label format in the Label Setup function before printing is allowed. On the menu bar select LabelsLabel Designer. See Label Designer and Label Setup in the User Manual for a detailed explanation. ASSETS The asset administration screen allows for the creation and history of assets which are tracked by this system. On the main button bar select the Asset button. See Asset Management in the User Manual for a detailed explanation. Once you have setup your initial data, you are ready to start using ATS! Check out assets to employees or locations. You can also check assets back “in” to storage. Be diligent on how you use the system and it will provide years of reliable tracking of all of your assets! Backup your database daily! ATS BASIC EDITION 6 GETTING STARTED Upon opening the program, the screen at left will appear. You will be prompted to enter a User Name and Password. If it is the first time logging in, you will use the Admin User’s data: Username: ADMIN Password: ADMINUSER Other users may be added to the system after setup. After users are entered into the system, they should each log in under their own User Name and Password. REGISTRATION After logging in as Admin, click File on the menu and select Registration Form. This step is important because it assigns licensing rights to you. Entering the information will unlock the program for your licensed use. The Four Digit Customer Identifier and the 16 digit License Key will be provided by Gigatrak when the product is purchased ATS BASIC EDITION 7 SETUP OPTIONS After registering your product, click File on the menu and select Setup Options. (Setup Options can only be accessed when logged in as Admin.) ASSET SETUP This option can be used to change the names of the parameters to fit your needs. This makes up the structure of the system. Classification, Type, Facility, Location, and Funding Source are parameters tied to assets. Model Number, Serial Number, Account, Condition, Master, Miscellaneous, Asset Number, and Container can be renamed to suit your needs. If you would like to alter any of the names, type in the desired value and then click the OK button. The root image folder is the default location for images that you wish to tie to an asset. If the image is in the default location, only the file name is required in the asset screen to identify the image. The Custom Report Folder is the location for custom report files. If a custom report is ordered, the report file should be placed in a folder, and the path to the folder should be set in this option. The Report Logo allows the display of a company logo on reports. You can select a .bmp, .gif, or .jpg file. To clear a logo after it is selected, click the “Select” button and click Cancel on the selection screen. APPLICATION SETTINGS Application Settings control various functions in the asset tracking application. ATS BASIC EDITION 8 SHOW DEPRECIATION If Show Depreciation is checked, then the depreciation information will be visible on the Asset information screen. The Asset Depreciation Report will also be available on the Reports screen. If the checkbox is not checked, the depreciation information will not be visible and the depreciation report will not be shown. The checkbox cannot be checked until you accept the disclaimer. After accepting the disclaimer, the Preferred Depreciation Type selection will be enabled. This will be the default selection when adding new assets on the Asset Information screen. ALLOW DELETE ASSET & PURGE HISTORY If checked, then the Delete button will be displayed on the Assets screen, and the Purge History button will be displayed on the Asset History screen. If the checkbox is not checked, the Delete button and the Purge buttons will not be displayed. RELOCATE ASSETS If Relocate Assets is checked, the Check In/Out function will change to a relocate function. This option does not use storage locations and does not allow entry or tracking of binned items. Assets are relocated from one location (or person) to another location (or person) without being returned to a storage location. AUTO-POPULATE ASSET FIND TABS When checked, the system will automatically display information when a Find screen is opened. If not checked, you must first click “Extract Data” to view a listing. DISPLAY EMPLOYEE BARCODES BEFORE NAMES This applies to several report selection filters. If you view employees primarily by their names, leave this unchecked. If you prefer tracking employees by the Barcode ID, then check the checkbox. DISPLAY ACCOUNT NUMBERS BEFORE DESCRIPTIONS The same rules apply to this option. Select how you prefer to view your report filters here. If you will view accounts by descriptions, leave this unchecked. If you prefer tracking accounts by numbers, check the box. ATS BASIC EDITION 9 SHOW BIN ASSETS BELOW REORDER POINT REPORT AFTER LOG IN By selecting this option, the system will automatically display the report of any binned items below the reorder point immediately following log in. REQUIRE CHECK IN BEFORE ANOTHER CHECK OUT Checking this box will require a checked out asset to be checked back in to the storage location before it can be checked out again. Leaving this unchecked will allow an asset to be checked out from person to person (or location to location) without being returned to the storage location. To save the changes for both tabs on the screen, select the OK button. A confirmation message will appear, listing the items that you altered. Selecting “Yes” will save the changes and close the screen. Selecting “No” will reset the changes back to the original values. To leave the screen without changing any values, select the in the upper right corner of the screen. PRINTER ASSIGNMENT The printer assignment process is used to set the printer the system will use for printing reports and barcode labels. Select Printer Assignment from the File menu and the screen below will be displayed. The Available Printers list will display all the printers that are on the Windows printer list. To select the report printer, select the printer of choice and then click the Assign Default Printer button. The Default Printer label will indicate the printer you selected. Any reports printed by the system will be directed to this printer. This does not affect the windows default printer selection. To select the label printer, select the printer of choice and then click the Assign Label Printer button. The Label Printer label will indicate the printer you selected. Any labels printed by the system will be directed to this printer. If you do not have a label printer, assign the default printer to act as the label printer. ATS BASIC EDITION 10 EMPLOYEE ADMINISTRATION Employees are either people that have access to the ATS system or people to whom assets will be assigned. To manage employees, select Employee Administration under the File menu. Upon initial setup, the only employee will be the Admin user. You may Add, Edit, or Delete employee information. To Add a new employee, select the Add button. The form will change as indicated. The items in bold text are required for all employees. The system will not allow editing of the last name, first name, middle initial, or user name for Admin User. To delete an employee, select the employee and then select the delete button. If an employee is assigned an asset or has an outstanding reservation or is involved in a history record, the system will not allow the employee to be deleted. Set the Status to inactive to prevent further use. To print employee labels, select the employee(s) to be printed and then select the Print Label button. If a label printer has been selected and if a default employee label has been designated (see Label Designer in this manual), the label(s) will be printed. For label printing, multiple employees may be selected. To select multiple employees, do one of the following: Drag the mouse over the employees desired while holding down the left mouse button. Select the first employee by left clicking with the mouse. Select the last employee in a range by holding down the Shift key and the left clicking on the last employee. All employees in between will be selected. Hold down the Control (Ctrl) key and select the employees you wish to print by left clicking on each one with the mouse. ATS BASIC EDITION 11 EMPLOYEE INFORMATION Enter the appropriate employee information. A few fields have special requirements: The barcode entry must be unique. A barcode for an asset, location, or employee cannot be the same. Keep the barcode as simple as possible, only using a short combination of capital letters and numbers. If you use the supplied barcode labels, the employee's barcode must match the label placed on their badge. If the employee will be using the ATS system, he will require a Log in Name and Password. The Log in Name must be between 5 and 10 characters long. It must be unique; no two employees may have the same log in name. Log in names are not case sensitive. A password must be between 5 and 10 characters long. Passwords are not case sensitive. EMPLOYEE ACCESS LEVELS Once the employee information is entered, set the employee's access levels. The default access level is for no access to ATS. Asset Administration - applies to activities associated with creating and editing asset data. Asset Check In/Check Out- applies to activities associated with assigning assets to an individual or location, or returning assets to storage. Asset Support Administration - applies to activities that support the overall asset process. This will include managing facilities, locations, asset types, classifications, and conditions. Employee Administration– applies to activities associated with managing employee information. Select the access level appropriate for the employee in question and then select the OK button. ATS BASIC EDITION 12 To save the employee information, including the access level changes, select the Save button. Selecting the Cancel button will leave the present process without saving the employee information. OTHER FILE MENU FUNCTIONS BACKUP/COMPACT DATABASE If you have the Access version of ATS, this option is used to periodically repair, compact, and backup the ATS database. To determine if you have the Access version of ATS, go to the Help tabAbout and the header of the box will say “About (Access)” It is possible that the Access database can get corrupted. Compacting the database may repair the damage. In addition, a previous compact operation will have created a backup of the database that can be used if the current database is corrupted beyond repair. The system will retain three backup copies of the database in the dbbackup folder. Backing up frequently will minimize the loss of data if the current database is corrupted beyond repair. MS Access does not automatically remove data that is deleted by the system. Compacting the database will remove data that has been deleted. This will reduce the size of the database file and improve performance. To compact the database, select Compact Database under the File menu. Then select the Compact Database button. The system will compact, repair, and backup the database and when complete, the Compact Database screen will disappear. CHANGE PASSWORD A user currently logged into ATS may change their password at any time. Select Change Password from the File menu and the screen at left appears. Type in your current user name and password and then select the Change password button. Passwords must be between 5 and 10 characters long. Type in your new password and then select the Change Password button. ATS BASIC EDITION 13 Type in your new password again. If the password matches the new password you typed earlier, the system will save the new password and the Change Password screen will disappear. If the password does not match the password typed in earlier, the system will state the passwords do not match and ask if you wish to try again. If you answer yes, the screen will be returned to the state above and you may try to type the second password again. LOGIN TEMPORARILY Log in temporarily is a function used in order to perform some function that the current user may not complete without the current user having to exit the program. Select Log In Temporarily under the file menu. The screen at right will appear. Enter your user name and password, and then select the Log In button. The banner on the main screen will turn red. As long as someone is temporarily logged into the system these conditions will remain. When the user temporarily logged in logs out by selecting the Log Out button, the main screen will return to normal and the original user is the current user. PURGE HISTORY If you would like to purge all history before a certain date, you can enter a specific date and then click OK. WARNING!! Be very careful with this feature, when you click OK, all asset history records will be purged for good. ATS BASIC EDITION 14 HANDHELD CONFIGURATI ON The Handheld Configuration screen is used to select the handheld device. This version of ATS currently supports Windows Pocket PC and CE handhelds. To view the Handheld Configuration screen, click the File menu item and select Handheld Configuration. Pocket PC devices require Microsoft ActiveSync (for Windows XP) or Windows Mobile Device Center (for Windows Vista or Windows 7) to communicate with ATS. Further instruction on how to use the Handheld device and configuring it with the Asset Tracking System will be discussed later. IMPORTS Each import has specific instructions included on the import screen that delineates data formatting requirements along with any special instructions you may need. Imports are available for the following: Import Assets: Allows the import of asset data into the ATS system. Import Employees: Allows the import of employee data into the Employee Administration table. The import even allows for the granting of specific access rights to the various functions in ATS. Import Locations: Allows the import of location data into the ATS system. ATS BASIC EDITION 15 HELP MENU FUNCTIONS CHECK FOR UPDATE After logging in, select Check for Update on the Help menu. Major updates may require you to contact GigaTrak and receive a special download. Access to the Check for Update function is only available when the ADMIN login is used. You must have a current Support Agreement in place to download updates. ABOUT The “About” section tells you which version of the software you currently have as well as some brief licensing information. This area also specifies which database the software uses for your system. This section is particularly helpful to the support and training teams when working to assist you on any questions you may have regarding the ATS system. SUPPORT MENU FUNCTIONS ACCOUNT ADMINISTRATION Account Administration is used to keep track of the account numbers that are used to purchase assets. Account numbers are not required to use ATS. To begin the process, select Account Administration from the Support menu. To Add a new account, select the Add button. Enter the Account Number (required field) and a description (optional), then select the Save button. To Edit an Account, select the Account of interest and then select the Edit button. Modify the information as desired. Select the Save button to save the Account changes. To Delete an Account, select the Account to be deleted and then select the Delete button. The system will check to see if the account is tied to an asset. If so, the ATS BASIC EDITION 16 system will not allow the Account to be deleted. You may inactivate the Account to prevent it from being assigned to an asset in the future if you desire. ASSET CONDITION ADMI NISTRATION Assets may be assigned a Condition, which indicates the usefulness of the asset. To access this process, select Condition Administration under the Support menu. Each Condition has a name and Description. In addition a Condition may be designated as Active or Inactive. Condition name may be up to 20 characters and is required. This name must be unique. Description may be up to 80 characters long and is not required A Condition set as active may be assigned to an asset; a Condition set as inactive will not be available for assignment to an asset. Setting a condition as “inactive” minimizes clutter, but retains historical information tied to each condition. To add a new Condition, select the “add” button, enter the new Condition (name) and Description, and click “save” button to save the new condition. To edit an existing Condition, select the Condition to be edited and then select the Edit button. Modify the Condition (name), Description, or Status (Active vs. Inactive). Select the Save button to save the changed Condition. To delete a Condition, select the Condition to be deleted and then select the Delete button. The system will check to see if the Condition is assigned to an asset. If so, the system will not allow the Condition to be deleted. You may inactivate the Condition to prevent it from being assigned to future assets if you desire. ATS BASIC EDITION 17 ASSET SUPPORT ADMINISTRATION Asset Support Administration is used to administer Classifications and Types. To access this process, select Asset Support Administration under the Support menu. Asset Support Administration has two tabs: Classification and Type. CLASSIFICATION The first tab is Classification. Assets may be assigned a Classification to organize them in groups. Each Classification has a name (Classification) and Description. In addition, a Classification may be designated as Active or Inactive. A classification assigned as active may be tied to an asset; an inactive classification may not be tied to an asset. A classification may be set as inactive to reduce clutter yet retain important historical information. Classification (name) may be up to 20 characters and is required. The Classification (name) must be unique (i.e., no other Classifications may have the same Classification (name). Description may be up to 80 characters long and is not required. Activities available for Classifications are: Adding new Classification, Editing an existing Classification, or Deleting an existing Classification. Adding a New Classification To add a new Classification, select the Add button. 1. Enter the new Classification (name) and Description (optional). 2. Select the Save button to save the new Classification. Selecting the Cancel button exits the Classification addition without saving the new Classification. If the Classification was saved, the new Classification will appear on the Classification list. Editing an Existing Classification To edit an existing Classification, select the Classification to be edited from the listing and then select the Edit button. 1. Modify the Classification (name), Description, or Status (Active vs. Inactive). 2. Select the Save button to save the changed Classification. ATS BASIC EDITION 18 3. Select the Cancel button to exit the Classification change without saving the changed Classification. If the Classification was saved, the changed Classification will appear on the Classification list. Deleting an Existing Classification To delete a Classification, select the Classification to be deleted and then select the Delete button. 1. The system will check to see if the Classification is assigned to an asset. 2. If so, the system will not allow the Classification to be deleted. You may inactivate the Classification to prevent it from being assigned to future assets if you desire. To leave the process, select the in the upper right corner of the screen. TYPE The second tab is type. Type is a subclass of Classification. Each Classification can have several Types. In addition to grouping assets under a Type, the Type will also set the default depreciation period for assets assigned to it. Each Type has a name (Type), Description, and Depreciation period in years. In addition a Type may be designated as Active or Inactive. A Type set as active may be assigned to an asset; a Type set as inactive will not be available to be assigned to an asset. A type may be set as inactive to reduce clutter, yet retain important historical information. Type (name) may be up to 20 characters and is required. The Type (name) must be unique (i.e., no other Types may have the same Type (name)). Description may be up to 80 characters long and is not required. Depreciation may be up to 255 years and is not required. Activities available for Types are: Adding new Type, Editing an existing Type, or Deleting an existing Type. Adding a New Type To add a new Type, select the Add button. 1. Select the appropriate Classification for the new Type. 2. Enter the new Type (name), Description, and depreciation period. ATS BASIC EDITION 19 3. Select the Save button to save the new Type. Select the Cancel button to exit the Type addition without saving the new Type. If the Type was saved, the new Type will appear on the Type list. Editing an Existing Type To edit an existing Type, select the Type to be edited and then select the Edit button. 1. Modify the Type (name), Description, Depreciation, or Status (Active vs. Inactive). 2. Select the Save button to save the changed Type. Select the Cancel button to exit the Type change without saving the changed Type. If the Type was saved, the changed Type will appear on the Type list. Deleting an Existing Type To delete a type, select the Type to be deleted and then select the Delete button. 1. The system will check to see if the Type is assigned to an asset. 2. If so, the system will not allow the Type to be deleted. You may inactivate the type to prevent it from being assigned to future assets if you desire. To leave the process, select the in the upper right corner of the screen. FACILITY ADMINISTRAT ION Facilities are the upper hierarchy of locations. In other words, locations are tied to a facility. Due to this structure, at least one facility is required by the system. To begin the process, select Facility Administration from the Support menu. Facility information consists of: Unique Name- up to 40 characters and is required. Address - up to 40 characters long, but is not required. City- up to 40 characters long, but is not required. State-up to 2 characters long, but is not required. Zip Code- up to 10 characters long, but is not required. Notes-up to 255 characters long, but is not required. Activities available for Facilities are: Adding a new Facility, Editing an existing Facility, or Deleting an existing Facility ATS BASIC EDITION 20 Adding a New Facility To Add a new facility, select the Add button. Enter the information as desired. Select the Save button to save the new Facility. Select the Cancel button to exit the Facility addition without saving the new Facility. In either case the main screen, shown at the beginning of this section will appear. If the Facility was saved, the new Facility will appear on the Facility list. Edit an Existing Facility To Edit a Facility, select the Facility of interest and then select the Edit button. Modify the information as desired. Select the Save button to save the Facility changes. Select the Cancel button to exit the Facility addition without saving the Facility changes. In either case the main screen, shown at the beginning of this section will appear. If the Facility was saved, the changed Facility will appear on the Facility list. Deleting an Existing Facility To delete a Facility, select the Facility to be deleted and then select the Delete button. The system will check to see if a location is tied to the Facility. If so, the system will not allow the Facility to be deleted. You may inactivate the Facility to prevent a location from being assigned to it in the future if you desire. To leave the process, select the in the upper right corner of the screen. ATS BASIC EDITION 21 FUNDING SOURCE ADMIN ISTRATION Funding Source Administration is used to keep track of the agency that provided the asset. The Funding Source is not required to use ATS. To begin the process, select Funding Source Administration from the Support Menu. The screen will appear. Activities available for Funding Source are: -Adding new Funding Source -Editing existing Funding Source -Deleting Funding Source Adding a New Funding Source: To add a new Funding Source, select the Add button. Enter the description, then select the Save button. Select the cancel button to exit the Funding Source addition without saving the new Funding Source. Editing an Existing Funding Source: To Edit a Funding Source, select the Funding Source of interest and then select the Edit button. Modify the information as desired. Select the save button to Save the Funding Source changes. Select the Cancel button to exit the Funding Source addition without saving the changes. Deleting an Existing Funding Source: To delete a Funding Source, select the Funding Source to be deleted and then select the Delete button. The system will check to see if the Funding Source is tied to an asset. If so, the system will not allow the Funding Source to be deleted. You may inactivate the Funding Source to prevent it from being assigned to an asset in the future if you desire. To leave the process, select the in the upper right corner of the screen. ATS BASIC EDITION 22 LOCATION ADMINISTRATION Location Administration is used to manage the locations to which assets may be assigned. It displays all the locations that exist in the system that are tied to the facility selected. To add a new Location, select the Facility to which it is to be added and then select the Add button. Enter the location information as desired: Facility - defaults to the facility selected on the main form but may be changed. Location - may be up to 50 characters and is required. Must be unique to each location. Barcode - may be up to 20 characters long and is required. A barcode for an asset, location, or employee cannot be the same. Checkout/Usage Location -location that assets can be checked out to. Storage Location - location used for storage rather than usage. Transfer Location - location that assets transfer to. Responsible Individual - employee that is responsible for the assets at the location. This is not required. If the responsible individual is not in the system, you may go directly to the Employee Administration process by selecting the Add New Employee button. Notes - may be up to 255 characters long and is not required. To edit a Location, select the Facility containing the Location, select the Location of interest and then select the Edit button. Modify the information as desired. Select the Save button to save the Location changes. To delete a Location, select the Location to be deleted and then select the Delete button. The system will check to see if an asset is tied to the location or the Location is being used in a history record. If so, the system will not allow the Location to be deleted. You may inactivate the Location to prevent an asset from being assigned to the Location in the future if you desire. ATS BASIC EDITION 23 EXPORT LIST TO FILE This button will export information for the displayed locations to a tab delimited text file. CHANGE RESPONSIBLE INDIVIDUAL Change Responsible Individual will change the responsible individual for all selected locations on the screen. Display and select the locations that you want to change. To select multiple locations, do one of the following: Drag the mouse over the locations desired while holding down the left mouse button. Select the first location by left clicking with the mouse. Select the last location in a range by holding down the Shift key and then left clicking on the last location. All locations in between will be selected. Hold down the Control (Ctrl) key and select the locations you wish to change by left clicking on each one with the mouse. After the locations are selected, click the Change Responsible Individual button. A screen will appear where you can select a new Employee. Select the new Employee and click the OK button. PRINT BARCODE LIST Print Barcode List will print a list of the displayed location barcodes that can be used for scanning. When the Print Barcode List button is selected, a pop-up window will appear where you can set the barcode row height. This allows you to control the space between barcodes on the list. The minimum row height is 0.5 inch. PRINT LOCATION LABEL To print a Location label, select the location(s) to be printed and then select the Print Label button. If a label printer has been selected and if a default location label has been designated (see Label Designer in this manual), the label(s) will be printed. For label printing, multiple locations may be selected. To select multiple locations, do one of the following: Drag the mouse over the locations desired while holding down the left mouse button. Select the first location by left clicking with the mouse. Select the last location in a range by holding down the Shift key and then left clicking on the last location. All locations in between will be selected. Hold down the Control (Ctrl) key and select the locations you wish to print by left clicking on each one with the mouse. ATS BASIC EDITION 24 LABEL DESIGNER The Label Designer is used to design labels for the various processes in the system that print barcodes. There are three process which print labels: assets, locations, and employees. These processes can be selected in the Design Type section of the form, located in the upper left corner. To design a label, first select the design type. The data source list will contain the possible fields that may be included in the label. The Current Label Design list will contain labels that have already been created for the design type. The list currently contains a sample asset label. When one of these labels is selected, the box on the right will display the label design, as indicated above for the sample asset label. To create a new label, select the Design type and then select New Design button. Set the label size (width and height in inches). Set the label orientation (Portrait or Landscape). For Portrait, the height is vertical on the screen. For Landscape, the height is horizontal on the screen. There are 6 different elements that may be placed on the label. They are (left to right): text, barcode, horizontal line, vertical line, box, and a graphic. LABEL QUICK START ADDING A TEXT ELEMENT Select the Text (T) button in the Element Options panel. Select (Label Caption only) in the Data Source box, and type a label caption in the Label Caption textbox. You can select Wrap Text or Center. To set the font style and size, click the Font button. Click the Add to Label button. The text element will appear in the upper left corner of the label design. Drag it to the desired position on the label. To edit the text caption or font after a text element has been placed in a label design, right click on the element and choose the option desired. ATS BASIC EDITION 25 ADDING A DATABASE FIELD TEXT ELEMENT In the Data Source box, select the desired database field. You can select Wrap Text or Center. To set the font style and size, click the Font button. Click the Add to Label button. A sample of the data will appear in the upper left corner of the label design. Drag it to the desired position on the label. When the label is printed, the actual data for that field will be printed on the label. To edit the text caption or font after a database field text element has been placed in a label design, right click on the element and choose the option desired. ADDING A BARCODE ELEMENT Select the Barcode button in the Element Options panel. Select (Label Caption only) in the Data Source box, and type a label caption in the Label Caption textbox. You can select Center. Select the barcode font and size desired. Click the Add to Label button. The text will be added to the label in the barcode font. Drag it to the desired position on the label. If a database field is needed as a barcode, select the field from the Data Source box, and add it to the label. When the label is printed, the actual data for that field will be printed on the label as a barcode. ADDING A HORIZONTAL LINE ELEMENT Select the Horizontal Line button in the Element Options panel. Click the Add to Label button. A horizontal line segment will be added to the label design in the upper left-hand corner. Drag it to the desired position on the label. To change the size of the line, place the mouse cursor over the right end of the line. When the cursor changes to a double arrow, click and drag the endpoint to the desired length. ADDING A VERTICAL LINE ELEMENT Select the Vertical Line button in the Element Options panel. Click the Add to Label button. A vertical line segment will be added to the label design in the upper left-hand corner of the label. Drag it to the desired position on the label. To change the size of the line, place the mouse cursor over the bottom of the line. When the cursor changes to a double arrow, click and drag the endpoint to the desired length. ADDING A BOX ELEMENT Select the Box button in the Element Options panel. Click the Add to Label button. A box will be added to the label design in the upper left-hand corner. Drag it to the desired position on the label. To change the size of the box, place the mouse cursor over the lower right-hand corner of the box. When the cursor changes to a double arrow, click and drag the endpoint to the desired size. ADDING A GRAPHIC ELEMENT Select the Graphic button in the Element Options panel. Click the Find Graphic File button to find a file on your computer to place on the label. File types supported are bmp, gif, jpg, wmf, and ico. Click the Add to Label button. The graphic will be added to the label design in the upper left-hand corner. Drag it to the desired position on the label. ATS BASIC EDITION 26 Graphic elements are resizable. Save the label design before attempting to resize a graphic element. Right click on the graphic in the label and select Resize Graphic. A Resize Graphic box will appear above the Label Size box. Enter the desired Height and Width (in inches) and click the OK button. It may be possible to enter a size that causes the graphic to disappear from the label design. If this happens, select a different label design. When prompted to save changes, respond NO to the prompt. Then go back to the label design and try again. DELETING A LABEL ELEMENT Select the element to be deleted from the label design. Click the Delete Element button, or press the Delete key on the keyboard. Elements can also be deleted by right-clicking on the element and selecting Delete from the popup menu. DELETING A LABEL DESIGN To delete an entire label design, select the design from the Current Label Designs list. Click the Delete Design button at the bottom of the screen. SAVE AN EXISTING DESIGN AS A NEW DESIGN Time may be saved by copying an existing label design and modifying it. Select the design from the Current Label Designs list, and click the Save Design As button at the bottom of the screen. Enter a new design name and click the OK button. Design names must be unique. VIEWING/PRINTING A LABEL The work space on the right-hand side of the screen provides a feel for how your label will print. If you need to view exactly how your label will print, click on the View button with the Mode setting set to Design. An exact replica of the label will appear. To print the label on your label printer, change the Mode setting to Print, enter the number of labels you want to print and click the Print button. To save a label design as default for a specified process, select the Design Type (process), and select the label design from the Current Label Designs list. Then select the Save as Default button. When a label is set as the default label, the word "Default" will appear after the label design. To leave the process, select the in the upper right corner of the form. ATS BASIC EDITION 27 LABEL SETUP The Label Setup screen allows the printing of barcode labels in sequence. This feature is only available for the Asset Design Type. This allows printing of asset barcode labels that can then be attached to assets, and entered on the Asset Information screen. Any Asset Label design can be chosen, it does not have to be the “Default” design. The label design must contain the barcode design element or it will not print. Note that if the label design contains an asset description, the description will be blank. They have not yet been assigned to an asset. On the Label Setup screen, select the Asset Design Type, then select the Print Label Sequence button. The screen below will be displayed. A three (3) character prefix can be entered if desired. The Start Number will initially start at 00000001 but can be changed to any number desired (up to 8 characters). Enter the number of labels to print in the How Many box and select the Start button. The system will check the barcodes already assigned to assets in the database to be sure that the barcode to be printed is unique. If it is unique, the label will print. If it is not unique, the number will be skipped, and the next number in the sequence will be checked. If the number of characters in the Start Number is incremented beyond 8 characters, a message will be displayed and printing will stop. After printing starts, a Cancel button will appear. Selecting the cancel button will stop the printing process. Pressing the Esc key on the keyboard will also stop printing. The prefix and the last barcode number printed will be saved in the database. These values will then appear the next time the Print Label Sequence function is used. The Start Number will automatically be increased to the next value. To exit the Print Label Sequence function, select the Close button. ATS BASIC EDITION 28 ASSETS SCREEN The Asset Management process is started by selecting the Assets button on the main toolbar, which displays the screen below: FIND ASSET Three tabs are displayed. The first is the “Find” tab, which is used to view assets and print lists of assets. The tab is controlled by sections on the upper part of the form, allowing you to filter and view those items by: Facility Location Funding Source Account Search by Criteria Classification Type Condition Status Several key aspects are available on the form. As an example, selecting the Reset button will return all selections to All. In addition, the Asset list can be sorted by one of its columns by clicking on the heading of that column. A second click will reverse the sort order of the items in the listing. The status of a group of selected assets can be changed all at once instead of just one asset at a time. Select the rows in the grid of the assets you want to change. Then click the “Change Status” button. A pop-up screen will appear where you can select the new status. Click the OK button to proceed. Note that binned items cannot be changed to a status of Lost or Broken. SEARCH FIELD Groups of assets can also be displayed by typing words in the Search Description box, and then selecting the Extract button. For example, if you type in the word “chair” into the box and click extract, only the assets that have the word “chair” in their description will be displayed. If a location is also selected, only assets that are located at the particular location and have the word “chair” in the description will be displayed. ADD TO LIST The Add To List button can be used to build a custom list of assets. When selected, it will appear to remain depressed. When in this mode, assets that are extracted will be added to the list of assets already shown on the screen, rather than clearing the screen first. You can continue to change the selection filters and extract the assets you need to build your list. The list can then be printed or ATS BASIC EDITION 29 exported. Clicking the Add To List button a second time will return the Extract Data function to its normal mode. PRINT LIST To print the Assets in the list, select the Print List button. A report is displayed and if the default printer is set, the Assets displayed on the screen will be printed when Print is selected. You may also PDF or Email the report directly. PRINT BARCODE LIST Print Barcode List will print a list of the displayed asset barcodes that can be used for scanning. The list will include the Barcode number, Barcode, Description, Product Number, and Serial Number. When the Print Barcode List button is selected, a pop-up window will appear where you can set the barcode row height. This allows you to control the space between barcodes on the list. The minimum row height is 0.5 inch. EXPORT LIST TO FILE Export List To File will export information for the displayed assets to a tab delimited text file. ASSET IMAGE If an image is assigned to an asset, a thumbnail picture will be displayed in the Description column of the grid. The thumbnail display can be turned on or off by right-clicking in the grid and selecting “Show Thumbnail Images” in the pop-up menu. A larger view of the image can be displayed by selecting “View Image” from the pop-up menu. To find a specific Asset by its barcode: Select Barcode in the Search Field box Select the Search Text Box (background will turn yellow when selected) Type in the barcode and select the Enter key. You can also select the “Extract Data” button to display the asset. To find assets by the in-service date: Select In-Service Date in the Search Field box. The Search text box will automatically default to a date range of the first and last days of the current month. This allows you to quickly find the assets that were added during the current month. You can enter a single date to find the assets that were added on a particular day. Select the “Extract Data” button to display the assets. ATS BASIC EDITION 30 ASSET INFORMATION Selecting an Asset and then selecting the Asset Information tab, or double-clicking on an Asset will bring up the Asset Information screen: Asset information with bold text above is required. Many of the fields listed below are included in the sub-tabbed section in the lower portion of the form. The available asset information is: Classification is a method of grouping Assets Type is a subset of Classification and a second method of grouping Assets Description is up to 80 characters describing the Asset Facility is the building in which the Asset is located Storage Location is the default storage location for the Asset Funding Source is the agency that provided the Asset In Service Date is the date the asset was put into service (defaults to current date) Barcode is the barcode that identifies the Asset. You must enter the first asset’s barcode number manually in a format that all barcodes will use (i.e. A00001). The system will then automatically increment the numerical portion of the barcode number one at a time. If you are using pre-printed barcodes, enter the number seen on the barcode. Asset Number is the unique permanent number given to an item for tracking. An asset number is usually engraved on larger, more expensive items. Condition is the physical condition of the Asset. Condition does not apply to binned items. Manufacturer is the manufacturer of the Asset (data entered on the Manufacturer Administration screen) Model is the model number of the Asset Serial Number is the Serial Number of the Asset Account is the account number used to purchase the Asset Status. An Active asset may be checked out, A Retired asset may not be checked out. ATS BASIC EDITION 31 PRIMARY DATA SUB-TAB Note is up to 255 characters of information about the Asset Container allows other assets to be checked out to the container itself (i.e. tool box) Binned item is used for small items that cannot be individually bar coded. If the binned item checkbox is checked, a box will appear to enter a bin quantity. There will also be an option to set the item as a consumable. Consumable assets can be checked out, but are not expected to be checked back in (e.g. gloves) Check Out determines whether an asset is checked out or not. If it is checked out, the following information will be available o By: User to whom the asset is checked out o Location: location to which the asset is checked out o Due Date: date the asset is due to be checked in PURCHASE / WARR. SUB-TAB Purchased From allows entry of general supplier information Warrant Expiration Date tracks when a warranty period expires Depreciation period in years (does not apply to bin items) o NOTE: fields relating to Depreciation will not be visible unless the “Show Depreciation” checkbox is checked on the Setup Options screen. Depreciation Type. The system will calculate depreciation based on five methods: Standard Straight Line, MACRS Half-Year, MACRS Mid-Quarter, MACRS Double Declining Half Year, and MACRS Double Declining Mid Quarter o MACRS means Modified Accelerated Cost Recovery System Original Value is the cost basis for depreciating the Asset Salvage Value is the remaining value of the asset after it has been fully depreciated Current Value is the current depreciated value of the Asset (calculated) Date for Current Value is the date used to calculate the current value Miscellaneous is a user definable field that can be used as desired IMAGES & DOCS SUB-TAB Asset Image is the path to a file that contains a picture of the asset. If the image information is entered and a file is at the proper location, the picture will be displayed in the area to the right of the sub-tab section. Double clicking on the image will display a full sized image of the picture. In addition, linked documents, PDF, URLs, and other related files can be assigned to the Asset. ATS BASIC EDITION 32 ADDING A NEW ASSET To Add a new Asset, select the Add button. All information is cleared and the Save and Cancel buttons appear. If turned on in System Setup, the system will automatically generate a unique barcode for the asset if the barcode field is blank. If a specific barcode number is needed, just enter the number manually. Each barcode number must be unique. Select or enter the required information (bold labels). Enter the non-required information if desired. Save the Asset by selecting the Save button. The screen will return to the original state with the new Asset information. Cancel the process without saving by selecting the Cancel button. The screen will return to the original state with the information displayed that was present prior to selecting the Add button. EDITING AN EXISTING ASSET To Edit an existing Asset, select the Edit button. The Save and Cancel buttons appear. Change the Asset's information as desired. Information with bold labels is required. Save the Asset by selecting the Save button. The screen will return to the original state with the changed Asset information. Cancel the process without saving by selecting the Cancel button. The screen will return to the original state with the Asset information unchanged. COPYING AN EXISTING ASSET’S INFORMATION TO A NEW ASSET This is one of the most helpful features when multiples of the same type of asset needs to be entered. To Copy an existing asset's information to use in creating a new asset, select the Copy button. The majority of data is copied to a new record. The exception is that the barcode number, serial number and checkout information is cleared and the Save and Cancel buttons appear. ATS BASIC EDITION 33 The system will automatically generate a unique barcode for the asset. If this barcode is unacceptable, it can be typed over by the user. The barcode entry must be unique. A barcode for a asset, location, or employee cannot be the same. Change the asset's information as desired and add the new barcode. Save the Asset by selecting the Save button, the screen will return to the original state with the new Asset information. Cancel the process without saving by selecting the Cancel button. The screen will return to the original state with the Asset information unchanged. To Delete an existing Asset, select the Delete button. After asking if you are sure, the system will delete the Asset. ASSET HISTORY Selecting an asset and then selecting the Asset History tab will bring up the Asset History screen below. The screen displays the history of the selected asset for the date range selected. The system defaults the date range to the last 12 months. Change one of the dates and select the Enter key or select a new date with one of the calendar controls and the list will change to reflect the new date range. To print the history displayed on the screen, select the Print List button. To remove all history records for the selected asset prior to a specified date, enter the date in the Date text box and then select the Purge button. All history records for the asset prior to the date specified will be deleted. The purge button is only available if the “Allow Delete Asset & Purge History” checkbox is checked on the Setup Options screen. To leave the process, select the in the upper right corner of the screen. ATS BASIC EDITION 34 CHECK IN/CHECK OUT ASSETS SCREEN The Check Out process is used to check assets out to a user or location. The Check in process is used to check assets into storage from a user or location. Check Out and Check In can also be performed on the handheld unit. To start these processes, select the Check In/Out button. CHECK OUT The Check In/Check Out process is composed of three (3) tabs. The first tab is the Check Out process as shown below. To check out assets: Select a Container, Location, or Employee to which the asset will be checked out If desired, enter the due date for the return of the Asset. Enter a date in the Due Date box, or enter a Default Interval (number of days from today) Scan the Asset barcode If the Asset is a binned item, a box will appear below the barcode to enter the quantity being checked out The asset checkout information will be displayed in the grid. To check out another asset to the same location/employee and with the same due date, scan another asset barcode. If no scanner is available, you may enter the barcode information into the barcode text boxes and then press the enter key on the keyboard. You may also select the find button next to the textboxes to display a list to choose from. Items that are entered into the grid by mistake can be removed by selecting the item and clicking the Remove Item button. ATS BASIC EDITION 35 Once items are displayed in the grid, the Out Date/Time can be changed by clicking the Change Out Date/Time button. A confirmation box will appear to indicate that the date/time will be changed for ALL items shown in the grid. Responding “Yes” will display a calendar where you can select the desired date and time. When all desired assets have been checked out, select the Save or Save/Print button. The check out information will be saved and, if Save/Print was selected, the system will ask if you wish to print the check-out report. The system will then clear the check-out list. To cancel the check-out process, select the Reset/Clear button. After confirming you wish to reset the check-out process, the system will clear the check-out list without saving it. CHECK IN BY ASSET To check in an individual asset, select the Check In by Asset tab. The screen will change as indicated below. To check an asset into storage, scan the asset barcode or enter the asset barcode and then press the Enter Key on the keyboard. If the asset is a binned item, a box will appear to enter the quantity being checked in. The check in information will be entered in the list. Condition, Facility, and Storage Location may be changed. Select the column you wish to change, select the Enter key and pick the new Condition, Facility, or Storage Location from the list. Once items are displayed in the grid, the In Date/Time can be changed by clicking the Change In Date/Time button. A confirmation box will appear to indicate that the date/time will be changed for ALL items shown in the grid. Responding “Yes” will display a calendar where you can select the desired date and time. ATS BASIC EDITION 36 When all assets have been checked in, select the Save or Save/Print button. The check in information will be saved and, if Save/Print was selected, the system will ask if you wish to print the check in report. The system will then clear the check in list. To cancel the check in process, select the Reset/Clear button. After confirming you wish to reset the check in process, the system will clear the check in list without saving it. Check In can also be performed on the handheld unit. CHECK IN BY CONTAINER / PERSO N / LOCATION To check in assets assigned to either a container, an employee, or a location select the Check In by Container / Person / Location tab. The screen will change as indicated below. To check an asset into storage, first select or scan the container, employee or location barcode the items are being returned from. A listing of all items checked out to the container/employee/location will be displayed. You can then click the check box for each line item being returned. Binned item quantities can also be changed in the grid if desired. A Check All option box will check or uncheck all checkboxes for each line item listed. Alternately, you can scan individual asset barcodes to check the checkbox. You can also change the status to Lost or Broken for any items checked. The change occurs on Save. If someone returns multiple assets but has lost others, check-in the returned items first and Save. Then, do a new check-in for the individual and confirm that the remaining items listed are lost. Check All and Change Status to Lost then Save. The COPY ROW function allows you to split up binned items being returned so that alternate locations can be assigned. Verify the QUANTITY is correct before saving! Once items are displayed in the grid, the In Date/Time can be changed by clicking the Change In Date/Time button. A confirmation box will appear to indicate that the date/time will be changed for ALL items shown in the grid. Responding “Yes” will display a calendar where you can select the desired date and time. When all assets have been checked in, select the Save or Save/Print button. The check in information will be saved and, if Save/Print was selected the system will ask if you wish to print the check in report. The system will then clear the check in list. To cancel the check in process, select the Reset/Clear button. After confirming you wish to reset the check in process, the system will clear the check in list without saving it. ATS BASIC EDITION 37 Check In can also be performed on the handheld unit. RESERVE SCREEN Reserving Assets is a process used to reserve the use of an asset for a specified period of time. This is not available in the Starter Edition. To start this process, select the Reserve button. The screen below will be displayed, showing all reservations that fall within the default date range (one month prior to current date and five months after the current date). The Reserve Assets process is composed of two tabs. FIND RESERVATION The first tab is the Find Reservation process. This is used to view the current reservations for an Asset or User. The Reservation type determines the type of reservations to display. Choose from All, Location, or Employee. To View the reservations for a user, scan the user barcode into the user barcode textbox and the reservations for the user in the date range specified will be listed. To view the reservations for an asset, scan the asset barcode into the asset barcode textbox and the reservations for the asset in the date range specified will be listed. If no scanner is available, you may also enter the barcode in the barcode text boxes followed by pressing the Enter key on the keyboard. Another option is to select one of the find buttons, to display a list from which you may select. If the reservation type is an employee, there will be from which you can search a list of users. Enter an employee barcode and select the Extract Data button. If a matching barcode is found, the employee will appear in the list. Alternately, you can enter a Last Name and select the Extract Data button. All employees with the entered last name will appear in the list. Select the user desired and then select the OK button. You may notice that “All” is available. If you select all, then the reservations for everyone will be displayed. Select the cancel button to return to the reservation process without selecting a user. If the reservation type is a location, there will be from which you can search a list of locations. If the reservation type is “All”, the find button will be disabled. ATS BASIC EDITION 38 If the reservation type is an asset, there will be from which you can search a list of assets. Select the asset desired, and then select the OK button. You may notice that “All” is available. If you select all, then the reservations for all assets will be displayed. Select the cancel button to return to the reservation process without selecting an asset. To change the date range for the reservation list, enter a new date and then select the Enter key or set the date using the calendar control. The list will change to reflect the new date range. The reset button will return the screen to the default settings. The purge reservations button will remove expired reservations from the system. Expired reservations are those that have a “To Date” that is older than the default “From Date”. They do not appear on the screen when the reservation form is opened. They can be displayed by setting the “To Date” back to an earlier date. A message will appear on the screen to confirm the purge operation. It will also show the number of reservations that will be removed. Respond “yes” to the message to remove the records. RESERVATION ADMIN The second tab is the Reservation Admin process. This is used to add new reservations and edit or delete existing reservations. To add a new reservation, select the Reservation admin tab. Select the add button, choose between location or employee as desired. Scan the location/employee barcode or select the find button. Then scan the asset barcode or select the asset find button. Set the date range, add a note, and set the priority as desired. When completed, select the save button to save the reservation. The screen will return to the find reservation tab, with the new reservation information. To cancel without saving, select the cancel button. To edit an existing reservation, find the reservation in the find reservation tab. Select the reservation of interest, then move to the reservation admin tab. Select edit and modify the information as desired. To save, select the save button. The screen will return to the find reservation tab, with the newly edited information. To cancel without saving, select the cancel button. To delete an existing reservation, find the reservation in the find reservation tab. Select the reservation of interest, then move to the reservation admin tab. Select the delete button, and then verify. The ATS BASIC EDITION 39 system will delete the reservation. To leave the process, select the in the upper right corner of the screen. REPORTS SCREEN Each report has a different set of Report Filters that the user can select to create the report results they desire. Select the report of interest and the report filters will appear on the right portion of the screen. Some reports have an Ignore Due Date greater than a specified date. This is useful if some assets are checked out to a location or employee over a long period of time, and you do not want these assets to appear on monthly reports. When the filters are set, the user then selects the Print Report button. A print preview screen will be displayed from which the report may be printed, PDF’d or Email(ed) (only if Microsoft Outlook is used). AUTO E-MAIL REPORTS The Asset Assignment and History Reports (see screen above) give you the ability to Auto E-Mail the report when desired. Select “Email Report(s)” so that each person gets their own email with their information. Only employees with an email address record will receive their email report. CUSTOM REPORTS If desired, GigaTrak can provide custom reports at your request. These reports will be quoted separately and automatically added to the Select Report listing when installed. ATS BASIC EDITION 40 DOWNLOAD SCREEN The system provides for a handheld scanner download process. The user must first configure the PC for the handheld in use (See Handheld Configuration). The Handheld Configuration screen can be displayed by choosing the Select Handheld button. The selected handheld device is shown in the blue banner of the Download screen. Check in/out records can be mixed with audit records and count records on the handheld unit. When the unit is downloaded, the records will be shown with the appropriate type displayed. The records displayed can be limited to a specific type by clicking the appropriate Display Type button. When a handheld unit is ready for download, select the Download button from the main screen. The form below is displayed. Batch handhelds must be loaded with a reference file before they can be used. Dock the handheld to the host PC and select the Sync Data button. Handhelds should be synced with the PC before each use to ensure that they have the latest data. If there are download records stored in the temporary database table, the grid will display the existing downloaded records. New handheld records can be added as long as the existing download has not started the commitment process. If commit has been started or the handheld audit is separate from the existing audit, then the existing records must be completed and cleared from the database prior to uploading the new handheld records. To download handheld data: Place the handheld in the downloader. Select the Sync Data button. Follow the on-screen instructions. If the download is successful, the grid will be rebuilt with the new records. If the records were downloaded successfully but there were some problems, the system will provide a message and the problems will be documented in a log file. This file can be viewed and printed by selecting the View Log File button. Note that the log file will be deleted whenever a new Sync Data function is performed. There could be some erroneous data in the grid. Therefore the system will only commit those records that have the Chk column checked. During download the system will check those records where the audited location matches the expected location, however the user may change the value if desired. This allows the user to control what records will be loaded into the database. If the audited location does not match the expected location, the text will be displayed in red. ATS BASIC EDITION 41 The Save Changes button will save the changes in the Chk column to the temporary audit table in the database. This does not change any asset data. If a checkout record is recorded on the handheld for an item that has a high priority reservation for a different employee than the one entered on the handheld, the text will be displayed in blue. The Chk column can be manually checked to allow the checkout of the item to the scanned employee, but this is not recommended. Always check with the employee who originally reserved the item on the Reservation screen before allowing the item to be checked out. The Commit button will save the information in the downloaded records that have been checked to the permanent portion of the database. The background color of the checkbox will turn yellow after those records have been committed. The Commit function may be performed several times. Records that were previously committed will be skipped. Once a Commit function has started, no further downloads will be accepted from a handheld until the downloaded records are cleared. IMPORTANT! -- The Commit function changes asset data. A message will appear to alert the user to sync all handhelds with the PC to update the reference file on the handheld. The Clear button will remove all records from the temporary download table in the database, making way for new download information. The system displays a warning message prior to clearing the records. The Report button will print a report of the records displayed on the grid. ATS BASIC EDITION 42 SUPPORT GigaTrak provides 90-days of telephone support for ATS from the date of purchase. GigaTrak will advise on installation issues but the customer is responsible for network and SQL Server installation. Our hours are 9am to 5pm central time Monday through Friday. During this time you are entitled to any updates or new releases issued by GigaTrak. By purchasing an extended support one, two or three year agreement, these services are extended. Onsite support is available at additional cost. Please call 262-657-5500 Option 2 with any questions. ATS BASIC EDITION 43