1
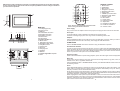
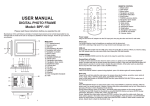
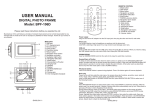
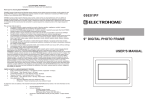
07E01PF
DIGITAL PHOTO FRAME
USER MANUAL
Manufacturer of this unit follows a principle of constant improvement and is not held responsible
for any changes that are made to the unit nor accepts any liabilities for these changes. Thanks for
your choice of our products.
19
14
1
2
3
4
9
5 6 7 8
10 11 12 13
20
16
17
18
MAIN UNIT
1. TFT display(screen)
2. Remote sensor
3. USB port
4. Snooze/Alarm off button
5. Navigation left button
6. Navigation up button
7. Return button
8. Power button
9. SD/MMC/XD/MS slot
10. Mode button
11. Navigation right button
12. Navigation down button
13. Play/Enter button
14. Phones jack
15. DC jack
16. Hanging hole
17. Speaker
18. Bracket
19. Interchangeable faceplate
20. Hole
1
11
2
12
3
4
5
6
13
7
8
9
10
15
14
16
Note: Please remove Battery Insulation Tab
before using the Remote Control.
REMOTE CONTROL
1. Mode button
2. OSD button
3. Menu button
4. Navigation up button
5. Navigation left button
6. Enter button
7. F.BWD & previous button
8. Navigation down button
9. Volume+ button
10. Mute button
11. Power button
12. Play/pause button
13. Stop button
14. Navigation right button
15. F.FWD & next button
16. Volume- button
Power supply
Plug one end of the AC adaptor into the DC input jack, then plug the other end into AC wall outlet.
Phone jack
For private listening, insert a headphone or earphone into the phone jack.
CAUTION: Listening at high power for a long moment could damage users' ears.
USB port
Insert a USB data traveller into the USB port to enjoy the audio files or pictures. When you need to unplug
the USB, please enter the main menu firstly, then unplug the USB data traveller.
SD/MMC/XD/MS
Insert an SD/MMC/XD/MS card into the card slot to enjoy the audio files or pictures.
Snooze/Alarm off button
To sleep an extra several minutes when the alarm comes on, lightly touch the SNOOZE/ALARM OFF
button, the alarm will stop for several minutes and comes on again. Press and hold SNOOZE/ALARM OFF
button about 3 seconds in normal mode to disable the alarm function. (this button works as described
above only when the mode option is set to ALARM enabled.)
Play/pause button
Press PLAY/PAUSE button to pause during playback, press this button again will resume playback.
Basic play
Power on the unit then enter the main menu, the screen shows eight functions, eg: photo, movie, setup,
calendar, clock, alarm, copy/delete and favorite.
Insert a USB data traveller or SD/MMC/XD/MS card first, press NAVIGATION BUTTON to select one of
the following function.
Photo
Press NAVIGATION buttons to select photo option, then press ENTER to confirm the selection. After the
player read it for several seconds, it begins to browse the picture automatically one by one. When photo In
auto play off mode, it enters Thumbnail mode directly.
During picture playing, press STOP button, thumbnail mode menu appears on the screen as below.
Thumbnail of each title: select the thumbnail by using NAVIGATION buttons and press ENTER to play.
Information: Resolution, created date, rotate, and slide show
Rotate: Highlight the rotate option and press ENTER to confirm, then enter the rotate mode, there are
three options appear in the bottom of the screen including Rotate it, Reset and return. Use NAVIGATION
buttons to select picture you desired to rotate, then press ENTER to rotate it. Select reset to restore the
picture. Select return to back the thumbnail mode.
15
1
2
Slide show: Select slide show option to slide the picture one by one.
Press NAVIGATION LEFT and NAVIGATION RIGHT buttons to rotate the picture Clockwise and Anticlockwise respectively.
Press STOP button twice to return the file manager.
Press NAVIGATION DOWN button to flip the picture vertically.
Press NAVIGATION UP button to flip the picture horizontally.
Movie
Press NAVIGATION buttons to select movie, then press ENTER To confirm. After the player read it for
several seconds, it begins to play movie automatically. Press STOP button to return the root menu during
movie playback, press PLAY/PAUSE to resume playback. This unit supports MPEG4 format.
Calendar
Use NAVIGATION buttons to select CALENDAR function and press ENTER to confirm, the screen shows
the month, date, year (eg: Jan-1-2006)and week with black background, and the Sundays show in red
words, Saturdays show in yellow words. press STOP button, use NAVIGATION LEFT/RIGHT button to
adjust year, use NAVIGATION UP/DOWN button to adjust month, then press STOP button to confirm, use
NAVIGATION buttons to select the date and press ENTER to confirm. To exit this function by pressing
MENU button.
Clock
Use NAVIGATION buttons to select CLOCK Function, then the clock display screen will be show on the
screen with black background and yellow words, the screen shows the current time (eg: 00:00:00) in big
digital and the current date, month, year and week under the time in small characters(eg: Jun-1-2006
Sunday).
Alarm
Use NAVIGATION buttons to select ALARM function. The options of ALARM as follows:
Enable: press NAVIGATION UP/DOWN button to make a selection between the two options(on/off)
Set time: Select this option to set the alarm time after the alarm is enabled. Use NAVIGATION UP/DOWN
button to select SET TIME option and press ENTER to confirm, use NAVIGATION LEFT/RIGHT button to
highlight the time you desired to set, then use NAVIGATION UP/DOWN button to adjust, press
NAVIGATION RIGHT button to confirm and press ENTER to exit the alarm time set. Buzzer will sound at
the pre-set alarm time.
Exit: select exit option to exit alarm setting.
Copy/Delete
Use NAVIGATION buttons to select Copy/delete function and press ENTER to confirm, select COPY or
DELETE to enter the correspond windows to do the file copy or file delete function.
Copy function: when copy function is selected, all JPEG files in the USB data traveller or memory card will
be displayed in the file manager. Use NAVIGATION UP/DOWN buttons to select the files and press
ENTER to confirm, then the selected file will be highlighted in a rectangle frame. When the selection is
finished, use NAVIGATION buttons to select SAVE to save the selected file into the internal memory of the
unit.
Delete function: When DELETE is selected, all JPEG files of you saved will be displayed, use
NAVIGATION buttons to select the files that you want to delete from the internal memory and press
ENTER to confirm, then the file of you selected will be deleted.
Delete all: Press NAVIGATION buttons to select delete all in the bottom menu, all the files in the internal
memory will be deleted.
Sort mode: select sort, then use NAVIGATION buttons to select the file that you want to move and press
ENTER to confirm. Then press LEFT NAVIGATION button to move the picture to up sequence. (For
example, move its sequence from 3rd position to 2nd position.). Press RIGHT NAVIGATION button to
move the picture to down sequence. (For example, move its sequence from 3rd position to 4th position.).
Press NAVIGATION buttons to select RETURN to return the edit mode, select SLIDE SHOW to browse
the pictures one by one.
Please note that the saving process may take some time to finish, larger file size will take more time.
Please don't remove the USB data traveller or memory card, or turn off the power while in saving, deleting
or sorting, it may cause data lose or damage in USB data traveller, memory card or internal memory.
3
Favorite
Use NAVIGATION buttons to select favorite option, then it begins to browse the files saved in the internal
memory one by one. During playback press PLAY/PAUSE to pause, to resume playback press this button
again. Press NAVIGATION buttons to rotate the picture. During slide show, press STOP button, it enters
thumbnail mode. To exit this option by pressing MENU button.
Setup
Select setup option to display setup menu, Use NAVIGATION UP/DOWN keys to select the desired item.
Then press NAVIGATION RIGHT button, the sub-options for each item will appear on the right side of the
screen.
Photo setting
Interval time
To browse picture at interval time. There are several options for you to set as follows:
5sec./10sec./15sec./30sec./1min./3min.
Transition effect
To select one of the effects when changing from one picture to another: No effect/Cover up/Cover
down/Cover left/Cover right/Uncover up/Uncover down/Uncover left/Uncover right/Wipe up/Wipe
down/Wipe left/Wipe right/Push up/Push down/Push left/Push right/random
Auto play
The options of auto play include photo and movie.
Display setup
Display type:
It is used to select the display type.
Options: 4:3 16:9
Custom setup
OSD language: to select the OSD of your choice English/French
Style: to select one of following style to display different setup menu style. The option of styles as follows:
style1/style2/style3/style4
Repeat mode: select one of following option to do a repeat function: off/ one/ folder/ all.
Default: select Ready to restore the setting.
Set time: use NAVIGATION UP/DOWN button to select SET TIME option and press ENTER to confirm,
use NAVIGATION LEFT/RIGHT button to highlight the time you desired to set, then use NAVIGATION
UP/DOWN button to adjust, press NAVIGATION RIGHT button to confirm and press ENTER To exit the
clock time set.
Exit
Select this option to exit the setup menu.
Remote function illustration
Power button: Press this button to power on or off the player.
Mode button: Press MODE button once display clock time, press this button twice display calendar,
press this button three times to exit.
OSD button: Press this button, the screen will display parts of information (current file number, total files
number ,current file name, and/or play time during movie playback mode).
Menu: Press MENU button during playback to return the main menu.
Play/pause button: Press PLAY/PAUSE button to pause during playback, press this button again will
resume playback.
Navigation buttons: Press navigation buttons to select the desired items or rotate the picture during
picture playback.
Enter button: Press this button to confirm selection.
Stop: Press STOP button to stop during playback. Press PLAY/PAUSE to resume playback.
4
F.BWD/previous: Press this button once during play to skip a file or picture backward, press and hold this
button during normal playback of video or audio files, the playback speed will cycle with each press as: 2X,
4X, 8X, 16X, 32X, Normal
Press PLAY to resume normal playback.
Bracket assembly illustration
F.FWD/next: Press this button once during play to skip a file or picture ahead, press and hold this button
during normal playback of video or audio files, the playback speed will cycle with each press as: 2X, 4X,
8X, 16X, 32X, Normal
Press PLAY to resume normal playback.
Mute: Press the MUTE button, the audio output of the main unit will be shut off; pressing this button again
or VOLUME button will resume the audio output.
Volume+ & volume-: Press volume + button to increase the volume, and press volume- button to reduce
the volume.
Interchangeable faceplate
1
3
2
1
2
1
2
3
4
Picture(4)
3
4
5
4
Picture(3)
5
1
6
Cleaning the Digital Photo Frame
1. Please make sure that you have turned off and unplugged the digital photo frame from the AC outlet
before cleaning it.
2. Don't put any liquid on the screen or the cabinet directly.
6
Picture(2)
Picture(1)
3
Picture(5)
Assembly panel: to install the faceplate, locate the faceplate as picture (1) show to the photo frame as
picture (2) show by aligning them point to point, clasp the panel slightly to assembly it . Please follow
above illustrate to operate.
Disassembly: To remove the faceplate, use a small provided pin to press each hole (as picture 4 show
point 1 2 3 4 ), then the panel can be taken out easily.
5
Cleaning the screen
1. Gently wipe the screen with a soft, lint-free cloth to remove dust and other particles that can scratch the
screen.
2. To clean the tough areas, use a soft, lint-free cloth with a few drops of water to remove stubborn dirt.
3. Never apply any pressure on the surface of the screen.
Cleaning the cabinet
1. Use a soft, dry cloth to clean the cabinet.
2. To clean the tough areas, use a soft, lint-free cloth with a few drops of water to remove stubborn dirt.
6
ELECTROHOME WARRANTY
Consumer Electronics Products and Home Appliances
Thank you for choosing ELECTROHOME!
RGC Redmond Group gives the following express warranty to the original consumer purchaser or gift recipient for this
Electrohome brand product, when shipped in its original container and sold or distributed in Canada by RGC Redmond
Group or by an Authorized Electrohome Dealer:
RGC Redmond Group warrants that this product is free, under normal use and maintenance, from any defects in material
and workmanship. If any such defects should be found in this product within the applicable warranty period, RGC
Redmond Group shall, at its option, repair or replace the product as specified herein. Replacement parts furnished in
connection with this warranty shall be warranted for a period equal to the unexpired portion of the original equipment
warranty.
This warranty shall not apply to:
a. Any defects caused or repairs required as a result of abusive operation, negligence, accident, improper
installation or inappropriate use as outlined in the owner’s manual.
b. Any Electrohome product tampered with, modified, adjusted or repaired by any party other than RGC Redmond
Group or Electrohome’s Authorized Service Centres.
c. Damage caused or repairs required as a result of the use with items not specified or approved by RGC Redmond
Group, including but not limited to head cleaning tapes and chemical cleaning agents.
d. Any replacement of accessories, glassware, consumable or peripheral items required through normal use of the
product including but not limited to earphones, remote controls, AC adapters, batteries, temperature probe, stylus,
trays, filters, cables, paper, cabinet, cabinet parts, knobs, buttons, baskets, stands, shelves, cookware and
cooking utensils.
e. Any cosmetic damage to the surface or exterior that has been defaced or caused by normal wear and tear.
f. Any damage caused by external or environmental conditions, including but not limited to transmission line/power
line voltage or liquid spillage.
g. Any product received without appropriate model, serial number and CSA /cUL /cULus /cETL /cETLus markings.
h. Any products used for rental or commercial purposes.
i. Any installation, setup and/or programming charges.
Should this Electrohome product fail to operate during the warranty period, warranty service may be obtained upon
delivery of the Electrohome product together with proof of purchase and a copy of this LIMITED WARRANTY statement to
an Authorized Electrohome Service Centre. In-home warranty service may be provided at RGC Redmond Group’s
discretion on any Electrohome television with the screen size of 27” or larger. This warranty constitutes the entire express
warranty granted by RGC Redmond Group and no other dealer, service centre or their agent or employee is authorized to
extend, enlarge or transfer this warranty on behalf of RGC Redmond Group. To the extent the law permits, RGC
Redmond Group disclaims any and all liability for direct or indirect damages or losses or for any incidental, special or
consequential damages or loss of profits resulting from a defect in material or workmanship relating to the product,
including damages for the loss of time or use of this Electrohome product or the loss of information. The purchaser will be
responsible for any removal, reinstallation, transportation and insurance costs incurred. Correction of defects, in the
manner and period of time described herein, constitute complete fulfillment of all obligations and responsibilities of
Electrohome Electronics to the purchaser with respect to the product and shall constitute full satisfaction of all claims,
whether based on contract, negligence, strict liability or otherwise.
CARRY-IN PARTS & LABOUR WARRANTY PERIODS:
• Audio Products: 1 Year (Remote Control, if applicable – 90 Days)
• DVD Products: 1 Year (Remote Control – 90 Days)
• LCD & Plasma Display TV: 1 Year (Remote Control – 90 Days)
• Television Products: 1 Year (Remote Control – 90 Days)
• VCR Products: 1 Year (Remote Control – 90 Days, Video Heads – 6 Months)
To obtain the name and address of the nearest Authorized Electrohome Service Centre or Dealer, please contact:
RGC Redmond Group, 6185 McLaughlin Road, Mississauga, ON L5R 3W7.
For more information on this Warranty or Service Locations, please call (905)366-5100 or toll free 1-800-663-5954,
Monday to Friday 9:00am – 5:00pm Eastern Standard Time.
10/2006