1
®
User’s Manual
© Copyright T&D Corporation. All rights reserved.
2011.08 16504650005 3rd Edition
Table of Contents
Safety Precautions and Instructions-------------------------------- 4
Before Using this Product-------------------------------------------- 12
Basic Procedures------------------------------------------------------- 13
About Thermo Recorder TR-71Ui / 72Ui-------------------------- 14
Selecting a Method for Downloading Data---------------------- 16
Package Contents------------------------------------------------------- 17
Appearance Diagram and Part Names--------------------------- 18
LCD Display--------------------------------------------------------------- 20
Installing the Battery--------------------------------------------------- 22
Changing a Battery----------------------------------------------------- 23
Turn ON the Power------------------------------------------------------ 24
Connecting the Sensors---------------------------------------------- 25
Starting Recording: <REC/STOP> Button----------------------- 26
Setting Recording Interval------------------------------------------- 27
Changing the LCD Display Mode---------------------------------- 28
How to Open the Application and Help-------------------------- 29
Specifications------------------------------------------------------------ 30
Options--------------------------------------------------------------------- 31
Warranty------------------------------------------------------------On Back
1
Important Notices and Disclaimers
In order to properly use this product, please carefully read this manual before
using.
T&D Corporation accepts no responsibility for any malfunction of and/or trouble
with this product or with your computer that is caused by the improper handling
of this product and will deem such trouble or malfunction as falling outside the
conditions for free repair outlined in the attached warranty.
-- All rights of this manual belong to T&D Corporation. It is prohibited to use, duplicate
and/or arrange a part or whole of this User’s Manual without the permission of T&D
Corporation.
-- Microsoft® and Windows® are registered trademarks of Microsoft Corporation USA
and are binding in the USA, Japan and all other countries.
-- Windows Vista is either a registered trademark or trademark of Microsoft Corporation
in the United States, Japan, and/or other countries.
-- All registered trademarks, company names, product names and logos mentioned
herein or for products being used are the property of T&D Corporation or of their
respective owners.
-- Specifications, design and other contents outlined in this manual are subject to
change without notice.
-- Please follow the safety precautions outlined in the Manual carefully. We cannot
guarantee nor are we responsible for safety if this product is used in any manner
other than was intended.
-- On-screen messages in this document may vary slightly from the actual messages.
-- Please notify the shop where you purchased this product or T&D Corporation of any
mistakes, errors or unclear explanations in this manual.
T&D Corporation accepts no responsibility for any damage or loss of income caused
by the use of our product.
-- This product has been designed for private and/or industrial use only. It is not for use
in situations where strict safety precautions are necessary such as in connection with
medical equipment, whether directly or indirectly.
-- We are not responsible for any malfunction or trouble caused by the use of our
product or by any problem caused by the use of measurement results of our product.
Please be fully aware of this before using our product.
-- This manual cannot be reissued, so please keep it in a safe place.
-- Please read the warranty and provisions for free repair carefully.
2
Radio, EMC and Safety Regulations
This device complies with Part 15 of the Federal Communications Commission
(FCC) rules. Operation is subject to the following two conditions: (1)This device
may not cause harmful interference, and (2)this device must accept any
interference received, including interference that may cause undesired operation.I
FCC Statement
This equipment has been tested and found to comply with the limits for a Class
A digital device, pursuant to part 15 of the FCC Rules. These limits are designed
to provide reasonable protection against harmful interference when the
equipment is operated in a commercial environment. This equipment generates,
uses, and can radiate radio frequency energy and, if not installed and used in
accordance with the instruction manual, may cause harmful interference to radio
communications. Operation of this equipment in a residential area is likely to
cause harmful interference in which case the user will be required to correct the
interference at his own expense.
--
Caution
Changes or modifications not expressly approved by the party responsible for
compliance could void the user’s authority to operate the equipment.
3
Safety Precautions and Instructions
To ensure safety obey all of the following warnings.
The following items should be strictly obeyed for the safe usage of this
Unit, and for protecting yourself and other people from bodily harm and/
or damage to property.
Before using this Unit, please read the following carefully and fully understand the contents.
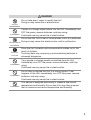
Explanation of Symbols
Explanation of Warning Symbols
DANGER
These entries are actions that absolutely under no
circumstance should be taken. These entries are
actions that absolutely under no circumstance should
be taken. The taking of such an action may cause
serious personal physical damage or death.
CAUTION
These entries are actions that if taken may lead to
physical injury or damage to persons or things.
Explanation of Picture Symbols
Denotes an important warning or caution. Inside or near the
symbol will appear another symbol giving details.
CAUTION AGAINST ELECTRIC SHOCK
EX:
Denotes a forbidden action. Inside or near the symbol will
appear another symbol giving details.
DO NOT DISASSEMBLE
EX:
Denotes an action that must be taken. Inside or near the
symbol will appear another symbol giving details.
UNPLUG POWER PLUG FROM OUTLET
EX:
4
DANGER
DO NOT
DISASSEMBLE
FORBIDDEN
DO NOT USE IN
WET AREAS
STRICTLY
FOLLOW
Do not take apart, repair or modify the Unit.
Doing so may cause fire or electrocution.
If water or a foreign object enters into the Unit, immediately turn
OFF the power, remove batteries, and stop using.
Continued use may cause fire or electrocution.
Do not use this Unit in wet or humid places, such as a bathroom.
Doing so may cause fire, electrocution, and/or malfunction.
Store the Unit, batteries and communication cables out of the
reach of children.
Touching them may cause injury and swallowing batteries is
extremely dangerous.
FORBIDDEN
If any smoke or strange smells are emitted from the Unit,
immediately turn OFF the power, remove batteries, and stop
using.
Continued use may cause fire or electrocution.
FORBIDDEN
Do not drop or expose the Unit to a strong impact. If that
happens to the Unit, immediately turn OFF the power, remove
batteries, and stop using.
Continued use may cause fire or electrocution.
FORBIDDEN
This device is designed exclusively to measure and record
temperature and humidity. Do not use it for any other purpose
than to measure and record temperature and humidity.
5
CAUTION
FORBIDDEN
FORBIDDEN
CAUTION
CAUTION
CAUTION
CAUTION
STRICTLY
FOLLOW
STRICTLY
FOLLOW
6
This Unit is not waterproof.
If the Unit gets dirty, wipe it with a clean cloth and a mild
detergent.
Harmful gases or chemicals may cause corrosion and/or other
danger to the Unit. Also, by coming in contact with hazardous
substances, harm may occur to the people handling the Unit.
Therefore, do not use or store it in any environment that is
exposed to chemicals and harmful gases.
Battery life varies depending upon the type of battery, the battery
performance, and the ambient temperature in which it is used.
Battery terminals may provide insufficient contact due to age or
vibration.
Condensation may occur when a Unit is moved from one
environment to another where there is a great difference in
temperature.
Use the Unit in an environment where the ambient temperature is
from -10 to 60°C and the humidity is 90%RH (no condensation)
or less.
To prevent damage to the Unit from static electricity, remove static
electricity from your body by touching metal around you (door
knob, window frame) before touching the Unit.
Static electricity may cause not only damage to the Unit, but may
cause breaks in or a loss of data.
If the Unit is not to be used for a long period of time, for safety
reasons please remove the battery.
If left in the Unit, the battery may leak and lead to malfunctioning.
If the Unit is not to be used for a long period of time, store it in a
place where it is not exposed to high temperature and high
humidity with other items included.
Use the Unit in an environment where the ambient temperature is
from 0 to 50°C and the humidity is 90%RH (no condensation) or
less.
CAUTION
STRICTLY
FOLLOW
FORBIDDEN
FORBIDDEN
FORBIDDEN
Please take extra caution when plugging in and pulling out the
USB plug while another USB device such as CDD or HDD is in
operation.
It may cause problems to your CD-RW or other device.
We shall not guarantee the operation of the Unit if you have
connected it to your computer using a USB hub or a USB
extension cable.
Please do not insert your fingers or any foreign objects into any
of the Units' jacks.
Do not use any other batteries than those that are specified in
this Manual.
Doing so may cause fire or malfunction.
Do not use or store the Unit in any of the following places. Doing
so may cause electrocution, fire and/or other adverse effects to
the device and/or your computer.
-Areas exposed to direct sunlight
This will cause the inside of the Unit to become overheated and
may cause fire, deformation, and/or other damage including
malfunction.
- Areas exposed to strong magnetic fields
This may cause damage including malfunction.
- Areas exposed to water leakage
This may cause electrocution or other damage including
malfunction.
- Areas exposed to excessive vibration
This may cause injury, malfunction, damage or loss of proper
electrical contact.
- Areas near fire or exposed to excessive heat
This may cause damage including malfunction and deformation.
- Areas exposed to excessive dust, dirt and smoke
This may cause damage including malfunction.
7
Notices about Wireless Communication Devices
This Unit is an infrared-equipped device. Do not place the Unit in areas
exposed to direct sunlight or incandescent light, or near other infrared
devices.
Infrared communication may not work properly when in direct incandescent
light or when other infrared devices are nearby.
Proper communication may not be possible if the Infrared Port accumulates
impurities (dirt).
If the Infrared Port gets dirty, wipe it with a soft cloth.
Don't touch the Infrared Port with your finger during infrared communication.
Cautions about using the Temperature Sensor
When using the Temperature Sensor TR-0106, please take note of
the following:
Use the sensor in an environment where the ambient temperature is from
-40 to 110°C.
It is possible to use just one extension cable per temperature sensor.
This sensor is not waterproof.
Only use in an environment where there is no condensation or possibility of
becoming wet. Do not use in water or near areas where high-pressure water
is flowing.
8
Cautions about using the Temperature / Humidity Sensor
When using the Temperature / Humidity Sensor TR-3100, please
take note of the following:
Use the sensor in an environment where the ambient temperature is from 0
to 50°C and the humidity is 95%RH (no condensation) or less.
If extremely severe temperature changes occur, the humidity measurements
may appear abnormal.
Once the sensor's temperature becomes stable, the measurements will
return to normal.
This sensor is not waterproof.
Only use in an environment where there is no condensation or possibility of
becoming wet. Do not use in water or near areas where high-pressure water
is flowing.
Do not use in any environment that is exposed to corrosive gas and organic
solvents. Also, do not use in areas near fire or exposed to excessive heat.
When using the temperature / humidity sensor in environments where the
temperature is 0 to 15°C and humidity under 30%RH, there may occur
changes in measurement readings. This is not a malfunction.
During use, the surface of the temperature / humidity sensor will accumulate
impurities (dirt) causing a decrease in the sensor's accuracy and sensitivity.
The service life of humidity sensors can vary greatly depending on operating
environment.Periodic calibration may be required.
Moreover, it may be necessary to replace the sensor if the sensor is being
used in an environment where smoke and dust are in over-abundance or
where the temperature and humidity exceed the operational range.
When the sensor is not being used, please place it in the attached vinyl bag
with the drying agent included and store it in a cool dark place with a
temperature of between 5 to 25°C and a humidity of below 30%RH.
9
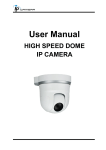
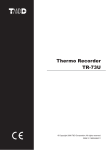
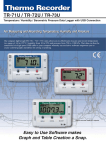
Attached to the temperature / humidity sensor are two stickers: a wetness
detection sticker and a temperature detection sticker. If either of the stickers
shows abnormality, you should change the old sensor to a new one
immediately.

Wetness Detection Sticker
Temperature Detection Sticker
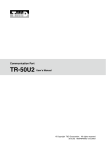
Wetness Detection Sticker
Informs you that the sensor has been wet.
Under normal conditions, black dots
will appear on a white background.
Normal :
Under abnormal conditions, it will
turn to red.
Abnormal :
Temperature Detection Sticker
Informs you that the sensor measured a temperature measurement over 60°C.
60
Normal :
10
Under normal conditions, the
number [60] will lightly appear on a
white (pink) background.
Under abnormal conditions, the
number [60] will clearly appear on a
Abnormal : red background.
60
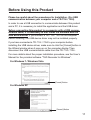
Before Using this Product
Please be careful about the procedures for Installation. (For USB
communication between your computer and a TR-71Ui / 72Ui)
In order to use a USB connection to communicate between this product
and a PC, it is necessary to install the application and the USB driver.
Before connecting this product to a computer with a USB communication cable, it is necessary to first install the software and the
USB device driver. If you connect a TR-71Ui / 72Ui to the computer
before installing, the USB device driver may not be installed properly.
If you have connected a TR-71Ui / 72Ui to your computer before
installing the USB device driver, make sure to click the [Cancel] button in
the Wizard window when it pops up on the computer display. Then
disconnect the USB communication cable from the TR-71Ui / 72Ui .
For more details about the proper installation procedure, see the User’s
Manual for the provided software "T&D Recorder for Windows".
For Windows 7 / Windows Vista

[Cancel] Button
For Windows XP

[Cancel] Button
11
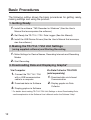
Basic Procedures
The following outline shows the basic procedures for getting ready,
making settings and using the product.
1. Getting Ready
111Install the software "T&D Recorder for Windows" (See the User's
Manual that accompanies the software.)
222Get Ready the TR-71Ui / 72Ui Data Logger (See this Manual)
333Install the USB Device Drivers (See the User's Manual that accompanies the software.)
2. Making the TR-71Ui / 72Ui Unit Settings
(using supplied software) and Starting Recording
111Make Settings for Device Names, Recording Intervals and Recording
Modes
222Start Recording
3. Downloading Data and Displaying Graphs*
Via Computer
111Connect the TR-71Ui / 72Ui
with a USB communication
cable to a computer
222Download data via Software
333Display graphs via Software
Via Data Collector TR-57DCi
(sold separately)
111Download data via Infrared
Communication
222Display graphs via Data
Collector
*For details about making TR-71Ui /72Ui Unit Settings or about Downloading Data,
see the explanation in the Software User's Manual and/or the Software "Help".
12
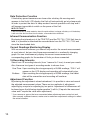
About Thermo Recorder TR-71Ui / 72Ui
Outline
TR-71Ui / TR-72Ui Thermo Recorders are data loggers capable of
measuring, displaying and recording temperature and humidity data.
TR-71Ui has two temperature channels and TR-72Ui has one temperature and one humidity channel.
Temperature Measurement Range: -60 to 155°C (TR-71Ui)
The TR-71Ui with the sensor included in this package can measure and record
in a range of -40 to 110°C, but by purchasing one of our optional sensors it is
possible to measure and record in the wider range of -60 to 155°C.
Please take a look at our full range of optional sensors to find one to match your
application.
Humidity Measurement Range: 10 to 95%RH (TR-72Ui)
The TR-72Ui with the sensor included in this package can simultaneously
measure and record temperature in a range of 0 to 50°C and humidity in a range
of 10 to 95%RH.
Storage Capacity: 8,000 Readings (One reading is a set of data
which includes measurements for that unit type’s number of channels.)
At the longest recording interval of 60 minutes, recording can continue
consecutively for one year.
One Year of Operation with just One AA Alkaline Battery
Our low energy consumption design gives you one year of continuous operation
with only one AA alkaline battery. This enables measuring and recording over
long periods of time.
I M P O R TA N T :
Battery life varies depending upon the type of battery, the battery performance, the measuring
environment, and the frequency of communication. Specifications and explanations used in this
manual are based on operations carried out with a new battery and are in no way a guarantee of
your actual battery life.
When infrared communication function is enabled, the estimated battery life will be about 7
months.
Battery Life Warning Display
When the battery power becomes low, a battery life warning mark will appear in
the Unit's LCD display.
13
Data Protection Function
If the battery power becomes even lower after a battery life warning mark
appears in the Unit's LCD display, the Unit will automatically go into sleep mode
in order to protect the data. In sleep mode all normal operations will stop and it
will become impossible to switch on the power of the Unit.
I M P O R TA N T :
If the Unit remains in sleep mode for about 2 months without a change of battery, or if the battery
is left out of the Unit for more than 2 minutes, all recorded data will be lost.
Infrared Communication Function
By placing the infrared port of the TR-57DCi and the TR-71Ui / 72Ui Unit face-toface, it is possible to download the recorded data from the TR-71Ui / 72Ui and
store the downloaded data.
Current Readings Monitoring Display
With our exclusive software, you cannot only monitor the current measurements
at a set interval, but can view those measurements in a continually changing
graph. You can simultaneously display the current measurements and
corresponding graphs for the number of Units you have connected.
15 Recording Intervals
Select from 15 recording intervals (from 1 second to 1 hour) to meet your needs.
Also, there are two types of recording modes to choose from.
One-Time: Upon reaching the storage capacity of 8,000 readings, "FULL" will
appear on the LCD display and recording will automatically stop.
Endless: Upon reaching the storage capacity of 8,000 readings, the oldest
data will be overwritten and recording will continue.
Adjustment Function
By entering the adjustment values beforehand, it is possible to view and record
the adjusted measurement values. There are two methods of adjustment:
adjusting by one point or adjusting by two points. Adjustment for differences will
be based upon the following simple equation Y=aX+b. (X equals the measured
value and Y equals the value after adjustment.)
*If you remove a sensor that was connected when adjustment was carried out and
then connect a different sensor, make sure to make new adjustment settings to reflect
the actual situation.
14
Selecting a Method for Downloading Data
Via USB Cable
Connect a TR-71Ui / 72Ui Unit directly to your computer with a USB
cable to download recorded data.
Via Data Collector TR-57DCi (sold separately)
Use the infrared communication function in the TR-57DCi to collect
recorded data from a TR-71Ui / 72Ui Unit. The collected data can then
be downloaded to your computer by connecting the TR-57DCi to a PC
with a USB cable.
Getting Ready and Downloading Data
1.Using the software "T&D Recorder for Windows" which comes with the Data Collector
TR-57DCi, make necessary settings for infrared communication function in the
TR-71Ui / 72Ui and set to "Permit". For more details, see the User’s Manual that
comes with the software.
2.With the Unit and the TR-57DCi face-to-face and with about 10 to 20 cm of space
between them, download the recorded data from the TR-71Ui / 72Ui to the TR-57DCi.
(within 15 degrees from side to side and top to bottom) For detailed information about
the operation and functions of the Data Collector TR-57DCi, see the TR-57DCi User’s
Manual.
I M P O R TA N T :
Infrared communication is a function limited to the downloading of recorded data. Other functions
such as making Unit settings cannot be carried out.
For downloading one TR-71Ui / 72Ui Unit at full storage capacity, it takes about 60 seconds.
15
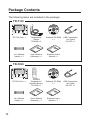
Package Contents
The following items are included in the package:
TR-71Ui
TR-71Ui Unit × 1
Temperature
Sensor
TR-0106 × 2
Software CD-ROM
×1
AA Alkaline
battery × 1
User’s Manual
(Warranty) × 1
Software User's
Manual × 1
TR-72Ui Unit × 1
Temperature /
Humidity Sensor
TR-3100 × 1
Software CD-ROM
×1
AA Alkaline
battery × 1
User’s Manual
(Warranty) × 1
Software User's
Manual × 1
USB Communication Cable
US-15C × 1
TR-72Ui
16
USB Communication Cable
US-15C × 1
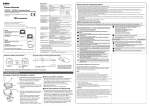
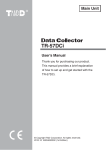
Appearance Diagram and Part Names
[FRONT]
Infrared Port
<DISPLAY>
Button
<INTERVAL>
Button
<REC/STOP>
Button
DISPLAY:
Pressing this button will change the LCD display mode. (See p.27)
INTERVAL: Pressing this button enables you to make or change recording
interval settings or view the currently set recording interval. (See
p.26)
REC/STOP: Pressing this button will start or stop recording. (See p.25)
[BACK]
Battery Cover
17
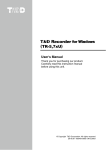
[LEFT SIDE]
Sensor Jack
(Channel 1)

Sensor Jack
(Channel 2)
Only for TR-71Ui
[RIGHT SIDE]
USB Communication
Cable Jack *1
Serial Communication
Cable Jack *2
<POWER> Button
*1:Enable communication by connecting the data logger to the computer with a USB
cable. Before communicating via USB it is necessary to install the USB device driver.
After installing, your computer will be able to detect and recognize any TR-71Ui /
72Ui that has been connected with a USB cable. For details about how to install the
USB device driver, see "Installing the USB Driver" in the Software "T&D Recorder for
Windows (TR-5,7xU)" User's Manual.
*2:The serial communication cable is optional.
18
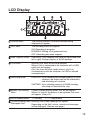
LCD Display
Channel Mark
The channel number of the measurement being
displayed will appear.
REC Mark
The recording status will appear.
ON: Recording in progress.
BLINKING: Waiting for programmed start.
OFF: Recording has been stopped.
Data Capacity Scale
After every 2,000 readings the scale will be marked from
left to right. Storage capacity is 8,000 readings.
COM Mark
Normally, this mark will not be displayed.
When a Unit is connected to the computer with a USB
cable, this will appear.
Also, this mark will blink rapidly when a Unit is in
communication with the computer via USB or Infrared
communication.
Recording Mode
ENDLESS: Upon reaching the storage capacity of 8,000
readings, the oldest data will be overwritten
and recording will continue.
ONETIME: Upon reaching capacity of 8,000 readings,
recording will automatically stop.
Battery Life Warning
Mark
If there is ample battery power, this will not appear.
When it is time for the battery to be replaced, this mark
will appear. (See p.22)
Unit of Measurement
%: Humidity
°C / °F: Temperature
Current Readings and Normally, the current readings will appear.
Messages Area
Depending on the Unit’s status, operational messages
will be displayed. (See the next page.)
19
Main Display Messages
The following are the main display messages that appear on the LCD
display.
FULL (Storage Capacity FULL)
Upon reaching storage capacity of 8,000 readings, "FULL" will appear on the
LCD display. When this message appears, recording has been stopped. (Only
when recording in ONETIME mode will this be displayed.)
Sensor Error
This will be displayed when a sensor has not been connected, has not been
completely inserted or the wire has been broken. Measurement and recording
will continue so battery power will be consumed.
SLP (Sleep Mode)
If the battery power becomes extremely low, this message will appear on the
LCD display. When this appears, recording has been stopped in order to save
the already recorded data. See "Changing the Battery" on page 22 and change
the battery.
Nothing Appears
If after going into sleep mode above, the battery is further left unchanged the
display will automatically shut off. If that occurs, all recorded data will be lost.
See "Changing the Battery" on page 22 and change the battery.
20
Installing the Battery
111Remove the battery cover form the back of the Unit.
222Insert one AA alkaline battery, making sure that the + and – are in the
correct direction.
Always use a new battery.
333Replace and close the battery cover.
21
Changing a Battery
I M P O R TA N T :
- - When using the TR-57DCi (Data Collector) to download recorded data via infrared
communication, while a battery life warning mark is on display, infrared communication may be
broken or may be impossible.
- - Besides the Unit’s LCD display, the battery level can be displayed on the computer screen via
the software if a Unit is connected to the computer with a USB communication cable.
- - If a Unit is left without a battery for some time, all data may be lost, so please work quickly when
changing the battery.
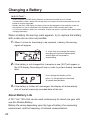
When a battery life warning mark appears, try to replace the battery
with a new one as soon as possible.
111When it is time for the battery to be replaced, a battery life warning
signal will appear.
*If, at this time you change the battery,
recording will continue uninterrupted
and all data will be saved for
downloading.
222If the battery is not changed but it remains in use, [SLP] will appear in
the LCD display. Recording will stop in order to protect already recorded
data.
*If you change the battery at this
point, it is still possible to download
all saved recorded data.
333If the battery is further left unchanged, the display will automatically
shut off and all previously recorded data will be lost.
About Battery Life
A TR-71Ui / 72Ui Unit can be used continuously for about one year with
one AA Alkaline Battery.
Battery life varies depending upon the type of battery, the measuring
environment, and the frequency of infrared communication.
22
Turning ON the Power
By holding in the <POWER> button at the left side, the Unit will turn
on.

<POWER>
Button
Turning OFF the Power
By holding in the <POWER> button, "OFF" will appear in the LCD
display and the Unit will turn off.
I M P O R TA N T :
- - During recording, the power cannot be turned off. Please stop recording first and then press the
<POWER> button to turn off the power.
- - Even if the power has been turned off, the recorded data will be saved. However, if the battery
power is totally lost, all data will be lost, so please download data as soon as possible to avoid
losing any necessary data.
23
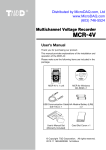
Connecting the Sensors
Connect the sensors to the sensor jacks on the TR-71Ui / 72Ui Unit.
TR-71Ui
-- If a temperature sensor is connected to only the Ch 2 jack, the internal
sensor will be used to measure for Ch 1.
-- To ensure a proper connection make sure that the sensor connector is
completely inserted.
I M P O R TA N T :
If a sensor extension cable is being used with the data logger connected by USB to your computer,
electromagnetic waves may cause large errors in measurements.
TR-72Ui
-- To ensure a proper connection make sure that the sensor connector is
completely inserted.
24
Starting Recording: <REC/STOP> Button
By pressing the <REC/STOP> button on the TR-71Ui / 72Ui Unit
you can start a recording session immediately.
*The Device Name, Channel Name, Recording Mode and all other recording condition
settings must be made first via the computer using the software.
Starting Recording
Pressing the <REC/STOP> button on the TR-71Ui / 72Ui Unit until the
REC mark appears will start a new recording session.
REC Mark lights up
I M P O R TA N T :
- - By starting a new recording session, all data currently saved in the Unit will be erased.
- - Even if the Unit is waiting for a programmed start, by pressing the <REC/STOP> button until the
REC mark appears, you can start a new recording session immediately.
Stopping Recording
You can stop a recording session by pressing the <REC/STOP> button
until the [REC] mark disappears from the LCD display. When it has
disappeared, recording has stopped.
REC Mark disappears
25
Setting Recording Interval:
<INTERVAL> Button
You can make or change recording interval settings from the
<INTERVAL> button on the front of the TR-71Ui / 72Ui Unit.
I M P O R TA N T :
During recording or while waiting for a programmed recording to start, you cannot make recording
interval settings.
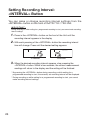
111Press in the <INTERVAL> button on the front of the Unit until the
recording interval appears in the display.
222With each pressing of the <INTERVAL> button the recording interval
time will change. Press until the desired setting appears.

15 seconds
15 minutes
333When the desired recording interval appears, stop pressing the
<INTERVAL> button. Within a few seconds, the current measurement
readings will return to the display and the setting will be finished.
*By pressing the <INTERVAL> button during recording or while waiting for a
programmed recording to start, the currently set recording interval will be displayed.
*During recording or while waiting for a programmed recording to start, you cannot
make recording interval settings.
26
Changing the LCD Display Mode:
<DISPLAY> Button
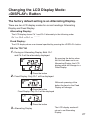
The factory default setting is an Alternating Display.
There are two LCD display modes for current readings: Alternating
Display and Fixed Display.
Alternating Display:
The LCD display shows Ch 1 and Ch 2 alternately in the following order:
Ch 1 >> Ch 2 >>Ch 1 >> . . . . . . .
Fixed Display:
The LCD display shows one channel specified by pressing the <DISPLAY> button.
EX: For TR-71Ui
111During an Alternating Display: Both Ch 1
and Ch 2 will be alternately displayed
By pressing the button when
the Unit has been set to an
Alternating Display, the LCD
display mode will change to a
Fixed Display.
Press the button
222Fixed Display: Only Ch 1 will be displayed
Press the button
Fixed Display: Only Ch 2 will be displayed
With each pressing of the
button the item for the Fixed
Display will change.
Press the button
333Alternating Display
The LCD display mode will
return to an Alternating
Display.
27
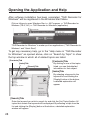
Opening the Application and Help
After software installation has been completed, "T&D Recorder for
Windows" will be registered in the Windows Start Menu.
Click as follows to open: Windows Start >> All Programs >> T&D Recorder for
Windows (TR-5,7xU) >> T&D Recorder for Windows (application)
"T&D Recorder for Windows" is made up of two applications. ("T&D Recorder for
Windows" and "Quick Start")
To get any necessary help, go to the "Help menu in "T&D Recorder
for Windows" as opened above, click on "Search by Topic" to show
the top window in which all of related topics are listed.
[Contents] Tab
[Index] Tab
[Search] Tab
[Contents] Tab
By clicking on one of the topics
listed, you can find detailed
information for that subject.
[Index] Tab
By selecting a keyword in the
keyword list and clicking the
[Display] button at the bottom,
a detailed explanation will
appear.
[Search] Tab
Enter the keyword you wish to search for and click the [List Topics] button. All
topics that contain the keyword will be displayed. By selecting a topic from the
list and clicking the [Display] button at the bottom, a detailed explanation
window will appear.
28
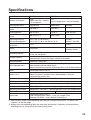
Specifications
Device Type
TR-71Ui
TR-72Ui
Number of Channels
2 Ch
(Select from Ch 1 internal
/ Ch 2 external)
2 Ch
(1ch for Temperature / 1ch for Humidity)
Measurement Items
Temperature
Temperature
Humidity
Internal Temperature
Sensor
-10 to 60°C
-10 to 60°C
-
Attached Sensor
-40 to 110°C
0 to 50°C
10 to 95%RH
Optional Temperature
Sensor
-60 to 155°C *1
-40 to 110°C
Measuring Accuracy
(with Attached Sensor)
Avg. ± 0.3°C (-20 to 80°C)
Avg. ± 0.5°C (-40 to -20 / 80 to 110°C)
Measurement / Display
Resolution
0.1°C
1%RH
Sensor
Thermistor
Macromolecular
Humidity Sensor
Recording Intervals
Select from 15 choices: 1, 2, 5, 10, 15, 20 and 30 sec. / 1, 2, 5, 10,
15, 20, 30 and 60 min.
Storage Capacity
8,000 readings (One reading is a set of data which includes
measurements for that unit type's number of channels.)
Recording Modes
ENDLESS / ONETIME
LCD Displayed Items
Measurements (Ch1 only, Ch2 only, alternating display),
Measurement and Recording Status,
Battery Life Warning, Amount of Recorded Data, Unit of Measurement
Power
AA Alkaline Battery LR6 × 1
Battery Life *2
About 1 year
(About 7 months if recorded data is downloaded via infrared
communication once a day)
±5%RH
(at 25°C / 50%RH)
Communication Interfaces USB / Serial (RS-232C) / Infrared Communication
USB Communication Time About 8 sec. (when downloading a Unit at full storage capacity)
Infrared Communication
IrPHY 1.2 low power
Dimensions / Weight
H55 × W78 × D18mm / About 62g (Including one AA battery)
Operating Environment
Temperature: -10 to 60°C / Humidity: 90%RH or less (no condensation)
Attached Sensor
TR-0106 × 2
Accessories
AA Alkaline Battery LR6 × 1
USB Communication Cable × 1 (US-15C ; length 1.5m)
Software (CD-ROM) / Users Manual (Warranty) × 1
TR-3100 × 1
*1:Measurement range varies depending upon the type of temperature sensor. For details see
"Options" on the next page.
*2:Battery life varies depending upon the measuring environment, frequency of communication,
recording interval, and quality of the battery being used.
29
Options
Temperature Sensor (for TR-71Ui)
Unit: mm
Fluoropolymer Coated Sensor TR-1106
Cable Length: 0.6m
Time to Thermal Constant:
In air: about 30 sec.
In water: about 4 sec.
Stainless Protection Sensor TR-1220
Cable Length: 2m
Time to Thermal Constant:
In air: about 36 sec.
In water: about 7 sec.
Stainless Protection Sensor TR-1320
Cable Length: 2m
Time to Thermal Constant:
In air: about 12 sec.
In water: about 2 sec.
Materials: Thermistor
Stainless pipe (SUS316)
Fluoropolymer Compaction Tube
Fluoropolymer-Coated Electrical Wire
Temperature Measurement Range: -60 to 155°C
Sensor Temperature Durability: -70 to 180°C
Water Resistance: IP67 (TR-1106 meets IP68)
Temperature Measuring Accuracy: Avg. ± 0.5°C (-40 to 80°C), Avg. ± 1.0°C (-60 to -40°C / 80 to
100°C), Avg. ± 2.0°C (100 to 155°C)
30
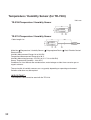
Temperature Sensor (for TR-71Ui / 72Ui)
Unit: mm
TR-0106 TPE Resin-Shielded Sensor
Cable Length : 0.6m
Time to Thermal Constant: In air: about
75 sec.
TR-0206 Screw-down Sensor
Cable Length : 0.6m
Time to Thermal Constant: In air: about
75 sec.
TR-0306 Stainless Protection Sensor
Cable Length : 0.6m
Time to Thermal Constant: In water:
about 18 sec.
TR-0406 Stainless Protection Sensor
Cable Length : 0.6m
Time to Thermal Constant: In water:
about 20 sec.
TR-0506 Stainless Protection Sensor
Cable Length : 0.6m
Time to Thermal Constant: In water:
about 20 sec.
TR-0706 Stainless Protection Sensor
Cable Length : 0.6m
Time to Thermal Constant: In water:
about 18 sec.
Materials: Thermistor
TPE resin
TPE resin-shielded wire
M3 Crimp Terminal
Compaction tube
Stainless pipe (SUS304)
Stainless pipe (SUS316)
Temperature Measurement Range: -40 to 110°C
Sensor Temperature Durability: -50 to 115°C
Water Resistance: Only the Stainless Pipe is Waterproof
Temperature Measuring Accuracy: Avg. ± 0.3°C (-20 to 80°C ), Avg. ± 0.5°C (-40 to 20°C / 80 to
100°C )
31
Temperature / Humidity Sensor (for TR-72Ui)
Unit: mm
TR-3100 Temperature / Humidity Sensor
TR-3110 Temperature / Humidity Sensor
Cable Length: 1m
Materials: Temperature / Humidity Sensor
Polypropylene Resin
Vinyl Chloride Coated
Electrical Wire
Humidity Measurement Range: 10 to 95%RH
Temperature Measurement Range: 0 to 50°C
Humidity Measuring Accuracy: ±5%RH (at 25 °C /10 to 50%RH)
Sensor Temperature Durability: -10 to 55°C
Conditions for Use: Without dew condensation, water leakage or effect from corrosive gas or
organic solvents.
The service life of humidity sensors can vary greatly depending on operating environment.
Periodic calibration may be required.
I M P O R TA N T :
The extension cable cannot be used with the TR-3110.
32
Sensor Extension Cable
Unit: mm
TR-1C30 Sensor Extension Cable (Temperature Sensor Only)
Cable Length: 3m
Materials:
Vinyl Coated Electrical Wire
I M P O R TA N T :
- - Only one extension cable per sensor. When using the extension cable there will be a +0.3°C at
normal temperature and at -50°C a gap of +0.5°C may occur.
- - If a sensor extension cable TR-1C30 is being used with the data logger connected by USB to
your computer, electromagnetic waves may cause large errors in measurements.
- - Do not use this extension cable with the temperature / humidity sensor.
TR-5C10 Sensor Extension Cable
(Temperature / Humidity Sensor TR-3100 Only)
Cable Length: 1m
Materials:
Vinyl Coated Electrical Wire
I M P O R TA N T :
- - The extension cable cannot be used with the temperature / humidity sensor TR-3110.
- - Only one cable per sensor.
33
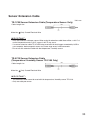
Serial Communication Cable (for TR-71Ui / 72Ui)
TR-07C Serial Communication Cable
Specialized Connector D-sub9pin for communication with PC
Cable Length: 1.5m
TR-4C10 Serial Communication Cable
For communication with TR-57C/RTR-57C
Cable Length: 1.0m
TR-6C10 Serial Communication Cable
For communication with TR-57DCi/57U and RTR-57U
Cable Length: 1.0m
34
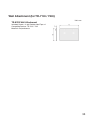
Wall Attachment (for TR-71Ui / 72Ui)
Unit: mm
TR-07K2 Wall Attachment
Included: Screw × 2 and Double-sided Tape × 1
Compatible Devices: TR-71Ui / 72Ui
Materials: Polycarbonate
35
For product information or questions contact us at:
817-1 Shimadachi, Matsumoto, Nagano, JAPAN 390-0852
Fax: +81-263-40-3152
E-mail: [email protected]
Website
http://www.tandd.com/
We have opened an English Website for your convenience. Here you can
find information about our company, news, products, upcoming events,
software and user’s manual downloads, as well as, other support. Please
stop by and see what we have to offer.
Thermo Recorder TR-71Ui / 72Ui User's Manual
Published by T&D Corporation (3rd Edition)
© Copyright T&D Corporation. All rights reserved.
This is printed on recycled paper.