1
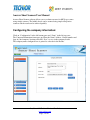
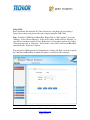
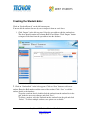
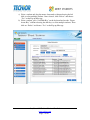
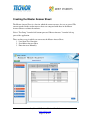
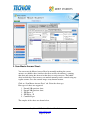
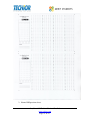
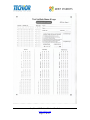
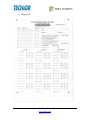
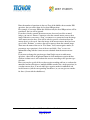
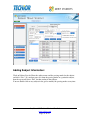
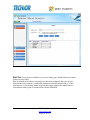
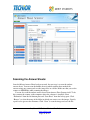
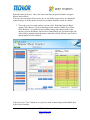
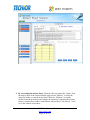
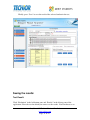
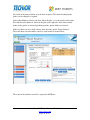
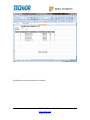
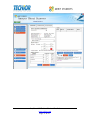
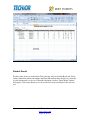
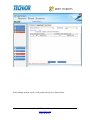
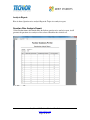
Answer Sheet Scanner
Version 5.1
User Manual
Confidential © Techior Solutions Pvt. Ltd.
www.techior.com
Page 1 of 44
INDEX
CONFIGURING THE COMPANY INFORMATION: .............................................................. 3
CONFIGURING THE SETUP: .................................................................................................... 4
CREATING THE STUDENT DATA: ......................................................................................... 6
BATCH MANAGEMENT: ........................................................................................................... 8
MESSAGE: .................................................................................................................................. 10
CREATING THE MASTER ANSWER SHEET: .................................................................... 11
1. Load from Test Generator: .................................................................................................................. 12
2. Scan Master Answer Sheet: ................................................................................................................. 13
3. Enter Answers Manually: ..................................................................................................................... 22
ADDING SUBJECT INFORMATION: .................................................................................... 23
SCANNING THE ANSWER SHEETS: .................................................................................... 25
EVALUATING THE ANSWER SHEETS: .............................................................................. 26
SEEING THE SCAN REPORTS: ............................................................................................. 30
SEEING THE RESULTS: .......................................................................................................... 33
Test Result: .............................................................................................................................................. 33
Student Result: ........................................................................................................................................ 39
Question Wise Analysis Report:............................................................................................................... 42
Topic wise analysis report: ...................................................................................................................... 43
Test Result Report: .................................................................................................................................. 44
Confidential © Techior Solutions Pvt. Ltd.
www.techior.com
Page 2 of 44
Answer Sheet Scanner User Manual
Answer Sheet Scanner software allows you to evaluate answers for MCQ type exams
using simple scanners. The bubble sheets can be scanned using simple inexpensive
scanners and the result can be achieved quickly.
Configuring the company information:
Click on “Configuration” in the left bottom pane and “Setup” in the left top pane.
The Company Information form opens up. Enter the Name, Address, Contact number and
logo of your company / institute and click “Save” to save to the company details.
The company name configured here is printed as a header in the Results.
Confidential © Techior Solutions Pvt. Ltd.
www.techior.com
Page 3 of 44
Configuring the Setup:
Click on “Configuration” in the left bottom pane and “Settings” in the left top pane.
The settings form opens up. Here SMS settings can be saved. You can choose to send
SMS using any one of the following 2 methods:
1. Bulk SMS Service
2. Using GSM
Bulk SMS Service:
Choose the “Server String” Option. Here you can configure the SMS server details along
with user-id and password which will be used to send SMS about fees reminders, test
marks, attendance to a selected group of students.
Confidential © Techior Solutions Pvt. Ltd.
www.techior.com
Page 4 of 44
Using GSM:
Please download and install the PC Suite Software for your phone on your desktop /
laptop. Now connect your phone with your computer using the USB Cable.
Note: To find the COM Port and Baud Rate, Right Click on “My Computer” and select
“Manage”. Select “Device Manager”. In the device listing, double click on “Modems” to
open the list of modems installed. Now “Right-click” on your phone modem (E.g. Nokia
/ Samsung) and click on “Properties”. Please make a note of the Com Port and Baud Rate
mentioned in the “Properties” window.
Now choose the GSM option from Configuration > Settings tab. Here you need to specify
the Com-Port and Baud Rate at which your phone is connected to the computer.
Confidential © Techior Solutions Pvt. Ltd.
www.techior.com
Page 5 of 44
Creating the Student data:
Click on “Student Records” on the left bottom pane.
You can add the student data one by one or import it from an excel sheet.
1. Click “Import” in the left top pane. Select the spreadsheet with the student data.
The sheet should contain two columns Roll No and Name. Click “Import” button
to import all the data from the spreadsheet into the database.
2. Click on “Student Info” in the left top pane. Click on “New” button to add a new
student. Enter the Roll number and the name of the student. Click “Save” to add the
student details to the database.
To update a student details, double-click the student from the student list in the
grid, make the necessary changes and click “Save”.
To delete a student, select the student from the student list in the grid and click
“Delete”. To delete multiple students, two options are available:
Confidential © Techior Solutions Pvt. Ltd.
www.techior.com
Page 6 of 44
a) Select a student and drag the mouse downwards without releasing the left
click to select multiple students. Once selected, click “Delete” and choose
“Yes” on the Pop-up Message.
b) Select a student, press “Left Shift Key” on the keyboard and use the “Down
Arrow Key” without releasing the shift key, to select multiple students. Then
click on “Delete” and choose “Yes” on the Pop-up Message.
Confidential © Techior Solutions Pvt. Ltd.
www.techior.com
Page 7 of 44
Batch Management:
You can group the students logically by adding them into a batch. While viewing the
results of a test, you can choose to view the result batch wise. In order to create a batch,
select “Student Records” on the left bottom pane and select “Batch” on the left top pane.
Click “New Batch”. Enter the name of a batch. The list of available students is displayed
at the bottom. Select the students which you want to add to this batch and press the “>>”
button to add the students to the batch. Click “Save” to save the batch.
To modify a batch, double-click on an existing batch from the list of batches in the grid.
Add/remove student(s) by shifting them from the “Available Students List” to “Students
in this Batch” using “>>” and “<<” buttons respectively. Then click on “Save” to save
the changes made to the batch.
To delete a batch, select a batch from the list of batches in the grid. Click “Delete Batch”
and select “OK” on the Pop-up Message.
To delete a batch along with its students, select a batch from the list of batches in the grid
and Click “Delete Batch and Students” and Select “OK” on the Pop-up Message.
Note: Use “Delete Batch with Students” with caution as this operation deletes the batch
as well as all the students in the batch permanently from the database.
Confidential © Techior Solutions Pvt. Ltd.
www.techior.com
Page 8 of 44
Confidential © Techior Solutions Pvt. Ltd.
www.techior.com
Page 9 of 44
Message:
This is used to send messages to a selected group of students.
You can choose to send SMS. For sending SMS you can choose a single student, the
group of students or all students in the list by ticking select all option to which the
message has to be sent.
Confidential © Techior Solutions Pvt. Ltd.
www.techior.com
Page 10 of 44
Creating the Master Answer Sheet:
The Master Answer Sheet is a sheet in which the correct answers of a test are stored. The
answers marked in the student answer sheets are compared with those in the Master
Answer Sheet to evaluate the students.
Select “Test Setup” from the left bottom pane and “Master Answers” from the left top
pane of the application.
There are three ways in which you can create the Master Answer Sheet:
1. Load from Test Generator
2. Scan Master Answer Sheet
3. Enter Answers Manually
Confidential © Techior Solutions Pvt. Ltd.
www.techior.com
Page 11 of 44
1. Load from Test Generator:
If you are already using the Test Generator product from Techior Solutions Pvt
Ltd and you have created the test using Test Generator, then the Master Answer
Sheet can be created directly from the Test Generator database as the questions in
the test and the correct answers are already available in Test Generator database.
Simply click on “Load from Test Generator” tab. Select sheet format from
dropdown ,by using the “Browse” button, select the Test Generator mdb file.
Path:(C:\TestGenerator\db\MeritStudents.mdb)
Then use the drop down to select the test for which the Master Answer Sheet is to
be prepared.
Enter a test name in the “Test Name” field. This is the name used for the test in
the Answer Sheet Scanner software. Enter negative marks (in percentage, if any),
date of the test and click “Save” to import the correct answers from the Test
Generator database.
Confidential © Techior Solutions Pvt. Ltd.
www.techior.com
Page 12 of 44
2. Scan Master Answer Sheet:
You can create the Master Answer Sheet by manually marking the correct
answers on a bubble sheet (similar to the sheet used by the students), scanning
that sheet and storing the answers in that sheet as correct answers. The bubble
sheet in which the correct answers are marked manually can be scanned using any
regular scanner. Save the scanned image at any known location.
Click on “Scan Master Answer Sheet” tab. Select the sheet type.
Four types of sheets are supported:
1. Normal 100 questions sheet.
2. Normal 200 questions sheet.
3. JEE Paper - I
4. JEE Paper – II
5. Combine Paper
The samples of the sheets are shown below.
Confidential © Techior Solutions Pvt. Ltd.
www.techior.com
Page 13 of 44
1. Normal 100 questions sheet.
Confidential © Techior Solutions Pvt. Ltd.
www.techior.com
Page 14 of 44
2. Normal 200 questions sheet.
Confidential © Techior Solutions Pvt. Ltd.
www.techior.com
Page 15 of 44
3. JEE paper-I
Confidential © Techior Solutions Pvt. Ltd.
www.techior.com
Page 16 of 44
Confidential © Techior Solutions Pvt. Ltd.
www.techior.com
Page 17 of 44
4. JEE paper-II
Confidential © Techior Solutions Pvt. Ltd.
www.techior.com
Page 18 of 44
5. Combined Paper
Confidential © Techior Solutions Pvt. Ltd.
www.techior.com
Page 19 of 44
Enter the number of questions in the test. Even if the bubble sheet contains 200
questions, the test can be taken for less than 200 questions.
For example, if you enter 100 in this field then only the first 100 questions will be
considered, the rest will be ignored.
If you have already scanned the master answer sheet and saved the scanned
image, you can use “Browse” button to select the scanned master answer sheet
image. Otherwise you can use “Scan” to connect to a scanner and scan the image
of the master answer sheet. You will be asked to provide a location where the
master sheet is to be saved. Once the image of the master answer sheet has been
saved, click “Evaluate” to retrieve the correct answers from the scanned image.
Then enter the name of the test in “Test Name” field, enter negative marks (in
percentage or per questions), date of the test and click “Save” to save test
information along with the correct answers obtained from the master answer
sheet.
If you want to change the question type from Single correst to mulicorrect
questions , then click on dropdown button & select multicorrect option & then
click on evaluate now it will evaluate the answers according to the question type
selection .
Here you can also specify if the test has negative marking and how to evaluate the
unmarked and invalid answers (multiple bubbles marked for a single questions) in
a student answer sheet. You can either give negative marks for unmarked and
invalid answers (tick the corresponding checkboxes) or you can give zero marks
for these (do not tick the checkboxes).
Confidential © Techior Solutions Pvt. Ltd.
www.techior.com
Page 20 of 44
Confidential © Techior Solutions Pvt. Ltd.
www.techior.com
Page 21 of 44
3. Enter Answers Manually:
The Master Answer Sheet can also be created by manually entering the correct
answer for each question manually directly in the Answer Sheet Scanner.
Select sheet format (Normal100/200 questions)
Tick on “Enter Answers Manually” checkbox.
Enter the total number of questions in the test and click on “Set”.
A grid appears on the right side of the form with the given number of questions,
correct answer and marks for each question.
Enter the Correct Answer option for each question in the grid.
Then enter the name of the test in “Test Name” field, enter negative marks (in
percentage or per questions), date of the test and click “Save” to save the master
answer sheet.
Here you can also specify if the test has negative marking and how to evaluate the
unmarked and invalid answers (multiple bubbles marked for a single questions) in
a student answer sheet. You can either give negative marks for unmarked and
invalid answers (tick the corresponding checkboxes) or you can give zero marks
for these (do not tick the checkboxes).
Confidential © Techior Solutions Pvt. Ltd.
www.techior.com
Page 22 of 44
Adding Subject Information:
Click on Subject List tab. Enter the subject name and the passing marks for the subject
and click “Save”. If a student scores less than the passing marks in a particular subject,
then the report will show “Fail” for that student in that subject.
You can double-click on any subject in the grid to modify the passing marks at any time.
Confidential © Techior Solutions Pvt. Ltd.
www.techior.com
Page 23 of 44
Edit Test: If you want to edit the test, go to test listing page ,double click on test name
of the test to be edited.
Here by mistake if the answer is wrong & test has been conducted, then you can give
bonus marks to the students ( whether the student has attended the question(s) or not).
Once the test is edit & bonus marks are given then again evaluate the student answer
sheet. Bonus marks given to student will be shown as BONUS.
Confidential © Techior Solutions Pvt. Ltd.
www.techior.com
Page 24 of 44
Scanning the Answer Sheets:
Once the Master Answer Sheet has been created, the next step is to scan the student
answer sheets. You can scan the bubble sheets in which students have marked the
answers using any scanner and save the image files in a folder. Make sure that you set the
scanner to 100/200 dpi while scanning the images.
You can also scan the student answer sheets from Answer Sheet Scanner itself. To do
this, connect the scanner to the computer where the software is installed. Select
“Evaluation” from the left bottom pane and “Scan Sheet” from the left top pane. Click
“Browse” to select the name of the folder in which you want to save the images. Specify
a prefix to be given to the filenames. Click “Scan” to scan the image and save the file.
Confidential © Techior Solutions Pvt. Ltd.
www.techior.com
Page 25 of 44
The student answer sheets will be stored using the name <prefix>_0001, <prefix>_002
and so on. This is an easy way to scan multiple answer sheets quickly.
Evaluating the Answer Sheets:
After the answer sheets have been scanned, the next step is to read the answer options
from the scanned sheets and compare them against the options marked in the master
answer sheet.
Select “Evaluation” from the left bottom pane and “Evaluate Answers” from the left top
pane.
Confidential © Techior Solutions Pvt. Ltd.
www.techior.com
Page 26 of 44
Select the name of the test – this is the same name that you provided while saving the
Master Answer Sheet.
You can scan each answer sheet one by one or scan all the answer sheets in a batch (the
scanned images of all the answer sheets to be evaluated should be stored in a folder).
1. To see the score of a single student, you can select “Individual Answer Sheet”
option. Click “Browse” to locate the image of the student’s bubble sheet. Then
click “Evaluate” to read the answers from the image and compare them to the
answers given in the Master Answer Sheet. Immediately, the grid on the right side
of the form is populated with the answers from the selected student’s answer sheet
and the marks are also allocated.
You can use the “View” button to see a preview of the scanned image of the bubble sheet
of the selected student.
Confidential © Techior Solutions Pvt. Ltd.
www.techior.com
Page 27 of 44
In evaluation of student’s answer sheet few possible evaluations are possible which are
mentioned as follows:
Confidential © Techior Solutions Pvt. Ltd.
www.techior.com
Page 28 of 44
Question Type
Single correct
Multiple correct
Matrix type
questions
Answer in Master
sheet
A
A
A/C
A/C
A/C
A,B
A,B
A,B/B,C
A,B/B,C
A,B/B,C
A-P,B-Q,C-R,D-S
A-P,B-Q,C-R,D-S
Student Answer
Correct/ Incorrect
A
B or C or D
Either A or C
Both A& C
B,D
A,B
A or B
A or B or C or D
A,B or B,C
A,D or A,C or C,D or B,D
A-P,B-Q,C-R,D-S
A-S,B-Q,C-R,D-A
Correct
Incorrect
Correct
Incorrect
Incorrect
Correct
Incorrect
Incorrect
Correct
Incorrect
Correct( Full marks)
Partial marks
2. To evaluate the answer sheets of a complete batch, you can select “Batch process
Answer Sheets” option. Click “Browse” to locate the folder in which the bubble sheet
images of the batch have been stored. Then click “Evaluate” to read the answers from the
images in the folder one by one and compare the answers in each scanned image to those
given in the Master Answer Sheet.
Confidential © Techior Solutions Pvt. Ltd.
www.techior.com
Page 29 of 44
Seeing the scan reports:
Sometimes there can be errors while scanning the bubble sheets, e.g. the sheet was placed
incorrectly in a scanner at a slanting angle, the roll no read from the sheet was not found
in the database, or the roll no was not entered at all in the sheet.
Confidential © Techior Solutions Pvt. Ltd.
www.techior.com
Page 30 of 44
In such cases, the Answer Sheet Scanner will be unable to read the correct answers from
the scanned image and hence it fails to evaluate the sheet. The number of erroneous
sheets is shown in the Results summary.
Select “Evaluation” from the left bottom pane and “Exception Reports” from the left top
pane to see the Test Scan Reports. Select the test in which erroneous sheets have been
found. This gives the list of students whose sheets have not been scanned properly. Select
the students one by one using the checkbox against the name of the student. You can
correct the erroneous sheet using any one of the following two methods:
1. By entering the answers manually: Select the “Enter answers manually” option.
Enter the Roll number of the student manually and then enter the answer options
marked by the student for each question manually in the grid which is provided
below. Once you have entered all the answer options, click “Save” to save the
options marked.
Confidential © Techior Solutions Pvt. Ltd.
www.techior.com
Page 31 of 44
2. By re-scanning the answer sheet: Select the “Re-scan image file” option. Scan
the answer sheet of the selected student again and use “Browse” to select the
image file of the re-scanned answer sheet. Then use “Evaluate” to read the
answers from the new image and evaluate the student by comparing the answers
in the re-scanned sheet to those in the Master Answer Sheet. You can use “View”
to see the scanned answersheet.
Confidential © Techior Solutions Pvt. Ltd.
www.techior.com
Page 32 of 44
Finally, press “Save” to save the result of the selected student in the test.
Seeing the results:
Test Result:
Click “Evaluation” in the left bottom pane and “Results” in the left top pane of the
application. Select the test for which you want to see the results. You can choose to see
Confidential © Techior Solutions Pvt. Ltd.
www.techior.com
Page 33 of 44
the results in the form of marks or in the form of grades. The marks breakup for the
grades can be changed as required.
Select either Marks or Grades and click “Show Results” to see the results of the batch.
The students in the batch are shown in the grid on the right side of the form, and the
marks or the grades are shown depending upon the option which was selected.
If the test taken was for a single subject, then select the option “Single Subject”.
The result shows the total marks scored by each student as shown below.
The result of the students can also be exported to MS Excel.
Confidential © Techior Solutions Pvt. Ltd.
www.techior.com
Page 34 of 44
Detailed report can be generated for a student.
Confidential © Techior Solutions Pvt. Ltd.
www.techior.com
Page 35 of 44
If the test taken was for multiple subjects, then select the option “Answer Sheet has
Multiple Subject”. You will then need to select the range of questions for each subject.
Then click on “Show Results” to see the result.
Confidential © Techior Solutions Pvt. Ltd.
www.techior.com
Page 36 of 44
Confidential © Techior Solutions Pvt. Ltd.
www.techior.com
Page 37 of 44
The result shows the marks scored by each student per subject as well as the total marks
scored by each student. The students are arranged as per rank. The student with highest
marks gets the first rank and is shown on top of the list.
A summary of the test results is also shown. This includes the total number of Answer
sheets which were scanned, the error in scanning (if any), the number of sheets which
were evaluated, the total marks in the test, the maximum marks scored and average marks
scored in the test. This summary provides a complete analysis of the test scores at a
glance.
The test results can be exported to an excel spreadsheet using “Export to MS Excel” or
“Export test result” button. The result can also be printed using the “Print” button.
Confidential © Techior Solutions Pvt. Ltd.
www.techior.com
Page 38 of 44
Student Result:
For the results of the test loaded from Test generator, click on Student Result tab. Select
student either from admission number dropdown OR student name drop down, select the
test for which result is to be seen. When the checkbox is ticked, “Show Result” button
will appear. Click on the button to see the result of the selected student for the selected
test.
Confidential © Techior Solutions Pvt. Ltd.
www.techior.com
Page 39 of 44
After clicking on show report, it will produce the report as shown below:
Confidential © Techior Solutions Pvt. Ltd.
www.techior.com
Page 40 of 44
Confidential © Techior Solutions Pvt. Ltd.
www.techior.com
Page 41 of 44
Analysis Report:
Here it shows Question wise analysis Report & Topic wise analysis report.
Question Wise Analysis Report:
Select Student name &/or batch name & click on question wise analysis report, it will
generate the question wise analysis of the selected batch for the selected test.
Confidential © Techior Solutions Pvt. Ltd.
www.techior.com
Page 42 of 44
Topic wise analysis report:
Select Student name &/or batch name & click on Topic wise analysis report, it will
generate the Topic wise analysis of the selected batch for the selected test.
Confidential © Techior Solutions Pvt. Ltd.
www.techior.com
Page 43 of 44
Test Result Report:
In this report the total number of questions ,number of questions attempted by the
students, negative marks & final marks & grand total of the marks ( if the test is of
multiple subjects) per subjects can be seen.
Confidential © Techior Solutions Pvt. Ltd.
www.techior.com
Page 44 of 44


![2010 [FACILITATOR]](http://vs1.manualzilla.com/store/data/005655528_1-cab0d059d42c2f5dfa4b2de0f050c49f-150x150.png)