1
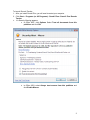
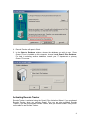
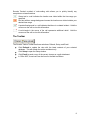
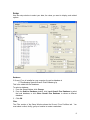
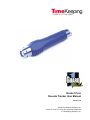
GUARD1 PLUS
Rounds Tracker User Manual
Version 2.8
© 2005 TimeKeeping Systems, Inc.
GUARD1 PLUS and THE PIPE are registered trademarks
of TimeKeeping Systems, Inc.
Overview
Rounds Tracker is a module of GUARD1 PLUS. Using data from any GUARD1 PLUS
database, backup or archive, Rounds Tracker displays your rounds information in
Microsoft Excel. Rounds Tracker creates five different views, which you can print, save,
or e-mail. From these views, you can determine whether all locations have been visited
at the required frequency.
Minimum System Requirements
Confirm that your computer meets these minimum system requirements for Guard1 Plus
version 2.8:
2.8 GHz processor
1 GB of RAM
1.5 GB of hard drive space
CD-ROM or DVD drive is required for installation only
Supported Operating Systems:
o Microsoft XP with Service Pack 3 (32 bit only)
o Microsoft Vista with Service Pack 2 (Home Basic /Home Premium
/Business/Ultimate) (32 and 64 bit)
o Microsoft Windows 7 (Home Premium/Professional/Ultimate) (32 and 64
bit)
Rounds Tracker reports can be emailed. For email support, an email client such
as Microsoft Outlook must be installed and configured prior to use.
Minimum display settings of 256 colors at a resolution of 800x600 pixels. For
best results, your display should be set to 32-bit color at a resolution of 1024x768
pixels.
Rounds Tracker requires Excel 2000 or later with macro code enabled.
Installing Rounds Tracker
Beginning with Guard1 Plus version 2.8, Rounds Tracker is automatically installed with
Guard1 Plus. Rounds Tracker can be used during Guard1 Plus’ sixty day trial period. If
you purchased Rounds Tracker, it will be activated when you activate Guard1 Plus. If
you did not purchase Rounds Tracker, you will not be able to use Rounds Tracker after
you activate Guard1 Plus.
You should set up your Guard1 Plus buttons and Facilities before using Rounds Tracker.
Rounds Tracker requires at least one Client, Facility or Group.
2
To launch Rounds Tracker:
1. After you install Guard1 Plus, you will need to restart your computer.
2. Click Start > Programs (or All Programs)> Guard1 Plus> Guard1 Plus Rounds
Tracker.
3. If a Security Warning appears:
a. In Office 2007, click Options. Select Trust all documents from this
publisher and click OK.
b. In Office 2003, select Always trust macros from this publisher and
click Enable Macros.
3
4. Rounds Tracker will open in Excel.
5. In the Select a Database window, choose the database you wish to use. Since
GUARD1 PLUS is installed on this computer, choose Local Guard1 Plus Database.
For help in selecting another database, consult your IT department or primary
GUARD1 PLUS user.
Activating Rounds Tracker
Rounds Tracker is activated using the Guard1 Plus Activation Wizard. If you purchased
Rounds Tracker, when you activate Guard1 Plus you are also activating Rounds
Tracker. If you did not purchase Rounds Tracker, after you activate Guard1 Plus you will
not be able to use Rounds Tracker.
4
If you purchased Rounds Tracker after you activated Guard1 Plus, you need to run the
Guard1 Plus Activate Software Wizard again.
To start the Guard1 Plus Activation Wizard:
1. Open Guard1 Plus.
2. Click Help and then click Activate Software Wizard.
3. The Guard1 Plus Activation Wizard will always attempt to process your activation
over the Internet.
4. If the Internet activation is successful, you will be able to exit from this wizard and
begin to use Rounds Tracker immediately.
5. If the Internet activation is not successful, you will be able to choose an alternate
method of activation: fax, email or phone.
6. If you have any questions about how to activate Rounds Tracker, you can click Help
or contact technical support at [email protected] or at (216) 595-0890.
5
About Rounds Tracker
Views
Rounds Tracker offers five ways to view your data.
The Quick View displays each visit with a green or red marker, so you can quickly
identify any exceptions.
The Time Between view shows the number of minutes between reads.
6
The Time view shows the time that each location button was read.
The Rounds view shows the number of reads for each hour of the day.
The Details view shows each location read and any related incidents.
7
Rounds Tracker's method of color-coding cells allows you to quickly identify any
exceptions or missed locations.
Green text in a cell indicates the location was visited within the time range you
specified.
Red text with an orange background means the location was visited outside your
desired time range.
A spotted background in a cell indicates that there is a related incident. Hold the
cursor over the cell to view this information.
A red triangle in the corner of the cell represents additional detail. Hold the
cursor over the cell to view this information.
The Toolbar
The Rounds Tracker Toolbar has three selections: Refresh, Setup, and Email.
Click Refresh to update the view with the latest contents of your selected
database. This will refresh the active worksheet only.
Click Setup to open the Setup window.
Click E-mail to send a copy of the current view as an e-mail attachment.
In Office 2007, these icons can be found in the Add-Ins Ribbon.
8
Setup
Use the setup window to select your data, the views you want to display, and related
options.
Database
If GUARD1 PLUS is installed on your computer, the active database is
C:\TimeKeeping Systems\Guard1 Plus\G1Master.g1p.
This is the called the local database.
To select a database:
1. From the Setup Window, click Change.
2. From the Select a Database window, click Local Guard1 Plus Database to select
the local database, or click Other Guard1 Plus Database to choose a different
database.
3. Click OK.
Filter
The Filter section of the Setup Window shows the GUARD1 PLUS Facilities tab. You
must select a client, facility, group or location to create a worksheet.
9
If the Facilities tab is changed in GUARD1 PLUS, click Refresh to update the list.
Worksheets
The Worksheets selection determines which views Rounds Tracker will display. Each
view is created in a separate Excel worksheet.
Date and Time
There are three ways to define the period of time displayed:
Synchronized Mode displays a period of time including the present.
o To refresh the data in the current view automatically, click Automatically
Refresh and select a time interval. A time interval less than 15 minutes is
not recommended.
Shift Mode includes the data recorded from the time entered in the Since field.
Specific Date Range includes the data defined by related date and time boxes.
Defaults
You can select values for the Minimum and Maximum Time Interval between visits to
a location. These values apply to all views except Rounds view. If the time between
location reads is less than the minimum or greater than the maximum, an exception is
noted on the worksheet.
The Default Rounds Value applies only to Rounds view. It specifies how many times
per hour each location should be read. If the number of visits is less than the default
rounds value, an exception is indicated in the Rounds view.
Options
24-Hour Time – when selected, times are displayed in 24-hour format.
Show Seconds – when selected, seconds are displayed in views and incident detail.
10
Auto-Load Spreadsheet – when selected, Rounds Tracker loads the most recently
used database on startup, skipping the Welcome Screen.
Show Incidents – when selected, incidents are included.
Using Rounds Tracker
About Rounds Tracker Operation
Rounds Tracker is a computation-intensive application. When preparing or refreshing
the display, it will require most of your computer's processing power. Therefore, it is
important to limit the amount of data that Rounds Tracker must process. To reduce the
time Rounds Tracker requires to prepare or refresh the display, we recommend one or
all of the following:
Limit the choice of client, facility, group to the data you really need. For example,
don't select a whole facility if there is a group with fewer locations that contains
the locations you need. The more locations in your selection, the longer Rounds
Tracker requires to process your data.
Limit the date and time range. Select a time period of twenty-four hours or less.
Select only the views you need. The more views you select, the longer it takes
for Rounds Tracker to process your data.
Refresh only when necessary. If you use the auto-refresh function, select a time
value of fifteen minutes or higher.
To Display Data
1.
2.
3.
4.
5.
6.
7.
8.
From the toolbar, click Setup.
Select a database file.
Select the client, facility, group or location to include.
Select the views you require.
Select a Date and Time option and enter any required details.
Select any desired options from Defaults and Options tabs.
Click OK.
An hourglass appears on the screen as Rounds Tracker prepares the display.
Printing
Printing a worksheet is done using the Excel print functions. Before printing, you must
define the Print Area for each worksheet. The Print Area defines what part of the
worksheet will be printed.
To Define the Print Area:
1. On the View menu, click Page Break Preview.
2. Select the area you want to print by clicking and dragging over the specific cells.
3. On the File menu (or Page Layout in Office 2007), click Print Area, and then click
Set Print Area.
4. When you save the document, your print area selection will also be saved.
11
To Clear the Print Area:
On the File menu, click Print Area, and then click Clear Print Area.
To Print the Worksheet:
On the File menu, click Print.
E-mailing Worksheets
Outlook is required to email a worksheet directly from Rounds Tracker. Rounds
Tracker's E-mail function creates an Excel Workbook (.xls) file of the active worksheet
and attaches the file to an Outlook email message.
To E-Mail with Outlook
1. Rounds Tracker will send only the active worksheet via e-mail. Select the worksheet
you wish to e-mail.
2. From the Toolbar, click Email. The Save As appears.
3. Type a file name and select the Microsoft Office Excel Workbook (*.xls) file type.
Select the file's folder location.
4. Click Save. An e-mail message is created with the .xls file attached.
5. Complete the email by adding the recipients and any additional message.
6. Click Send.
To E-Mail with another E-Mail Client
If you do not have Outlook, you must first save the workbook in Microsoft Office Excel
Workbook format (.xls), and then send it as an e-mail attachment.
1. From the Excel Menu, click File (or the Office Button in Office 2007).
2. Click Save As. The Save As window appears.
3. Type a file name and select the Microsoft Office Excel Workbook (*.xls) file type.
Select the file's folder location.
4. Click Save to create the file.
5. Follow the instructions for your e-mail program to create a new message and attach
the file you saved.
Troubleshooting
The Toolbar is not visible
To display the Toolbar:
1. From the Excel menu:
In Office 2003, click View, then Toolbars and Guard1 Plus.
In Office 2007, click the Add-Ins Ribbon
2. You can select any of these commands: Refresh, Setup or Email.
12
The Setup Window does not appear
If the Setup Window does not appear when you click Setup, the database file that
Rounds Tracker is trying to open may be corrupted. Contact TimeKeeping Systems
technical support for assistance.
There is no data in the worksheet
If no data is displayed:
Confirm that the download data exists by viewing the downloads in GUARD1
PLUS.
Check that the time and date range are correct.
Computer is sluggish or does not respond
Rounds Tracker is a computation-intensive application and will use most of your CPU
cycles while preparing or refreshing the display. These steps may help:
Try the suggestions under About Rounds Tracker Operation, above.
Move Rounds Tracker and GUARD1 PLUS to a more powerful computer.
Promote the Excel process priority in the Windows Task Manager. Consult your
IT department if you are unfamiliar with the Task Manager or setting priorities.
13