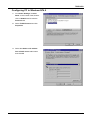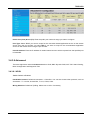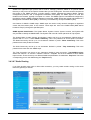
1
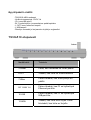
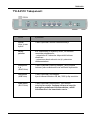
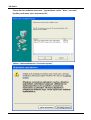
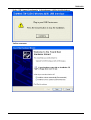
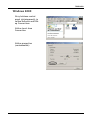
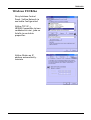
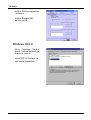
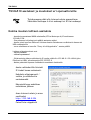
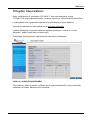
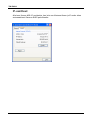
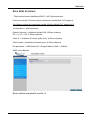
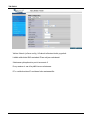
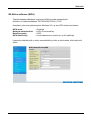
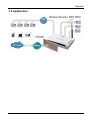
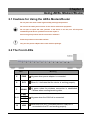
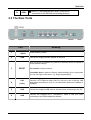
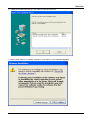
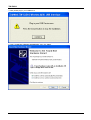
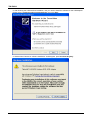
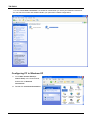
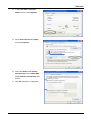
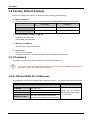
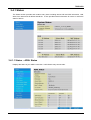
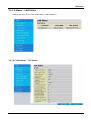
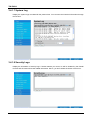
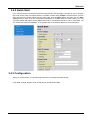
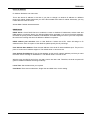
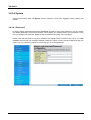
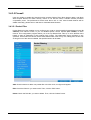
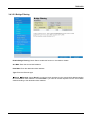
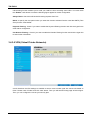
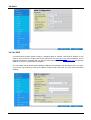
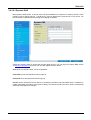
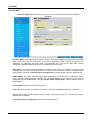
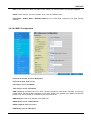
TeleWell
TW-EA510
ADSL-modeemi &
palomuuri &
WLAN-tukiasema (802.11b+g)
Ohjekirja
English user’s Manual
from page 32
CE
TW-EA510
Elisa ADSL Premium .....................................................................26
IP-osoitteet ..............................................................................25
Kuinka muutan laitteen asetuksia ....................................................21
Laitteen etupaneeli...................................................................... 1
Laitteen käyttöönotto ................................................................... 5
Laitteen takapaneeli .................................................................... 3
Langaton yhteys eli WLAN .............................................................28
Myyntipaketin sisältö .................................................................... 1
TCP/IP-verkkoasetukset ...............................................................13
Tuetut protokollat ....................................................................... 4
TW-EA510 oletusasetukset.............................................................. 4
TW-EA510 asetukset ja muutokset eri operaattoreille ............................21
USB-ajureiden asennus .................................................................. 6
USB-portti ................................................................................. 5
Verkkorajapinnat......................................................................... 4
Yhteyden tilan tarkistus ...............................................................24
Yleistä operaattoreiden asetuksista..................................................22
2
Myyntipaketin sisältö
- TW-EA510 ADSL-modeemi
- Verkkovirtamuuntaja 12V DC 1A
- CD, jossa USB-ajurit
- RJ-11 puhelinjohto ja suomalainen puhelinpistoke
- 1 CAT-5 suora ethernet-kaapeli
- 1 USB-kaapeli
- Pikaohje suomeksi ja laajennettu ohjekirja englanniksi
TW-EA510 etupaneeli
Merkkivalot
Toiminto
5 Power
Palaa, kun laitteessa on virrat päällä
6 SYS
Vilkkuu, kun laite on toimintavalmis
7 Wlan
Palaa vihreänä, kun Wlan-yhteys on
päällä
8-11 LAN 1-4
Palaa vihreänä, kun PC on kytkettynä
Ethernet-porttiin
12 USB
Palaa vihreänä, kun PC on kytkettynä
USB-porttiin.
13 ADSL
Vilkkuu, kun laite etsii linjaa. Palaa
kiinteästi, kun laite on linjalla
TW-EA510
TW-EA510 Takapaneeli
Portti
Kytkennät
Power
Virta ja sen
kytkin
Tähän kytketään laitteen sähkömuuntaja
Resetpainike
Kun laitteeseen on kytketty virrat, voi laitteen
resetoida painikkeesta:
- painettuna 0-3 sekuntia: käynnistää laitteen
uudelleen
- painettuna kuusi sekuntia tai yli: palauttaa
tehdasasetukset
LAN-portit
1-4
(RJ45-liitin)
Tähän kytketään Ethernet-kaapeli, joka yhdistää
laitteen joko verkkokortille tai erilliselle kytkimelle.
USB-portti
(USB-liitin)
Tähän kytketään USB-kaapeli.
Ajurit tukevat Windows 98, Me, 2000 ja Xp-versioita.
LINE-portti
(RJ11-liitin)
Tähän kytketään puhelinjohto, joka menee
puhelinpistorasiaan. Samassa rasiassa ei saa olla
analogisen puhelimen häiriösuodatinta, mikäli
häiriösuodin ei ole haaroitettu versio.
2
TW-EA510
Network Address Translation (NAT): toimii sovellusten yhdyskäytävänä webselaimelle, ICQ-, FTP-, Telnet-, E-mail-, News-, Ping- ja muille ohjelmille sekä suojaa
sisäverkkoa ulkoverkon käyttäjiltä.
Domain Name System (DNS) relay: nimipalvelin toiminto, jossa laite toimii
nimipalvelimena sisäverkon laitteille ulkoverkkoon nähden.
PPPoE: toimii PPPoE-asiakkaana ja mahdollistaa yhden IP-yhteyden jakamisen PPPoEpalveluissa.
Virtual Server: määritellään haluttuja palveluita avoimeksi Internetiin päin, vaikka
NAT-palvelu olisi käytössä. DMZ tuo täysin avoimen yhteyden halutulta sisäverkon IPosoitteelta Internettiin, vaikka NAT-palvelu olisi käytössä..
Bridge Filtering: pakettisuodatus perustuen MAC-osoitteisiin.
Dynamic Host Control Protocol (DHCP) client and server: DHCP palvelu- ja
asiakasohjelmisto. Mahdollistaa IP-osoitteen hakemisen ADSL-operaattorilta ja sen
jakamisen DHCP- ja NAT-toiminnolla sisäverkkoon.
WWW-hallinta: yksinkertainen www-hallintaohjelmisto
3
TW-EA510
Tuetut protokollat
RFC 1483 Bridge ja Routed (nykyisin RFC 2684)
RFC 1577 (nykyisin 2225)
RFC 2364, PPPoA
RFC 2615, PPPoE
Verkkorajapinnat
USB-portti
1 x USB-portti
Laite on testattu Windows 2000 (sp4) ja
XP (sp1/2) versioissa. USB-portti 1.1 ja 2.0 versioissa.
Toimii näissä standardien mukaisissa ympäristöissä.
Windows-ajurit asennus-CD:llä
Ethernet-portti
(RJ-45)
4 x 10/100 Mbps Ethernet-portti
Käyttää suoraa kaapelia, joka tulee laitteen mukana.
Käyttöalue
Laitetta käytetään yleisessä puhelinverkossa ADSLkeskuksen ja tilaajan välillä luomassa ADSL-yhteyden Internetiin.
TW-EA510 oletusasetukset
Laitteen tehdasasetukset ovat seuraavat:
RFC 1483 Bridged (sillattu)
Encapsulointi LLC
VPI = 0, 8 tai 14 ja VCI = 24, 33, 35, 50 tai 100
DHCP-palvelin, NAT ja palomuuri ovat oletuksena päällä
Laite hakee IP-osoitteen operaattorilta automaattisesti ja jakaa sen omalla
DHCP-palvelimella tietokoneille
Käytä Windows-verkkoasetuksissa automaattista IP-osoitteen hakua
WWW-selaimessa ei saa olla ”välityspalvelintoiminto eli Proxy” päällä
Laitteen IP-osoite on 192.168.0.254
Laitteen käyttäjätunnus on admin ja salasana password
Laitteen saa palautettua tehdasasetuksille laitteen takaa reset-painikkeesta.
(painettuna yli kuuden sekunnin ajan palauttaa tehdasasetukset)
4
TW-EA510
Laitteen käyttöönotto
Ethernet-portti 10/100 Mbps
– Kytke Ethernet-kaapeli laitteen ja tietokoneen välille
– Kytke puhelinjohto laitteen RJ11-liittimen ja puhelinpistorasian välille
– Kytke laite sähköverkkoon
– Laitetta käytetään yleisessä puhelinverkossa ADSL-keskuksen ja tilaajan välillä
– Odota noin 30 sekuntia, kunnes laite on käynnistynyt oikein
– Tarkista, että Power- ja LAN-merkkivalot palavat
– Tarkista, että SYS–merkkivalo vilkkuu ja ADSL-merkkivalo jää palaamaan eli laite on
linjalla
– Tarkista Windows MS-DOS komentokehotteesta, että saat IP-osoitteen:
MS-DOS> IPconfig<Enter>.
– IP-osoite on muotoa 192.168.0.100–xxx. Operaattorin IP-osoitteen näkee laitteen
järjestelmälogista osoitteessa http://192.168.0.254 tunnuksilla admin ja password.
Huomautus! WWW-selaimen Proxy-asetus ei saa olla päällä
USB-portti
- Käynnistä laite kytkemällä se sähköverkkoon
- Kytke puhelinjohto laitteen RJ11-liittimen ja puhelinpistorasian välille
- Kytke USB-kaapeli vasta, kun Windows-ajurien SETUP.EXE -ohjelma pyytää
kaapelin kytkemistä
- Seuraavassa USB-ajurien ajurien asennus
5
TW-EA510
USB-ajureiden asennus (Windows Xp)
Mikäli käytät laitteen USB-porttia, niin se tarvitsee erillisen ajurin USB-väylälle ja
Windows-verkkorajapintaan
Tässä ohjeessa keskitytään Windows Xp ja 2000
asennukseen. Windows 98 ja Me poikkeavat hivenen
asennukseltaan.
- Käynnistä laite kytkemällä se sähköverkkoon
- Kytke puhelinjohto laitteen RJ11-liittimen ja puhelinpistorasian välille
- Kytke USB-kaapeli vasta, kun Windows-ajurien SETUP.EXE -ohjelma pyytää
kaapelin kytkemistä
Laita TeleWell TW-EA510 asennus-CD CD-asemaan:
-Käynnistä ajurien asennus Driver-hakemistosta SETUP.EXE-ohjelma
Huomautus!
Windows Xp ja 2000 -versioissa käyttöjärjestelmän vaatima
”Driver signature” -kysely ohitetaan vastaamalla joko Y=kyllä tai
”Continue anyway/Jatketaan” vastauksella.
- Valitaan driver-hakemistosta ”Setup.exe”
6
TW-EA510
Seuraa kuvien mukaista asennusta, ”pyydettäessä valitse ”Next / seuraava”
Hyväksy molemmat ajurit asennettaviksi
Valitse “Jatka asentamista / Continue anyway”
7
TW-EA510
Kytke USB -kaapeli modeemin ja tietokoneen välille tässä kohdassa.
Valitse seuraava
8
TW-EA510
Valitse “Jatka asentamista”
Hyväksy “Valmis”
9
TW-EA510
Valitse ”Seuraava”
Valitse “Jatka asentamista”
10
TW-EA510
Kuittaa asennuksen onnistuminen OK -valinnalla
- Nyt ajurit on asennettu ja laite valmis käytettäväksi
- Käynnistä tietokone uudelleen ennen kuin jatkat ADSL–laitteen käyttöä
- Käynnistyksen jälkeen odota, että SYS-merkkivalo vilkkuu ja ADSL-valo palaa eli
laite on kytkeytynyt ADSL –keskukselle
– Tarkista Windows MS-DOS komentokehotteesta, että saat IP-osoitteen:
MS-DOS> IPconfig<Enter>
– IP-osoite on muotoa 192.168.0.100–xxx. Operaattorin IP-osoitteen näkee laitteen
järjestelmälogista osoitteessa 192.168.0.254 tunnuksilla admin ja password
Huomautus! WWW-selaimen Proxy-asetus ei saa olla päällä
11
TW-EA510
Kun käytät laitetta USB-liitännän kautta, niin verkkokorteissa laite näkyy TW-EA510
Ethernet adapterina
Kuva TW-EA510 USB–ajurin verkkoyhteydestä XP–ympäristössä
12
TW-EA510
TCP/IP-verkkoasetukset
Windows Xp, 2000, Me, 98, 95, NT4
Windows verkkoasetuksissa käytetään automaattista IP-osoitteen hakua
Kytke tarvittaessa ko. kuvakkeen ominaisuuksista ”Xp:n palomuuri päälle”
13
TW-EA510
Windows XP
Siirry kohtaan
Ohjainpaneeli (Control
Panel +in Classic View).
Valitse verkkoyhteydet
(Network Connections).
Valitse Lähiverkkoyhteydet
(Local Area Connection)
Valitse verkkoyhteys
kuvakkeen ominaisuudet
(Properties)
14
TW-EA510
Valitse Internet Protocol
(TCP/IP) ja valitse
ominaisuudet (Properties)
Valitse Obtain an IP
address automatically ja
Obtain DNS server address
automatically -valinnat.
Kuvan mukainen asetus
Valitse OK
15
TW-EA510
Windows 2000
Siirry kohtaan control
panel (ohjainpaneeli) ja
valitse Network and Dialup Connections.
Valitse Local Area
Connection.
Valitse properties
(ominaisuudet).
16
TW-EA510
Valitse Internet Protocol
(TCP/IP) ja sen properties
(ominaisuudet)
Valitse Obtain an IP
address automatically ja
Obtain DNS server address
automatically -toiminnot.
Valitse OK.
17
TW-EA510
Windows 95/98/Me
Siirry kohtaan Control
Panel. Valitse Network ja
sen kohta Configuration.
Valitse TCP/IP ->
NE2000 Compatible tai sen
verkkokortin nimi, joka on
listalla ja sen kohta
properties.
Valitse Obtain an IP
address automatically toiminto
18
TW-EA510
Valitse DNS Configuration
-toiminto.
Valitse Disable DNS valinta ja OK.
Windows NT4.0
Siirry / Settings / Control
Panel. Valitse Network ja
Protocol -asetus.
Siirry TCP/IP Protocol ja
sen kohta Properties.
19
TW-EA510
Valitse Obtain an IP
address from a DHCP
server -toiminto ja OK.
20
TW-EA510
TW-EA510 asetukset ja muutokset eri operaattoreille
Tietokoneessa pitää olla Internet-selain asennettuna.
Vähintään Netscape 4.6 tai uudempi tai IE5 tai uudempi.
Kuinka muutan laitteen asetuksia
- Asetuksia muutetaan WWW-selaimella (IE5 tai Netscape 6) IP-osoitteessa
192.168.0.254
- Ota palomuuri-ohjelmat pois päältä asetusten ajaksi
- Asetus toimii suoraan Ethernet-liittimen kautta tietokoneen verkkokortin kanssa tai
USB-verkkoajurilla
- www-selaimessa ei saa olla ”Proxy eli välityspalvelin” -asetus päällä
Laitteen oletustunnukset ovat
- käyttäjä admin
- salasana password
- Ohjelmoinnin aikana verkkokortin IP-osoite pitää olla 192.168.0.1-99 väliltä (joko
Ethernet tai USB), aliverkonpeite 255.255.255.0
- Muista palauttaa lopussa verkkokortin asetukset oletukselle
Aseta verkkokortille kiinteät
IP-tiedot kuvan mukaisesti.
Kohdasta ohjainpaneeli /
verkko ja verkkokortin
ominaisuudet
Käynnistä kone uudelleen
muutoksen jälkeen
Avaa Internet-selain ja anna
osoitteeksi
http://192.168.0.254
Paina Enter-näppäintä
21
TW-EA510
Anna käyttäjän nimi ”user
name”, joka on admin ja
salasana ”password”, joka
on password.
Yleistä operaattoreiden asetuksista
Bioskoodit tukevat automaattisesti seuraavia operaattoreita:
Sonera Koti ADSL
Elisa ADSL
DNA ADSL
Baana ADSL
Soon ADSL
Saunalahti ADSL
MTV3
Maxinetti
Yllä mainituilla operaattoreilla on yleensä seuraava asetus
RFC 1483 Bridge, LLC encapsulation
VPI = 0, 8 tai 14
VCI = 24, 33, 50 tai 100
Mikäli operaattorisi käyttää joitain yllä mainituista asetuksista, ei laitteen
asetuksia tarvitse muuttaa. Älä kokeile mitään ylimääräistä!
Mikäli asetuksia tarvitsee muuttaa, katso asetusten muutokset seuraavalta sivulta!
Mikäli jokin menee pieleen, niin laitteen takapaneelin ”RESET”-painikkeella saat
muutettua laitteen takaisin oletusasetuksille:
- 0-3 sekunnin ajan painettuna: käynnistää laitteen uudelleen
- kuuden sekunnin ajan tai pidempään painettuna: palauttaa laitteen tehdasasetukset
22
TW-EA510
Muutokset yleisimmin
Tarkista aina oikeat WAN-portissa tarvittavat asetukset operaattorilta
Eri PVC adaptereiden asetukset näkyvät kohdassa Configuration / WAN
Eri PVC adapterit:
PCV adapter 0
PVC adapter 1
PVC adapter 2
PVC adapter 3
PVC adapter 4
= Sonera VPI=0 ja VCI=33
= Elisa, DNA, Baana, Saunalahti, VLP VPI=0 ja VCI=100
= PHP VPI=14 ja VCI=24
= VPI=0 ja VCI = 50
= VPI=8 ja VCI = 35 (TeliaSonera, Maxinetti)
Mikäli tehdään joitain muutoksia asetuksiin, poistetaan ensin ylimääräiset asetukset
ja asetusten muutos tehdään jäljelle jäävään PVC adapteriin
Ylimääräisten PVC adapterien (porttien) poisto
a) Valitaan kohdasta Configuration / WAN kohta Adapter 3 + Submit
Asetetaan Virtual Circuit kohta Disabled-tilaan ja
Valitaan Submit sekä Save setting + Submit
Odotetaan laitteen uudelleen käynnistymistä
b) Valitaan kohdasta Configuration / WAN kohta Adapter 2 + Submit
Asetetaan Virtual Circuit kohta Disabled-tilaan ja
Valitaan Submit sekä Save setting + Submit
Odotetaan laitteen uudelleen käynnistymistä
c) Valitaan kohdasta Configuration / WAN kohta Adapter 1 + Submit
Asetetaan Virtual Circuit kohta Disabled-tilaan ja
Valitaan Submit sekä Save setting + Submit
Odotetaan laitteen uudelleen käynnistymistä
Tämän jälkeen on vain yksi adapteri jäljellä eli PVC adater 0, jota käytetään.
Lopulliset asetukset tehdään kohtaan "PVC adapter 0”.
Lopussa valitaan aina ”Submit” ja ”Save Setting + Submit”.
Asetusten muutoksien jälkeen muuta verkkokortin IP-tiedot automaatille, käynnistä
tietokone sekä laite uudelleen ja odota SYS–valon vilkkumista ja ADSL–valon
vilkkumisen päättymistä.
23
TW-EA510
Yhteyden tilan tarkistus
Aseta verkkokortin IP-osoitteeksi 192.168.0.5. Ota www-selaimella yhteys
192.168.0.254 (käyttäjätunnus admin, salasana password). Valitse kohta Status/ADSL.
Linjanopeudet ovat riippuvaisia operaattorin asetuksista ja linjan laadusta.
Yleensä downstream on aina maksimina ja upstream vaihtelee.
Laitteen käyttämän nopeuden maksimin asettaa operaattori, mutta se voi olla
alempikin, mikäli linjan laatu ei muuta salli.
Todelliseen siirtonopeuteen vaikuttaa aina Internetin ruuhkaisuus.
Laite on valmis käytettäväksi.
Sulje Internet-selain ja muuta verkkokortin IP-tiedot automaatille. Avaa nettiselain
uudelleen ja kokeile haluttua www-osoitetta.
24
TW-EA510
IP-osoitteet
Alla kuva Sonera ADSL IP-osoitteista, kun laite on sillatussa tilassa ja IP-osoite tulee
automaattisesti Soneran DHCP-palvelimelta.
25
TW-EA510
Elisa ADSL Premium
* Tämä eroaa hivenen edellisestä DHCP + NAT ohjelmoinnista.
Poista ensi sivulla 23 olevan ohjeen mukaisesti ylimääräiset PVC adapterit
Sen jälkeen muuta vain seuraavat kohdat jäljelle jäävään PVC adapteriin 0:
Configuration / WAN asetukset;
Default Gateway = Asiakkaan default GW
VPI = 0, VCI = 100
Elisan ohjeesta
Static IP = asiakkaan IP-osoite (jokin 5:tä)
Subnet mask = Asiakkaan aliverkon peite
Elisan ohjeesta
Elisan ohjeesta
Elisan ohjeesta
Encapsulation = 1483 Routed LLC, Bridge Disabled, IGMP = Enabled
DHCP client Disable
Ruutu jatkuu seuraavalla sivulla
26
TW-EA510
Valitse Submit ja Save config
Submit tallentaa tiedot pysyvästi.
Lisäksi määrittele DNS–asetukset Elisan ohjeen mukaisesti
Selaimessa yhteydenotto portti.arenanet.fi
Proxy-asetus ei saa olla päällä www–selaimessa
PC:n verkkokortissa IP-osoitteen haku automaatille
27
TW-EA510
Langaton yhteys eli WLAN
Perusasetukset ja WEB 64 / 128
SSID: Tukiaseman nimi. Tämän pitää olla yksilöllinen. Erikoismerkkejä tai välilyöntejä
tukiaseman nimessä ei saa käyttää.
Channel: Tukiaseman radiokanava.
Security: Turvallisuus asetus. Aseta se aina päälle (Enable). Määrittele myös
salausavaimen pituus (Key length 64/128) ja haluttu avain kenttään (Key 0). Merkit 0-9
ja a-z ovat sallittuja merkkejä.
Samat määritykset tulee tehdä WLAN-kortin asetuksissa omalla tietokoneella, jossa
WLAN-yhteys.
Encryption Key: Salausavain. Tällä avaimella salaat yhteyden. Käytä avainkenttää 0.
Secret AP: Tällä toiminnolla piilotat tukiaseman näkymisen sitä etsiville. Tällöin WLAN–
tietokoneessa pitää määrittää WLAN AP eli tukiaseman nimi käsin.
28
TW-EA510
Lisäasetukset
Tässä kohdassa voi muuttaa tukiaseman oletusasetuksia.
Älä tee mitään muutoksia, jos et tunne tekniikkaa riittävästi.
29
TW-EA510
WLAN-turvallisuus (WPA)
Tässä kohdassa määrittelet uusimman WLAN turvallisuusstandardin.
Suositus on käyttää kohdassa ”DATA ENCRYPTION = TKIP”
Asetukset, jotka ovat yhteensopivia Windows XP:n ja sen WPA-toiminnon kanssa
WPA mode
Network authentication
Data Encryption
WPA Shared Key
= Enabled
= WPA Pre-shared key
= TKIP
= Oma salaustunnus (merkit a-z ja 0-9 sallittuja)
Loppuosa määrittelyistä on tehty ammattilaisille ja niihin ei tule koskea, ellei tiedä mitä
tekee.
30
TW-EA510
31
TW-EA510
TeleWell TW-EA510
ADSL Router
WLAN AP 802.11b/g
(11/54 Mbps)
User Manual
32
Table of Contents
Chapter 1 .................................................................................................... 1
INTRODUCTION ......................................................................................... 1
1.1 An Overview of the ADSL Router................................................................................1
1.2 Package Contents .......................................................................................................2
1.3 Features ......................................................................................................................2
1.4 Application...................................................................................................................4
Chapter 2 .................................................................................................... 5
USING ADSL MODEM/ROUTER ....................................................... 5
2.1 Cautions for Using the ADSL Modem/Router..............................................................5
2.2 The Front LEDs ...........................................................................................................5
2.3 The Rear Ports............................................................................................................6
2.4 Cabling ........................................................................................................................7
Chapter 3 .................................................................................................... 8
CONFIGURATION ...................................................................................... 8
3.1 Before Configuration ...................................................................................................8
3.2 Factory Default Settings ............................................................................................21
3.2.1 Password ....................................................................................................21
3.2.2 LAN and WAN Port Addresses ........................................................21
3.3 Information from ISP .................................................................................................22
3.4 Configuring with Web Browser ..................................................................................22
3.4.1 Status ...........................................................................................................24
3.4.1.1 Status – ADSL Status .......................................................................................................... 24
3.4.1.1.1 ADSL Status – WAN Status ........................................................................................ 25
3.4.1.1.2 ADSL Status – ATM Status ......................................................................................... 25
3.4.1.2 Status – LAN Status............................................................................................................. 26
3.4.1.2.1 LAN Status – TCP Status ............................................................................................ 26
3.4.1.3 Status- PPP Status............................................................................................................... 27
3.4.1.4 Status- VPN Connect Status .............................................................................................. 27
3.4.1.5 Status- Learned MAC Table ............................................................................................... 28
3.4.1.6 Routing Table........................................................................................................................ 28
3.4.1.7 System Log............................................................................................................................ 29
3.4.1.8 Security Logs......................................................................................................................... 29
3.4.2 Quick Start .................................................................................................30
3.4.3 Configuration.............................................................................................30
3.4.3.1 WAN ....................................................................................................................................... 31
3.4.3.2 LAN ......................................................................................................................................... 33
3.4.3.3 Wireless ................................................................................................................................. 35
3.4.3.3.1 Basic setting....................................................................................................................... 35
3.4.3.3.2 Advanced setting............................................................................................................... 36
3.4.3.3.3 WLAN Security .................................................................................................................. 36
3.4.3.4 System ................................................................................................................................... 37
3.4.3.4.1 Password........................................................................................................................ 37
3.4.3.4.2 Time Zone ...................................................................................................................... 38
i
TW-EA510
3.4.3.4.3 Factory Setting............................................................................................................... 39
3.4.3.4.4 Restart ............................................................................................................................ 39
3.4.3.5 Firewall ................................................................................................................................... 40
3.4.3.5.1 Packet Filter ................................................................................................................... 40
3.4.3.5.2 Bridge Filtering............................................................................................................... 42
3.4.3.5.3 Intrusion Detection ........................................................................................................ 43
3.4.3.5.4 Block WAN Request ..................................................................................................... 44
3.4.3.5.5 URL Blocking ................................................................................................................. 44
3.4.3.6 VPN (Virtual Private Networks) .......................................................................................... 45
3.4.3.7 Virtual Server......................................................................................................................... 47
3.4.3.8 Advanced ............................................................................................................................... 48
3.4.3.8.1 ADSL ............................................................................................................................... 48
3.4.3.8.2 DNS ................................................................................................................................. 49
3.4.3.8.3 Dynamic DNS ................................................................................................................ 50
3.4.3.8.4 NAT ................................................................................................................................. 51
3.4.3.8.5 RIP................................................................................................................................... 53
3.4.3.8.6 SNMP.............................................................................................................................. 54
3.4.3.8.7 Static Routing................................................................................................................. 55
3.4.3.8.8 MISC Configuration....................................................................................................... 56
3.4.3.8.9 Diagnostic Test.............................................................................................................. 57
3.4.4 Save Config ...............................................................................................59
Chapter 4 .................................................................................................. 60
TROUBLESHOOTING ............................................................................. 60
Problems Starting Up the ADSL Router ....................................................................................60
Problems with the WAN Interface ............................................................................................60
Problems with the LAN Interface .............................................................................................60
Problems Connecting to a Remote Node or ISP..........................................................................60
APPENDIX ................................................................................................ 61
PRODUCT SUPPORT AND CONTACT INFORMATION ............... 61
ii
Chapter 1
Introduction
1.1 An Overview of the ADSL Router
802.11g ADSL Router provides a high-speed Ethernet port and an USB (Universal Serial Bus) port for
high-speed Internet browsing. It can support downstream transmission rates of up to 8Mbps and
upstream transmission rates of up to 1024Kbps. It is compliant with Multi-Mode standard (ANSI T1.413,
Issue 2; G.dmt (G.992.1); G.lite (G992.2); G.hs (G994.1)).
The product supports PPPoA (RFC 2364 – PPP (Point-to-Point Protocol) over ATM Adaptation Layer 5),
RFC 1483 encapsulation over ATM (bridged or routed), PPP over Ethernet (RFC 2516), and IPoA
(RFC1577) to establish a connection with ISP. The product also supports VC-based and LLC-based
multiplexing.
It is the perfect solution to connect a small group of PCs to a high-speed broadband Internet connection.
Multi-users can have high-speed Internet access simultaneously.
This product also serves as an Internet firewall, protecting your network from being accessed by outside
users. Not only provide the natural firewall function (Network Address Translation, NAT), it also provides
rich firewall features to secure user’s network. All incoming data packets are monitored and filtered.
Besides, it can also be configured to block internal users from accessing to the Internet.
The product provides two levels of security support. First, it masks LAN users’ IP addresses which are
invisible to outside users on the Internet, making it much more difficult for a hacker to target a machine on
your network. Secondly, it can block and redirect certain ports to limit the services that outside users can
access. For example, to ensure that games and other Internet applications will run properly, user can
open some specific ports for outside users to access internal services in network.
Integrated DHCP (Dynamic Host Control Protocol) services, client and server, allow multiple users to get
their IP addresses automatically on boot up from the product. Simply set local machines as a DHCP
client to accept a dynamically assigned IP address from DHCP server and reboot. Each time local
machine is powered up; the router will recognize it and assign an IP address to instantly connect it to the
LAN.
For advanced users, Virtual Service function allows the product to provide limited visibility to local
machines with specific services for outside users. An ISP (Internet Service Providers) provided IP
address can be set to the product and then specific services can be rerouted to specific computers on the
local network. For instance, a dedicated web server can be connected to the Internet via the product and
then incoming requests for HTML that are received by the product can be rerouted to the dedicated local
web server, even though the server now has a different IP address. In this example, the product is on the
Internet and vulnerable to attacks, but the server is protected.
Virtual Server can also be used to re-task services to multiple servers. For instance, the product can be
set to allow separated FTP, Web, and Multiplayer game servers to share the same Internet-visible IP
address while still protecting the servers and LAN users from hackers.
1
TW-EA510
1.2 Package Contents
1.
ADSL VPN Firewall Router
2.
One CD-ROM containing the driver and online manual
3.
One Quick Start Guide
4.
One RJ-11 ADSL/telephone cable
5.
One CAT-5 straight LAN cable
6.
One USB cable
7.
One power adapter
1.3 Features
802.11g ADSL Router provides the following features:
ADSL Multi-Mode Standard: Supports downstream transmission rates of up to 8Mbps
and upstream transmission rates of up to 1024Kbps. It is compliant with Multi-Mode
standard (ANSI T1.413, Issue 2; G.dmt (G.992.1); G.lite (G992.2); G.hs (G994.1)).
Multi-Protocol to Establish A Connection: Supports PPPoA (RFC 2364 - PPP over ATM
Adaptation Layer 5), RFC 1483 encapsulation over ATM (bridged or routed), PPP over Ethernet
(RFC 2516) and IPoA (RFC1577) to establish a connection with ISP. The product also supports VCbased and LLC-based multiplexing.
Quick Installation Wizard: Supports a WEB GUI page to install this device quickly. With this wizard,
an end user can enter the information easily which they from the ISP, then surf the Internet
immediately.
Universal Plug and Play (UPnP) and UPnP NAT Traversal: This protocol is used to enable
simple and robust connectivity among stand-alone devices and PCs from many different vendors. It
makes network simple and affordable for users. UPnP architecture leverages TCP/IP and the Web
to enable seamless proximity networking in addition to control and data transfer among networked
devices. With this feature enabled, users can now connect to Net meeting or MSN Messenger
seamlessly.
Network Address Translation (NAT): Allows multi-users to access outside resource such as
Internet simultaneously with one IP address/one Internet access account. Besides, many application
layer gateway (ALG) are supported such as web browser, ICQ, FTP, Telnet, E-mail, News, Ping and
others.
Domain Name System (DNS) relay: Provides an easy way to map the domain name (a friendly
name for user such as www.yahoo.com) and IP address. When local machine sets its DNS server
with this router’s IP address. Then every DNS conversion request packet from the PC to this router
will be forwarded to the real DNS in outside network. After the router gets the reply, then forwards it
back to the PC.
Dynamic Domain Name System (DDNS): The Dynamic DNS service allows you to alias a dynamic
IP address to a static hostname. This dynamic IP address is the WAN IP address. For example, to
use the service, you must first apply an account from this free Web server http://www.dyndns.org/.
There are more than 5 DDNS servers supported.
PPP over Ethernet (PPPoE): Provides embedded PPPoE client function to establish a connection.
Users can get greater access speed without changing the operation concept, sharing the same ISP
account and paying for one access account. No PPPoE client software is required for local
computer. The Automatic Reconnect and Disconnect Timeout (Idle Timer) functions are provided,
too.
2
TW-EA510
Virtual Server: User can specify some services to be visible from outside users. The router can
detect incoming service request and forward it to the specific local computer to handle it. For
example, user can assign a PC in LAN acting as WEB server inside and expose it to the outside
network. Outside user can browse inside web server directly while it is protected by NAT. A DMZ
host setting is also provided to a local computer exposed to the outside network, Internet.
Firewall: Supports SOHO firewall with NAT technology. Automatically detects and blocks the Denial
of Service (DoS) attack. The URL-blocking and packet filtering are also supported. The hacker’s
attack will be recorded associated with timestamp in the security logging area. More firewall features
will be added continually, please visit our web site to download latest firmware.
Dynamic Host Control Protocol (DHCP) client and server: In the WAN site, the DHCP client can
get an IP address from the Internet Server Provider (ISP) automatically. In the LAN site, the DHCP
server can allocate multiple clients IP addresses and distribute them including IP address, subnet
mask as well as DNS IP address to local computers. It provides an easy way to manage the local IP
network.
Rich Packet Filtering: Not only filter the packet based on IP address, but also based on Port
numbers and MAC address. It will increase the performance in LAN and WAN, also provide a
higher-level security control
SNTP: An easy way to get the network real time information from an SNTP server.
Web based GUI: Supports web based GUI for configuration and management. It is user-friendly
and comes with on-line help. It also supports remote management capability for remote users to
configure and manage this product.
Virtual Private Networks (VPN): Allows user to make a tunnel with a remote site directly to secure
the data transmission among the connection. User can use IPSec with IKE key management are
supported by this router to make a VPN connection and the router already provides L2TP, IPSec
and PPTP pass through function to establish a VPN connection if the user likes to run the PPTP
client in his local computer.
Simple Network Management Protocol (SNMP): It is an easy way to remotely manage the router
via SNMP.
3
TW-EA510
1.4 Application
4
Chapter 2
Using ADSL Modem/Router
2.1 Cautions for Using the ADSL Modem/Router
Do not place the router under high humidity and high temperature.
Do not use the same power source for the device with other equipment.
Do not open or repair the case yourself. If the device is too hot, turn off the power
immediately and have a qualified serviceman repair it.
Avoid using this product and all accessories outdoors.
Place the product on the stable surface.
Only use the power adapter that comes with the package.
2.2 The Front LEDs
LED
5
Meaning
5
PWR
Lit green when power adapter is connected.
6
SYS
When lit, it indicates that the device is working properly.
7
WLAN
Lit green when the wireless connection is established.
Flashes when sending/receiving data.
8-11
LAN1
LAN2
LAN3
LAN4
Lit green when the LAN link is connected.
12
USB
When this LED is lit, it indicates that the USB port is
connected to the PC and working properly.
TW-EA510
13
ADSL
When lit, it indicates that the ADSL (Line) port is
connected to the DSLAM and working properly.
2.3 The Rear Ports
Port
Meaning
1
Power
Switch
Power ON/OFF switch
2
PWR
Connect the supplied power adapter to this jack.
After the device is powered on, press it to reset the device or restore to
factory default settings.
3
RESET
0-3 seconds: reset the device
6 seconds above: restore to factory default settings (this is used when
you can not login to the router, e.g. forgot the password)
(1x-4x)
Connect a UTP Ethernet cable (Cat-5 or Cat-5e) to one of the four LAN
ports when connecting to a PC or an office/home network of 10Mbps or
100Mbps.
5
USB
Connect the supplied USB cable to this port when connecting to the PC.
6
LINE
Connect the supplied RJ-11 (“telephone”) cable to this port when
connecting to the ADSL/telephone network.
LAN
4
6
TW-EA510
2.4 Cabling
Through USB Port
The product can be used as a Network Adapter on your PC. That means you do not have to install a
network adapter first on your PC before connecting the ADSL Modem/Router. Just connect the supplied
USB cable to the USB port of the ADSL Modem/Router and connect the other end to the PC.
Make sure that your ADSL Modem/Router and PC are turned on. On the front of the product is a bank of
LEDs. As a first check, please verify that the PWR, LAN LNK and ADSL SYS LEDs are lit.
So long as the cables are connected and the LEDs are lit normally, follow section “3.1 Installing the
USB Driver” below to setup this device.
Through Ethernet Port
The product’s LAN port is wired just like a Network Adapter’s port. From the product directly to a PC, the
cable should be an Ethernet straight cable. From the product to a hub or switch, the cable should be an
Ethernet straight through cable to a normal hub/switch port, or an Ethernet crossover cable to an uplink
port.
The most common problem associated with Ethernet is bad cabling or ADSL line. Make sure that all
connected devices are turned on. On the front of the product is a bank of LEDs. As a first check, please
verify that the PWR, SYS, LAN LNK and ADSL SYN LEDs are lit. If they are not, verify that you are using
the proper cables.
So long as the cables are connected and the LEDs are lit normally, follow section “3.2 Configuring the
Network Properties” below to modify the network settings.
Since the product cannot auto-detect whether your cable is correct or not, please make
sure you are using the right cable to a PC or a Hub.
7
Chapter 3
Configuration
The ADSL Router can be configured with your Web browser. The web browser is included as a standard
application in following operation systems, UNIX, Linux, Mac OS, Windows 95/98/NT/2000/Me/XP, etc.
The product provides a very easy and user-friendly interface for configuration.
3.1 Before Configuration
This section describes the configuration required by LAN-attached PCs that communicate with the Router,
either to configure the device, or for network access. These PCs must have an Ethernet interface
installed properly, be connected to the Router either directly or through a hub, and have TCP/IP installed
and configured to obtain an IP address through a DHCP server or a fixed IP address which must be in the
same subnet of the Router. The default IP address of router is 192.168.0.254 and subnet mask is
255.255.255.0. The best and easy way is to configure the PC to get an IP address from the ADSL Router.
Please follow the steps below for PC’s network environment installation. Before taking the first step,
please check your PC’s network components. If your PC connects to the ADSL Modem/Router through
USB port, the TCP/IP protocol stack must be installed. If your PC connects the ADSL Modem/Router
through Ethernet port, the TCP/IP protocol stack and Ethernet network adapter must be installed. If not,
please refer to MS Windows relative manuals.
Any TCP/IP capable workstation can be used to communicate with or through
the ADSL Router. To configure other types of workstations, please consult the
manufacturer’s documentation.
8
TW-EA510
Installing the USB Driver on a PC
Please follow the steps below to install the USB driver.
1. Insert the CD into the CD-ROM drive and execute the USB driver. Double-click on ”Setup.exe” to launch
installation process.
9
TW-EA510
2. When the window below pop-up, click ”OK” to install device drivers.
3. Window titled ”hardare or software installation” would appear, press”Continue Anyway”.
10
TW-EA510
4. Now please plug-in your USB device.
5. Select ”Install the software automatically” then click ”Next”.
11
TW-EA510
6. Press ”Continue Anyway”.
7. Click ”Finish” to close the the wizard.
12
TW-EA510
8. After finishing the USB Interface installation, now you need to install the software for the USB Adapter.
Please select ”Install the soft ware automatically” and click ”Next”.
9. Window titled ”hardare or software installation” would appear, press”Continue Anyway”.
13
TW-EA510
10. Now you have completed all of the installation and window would show success results. Click ”OK” to
finish the driver.
14
TW-EA510
11. A new ”Local Area Connection” now would be created when you check your Network Connections.
You can check its content and estalsh/maintain your personal IP-related configurations.
Configuring PC in Windows XP
1. Go to Start / Control Panel (in
Classic View). In the Control Panel,
double-click on Network
Connections.
2. Double-click Local Area Connection.
15
TW-EA510
3. In the Local Area Connection
Status window, click Properties.
4. Select Internet Protocol (TCP/IP)
and click Properties.
5. Select the Obtain an IP address
automatically and the Obtain DNS
server address automatically radio
buttons.
6. Click OK to finish the configuration.
16
TW-EA510
Configuring PC in Windows 2000
1.
Go to Start / Settings / Control
Panel. In the Control Panel, doubleclick on Network and Dial-up
Connections.
2.
Double-click Local Area Connection.
3.
In the Local Area Connection
Status window, click Properties.
4.
Select Internet Protocol (TCP/IP)
and click Properties.
17
TW-EA510
5.
Select the Obtain an IP address
automatically and the Obtain DNS
server address automatically radio
buttons.
6.
Click OK to finish the configuration.
Configuring PC in Windows 95/98/ME
1. Go to Start / Settings / Control
Panel. In the Control Panel, doubleclick on Network and choose the
Configuration tab.
2. Select TCP / IP -> NE2000
Compatible, or the name of your
Network Interface Card (NIC) in your
PC.
3. Click Properties.
18
TW-EA510
4. Select the IP Address tab. In this
page, click the Obtain an IP address
automatically radio button.
5. Then select the DNS Configuration
tab.
6. Select the Disable DNS radio button
and click OK to finish the configuration.
19
TW-EA510
Configuring PC in Windows NT4.0
1.
Go to Start / Settings / Control
Panel. In the Control Panel, doubleclick on Network and choose the
Protocols tab.
2.
Select TCP/IP Protocol and click
Properties.
3.
Select the Obtain an IP address
from a DHCP server radio button
and click OK.
20
TW-EA510
3.2 Factory Default Settings
Before you configure this device, you need to know the following default settings.
1. Web Configuration
Password: There are two levels of password protection, Administrator Level and User Level.
Administrator Level
User Name
Password
admin
password
user
password
User Level
2. Device IP Network settings in LAN site
IP Address: 192.168.0.254
Subnet Mask: 255.255.255.0
3. ISP setting in WAN site
Virtual Circuit 0: 1483 Routed IP LLC
4. DHCP server
DHCP server is enabled.
IP address pool from IP Address: 192.168.0.100 to IP Address: 192.168.0.199
3.2.1 Password
The default username and password are admin and password respectively.
If you ever forget the password to log in, you may press the RESET button up to 2
seconds to restore the factory default settings.
3.2.2 LAN and WAN Port Addresses
The parameters of LAN and WAN ports are pre-set in the factory. The default values are shown below.
LAN Port
IP address
Subnet Mask
DHCP server function
IP
addresses
for
distribution to PCs
21
192.168.0.254
255.255.255.0
Enabled
100 IP addresses continuing from
192.168.0.100 through 192.168.0.199
(Actually, it can supports up to 253 users.)
WAN Port
Obtain an IP address
automatically. ISP assigns
this IP address.
TW-EA510
3.3 Information from ISP
Before configuring this device, you have to check with your ISP (Internet Service Provider) what kind of
service is provided such as PPPoE, PPPoA, RFC1483, IPoA, or PPTP-to-PPPoA Relaying.
Gather the information as illustrated in the following table and keep it for reference.
VPI/VCI, VC-based/LLC-based multiplexing, Username, Password, Service
PPPoE
Name, and Domain Name System (DNS) IP address (it can be
automatically assigned by your ISP when you connect or be set manually).
VPI/VCI, VC-based/LLC-based multiplexing, Username, Password, and
PPPoA
Domain Name System (DNS) IP address (it can be automatically assigned
by your ISP when you connect or be set manually).
RFC1483 Bridged
VPI/VCI, VC-based/LLC-based multiplexing to use Bridged Mode.
VPI/VCI, VC-based/LLC-based multiplexing, IP address, Subnet mask,
RFC1483 Routed
Gateway address, and Domain Name System (DNS) IP address (it is fixed
IP address).
VPI/VCI, VC-based/LLC-based multiplexing, IP address, Subnet mask,
IPoA
Gateway address, and Domain Name System (DNS) IP address (it is fixed
IP address).
3.4 Configuring with Web Browser
The ADSL Modem/Router can be configured with your Web browser. The web browser is included as a
standard application in following operation systems, UNIX, Linux, Mac OS, Windows
95/98/NT/2000/Me/XP, etc. The product provides a very easy and user-friendly interface for configuration.
Open the web browser, enter the local port IP address of the ADSL Router, which default at
192.168.0.254, and click “Go” to get the login page.
22
TW-EA510
There are two levels of password protection. The first level is for administrator and the second one is for
user.
If you want to configure the device with administrator level, type admin in the username field and
password in the password field. Then, click “OK” to log in. You can modify these passwords for security
and management purpose.
At the configuration homepage, the left navigation pane where bookmarks are provided links you directly
to the desired setup page, including:
Quick Start
Configuration (LAN, WAN, Firewall, System, VPN, Virtual Server, Advanced and Help)
Status (System Status, Device Info, System Logs, Security Logs, ARP Cache Table, DHCP Table,
Routing Table and VPN Connect Status)
23
TW-EA510
3.4.1 Status
The Status section provides and contains many items including device H/W and S/W information, LAN,
WAN, Port status and all defined interfaces. It also provides useful information for users to review the
status of device.
3.4.1.1 Status – ADSL Status
Displays the status of your ADSL connection. It will refresh every two seconds.
24
TW-EA510
3.4.1.1.1 ADSL Status – WAN Status
3.4.1.1.2 ADSL Status – ATM Status
25
TW-EA510
3.4.1.2 Status – LAN Status
Displays the status of your Local Area Network (LAN) connection.
3.4.1.2.1 LAN Status – TCP Status
26
TW-EA510
3.4.1.3 Status- PPP Status
Displays the status of your PPP connection. It will refresh every ten seconds.
3.4.1.4 Status- VPN Connect Status
Through this page you can check connection status of Virtual Private Network (VPN).
Once you setup your VPN tunnel the information of connection will show on this page.
27
TW-EA510
3.4.1.5 Status- Learned MAC Table
Aging Timeout: Enter the time period for the router to memorize MAC addresses.
3.4.1.6 Routing Table
Display the current routing paths of the ADSL Router.
28
TW-EA510
3.4.1.7 System Log
Display the system logs cumulated till the present time. You can trace the historical information through
this function.
3.4.1.8 Security Logs
Display the information of security logs. If hacker attacks your sever, he will be isolated by the firewall
function and the router will record related information. Hence, you know where the hacker comes from.
29
TW-EA510
3.4.2 Quick Start
If you use this device to access the Internet through the ISP, this web page is enough for you to configure
this router and access the Internet without a problem. Please check Chapter 3.3 (Information from the
ISP), then enter the proper values into this web page, click the Apply button and then click the Save
Config button to save all of the configuration parameters to FLASH. After the router reboot, you may
check the Status web page to check whether the router is connected to the ISP or not. In most cases, you
can access the Internet immediately. If not, please refer to the sections below for more information.
3.4.3 Configuration
When you click this item, you get following sub-items to configure the ADSL Router.
LAN, WAN, Firewall, System, VPN, Virtual Server, Advanced and Help
30
TW-EA510
3.4.3.1 WAN
The screens below contain settings for the WAN interface toward Internet.
Select Adapter
Select the item of PVCs you want to configure. Then, press the Submit button.
31
TW-EA510
Virtual Circuit
Virtual Circuit: Enable/Disable the settings of this VC.
Bridge: If you set this device to be bridge mode, select Enable; if not, please select Disable.
IGMP: You can Enable or Disable this function.
Encapsulation: There are eleven ways ─ PPPoE VC-Mux, PPPoE LLC, PPPoE None, PPPoA VC-Mux,
PPPoA LLC, 1483 Bridged IP VC-Mux, 1483 Bridged IP LLC, 1483 Routed IP VC-Mux, 1483 Routed IP
LLC, Classical IP over ATM, Native ATM ─ for the device to have a public IP address and then to access
Internet. You have to check with your ISP about which way is adopted.VPI: Consult the telephone
company to get the Virtual Path Identifier (VPI) number. The default value is 0.
ATM
VPI: Consult the telephone company to get the Virtual Path Identifier (VPI) number. The default value is 0.
VCI: Consult the telephone company to get the Virtual Channel Identifier (VCI) number. The default value
is 33.
Service Category: Select UBR or CBR.
DHCP Client
DHCP Client: Check to enable the DHCP client function if you want the device to get an IP address
automatically from your ISP.
Host Name: Enter the name of your work group.
MAC Spoofing
MAC Spoofing: The MAC Spoofing is for solving the scenario when the ISP only recognizing the
specified MAC address.
Static IP Settings
IP Address: Enter the information provided by your ISP.
Subnet Mask: Enter the information provided by your ISP.
Default Gateway: Enter the gateway address provided by your ISP.
PPP
If your encapsulation is set to be PPPoE or PPPoA, the following fields must be entered.
Service Name: This item is for identification purpose. If it is required, your ISP will provide you the
information. Maximum input is 31 alphanumeric characters.
Username: Enter the username provided by your ISP.
Password: Enter the password provided by your ISP.
32
TW-EA510
Disconnect Timeout seconds: Auto-disconnect the ADSL Router when there is no activity on the
line for a predetermined period of time. You can input any number from 0 to 32767. The default value is 0
seconds.
MRU: Maximum Receive Unit indicates the peer of PPP connection the maximum size of the PPP
information field this device can be received. The default value is 1492 and is used in the beginning of the
PPP negotiation. In the normal negotiation, the peer will accept this MRU and will not send packet with
information field larger than this value.
MTU: Maximum Transmission Unit indicates the network stack of any packet is larger than this value will
be fragmented before the transmission. During the PPP negotiation, the peer of the PPP connection will
indicate its MRU and will be accepted. The actual MTU of the PPP connection will be set to the smaller
one of MTU and the peer’s MRU. The default value is 1492.
MSS: Maximum Segment Size is the largest size of data that TCP will send in a single IP packet. When a
connection is established between LAN client and a host in the WAN side, the LAN client and the WAN
host will indicate their MSS during the TCP connection handshake. The default value is 1492.
Authentication: Default at “Auto”.
Automatic Reconnect: Check to enable this device to automatically re-establish the PPPoE session
when disconnected by ISP.
3.4.3.2 LAN
This screen contains settings for LAN interface attached to the LAN port.
33
TW-EA510
Device IP Address
IP Address: Default at 192.168.0.254.
This is the device IP address in LAN site. If you plan to change it to another IP address to a different
range of IP subnet. Please make sure your PC is also located at the same IP subnet. Otherwise, you may
not be able to access the router.
Subnet Mask: Default at 255.255.255.0.
DHCP Server
DHCP Server: Check DHCP Server to enable the router to distribute IP Addresses, subnet mask and
DNS setting to computers. Hence, the following fields will be activated. If you do not check this selection,
remember to specify a static IP address, subnet Mask, and DNS setting for each of your local computers.
Be careful not to assign the same IP address to different computers.
DHCP address pool selection: Auto or User Defined. If select the AUTO, router will assign an IP
address back to PC’s IP request. If User Defined, please specify the IP pool range.
User Defined Start Address: Enter the start address of this local IP network address pool. The pool is a
piece of continuous IP address segment. The default value is 192.168.0.100.
User Defined End Address: Enter the last address of this local IP network address pool that you want
the DHCP server to assign IP addresses to. The default value is 192.168.0.199.
With this case, the DHCP pool is from 192.168.0.100 to 192.168.0.199. Therefore, the local computer will
get an IP address located at this range randomly.
Lease Time: Set the lease time you required.
User Mode: There are two selections, Single User and Multi-User, for this setting.
34
TW-EA510
3.4.3.3 Wireless
3.4.3.3.1 Basic setting
SSID : Enter the unique ID given to the Access Point (AP) built in the wireless broadband firewall
gateway. To connect to this device, your wireless clients must have the same SSID as that of this device.
Channel : Select the ID of channel you would like to use.
Security: Select Enable or Disable the function of Encryption to establish more secure environment for
wireless data transmission.
Encryption Key: Enter the key to encrypt wireless data. To allow encrypted data transmission, the WEP
Encryption Key values on all wireless stations must be the same as that of the device.
35
TW-EA510
3.4.3.3.2 Advanced setting
Advanced wireless configuration page enables you to select Basic Rate and TX Rate.
Multiple choices are available in this part from at least 1M to 54M maximum.
3.4.3.3.3 WLAN Security
This session provides the setup function of WPA mode. You can enable or disable the Wi-Fi Protected
Access (WPA) to assure your wireless environment is under protection.
36
TW-EA510
3.4.3.4 System
There are five items under the System section: Password, Time Zone, Upgrade, Factory Setting and
Restart.
3.4.3.4.1 Password
In factory setting, the default password is password, and that for user is also password. You can change
the default password to ensure that someone cannot adjust your settings without your permission. Every
time you change your password, please record the password and keep it at a safe place.
Please note that the minimum input for password is 8 alphanumeric characters long. Since it is case
sensitive, be sure that you remember whether a letter is in upper or lower case and make sure that your
Caps Lock is off. Moreover, please do not use the sign “&” in the passwords.
37
TW-EA510
3.4.3.4.2 Time Zone
The Router does not have a real time clock on board; instead, it uses the simple network time protocol
(SNTP) to get the current time from the SNTP server in outside network. Please choose your local time
zone and click Submit. You will get the correct time information after you really establish a connection to
Internet. The current time of selected time zone will be shown in the Status – System window.
Automatically adjust clock for daylight saving changes: It is optional for different time zone area.
SNTP Server IP Address: Specify the IP address if you want to use your familiar SNTP server.
38
TW-EA510
3.4.3.4.3 Factory Setting
If for any reason, you have to reset this router back to factory default settings, be careful that the current
settings will be lost and the settings are reset back to its default value. The factory default values is
detailed in the section 3.2 ‘‘Factory Default Settings’’.
3.4.3.4.4 Restart
In case the router stops responding correctly or in some other way stops functioning, you can perform the
restart. Your setting won’t be changed. Performing the restart, click on the Submit button.
39
TW-EA510
3.4.3.5 Firewall
User can decide to enable this firewall function including Packet Filter, Block Hacker Attack, and Block
WAN request features for better security control or not. But be noted, it wastes network processor
computation power. The performance will be lower about 10% to 15%. More firewall features will be
added continually, please visit our web site to download latest firmware.
3.4.3.5.1 Packet Filter
Packet filtering function enables you to configure your router to check specified internal/external user (IP
address) from Internet access, or you can disable specific service request (Port number) to /from
Internet. This configuration program allows you to set up different filter rules up to 6 for different users
based on their IP addresses or their network Port number. The relationship among all filters is “or”
operation, which means the device checks these different filter rules one by one, stating from the first rule.
As long as one of the rules is satisfied, the specified action will be taken.
Add: Click this button to add a new packet filter rule. After click, next figure will appear.
Edit: Check the Rule No. you want to edit. Then, click the “Edit” button.
Delete: Check the Rule No. you want to delete. Then, click the “Delete” button.
40
TW-EA510
Outgoing
Incoming: Determine whether the rule is for outgoing packets or for incoming packets.
Active: Choose “Yes” to enable the rule, or choose “No” to disable the rule.
Packet Type: Specify the packet type (TCP, UDP, ICMP or any) that the rule will be applied to.
Select TCP if you want to scope for the connection-based application service on the remote server using
the port number. Or select UDP if you want to scope for the connectionless application service on the
remote server using the port number.
Log: Choose “Yes” if you want to generate logs when the filer rule is applied to a packet.
Action When Matched: If any packet matches this filter rule, Forward or Drop this packet.
Source IP Address: Enter the incoming or outgoing packet’s source IP address(es).
Source Port: Check the TCP or UDP packet’s source port number(s).
Destination IP Address: Enter the incoming or outgoing packet’s destination IP address(es).
Destination Port: Check the TCP or UDP packet’s destination port number(s).
If the DHCP server option is enabled, you have to be very careful in assigning the IP
addresses of filtered private IP range in order to avoid conflicts because you do not know
which PC in LAN is assigned to which IP address. The easiest and safest way is that the
filtered IP address is assigned to specific PC that is not allowed to access outside
resource such as Internet. You configure the filtered IP address manually to this PC, but it
is still in the same subnet with the router.
41
TW-EA510
3.4.3.5.2 Bridge Filtering
Enable Bridge Filtering: Check Yes to enable this function or check No to disable.
Src MAC: Enter the source MAC address.
Dest MAC: Enter the destination MAC address.
Type: Enter the Ethernet type.
Block
Forward: Check Block if you want to block requests from the source MAC address sending
to the destination MAC address. Check Forward if you want to forward requests from the source MAC
address sending to the destination MAC address.
42
TW-EA510
3.4.3.5.3 Intrusion Detection
Check “Enable” if you want to detect invader sneak in your computer without permitted .The ADSL Router
can automatically detect and block the DoS (Denial of Service) attack if user enables this function. This
kind of attack is not to achieve the confidential data of this network; instead, it aims to crush specific
equipment or the entire network. If this happens, the users will not be able to access the network
resources. There are few samples of hacker patterns implemented as below.
-
IP Spoofing
-
Ping of Death (Length > 65535)
-
Land Attack (Same source / destination IP address)
-
IP with zero length
-
Sync flooding
-
Smurf Attack (ICMP Echo with x.x.x.0 or x.x.x.255)
-
Snork Attack
-
UDP port loop-back
-
TCP NULL scan
43
TW-EA510
3.4.3.5.4 Block WAN Request
Check “Enable” if you want to exclude outside PING request from reaching on this router.
3.4.3.5.5 URL Blocking
44
TW-EA510
URL blocking function enables you to avoid your LAN PCs from accessing some URLs. You must check
the “Enable” radio button to make the following figure appear for further configuration.
Always Block: Check this will block all browsing requests from PCs
Block: to specify the time period when you want this function activated. But be noted that SNTP (Time
Zone) function must WORK.
Keyword Filtering: Check if you want to enable the Keyword Filtering function and click the hyper link to
enter further configuration.
Use Domain Filtering: Check if you wan to enable the Domain Filtering function and click the hyper link
to enter further information.
3.4.3.6 VPN (Virtual Private Networks)
we will introduce the VPN settings to establish a secure communication path with remote site based on
IPsec. Please check “Enable” and click “Add” button. Then you will see IKE Setup page as below figure.
Then, you can configure the rule as your security plan.
45
TW-EA510
Active: To enable this VPN tunnel setting or not.
Remote Gateway IP or Host Name: the public IP address or host name of remote VPN device. For
example, it may be jet.dyndns.org (If remote IP is not fixed.) or 210.243.142.29.
Remote Subnet: The IP subnet of remote LAN environment, network ID. For example, it is 192.168.4.0
Remote Subnet Mask: The range of remote IPs can be communicated. For example, it is 255.255.255.0.
Proposal: There are two methods to check the authentication information, AH (authentication header)
and ESP (Encapsulating Security Payload).
ESP: Data will be encrypted and/or authentic. DES and 3DES encryption methods are supported. The
DES uses 56 bits as an encryption method. The 3DES uses 128 bits as an encryption method. MD5 and
SHA1 authentication protocols are supported. The authentication keys are a string and must be exactly
16 characters long for MD5 and 20 characters long for SHA1. The ESP can be one of following
proposals:
.ESP: DES without Authentication
.ESP: 3DES without Authentication
.ESP: DES with MD5
.ESP: DES with SHA-1
.ESP: 3DES with MD5
ESP: 3DES with SHA-1
46
TW-EA510
.ESP: MD5 without Encryption
.ESP: SHA-1 without Encryption
AH: Data will be authentic only. MD5 and SHA1 authentication protocols are supported. The
authentication keys are a string and must be exactly 16 characters long for MD5 and 20 characters long
for SHA1.
PreShared Key: IKE authentication method. This is a string from 8 characters to 128 characters. Both
sides should use the same key.
Advanced IKE Setup: Press “Advanced IKE Setup” button, you will see Advanced IKE Setup page as
below figure. Then, you can configure the parameters of IKE.
3.4.3.7 Virtual Server
Being a natural Internet firewall, the ADSL Router protects your network from being accessed by outside
users. When it needs to allow outside users to access internal servers, e.g. Web server, FTP server, Email server or News server, this product can act as a virtual server. You can set up a local server with
specific port number that stands for the service, e.g. Web (80), FTP (21), Telnet (23), SMTP (25), POP3
(110), DNS (53), ECHO (7), NNTP (119). When an incoming access request to the router for specified
port is received, it will be forwarded to the corresponding internal server.
For example, if you set the Public Port number 21 (FTP) to be mapped to the IP Address 192.168.0.100,
then all the ftp requests from outside users will be forwarded to the local server with IP address of
192.168.0.100.
47
TW-EA510
Public Port (from) & Port (To): Enter the public port number & range you want to configure.
Port Type: Select TCP if you want to scope for the connection-based application service on the remote
server using the port number. Or select UDP if you want to scope for the connectionless application
service on the remote server using the port number.
Host IP Address: Enter the IP address of certain internal server to which requests from the specified port
is forwarded.
3.4.3.8 Advanced
There are eight items under the Advanced section: ADSL,DNS. Dynamic DNS, NAT. RIP. Static Routing,
MISC Configuration and Diagnostic Test.
3.4.3.8.1 ADSL
Trellis: Default at Enabled.
Handshake Protocol: Default at Autosense – G.dmt first. You can also choose other protocols, such as
Autosense – T1.413 first, G.dmt/G.lite, T1.413, G.dmt, G.lite.
Wiring Selection: Default at Tip/Ring. Select Auto or A/A1 if necessary.
48
TW-EA510
3.4.3.8.2 DNS
A Domain Name System (DNS) contains a mapping table for domain name and IP address. In the
Internet, every host has a unique and friendly name such as www.yahoo.com and IP address. The IP
address is so hard to remember that you may just enter the friendly name www.yahoo.com and then the
DNS will convert it to its equivalent IP address.
You can obtain Domain Name System (DNS) IP address automatically if ISP provides it when you logon.
Or your ISP may provide you with an IP address of DNS. If this is the case, you must enter the DNS IP
address.
49
TW-EA510
3.4.3.8.3 Dynamic DNS
With Dynamic DNS service, a domain name can be translated into a dynamic IP address, which is often
issued by ISP for dial-up service. A local server, such as Web server, Email server or FTP server, can
then be easily accessed without knowing the changing IP address.
Check the “Enable” button to access the Dynamic DNS service. You may sign up Dynamic DNS service
at http://www.dyndns.org and there you can also register domain names.
Host: Enter one domain name you have registered.
User Name: Enter the username used for sign-up.
Password: Enter the password used for sign-up.
Period: Set the time period for the Router to exchange information with the DDNS server. In addition to
update periodically according to this period setting, the Router will take the same action automatically
whenever the assigned IP changes
50
TW-EA510
3.4.3.8.4 NAT
The NAT Configuration page allows the user to set the configuration for the Network Address
Translation.
Dynamic NAPT: It provides dynamic Network Address Translation capability between LAN and multiple
WAN connections, and the LAN traffic is routed to appropriate WAN connections based-on the
destination IP addresses and Rout Table. This eliminates the need for the static NAT session
configuration between multiple LAN clients and multiple WAN connections.
NAT (Static): This option maps single WAN IP address to the local PC IP address. It is peer-to-peer
mapping, one-to-one. For each WAN interface, only one local PC IP address can be associated with each
WAN interface. Click the link Session Name Configuration to add the session name for WAN interface.
NAPT (Static): This option maps the single WAN IP address to many local PCs IP addresses, one-tomany. It is the multiple-mapping mechanism. For each WAN interface, more than one local PC can be
associated with one WAN interface. Click the Session Name Configuration to add the session name for
WAN interface.
Session Name: Enter the desired session name.
User’s IP: Allows the user to assign the IP address to map the corresponding NAT/NAPT sessions.
Session Name status will be displayed at the middle of this page to show the corresponding Session
Name with its IP address.
Click Session Name Configuration, the following screen displays.
51
TW-EA510
Session Name: Enter the desired session name.
Interface: This field allows the user to choose specific WAN interface (PVC or PPP Session) for NAT
session.
NAT allows only one entry (User IP) per session, NAPT allows many entries (User IPs) per session.
Select Add or Delete and then press the Submit button to add or delete any NAT session name setting
to/from the following table.
Go back to the previous page, NAT Configuration, to continue further settings.
52
TW-EA510
3.4.3.8.5 RIP
RIP: Default is Disabled.
Border Gateway: Default is Enabled.
Supply Interval seconds: The default value is 30 seconds.
Expire Timeout seconds: The default value is 180 seconds.
Garbage Timeout seconds: The default value is 120 seconds.
53
TW-EA510
3.4.3.8.6 SNMP
Simple Network Management Protocol (SNMP) is an optional feature that may or may not be supported
by your ADSL Bridge/Router.
54
TW-EA510
SNMP is an application layer protocol that is used for managing networks. SNMP is an optional feature
that may or may not be in the specific firmware that you are working with. There are several components
that make up the SNMP structure, including agents, network management stations (NMS), network
management protocols, and a management information base (MIB). An SNMP agent is a node that
resides on the network, typically a computer or a router. The SNMP agent is controlled and configured by
the NMS by sending SNMP messages between one another. SNMP agents are logged and identified in a
Management Information Base (MIB), in which they are identified by an object identifiers (OID).
One feature of SNMP is SNMP traps. SNMP traps are used to notify network managers of significant
events that have taken place in the network. These traps are sent to the SNMP NMS (NMS Server
located at Trap IP) through the specified ports.
SNMP System Identification: The System Name, System Contact, System Location, and System OID
are provided to identify the SNMP NMS. The System OID is the ID number placed in all Trap reports.
The System Name, System Contact, and System Location can be up to 127characters. Default value for
System OID is 1.3.6.1.4.1.4900. Read Community: This is the password to access public information.
The Read Community can be up to 127 characters. Default is “public.” Write Community: This is the
password to access private information.
The Write Community can be up to 127 characters. Default is “private.” Trap Community: This is the
password to access and view SNMP traps.
The Trap Community can be up to 127 characters. Default is “trap community.” Trap SNMP Version:
Select from Version 1 or Version 2. Default is Version 1. Trap IP: This is the IP address to which SNMP
traps are sent. There can be up to 5 different SNMP trap destination IP addresses. Trap Port: This is the
corresponding port for the SNMP trap (see Trap IP above)
3.4.3.8.7 Static Routing
If you have another router with a LAN-to-LAN connection, you may create a static routing on the router
that is the gateway to Internet.
55
TW-EA510
Add: Click this button to add a new static routing. When you click this button, the next figure appears.
Delete: Check the item you want to delete. Then, click the “Delete” button.
Destination / Subnet Mask / Gateway Address: Fill in these fields required by this Static Routing
function.
3.4.3.8.8 MISC Configuration
HTTP server access: Default at Restricted.
HTTP server port: Default at 80.
FTP server: Default at Enabled.
TFTP server: Default at Disabled.
DMZ: Regarding the DMZ Host, it is a local computer exposed to the Internet. Therefore, an incoming
packet will be checked by NAT algorithms in the ADSL Router, then passed to the DMZ host when the
packet is not sent by hacker or not limited by the virtual server list.
DMZ HOST IP: Enter the IP address of the DMZ host.
DHCP Relay: Default at DHCP Server.
DHCP Target IP: Default is 0.0.0.0
IGMP Proxy: Default at Disabled.
56
TW-EA510
PPP Half Bridge: Default at Disabled.
PPP reconnect on WAN access: Default at Disabled. Select Enabled if you want to automatically reestablish the PPPoE/PPPoA session when disconnected by ISP.
3.4.3.8.9 Diagnostic Test
As soon as you enter the test program, all tests will run automatically to diagnose the connection status of
the device.
Checking LAN Connection
Testing Ethernet LAN connection
This test passes if the Ethernet LAN interface is working properly.
Checking ADSL Connection
Testing ADSL Synchronization
This test checks your DSL modem to see if it can successfully negotiate and establish a DSL connection
with your service provider's central office equipments. The test returns PASS if a DSL connection is
established.
If this test returns FAIL, please try the test again a few minutes after this test is completed. Since your
DSL modem need a couple of seconds to a few minutes to establish the DSL connection depending on
57
TW-EA510
your phone line quality. If this test returns FAIL, make sure your phone line is connected to your DSL
modem securely, and also check with your service provider to see if your service is activated.
If this test returns FAIL, all other tests will be skipped.
Checking Circuit 0 for Network Connection
Test ATM OAM Segment Loop Back
This test sends ATM OAM F5 Segment loop back request cells to the central office equipments through
your DSL connection. This test will pass if response cell is received. Since your service provider might not
support this test, your DSL modem could still work even if this test fails.
If this test fails consistently and your DSL modem seems not working, check to make sure the VPI and
VCI are configured correctly.
This test returns FAIL if the DSL synchronization test failed.
Test ATM OAM End-to-End Loop Back
This test sends ATM OAM F5 End-to-End loop back request cells to the central office equipments
through your DSL connection. This test returns PASS if response cell is received. Since your service
provider might not support this test, your DSL modem could still work even if this test fails.
If this test return FAIL consistently and your DSL modem seems not working, check to make sure the VPI
and VCI are configured correctly.
This test returns SKIPPED if the DSL synchronization test failed.
Test Ethernet connect to ATM
This test returns PASS if the ATM AAL5 module is loaded correctly in your DSL modem. If this test
returns FAIL, an internal error has occurred.
This test returns SKIPPED if the DSL synchronization does not return PASS.
Test IP connect to PPP
This test returns PASS if your DSL modem has been assigned a valid IP address by your service
provider through DHCP or your DSL modem is assigned a valid IP address statically.
If this test returns FAIL, run this test again a few minutes after this test is completed. If this test returns
FAIL consistently and DHCP client is turned on in your DSL modem, check with your service provider. If
this test returns FAIL consistently and your DSL modem is statically assigned an IP address, make sure
the IP address is the correct one assigned by your service provider.
This test returns SKIPPED if “Ethernet connect to AAL5” test does not return PASS.
Test Internet connection
This test returns PASS if the gateway can be reached through ping request. The gateway is assigned by
your service provider, or obtained from your service provider by PPP negotiation or DHCP negotiation.
58
TW-EA510
If this test returns FAIL, run this test again a few minutes after this test is completed. If this test returns
FAIL consistently and your DSL modem seems not working, check to make sure your statically assigned
IP address is configured correctly or DHCP client is turned on with the current VC.
This test returns SKIPPED if "IP connect to PPP" or "IP connect to Ethernet" test does not return PASS.
3.4.4 Save Config
Click the Submit button to write settings to flash. Then, the system will reboot for changes to take effect.
59
Chapter 4
Troubleshooting
If the ADSL Router is not functioning properly, you can refer first to this chapter for simple troubleshooting
before contacting your service provider. This could save your time and effort but if the symptoms persist, then
consult your service provider.
Problems Starting Up the ADSL Router
Problem
None of the LEDs are on
when you turn on the
ADSL Router.
Corrective Action
Check the connection between the adapter and the ADSL Router.
If the error persists, you may have a hardware problem. In this
case, you should contact technical support.
Problems with the WAN Interface
Problem
Initialization of the PVC
connection failed.
Corrective Action
Ensure that the cable is connected properly from the ADSL port to
the wall jack. The ADSL SYN LED on the front panel of the ADSL
Router should be on. Check that your VPI, VCI, type of
encapsulation and type of multiplexing settings are the same as
what you collected from your telephone company and ISP.
Reboot the ADSL Router. If you still have problems, you may need
to verify these variables with the telephone company and/or ISP.
Problems with the LAN Interface
Problem
Can’t ping any station on
the LAN.
Corrective Action
Check the LAN LNK LED on the front panel. The LED should be
on for a port that has a station connected. If it is off, check the
cables between your ADSL Router and the station.
Verify that the IP address and the subnet mask are consistent
between the ADSL Router and the workstations.
Problems Connecting to a Remote Node or ISP
Problem
Can’t connect to ISP.
Corrective Action
Check section 3.4.1.3 “Status – PPP status” to verify the line
status.
60
APPENDIX
Product Support and Contact Information
Most problems can be solved by referring to the Troubleshooting section in the User’s Manual. If you cannot
resolve the problem with the Troubleshooting chapter, please contact the dealer where you purchased this
product.
61
Chapter 4 Troubleshooting
62