1
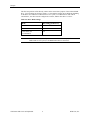
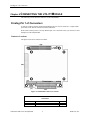
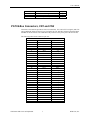
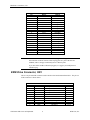
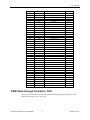
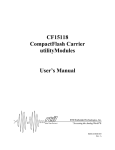
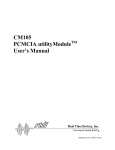
CMT36106/CMT3106
Hard Drive Carrier utilityModule
User’s Manual
BDM-610020031
Rev. B
CMT36106/CMT3106
Hard Drive Carrier utilityModule
User’s Manual
RTD Embedded Technologies, INC.
103 Innovation Blvd.
State College, PA 16803-0906
Phone: +1-814-234-8087
FAX: +1-814-234-5218
E-mail
[email protected]
[email protected]
web site
http://www.rtd.com
Revision History
Rev. A
Rev. B
New Manual
Corrected the Jumpers section in Chapter 2.
Published by:
RTD Embedded Technologies, Inc.
103 Innovation Blvd.
State College, PA 16803-0906
Copyright 1999, 2002-2005 RTD Embedded Technologies, Inc.
All rights reserved
Printed in U.S.A.
The RTD Logo is a registered trademark of RTD Embedded Technologies. cpuModule and utilityModule are
trademarks of RTD Embedded Technologies. MS-DOS, Windows, Windows 95, Windows 98 and Windows NT
are trademarks of Microsoft Corp. PC/104 is a registered trademark of PC/104 Consortium. All other trademarks
appearing in this document are the property of their respective owners.
TABLE OF CONTENTS
CHAPTER 1
INTRODUCTION ...........................................................................................................................1
CMT36106 EIDE AND HARD DRIVE CARRIER UTILITYMODULE ...............................................................................1
CMT3106 HARD DRIVE CARRIER UTILITYMODULE WITH HARD DRIVE ....................................................................1
FEATURES...................................................................................................................................................................1
CONNECTORS .............................................................................................................................................................1
RECOMMENDED CABLES ............................................................................................................................................2
GENERAL SPECIFICATIONS .........................................................................................................................................2
CHAPTER 2
CONFIGURING THE UTILITYMODULE.................................................................................3
CABLE MODES ............................................................................................................................................................3
CONNECTING EXTERNAL DRIVES ...............................................................................................................................3
JUMPERS .....................................................................................................................................................................3
CHAPTER 3
INSTALLING THE UTILITYMODULE .....................................................................................5
RECOMMENDED PROCEDURE......................................................................................................................................5
CHAPTER 4
CONNECTING THE UTILITYMODULE...................................................................................6
FINDING PIN 1 OF CONNECTORS .................................................................................................................................6
Connector Locations .............................................................................................................................................6
CONNECTORS .............................................................................................................................................................6
PC/104 BUS CONNECTORS, CN1 AND CN2................................................................................................................7
EIDE DRIVE CONNECTOR, CN3.................................................................................................................................8
EIDE STACK THROUGH CONNECTOR, CN4 ................................................................................................................9
EIDE CABLE CONNECTOR, CN5 ..............................................................................................................................10
CHAPTER 5
RETURN POLICY AND WARRENTY......................................................................................11
RETURN POLICY .......................................................................................................................................................11
LIMITED WARRANTY ..........................................................................................................................................13
User's Manual
Chapter 1 INTRODUCTION
This manual gives information on the CMT36106 Hard Disk Carrier utilityModule. This module
attaches to the EIDE and PC/104 connector of a cpuModule, allowing a high speed hard drive
interface.
CMT36106 EIDE and Hard Drive Carrier utilityModule
The CMT36106 utilityModule was designed to provide an EIDE hard drive or Flash drive in the
PC/104 stack to support the Real Time Devices family of cpuModules that have integrated EIDE
controllers.
Notes:
The CMT36106 is not an EIDE controller. It is only a drive carrier. It must be used
with a cpuModule that has an on-board EIDE controller.
CMT3106 Hard Drive Carrier utilityModule with Hard Drive
The CMT3106 is a CMT36016 shipped with a 2.5” form factor hard drive installed.
Features
The following are major features of the CMT36106 utilityModule.
•
Provides a high speed drive interface up to DMA/100 (if supported by the
cpuModule)
•
A standard 2.5” form factor drive can be mounted directly onto the module
•
A 0.1” 40-pin connector is provided to connect to a second drive, i.e. a CD-ROM
drive.
•
A stack through connector is provided to allow two CMT36106 drives in a system.
Connectors
Connectors provided are:
•
•
•
•
•
CN1: PC/104 Bus (XT)
CN2: PC/104 Bus (AT)
CN3: EIDE hard drive connector
CN4: EIDE stack through connector
CN5: EIDE cable connector
CMT36106 IDE Carrier utilityModule
1
RTD USA, Inc.
Recommended Cables
Recommended Cables
•
40-conductor or 80-conductor EIDE cable which can be used to connect an external drive
(hard drive or CD-ROM drive) to the CMT36106.
General Specifications
•
•
•
•
•
•
•
Dimensions: 3.8 x 3.9 x 0.6" (97 x 100 x 16 mm)
Weight (mass): 3.0 ounces (85 grams)
4-layer PCB
Operating conditions: (not including drive)
temperature: -40 - +85 degrees C
relative humidity: 0 - 95%, non-condensing
Storage temperature: -55 to +125 degrees C
CMT36106 IDE Carrier utilityModule
2
RTD USA, Inc.
User’s Manual
Chapter 2 CONFIGURING THE UTILITYMODULE
The following sections contain information on configuring the utilityModule.
Please read this entire section before attempting to use the utilityModule.
Cable modes
There are two types of cables that are used for EIDE drives: a 40 conductor cable, and an 80
conductor cable. The 80 conductor cable adds a ground wire between each signal, and uses the
standard 40 pin connectors. A 40 conductor cable can be used for speeds up to UDMA Mode 2
(Ultra ATA/33). An 80 conductor cable is required for higher speeds. The BIOS or operating
system detects the type of cable that is attached, and selects an appropriate speed. The
CMT36106 can emulate either 40 conductor or 80 conductor cables based on the jumper settings.
Connecting External Drives
External EIDE drives can be connected to CN5 of the CMT36106. This can be either an
additional hard drive, or a CD-ROM drive. In this configuration, one of the drive must be
configures as a master, and one as a slave.
When using an external drive, a 40 conductor cable is generally used, and the board configured in
40 conductor mode. If higher transfer rates are desired, 80 conductor mode can be used. The
ATA specification limits an 80 conductor cable to 18 inches in length. The CMT36106 has about
12 inches of trace, so a cable attached to CN5 in 80 conductor mode may only be 6 inches in
length. Also, not all signals go to all connectors on an 80 conductor cable. The section of the
cable that attaches to the drives should be used, and the remaining cable should be discarded.
Jumpers
Jumper JP1 configures the following functions:
•
40 or 80 conductor mode
•
Master/Slave
Table 2.1 shows the jumper settings to select the cable mode for the CMT36106. When two
CMT36106 boards are used in the same system, they must both be jumpered for 40-conductor
mode.
Table 2.1 Cable Mode Settings
Cable Mode
Fastest Speed
JP1
5-6
7-8
40conductor
Yes
No
Ultra ATA/33
80conductor
No
Yes
Ultra
ATA/100
CMT36106 IDE Carrier utilityModule
3
RTD USA, Inc.
Jumpers
The first four positions of JP1 directly connect to the master/slave jumpers of the on board EIDE
drive. Typical settings are shown in Table 2.2. Note that the settings may be different depending
on the drive used. When two CMT36106s are in a system, or a CMT36106 is used with an
external drive, one drive must be configured as a master, and the other drive as a slave.
Table 2.2: Drive Mode Settings
Mode
JP1 Setting (position 1-4)
Master
None
Slave
3-4
Cable Select (not
recommended)
2-4
Notes:
The CMT36106 only can only connect to two drives. For example, if two
CMT36106s are in a system, a CD-ROM cannot also be connected.
CMT36106 IDE Carrier utilityModule
4
RTD USA, Inc.
User’s Manual
Chapter 3 INSTALLING THE UTILITYMODULE
Since the utilityModule uses a PC/104 and EIDE stack through bus, it must be stacked directly
above the cpuModule.
Recommended Procedure
We recommend you follow the procedure below to ensure that stacking of the modules does not
damage connectors or electronics.
•
Turn off power to the PC/104 system or stack.
•
Select and install standoffs to properly position the utilityModule on the PC/104 stack.
•
Touch a grounded metal part of the stack to discharge any buildup of static electricity.
•
Remove the utilityModule from its anti-static bag.
•
Verify the jumper settings of the utilityModule.
•
Check that keying pins in the PC/104 bus connector are properly positioned.
•
Hold the utilityModule by its edges and orient it so the bus connector pins line up with the
matching connector on the stack.
•
Gently and evenly press the utilityModule onto the PC/104 stack.
CAUTION: Do not force the module onto the stack! Wiggling the module or applying too
much force may damage it. If the module does not readily press into place,
remove it, check for bent pins or out-of-place keying pins, and try again.
CMT36106 IDE Carrier utilityModule
5
RTD USA, Inc.
Finding Pin 1 of Connectors
Chapter 4 CONNECTING THE UTILITYMODULE
The following sections describe connectors of the utilityModule.
Finding Pin 1 of Connectors
A white area silk-screened on the PC board indicates the pin 1 end of connectors. A square solder
pad visible on the bottom of the PC board also indicates it.
Please make certain you have correctly identified pin 1 of a connector before you connect to it and
attempt to use the utilityModule.
Connector Locations
The figure below shows connector locations.
Figure 4.1 CMT36106 Connector Locations
Connectors
Connector
CN1
CN2
CMT36106 IDE Carrier utilityModule
Function
PC/104 XT Bus
PC/104 AT Bus
6
Size
64 pin
40 pin
RTD USA, Inc.
User’s Manual
CN3
CN4
CN5
JP1
EIDE Drive Connector
EIDE Stack through Connector
EIDE Cable Connector
Options Jumper
50 pin
44 pin
40 pin
8 pin
PC/104 Bus Connectors, CN1 and CN2
Connectors CN1 and CN2 provide PC/104 bus connections. CN1 carries XT bus signals, and CN2
carries additional signals for the AT bus. The signals on CN1 and CN2 conform to the IEEE P966
standard for the PC/104 bus. The CMT36106 only connects to the power pins of the PC/104 bus.
The following tables list the connector pin outs:
Pin
1
2
3
4
5
6
7
8
9
10
11
12
13
14
15
16
17
18
19
20
21
22
23
24
25
26
27
28
29
30
31
32
CMT36106 IDE Carrier utilityModule
PC/104 XT Bus Connector, CN1
Row A
Row B
IOCHCHK*
SD7
SD6
SD5
SD4
SD3
SD2
SD1
SD0
IOCHRDY
AEN
SA19
SA18
SA17
SA16
SA15
SA14
SA13
SA12
SA11
SA10
SA9
SA8
SA7
SA6
SA5
SA4
SA3
SA2
SA1
SA0
0V
7
0V
RESETDRV
+5V
IRQ9
-5V
DRQ2
-12V
ENDXFR*
+12V
(KEYING PIN)
SMEMW*
SMEMR*
IOW*
IOR*
DACK3
DRQ3
DACK1*
DRQ1
REFRESH
SYSCLK
IRQ7
IRQ6
IRQ5
IRQ4
IRQ3
DACK2*
TC
BALE
+5V
OSC
0V
0V
RTD USA, Inc.
EIDE Drive Connector, CN3
Pin
0
1
2
3
4
5
6
7
8
9
10
11
12
13
14
15
16
17
18
19
Note:
PC/104 AT Bus Connector, CN2
Row C
Row D
0V
SBHE*
LA23
LA22
LA21
LA20
LA19
LA18
LA17
MEMR*
MEMW*
SD8
SD9
SD10
SD11
SD12
SD13
SD14
SD15
(KEYING PIN)
0V
MEMCS16*
IOCS16*
IRQ10
IRQ11
IRQ12
IRQ15
IRQ14
DACK0*
DRQ0
DACK5*
DRQ5
DACK6*
DRQ6
DACK7*
DRQ7
+5V
MASTER*
0V
0V
Two locations on the bus have mechanical keying pins to help prevent
misconnection of the PC/104 bus. These keying pins are a part of the PC/104
standard, and we strongly recommend you leave them in place.
If you have other modules without keying pins, we suggest you modify them to
include keying.
EIDE Drive Connector, CN3
CN3 is a 50-pin 2mm DIL connector used to attach to the board mounted hard drive. The pin out
of this connector is shown below.
Pin
A
B
C
D
Key
Key
1
2
3
4
CMT36106 IDE Carrier utilityModule
EIDE Hard Drive Connector, CN3
Signal
Function
in/out
Option Selection Pin
Option Selection Pin
Option Selection Pin
Option Selection Pin
n.c.
n.c.
RESET*
GND
HD7
HD8
Reset HD
Ground signal
HD data 7
HD data 8
8
out
-in/out
in/out
RTD USA, Inc.
User’s Manual
5
6
7
8
9
10
11
12
13
14
15
16
17
18
19
20
21
22
23
24
25
26
27
28
29
30
31
32
33
34
35
36
37
38
39
40
41
42
43
44
HD6
HD9
HD5
HD10
HD4
HD11
HD3
HD12
HD2
HD13
HD1
HD14
HD0
HD15
GND
n.c.
AEN
GND
IOW*
GND
IOR*
GND
IOCHRDY
BALE
n.c.
GND
IRQ
IOCS16*
A1
GND
A0
A2
HCS0*
HCS1*
LED
GND
+5V
+5V
GND
n.c.
HD data 6
HD data 9
HD data 5
HD data 10
HD data 4
HD data 11
HD data 3
HD data 12
HD data 2
HD data 13
HD data 1
HD data 14
HD data 0
HD data 15
Ground signal
Address Enable
Ground signal
I/O Write
Ground signal
I/O Read
Ground signal
I/O Channel Ready
Bus Address Latch Enable
in/out
in/out
in/out
in/out
in/out
in/out
in/out
in/out
in/out
in/out
in/out
in/out
in/out
in/out
--out
-out
-out
-in
out
Ground signal
Interrupt Request
16 bit transfer
Address 1
Ground signal
Address 0
Address 2
HD Select 0
HD Select 1
HDD activity LED (-)
Ground signal
Logic Power
Motor Power
Power Ground
-in
in
out
-out
out
out
out
in
-Pwr
Pwr
--
EIDE Stack through Connector, CN4
CN4 is a 44-pin 2mm DIL connector is the EIDE stack through connector. The pin out of this
connector is the same as pins 1-44 of CN3.
CMT36106 IDE Carrier utilityModule
9
RTD USA, Inc.
EIDE Cable Connector, CN5
EIDE Cable Connector, CN5
CN5 is a 40-pin 0.1" DIL connector is the EIDE cable connector. The pin out of this connector is
the same as pins 1-40 of CN3.
CMT36106 IDE Carrier utilityModule
10
RTD USA, Inc.
User’s Manual
Chapter 5 RETURN
POLICY AND WARRENTY
Return Policy
If you wish to return a product to the factory for service, please follow this procedure:
Read the Limited Warranty to familiarize yourself with our warranty policy.
Contact the factory for a Return Merchandise Authorization (RMA) number.
Please have the following available:
•
•
•
Complete board name
Board serial number
A detailed description of the board’s behavior
List the name of a contact person, familiar with technical details of the problem or situation, along
with their phone and fax numbers, address, and e-mail address (if available).
List your shipping address!!
Indicate the shipping method you would like used to return the product to you.
We will not ship by next-day service without your pre-approval.
Carefully package the product, using proper anti-static packaging.
Write the RMA number in large (1") letters on the outside of the package.
Return the package to:
RTD Embedded Technologies, Inc.
103 Innovation Blvd.
State College PA 16803-0906
USA
CMT36106 IDE Carrier utilityModule
11
RTD USA, Inc.
Return Policy
CMT36106 IDE Carrier utilityModule
12
RTD USA, Inc.
User’s Manual
LIMITED WARRANTY
RTD Embedded Technologies, Inc. warrants the hardware and software products it manufactures and
produces to be free from defects in materials and workmanship for one year following the date of shipment
from RTD Embedded Technologies, INC. This warranty is limited to the original purchaser of product and
is not transferable.
During the one year warranty period, RTD Embedded Technologies will repair or replace, at its option, any
defective products or parts at no additional charge, provided that the product is returned, shipping prepaid,
to RTD Embedded Technologies. All replaced parts and products become the property of RTD Embedded
Technologies. Before returning any product for repair, customers are required to contact the factory for an
RMA number.
THIS LIMITED WARRANTY DOES NOT EXTEND TO ANY PRODUCTS WHICH HAVE BEEN
DAMAGED AS A RESULT OF ACCIDENT, MISUSE, ABUSE (such as: use of incorrect input voltages,
improper or insufficient ventilation, failure to follow the operating instructions that are provided by RTD
Embedded Technologies, "acts of God" or other contingencies beyond the control of RTD Embedded
Technologies), OR AS A RESULT OF SERVICE OR MODIFICATION BY ANYONE OTHER THAN
RTD Embedded Technologies. EXCEPT AS EXPRESSLY SET FORTH ABOVE, NO OTHER
WARRANTIES ARE EXPRESSED OR IMPLIED, INCLUDING, BUT NOT LIMITED TO, ANY
IMPLIED WARRANTIES OF MERCHANTABILITY AND FITNESS FOR A PARTICULAR
PURPOSE, AND RTD Embedded Technologies EXPRESSLY DISCLAIMS ALL WARRANTIES NOT
STATED HEREIN. ALL IMPLIED WARRANTIES, INCLUDING IMPLIED WARRANTIES FOR
MECHANTABILITY AND FITNESS FOR A PARTICULAR PURPOSE, ARE LIMITED TO THE
DURATION OF THIS WARRANTY. IN THE EVENT THE PRODUCT IS NOT FREE FROM
DEFECTS AS WARRANTED ABOVE, THE PURCHASER'S SOLE REMEDY SHALL BE REPAIR
OR REPLACEMENT AS PROVIDED ABOVE. UNDER NO CIRCUMSTANCES WILL RTD
Embedded Technologies BE LIABLE TO THE PURCHASER OR ANY USER FOR ANY DAMAGES,
INCLUDING ANY INCIDENTAL OR CONSEQUENTIAL DAMAGES, EXPENSES, LOST PROFITS,
LOST SAVINGS, OR OTHER DAMAGES ARISING OUT OF THE USE OR INABILITY TO USE
THE PRODUCT.
SOME STATES DO NOT ALLOW THE EXCLUSION OR LIMITATION OF INCIDENTAL OR
CONSEQUENTIAL DAMAGES FOR CONSUMER PRODUCTS, AND SOME STATES DO NOT
ALLOW LIMITATIONS ON HOW LONG AN IMPLIED WARRANTY LASTS, SO THE ABOVE
LIMITATIONS OR EXCLUSIONS MAY NOT APPLY TO YOU.
THIS WARRANTY GIVES YOU SPECIFIC LEGAL RIGHTS, AND YOU MAY ALSO HAVE OTHER
RIGHTS WHICH VARY FROM STATE TO STATE.
CMT36106 IDE Carrier utilityModule
13
RTD USA, Inc.
Return Policy
RTD Embedded Technologies, Inc.
103 Innovation Blvd.
State College PA 16803-0906
USA
Our website: www.rtd.com
Techsupport: [email protected]
(814) 234-4626
CMT36106 IDE Carrier utilityModule
14
RTD USA, Inc.