1
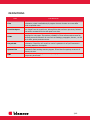
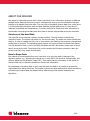
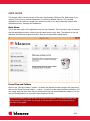
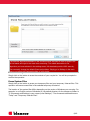
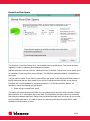
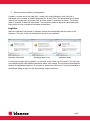
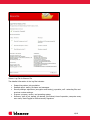
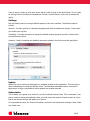
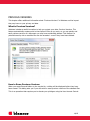
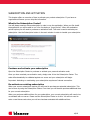
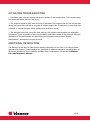
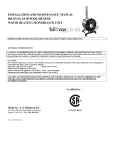
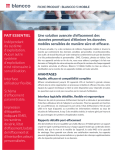
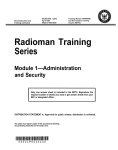
BLANCCO FILE User Manual VERSION 2015 7.7.2.8 Windows 8.1, Windows 8, Windows 7, Windows Vista and Windows XP. Certified and approved for Windows 8.1, Windows 8, Windows 7, Windows Vista and Windows XP. www.blancco.com ABSTRACT This is the official Blancco File User Manual. Blancco is the proven data erasure solution for millions of users around the world. As the pioneer and global leader in data sanitization and end-oflifecycle solutions, the company offers the most certified data erasure within the industry. Deleting files with Windows commands does not actually remove the data. Blancco File permanently erases data and files from servers, desktops and laptops and related storage while they are active. The user-friendly Blancco File graphical user interface makes day-to-day data erasing easy. For centralized reporting or to implement automatic erasing routines through scheduling or using command line integration, please see the Blancco File Administrator’s Manual. 2/19 DEFINITIONS ITEM Files Free Disk Space HTML Recycle Bin System Files XML EXPLANATION A file is stored on a computer as a piece of information or resource for storing information, which is accessible by a program. Its main function is to store data under a specified name. Free Disk Space is essentially unused disk space that comprises a lot of information out of sight from the regular user, although files that have been previously “deleted” can still be recreated from free disk space on a drive. HTML, which stands for Hyper Text Markup Language, is the predominant markup language for web pages. It provides a possibility to create structured documents by denoting structural semantics for text such as headings, paragraphs, lists etc., as well as for links, quotes, and other items. Files and folders frequently end up in the recycle bin for the disposing of sensitive information. Therefore, the recycle bin can be a goldmine for anyone interested in recreating data from a computer. Different programs create a lot of extra data (system files) that are left as back-up information while working with the program. These files are regularly not known or seen by the user. eXtensible Markup Language is a markup language that defines a set of rules for interpreting documents. 3/19 TABLE OF CONTENTS About File Erasing................................................................................................................... 5 Structure of the Hard Disk.................................................................................................... 5 How to Erase Data .............................................................................................................. 5 Levels of Information........................................................................................................... 6 Install and Uninstall ................................................................................................................ 7 System Requirements .......................................................................................................... 7 Install using a CD: ............................................................................................................... 7 Install using a file: ............................................................................................................... 7 Uninstall the application: ...................................................................................................... 7 User Guide ............................................................................................................................. 8 Main Menu.......................................................................................................................... 8 Erase Files and Folders ........................................................................................................ 8 Erase the Recycle Bin .......................................................................................................... 9 Erase System Files............................................................................................................... 9 Erase Free Disk Space ....................................................................................................... 10 Log files ........................................................................................................................... 11 Settings ............................................................................................................................ 13 Update ............................................................................................................................. 13 Subscription ...................................................................................................................... 13 Previous Versions ................................................................................................................. 14 What is Previous Versions? ................................................................................................. 14 How to Erase Previous Versions .......................................................................................... 14 Disable dialog ................................................................................................................... 15 Subscription and activation .................................................................................................... 16 What is the Subscription Center? ........................................................................................ 16 Purchase and activate your subscription .............................................................................. 16 Re-activate an existing subscription .................................................................................... 16 Activation Troubleshooting .................................................................................................... 17 Additional information ........................................................................................................... 17 Contact information .............................................................................................................. 18 4/19 ABOUT FILE ERASING One aspect of computer security that is often overlooked is how information is stored on different storage media. Research has proven that it is dangerously easy to recover information that was thought to be deleted from hard disks. The only way to completely remove data from a hard drive is to overwrite that information with new data. Because physical destruction of a hard drive is relatively complicated and unsatisfactory, it is often preferred to Erase hard drive information by intentionally overwriting that data with other data so that the original data cannot be recovered. Structure of the Hard Disk The hard disk is the computer’s primary storage medium. The disk surface is divided into concentric tracks. The thinner the tracks are, the more storage. The tracks are further divided into sectors. In order to update the disk, one or more sectors are read into the computer, changed and written back to the disk. The operating system figures out how to fit data into these fixed spaces. The File Allocation Table, a part of the DOS, Windows and OS/2 file system, keeps track of where data is stored on the disk. The directory list, which contains the file name, extension, date, etc., points to the FAT entry where the file starts. How to Erase Data One method of removing data from your hard drive is by using the built-in features of the operating system, e.g., emptying the recycle bin or using DEL in the terminal. Unfortunately, this will only affect the File Allocation Table (FAT). That means that the information is still stored on the hard disk and it is therefore possible to recover that information. By intentionally overwriting data on your hard disk with new data, it is possible to prevent the original data from being recovered. The number of times and byte patterns that should be used for overwriting the original data are determined by different approved erasure standards and algorithms. 5/19 Levels of Information There are several different levels of information stored on your hard disk. These include: Regular files - Information contained in the file system. This includes file names, file attributes, and file contents. Deleted files - When a file is deleted from a file system, the operating system does not overwrite the blocks on the hard disk that the file is written on. Instead, they simply remove the file’s reference from the File Allocation Table. System files - Temporary files, including print spooler files, browser cache files and files for “helper” applications. Most users either expect the system to automatically delete this data or are not even aware that it exists. “Free Space” - Includes information in slack space, backing store for virtual memory, and old data that has been partially overwritten. Blancco File allows erasure of file slack, namely the space that exists from the end of the file to the end of the last blocks of data assigned to the file. TIP: Make sure that you run the “Erase Free Space” function regularly in order to prevent data leaks. Number ”Security is a chain; it's as strong as the weakest link. Mathematical cryptography /…/ is the strongest link in most security chains. The computer security, the network security, the people security these are all much worse” Bruce Schneier Erasing Algorithms (as used above) 0 HMG Infosec, Lower standard (DEFAULT ALGORITHM) 1 HMG Infosec, Higher standard 2 Peter Gutmann's Algorithm 3 U.S Department of Defense Sanitizing (DoD 5220.22-M) 4 Bruce Schneier's Algorithm 5 Navy Staff Office Publ. 6 NCS Center 7 Air Force System Security 8 US Army 9 Not currently in use 10 OPNAVINST 5239.1A 11 NSA 130-1 12 DoD 5220.22-M ECE 13 BSI-2011-VS (similar) 14 BSI-GS 15 BSI-GSE 50 Random* * Random; 1 round of overwriting based on pseudo random data generated by host OS PRG. Overwriting rounds 1 3 35 3 7 3 4 4 3 7 3 3 7 3 2 3 1 6/19 INSTALL AND UNINSTALL This chapter will help you to install Blancco File. System Requirements Windows 8, 7, Vista and XP all versions. Windows Server: 2012, 2008, 2003 all versions (if you have licensed the Server Edition). Both 32 and 64 bit systems are supported. Install using a CD: 1. 2. 3. 4. 5. Insert the Blancco File CD into your optical drive (CD-ROM or DVD). Choose “Install” from the menu. Follow the instructions on the screen. Enter your personal license information when prompted. The application will start automatically as soon as the installation process has been completed. Install using a file: 1. 2. 3. 4. Double-click on the installation file. Follow the instructions on the screen. Enter your personal license information when prompted. The application will start automatically as soon as the installation process has been completed. Please note: Deployment can also be done by using an MSI package that can be requested for delivery in case of an enterprise solution. Uninstall the application: 1. 2. 3. 4. Open the Control Panel. Choose “Add/Remove Programs”. Select the application you wish to remove. Follow the instructions on the screen. 7/19 USER GUIDE This chapter offers a brief overview of the main functionality of Blancco File. Read below if you want to find out how to use the application in a safe and efficient manner. This versatile application can be used on a single user machine as well as in a large corporate network with centralized control, licensing and installation. Main Menu This is the main menu of the application and the user interface. There are other ways to interact with the application but this is where you will spend most of your time. The buttons on the left represent the different program functions. Each one is described in detail below. Erase Files and Folders Click on the “Files and Folders”- button. To display the desired function window (see next page), click on the “Erase Files and Folders” – button. In order to erase individual files and folders, you can simply drag and drop them into the window and they will be automatically added or you can use the Browse-buttons on your left to add objects to the list. Tip: Prior to operation, check the box “Go directly to operation” in the center bottom field of the window. This will take you directly to the the function next time without showing the built in mini guide. 8/19 The different algorithms available in the shortcut menus are listed in order of speed. Left is the fastest and right is the most time consuming. The middle alternative is the algorithm you have selected in the settings menu. All standrads provide 100% security. You can easily change the default Erasure algorithms. Simply go to Settings in the main menu and select the Erasing algorithm of your choice. Erase the Recycle Bin Simply click on the button to erase the contents of your recycle bin. You will be prompted to confirm the operation. Erase System Files Simply click on the button to erase your temporary files and your temporary Internet files. This operation will erase unused files in the selected temporary directories. The location of the system files differs depending on the version of Windows you are using. For example: in an English version of Windows XP, the default directory for the temporary folders is “C:\Documents and Settings\<your name>\Local Settings\”. The concerned subdirectories are “Temp” and “Temporary Internet Files”. 9/19 Erase Free Disk Space This function is used for erasing all of your available free hard disk space. This should be done regularly in order to maintain good data leak protection. Add the hard disks that you want by checking the box on the left. The amount of free space gives an indication of how long the process will take. The different erasing algorithms are available on your right. You also have to select if you want to erase all free disk space, erase old file and folder names in the file table and also the slack space of your drives. Erasing the slack will take a long time to complete but is recommended for increased protection. For the best possible security, all operations should be checked and performed. 1. Shred all free (unused) disk space This option will create a temporary folder on your selected drive and fill it with a number of large files until there is no more space left on the disk. The application will then continue to erase the files using the selected algorithm. Please note that Windows might warn you that you are running out of available disk space. It is safe to ignore this warning since the disk space will be made available once the erasing is done. 10/19 2. Extra thorough shredding (includes slack) A cluster is a small part of the hard disk – usually only a few kilobytes in size. Each file is distributed over a number of clusters depending on its size. Even if the actual data being stored requires less storage than the cluster size, an entire cluster is reserved for the file. The unused space in a cluster is called the slack space. It is sometimes useful to erase the slack space since there might be a lot of sensitive information stored there. Log files When the operation has finished, a summary window will be displayed with the result of the operation. The color of the icon indicates the result of your operation. Operation Successful Completed with errors Operation Failed If you want to inspect your operation, you can click on the “View Log File”-button. This will open your default browser with detailed information about your erasing. The log files are automatically saved in the application directory. If you want to access your files, there is a shortcut available in the Settings dialog as well as in the Start Menu’s program directory. 11/19 Picture: Log File for Blancco File The detailed information in the log files includes: Overarching status: job completion. Detailed report: status, file name and messages. Security settings: algorithms (encryption and erasing), operation, self - extracting files and previous versions settings. Program: program, version, and operating system. Summary: type of job, started, job started, job finished, time of operation, computer name, user name, result logged to file and security signature. 12/19 There is also an option to have each report stored in XML-format in the report folder. This is useful for storing them in the Blancco Management Console. Contact Blancco if you wish to enable this option. Settings Use the Settings menu to change different aspects of the user interface. The different options include: General – Provides options for changing languages and other miscellaneous settings. It also helps you handle your log files. Shredding – Provides the option to change the default erasing algorithm and also contains brief information about them. Updates – Used for enabling and disabling automatic updates. Also lets you set the periodicity. Update Allows the user to check and download any available updates to the application. This can also be done automatically by using the Settings menu. The automatic downloads can be removed for deployment in larger organisations where updates are handled centrally. Subscription This is where you register your license if you have received a license code. This is necessary if you wish to continue using the application after your trial period has expired. Please contact us if your license has expired and we will gladly be of service. For organizational users, the license information received in the deployment package is hard coded and visible here. 13/19 PREVIOUS VERSIONS This chapter offers additional information about “Previous Versions” in Windows and the impact they may have on your privacy and data. What is Previous Versions? Windows includes a useful innovation to help you protect your data: Previous Versions. This feature automatically creates point-in-time copies of files as you work, so you can quickly and easily retrieve versions of a document you may have accidentally deleted. This feature is a potential security risk as sensitive files can be recreated – even if they have been deleted. How to Erase Previous Versions When you erase files and folders or the recycle bin, a dialog will be displayed before they have been erased. This dialog asks you if you also wish to erase previous versions of the selected files. This is an operation that requires you to elevate your privileges using the User Account Control. 14/19 Enter your administrative account password and wait while the previous versions are being erased. You can verify that the files have been removed by right clicking on a drive in Windows and selecting “Restore previous versions”. Disable dialog This dialog can be disabled by selecting the option “Always leave previous versions”. This can also be modified in the Settings dialog. 15/19 SUBSCRIPTION AND ACTIVATION This chapter offers an overview of how to activate your product subscription. If you have an organisational license you can skip this information. What is the Subscription Center? You will always need an active subscription in order to use the application. When you first install the application you will be able to run it for free during a “grace period”. When this evaluation period expires you will need to purchase an activation code. This code is used to activate your subscription. Use the Subscription button in the main window in order to handle your subscription. Purchase and activate your subscription Open the Subscription Center to purchase or activate your personal activation code. Once you have received your activation code, simply enter it into the Subscription Center. The code will automatically be validated against our server and your subscription will begin. Important: Activating or reactivating your subscription requires an Internet connection. Re-activate an existing subscription When your current subscription expires you will need to purchase an extended subscription. This can be done by using the Subscription Center. From here you will be able purchase additional time for your current subscription. When you purchase additional time for your subscription, your current subscription will need to be re-activated with our server. Please use the Subscription Center to do this. You will not need to enter a new license code since your old one has been extended with additional time. 16/19 ACTIVATION TROUBLESHOOTING 1. The license code must be entered exactly as it appears in the license email: This includes upper and lowercase letters, periods, and so on. 2. The program seems to hang when the code is activated. The program tries for five minutes and during this period there will be no progress: If it takes longer than 30 seconds it is most likely that a firewall or a similar program blocks access to our activation server. 3. The activation went well, but at the next start-up, the program has forgotten the registration information. There is possibly an anti-virus protection that blocks access to the program. Start the application as the administrator by right-clicking the program icon and select "Run As Administrator". Activate the program as usual. ADDITIONAL INFORMATION The Blancco File can also be used through sending parameters to the .exe or by using a special command line feature. These interfaces are optimized for efficient integration and atomization of file erasing operations. If your licensing includes these configurations, please see the Blancco File- Administrator’s Manual. 17/19 CONTACT INFORMATION Visit the technical knowledgebase (FAQ) and contact Blancco Technical Support by submitting a technical support ticket at: http://support.blancco.com/ See the instructional videos for Blancco products at: http://www.blancco.com/en/videos For contact information and the latest information about secure data erasure solutions, visit the Blancco website at: http://www.blancco.com/ We are always looking for ways to improve our products. Please let us know if you have any suggestions! 18/19 19/19