1
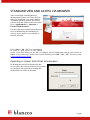
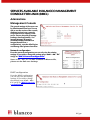
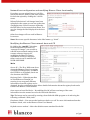
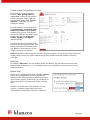
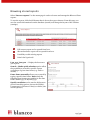
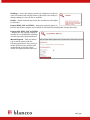
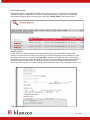
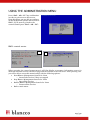
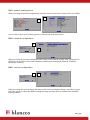
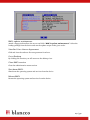
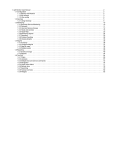
BLANCCO MANAGEMENT CONSOLE FOR LINUX
Enterprise Admin Manual for version 1.5
18.5.2009
TABLE OF CONTENTS
INTRODUCTION ................................................................................................ 5 Organization approach ............................................................................................ 5 Recycling / Warehoused devices approach ............................................................... 6 STANDARD VIEW AND ACCESS VIA BROWSER ..................................................... 7 Opening a screen lock from screensaver.................................................................. 7 SERVICES AVAILABLE IN BLANCCO MANAGEMENT CONSOLE FOR LINUX (BMCL) . 8 Administrate Management Console ......................................................................... 8 Network configuration .................................................................................................................... 8 DHCP configuration ......................................................................................................................... 8 Network boot configuration and modifying Blancco Client functionality ....................................... 9 Modifying the Blancco Client network boot and CD ........................................................................ 9 Manage backups............................................................................................................................ 12 Manage images and other files ..................................................................................................... 13 Reset failed logins ......................................................................................................................... 13 Administrate Management Consoler Users............................................................. 13 Create a new Group Admin or User ............................................................................................... 14 Edit User ........................................................................................................................................ 14 Delete User .................................................................................................................................... 14 Browsing stored reports ........................................................................................ 15 Print label option........................................................................................................................... 17 Install printer ................................................................................................................................ 17 Import reports ....................................................................................................... 20 Download Blancco Client Software ......................................................................... 20 Statistical Information ........................................................................................... 20 License Information ............................................................................................... 21 HASP Management ........................................................................................................................ 21 Creating a license activation key .................................................................................................. 22 2 / 31
Erasure status ....................................................................................................... 23 APPLICATION INTERFACE FOR DATA INTEGRATION ......................................... 24 USING THE ADMINISTRATION MENU ................................................................ 25 BMCL control centre ...................................................................................................................... 25 BMCL general configuration .......................................................................................................... 26 BMCL network configuration......................................................................................................... 26 BMCL service configuration........................................................................................................... 26 BMCL update-maintenance ........................................................................................................... 27 View End-User License Agreement ............................................................................................... 27 Go to Desktop................................................................................................................................ 27 Close BMCL session ....................................................................................................................... 27 Shut down BMCL ........................................................................................................................... 27 Reboot BMCL ................................................................................................................................. 27 TROUBLESHOOTING ........................................................................................ 28 Forgotten console key ........................................................................................... 28 CONTACT BLANCCO SERVICE ......................... ERROR! BOOKMARK NOT DEFINED. 3 / 31
Glossary
ITEM
EXPLANATION
Blancco Client
A Blancco product family which includes the following products: Blancco Asset
Manager, Blancco PC Edition, Blancco Server Edition and Blancco Data Centre
Edition
ERP
An Enterprise Recourse Planning system supports most of the business system that
maintains, in a single database, the data needed for a variety of business functions
such as Manufacturing, Supply Chain Management, Financials, Projects, Human
Resources and Customer Relationship Management.
HASP
Blancco Management Console for Linux uses a USB attachable HASP key solution in
order to control the license usage. The key contains license information about the
number of product licenses and license validation times. The HASP key and the
license updates can be activated with the HASP activation code, which can be
delivered by Blancco sales or service, or you can download it directly from your
license pool from blanccoservice.com
4 / 31
INTRODUCTION
Blancco Management Console for Linux is designed for:
•
•
•
•
•
Managing and receiving the audit trails/erasure reports from the asset manager, erasure
software (PC, Server or Data Centre) or profiling processes at one location
Browse, modify and delete audit trails
Distribution channel for *.iso images and PXE/TFTP network images
Provides a robust solution to handle and erase a large number of computers
Acts as a interface for synchronizing the Blancco database inside an organization’s asset
management databases or ERP databases
Organization approach
Blancco Management console can be used as an all-in-one solution around the data erasure
needs. All the necessary information about the erasure can be found from this location. Erasures
can be performed all over the organization and the distribution of the erasure client can be done
via several different methods such as: *.msi package(push) or *.iso image(pull & burn). The
network boot image and service for PXE/TFTP protocol is also available.
Reports from the erasure client can be sent directly to the database where they can be integrated
to the internet, extranet, ERP or other databases. Additional fields inside the erasure client can
be added for easier invoicing or asset recovery.
5 / 31
Recycling / Warehoused devices approach
Blancco Management console can act as a robust solution for recyclers or IT asset disposal
companies. It provides access to all the different distribution methods of the erasure
software(*.iso, networkboot/PXE boot). By having a KVM switch, several desktop units can be
erased just by attaching the minimum amount cables to the devices.
Reports from the erasure client can be sent directly to the database where they can be integrated
to the internet, extranet, ERP or other databases. During the reporting process the barcode
readers can be used in order to improve and speed up the process. Additional fields inside the
erasure client can be added for easier invoicing or asset recovery.
6 / 31
STANDARD VIEW AND ACCESS VIA BROWSER
After successfully installing Blancco
Management Console for Linux, the first
thing you would see is an empty desktop
of CentOS operating system. In order to
gain access to the system itself you need to
go to “Applications -> Internet ->
Firefox Web Browser”
Use the login name and password that you
have created during the installation in
order to access the services available in
the web interface.
Press “Ctrl – Alt – F1” key combination
in order to gain access to the Admin
screen. From this menu you are able to configure all the background options and services in
BMCL. If you want to go back to the normal CentOS press “Ctrl – Alt – F2”. See more from
Using administration menu.
Opening a screen lock from screensaver
By default the screen lock password in the
server will be the console password. If you make
no changes to the screensaver settings the
default time out will be 10 minutes.
7 / 31
SERVICES AVAILABLE IN BLANCCO MANAGEMENT
CONSOLE FOR LINUX (BMCL)
Administrate
Management Console
The general settings of the server can
be administrated from here. You are
able to see the version of the console,
database version in use, network
scope and services running on the
server. You are also able to manage
backups, download/modify *.iso
images(manage CD-images),
download/modify network boot
images(network boot->
configuration), reset the failed logins
and manage label printers from here.
Network configuration
From the network configuration you can only view the existing
settings. If you wish to change the settings press “Ctrl – Alt – F1”
and go to “BMCL Network configuration”
Note! “Ctrl – Alt – F1” is NOT available in Blancco Kit,
please use the link on a desktop.
DHCP configuration
From the DHCP configuration
you can only view the existing
settings. If you wish to change
the settings press “Ctrl – Alt –
F1” and go to “BMCL Services
configuration”.
8 / 31
Network boot configuration and modifying Blancco Client functionality
From here you can upload/import *.nbi files
sent by the Service Team or your sales contact.
Perform the upload by clicking the *.nbi file
name.
When all the desired *.nbi images have been
uploaded to the system you can set up the time
out(display time of the boot menu right after
the PXE boot) for the network boot menu. You
can also change the label displayed in the boot
menu.
Other boot images will not work in Blancco
boot menu.
Note! Do not use special characters in the label name e.g. “!&#%”.
Modifying the Blancco Client network boot and CD
By clicking the “modify” link either
from the network boot section or
“manage CD images” you are able to
edit the most common settings in the
erasure software. Support for
modifying the Blancco Client is
available in version 4.8 and later.
Other versions can be modified AT
YOUR OWN RISK.
Main
Server IP – The IP or DNS name from
where the Blancco Client is accessing
via HTTP/HTTPS protocol. In BMCL
the HTTPS is on by default, but it can
also function with HTTP.
Registry Fetch – When the machine
in which Blancco Client(BC) is
running is not encrypted, different
information from the registry can be
obtained. See the combinations here. More detailed information about the registry fetch can be
found in the Blancco Client manual.
Save report to hard disk drive – By enabling this, BC will store an image of the asset
information into the master boot record of the hard disk drive.
Tip: The image can be removed by running a boot disk with fdisk program on it and using the
following command: “fdisk /mbr”
Hardware Check – You can turn the hardware check on or off. For more information about the
hardware check, refer to the Blancco Client User Manual.
Default erasure method – Select the default erasure standard for the BC.
9 / 31
Authentication user and password – You can type in the default user and password information
for the BC in order to speed up the process. Remember that you cannot use Admin credentials
here. The Group admin is the first level that can perform erasures.
Default language and keyboard layout – Select the default language to be used.
Screens
Show license page – Turn on/off the license page display (1/4).
Show hard disk selection page – Turn on/off the hard disk detection screen (2/4).
Show method selection – Turn on/off the F3 function key for changing the overwriting
standard.
Show hexviewer – Turn on/off the F4 function key for displaying the Hexviewer for viewing
the contents of the hard disk drive in hex form.
Show prereport – Remove/add/automate the F5 function key for displaying the overview of
the report before the erasure. Automate would display the F5 function immediately when
entering the hard disk selection page.
Note! When setting extra fields with the mandatory option turned on, the user cannot exit the
screen until the mandatory extra field contains something.
Show erasure start warning – Turn on/off the pop-up screen for the “Are you sure?”
confirmation.
Show error screen – You can turn off all the error pop-ups.
Show overwriting success/bad sectors – Turn on/off the pop-up that informs the user
whether or not the erasure has been successful or if there have been any bad sectors on the
cleaned hard disk drives.
Show report page – Turn on/off the report page that is displayed after the erasure. When
turned off the report is sent automatically to the server.
Show test screen – If the hardware check has been turned on, you have 3 options: 1) part of
the tests are performed before the erasure, 2) Part of the tests are performed after the erasure,
3) Tests are performed before and after the erasure. If no option is selected, part of the testing
process is not shown. Please read the Blancco client user manual for more information about
the hardware Check.
Note! This function will not apply to motherboard, memory and CPU tests. Due to
implementation reasons these tests are carried out during the boot up process.
10 / 31
Extra Fields
In the Blancco Client you can have up to 25 extra fields added to the software. Fill in the
necessary information and press “Add” when you are ready.
Title: Input the title for the field
Enabled: Is the field on or off
Place: Location of the extra field in the erasure report structure
Type: The format of the field text, droplist or multidroplist
Tip: For a robust process Blancco recommends that you use text in the type selection. It is
recommended that the data be entered with a barcode scanner. This is not possible with the
dropdown option.
Value/s: Input the values inside the drop lists. Remember to separate the items with commas.
Extra field 1(see picture above) means that the AssetID field is located in the extra1 field in the
database. The next field will be extra2 and so on. Remember to save the configuration by
pressing “Save”!
11 / 31
Manage backups
Create backups simply by clicking “submit”. It is recommended that a backup operation be
performed at least once a month. Backup information will contain Blancco Client images,
Uploaded documents, configurations and the settings for the browse reports view.
The possible actions on an existing backup are:
Delete: Removes the backup
Export: Export the backup file to another destination. (IMPORTANT!)
Restore: Apply the backup to the BMCL database
Note! Restoring a backup will replace the current state of your database with the information
contained in the backup that is being restored. If you want to make sure that you do not lose any
data, make a new backup before using the restore command.
A previously exported and deleted backup can be imported again to the BMCL. To import a
backup, click, “Browse” to select the backup file and then click, “Import”. The backup will
then appear on the left side.
Important! An exported backup file name should never be modified because you will not be
able to import it again.
Note! After importing a backup, your database state remains unchanged until you restore the
imported backup.
12 / 31
Manage images and other files
From here you can upload *.iso images sent by the Service team to the system. You can also
upload documents from here. Click “Browse” to locate the file and then click “Import”. If the
image is version 4.8 or newer you can also click “Modify” in order to modify the functionality
of the image (see more from “Modifying the blancco software”) . Click “Delete” if you no longer
need the image or the file.
Reset failed logins
The user account may end up locked if there are more than 50 failed login attempts. By clicking
the “Clear all who have 50 or more failed logins”, the accounts become functional again.
Administrate Management Consoler Users
User management is built inside BCML.
This allows you to create the following
user structure:
1st level Enterprise Admin(You,
Only 1)
2nd level Group Admin(s)
2nd level Group Admin(s)(2)
…
3rd level User(s)
3rd level User(s)(2)
3rd level User(s)(3)
…
The Group Admin users are the first level users to perform erasures.
The Admin user can distribute license(s) and hasp key(s) to different group admin(s) and
user(s) from his license pool. During license usage and sharing a HASP dongle needs to be
attached to the server.
13 / 31
Create a new Group Admin or User
If you want to create a new user,
click the “new group admin”/
“new user” button. If you want to
create a new user under a specific
group admin group, click “create
subuser” (Available only for
Enterprise admin).
In both scenarios you need to fill in
the login name, password, first
name, last name and the email
address of the person. You should
also define what the available actions
for the user are. Check Browse,
Delete, Modify and Import
reports options.
Licenses can also be assigned to the
user from the license pool. If the user
being created is NOT allowed to use
any Blancco Client software, do not
assign any licenses to him/her.
Note! Ownership of the licenses is moved to the group/subuser. If you need to move licenses to
another team or user you need to edit the group/user and decrease the number of licenses
available.
Edit User
By clicking “Edit user” you can modify all the user details. You can also take licenses away
from the user if necessary, e.g. in a situation where you would like to move licenses from one
group to another.
Delete User
On the user’s administration page, click the “delete”
link of the corresponding user. You will then be
informed if the user you want to delete owns one or
more erasure reports. In this case you can choose to
delete the reports or give them to another existing
user.
Whether or not the user to be deleted owns any
reports, or whether some other users exist,
confirmation is asked before the user is deleted.
14 / 31
Browsing stored reports
Select “Browse reports” on the menu page in order to browse and manage the Blancco Client
reports.
To sort the reports, click the field name that is above the report columns. From this page you
can also search information from the database (search) and change the layout of the columns
(settings).
Full erasure report can be opened from here.
Shorter hardware report can be opened from here.
Possibility to edit existing reports
Print Label (optional)
Last 100, Last 500 – Display the last 100 or
500 reports
Search – Make quick selection option offers
the possibility to search for specific reports
according to a given time frame (e.g. week or
month).
Enter dates manually allows you to search by
typing a specific time frame. Note! Only the
following date formats are suitable for the date
fields: dd.mm.yyyy or dd/mm/yyyy.
Specify condition can be used to define more
precise searching options: choose the Field(s),
Comparator(s) and enter Value(s) to define your
search option(s).
15 / 31
Settings – Access the settings options for columns to be shown,
order of columns and edit the names of the fields. Also ability to
change settings for the CSV file is available.
Delete – Delete selected reports(see the check boxes and option
to select all)
Export XML, CSV or HTML – Export the selected reports in
the selected format. (output as all.xml/all.csv/all.html file including the selected files only).
Export ALL XML, CSV or HTML
– Export ALL the reports (output as
all.xml/all.csv/all.html file including
ALL the reports from the database).
Match Reports – This tool allows
you to match reports with the
following parameters: bios serial, pc
model, pc brand, mac number and
motherboard serial. The search
results are displayed below the tool.
16 / 31
Print label option
Print labels option is optionally available starting from version 1.4. This feature is especially
utilized in Task Force Kit edition. In order to start printing report information to the labels
select first the reports that you want print. Then click “Print Label”. See picture below:
Install printer
In the Task Force Kit the printer is already installed, but you are also able to install other
printers in to the system. For this you need to have CUPS and printer driver installed in to the
operating system in use. As a last step from BMCL website you would just select the installed
device that you want use, select the PPD file (/bws/usr/lib/cups/driver/lw400.ppd) and fill in a
desired ID Name for the device. From picture below you can see ID Name, PPD and Device
option for selecting device. If you are using a network printer select device dropdown and select
“add custom device”.
17 / 31
Template editor
Before you start printing please check that you have created a template for the printer attached
to the system. Please check also what paper size you are using (you should find the paper code
from the behind of the labels). See picture below.
Modifying the template
You can add and delete in the template text, logo and bar code elements. Each of these elements
can have a different size (width, height) and location in the paper(x, y). You can also move the
elements inside of the editor by using mouse. See picture below. From next page you can find a
template where the differences are described between different elements.
18 / 31
Elements
Example
Text element
Text: Fill in static text or a database field inside
of “%” signs. Select font size from 1-5 scale from
the dropdown menu.
Bar code element
Select the static text or database field used
inside of the code. Select also the code type to
be used.
Logo element
Please resize the image into a desired size
before uploading it. You can edit the stored
logos by clicking “EDIT LIST” inside the logo
dropdown menu. Following formats are
supported: jpg, bmp and png.
The whole database is available for the print label tool. Hear is a list of most common fields that
you can use to fetch information from the database (e.g. %product% or %disc.cleaningtime%):
Used product = product
Assettag = assettag
Version = version
Bios date = bios_date
Bios Info = bios_info
Bios Serial = bios_serial
Bios version = bios_version
Cache = processor. Cache
Chassis = chassis
Cleaning time = disk.cleaningtime
Company = company
CPU speed = processor.proc_speed
Date = date_item
Extra1(2-25) = extra1(2-25)
Info1(2-5) = info1(2-5)
Firewire = firewire_ports
HD badsectors = disk.badsectors
HD serial nb = disk.hdserial
HD Size = hdsize
HD vendor = disk.vendor
Login name = person_id
MAC = mac0
MAC2 = mac2
MAC3 = mac3
MB Chipset = mb_chipset
Memory (MB) = memory
PC brand = bios_make
PC model = bios_model
Person = person
Processor = processor. proc_name
Processor Name = processor.proc_name
Processor Cache = processor.cache
Processor DMI Speed = processor.dmispeed
Report ID = report_id
Serial N = serial
Server time = server_time_str
Time = time
USB = usb_ports
USB2 = usb2_ports
Windows version = windows.version
Windows serial = windows.serial
19 / 31
Import reports
To import new reports choose the option “Import Reports” on the menu page.
Shown only for Enterprise or Group Admin
BMCL contains a function for importing erasure reports (in XML format) from another location.
If the user has not been able to use the network for sending the report to the server this function
enables the user to import/gather reports to the Management Console database from stand alone
PCs via received email/floppy diskette/USB stick/other network directories.
At this point you are able to define the report file that is to be imported to the BMCL (e.g.
a:\preport.xml), or if you need to browse for the file from possible locations. If you are Enterprise
or Group admin you need to also choose to whom those reports will belong.
Download Blancco Client Software
From here the Group and normal users are able to download the imported documents and Erasure
software CD images. Only enterprise admin is capable of adding or deleting files/images from
here.
Statistical Information
To view statistics, choose the option “Statistical information” on the menu page.
In multi-user mode, the number of existing report(s) received during the defined period (today,
this/previous week, month, and year) is displayed for each user.
In addition, the total and average number of reports is also available for each period.
In single user mode, only the number of existing report(s) received during the defined period is
shown.
20 / 31
License Information
You can see the following details from here:
Product name – The licenses of which
products have been used(e.g. Demo, Asset
Manager)
License expiration date – Validation
date for this product from the HASP key
Total licenses – Total number of licenses
in use. When looking at the total number of
licenses it is good to remember that the
licenses from the HASP key can also be used
for other Blancco products. Therefore, the
licenses used and those remaining may not
correspond with the information stored in
the database. Therefore it is recommended that you keep 1 HASP key for 1 purpose if
possible.
Licenses given to others – Number of distributed licenses for different users
Remaining licenses to give or to erase – Number of licenses that are not assigned to any other
person and are available for use.
Reports received – Number of reports received for this product
HASP Management
When the Enterprise admin is informed that a specific HASP key has been assigned to his account,
he needs to go and assign the key to a Group Admin or User. He can gain access to this view by
going to “License Information” and from there to the HASP Management.
In the picture above, Enterprise Admin has already assigned the key to a user called “marge”. After
that he can delete the user from the list by clicking “delete”.
21 / 31
Creating a license activation key
If a HASP key has been assigned to you, you can create an activation code for the key from the
license pool that has been given to you. Therefore, there is no need to activate all the licenses
immediately.
Go to “License Information” and from there to “Create activation code”. Then select the key that
you would like the licenses to be uploaded to. You should see a similar picture as shown below:
Enter the number of licenses you want to take from your license pool, select the expiration time for
the activation code and press “Generate activation code”. Code generations may take for a while,
please wait. When the code is ready, you will see the screen as shown below:
The activation file can be used in all erasure client software, Blancco Management Console for
Linux and Blancco Management Console for Windows. Check how the activation is done from the
user manual of each product.
22 / 31
Erasure status
In the erasure status page the individual client machines erasure progress is shown. Operator ID is
filled by the person doing the erasure or automatically by the erasure software client (automatic fill
available starting from v4.9, view erasure status available starting v4.7).
Status indicators are coming in order of arrival within the exception that the finished erasures
should be on top. Press remove button when you no longer don’t need this information.
23 / 31
APPLICATION INTERFACE FOR DATA INTEGRATION
The Blancco database can be accessed easily from HTTP or HTTPS protocol directly. This can be
done with specific scripting rules. The interface instructions can be found here:
http://download.blancco.com/BWS/api_instructions/api_instructions.txt
You can test the scripts directly from the URL of your browser. Then just implement them into
your code and there you go!
Note! When doing scripting advanced skills may be needed. Blancco will not provide support for
problems associated with basic programming skills.
24 / 31
USING THE ADMINISTRATION MENU
Press “Ctrl – Alt – F1” key combination
in order to gain access to this screen.
From this menu you are able to configure
all the background options and services in
BMCL. If you want to go back to the
normal CentOS press “Ctrl – Alt – F2”.
BMCL control centre
1
2
When accessing the control centre menu it will first display a necessary information screen (1)
about the different services, DHCP IP range and the location of the web server. After pressing “Ok”
you will be able to access the menu itself(2) with the following options:
• Start Blancco Management Console for Linux
o Start all the services if they are stopped
• Stop Blancco Management Console for Linux
o Stop all the services
• Restart Blancco Management Console for Linux
o Restart all the services
• Back to main menu
25 / 31
BMCL general configuration
When accessing the general configuration menu the status of the server is shown first (1) and then
2
1
you are able to edit (2) all of these options or return back to the main menu.
BMCL network configuration
1
2
When accessing the network configuration the status of the network and the cable is displayed (1)
and then you are able to edit (2) the IP address and Network settings(IP, Network, Netmask,
Broadcast, Gateway).
BMCL service configuration
1
2
When accessing the services status, the status of the services is displayed first (1) and then you are
given the option to edit(2) the DHCP settings(IP range and lease time as milliseconds) and PXE
booting settings.
26 / 31
BMCL update-maintenance
Attach a floppy/usb media to the server and click “BMCL update maintenance”. Select the
backup package from the device and run the update scripts in the given order.
View End-User License Agreement
Click and view the end user license agreement from here.
Go to Desktop
By clicking this function you will return to the desktop view.
Close BMCL session
Close the administration menu session.
Shut down BMCL
Shut down the operating system and services from the device.
Reboot BMCL
Restart the operating system and services from the device.
27 / 31
TROUBLESHOOTING
Forgotten console key
If you have forgotten your console key, press “I forgot the key”. The screen below will appear:
Copy/Write the “unblock code” down and send it to: [email protected] The service team will
send your console key back via email. When logged on in the administrative console, remember to
change the console key to one that you will remember.
User right issues after running all the CentOS updates in the
CD installation version
After running all the security updates to CentOS you might discover that you can’t mount your
drives. Issue here is that after updating the security updates you need to modify the haldaemon
security policy configuration file.
File can be found in CentOS at "/etc/dbus-1/system.d/hal.conf" and add the following lines before
tag
</busconfig>:
<policy user="bws">
<allow send_interface="org.freedesktop.Hal.Device.SystemPowerManagement"/>
<allow send_interface="org.freedesktop.Hal.Device.LaptopPanel"/>
<allow send_interface="org.freedesktop.Hal.Device.Volume"/>
<allow send_interface="org.freedesktop.Hal.Device.Volume.Crypto"/>
</policy>
28 / 31
CONTACT INFORMATION
Blancco Service Team:
Blancco recommends using email to contact the support team. Service engineers will respond
within 24 hours to customers who have purchased a Blancco Service Package. Response time may
be longer during weekends and Finnish public holidays.
Technical support:
support.blancco.com
Phone and Fax:
Telephone switch:
+358-207-433-850
Address:
Blancco Ltd.
Länsikatu 15
FIN-80110 Joensuu
Finland
The Blancco website has the latest information about secure data destruction solutions:
www.blancco.com
We are always looking for ways to improve our products. Please let us know if you have any
suggestions!
29 / 31
NOTES
30 / 31
NOTES
31 / 31
32 / 31