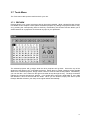
1
IMAGIX 3.2
user manual
- technical specifications subject to change without notice Reproduction in any form only with written permission from the publisher
Edition November 1997
BÄSSGEN AV-Technik GmbH
Hauptstr. 58 * D-79104 Freiburg * Germany
Tel. +49 761 23953 * Fax +49 761 35042
e-mail [email protected]
http://www.dia.de
Kodak is a registered trademark of Kodak AG
Syncode is a registered trademark of Dataton AB
MS-DOS is a registered trademark of Microsoft Corp.
IBM is a registered trademark of International Business Machines Corp.
CONTENTS
1 INTRODUCTION AND INSTALLATION ...............................................4
1.1 The IMAGIX Screen ............................................................................................... 5
1.2 Installation .............................................................................................................. 6
1.2.1 Installation on a PC .....................................................................................................................6
1.2.2 Configuring IMAGIX to your PC ..................................................................................................6
1.2.3 Connecting the control units to the PC........................................................................................6
2 WORKING WITH IMAGIX .....................................................................7
2.1 The First Steps with IMAGIX.................................................................................. 7
2.1.1 Let's get started ...........................................................................................................................7
2.2 Programming Suggestions................................................................................... 12
2.3 Formating and Playback with Timecode .............................................................. 14
2.4 Converting PlusTrac............................................................................................. 17
3 OVERVIEW ..........................................................................................18
3.1 IMAGIX Commands ............................................................................................. 18
3.2 The Graphic Corner ............................................................................................. 21
3.3 Event and Relative Times .................................................................................... 22
3.4 Operating modes.................................................................................................. 22
3.4.1 EDIT ..........................................................................................................................................22
3.4.2 PLAY .........................................................................................................................................22
3.4.3 SYNC.........................................................................................................................................23
3.5 Function Keys....................................................................................................... 23
3.5.1 F1 Help .....................................................................................................................................23
3.5.2 F2 Save File .............................................................................................................................23
3.5.3 F3 Load File .............................................................................................................................23
3.5.4 F4 Block Functions...................................................................................................................24
3.5.5 F8-F9 External and internal Clocks..........................................................................................26
3.6 File Menu.............................................................................................................. 26
3.6.1 New File ....................................................................................................................................26
3.6.2 Generate standard slide show ..................................................................................................27
3.6.3 Save As... ..................................................................................................................................27
3.6.4 Print ...........................................................................................................................................27
3.6.5 Select Wave File .......................................................................................................................27
3.6.6 Options ......................................................................................................................................28
3.6.7 Generate timecode....................................................................................................................29
3.6.8 Memory Functions.....................................................................................................................29
3.6.9 exit .............................................................................................................................................30
3.7 Tools Menu........................................................................................................... 31
2
3.7.1 PREVIEW ..................................................................................................................................31
3.7.2 SCREEN ...................................................................................................................................32
3.8 Connecting IMAGIX 3.2 to Harddisk Recording................................................... 33
3.9 Mouse Bar ............................................................................................................ 34
3.10 "Clock Source" Setting ....................................................................................... 34
3.11 Relative Blocks................................................................................................... 35
3.12 Working with X-Markings ................................................................................... 36
3.13 Keyboard Overview............................................................................................ 37
3
1 Introduction and Installation
IMAGIX 3.2 for Windows places the comprehensive functions of the Baessgen AV software at your
disposal under Windows. Intuitiveness has always been a hallmark of IMAGIX. Now in the Windows
version this perfection has been brought to a new height.
Experienced users will recognize IMAGIX' tried and true functions in the Windows version, as well. Up
to 16 projectors can be controlled by numerous programming commands.
With IMAGIX 3.2 you can use the mouse and the keyboard in any combination.
The flexible synchronization lets you view each programming step in real-time on the projection screen
or off-line using IMAGIX' Graphic Corner on your monitor. In other words, you control the software, not the other way around.
Absolute and waiting times allow your most divers ideas to be programmed with ease. IMAGIX works
with you. With 1/20ths of a second precision.
A comprehensive arsenal of Block Functions provide you with the tools to realize even the most
unusual projects.
Relative Blocks, the Preview Function, Speaker Support with X-Times - these mention only a few of
the valuable features for efficient programming.
Among the many fine details, one concept is self-evident: compatibility - .IMX files can be transferred
at will between IMAGIX for DOS and IMAGIX for Windows.
This manual contains practical examples and a detailed reference section which exhibit the fascinating
possibilities IMAGIX 3.2 has to offer.
4
1.1 The IMAGIX Screen
Clock Display and Setting (1)
Reset button for Clock (2)
Mode Display (3)
Mouse Bar (4)
Menu Bar (5)
Graphic Corner
On-line Help, File Name, Cues and Clock (7)
Marked Entry Position (8)
Programming Area (9)
5
1.2 Installation
1.2.1 Installation on a PC
IMAGIX 3.2 can be installed on your harddrive under Windows 3.1 or Windows 95. The installation
program is on the IMAGIX disk.
To install IMAGIX 3.2,
1. Start Windows.
2. Insert the IMAGIX disk in your diskette drive.
3. Select $Datei/Ausfuehren from the Main Menu of the Windows Program Manager.
4. Enter either a:\setup or b:\setup in the text field "$Befehlszeile" to indicate the diskette drive.
5. Confirm this either by pressing the Return key or by clicking the OK button with the mouse.
6. Follow the instructions on the screen.
After installing IMAGIX, start the program by selecting the IMAGIX symbol under Windows.
1.2.2 Configuring IMAGIX to your PC
Using the "Setup" Menu, you can configure IMAGIX to your PC. Start IMAGIX and then select from
the "File" Menu the menu item "Setups", or click the "E" button in the upper mouse bar. The Setup
menu appears. Two of the input possibilities are of interest to us now. First, choose whether you
have an external control unit connected to COM1/2 or whether you are working with an XCARD.
If you are using an external control unit, indicate whether it is connected to COM1 or COM2. If you are
using an XCARD, click the appropriate XCARD and then indicate in which expansion slot (between 1
an 7) the XCARD is located. In case you have made any changes, use the Save button to save your
changes.
When IMAGIX is started, it will first check COM1 and COM2 and then automatically recognize which
Baessgen control units are being used. Should you have changed the configuration you entered
under "Setup", IMAGIX will automatically switch to the other port and signal this to you.
1.2.3 Connecting the control units to the PC
Use the following cables when connecting the control units to your PC:
1. Cable E-1
QUATRIX/TRIPLEX/TRIPLEX, UX-MEGA, UX-PLUS
2. Cable D-2 (25-pole) or D-3 (9-pole)
TCX-4040, TCQ-2020
The appropriate cable is connected to the control unit's V-24 socket and to the PC's COM1/2 socket.
Important for TCX-4040/TCQ-2020:
After connecting the control unit and the PC, the TCX-4040/TCQ-2020 units must be set to PC mode
in order to work with IMAGIX. To do this,
1. call up Function 9 on the TCX-4040/TCQ-2020,
2. select in Function 9 the last line "Start PC-Mode",
6
3. Press the "Start" button.
"PC-Mode" will appear in the display along with the projector's current tray positions.
As soon as you call up the projector synchronization "sYnc", the TCX-4040/TCQ-2020's display will
show the word "sync" after "PC-Mode", at which time the TCX-4040/TCQ-2020 is ready to be the
interface between the PC, the projectors, and the tape machine. Should "sync" not appear in the
display, check the connections again between the TCX-4040/TCQ-2020 and the PC as well as the
configuration on the serial ports on your PC in Setup.
You can leave the PC-Mode on the TCX-4040/TCQ-2020 by pressing the Function button on the unit.
Attention: When connecting and turning on your gear, be sure to follow the proper procedure
exactly. First connect the devices according to the diagrams, next switch the TCX-4040/TCQ-2020 to
PC-Mode and finally switch on "sYnc" in IMAGIX.
Be sure to turn off the "sYnc" synchronization in IMAGIX before you quit IMAGIX and before you
disconnect the connection cable from your PC to the control units. This avoids possible function
errors.
2 Working with IMAGIX
2.1 The First Steps with IMAGIX
Before we delve into a detailed description of each IMAGIX function, let us look at a real-life situation
in order to gain an understanding of how easy it is to work with IMAGIX. IMAGIX can be worked with
comfortably using the mouse and the keyboard. When using the keyboard, the program adheres to
the standard Windows rules.
The following example uses primarily the mouse with additional references to the corresponding
keyboard commands.
The best method would be to follow the descriptions directly at the computer in order step-by-step to
get a feeling for working with IMAGIX. Numbers appearing in brackets refer to the Screen Overview
on page $$$. A number of the functions and modes will only be mentioned in passing, since the idea
here is to help you, not confuse you. Detailed information on every aspect of IMAGIX can be found in
Appendix C.
2.1.1 Let's get started
Let us start by loading the show titled "Example" into IMAGIX. To do this, click with the left mouse
button in the Mouse Bar (4); a menu box appears. Choose "Example.imx" from the list using the
mouse and confirm your selection with "OK". Alternatively you could use the keyboard by selecting
"File" and then "Load File"; press F10 to access this menu. Under "File" you will find the important
modes and functions. To access a certain line, press the "up" and "down" arrow keys until you reach
the line; the line will invert its color, thereby showing that it has been selected. Alternatively, you can
press the capital letter in the menu item (eg., for "sYnc" press "Y"). In other words, to select "Load
File", the "Load File" menu item must be displayed inverted. Confirm your selection by pressing the
"Return" key. The menu box will disappear and the example show will appear on your screen.
Let us now take a moment to get acquainted with IMAGIX' screen itself. Most of the room is taken by
the input area in which you program the commands.
7
Starting from the top under the IMAGIX 3.2 label you will find the menu bar containing "File", "Block
Functions", "Tools" and "Help", and directly under that the menu bar for use with the mouse. Behind
the symbols for the mouse are the menus (from left to right):
1. Open File (opened directory)
2. Save File (diskette)
3. Open Wave-File (music note)
4. $E (for "Setup"; "Einstellungen" in German)
5. Print (print the current file)
6. IMAGIX Info (i)
7. Quit IMAGIX (EXIT)
Once a symbol has been clicked, a dialog window will open listing various menu items.
Further down the screen you will find the buttons for "Edit", "Play" and "Sync", which allow you to
switch between the modes "Edit" and "Play", while the "Sync" lets you toggle the synchronization on
and off. For instance, when you want to want to view your programming in real-time on the screen,
simply click "Sync" to turn on IMAGIX' synchronization mode. Active input is always marked by a
brighter color.
When using the keyboard, press Alt-P to enter Play mode. To switch from Play mode back to Edit
mode, press Escape. Toggle "Sync" by pressing Alt-Y.
A listing of these and other keyboard shortcuts is always available via the integrated Windows-OnlineHelp.
In the next line you will find the Clock Display. The small button to the left of the display is the Reset
button with which you can reset the clock to 0:00.00. CLK-Source allows you to select which clock will
be used for IMAGIX' operation. The following settings are available:
TC ext: Time-Code coming from outside the system will control the operation.
TC int: Time-Code will be generated by the PC's internal clock.
Wave: The PC's internal clock will control the operation parallel to the selected Wave-File.
MTC out: An internal MIDI-Time-Code will control the operation and any connected Multimedia
applications.
By clicking the arrow to the right, a menu box will open out of which you can select the desired clock.
Below the Programming Area is a line containing (from left to right) a field for messages, the name of
the current IMAGIX production, the name of the activated WAVE-file (when appropriate), the number
of programming step in the current production (in brackets), and the computer's time reading. The
message field contains information appropriate to the programming column currently being edited.
In conclusion, let us take a look at the Graphic Corner in the upper right-hand portion of the screen.
This special display offers you a new prospective and new form of orientation while recording and
playing back. More on that later.
If you are ever uncertain about the use of a certain button or field (except for the Programming Area),
just hold the mouse of the item without clicking and after a short while an information line with appear
with an explanation of its function.
After this initial overview let us turn to our example show. The active input field will always be colored
according to your Windows Screen Color settings. To enter your programming, simply click the
appropriate column with the left mouse button.
The scroll bar to the right to the Programming Area allows you to review your programming. Clicking
the "up" and "down" arrows scrolls the show line for line. Sliding the blinking knob up or down allows
you to move freely through your programming to the desired position.
To can navigate with the keyboard by pressing the cursor right, left, up and down keys. The $Pos 1
and $End keys bring you to the beginning or end of the current line.
You can page through your programming by pressing the Page Up and Page Down keys. And finally
the Strg-$$$ and Strg-$$$ keys bring you to the beginning or end of the show, respectively.
8
When you move around in the show, you will see that something changes in the Graphic Corner (6).
This is where the current status of your programming can be viewed and checked graphically. The
fade-in and fade-out as well as the blink commands can be viewed here in in real-time; that is, the
executed command can be seen at the speed in which it would actually occur. Under the projector
letters the current tray positions of the programming up to (but not including) the current line can be
viewed. That means that you know the current status of your equipment even when it is not
connected.
Let us now change the example show.
How does one insert a line, change or delete a programming step, or mark a block?
First, make sure you are in "Edit" mode. If not, then click "Edit" with the mouse or press "Escape" on
the keyboard.
If we choose any two contiguous lines of programming, it could, for instance, look like this:
1
2
3
4
5
6
7
8
9
10
1. X-Marking of a programming step
An X can be put at the beginning of a line by clicking that position with the left mouse button or by
press "X" on the keyboard. Repeating this procedure removes the "X" from the line.
2. The Event Time (an absolute time value) sets the execution time of the programming step; that is,
when the Event Time equals the clock's value, the line will be carried out. All programming steps are
sorted according to the Event Times.
Setting the Event Time is done by clicking the position with the right mouse button. The input bar
appears. You can alter the current value by clicking the up or down arrows or by dragging the blinking
slider with the left mouse button. Alternatively, you can navigate to this column and press the "Return"
on the keyboard. A blinking cursor appears. Move it to the desired position (left or right arrow key) or
enter the entire new time (from left to right) directly. IMAGIX accepts only time values which fit within
the times of the previous and next programming steps.
3. R-Marking of a programming step.
This marks the step as part of a Relative Block. Set this marking by clicking the position with the left
mouse button or by pressing "R" on the keyboard. Repeating this procedure removes the "R" from the
line.
4. Programming Command, eg., Fade, Blink, Transport
Input is accomplished by clicking the field with the right mouse button and choosing a command from
the list which appears, or by pressing the first letter of the desired command on the keyboard.
5. The letters of the projectors which should carry out the command in column four.
Input is accomplished by clicking the field with the right mouse button and choosing the desired
projectors from the list which appears, or by pressing the projectors' letters on the keyboard.
6. Numerical input which accompanies the command, such as a fade rate, a slide number, or a blink
frequency (bright-dark). The number can be entered in a variety of manners:
Input is accomplished by clicking the field with the right mouse button. An input bar appears. The
value can be changed by clicking the up or down arrows or by dragging the blinking slider with the left
mouse button. Alternately, enter the input field and press "Return". A blinking cursor appears. Place
9
the cursor at the desired position (using the left or right arrow keys) and make your entry, or simply
enter the entire value.
7. Relative Time. This sets the distance in time from the previous command to the present command.
Changing the Relative Time shifts all subsequent Event Times. Should you only enter Event Times,
IMAGIX will automatically enter the correct Relative Time for you. Enter a Relative Time in the same
manner as you would an Absolute Time.
8. Commentary of up to 20 characters can be entered here via the keyboard.
9. The number of the current programming step. Since all steps are numbered uniquely, typing a
number into this column bring you to that line.
10. *-Marking of a programming step.
This marks the step as part of a Block. Set this marking by clicking the position with the left mouse
button or by pressing "*" on the keyboard. Repeating this procedure erases the "*" from the line.
Refer to Part C for an exact explanation of the fade commands.
Let us now alter the example show. First let us run the show and see happens in the Graphic Corner.
To do this, go to the first programming step and then set the Clock to "TC int". Now click the arrow
next to the "CLK Source" display field. A menu appears out of which you should select "TC int" with
the left mouse button.
With the internal clock you can check your programming at any time without having to turn on your
tape machine. For information about using the external clock, see the chapter "Formating and
Playback with Time-Code". Now click "Play" with the left mouse button. IMAGIX will switch to
Playback Mode.
The first line in the Programming Area is displayed inverted.
The Clock (1) runs while IMAGIX works through the program line for line. Its progress can be viewed
in the bar diagram in the Graphic Corner.
To stop playback, click "Edit" or press the Escape key. IMAGIX switches back to Edit Mode. You can
now, for instance, remove a mistake, adjust the timing, etc. To test your changes, just step back a few
commands and switch to Play Mode. You can switch between Play and Edit at any time and change
your programming. All changes will be immediately reflected in the Graphic Corner as well as on the
projector screen.
Go now to the line with the Event Time of 0:42. For purposes of illustration, let us add to slides (one
each in projectors A and B) between this line and the previous line. To do this, press the Insert button
twice. IMAGIX will insert two new lines above the currently selected line. In addition, IMAGIX will
suggest Event Times for the two lines, such as 0:39 and 0:40. Our first new line, though, should fade
in the first new slide at 0:41 and the second line should fade in the second new slide at 0:45. If you try
to change them now, you will notice that IMAGIX will allow a maximum time of 0:40 or 0:42. It is
therefore clear that is not possible to change the logical order of the Event Times in this manner (and
is good because it could easily make a chaos out of the show). Instead you can use Relative Times to
make room for the two new slides. Since the Event Times and the Relative Times are interdependent,
we can use this to our advantage. When we change an Event Time, IMAGIX automatically corrects
the corresponding Relative Time. Should we change a Relative Time, IMAGIX will add or subtract the
difference of the new time value to all subsequent lines. Remember: a Relative Time always sets the
temporal distance between one line and the previous line.
Let us do it: go to the first of the two new lines (Event Time 0:38) and select the Relative Time in that
line which is currently 1.0 seconds, the duration between this line and the line before it.
This new step, though, should not be executed 1 second but rather 3 seconds later. Simply change
now the value to 3.0 seconds, and IMAGIX will immediately change the Event Time of the line to 0:41
and shift the remaining lines accordingly. Do this again with the next line which has a new Event Time
10
of 0:41. Since it should occur at 0:45 (4 seconds later), simply enter 4.0 in the Relative Time column
of that line. IMAGIX will immediately change the Event Time of the line to 0:45 and shift the remaining
lines accordingly.
Let us now enter commands into the new lines. Go into column 4 of the list with the Event Time of
0:41. Notice the prompt at the bottom of the screen which states that a command will be entered in
this column. You will find an exact list in Part C. Alternatively, you can use the on-line help, which is
available by clicking the Help button or by pressing F1.
Let us at this point program a crossfade which automatically causes a tray transport on the darkened
projector. The command we shall use for this is called "dissolve" ("DISS" for short). Here, as already
in the menus, you can enter the desired command by pressing its first letter or by clicking the field with
the right mouse button and selecting the desired command from the list. In the next column we shall
enter which projectors will carry out the command; the help line prompts this. The bargraph in the
Graphic Corner shows us that projector B is bright. We want it to crossfade to projector A; that is, in
the desired crossfade, projectors A and B will be involved. Thus, enter AB in the column. As soon as
this step is executed, both projectors will change their brightness contrarily.
Go to the next column and enter a fade rate of 1.0 seconds. This completed the new line. Now click
the Event Time of the second new line. See in the Graphic Corner how IMAGIX executes the new
command in real-time. Note, too, that the tray position counter increments by one once projector B
goes dark.
Enter the same command in the second new line. Enter once again DISS, projectors AB, and a fade
rate of 1 second. Thus we have programmed two new lines in the example show.
To save your changes, simply click the Diskette icon. A field will appear in which you can enter where
and under which name the file should be saved. In this example let us save our show "Example" now
as "Test". Enter "Test" using the keyboard and confirm it by clicking "OK" or by pressing the Return
button. The show is now saved under the name "Test" and can be called up at any time by that name.
Let us now view the new lines in a larger context. If you have not already, switch the clock to internal
clock "int". Go to any programming step before the two new lines. Go into "Play" Mode. IMAGIX will
immediately start executing commands starting with the Event Time of the line you chose. This can
be confirmed by viewing the clock display (1). It is apparent that you can start a show at any point in
the programming. When you have projectors connected, IMAGIX's synchronization "sYnc" will assure
that the projectors are always at the proper spot.
When you watch the show until the last line, you will find the last empty step 0027 displayed inverted.
Click on "Edit" or press the Escape key. The clock will stop and IMAGIX will return to Edit Mode.
Next let us delete a few lines of programming from the show. Go to the line with the Event Time of
1:34 and press the $"Entf" key once. The contents of the line are basically erased and ready for a
new command. Press the same key now a second time: the whole line disappears. Thus, deleting a
line has two step involved.
Deleting several lines would be too taxing using this method. Instead, let us use the Block Functions.
To reach that menu, click "Block Functions" with the left mouse button or press the F4 key. A
complete description of all the uses of the Block Functions can be found in Part C or in the Help texts.
Let us mark a block, shift it, and then delete it. Marking a line or several lines is always the first step.
You can tell if a line is marked in that an asterisk appears at the end of the line(s) in question. There
are a number of methods available for placing an asterisk at the end of a line.
1. You select the command "Mark Block from...to" from the Block Menu using the Return key and set
the upper and lower boundaries of the desired block (eg., 0012-0021). Confirm this with Return and
the block is marked.
2. You press the asterisk key while you are in the desired line (except, of course, in the Comment
column since the asterisk would then appear there). IMAGIX will mark the line automatically. In this
manner you can mark non-contiguous lines as a block.
3. By clicking in the far-right column with the left mouse button, you can place an asterisk in the line.
As a matter of practice, mark all the line beginning with an Event Time of 1:xx minutes.
11
To remove a block marking, there are also three possibilities:
1. You press the F4 key, select "Remove Marking", and confirm it with the Return key. All markings
will be removed.
2. You can enter the marked line and press once again the asterisk key (except, of course, in the
Comment column since this would place an asterisk there). This will toggle the marking.
3. By clicking the asterisk in the far-right column with the left mouse button, you can toggle the
asterisk off again.
Let shift the 1:xx lines you marked as a block. Select the "Block Functions" menu the function "Shift
Block". A window appears in which you set in which direction (+ or -) the block should be shifted. By
clicking on the button the display toggles back and forth between + and -. Enter a time value in the
field in which the field should be shifted.
In this exercise let us shift the block by a factor of 2:00 Minutes. Once you click "OK" or press the
Return key, the marked block with appear at the end of the show with Event Times of 3:xx minutes.
You can also save, erase, copy as well as shift again this marked block.
When you insert a block into a marked show or shift it into another part of the show, the marked lines
may get mixed up with other lines. As long as the lines are marked with an asterisk, they can be
shifted back out or otherwise edited.
After this short introduction, you should be in the position to add a few lines to the end of the show, or
even start a new show by selecting "New File" from the "File" menu. Enter in various commands,
clear up uncertainties with the on-line help, change mistakes by overtyping them, and view the entire
show using IMAGIX's Play Mode. If you prefer, connect your projectors and control units according to
the installation instructions in Part A, turn on the synchronization "sYnc", and enter Play Mode. You
may want to start an entirely new show, since playing the altered example show may prove
meaningless.
To exit IMAGIX, click the "Exit" symbol with the left mouse button or press "Alt-X" on the keyboard.
Since changes were made, you will be prompted "Save file?", at which point you can click "Yes" to
save the file under the current filename, or click "No" to have the changes not saved.
If you would like to save the altered show under a different name, simply select "Save As..." from the
"File" menu. Enter the new name in the field. You can also choose to have the file protected against
changes by choosing "Protect File".
2.2 Programming Suggestions
In the following, we would like to present you with two possibilities on how to program with IMAGIX.
Since the each person's ideas and working method can be highly individual, these suggestions should
be considered as a general introduction. IMAGIX offers many functions with which to realise your
every programming wish. In general, though, it is possible to identify two basic working methods:
1. The music and text are finished. The slides should be programmed exactly to the soundtrack.
2. The programming of the slides is finished.
programming.
The music and text should be added to the
1. In the first instance, we have the music and text already recorded and want to program the slides to
fit the soundtrack exactly. It could prove wise at this point to make a storyboard so that you can
maintain an overview over your project. This could include writing down possible fade and blink rates
as well as other specifics.
12
Enter the commands line-for-line into the Programming Area but without specifying any Event Times;
they can be entered later "on the fly" while the music is playing.
Stripe track 3 of your soundtrack tape with enough timecode for the entire production, leaving plenty of
room at the beginning and end of the tape in case you need to back major changes later. This
procedure is explained in the chapter "Formating and Playback with Timecode".
Use the Block Functions to mark your entire programming as a block. To do this, choose "Prepare
timing" from the Block Functions. IMAGIX marks all the lines with an asterisk and set the Event Times
to 99:59.95; that is, IMAGIX would wait almost 100 minutes before executing the programming. This
is useful because it allows you to set the times to earlier Event Times while the music is running.
Switch the Clock to "TC ext" (eg., use the external time source you striped on your tape), enter Play
Mode, and set your connected projectors to "sYnc". Now start your tape. You should hear the
soundtrack while IMAGIX monitors the incoming timecode (cf. "Playback with Timecode"). Once you
can hear the soundtrack and the timecode is being read by IMAGIX, you can press the Return key to
set each successive command to a precise moment in the music. At the moment you press Return,
IMAGIX will take the time from the tape and set the command in question to that exact Event Time.
Afterwards, IMAGIX will invert the next command line, thus showing that it is the next in line for
programming. In this manner you can program each successive command in perfect synchronization
to the music "on the fly"! When you are finished, you can go back and review your work. IMAGIX
allows you to stop and restart at any moment as well as correct your program with 1/20th of a second
precision. IMAGIX's flexibility and precise control makes programming a delight. Just rewind a bit and
play it again. Switch between Play and Edit as often as you wish.
When you are satisfied with the results, record the show in PlusTrac onto the tape (cf. "Conversion
into PlusTrac"). Now you can play the completed show from tape/cassette at any time.
An interesting possibility in this context is the use of Relative Blocks. Relative Blocks allow you to set
the starting time of the first line "on the fly" while maintaining the integrity of the timing within the block.
More on this can be found in the section "Relative Blocks" toward the back of this manual.
2. Here the programming of the production has been completed. The next task is to synchronize the
music to it. While the precision afforded by the previous example cannot be achieved using this
method, it does show how to synchronize fast sequences and how to use a large number of
projectors. In this case, a storyboard is essential.
First, stripe your tape with timecode (cf. "Formating and Playback with Timecode"). Program the show
using the storyboard and IMAGIX' 1/20th of a second precision. Be sure to use your projectors and
IMAGIX' projector synchronization "sYnc" to check each step of the programming. Use the fast
forward and rewind functions of your recorder to wind to any position on the tape; as soon as you start
your recorder, IMAGIX will send the projectors to that precise position in the show. That is, it is always
possible to check any portion of your programming as well as make changes and review the changes
on the fly. Of course, IMAGIX must be set to accept external timecode ("TC ext"). Switch between
modes at will by clicking EDIT and PLAY or by pressing Escape and Alt-P.
In addition, you can check your programming "off-line" by selecting "TC int". This way you can review
your work without using the tape recorder. If "sYnc" is on, the projectors will follow each step. EDIT
and PLAY work the same in this mode as in "TC ext" mode. As usual, the Graphic Display shows you
the brightness level of each projector as well as its tray position.
Using IMAGIX' Relative Times can make programming fast sequences a snap. You need only give
the first command a precise timing and then do the rest with relative timing.
13
Example:
Ten programming steps should follow one another at an interval of 2/10 of a second. Simply enter a
Relative Time value of 0.2 seconds for each step and IMAGIX will adjust the Event Times accordingly.
When the programming is completed, record the music onto the tape. Using the timecode as a
reference, it is possible to adjust the lengths of the individual music pieces and programming portions
successively. When necessary, make fine adjustments using the Block Functions or the Event and
Relative Times.
Often a combination of these two suggestions is used in the programming of an actual show. That is,
in some portions it is possible to program the commands to the music "on the fly" while in others it is
easier to program the lines directly. Choose the programming method which best suits the specific
task at hand.
The Block Functions also allow you to combine the programming for several screens into a signal
show since IMAGIX can dovetail them into existing programming sequences. Furthermore, finished
("canned") sequences can be inserted at will.
Additional possibilities include programming with X-Times for live presentations (Speaker Support)
with precise call-up of single commands as well as whole sequences. These are available in
combination with the QUATRIX/TRIPLEX control units. See "Going Live" in the QUATRIX/TRIPLEX
handbook for details.
2.3 Formating and Playback with Timecode
The use of the internal and external clocks have been mentioned throughout this manual. In the
chapter "The First Steps with IMAGIX" we worked with an example show using the internal clock. In
this chapter we shall be examining the use of the external clock in combination with timecode.
Timecode is a digitally-coded clock signal which is recorded onto tape on a separate track from the
music. A single timecode signal is "striped" for the entire length of the music and programming. Thus,
this digital clock signal can be used as a reference in identifying each point in the show uniquely.
When the tape is run, the timecode being fed into the PC synchronizes the programming in the PC
exactly with the music since each unique time reading identifies a position in the music as well as a
corresponding position in the show's programming. In other words, IMAGIX compares the incoming
timecode with the programming, and when there is a concurrence, IMAGIX executes the
corresponding command. Should a command not be executed at the proper moment, you need only
change its Event Time accordingly. Check the section anew and make any further adjustments as
needed. With a precision of 1/20ths of a second.
This explains why timecode is used to insure the synchronization between tape and a computer (that
is, between music and slides). This works because IMAGIX reacts instantly to any deviations in the
tape's running speed.
14
How does one format a tape with timecode?
Using a four-track recorder, record the music on tracks 1 and 2 (stereo recording). Use track 3 for the
timecode and track 4 for the PlusTrac control signal.
Connect your PC, your Baessgen control units, and your tape recorder according to the schematics in
your control unit's handbook. If you are using a QUATRIX/TRIPLEX, for instance, the schematic is the
following:
Where applicable, be sure that your control unit is connected to an appropriate power supply.
Next, select the function "Format Timecode" from the File menu. A timing display appears for entering
the starting time for the timecode. In general, timecode is started at the suggested time of 0:00.0. If,
though, your show is longer than a 45-minute cassette, for instance, you could format the second
cassette starting at 50:00.0.
Now set track 3 of the tape recorder into record mode and click Start with the left mouse button. Once
this button has been clicked, "Start" changes to "Stop". The progress of this procedure is shown in
percent. You can stop the formating at any time by clicking Stop. Record the signal at +/- 0db.
The displays of the following Baessgen control units show that the clock is running:
QUATRIX/TRIPLEX, TCX-4040, TCQ-2020, UX-CDIX, UX-MEGA.
Quick overview
1.
2.
3.
4.
5.
6.
Set up the devices according to the schematics.
Select "Format Timecode" from the File menu.
Set the start and end times for the timecode formating.
Set track 3 into record mode.
Click Start.
To stop, click Stop.
15
To play a show back using timecode, connect the devices according to their respective schematics. If
you are using a QUATRIX/TRIPLEX, for instance, the schematic is the following:
Switch the "CLK source" to "TC ext" using the mouse or by pressing the F8 key. Set IMAGIX into Play
Mode and turn on "sYnc". Start your recorder. As soon as timecode is recognized, the computer
screen will spring into action in perfect synchronization with the timecode on the tape. With "sYnc"
turned on, you can watch the show's progress on the projection screen with your connected
projectors. Alternatively, you could watch the show's progress in the Graphic Corner.
Note: When using the UX-CDIX, control units (UX-MEGA, UX-PLUS, PlusMaster 4, AXIT) must of
course be connected to the "Analog out" socket so that the projectors can be controlled (cf. the UXCDIX handbook for details).
16
2.4 Converting PlusTrac
Once you have programmed your show using timecode, you can record your programming onto track
4 of your recorder. The recorded PlusTrac signal can then be used for running up to 16 slide
projectors without the need of the computer.
Connect your PC, your Baessgen control units, and your tape recorder according to the schematics in
your control unit's handbook. If you are using a QUATRIX/TRIPLEX, for instance, the schematic is the
following:
Using the same procedure as with recording timecode, we shall play the show through in its entirety.
Set track 4 of your tape recorder into record mode. Adjust the PlusTrac signal to a reading of +/- 0db.
Run the show while recording the PlusTrac signal onto your tape. When you are finished, you can run
your show without the PC.
Quick Overview
1.
2.
3.
4.
5.
Set up the devices according to the schematics.
Set the Clock to "TC ext".
Set PLAY and sYnc.
Start your tape with track 4 in record mode.
Stop the show and your recorder when finished.
17
3 Overview
3.1 IMAGIX Commands
The following projector commands can be used to control any of the 16 possible projectors. It is
possible to have several steps assigned to the same Event Time. Note that when there are many
commands programmed at the same Event Time, a delay can occur in execution.
ALTERNATE - ALTN -*
All indicated projectors change their brightness contrarily; that is, a dark projector will go bright while a
bright projector goes dark. Fade rates are available between 0-4 seconds in intervals of 0.5 seconds,
otherwise in intervals of 1 second. In addition, there is a fade rate of 0.2 seconds.
When programmed with the mouse, 16 fade rates between 0.0 and 16 seconds are available; simply
click the entry field with the right mouse button.
DISSOLVE - DISS -*
The same as the ALTERNATE command with the addition of an automatic tray transport around 1
second after the fading-out projector goes dark.
FADELEVEL - FADE All indicated projectors fade using the indicated fade rate (as with the ALTERNATE command) to the
indicated brightness level.
Brightness levels are available between 10% - 100% in steps of 10%. IMAGIX always suggests 50%.
Programming "S" instead of a number caused the indicated projectors to stop fading (freeze). When
programmed with the mouse, select "STP" (for "stop").
PULSE - PULS -*
The lamps of the indicated projectors "blink" when this command is executed. The duration of the
dark and bright phases can be set in intervals of 1/10 of a second between 0.1 seconds and 1.0
seconds. In addition, there is a blink rate of 0.05 seconds. The first value in this command sets the
duration of the dark phase while the second value determines the duration of the bright phase.
The blinking effect is independent of the actual brightness of the projector. This therefore allows you
to fade and crossfade projectors while they are blinking.
UNPULSE - UNP -*
This command cancels the blinking effect on the indicated projectors. This does not effect projectors
which are not indicated.
RELAY - REL -*
This command toggles the status of the indicated relays. That is, open relays close, while closed
relays open. The availability of this feature depends on the number of extra relays on your Baessgen
control unit.
TRAY - TRAY -*
This command sends the trays of the indicated projectors to the indicated position.
This command will be executed immediately when only one projector is indicated. When two or more
projectors are indicated, the command will be handled by the status control in the PlusTrac signal
18
which can lead to a delay of around 0.5 seconds. Therefore, when you need exact control of, say, two
trays, then it is probably better to program two separate tray commands.
At the end of the show, you can have all the projectors to return to position 0 using a single command
since timing is unimportant in this circumstance (cf. the HOME command).
SNAP - SNAP -*
This command cause the shutter (tachystoshop) of the indicated projectors to change their status; that
is, an open shutter closes, while a closed shutter opens. This command only works with projectors
which have this feature. In addition, this command can only be issued to the following Baessgen
control units: QUATRIX/TRIPLEX, PlusMaster 4, TCX-4040, AXIT, DIXIT, and UX-MEGA (here only
with Kodak EKTAPRO projectors).
HOME - HOME -*
This command darkens the indicated projectors, cancels blinking, opens their shutters, opens the
relays, and sends the trays of the indicated projectors back to their home positions (position 0).
CONTROL - CTRL -*
This command allows ESI, RC5 and ASCII commands to be programmed into the PlusTrac control
signal.
ESI is a standardized remote control code developed by Philips, while RC5 is its widely-used
predecessor. These remote control codes are used in various HiFi and video devices made by Philips
and other companies. IMAGIX allows you to control these devices and therefore include them in your
Baessgen installation with the same 1/20th of a second precision which you enjoy with your projectors.
ASCII allows you to send any two bytes to the serial port of a compatible control device. Such devices
can therefore be included into your Baessgen installation, as well. Your device's handbook should list
the ASCII commands available to the unit.
In column 4 enter CTRL. In column 5 enter ESI, RC5 or ASCII. When programming ESI or RC5,
specify in the next field the device to be controlled using the following codes:
14 CD-Player
12 Recorder 1
17 Recorder 2
In the next field enter the command's code:
00-09 Buttons 0 - 9
20 Next
21 Previous
30 Pause
35 Play
36 Stop
0B Standby
Using these codes is the same as pressing the buttons on the device itself.
For example: A CD-Player should play track 5. Using ESI and a fictitious execution time of 30:00, the
programming would look like this:
30:00.00 CTRL ESI 14 05
19
Should you need to select a two-digit track (for instance, track 15), then send two commands:
30:00.00 CTRL ESI 14 01
30:00.30 CTRL ESI 14 05
In this case it is important that the second command reach the CD-Player within 0.3 seconds in order
for it to be recognized as being the second digit of the desired track.
If you are using a QUATRIX/TRIPLEX, you can start track 15 of the CD-Player simply by programming
30:00.00 CTRL ESI CD 15
EKTAPRO-STANDBY - ESTB -*
This command sets the indicated Kodak Ektapro projectors into standby mode. This mode holds the
projectors in readiness while turning off their lamps and ventilators.
Sending this command again releases the indicated projectors from standby mode. In addition, the
commands ALTERNATE, DISSOLVE, TRAY and FADE also release the indicated projectors from
standby mode; in this case, though, a slight delay may occur, therefore it is wise to release the
projectors using ESTB if timing is important.
Note: If the standby status was switched on directly on the projector, it is not possible to switch the
projector back out of standby mode with any software command. It must be switched off directly on
the projector.
NEXT - NEXT -*
This command steps the trays of the indicated projectors forward by the indicated number of positions.
For instance, if a tray is at position 50, a NEXT 5 command would step it forward to position 55.
This relative tray transport command is interesting when working with blocks since the integrity of the
relative position can be maintained throughout copying, inserting and shifting, whereby an absolute
position (using TRAY) would have to be corrected each time.
BACK - BACK -*
This command steps the trays of the indicated projectors back by the indicated number of positions.
For instance, if a tray is at position 50, a BACK 5 command would step it forward to position 45.
This relative tray transport command is interesting when working with blocks since the integrity of the
relative position can be maintained throughout copying, inserting and shifting, whereby an absolute
position (using TRAY) would have to be corrected each time.
ZOOM - ZOOM -*
This command is much like the TRAY command. Values up to 99 are possible. This command will be
implemented in future components of the Baessgen system.
VOLT - VOLT -*
This command is much like the TRAY command. Values up to 99 are possible. This command will be
implemented in future components of the Baessgen system.
* These abbreviations appear on the screen when programmed. When using the keyboard, simply type the first letter of the
abbreviation in column 4 in order to enter the desired command.
20
3.2 The Graphic Corner
This chapter offers a quick overview of the Graphic Corner.
Bargraph :
Shows in percent the brightness of the associated projectors. Fades and crossfades are depicted in
real-time. Blinking bars depict the execution of PULSE commands in real-time.
A-P:
Projector letters
- Small letters: the projector's shutter is closed.
- Blinking letters: the projector is "blinking".
- Letter not visible: the (Ektapro) projector is in standby mode.
00-80:
Current tray position
The Graphic Corner orients itself on the status of the PlusTrac signal. For this reason it is not always
possible to reconstruct certain programming steps when stepping backwards through the show.
Therefore, commands such as FADELEVEL and PULSE may not be exactly depicted. A FADELEVEL
of 50%, for instance, may be depicted as a fade in of 100%.
As long as you are moving forward step-by-step through a show (for instance when checking a
specific sequence), the Graphic Corner will depict the programming exactly.
Preview:
To enter Preview mode, click the projector's letter or tray status with the mouse, or press the
appropriate key combination between Alt-A and Alt-O on the keyboard. This mode allows you to step
through the tray of a single projector, for instance, when searching for a particular slide. See the
chapter "The Preview Function" for details.
21
3.3 Event and Relative Times
Each programming line has an Event Time and a Relative Time associated with it.
A. Event Time
The Event Time sets an absolute time within the show at which a command will be executed.
Regardless if the internal clock or the external Clock (timecode) is used, as soon as the Clock time
concurs with an Event Time, the programming step will be executed. The Event Time is therefore an
absolute time which is completely independent of all other steps.
Each time you program an Event Time, IMAGIX fills in the appropriate Relative Time for you.
B. Relative Time
The Relative Time -or waiting time- is the duration between a single step and its preceding step. It is
calculated as the difference between the Event Times of the two lines. When you change a Relative
Time, IMAGIX automatically changes the Event Time of the current line and that of all succeeding
lines. For instance, if you increase the Relative Time in a particular line by 1 second, then IMAGIX will
automatically increase its Event Time and all subsequent ones by 1 second.
With this in mind, if you just want to change the timing of a single line, then change only the line's
Event Time.
Relative Times lend themselves well to effects with the same or repeating time intervals. They make
the programming much quicker and easier to follow than is the case with programming solely using
Event Times.
3.4 Operating modes
3.4.1 EDIT
Edit mode.
To enter Edit mode,
- click Edit with the left mouse button, or
- press the Escape key.
Choose this operating mode when you want to program your show. By additionally turning on "sYnc",
you can view your work simultaneously on the projection screen.
3.4.2 PLAY
Play mode.
To enter Play mode,
- click Play with the left mouse button, or
- press the key combination Alt-P.
The inverted programming line is always the next line to be executed.
PLAY automatically starts the internal Clock (if "TC int" is displayed in the "CLK source" window) or it
waits for incoming timecode (if "TC ext" is displayed).
When using the internal Clock, you can start playing the show at any point by simply navigating to that
line while in Edit mode, and then by switching to Play mode. The show will start at that line.
As with the Edit mode, switching on "sYnc" activates the projectors.
Choose "sYnc" mode as well when you want to synchronized marked lines "on the fly" to music on the
tape using the Return key. See the first example under the programming suggestions.
22
3.4.3 SYNC
Toggle IMAGIX' synchronization feature
To enter or leave the synchronization mode,
- click SYNC with the left mouse button, or
- press the key combination Alt-Y.
3.5 Function Keys
The Function Keys F1 to F10 give you direct access to IMAGIX' menus and other functions via the
keyboard. All functions can be called up using the mouse, as well; how this is done will also be
explained here.
3.5.1 F1 Help
IMAGIX' on-line help is available via F1. It offers brief answers to questions such as "How do I
program a FADELEVEL command?" as well as "What is the hotkey for 'eXit'?"
With the mouse, click the Help button with the left mouse button.
3.5.2 F2 Save File
When you create a new file, you will most likely want to save it. The "Save File" function fills that
purpose. When you call up this function, IMAGIX will suggest "noname". Feel free to overtype this
suggestion with your own label of up to eight alphanumeric characters. Press Return to confirm your
entry.
If you have already saved the file, IMAGIX will suggest your label. Press Return to save the file using
the current label, or change the label before pressing Return.
IMAGIX will save your show with the extension .IMX. IMAGIX will also create a backup copy of the
most recently saved version using the extension .BAK (backup).
To save your file in a different location, select "Save as..." from the File menu and navigate to the
desired location before saving.
With the mouse, simply click on the Diskette icon (second from the left) on the screen, or choose
"Save" or "Save as..." from the File menu.
3.5.3 F3 Load File
Pressing F3 opens an overview of the shows which have already been saved. Choose the desired file
using the keyboard (type the first letter or use the arrow keys and then press Return) or by clicking
with the mouse. You can also navigate first to another location.
To load a backup version, select "Load Backup" from the File menu and choose the file from the list.
With the mouse, click the Symbol button (first from the left) and then choose the file from the list.
23
3.5.4 F4 Block Functions
Pressing F4 calls up a list of IMAGIX' extensive Block Functions which open a multitude of editing
possibilities for your use. Select a function from the list and confirm this with Return.
With the mouse, click Block Functions with the left mouse button and then the desired function as well
with the left mouse button.
To leave this menu without selecting a function, simply press Escape or click Cancel.
IMAGIX handles blocks as small individual shows. It is possible to save and load blocks just as it is
larger shows. When you select "Load File", the saved blocks are listed along with the larger shows.
a. Mark Block from...to
To use a Block Function, the block must first be marked. When you select "Mark Block from...to", a
window opens in which you can indicate the first and last lines of the desired block. When you press
Return, IMAGIX will mark the lines with an asterisk.
It is also possible to mark noncontiguous lines, such as, for instance, line 3, line 8 and line 11. This is
done manually:
- with the keyboard: navigate to the desired line and press the asterisk key (except when in the
Comment column). IMAGIX will mark the line with an asterisk.
- with the mouse: click in the right-most column (after the line number) with the left mouse button.
IMAGIX will mark the line with an asterisk.
To remove a marking, repeat the procedure. That is, you can toggle the marking on and off.
IMAGIX will maintain the marking since a block will usually be worked on after it is marked. To cancel
the marking before going on, simply press Escape or click Cancel.
b. Remove block-markers
If you would like to remove all the markings from the entire show (cf. a. above for removing individual
markings), select "Remove Markings" and confirm this with Return/OK.
c. Prepare sync
This function prepares a block for setting each line's Event Time "on the fly". IMAGIX alters the Event
Times of the selected lines to their highest possible Event Time in preparation for their next timing, as
follows:
Let us say the lines have the Event Times of
0:10.00 ....
0:20.00 ....
0:30.00 ....
24
If you mark the middle line for "on the fly" timing, IMAGIX will alter its Event Time to that of the third
line (0:30.00), that is, without breaking the logical order of your programming. Should the line be at
the end of the show, IMAGIX will alter its Event Time to 99:59.95. This function is used when setting
Event Times "on the fly" while listening to the soundtrack (cf. programming example 1). Should you
not be satisfied with the result, you can repeat the process since the lines remain marked until you
remove the asterisk markings with the Remove Markings command.
d. Load block
Selecting this function calls up a list of possible blocks. As already mentioned, IMAGIX handles
blocks and full-length productions the same; that is, it uses the extension .IMX for both. The
advantage here is that it allows you to load both types of programming into your production so that you
can even join two full-length shows together.
Select the desired file from the list and confirm this with Return/OK; if necessary, navigate first to the
desired location.
e. Load block at curent time
Similar to "Load Block", selecting this function calls up a list of possible blocks. The difference here is
that, when you confirm your selection with Return/OK, IMAGIX will insert the block into your production
starting at the current position of the cursor. Should the Event Times overlap, IMAGIX will
automatically dovetail the new lines with the existing lines. Since the inserted lines are marked as a
block, they can be treated further as desired.
Be sure to set the cursor to the desired location before calling up this function.
f. Save block
Use this function for saving a marked block. This is done in the same manner as when saving fulllength shows. Here you can navigate to the desired location, enter an 8-character alphanumeric label
and confirm your entry with Return/OK. This function allows you to create a whole library of
sequences and effects, such as thunder animations, fireworks, and so on. Load these effects at any
time into your subsequent shows by selecting "Load Block".
g. Delete block
Use this function to delete (erase) a marked block. Confirm this with Return/OK. Before the block is
erased, IMAGIX will ask you to confirm this intention.
Note: This function not only deletes the markings but the marked lines themselves! If you only want
to remove the markings, use "Remove Markings".
h. Shift block
Use this feature for shifting a marked block within a production. In the window which appears, indicate
the amount of the desired shift. The direction of the shift is indicated with the plus and minus signs.
Care should be taken when shifting a block, as it can disturb the logical temporal structure of your
show.
i. Copy block
This valuable function allows you to work with copies of a block within your production. When you call
up this function and confirm it with Return/OK, IMAGIX makes a copy of the original at the original
location; use other Block Functions to shift the copy to a new location. Care should be taken when
shifting a copied block, as it can disturb the logical temporal structure of your show.
j. Change block length
This function allows you to expand or compress the timing of a marked block uniformly by a factor of
twice or half of its original length. When you call up this function, a window appears into which you
can determine the amount of desired change. Confirm the entry with Return/OK. Care should be
taken when expanding or compressing a block, as it can disturb the logical temporal structure of your
show.
k. dto. (ask for max. time)
This function gives you a second possibility for expanding or compressing the timing of a marked
block. When you call up this function, a window appears showing the Event Time of the last step in
the marked block. Entering a new End Time will cause IMAGIX to expand or compress the marked
lines uniformly to fit the new End Time. Care should be taken when expanding or compressing a
block in this manner, as it can disturb the logical temporal structure of your show.
25
3.5.5 F8-F9 External and internal Clocks
F8 - Switches the internal Clock from "TC int" to the external Clock "TC ext" and stops the internal
Clock from running.
F9 - Switches the external Clock from "TC ext" to the internal Clock "TC int" and starts the internal
Clock running.
Particularities:
1. When you have chosen "TC int", IMAGIX will switch automatically into Play mode.
2. When you are in Edit mode and the Clock is set to "TC int", then the Clock will display an Event
Time 1/20th of a second earlier than the Event Time of the line which you are currently editing.
This is desirable since it allows you to play the current line immediately upon starting Play mode.
3.6 File Menu
One portion of the functions in the File menu have already been covered in the discussion about the
F1-F9 keys. The remaining functions will be handled here. They can be selected from the menu
using the left mouse button, or by pressing the appropriate letter or arrow key; confirm the selection
with Return.
3.6.1 New File
The function is used for creating a new show. If you are just finished working on a show, be sure to
save it using "Save File" before choosing this function. Select "New File" by clicking it with the left
mouse button, or confirm the selection by pressing Return. The current show will disappear from the
screen, allowing you to start immediately with programming a new show.
26
3.6.2 Generate standard slide show
This function allows you to set up a standard show automatically. Simply determine the Start Time of
the show, the on-duration of the slides, the fade rate for the crossfades, the number of slides to be
used, and the number of projectors (2-4) in the installation. Click Start to generate the show.
3.6.3 Save As...
Using this function allows you to save the current production under a different name and/or at a
different location. A window will appear into which you can type the new name and/or indicate a new
location. Confirm your entries with Return/OK.
3.6.4 Print
The function causes the current show to be printed on your printer.
3.6.5 Select Wave File
With IMAGIX 3.2 you have the possibility to play a Wave file parallel to your IMAGIX production. This
function opens a window out of which you can select the desired file. Confirm your choice with
Return/OK. Set "CLK Source" on the IMAGIX screen to "Wave".
Your IMAGIX programming and the Wave file will now play synchronized to the internal clock, allowing
you to program in exact synchronization with the sound file. Once you are finished programming, you
can record both the programming and the sound file onto tape simultaneously. The sound is available
at the soundcard's audio outputs. At the same time the PlusTrac signal can be fed from your PC via a
connected QUATRIX/TRIPLEX to another track on your multitrack recorder.
27
3.6.6 Options
This function opens a window in which you can determine a variety of important settings. When you
make changes to these settings, be sure to save them by clicking "Save". Saved changes will be
used now and each time IMAGIX is started.
Should you confirm the changes with "OK", then the changes will be used only during the current
session. The next time you start IMAGIX, the old settings will be used.
a. Timecode in
Possible settings: Auto, Digital, Analog
Default setting: Auto
This function is only for use with an XCARD or UX-CDIX.
Auto
If a digital audio signal is detected at the "Digital in" port (the Lock LCD on the UX-CDIX will light up),
timecode will be expected in the digital signal. If there is no digital audio signal, analog timecode will
be expected.
Digital
Timecode will be expected in the digital audio signal ("Digital in").
Analog
Timecode will be expected at the "Analog in"/"TC in" port.
This setting is necessary when copying analog productions (that is, when a digital soundtrack and an
analog timecode are used) since "Auto" would expect a digital timecode as well.
b. Autoplay
Possible settings: On, Off
Default setting: Off
When Autoplay is "On", incoming timecode automatically starts Play mode.
When "Off", switching to Play mode must be done manually.
c. Time Display
Possible settings: mm:ss.xx, ssss.xx
Default setting: mm:ss.xx
Use this setting to change the look of all the time displays in IMAGIX (Event and Relative Times, etc.)
from the usual minutes-seconds-tenths display to a pure seconds display, or back.
28
d. Interface
Possible settings: COM1, COM2, XCARD
Determine on which port (COM1 or COM2) you will connect your control unit. Save the setting by
using "Save".
IMAGIX independently recognizes where the connected Baessgen control unit is connected and
switches automatically to the appropriate port when the other port is in use.
If you are using an XCARD, see "e. XCARD" below.
e. XCARD
Possible settings: 0 - 7
Default setting: 0
Determine the address you have set on your XCARD. Addresses between 0 and 7 are possible.
Details can be found in the XCARD handbook.
Save your setting with "Save".
f. Timecode Tolerance
Possible settings: 0.3 - 60 seconds
Default setting: 0.3 seconds
Use this setting to determine how long a drop-out in the incoming timecode should be tolerated.
IMAGIX uses this setting to determine when it should break off playing the show once timecode has
ceased to come in. This function increases the reliability of playing shows from tape.
When programming a show, it is desirable to keep this set to a minimum in order to avoid having the
playback continue unnecessarily when you stop the timecode.
Note: this setting is copied with the production into the memory of a QUATRIX/TRIPLEX or UX-MEGA
control unit.
g. CLK Source when Starting
Possible settings: TC int, TC ext, Wave, MTC out
Default setting: TC int
Use this setting to determine which clock setting should be used when IMAGIX starts. You can, of
course, change this setting in IMAGIX at any time. Changes made while the program is running will
not be saved, though. That is done here. See the chapter "Setting the CLK Source" for details.
Save changes made to the settings. The settings are saved in the file "IMAGIX.CFG" and are loaded
automatically when IMAGIX is started.
Note: If you confirm the changes with "OK", they will only be valid during the current sitting and not
when you start IMAGIX again.
3.6.7 Generate timecode
Please look to: Formating and Playback with timecode
3.6.8 Memory Functions
These are special functions used in conjunction with the QUATRIX/TRIPLEX/UX-MEGA control units.
Be sure your QUATRIX/TRIPLEX is connected properly to your PC before using this function.
First, call up "Memory Functions". A window appears showing you the current contents of the
memory. The QUATRIX/TRIPLEX offers four memories while the UX-MEGA offers three.
To load the current production in the control unit's internal memory, select first the memory 1, 2, 3, or 4
(according to the lines 1 - 4), and then click "Send Data". The percent display shows the progress of
the transfer.
This function fills an empty memory or overwrites a currently used memory.
In addition to the production itself, the following information is also transferred:
1. The name of the IMAGIX file being transferred.
29
2. The number of program steps (Cues) in the production.
3. The date of the transfer.
4. CLK=int/ext, that is, the setting of the IMAGIX Clock at the time of the transfer. Note: Should you
want the production to play in conjunction with the external Clock (i.e., with timecode), be sure
IMAGIX' Clock is set to "TC ext" before transferring the production, since this setting is transferred with
the production and cannot be changed on the QUATRIX/TRIPLEX/UX-MEGA control unit itself. If you
want the production to run on the internal Clock, then be sure IMAGIX' Clock is set to "TC int" before
transferring the production, since this setting is transferred with the production and cannot be changed
on the QUATRIX/TRIPLEX/UX-MEGA control unit itself.
5. TCT=X.Xs, that is, the current timecode tolerance. Note: Be sure the desired timecode tolerance it
set before transferring the production, since it cannot be changed on the QUATRIX/TRIPLEX/UXMEGA control unit itself.
6. Max: The maximum number of cues in the production.
Load Backup File
By subsequent savings of a production, IMAGIX automatically saves the old file with the extension
.BAK. This allows you to return to the former version when desired. First, select this function and then
choose the desired backup file to load into IMAGIX.
3.6.9 exit
Use this function to exit IMAGIX. When appropriate, IMAGIX will ask you if you want to save the
changes to your current show. If you choose "Yes", IMAGIX will save the changes under the current
show's name. Choosing "No" will close IMAGIX without saving the changes. Choosing "Cancel" will
return you to IMAGIX.
30
3.7 Tools Menu
The Tools menu calls up three useful tools for your use.
3.7.1 PREVIEW
Preview allows you to control a projector directly from within IMAGIX. While a limited Preview function
is available via the Graphic Corner (select the desired projector by clicking the projectors letter or tray,
or by pressing the corresponding Alt-A to Alt-O key combination), this Preview function allows you to
switch between all 16 projectors at will and at any spot in your production.
The selected projector will go bright while the other projectors will go dark. Across the top of the
window are the letters of the 16 possible projectors. Below them is a table containing all 80 possible
slides for the selected projector; simply click a number to view the slide at that position. Alternatively,
you can click the + and - buttons to the right of the table to step through the tray. The large characters
indicate the currently selected tray position. If you would like to test how a slide fades in, set a fade
rate between 0 and 10 seconds with the slider. When you are finished, simply click End or press
Escape; IMAGIX will return your setup to its original status automatically.
31
3.7.2 SCREEN
SCREEN is a handy freeware program which comes with your IMAGIX software. You may pass the
program on to others.
SCREEN saves you time. Simply click the size of your slides (eg., 24x36 for 36mm film) and then set
the parameters which are known to you. Let us say you know the width of the screen and the distance
to the screen. Set the screen width in meters under Screen Width and the distance to the screen
under Distance. SCREEN immediately tells you which focal distance is necessary. Or perhaps you
only have one size of lenses: enter the size of your screen and SCREEN will tell you at which
distance from the screen you should set up your projectors.
For instance, if you are projecting 24x36 mm slides, click 24x36. If your projection screen is 3 meters
wide, then set 3 meters using the lower slider. If the distance to the screen is 8 meters, set 8 meters
using the middle slider. Immediately the Focal Length of 92mm will be shown.
32
3.8 Connecting IMAGIX 3.2 to Harddisk Recording
IMAGIX 3.2 allows a direct connection to the TripleDAT 3.2 harddisk recording system under
Windows. To do this, select "triple AV" under "CLK Source".
If you are using a Baessgen XCARD, then connect the "MIDI-Port" of the tripleDAT card to the digital
input of the Baessgen XCARD. Set the CLK-Source to "external". The XCARD will then send the
soundtrack with an implemented control and timecode signal out the digital output.
This establishes a connection between the IMAGIX programming and the HDR source. Be sure both
IMAGIX 3.2 and the harddisk recording programs are open. In this constellation, IMAGIX functions as
the slave and the HDR system as the master. That is, the time reference signal used is always the
one from the HDR system.
Once IMAGIX establishes contact with the HDR system, the Speed Button bar will appear.
Snatch triple Locator
Click this icon to snatch the current Event Time in the HDR program and use it as the Event Time of
the current IMAGIX programming step. This is only useful when the HDR's Event Time does disturb
the current logical structure of your production.
Prepare Projectors
Once you have set a location in the HDR software, click this icon to send the projectors to that location
in your IMAGIX production.
Tile Windows
Clicking this icon automatically sets IMAGIX' and the HDR software's windows to the optimal size for
viewing both simultaneously on your monitor.
New Line at Locator Position
Clicking this icon automatically generates a new line in IMAGIX using the current Event Time of the
Locator in the HDR recording software. Set the Locator in tripleDat at the desired location and click
this icon. IMAGIX 3.2 will generate a new programming line using the current Event Time of
tripleDat's Locator.
33
3.9 Mouse Bar
IMAGIX has seven icons (located in the upper third of the screen) for use with the mouse. Use these
to access IMAGIX' various functions. Except for the harddisk recording icons which have already
been discussed, you will find a description of each icon below (from left to right):
1. "Opened Directory" button
Open File (cf. "F3 - Load File")
2. "Diskette" button
Save File (cf. "F2 - Save File")
3. "Music note" button
Open Wave file (cf. "File Menu - Select Wave File")
4. $"E" button ($"Einstellungen"="Setup")
Open Setup menu (cf. "Setup Menu")
5. "Printer" button
Print current file.
6. "i" button
Display information about IMAGIX.
A window will open displaying the current IMAGIX version, its copyright, version date, and the
connected hardware recognized by the IMAGIX software.
7. "EXIT" button
Quit IMAGIX (cf. "File Menu - Exit")
3.10 "Clock Source" Setting
Next to the IMAGIX time reading is the "Clock Source" field. When you click the arrow button, a
window containing four points will appear. This is where you determine which Clock setting IMAGIX
will use.
1. TC int
IMAGIX will orient itself to the PC's internal clock. IMAGIX will use this reading immediately upon
being switched from Edit mode to Play mode. Should timecode be fed into the system, IMAGIX will
take the timecode, thus overriding the internal clock.
2. TC ext
When set into Play mode, IMAGIX will wait for timecode to be fed into the system. This timecode can
come from an analog source (multitrack recorder) or a digital source (DAT/CD).
3. Wave
It is possible with IMAGIX 3.2 to have a Wave file play simultaneously with your IMAGIX production.
First, select the desired Wave file from the File menu, then select "Wave" from the "CLK Source" list.
IMAGIX and the chosen Wave file orient themselves on the same internal PC clock, insuring an exact
synchronization. Once you are finished programming, you can record both the programming and the
sound file onto tape simultaneously. The sound is available at the soundcard's audio outputs. At the
same time the PlusTrac signal can be fed from your PC via a connected QUATRIX/TRIPLEX to
another track on your multitrack recorder.
4. triple AV
This setting allows you to synchronize IMAGIX with a tripleDAT harddisk recording system for
simultaneous use on your PC.
34
3.11 Relative Blocks
IMAGIX offers two types of Block groupings.
Standard Blocks (cf. F4) comprise several steps or even an entire show united into a single Block.
This allows you to change the Event and Relative Times of the entire Block without altering the
surrounding programming. The lines belonging to the Block are marked with an asterisk.
Relative Blocks also comprise a arbitrary number of steps. This steps are marked with an "R". Any
line can be marked or the marking removed simply by pressing "R" (except in the Command and
Comments columns) in the desired line.
With the mouse, simply click with the left mouse button in the column directly after the Event Time to
mark or remove the marking.
Relative Blocks open new uses.
For instance, the start of an entire Block can be set "on the fly" while the internal integrity of the timing
remains unaltered when the Block is marked with asterisks (cf. "F4 - Block Functions" and
"Programming Suggestions"). In order to prepare a Block, all of the desired programming steps must
be marked using the Relative Block Markings; in addition, the first step of the block will be marked with
a Standard Block Marking ("*").
By simply pressing the Return key during playback, you can resynchronize the entire Block to a new
start time; IMAGIX will immediately assign the clock time to the first programming step of the block and
will calculate the new Event Times of the other steps automatically for you. This allows you to
synchronize an entire Block to music "on the fly".
35
3.12 Working with X-Markings
IMAGIX allows the use of X-Markings.
An X-Marking interrupts the normal execution of a show regardless of if the internal Clock is being
used or if timecode is being fed into the system. An "X" can be placed on any line: simply press the X
key in any column (except in the Comment column) to set or remove the marking; using the left mouse
button, click in the first column of the line. When using the internal Clock, the playback will stop 1/20th
of a second before the next line to be executed; press Return to continue.
Should you be using timecode, IMAGIX will stop and wait just before that line until Return is pressed,
at which point it will jump to the current position set by the timecode; the projectors will follow.
X-Markings are best used in live Speaker Support environments where an interaction between the
presentation and the Baessgen IMAGIX system is desired. This allows single steps as well as
complex sequences to be started at will at the touch of a button (that is, at the touch of the Return
key).
An example:
In this example, the internal Clock will advance the trays of all four projectors to position 1 and then
wait just before the X. Once the Return key is pressed, it will execute lines 0001 to 0005 and then wait
before the next X. Once the Return key is pressed again, it will execute line 0006 and then wait
before the next X. It is clear that this feature holds the key to successful live presentations.
This feature is most useful in combination with a QUATRIX/TRIPLEX or a UX-MEGA with memory
option, since it allows you to call up sequences without having to bring your PC to the presentation.
Details can be found in the control units' handbooks. The QUATRIX/TRIPLEX and the UX-MEGA with
memory option are excellent choices for live presentations.
36
3.13 Keyboard Overview
Return
- replaces the Event Time with the current clock reading when setting the timing "on the fly".
- continues playback at an X-Marking.
Esc
- Exit a menu or window without taking action.
- Switch from Play mode to Edit mode.
- Stop formatting.
- Close Preview function.
Delete
- in the first and second programming columns (Event Time and Command columns) in a
programming line:
--- first time: delete everything except the Event Time and the Comments.
--- second time: delete the entire line.
- in the Comment column: erase the character above the cursor.
Insert
- place a new line before the current line.
- in the Comment column: prepare for inserting characters.
--> <-- go to the next or previous column in a programming line.
- move the cursor within a column to the right or left.
- go to the next programming line
- go to the previous programming line
Page Down (PgDn)
- jump to the next page
Page Up (PgUp)
- jump to the previous page
CTRL-Page Down
- go to the end of the document
CTRL-Page Up
- go to the beginning of the document
Home
- go to the beginning of the line
- in the Comment column: go to the beginning of the comment
End
- go to the end of the line
- in the Comment column: go to the end of the comment
37