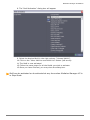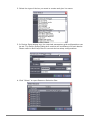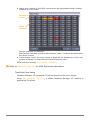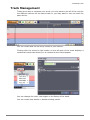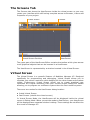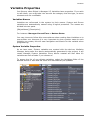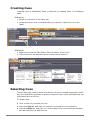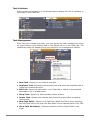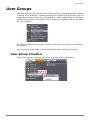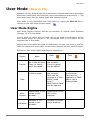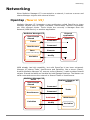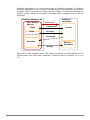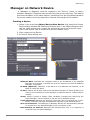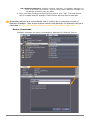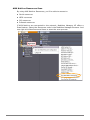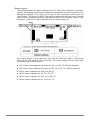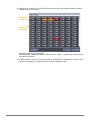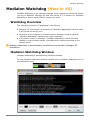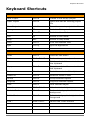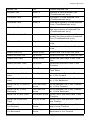
1
MEDIALON MANAGER V5 Show & Media Control Software MEDIALON MANAGER V5 Show & Media Control Software User Manual Medialon 101 rue Pierre Sémard F92324 Châtillon Cedex France Tel: +33 (0)1 46 55 60 70 Fax: +33 (0)1 46 55 54 83 Medialon Inc. 2977 McFarlane Road, Suite 301 Miami, FL 33133, USA Tel: +1 305 445 4045 Fax: +1 305 445 4048 [email protected] www.medialon.com Revision 2.0.1 Copyright ©2008 Medialon, All rights reserved FINAL USER'S LICENSE AGREEMENT FOR MEDIALON SOFTWARE & PLUG-IN IMPORTANT - READ ATTENTIVELY: By loading and installing the software on your computer, you indicate your acceptance of the following Final User's License for Medialon Software & Plug-In product (the "License Agreement") which is either: (i) printed on a licence card with the software; (ii) on-line in the software application. If you do not agree to the terms of this License Agreement, for a full refund, promptly return this product to the place you obtained it. The License Agreement is entered into between you (the final user, a legal entity or natural person), and Medialon, 101 rue Pierre Sémard, 92324 Chatillon Cedex France, SA with a capital of 311 538 € registered at Nanterre RCS B 383 966 009 00029, and concerns the aforementioned software product, any attached add-in software, the documentation in electronic format and any example or educational software (the "Software"). You shall inform all authorized users of the Software of the terms and conditions of this Agreement. License granting The Software is protected by Intellectual Property Right, copyright law and by international agreements. Any partial or total reproduction or distribution of the Software, by any means whatsoever, is strictly prohibited. Any person not respecting these provisions shall be guilty of the crime of forgery and shall be liable to the penal penalties provided for by law. The Software is not sold but transferred under license. You are authorized to install, use, run ONE copy of the Software on ONE computer. If you use a network server, you can install one copy of the Software on it, but you must acquire a user's license for each distinct customer computer using the Software. You are not authorized to use the Software for shared work time or on behalf of a third party. All other rights not expressly granted in the present contract are reserved by MEDIALON SA, in particular the present contract grants you no right in relation to the service or trade mark belonging to MEDIALON SA. MEDIALON SA is the sole holder of the right to make any and all required corrections to the Software in order to comply with the Software documentation. Save as otherwise provided by law, you are not authorised to reconstitute, reverse engineer, to de-compile or disassemble the Software product If the software product is an update, you must, in order to use it, be the holder of a user's license for the original product. An update replaces the product that gave you the right to the update. The original holder of the license for the software product is only authorized to transfer this contract once and permanently, to another end user provided that he provides written notice to MEDIALON SA and the recipient agrees to be bound by and subject to the terms and conditions of this Agreement. This transfer must include all the software elements including without limitation the most recent update and all prior versions, electronic and paper documents and the certificate of authenticity. Copyright All ownership rights and copyrights relating to the Software, any attached add-in software, the documentation in electronic or paper format and any other example or educational applications are proprietary of MEDIALON SA. MEDIALON SA retains all title and ownership of the Software and Software Documentation. All intellectual property rights relating to the APIs and contents to which the product can give access are proprietary of the respective owners of these APIs and contents, and can be protected by regulations and international agreements relating to copyrights and intellectual property rights. Limited warranty MEDIALON SA warrants that the magnetic media on which the Software is recorded and any Software Documentation will be free from defects in material and workmanship under normal use for a period of one (1) year from first date of purchase (date of invoice). MEDIALON SA also warrants that the original copy of the Software will perform substantially in accordance with the accompanying Software documentation for one (1) year from the date of receipt. MEDIALON SA does not warrant that the functions contained in the Software will meet your all requirements or that the operation of the Software will be error free or uninterrupted. Your exclusive remedy for breach of MEDIALON SA warranty shall be (i) in case of defects in the media, the replacement by MEDIALON SA of any magnetic media not meeting the warranty and (ii) in case of any defect in the Software, MEDIALON SA shall use reasonable efforts to provide maintenance, modifications or fixes in a timely manner, or at its option replace the Software, provided the Software is returned with a copy of your receipt. This limited warranty is void if failure of the Software has resulted from accident, abuse, alteration or misapplication. Any replacement Software will be warranted for the remainder of the original warranty period two (2) months, whichever is longer. MEDIALON SA is not responsible for problems caused by changes in, or modifications to, the operating characteristics of any computer hardware or operating system for which the Software or any upgrade or update is procured, nor is MEDIALON SA for problems which occurs as a result of the use of the Software in conjunction with software of third parties or with hardware which is incompatible with the operating system for which the Software is being procured. Infringement MEDIALON SA, at its own expense, will indemnify and defend you against any action brought against you to the extent that it is based on a claim that the Software or any upgrade or update of the Software used within the scope of this Agreement infringes any French patent or copyright provided that MEDIALON SA is promptly notified in writing of such claim. MEDIALON SA shall have the right to control the defense of all such claims, lawsuits, and other proceedings. In no event may you settle any such claim, lawsuit, or proceeding without MEDIALON SA's prior written approval. MEDIALON SA shall have no liability for any claim under this section if a claim for a French patent or copyright infringement is based on the use of a superseded or altered version of the Software if such infringement would have been avoided by use of the latest unaltered version of the Software made available to you, or in the event such claim is based upon any modification or enhancement to the Software made by you or on your behalf. In the event a third party infringement claim is sustained in a final judgment from which no further appeal is taken or possible, or if your use of the Software is enjoined by a court, then MEDIALON SA shall, in its sole election and at its expense either (i) procure for you the right to continue to use the Software pursuant to this Agreement; (ii) replace or modify the Software to make it non-infringing; or if (i) and (ii) are not reasonably feasible, (iii) terminate this Agreement and refund to you the depreciated value of the Software, based on straight line depreciation over a period of 5 years. The foregoing obligations state MEDIALON SA's entire liability and your exclusive remedy of and MEDIALON SA shall have no other liability or obligation with respect to any actual or alleged infringement of any intellectual property rights under this Agreement Limitation of liability MEDIALON SA's entire liability to you or another party for any loss or damage resulting from any claims, demands or actions arising out of this Agreement shall not exceed the license fee paid to MEDIALON SA for the Software ("License Fee"), net of dealer or distributor margins, notwithstanding any failure of essential purpose of any limited remedy. No other warranties Except for the express warranty provided under heading Limited Warranty above, the Software and its related documentation are provided "As Is" and without a warranty of any kind, whether express, implied, statutory and MEDIALON SA specifically disclaims the implied warranties, terms or conditions of merchantability, non-infringement and fitness for a particular purpose. No liability for consequential damages ACCORDING TO DANGEROUSNESS OF CERTAIN KIND OF EQUIPMENTS WHICH CAN BE CONTROLED BY THE SOFTWARE, THE LIABILITY OF MEDIALON SA IS SUBMITTED TO THE STRICT COMPLIANCE WITH THE MANDATORY SAFETY RULES AS DESCRIBED INTO THE SOFTWARE DOCUMENTATION. Save as otherwise provided by law, in no event and more particularly in case of breach of the safety rules as described into the Software documentation, shall MEDIALON SA be held liable for any special, indirect or accessory damage, of any nature whatsoever, including without limitation body or material injury, loss of profit, interruption of activity, loss of information or other pecuniary losses which may result from the use or the impossibility to use the Software, and this even if the company MEDIALON SA has been notified of the possibility of such prejudice. Termination This Agreement is effective until terminated. This Agreement will terminate if you fail to comply with any provision of the Agreement. Upon termination, you shall destroy all copies of the Software, including security keys and modified copies, if any. Maintenance and support Maintenance, including the provision of upgrades and updates to the Software, and telephone support is available from MEDIALON SA only through a maintenance plan. Updates and upgrades are not available separately. General provisions If any term, condition, or provision in this Agreement is found to be invalid, unlawful or unenforceable to any extent, such invalid term, condition or provision will be severed from the remaining terms, conditions and provisions, which will continue to be valid and enforceable to the fullest extent permitted by law. This Agreement shall be interpreted and construed in accordance with the laws of France. Any dispute arising out of this Agreement shall be submitted to Paris Commercial Court (Tribunal de Commerce de Paris). MEDIALON SA 101 rue Pierre Sémard 92324 Châtillon Cedex France www.medialon.com Table of Content Table of Content Table of Content . . . . . . . . . . . . . . . . . . . . . . . . . . . . . . . .I New In Manager V5 . . . . . . . . . . . . . . . . . . . . . . . . . . . . 1 INTRODUCTION Show & Media Control .... . . . . . . . . . . . . . . . . . . . . . . . . 5 Overview of Medialon Manager . . . . . . . . . . . . . . . . . . . 7 Main Features . . . . . . . . . . . . . . . . . . . . . . . . Device Control . . . . . . . . . . . . . . . . . . . Timelines Tasks. . . . . . . . . . . . . . . . . . . StepBased Tasks and Variables . . . . . . . . Graphical UserScreen Interface . . . . . . . . Master / Slave Capabilities . . . . . . . . . . . Add-on Functionalities . . . . . . . . . . . . . . Internet Functionalities . . . . . . . . . . . . . Sophisticated Programming . . . . . . . . . . Architecture . . . . . . . . . . . . . . . . . . . . . . . . . MxMs . . . . . . . . . . . . . . . . . . . . . . . . . . . . . . Device MxMs. . . . . . . . . . . . . . . . . . . . . Service MxMs . . . . . . . . . . . . . . . . . . . . Low Level Communicator . . . . . . . . . . . . Protocols and Hardware . . . . . . . . . . . . . Task Engine . . . . . . . . . . . . . . . . . . . . . . . . . Graphical User Interfaces . . . . . . . . . . . . . . . . Built-in User Interfaces . . . . . . . . . . . . . Custom User Interfaces . . . . . . . . . . . . . Variables . . . . . . . . . . . . . . . . . . . . . . . . . . . System Variables. . . . . . . . . . . . . . . . . . Screen Variables . . . . . . . . . . . . . . . . . . User Defined Variables . . . . . . . . . . . . . . Medialon Manager V5 Objects and Interactions . Medialon Manager V5 Modes . . . . . . . . . . . . . . Stop Mode . . . . . . . . . . . . . . . . . . . . . . Debug Mode . . . . . . . . . . . . . . . . . . . . . User Mode (New in V5) . . . . . . . . . . . . . Run Mode . . . . . . . . . . . . . . . . . . . . . . . Medialon Manager V5 License Options . . . . . . . Medialon Manager V5 Pro . . . . . . . . . . . . Medialon Manager V5 Lite. . . . . . . . . . . . Medialon Manager V5 Panel . . . . . . . . . . Computer Requirements. . . . . . . . . . . . . . . . . Minimum System Requirements . . . . . . . Suggested System Requirements . . . . . . MANDATORY SAFETY RULES . . . . . . . . . . . . . . Table of Content . . . . . . . . . . . . . . . . . . . . . . . . . . . . . . . . . . . . . . . . . . . . . . . . . . . . . . . . . . . . . . . . . . . . . . . . . . . . . . . . . . . . . . . . . . . . . . . . . . . . . . . . . . . . . . . . . . . . . . . . . . . . . . . . . . . . . . . . . . . . . . . . . . . . . . . . . . . . . . . . . . . . . . . . . . . . . . . . . . . . . . . . . . . . . . . . . . . . . . . . . . . . . . . . . . . . . . . . . . . . . . . . . . . . . . . . . . . . . . . . . . . . . . . . . . . . . . . . . . . . . . . . . . . . . . . . . . . . . . . . . . . . . . . . . . . . . . . . . . . . . . . . . . . . . . . . . . . . . . . . . . . . . . . . . . . . . . . . . . . . . . . . . . . . . . . . . . . . . . . . . . . . . . . . . . . . . . . . . . . . . . . . . . . . . . . . . . . . . . . . . . . . . . . . . . . . . . . . . . . . . . . . . . . . . . . . . . . . . . . . . . . . . . . . . . . . . . . . . . . . . . . . . . . . . . . . . . . . . . . . . . . . . . . . . . . . . . . . . . . . . . . . . . . . . . . . . . . . . . . . . . . . . . . . . . . . . . . . . . . . . . . . . . . . . . . . . . . . 7 . 7 . 7 . 8 . 8 . 8 . 8 . 8 . 9 . 9 . 9 .10 .10 .11 .11 .12 .12 .12 .13 .14 .14 .14 .14 .15 .15 .15 .16 .16 .16 .16 .16 .16 .17 .18 .18 .18 .19 I PROJECT & SYSTEM SETUP Medialon Manager Installation . . . . . . . . . . . . . . . . . . . 23 Installation of Main Software First Start. . . . . . . . . . . . . . Registration . . . . . . . . . . . . Activating MxMs . . . . . . . . . MxM Activation . . . . . . . . . . . . . . . . . . . . . . . . . . . . . . . . . . . . . . . . . . . . . . . . . . . . . . . . . . . . . . . . . . . . . . . . . . . . . . . . . . . . . . . . . . . . . . . . . . . . . . . . . . . . . . . . . . . . . . . . . . . . . . . . . . . . . . . . . . . . . . . . . . .23 .25 .26 .27 .28 Workspace . . . . . . . . . . . . . . . . . . . . . . . . . . . . . . . . . . 31 The Workspace . . . . . . . . . . . . Main Toolbar . . . . . . . . . . . . . . Browser Tab . . . . . . . . . . . . . . Lister Tab . . . . . . . . . . . . . . . . Properties Tab. . . . . . . . . . . . . Control Tab. . . . . . . . . . . . . . . Screens Tab . . . . . . . . . . . . . . Device Map Tab. . . . . . . . . . . . Custom Workspace . . . . . . . . . Workspace Theme (New in ... ... ... ... ... ... ... ... ... V5) . . . . . . . . . . . . . . . . . . . . . . . . . . . . . . . . . . . . . . . . . . . . . . . . . . . . . . . . . . . . . . . . . . . . . . . . . . . . . . . . . . . . . . . . . . . . . . . . . . . . . . . . . . . . . . . . . . . . . . . . . . . . . . . . . . . . . . . . . . . . . . . . . . . . . . . . . . . . . . . . . . . . . . . . . . . . . . . . . . . . . . . . . . . . . . . . . . . . . . . . . . . . . . . . . . . . . . . . . . . . . . . . . . . . . . .31 .32 .33 .34 .34 .35 .35 .35 .36 .39 Devices . . . . . . . . . . . . . . . . . . . . . . . . . . . . . . . . . . . . . 41 Creating a Device . . . . . . . . . . . . . . Device Properties . . . . . . . . . . . . . . Resource Management (MRC) . . . . . . Add New Resource. . . . . . . . . . Saving Resource Configurations Testing Devices . . . . . . . . . . . . . . . . Testing Device Control Panels . . Testing Commands . . . . . . . . . Device Help . . . . . . . . . . . . . . . . . . . . . . . . . . . . . . . . . . . . . . . . . . . . . . . . . . . . . . . . . . . . . . . . . . . . . . . . . . . . . . . . . . . . . . . . . . . . . . . . . . . . . . . . . . . . . . . . . . . . . . . . . . . . . . . . . . . . . . . . . . . . . . . . . . . . . . . . . . . . . . . . . . . . . . . . . . . . . . . . . . . . . . . . . . . . . . . . . . . . . . . . . . . . . . . . . . . . .41 .43 .44 .45 .53 .53 .53 .54 .55 SHOW PROGRAMMING Timebased Tasks . . . . . . . . . . . . . . . . . . . . . . . . . . . . . 59 Show Structure . . . . . . . . . . . . . . . Single Timeline . . . . . . . . . . . Multiple timeline . . . . . . . . . . Creating a TimeBased Task. . . . . . . Creating a TimeBased task: . . The Task Editor . . . . . . . . . . . Track Management . . . . . . . . . . . . Track Note . . . . . . . . . . . . . . Creating Cues . . . . . . . . . . . . . . . . Cue Properties . . . . . . . . . . . Inserting a Message Cue . . . . Inserting a Countdown Cue. . . Editing Cues . . . . . . . . . . . . . . . . . Changing Cue Properties . . . . Selecting Cues . . . . . . . . . . . . . . . The “Cue Selection” menus. . . Managing Cues . . . . . . . . . . . . . . . Cut/Paste and Delete . . . . . . . Moving Cues . . . . . . . . . . . . . The «Cue Management» menu Cue Disable/Enable . . . . . . . . II . . . . . . . . . . . . . . . . . . . . . . . . . . . . . . . . . . . . . . . . . . Table of Content . . . . . . . . . . . . . . . . . . . . . . . . . . . . . . . . . . . . . . . . . . . . . . . . . . . . . . . . . . . . . . . . . . . . . . . . . . . . . . . . . . . . . . . . . . . . . . . . . . . . . . . . . . . . . . . . . . . . . . . . . . . . . . . . . . . . . . . . . . . . . . . . . . . . . . . . . . . . . . . . . . . . . . . . . . . . . . . . . . . . . . . . . . . . . . . . . . . . . . . . . . . . . . . . . . . . . . . . . . . . . . . . . . . . . . . . . . . . . . . . . . . . . . . . . . . . . . . . . . . . . . . . . . . . . . . . . . . . . . . . . . . . . . . . . . . . . . . . . . . . . . . . . . . . . . . . . . . . . . . . . . . . . . . . . . . . . . . . . . . . . . . . . . . . . . . . . . . . . . . . . . . . . . . . . . . . . . . . . . . . . . . . . . . . . . . . . . . . . . . . . . . . . . . . . . . . . . . . . . . . . . . . . . . . . . . . . . . . . . . . . .59 .59 .59 .59 .60 .60 .61 .62 .62 .64 .64 .65 .66 .66 .67 .68 .68 .68 .68 .69 .69 Table of Content Grouping Cues . . . . . . . . . . . . . . . . . . . . . . . . . . . . . . . Expanding and Compressing Cues . . . . . . . . . . . . . . . . . . Distributing Cues. . . . . . . . . . . . . . . . . . . . . . . . . . . . . . Cues time…(+/- keyboard shortcuts) . . . . . . . . . . . . . . . . Size Cues & Cue size options . . . . . . . . . . . . . . . . . . . . . The Cue Library. . . . . . . . . . . . . . . . . . . . . . . . . . . . . . . . . . . Time-X . . . . . . . . . . . . . . . . . . . . . . . . . . . . . . . . . . . . . . . . . Timeline Management . . . . . . . . . . . . . . . . . . . . . . . . . . . . . . Indicators . . . . . . . . . . . . . . . . . . . . . . . . . . . . . . . . . . . Controls . . . . . . . . . . . . . . . . . . . . . . . . . . . . . . . . . . . . Time Ruler contextual Menu . . . . . . . . . . . . . . . . . . . . . . Blind Mode . . . . . . . . . . . . . . . . . . . . . . . . . . . . . . . . . . . . . . Lock Task . . . . . . . . . . . . . . . . . . . . . . . . . . . . . . . . . . . . . . . Positrack . . . . . . . . . . . . . . . . . . . . . . . . . . . . . . . . . . . . . . . Timecode . . . . . . . . . . . . . . . . . . . . . . . . . . . . . . . . . . . . . . . Internal Timecode . . . . . . . . . . . . . . . . . . . . . . . . . . . . . External Timecode . . . . . . . . . . . . . . . . . . . . . . . . . . . . . Recording Cues . . . . . . . . . . . . . . . . . . . . . . . . . . . . . . . . . . . Manager Commands in TimeBased Tasks . . . . . . . . . . . . . . . . . UserScreen Commands . . . . . . . . . . . . . . . . . . . . . . . . . . . . . Open UserScreen. . . . . . . . . . . . . . . . . . . . . . . . . . . . . . Close UserScreen . . . . . . . . . . . . . . . . . . . . . . . . . . . . . Goto Page. . . . . . . . . . . . . . . . . . . . . . . . . . . . . . . . . . . Task Commands . . . . . . . . . . . . . . . . . . . . . . . . . . . . . . . . . . Start Task . . . . . . . . . . . . . . . . . . . . . . . . . . . . . . . . . . Pause Task . . . . . . . . . . . . . . . . . . . . . . . . . . . . . . . . . . Stop Task . . . . . . . . . . . . . . . . . . . . . . . . . . . . . . . . . . . Sync Task. . . . . . . . . . . . . . . . . . . . . . . . . . . . . . . . . . . Lock Task . . . . . . . . . . . . . . . . . . . . . . . . . . . . . . . . . . . Goto Label . . . . . . . . . . . . . . . . . . . . . . . . . . . . . . . . . . Goto Time . . . . . . . . . . . . . . . . . . . . . . . . . . . . . . . . . . Show Task . . . . . . . . . . . . . . . . . . . . . . . . . . . . . . . . . . System Commands . . . . . . . . . . . . . . . . . . . . . . . . . . . . . . . . Device Control . . . . . . . . . . . . . . . . . . . . . . . . . . . . . . . Sound Beep . . . . . . . . . . . . . . . . . . . . . . . . . . . . . . . . . Expression . . . . . . . . . . . . . . . . . . . . . . . . . . . . . . . . . . Controlling the Task. . . . . . . . . . . . . . . . . . . . . . . . . . . . . . . . Views. . . . . . . . . . . . . . . . . . . . . . . . . . . . . . . . . . . . . . . . . . Timeline View . . . . . . . . . . . . . . . . . . . . . . . . . . . . . . . . List View . . . . . . . . . . . . . . . . . . . . . . . . . . . . . . . . . . . Flash Control . . . . . . . . . . . . . . . . . . . . . . . . . . . . . . . . . . . . Pause Points . . . . . . . . . . . . . . . . . . . . . . . . . . . . . . . . . . . . . Tasks in a Project . . . . . . . . . . . . . . . . . . . . . . . . . . . . . . . . . Task Properties . . . . . . . . . . . . . . . . . . . . . . . . . . . . . . . Task Variables. . . . . . . . . . . . . . . . . . . . . . . . . . . . . . . . Task Management . . . . . . . . . . . . . . . . . . . . . . . . . . . . . Task Setup . . . . . . . . . . . . . . . . . . . . . . . . . . . . . . . . . . . . . . Use Task Variables . . . . . . . . . . . . . . . . . . . . . . . . . . . . Restart if start condition changes to true during execution . Task Duration . . . . . . . . . . . . . . . . . . . . . . . . . . . . . . . . Timecode Setup . . . . . . . . . . . . . . . . . . . . . . . . . . . . . . Timecode Loss Conditions. . . . . . . . . . . . . . . . . . . . . . . . Timecode Sync Conditions . . . . . . . . . . . . . . . . . . . . . . . Timecode Jump Conditions . . . . . . . . . . . . . . . . . . . . . . . Timecode Offset . . . . . . . . . . . . . . . . . . . . . . . . . . . . . . Timecode display. . . . . . . . . . . . . . . . . . . . . . . . . . . . . . Table of Content . . . . . . . . . . . . . . . . . . . . . . . . . . . . . . . . . . . . . . . . . . . . . . . . . . . . . . . . . . . . . . . . . . . . . . . . . . . . . . . . . . . . . . . . . . . . . . . . . . . . . . . . . . . . . . . . . . . . . . . . . . . . . . . . . . . . . . . . . . . . . . . . . . . . . . . . . . . . . . . . . . . . . . . . .69 .70 .70 .71 .71 .71 .71 .73 .73 .73 .73 .74 .74 .74 .75 .75 .76 .76 .78 .78 .78 .78 .78 .79 .79 .79 .79 .80 .80 .80 .80 .81 .81 .82 .83 .83 .83 .84 .84 .84 .85 .85 .85 .86 .86 .87 .87 .88 .88 .88 .89 .89 .89 .90 .90 .90 III AUTOMATION PROGRAMMING Graphical UserScreens . . . . . . . . . . . . . . . . . . . . . . . . . 93 Creating a UserScreen . . . . . . . . The Screens Tab . . . . . . . . . . . . Virtual Screen . . . . . . . . . . . . . . UserScreen Properties . . . . . . . . UserScreen Pages . . . . . . . . . . . Page Properties . . . . . . . . . UserScreen Management . . . . . . Graphical Objects . . . . . . . . . . . UserScreen Toolbar . . . . . . Creating Graphical Objects . Graphical Object Properties . . . . Common Properties . . . . . . Buttons . . . . . . . . . . . . . . Sliders . . . . . . . . . . . . . . . Digital Sliders . . . . . . . . . . Text Edits . . . . . . . . . . . . . Lists. . . . . . . . . . . . . . . . . Text Displays . . . . . . . . . . LEDs . . . . . . . . . . . . . . . . Gauges . . . . . . . . . . . . . . Containers . . . . . . . . . . . . Graphical Object Tools . . . . . . . . Font Selector . . . . . . . . . . Color Selector . . . . . . . . . . Image Selector . . . . . . . . . Value Selection Window . . . . . . . . . . . . . . . . . . . . . . . . . . . . . . . . . . . . . . . . . . . . . . . . . . . . . . . . . . . . . . . . . . . . . . . . . . . . . . . . . . . . . . . . . . . . . . . . . . . . . . . . . . . . . . . . . . . . . . . . . . . . . . . . . . . . . . . . . . . . . . . . . . . . . . . . . . . . . . . . . . . . . . . . . . . . . . . . . . . . . . . . . . . . . . . . . . . . . . . . . . . . . . . . . . . . . . . . . . . . . . . . . . . . . . . . . . . . . . . . . . . . . . . . . . . . . . . . . . . . . . . . . . . . . . . . . . . . . . . . . . . . . . . . . . . . . . . . . . . . . . . . . . . . . . . . . . . . . . . . . . . . . . . . . . . . . . . . . . . . . . . . . . . . . . . . . . . . . . . . . . . . . . . . . . . . . . . . . . . . . . . . . . . . . . . . . . . . . . . . . . . . . . . . . . . . . . . . . . . . . . . . . . . . . . . . . . . . . . . . . . . . . . . . . . . . . . . . . . . . . . . . . . . . . . . . . . . . . . . . . . . . . . . . . . . . . . . . . . . . . . . . . . . . . . . . . . . . . . . . . . . . . . . . . . . . . . . . . . . . . . . . . . . . . . . . . . . . . . . . . . . . . . . . . . . . . . . . . . . . . . . . . . . . . . . . . . . . . . . . . . . . . . . . . . . . . . . . . . . . . . . . . . . . .93 . .94 . .94 . .95 . .96 . .96 . .97 . .98 . .98 . .99 . .99 . .99 . 100 . 101 . 101 . 101 . 102 . 102 . 103 . 104 . 104 . 105 . 105 . 105 . 107 . 107 Variables . . . . . . . . . . . . . . . . . . . . . . . . . . . . . . . . . . . 109 Defining Variables . . . . . . . . . . . . Categories . . . . . . . . . . . . . Types of Variables . . . . . . . . Persistent Variable. . . . . . . . Creating User Variables . . . . . . . . Variable Properties . . . . . . . . . . . Variables Names . . . . . . . . . System Variable Properties . . Screen Variable Properties . . User Variable Properties . . . . Using Variables as Cue Parameters . . . . . . . . . . . . . . . . . . . . . . . . . . . . . . . . . . . . . . . . . . . . . . . . . . . . . . . . . . . . . . . . . . . . . . . . . . . . . . . . . . . . . . . . . . . . . . . . . . . . . . . . . . . . . . . . . . . . . . . . . . . . . . . . . . . . . . . . . . . . . . . . . . . . . . . . . . . . . . . . . . . . . . . . . . . . . . . . . . . . . . . . . . . . . . . . . . . . . . . . . . . . . . . . . . . . . . . . . . . . . . . . . . . . . . . . . . . . . . . . . . . . . . . . . . . . . . 109 . 109 . 109 . 110 . 110 . 111 . 111 . 111 . 113 . 114 . 114 Expressions. . . . . . . . . . . . . . . . . . . . . . . . . . . . . . . . . 117 Logical Expressions . . . . . . . . . . . . . . . . . Operators . . . . . . . . . . . . . . . . . . . . Evaluation expressions . . . . . . . . . . . Assignment expressions . . . . . . . . . . The Expression Window . . . . . . . . . . . . . . Operations . . . . . . . . . . . . . . . . . . . . . . . Conversion Rule . . . . . . . . . . . . . . . Operations on Strings . . . . . . . . . . . Converting Time . . . . . . . . . . . . . . . Comparing Time . . . . . . . . . . . . . . . Calculating/Converting Date . . . . . . . Creating a toggle value . . . . . . . . . . Creating a value selector with buttons Function Operators . . . . . . . . . . . . . . . . . IV Table of Content . . . . . . . . . . . . . . . . . . . . . . . . . . . . . . . . . . . . . . . . . . . . . . . . . . . . . . . . . . . . . . . . . . . . . . . . . . . . . . . . . . . . . . . . . . . . . . . . . . . . . . . . . . . . . . . . . . . . . . . . . . . . . . . . . . . . . . . . . . . . . . . . . . . . . . . . . . . . . . . . . . . . . . . . . . . . . . . . . . . . . . . . . . . . . . . . . . . . . . . . . . . . . . . . . . . . . . . . . . . . . . . . . . . . . . . . . . . . . . . 117 . 117 . 118 . 118 . 119 . 122 . 122 . 122 . 123 . 123 . 123 . 123 . 123 . 125 Table of Content Start Conditions . . . . . . . . . . . . . . . . . . . . . . . . . . . . . . . . . . . . . 130 Setting the Start Condition of a task . . . . . . . . . . . . . . . . . . . 130 StepBased Tasks . . . . . . . . . . . . . . . . . . . . . . . . . . . . . 133 Creating a StepBased task . . . . . . . . . . . . . . . . . . . . . . . . . . . Creating Cues . . . . . . . . . . . . . . . . . . . . . . . . . . . . . . . . . . . . Selecting Cues . . . . . . . . . . . . . . . . . . . . . . . . . . . . . . . . . . . The “Cue Selection” menus. . . . . . . . . . . . . . . . . . . . . . . Managing Cues . . . . . . . . . . . . . . . . . . . . . . . . . . . . . . . . . . . Cut/Paste and Delete . . . . . . . . . . . . . . . . . . . . . . . . . . . Moving Cues . . . . . . . . . . . . . . . . . . . . . . . . . . . . . . . . . The «Cue Management» menu . . . . . . . . . . . . . . . . . . . . Cue Disable/Enable . . . . . . . . . . . . . . . . . . . . . . . . . . . . Grouping Cues . . . . . . . . . . . . . . . . . . . . . . . . . . . . . . . Blind Mode . . . . . . . . . . . . . . . . . . . . . . . . . . . . . . . . . . . . . . Lock Task . . . . . . . . . . . . . . . . . . . . . . . . . . . . . . . . . . . . . . . Manager Commands in StepBased Tasks . . . . . . . . . . . . . . . . . UserScreen Commands . . . . . . . . . . . . . . . . . . . . . . . . . . . . . Open UserScreen. . . . . . . . . . . . . . . . . . . . . . . . . . . . . . Close UserScreen . . . . . . . . . . . . . . . . . . . . . . . . . . . . . Goto Page. . . . . . . . . . . . . . . . . . . . . . . . . . . . . . . . . . . List Control . . . . . . . . . . . . . . . . . . . . . . . . . . . . . . . . . . Object Text Control . . . . . . . . . . . . . . . . . . . . . . . . . . . . Task Commands . . . . . . . . . . . . . . . . . . . . . . . . . . . . . . . . . . Start Task . . . . . . . . . . . . . . . . . . . . . . . . . . . . . . . . . . Pause Task . . . . . . . . . . . . . . . . . . . . . . . . . . . . . . . . . . Stop Task . . . . . . . . . . . . . . . . . . . . . . . . . . . . . . . . . . . Sync Task. . . . . . . . . . . . . . . . . . . . . . . . . . . . . . . . . . . Lock Task . . . . . . . . . . . . . . . . . . . . . . . . . . . . . . . . . . . Goto Label . . . . . . . . . . . . . . . . . . . . . . . . . . . . . . . . . . Goto Time . . . . . . . . . . . . . . . . . . . . . . . . . . . . . . . . . . Goto Line . . . . . . . . . . . . . . . . . . . . . . . . . . . . . . . . . . . Call Task . . . . . . . . . . . . . . . . . . . . . . . . . . . . . . . . . . . Show Task . . . . . . . . . . . . . . . . . . . . . . . . . . . . . . . . . . Expression . . . . . . . . . . . . . . . . . . . . . . . . . . . . . . . . . . . . . . Logical Cues . . . . . . . . . . . . . . . . . . . . . . . . . . . . . . . . . . . . . Wait. . . . . . . . . . . . . . . . . . . . . . . . . . . . . . . . . . . . . . . While/EndWhile . . . . . . . . . . . . . . . . . . . . . . . . . . . . . . . If/Else/Endif . . . . . . . . . . . . . . . . . . . . . . . . . . . . . . . . . Wait For . . . . . . . . . . . . . . . . . . . . . . . . . . . . . . . . . . . . OnExpression/Case . . . . . . . . . . . . . . . . . . . . . . . . . . . . System Commands . . . . . . . . . . . . . . . . . . . . . . . . . . . . . . . . Device Control . . . . . . . . . . . . . . . . . . . . . . . . . . . . . . . Load New Data File . . . . . . . . . . . . . . . . . . . . . . . . . . . . Sound Beep . . . . . . . . . . . . . . . . . . . . . . . . . . . . . . . . . Mouse Control . . . . . . . . . . . . . . . . . . . . . . . . . . . . . . . . Quit Manager . . . . . . . . . . . . . . . . . . . . . . . . . . . . . . . . Flash Control . . . . . . . . . . . . . . . . . . . . . . . . . . . . . . . . . . . . The Cue Library. . . . . . . . . . . . . . . . . . . . . . . . . . . . . . . . . . . Pause Points . . . . . . . . . . . . . . . . . . . . . . . . . . . . . . . . . . . . . Tasks in a Project . . . . . . . . . . . . . . . . . . . . . . . . . . . . . . . . . Task Properties . . . . . . . . . . . . . . . . . . . . . . . . . . . . . . . Task Variables. . . . . . . . . . . . . . . . . . . . . . . . . . . . . . . . Task Management . . . . . . . . . . . . . . . . . . . . . . . . . . . . . Task Setup . . . . . . . . . . . . . . . . . . . . . . . . . . . . . . . . . . . . . . Use Task Variables . . . . . . . . . . . . . . . . . . . . . . . . . . . . Restart if start condition changes to true during execution . Table of Content . . . . . . . . . . . . . . . . . . . . . . . . . . . . . . . . . . . . . . . . . . . . . . . . . . . . . . . . . . . . . . . . . . . . . . . . . . . . . . . . . . . . . . . . . . . . . . . . . . . . . . . . . . . 133 . 134 . 134 . 135 . 135 . 135 .135 . 136 . 136 . 136 . 137 . 137 . 137 . 137 . 137 . 137 . 137 . 138 . 138 . 139 . 139 . 139 . 139 . 139 . 140 . 140 . 140 . 140 . 141 . 141 . 141 . 142 . 142 . 142 . 142 . 143 . 144 . 145 .145 . 146 . 146 . 146 . 147 . 148 . 148 . 148 . 149 . 149 . 150 . 150 . 151 . 151 . 151 V ADVANCED PROGRAMMING Task Creation Wizards . . . . . . . . . . . . . . . . . . . . . . . . 155 Graphical Object Wizards . . . . . . . . . . . . . . . . . . . . . . . . . . . . . Create a task started by this object . . . . . . . . . . . . . . . . . . Add start condition to selected task . . . . . . . . . . . . . . . . . . Create a task to monitor a variable with this object . . . . . . . Create a task to perform a device command from this object Variable Wizards . . . . . . . . . . . . . . . . . . . . . . . . . . . . . . . . . . . . . . . . . . 155 . 155 . 155 . 156 . 156 . 157 Drag and Drop Wizards. . . . . . . . . . . . . . . . . . . . . . . . 158 Dragging Dragging Dragging Dragging Dragging Dragging Dragging Device Commands onto Graphical Objects Devices on Container Objects (New in V5) Variables onto Graphical Objects . . . . . . . Task onto Graphical Objects . . . . . . . . . . Task onto Task . . . . . . . . . . . . . . . . . . . Variable onto Task . . . . . . . . . . . . . . . . . Cue onto Task . . . . . . . . . . . . . . . . . . . . . . . . . . . . . . . . . . . . . . . . . . . . . . . . . . . . . . . . . . . . . . . . . . . . . . 158 . 158 . 159 . 160 . 160 . 160 . 160 The Cue Library (New in V5) . . . . . . . . . . . . . . . . . . . 161 The Cue Library. . . . . . . . . . . . . . . . Adding Cues to the Cue Library . . . . . From a Task . . . . . . . . . . . . . . From The Device Command List Inserting Cues from the Cue Library . Deleting Cues from Library . . . . . . . . . . . . . . . . . . . . . . . . . . . . . . . . . . . . . . . . . . . . . . . . . . . . . . . . . . . . . . . . . . . . . . . . . . . . . . . . . . . . . . . . . . . . . . . . . . . . . . . . . . . . . . . . . . . . . . . . . . . . . . . . . . . . . . . 161 . 161 . 161 . 162 . 162 . 163 User Groups . . . . . . . . . . . . . . . . . . . . . . . . . . . . . . . . 165 User Group Creation . . . . . . . Sub Group Creation . . . . Adding Object to User Groups . Share Objects (New in V5) . . . . . . . . . . . . . . . . . . . . . . . . . . . . . . . . . . . . . . . . . . . . . . . . . . . . . . . . . . . . . . . . . . . . . . . . . . . . . . . . . . . . . . . . . . . . . . . . . . . . . . . . . . . . 165 . 166 . 167 . 168 User Mode (New in V5). . . . . . . . . . . . . . . . . . . . . . . . 169 User Mode Rights . . . . . . . . . . . . . . . . . . . . . . . . . . . . . . . . . . . . 169 Task Editor in User Mode . . . . . . . . . . . . . . . . . . . . . . . . . . . . . . . 171 Networking . . . . . . . . . . . . . . . . . . . . . . . . . . . . . . . . . 173 OpenCap (New in V5). . . . . . Manager on Network Device . Creating a device . . . . Device Commands . . . . Device Variables . . . . . Network Architectures . . . . . Single Slave . . . . . . . . Multiple Slaves . . . . . . Medialon Manager Panel . . . . Network Example . . . . . . . . VI . . . . . . . . . . . . . . . . . . . . . . . . . . . . . . . . . . . . . . . . . . . . . . . . . . . . . . . . . . . . . . . . . . . . . . Table of Content . . . . . . . . . . . . . . . . . . . . . . . . . . . . . . . . . . . . . . . . . . . . . . . . . . . . . . . . . . . . . . . . . . . . . . . . . . . . . . . . . . . . . . . . . . . . . . . . . . . . . . . . . . . . . . . . . . . . . . . . . . . . . . . . . . . . . . . . . . . . . . . . . . . . . . . . . . . . . . . . . . . . . . . . . . . . . . . . . . . . . . . . . . . . . . . . . . . . . . . . . 173 . 175 . 175 . 176 . 179 . 180 . 180 . 181 . 181 . 182 Table of Content The Finder . . . . . . . . . . . . . . . . . . . . . . . . . . . . . . . . . . 183 The Finder Window . String . . . . . . Where . . . . . . Options . . . . . The Results Window. . . . . . . . . . . . . . . . . . . . . . . . . . . . . . . . . . . . . . . . . . . . . . . . . . . . . . . . . . . . . . . . . . . . . . . . . . . . . . . . . . . . . . . . . . . . . . . . . . . . . . . . . . . . . . . . . . . . . . . . . . . . . . . . . . . . . . . . . . . . . . . . . . . . . . . . . . . . . . . . . . . . . . . 183 . 183 .183 . 184 .185 Advanced Options . . . . . . . . . . . . . . . . . . . . . . . . . . . . 187 Cue Multi Devices . . . . . . . . . . Device Replacement . . . . . . . . Device Cue Reassignment Device Replacement . . . . Device Auto selection . . . . Pause Point. . . . . . . . . . . . . . . . . . . . . . . . . . . . . . . . . . . . . . . . . . . . . . . . . . . . . . . . . . . . . . . . . . . . . . . . . . . . . . . . . . . . . . . . . . . . . . . . . . . . . . . . . . . . . . . . . . . . . . . . . . . . . . . . . . . . . . . . . . . . . . . . . . . . . . . . . . . . . . . . . . . . . . 187 . 188 . 188 . 189 . 189 . 190 Project Files . . . . . . . . . . . . . . . . . . . . . . . . . . . . . . . . 191 Project Files . . . . . . . . . . . . . . . . . . . . . . . . Image Folder . . . . . . . . . . . . . . . . . . . Persistent Variable File . . . . . . . . . . . . . Converting a Project . . . . . . . . . . . . . . . . . . Exports/Imports . . . . . . . . . . . . . . . . . . . . . Importing a Project file (.mpf5). . . . . . . Exporting a task . . . . . . . . . . . . . . . . . Importing a Task file (.mef5) . . . . . . . . Recovering the Previous Versions of a Project . Upgrading Manager V5 & MxMs . . . . . . . . . . . . . . . . . . . . . . . . . . . . . . . . . . . . . . . . . . . . . . . . . . . . . . . . . . . . . . . . . . . . . . . . . . . . . . . . . . . . . . . . . . . . . . . . . . . . . . . . . . . . . . . . . . . . . . . . . . . . . . . . . . . . . . . . . . . . . . . . . . . . . . . . . . . . . . . . . . 191 . 191 . 191 . 191 . 192 . 192 . 192 . 192 . 193 . 193 SETTINGS & PREFERENCES Preferences . . . . . . . . . . . . . . . . . . . . . . . . . . . . . . . . . 197 General . . . . . . . . . . . . . . . . . . . . . . Project . . . . . . . . . . . . . . . . . . . . . . . Task . . . . . . . . . . . . . . . . . . . . . . . . General . . . . . . . . . . . . . . . . . . TimeBased (Timeline) . . . . . . . . StepBased . . . . . . . . . . . . . . . . Runtime . . . . . . . . . . . . . . . . . . . . . . Auto Run Manager when Opened. Delayed Startup . . . . . . . . . . . . Quit . . . . . . . . . . . . . . . . . . . . . Enable Multi Processor Support . . Network . . . . . . . . . . . . . . . . . . . . . . Manager Server Port . . . . . . . . . Option . . . . . . . . . . . . . . . . . . . UserScreen . . . . . . . . . . . . . . . . . . . . Target screens . . . . . . . . . . . . . Default UserScreen Settings . . . . Userscreens Debug Location . . . . Watchdog . . . . . . . . . . . . . . . . . . . . . Setup. . . . . . . . . . . . . . . . . . . . Log Traces . . . . . . . . . . . . . . . . . . . . Target . . . . . . . . . . . . . . . . . . . Trace options . . . . . . . . . . . . . . Table of Content . . . . . . . . . . . . . . . . . . . . . . . . . . . . . . . . . . . . . . . . . . . . . . . . . . . . . . . . . . . . . . . . . . . . . . . . . . . . . . . . . . . . . . . . . . . . . . . . . . . . . . . . . . . . . . . . . . . . . . . . . . . . . . . . . . . . . . . . . . . . . . . . . . . . . . . . . . . . . . . . . . . . . . . . . . . . . . . . . . . . . . . . . . . . . . . . . . . . . . . . . . . . . . . . . . . . . . . . . . . . . . . . . . . . . . . . . . . . . . . . . . . . . . . . . . . . . . . . . . . . . . . . . . . . . . . . . . . . . . . . . . . . . . . . . . . . . . . . . . . . . . . . . . . . . . . . . . . . . . . . . . . . . . . . . . . . . . . . . . . . . . . . . . . . . . . . . . . . . . . . . . . . . . . . . . . . . . . . . . . . . . . . . . . . . . . . . . . . . . . . . . . . . . . . . . . . . . . . . . . . . . . . . . . . . . . . . . . . . . . . . . . . . . . . . . . . . . . . . . . . . 197 . 198 . 199 . 199 . 199 . 199 . 201 . 201 . 201 . 202 . 202 . 202 .202 . 202 . 203 . 203 . 203 . 204 . 204 . 204 . 205 . 205 . 206 VII Menus . . . . . . . . . . . . . . . . . . . . . . . . . . . . . . . . . . . . . 207 File Menu . . . . . . Edit Menu . . . . . . Object Menu . . . . UserScreens Devices . . . Variables . . Tasks . . . . . Windows Menu . . Workspace . Tools . . . . . View . . . . . Close . . . . . Help. . . . . . . . . . . . . . . . . . . . . . . . . . . . . . . . . . . . . . . . . . . . . . . . . . . . . . . . . . . . . . . . . . . . . . . . . . . . . . . . . . . . . . . . . . . . . . . . . . . . . . . . . . . . . . . . . . . . . . . . . . . . . . . . . . . . . . . . . . . . . . . . . . . . . . . . . . . . . . . . . . . . . . . . . . . . . . . . . . . . . . . . . . . . . . . . . . . . . . . . . . . . . . . . . . . . . . . . . . . . . . . . . . . . . . . . . . . . . . . . . . . . . . . . . . . . . . . . . . . . . . . . . . . . . . . . . . . . . . . . . . . . . . . . . . . . . . . . . . . . . . . . . . . . . . . . . . . . . . . . . . . . . . . . . . . . . . . . . . . . . . . . . . . . . . . . . . . . . . . . . . . . . . . . . . . . . . . . . . . . . . . . . . . . . . . . . . . . . . . . . . . . . . . . . . . . . . . . . . . . . . . . . . . . . . . . . . . . . . . . . . . . . . . . . . . . . . . . . . . . . . . . . . 207 . 208 . 209 . 210 . 210 . 211 . 211 . 211 . 211 . 211 . 212 . 212 . 213 ANNEXES Medialon Resource Connector . . . . . . . . . . . . . . . . . . 215 MRC AMX NetLinx . . . . . . . . . . . . . . . . . . . AMX NetLinx . . . . . . . . . . . . . . . . . . . AMX NetLinx Resources Addressing . . . AMX NetLinx Resources Scan . . . . . . . Serial Ports Setup . . . . . . . . . . . . . . . MIDI Ports Setup. . . . . . . . . . . . . . . . Input/Output Ports Setup . . . . . . . . . . Infrared Ports Setup . . . . . . . . . . . . . MRC Advantech ADAM . . . . . . . . . . . . . . . . Advantech ADAM Module . . . . . . . . . . Input/Output Ports Setup . . . . . . . . . . MRC Opto22 SNAP Ethernet IO (New in V5).. Opto22 SNAP Ethernet I/O . . . . . . . . . Input/Output Ports Setup . . . . . . . . . . MRC Adlink NuDAM (New in V5). . . . . . . . . . Adlink NuDAM . . . . . . . . . . . . . . . . . . Input/Output Ports Setup . . . . . . . . . . NuDAM Module Type . . . . . . . . . . . . . Initialize or Diagnose NuDAM module. . MRC Adlink PCI7432 (New in V5) . . . . . . . . Adlink PCI-7432 Board . . . . . . . . . . . . Input/Output Ports Setup . . . . . . . . . . MRC ICP DAS PISO P32x32 (New in V5) .. . . PISO P32C32/PISO P32A32 Board . . . . Input/Output Ports Setup . . . . . . . . . . MRC Adrienne . . . . . . . . . . . . . . . . . . . . . . Adrienne RG1 PCI Card . . . . . . . . . . . Adrienne USB-TC. . . . . . . . . . . . . . . . TimeCode Ports Setup . . . . . . . . . . . . MRC SoundLight . . . . . . . . . . . . . . . . . . . . SoundLight 1514PCI . . . . . . . . . . . . . DMX Ports Setup . . . . . . . . . . . . . . . . MRC ArtNet. . . . . . . . . . . . . . . . . . . . . . . . ArtNet . . . . . . . . . . . . . . . . . . . . . . . ArtNet Scan . . . . . . . . . . . . . . . . . . . DMX Ports Setup . . . . . . . . . . . . . . . . MRC RedRat (New in V5) . . . . . . . . . . . . . . RedRat3 . . . . . . . . . . . . . . . . . . . . . . irNetBox . . . . . . . . . . . . . . . . . . . . . . Learning IR Signals . . . . . . . . . . . . . . RedRat Scan . . . . . . . . . . . . . . . . . . . VIII Table of Content . . . . . . . . . . . . . . . . . . . . . . . . . . . . . . . . . . . . . . . . . . . . . . . . . . . . . . . . . . . . . . . . . . . . . . . . . . . . . . . . . . . . . . . . . . . . . . . . . . . . . . . . . . . . . . . . . . . . . . . . . . . . . . . . . . . . . . . . . . . . . . . . . . . . . . . . . . . . . . . . . . . . . . . . . . . . . . . . . . . . . . . . . . . . . . . . . . . . . . . . . . . . . . . . . . . . . . . . . . . . . . . . . . . . . . . . . . . . . . . . . . . . . . . . . . . . . . . . . . . . . . . . . . . . . . . . . . . . . . . . . . . . . . . . . . . . . . . . . . . . . . . . . . . . . . . . . . . . . . . . . . . . . . . . . . . . . . . . . . . . . . . . . . . . . . . . . . . . . . . . . . . . . . . . . . . . . . . . . . . . . . . . . . . . . . . . . . . . . . . . . . . . . . . . . . . . . . . . . . . . . . . . . . . . . . . . . . . . . . . . . . . . . . . . . . . . . . . . . . . . . . . . . . . . . . . . . . . . . . . . . . . . . . . . . . . . . . . . . . . . . . . . . . . . . . . . . . . . . . . . . . . . . . . . . . . . . . . . . . . . . . . . . . . . . . . . . . . . . . . . . . . . . . . . . . . . . . . . . . . . . . . . . . . . . . . . . . . . . . . . . . . . . . . . . . . . . . . . . . . . . . . . . . . . . . . . . . . . . . . . . . . . . . . . . . . . . . . . . 217 . 217 . 218 . 220 . 222 . 224 . 226 . 228 . 231 . 231 . 231 . 233 . 233 . 234 . 237 . 237 . 237 . 238 . 240 . 243 . 243 . 245 . 247 . 247 . 251 . 253 . 253 . 253 . 253 . 255 . 255 . 255 . 259 . 259 . 259 . 260 . 263 . 263 . 264 . 265 . 269 Table of Content Infrared Ports Setup . . . . . . . . . . . . . . . . . . . . . . . . . . . . . . 269 Medialon Watchdog (New in V5) . . . . . . . . . . . . . . . . 273 Watchdog Overview . . . . . . Medialon Watchdog Window Failure Action . . . . . . Activity. . . . . . . . . . . Applications . . . . . . . Log Event . . . . . . . . . Email . . . . . . . . . . . . . . . . . . . . . . . . . . . . . . . . . . . . . . . . . . . . . . . . . . . . . . . . . . . . . . . . . . . . . . . . . . . . . . . . . . . . . . . . . . . . . . . . . . . . . . . . . . . . . . . . . . . . . . . . . . . . . . . . . . . . . . . . . . . . . . . . . . . . . . . . . . . . . . . . . . . . . . . . . . . . . . . . . . . . . . . . . . . . . . . . . . . . . . . . . . . . . . . . . 273 . 273 . 274 . 274 . 274 . 275 . 276 Regional and Language Option . . . . . . . . . . . . . . . . . . 279 Configure Windows to type in multiple languages . . . . . . . . . . 279 Specify the language that is used for Medialon Manager. . . . . . 281 How to install additional languages . . . . . . . . . . . . . . . . . . . . 282 REFERENCES Keyboard Shortcuts . . . . . . . . . . . . . . . . . . . . . . . . . . 285 Action on Double click . . . . . . . . . . . . . . . . . . . . . . . . . . . . . . . . . 291 INDEX . . . . . . . . . . . . . . . . . . . . . . . . . . . . . . . . . . . . . 293 NOTE . . . . . . . . . . . . . . . . . . . . . . . . . . . . . . . . . . . . . . 305 Table of Content IX X Table of Content New In Manager V5 New In Manager V5 User Mode Medialon Manager had 3 different modes of operation: • Stop mode where your project can be conceived. Devices, Tasks, UserScreens and Variables can be created, modified and deleted freely. • Debug mode allows you to see what is happening internally while your project runs and to make adjustments without stopping your project. • Run Mode where Manager V5 fully interacts with external devices and hides all of the programming windows. Only the UserScreens or Device and Task Control Panels are displayed. Medialon Manager V5 adds the User Mode. Giving the programmer the possibility to grant access to a "Custom Debug Mode" for the users and decide what will be available (which tasks, which variables or which device commands will be viewable or editable.). This important new feature allows end users to have access to the programming environment of Medialon Manager V5 without compromising tasks running security or core processes vital for the project. OpenCap OpenCap using MON (Manager On Network) protocol publishes tasks, variables and userscreens to other Medialon Manager projects for easy development of shared applications. OpenCap also allows sharing of Manager Objects to "external clients" using the OpenCap API that increases Medialon Manager V5’s powerful interoperability tools to communicate with third party software or develop add on modules in C++ or C#. Shared User Groups Medialon Manager V5 changes the way Variables, Tasks, Screen information or Library Cues are shared between projects. Network sharing is now performed through the User Groups and Subgroups containing the elements to be published, a MON connection can therefore only control objects present in the shared group selected in the setup of its connection. Manager V5 projects can now control different parts of the same Server project without interfering with each other. 2 different Manager V5 projects can control different parts of the same main project without interfering each other. Network Detection and MON Login To add more security, Medialon Manager V5 now implements network detection of Medialon Manager V5 hosts before allowing remote connections as well as a Login and Password authentication option to prevent illicit connections to your Server projects. NEW IN MANAGER V5 1 Cue Library The Cue library stores cues (commands for devices with saved parameters) that are frequently used during programming or a show. This option used to be only available via a right click menu within the task. It is now possible to simply drag and drop these cues into the Cue Library folder in the Medialon Manager Browser. It brings great control to the User Mode where restricted users can now have access to pre-programmed cues to edit the shows. Workspace Theme Medialon Manager V5 now offers different themes to change the look of your workspace. 2 NEW IN MANAGER V5 INTRODUCTION In this section you will discover the main architecture of Medialon Manager Software, what its main elements are and how they interact with each other. This section also helps those who are new to Medialon Manager to understand its core engine and ease their understanding of the following chapters. INTRODUCTION 3 4 INTRODUCTION Show & Media Control ... Show & Media Control ... The introduction of our first Audiovisual Control Software in 1999 was driven by our vision of giving the power to the user with an easy but powerful and open programming environment, using non proprietary hardware. Medialon Manager V5 is a Windows® based control software. Its legendary ease of programming and reliability has made it widely used in simple as well as critical control applications such as: Museum media control, Theme Parks and Attractions Show Control, Architectural video & Lighting control, Convention Centers audio & video remote control, etc. Medialon Manager can control any audiovisual equipment using any protocol and network. Being software based it integrates perfectly with IT opening a wide range of new applications. Control of audio & video streaming, links to database, media management, and facility wide control are not dreams any more. Thanks to its easy graphical programming environment, application are programmed in much less time than with any other conventional control system, neither coding nor compilation is required. Its native synchronization capabilities and its legendary Timeline with drag and drop programming makes it the ideal choice for Show Control Applications. However, complex logical task programming is also available. Medialon Manager is hardware independent and relies on standard hardware from IT or audiovisual industries to connect to devices. The customer has the choice between proprietary or standard hardware making maintenance and upgrade far easier. Medialon Manager can run in hidden mode where only custom designed interfaces are visible or in user mode allowing live edition. It comes with free Panel software for custom touch screen design. A driver for virtually anything… Medialon Manager V5 uses Plug-in drivers called MxM (Manager X Object Modules) to control devices. It exists a wide range of MxMs for most popular devices on the market connected through Serial, MIDI, TimeCode, Infrared, Modbus, OPC, TCP / IP etc. Manager also includes a powerful tool to write your own drivers in Serial, TCP/IP, UDP and MIDI. These drivers can be shared on medialon.com with other Medialon users. Hardware independent Independently from the plug-in drivers, Medialon Manager V5 uses a resource to physically connect to the device. This resource can be a Windows serial or relay card, a Windows over IP serial converter, and since version 5 other control hardware such as AMX NetLinx, Artistic Licence Artnet, Global Caché, etc. Not just a device controller… Medialon Manager includes MxMs plug-ins to add functionalities or control the new type of devices found in modern AV / IT installations: SQL Database for data management, FTP Site for media management and transfer, Email engine, Telephony engine to build up a DTMF server, etc. Medialon Manager really uses the power of modern AV/IT. INTRODUCTION 5 An open network application … Medialon Manager is network oriented from its original first version. It not only controls many AV and IT devices over TCP / IP, but it also communicates with other Medialon Manager application on the same network. OpenCap, using MON protocol publishes tasks and User Screens to other Medialon Manager Applications for easy development of shared application. OpenCap is also available as an API offering powerful interoperability tool to communicate with third party software or develop add on module in C++ or C#. Unlimited topology Thanks to its versatility, Medialon Manager can be deployed in various topologies ranging from the simple installation to complete facility wide control. 6 INTRODUCTION Overview of Medialon Manager Overview of Medialon Manager Medialon Manager V5 is a software system which can control and synchronize digital audio & video, lighting dimmers and desks, matrix switchers, image processors, video walls, lasers, fireworks, special effects, etc., all over one network. It offers frame accurate synchronization, even on digital video, DMX acquisition and editing, multitasking and permanent device position tracking to free your creativity. Main Features Device Control Materialized by the Device Map, this is the capability to control any type of devices via serial communication, TCP/IP, MIDI, DMX, IR, Relays etc. Medialon Manager V5 uses plug-in driver called MxM (Manager X object Modules) to control devices. It exists a wide range of MxMs for most popular devices on the market in serial, Midi, Timecode, Infrared, Modbus, OPC, TCP/IP, etc. Manager also includes a powerful tool to write your own drivers in Serial, TCP/IP, UDP and MIDI. These drivers can be shared with other Medialon users. Each MxM provides a set of commands that can be sent to the devices and returns a set of variables that give feedback information from the device, which can be used in programming to monitor the devices status or to make decisions. Most MxMs come with a powerful already built graphical user interface (GUI) called Control Panels to control and monitor devices. Medialon Manager V5 has been designed to natively synchronize the devices. Medialon Manager V5 controls with an accuracy of a hundredth of a second. Medialon has always been hardware independent; it can virtually use any hardware to control devices. Independently from the plug-in driver (MxM), Medialon Manager V5 uses a resource to be physically connected to the device. This resource can be a Windows serial or relay card, a windows over IP serial converter, or any other hardware such as AMX® interfaces, Artistic Licence Artnet, Windows® PC resources, etc. Medialon Resource Connector (MRC) helps to manage and configure the necessary resources for Medialon Manager V5 projects. Timelines Tasks This is the core show engine in Medialon Manager. The timeline is a time metaphor in which users program cues to control various devices. The Timeline offers a number of tools to ease the programming job and the playback of the show. Positrack functionality is a powerful tool to program shows on a timeline. This is the capability for the software to reposition every device at the position / status they should be when you move back and forth in the timeline. This allows fine tuning of a complex show without having to run the show from the beginning each time you want to test a new adjustment. A Task Control Panel acts as a real control panel for each Timeline. It can be enlarged and sent to another monitor to the lighting designer for example. This task monitor window provides start, pause and stop buttons, the current INTRODUCTION 7 Timecode of the timeline, a display for comment and countdown cues (comment cues are user defined cues in the timeline to add comment to programming, countdown cues give a comment as well and a countdown till the next action in the show). Timelines can be turned into a list view, giving access in this case to “Flash Controls”. This functionality allows users to move up and down in the show while the show is running, user can fire a cue in advance or disable a cue to come. This gives extreme flexibility in live event shows where things sometimes do not happen as expected. Of course, several timelines can run simultaneously, a timeline can control another one, or synchronized to another one or run independently, and all of the timelines can be synced to external timecode. StepBased Tasks and Variables StepBased tasks can also perform cues, just like timelines do, but in a “step by step” manner without any time reference. StepBased tasks can also perform logical operator cues such as “If, Then, Else” or “While, End While”, etc. Variables returned by devices, but also user defined variables can be used in this programming object. A variable inspector gives permanently status of each variable in a show. These tasks can be used to really build up a powerful program object to perform complex actions or make decisions. Graphical UserScreen Interface Although the software comes with a number of screens to control devices or Timeline which are sufficient in most shows, an additional UserScreen builder allows users to define their own screens with buttons, sliders, video windows, leds, bar graphs, pictures etc. This feature allows the creation of “protected” user interface for critical shows or to customize applications. Master / Slave Capabilities Medialon Manager is network oriented by design. Medialon Manager applications can share their objects like Variables, Tasks, UserScreens on the TCP/IP network (Slave), or see variables and send commands to others Medialon Managers (Master). It becomes very easy to build applications where a Medialon Manager is controlled by several other Medialon Managers such as touch panels, or where a central Medialon Manager controls other Medialon Manager or touch panels. Add-on Functionalities These functionalities bring powerful tools, for instance to manipulate and analyze text. They are available in the form of MxMs such as Files Management which gives all necessary tools to deal with files on windows environment and String Management which allows conversion and analyze of text string and Event log which logs all events on the software. Most of these functionalities are useful in permanent installation more than in live events. Internet Functionalities Medialon Manager V5 includes a number of add-on functionalities in the form of specific MxM plug-ins to perform actions which are related to internet 8 INTRODUCTION Overview of Medialon Manager communication. Most of these functionalities are useful in permanent installation more than in live events, i.e.: E-mail which gives the capability of sending and receiving E-mails, FTP client which allows Manager to deal with all kind of FTP transfers, Database which allows exchange with SQL type databases. Sophisticated Programming Cues can also perform actions in the software itself, like “Pause” or “Synchronize Task”, to make real-time changes during the show. Significant internal or device conditions can be identified as variables. Variables can be used locally or published on the network, for other Managers or for external displays. Variables can be continuously monitored and combined to fire tasks. Now you can base tasks on device exceptions, day-date times, or outside authorization. Architecture Medialon Manager V5 is made of 4 main objects you will use to build and create your program: • Devices (MxMs) • Tasks • Graphical user interfaces • Variables MxMs Medialon Manager V5 sends commands to external devices via software modules called Medialon X Object Modules (MxMs). Medialon develops these software plug-ins to allow Manager V5 to control external devices or increase its functionalities. In return the MxMs receive information from the external devices and make it available for Manager V5. Medialon Manager Task Engine MxMs External Devices There are two major types of MxMs: • Device MxMs INTRODUCTION 9 • Service MxMs. Device MxMs These MxMs allow communications with external devices are referred to as “Device MxMs”. Device MxMs allow Medialon Manager V5 to communicate with hardware machines such as: video projectors or lighting consoles but they can also control third party software such as Dataton Watchout. A wide range of Device MxMs are available for your show control application. • Video Server (Serial, TCP/IP) Doremi, Turbo, Mediasonics, Dataton Watchout, Window Media, etc. • Video Processor (Serial, TCP/IP) Barco Encore, Analog Way iX Series, etc. • Audio console and DSP (MIDI, TCP/IP) DM 2000, etc. • Lighting console (MIDI, TCP/IP) Martin Maxxys, Wholehog, etc. • Dimmers, light fixtures (DMX) Dimmers, DL1, Foggers, etc. • Media servers (DMX) Catalyst, Pandora, etc. • Switchers & Routers (Serial, TCP/IP) Folsom, Autopatch, etc. • Video Projectors (Serial, TCP/IP) Barco, Christies, etc. • Digital I/O and PLCs (Serial, TCP/IP and dedicated PCI boards,...) Modbus, OPC, Adlink, etc. Service MxMs Some MxMs implement services as extensions of Medialon Manager V5 and provide sophisticated functionalities like scheduling, error logging or database management. they are referred to as “Service MxMs”. These MxMs greatly enhance Medialon Manager V5 and provide the necessary resources to manage and control information or perform special tasks. • E-mail: This MxM offers the possibility to manage the sending and the reception of E-mails in a Medialon Manager project. It has all the functionalities of an E-mail software, including modem connections. • Event log: MxM EventLog is designed to produce messages and event reports. It provides functions to store, sort, export and print events list by date and time. • Database: This MxM allows interfacing of SQL compatible databases. It allows reading, modification and creation of data and records, and sending of SQL request in the database. • Files Management: This MxM provides a simple way to copy, move or erase files on hard disk. It also provides commands for reading and writing files. • String Management: This MxM provides conversion and analysis of 10 INTRODUCTION Overview of Medialon Manager character strings. • Variables Management: This MxM provides commands that act on variables, and these commands are positracked when they are used into a Medialon Manager timeline. • Network Utilities: Network Utilities MxM provides several commands for network management and system information retrieving. Low Level Communicator The Low Level Communicator MxM is a low level and powerful MxM. It is a lowlevel MxM because it is not dedicated to a special device and is able to use many raw communication protocols. You can write your own set of commands, create monitoring variables linked to the reception of specified frames, and much more, in order to create drivers dedicated to your specific devices and projects. 5 type of communication are available: • Serial • TCP/IP Client • TCP/IP Server • UDP/IP • MIDI 2 Low Level Communicator drivers may be published and shared on the Medialon web site: www.medialon.com Protocols and Hardware MxMs have been developed for all standard communication protocols: • Serial protocols using local COM port or IP interfaced COM ports • TCP/IP and UDP/IP communication • DMX via PCI Card or IP protocols (ArtNet Interface) • MIDI using PC Audio Cards or USB Interfaces • TimeCode via a PCI Card in PC • Infrared via external interfaces 2 All MxMs are available for free download on the Medialon web site: www.medialon.com Independently from the MxM, Medialon Manager V5 uses a resource to physically connect to the device. This resource can be a Windows serial or a relay card, a windows over IP serial converter, or any other hardware such as AMX® interfaces, Artistic Licence Artnet, Windows® PC resources, Global Caché, etc. Medialon Resource Connector (MRC) will help you to manage and configure the necessary resources for your projects. INTRODUCTION 11 Task Engine The core of Medialon Manager V5 is its task engine which allows the execution of programmed cues. How and when cues are executed depends on whether the cues are in a TimeBased task or a StepBased task. Manager V5 is able to run these tasks in parallel and concurrently thanks to its built-in multitasking architecture. TimeBased Tasks In TimeBased tasks, cues are executed based on the current time position of the task. This is a familiar Show Control concept known as “Timeline”, where cues are laid down on tracks and are triggered as soon as the time of the task reaches the cue. StepBased Tasks In StepBased tasks, there is no notion of reference time and cues are executed one after the other in a “Step by Step” manner. The task flow can be modified by conditional statements, much like traditional scripting or programming language, making them useful to implement logical behaviors. Graphical User Interfaces Medialon Manager V5 provides 2 different types of user interface windows which can give you immediate control and feedback of what’s going on while your show is running: • Built-in User Interfaces provided by Manager V5 or by the MxMs. • Custom User Interfaces which you can create and configure depending on your needs. Built-in User Interfaces Task Control Panels Exclusively designed to control TimeBased tasks, the Task Control Panel displays information about a task including the current time of the task, countdowns and messages attached to the next cue to be executed. 12 INTRODUCTION Overview of Medialon Manager Device Control Panels Device Control Panels look similar to equipment front panels and feature the necessary buttons and displays needed to control your device. Device Control Panels may be opened either in the Control Center window, or as an independent floating window. Custom User Interfaces Medialon Manager V5 is provided with a powerful graphical tool which can be used to build custom screens. Custom UserScreens can be easily built thanks to the graphical toolset provided by Manager V5. Graphical objects on these UserScreens can trigger tasks and/or display system & device information, thus allowing you to design complete custom user interfaces. 2 Before you can type in a different language than the one installed, you must configure the keyboard to match the language. See “Regional and Language Options”, page 279. INTRODUCTION 13 Variables The various elements of Medialon Manager V5 like tasks, devices and UserScreens share information through variables. Variables can be described as objects that contain values. There are 6 types of variables used by Medialon Manager V5 and MxMs to store information. Each type has its own specificities and parameters. • Integer • Real • String • Enum • Time • Date System Variables Some variables are automatically created by Manager V5 and are called System variables. For example there are variables for the current time, Manager status or the current position of the mouse pointer. Other variables are automatically created with the devices: these may be the current timecode of the device, whether the device is online or the list of clips available on a video server. Tasks may also have variables, such as Status or TimecodeStatus for TimeBased Tasks. These variables are not automatically, created you must define that upon task creation, as part of your Medialon Manager V5 preferences or by editing your task’s preferences. Screen Variables All dynamic objects present in a UserScreen generate one or several variables. Pushing a button changes a variable value, a text display can be updated by the new value of a timecode variable, etc. Screen variables are “Read/Write”, and can be updated manually or by programming. User Defined Variables You may also create your own variables in order to store information. These can be of any types and all the parameters are editable. User variables are “Read/ Write”, they can be updated manually or by programming and may also be made persistent (values will be stored automatically). 14 INTRODUCTION Overview of Medialon Manager Medialon Manager V5 Objects and Interactions The following diagram outlines the interactions between the objects inside Medialon Manager. As you will notice, a key element of Medialon Manager V5 is the Variables, which allow all the different elements to share their information in the system. Medialon Manager Task Engine MxMs MRC TimeBased Tasks device Resource Commands StepBased Tasks device Resource External Devices Variables UserScreens Device Control Panels Task Control Panels Medialon Manager V5 Modes Stop Mode The first time you launch Medialon Manager V5, you will be in Stop Mode. In this mode, Manager V5 doesn’t communicate with any external equipment nor does it perform any internal tasks. Stop Mode is the default programming mode where your project will be conceived. Devices, Tasks, UserScreens and Variables will be created, modified and deleted freely. Pressing the Esc key or clicking on the Stop Project button will return you to this mode. INTRODUCTION 15 Debug Mode In Debug Mode, Medialon Manager V5 fully interacts with external devices, however programming windows such as the Object Browser, Object Properties or Task Editors are still accessible. This allows you to see what is happening internally while your project runs and to make adjustments without stopping your project. Debug Mode is only accessible from Stop Mode by typing the F2 key or clicking on the Debug Project button. User Mode (New in V5) Medialon Manager V5 User Mode gives the opportunity to the programmer to decide which object will be accessible to the user (task, device, command for a device, variable...). The User Mode works like the Debug Mode with selected objects. User Mode is only accessible from Stop Mode by typing the Ctrl+F2 key or clicking on the User Mode Project button. Run Mode Run Mode is the final runtime mode of a project. Medialon Manager V5 fully interacts with external devices and hides all of the programming windows. Only the UserScreens or the Device and Task Control Panels are displayed. Run Mode is only accessible from Stop Mode by typing the F3 key or clicking on the Run Project button. Medialon Manager V5 License Options Medialon Manager V5 is a program protected by a license number and will only run with the appropriate dongle Key connected to the parallel port or the USB port of your PC. Medialon Manager V5 Pro Medialon Manager V5 Pro is designed for any show & media control application, from simple stand alone to large networked systems. Several Manager V5 stations can be connected together and share data over an Ethernet network. Perfect for demanding applications such as theme parks, museums or complex live events. Medialon Manager V5 offers multiple TimeBased tasks (or Timelines), StepBased tasks and custom control panel (UserScreen). Medialon Manager V5 Lite Medialon Manager V5 Lite is designed for small to medium size permanent installation. Limited in capacity, it yet offers all Medialon Manager V5 control and 16 INTRODUCTION Overview of Medialon Manager programming power at an affordable price. Medialon Manager V5 Panel Medialon Manager V5 Panel is specifically designed to implement remote control panels, typically a touch screen computer. This free version of Medialon Manager V5 cannot control external devices but is able to connect and share data with other Manager on the network. 2 A project saved with a Medialon Manager Lite Edition can be opened with a Medialon Manager Pro Edition. But any modification could invalidate the project for a Medialon Manager Lite Edition use. To prevent this, you could launch a Medialon Manager V5 Pro Edition as a Medialon Manager Lite one using key combination at start up CONTROL + ALT. INTRODUCTION 17 Computer Requirements Minimum System Requirements 2 GHz PC Pentium IV Processor 512 MB Memory 40 GB Hard Disk Windows XP Pro TCP/IP (Winsock2) Layer 1024x768 32Bits Graphic Card. Sound Adapter Suggested System Requirements 3Ghz PC Pentium IV Processor 1 GB Memory 60 GB Hard disk Windows XP Pro SP2 1280x1024 32Bits Graphic Card Sound Adapter 18 INTRODUCTION Overview of Medialon Manager MANDATORY SAFETY RULES Although Medialon Manager V5 Software is designed to control different kinds of hardware equipment, such as relays to control fire works, Medialon Manager V5 can NOT be used to insure safety of users. Users must make sure that all dangerous equipment controlled directly or indirectly by Medialon Manager V5, includes their own safety procedures and process. Medialon Manager V5 is not designed to insure safety process. ACCORDING TO THE DANGEROUSNESS OF CERTAIN KINDS OF EQUIPMENT WHICH CAN BE CONTROLLED BY THIS SOFTWARE, THE LIABILITY OF MEDIALON SA IS SUBMITTED TO THE STRICT COMPLIANCE WITH THE MANDATORY SAFETY RULES AS DESCRIBED HERE ABOVE. INTRODUCTION 19 20 INTRODUCTION PROJECT & SYSTEM SETUP In this section you will learn how to correctly install Medialon Manager Software and discover your main working environment. PROJECT & SYSTEM SETUP 21 22 PROJECT & SYSTEM SETUP Medialon Manager Installation Medialon Manager Installation This chapter will describe the procedure to follow in order to correctly install Medialon Manager V5 on your computer. Please follow it closely, as correct installation of Medialon Manager V5 is very important for the success of your project. Installation of Main Software To install Medialon Manager V5 software: 1. First make sure you have administration rights on your computer. 2 With Windows Vista, you need to turn off the User Account Control. 2. Set the dongle aside, do not connect to the computer at this point. 3. Insert the distribution CD in the CD-ROM drive of your computer, the installer will automatically be launched. 4. Click on “Install Medialon Manager V5”. 5. Read the Software license Agreement, then click on the “Yes” button. 6. Click “Next” on the Welcome page. 7. Fill in the user information and click “Next”. 8. Click “Next” on the Choose Destination Location page. This will install Medialon Manager V5 in the default Manager V5 directory. 9. The installation process will copy the Manager V5 files. PROJECT & SYSTEM SETUP 23 10.When the following information window is displayed, click “OK”. 11.Remove the distribution CD from the CD-ROM drive and click “Finish” to to complete Medialon Manager V5 installation. If your computer asks you to restart, you must restart. 24 PROJECT & SYSTEM SETUP Medialon Manager Installation First Start 1. Insert the Dongle Key on either the parallel port or the USB port of your computer. This will depend on the type of the key you have received. 2. Windows will prompt you to install new hardware (USB Key). Follow the instructions to install the driver on the USB port. 3. Select «No, not this time» and press «Next» PROJECT & SYSTEM SETUP 25 4. Select «Install the software automatically» and press «Next» 5. Click «Finish» to complete the USB driver installation. 6. Select “Medialon Manager V5” in the Windows Start Menu. Registration Medialon Manager V5 will ask for your registration number upon startup. Please take a few moments to register your product with us. If you have not yet your registration number, please proceed to use one of the following methods to obtain it: • Click on "Request Registration Number" button below, if you have an Internet connection. An e-mail will be sent to you with your registration number. • Fax your contact information, your Serial and License numbers (above) to +33 (0)1 46 55 54 83 (for Europe and Asia) or + 1 (305) 445 4048 (for North & South America). Your registration number will be sent back to you using your contact information. • Call us at +33 (0)1 46 55 60 70 (for Europe and Asia) or + 1 (305) 445 4045 26 PROJECT & SYSTEM SETUP Medialon Manager Installation (for North & South America) to request your registration number. Once you have received your registration number, simply fill out the registration number field and click the “Register” button. Should you need to use your license on several computers, you may use this number to register your software on all of them. You will however need the dongle key to run Medialon Manager V5. 2 We strongly recommend to register your license if you start your project with «autorun» option. The register dialog box will continue to be displayed each time you launch your project. Activating MxMs The first time you start Medialon Manager V5, no MxMs will be activated, this is reminded to you by the following message box: None of the MxMs are activated in order to spare unnecessary memory usage. This is why you have to activate the required MxMs manually when the installation is complete. Once the needed MxMs have been activated, Manager will only load the activated MxMs on startup, using only the necessary memory and optimizing the load time of Manager V5. PROJECT & SYSTEM SETUP 27 MxM Activation To activate the MxMs you need in your Medialon Manager V5 project, please follow the next below: 7. Select the “File/MxM Activation...” menu item 28 PROJECT & SYSTEM SETUP Medialon Manager Installation 8. The “MxM Activation” dialog box will appear. 9. Select the desired MxM in the right column (“Unused MxMs”). 10.Click on the “Move MxM to used MxM List” button (left arrow). 11.The MxM is now activated. 12.Follow the same steps for all the MxMs you wish to activate. 13.Once you have finished, you may close the dialog box. 2 MxM can be activated or de activated at any time when Medialon Manager V5 is in Stop Mode. PROJECT & SYSTEM SETUP 29 30 PROJECT & SYSTEM SETUP Workspace Workspace The Workspace Medialon Manager V5’s workspace is composed of areas that are used to display system and device information, graphical user interfaces or tasks of your project. The workspace is defined by all the areas that segment and organize the graphical environment of Medialon Manager V5, and each one can contain one or several tabs that display the project’s information. Together, the layout of the areas and the distribution of the tabs within create the Workspace. There are 5 predefined workspace configurations which you can choose from: • Design • Debug • Stage • Full Screen • Control Center When Medialon Manager V5 is started, the Workspace will open up in Design mode as below. PROJECT & SYSTEM SETUP 31 1. The Toolbar. 2. The Object Browser tab: gives access to all your project objects. 3. The Object Lister tab: displays the selected object content. 4. The Object Properties tab: selected object or cue properties can be monitored and edited. 5. The Working Area contains the Control tab, Device Map tab, Screens tab and Tasks tab. The Workspace will contain all editors you need for your project, where you will create and edit your tasks, your user interfaces and display the control panels of your devices. Main Toolbar Medialon Manager V5 Main Toolbar gives access to menus and groups of functions. Finder Mode Objects Task Control • Open and Save Project • Manager Mode • Finder • Objects: New / Control Panel / setup • Task control: Stop All / Lock / Start / Stop • Workspace 32 PROJECT & SYSTEM SETUP Workspace Browser Tab The Browser presents all elements of your project. Like an explorer, you can expand or collapse every node. When you select a node, its content is displayed in the Lister and/or in the Object Properties. Objects • Devices • Tasks • UserScreens • User Variables • Cue Library User Groups With the User Groups, you can create groups and sub-groups of objects from the same class (Devices, Variables, Tasks or UserScreens), this allows you to regroup information that is important for your program. Resources The Resources create a list of ports available for your project but also allows you to create virtual resources for specific configurations. PROJECT & SYSTEM SETUP 33 Lister Tab The content of the Lister depends on the Browser selection For example: the list of Manager commands when the Manager device is selected in the Browser. Properties Tab When an object is selected in the Lister or in an Editor, its properties will be displayed in the Properties Tab. Some properties are constant and cannot be modified. Only properties with orange corners can be changed. To change a value: 1. Select the field by clicking on it. 2. Enter the new value and press Enter to store it. 3. For Command Properties click on the Test Command button to send the command with the desired settings. 2 Use Ctrl + Mouse Wheel to select constant property and copy it (Ctrl+C). 34 PROJECT & SYSTEM SETUP Workspace Control Tab The Control tab is used specifically to display the Control Panels of certain devices. To display a Control Panel inside the Control Center tab, hit Shift + double click on the device within the Browser tab or inside the Device Map tab. To display a Control Panel as a floating window the Control Center tab, hit Alt + double click on the device within the Browser tab or inside the Device Map tab. Screens Tab The Screen tab is where the custom graphical interface will be designed and created. To create a new UserScreen or enter the UserScreen, right click inside the tab and select the desired options from the menu. For further information please refer to the “Graphical UserScreens” page 93. Device Map Tab The Device Map tab is where you create and visualize your devices. The devices will be displayed as icons from which you will be able to access their information and setup menus. To create a new device, right click inside the tab and select the “New Device” option. To edit an existing device or simply view the device Help file, right click on the device icon and select the desired option. PROJECT & SYSTEM SETUP 35 Custom Workspace You may choose to customize your workspace to adapt the programming environment to your needs. Areas can be resized by expanding the edges of the area or split vertically and horizontally by clicking on the area management icon. Once you have split an area in two. 36 PROJECT & SYSTEM SETUP Workspace You can drag and drop tabs from other areas to create and organize your own workspace. Tabs can also be duplicated. For example: Get a filtered view of the Lister with the list of Manager commands. PROJECT & SYSTEM SETUP 37 Tabs can also be detached and become independent windows. Any change in the current workspace are marked by a star in front of the name of the selected workspace. You can save it by clicking on the Save Current Workspace button. This new workspace will be available in the list of Workspace. 38 PROJECT & SYSTEM SETUP Workspace Workspace Theme (New in V5) You can change the look of Medialon Manager V5 Workspace by chosing a different theme. See “Theme Selector (New in V5)”, page 197. PROJECT & SYSTEM SETUP 39 40 PROJECT & SYSTEM SETUP Devices Devices Once all of the required MxMs are set up in Manager V5, you are able to create the devices you want within your program. Devices are the machines, programs or services that Medialon Manager V5 will control, via the MxMs and the hardware interfaces connected to it. An MxM can host several devices. For example you may create as many Doremi devices as you wish once the Doremi V1 MxM is activated. Creating a Device 1. Select in the menu bar Object/Device/New Device: this opens the Create Device dialog window OR select the Devices item in the Object Browser and use the right mouse click to open the contextual menu.You may also right click in the device map to access the device creation menu. PROJECT & SYSTEM SETUP 41 2. Select the type of device you want to create and give it a name. 3. In Device Setup dialog box, the required parameters and configurations can be set. The Device Setup Dialog box content will be different for each device. Please refer to MxM help files for correct device setup configurations. 4. Click “Select” to open Resource Selection Box. 42 PROJECT & SYSTEM SETUP Devices 5. Select an available resource and click “OK”. If resource is not yet defined, you can keep Unspecified resource or use “Setup” button to add a new resource. 6. Once you have finished configuring the device, click “OK”. The new device will be created and will appear in the Browser tab and Device Map tab. Device Properties Select a Device in the Browser tab or in the Device Map tab, its properties are displayed in the Properties tab. MxM information used by this Device is available here. You can also rename the Device. Don’t forget to validate your changes with the Enter key. Description field allows extra information. User Mode Rights define if this device object is visible in User Mode. PROJECT & SYSTEM SETUP 43 Resource Management (MRC) Medialon has always been hardware independent, it can virtually use any hardware to control devices. Independently from the MxM, Medialon Manager V5 uses a resource to be physically connected to the device. Medialon Resource Connector (MRC) helps you to manage and configure the necessary resources for your projects. All resources installed in your PC will automatically be scanned when Medialon Manager V5 is started, and mounted in your projects. Medialon Manager V5 can also manage external resources, like networked resources as ArtNet, Advantech, AMX NetLinx, etc. These resources can be of the following type: • Serial COM Ports • MIDI Ports • DMX ports • TimeCode Ports • Input/Output Ports • Infrared Ports The MRC can also define resources that are not yet available but will eventually be on the final installation. 44 PROJECT & SYSTEM SETUP Devices Add New Resource The resources folder in the Browser tab displays the 6 types of resources available for your project. To add a new resource, right click on the Resources node and select the New Resource wanted or start resources scanning. Serial Ports Setup Different types of Serial resources that can be mounted in your project. Click on Serial Ports node to display the resources present in your project when Medialon Manager started. PROJECT & SYSTEM SETUP 45 You may add Serial ports to your project by right clicking the “New Resource” menu and choosing which port you wish to add. Serial Ports are used by (non exhaustive list): • MxM Medialon Low Level Communicator • MxM Doremi Labs V1 & Nugget • MxM Sony RS422 • MxM Barco DLP VP • MxM Analog Way iX-Series • ... 2 Refer to ANNEXES page 215 for non Windows Resources. Windows COM Resource All Windows COM Port installed in your PC are scanned when Medialon Manager started. You may add “virtual” COM ports to your project by right clicking the “New Resource\Windows COM Serial” menu and choosing which port you wish to add (up to 255). If you wish to delete a “virtual” COM port you may do so, but the “Real” ports cannot. 46 PROJECT & SYSTEM SETUP Devices MIDI Ports Setup Different types of MIDI resources that can be mounted in your project. Click on MIDI Ports node to display the resources present in your project when Medialon Manager started. You could add new MIDI Port by right clicking the “New Resource” menu. MIDI Ports are used by (non exhaustive list): • MxM Medialon Basic Midi IN/OUT • MxM Medialon MIDI Machine Control • MxM Medialon MIDI Show Control • MxM Medialon Low Level Communicator • ... 2 Refer to ANNEXES page 215 for non Windows Resources. Windows MIDI Resource MIDI Input and Output Ports installed in your PC that are scanned on startup will be automatically shown as available. PROJECT & SYSTEM SETUP 47 “Virtual” MIDI Inputs and Outputs can be added. You may create up to 63 MIDI Input or Output Ports. If you wish to delete a “virtual” MIDI port you may do so, but the “Real” ports cannot. DMX Ports Setup Different types of DMX resources can be mounted in your project. DMX Resources are managed by Medialon Manager and no longer by the MxMs, as it was in previous version 3 of the software. If resources are scanned on startup, they will appear as available. Click on DMX Ports node to display them. 48 PROJECT & SYSTEM SETUP Devices If you create a “Virtual” resource, the setup window will automatically open for you to configure it. If you wish to configure the DMX Resources, select the resource in the Lister and use right click menu. DMX Resources have common configuration. • Name: Name given to the resource. • Direction: Determines whether Input or Output. PROJECT & SYSTEM SETUP 49 • Patch: Any channel of the DMX resource can be redirected through a Patch modified to your needs. Resource Index DMX Channel Orange channels are patched. Red channel indicates a conflict with another index. 2 indexes are patched to the same channel. • Initial Output Level: You may choose to Reset all the Outputs to 0 when the project is started, or keep the last values that were sent. DMX Ports are used by MxM Medialon DMX512. 2 Refer to ANNEXES page 215 for DMX Resources description. TimeCode Ports Setup Medialon Manager V5 can handle TimeCode Resources for your project. Using MxM Medialon TimeCode, it allows Medialon Manager V5 reading or generating TimeCode. 50 PROJECT & SYSTEM SETUP Devices Click on TimeCode Ports node to display the resources present in your project when Manager started. You may add TimeCode ports to your project by right clicking the “New Resource” menu and choosing which port you wish to add. 2 Refer to ANNEXES page 215 for TimeCode Resources description. Input/Output Ports Setup Medialon Manager V5 can manage Input/Output resources, like relays, contact closure, analog output, etc. Click on I/O Ports node to display the resources present in your project when Medialon Manager started. You may add I/O ports to your project by right clicking the “New Resource” menu and choosing which port you wish to add. I/O Ports are used by MxM Medialon IO. 2 Refer to ANNEXES page 215 for I/O Resources description. PROJECT & SYSTEM SETUP 51 Infrared Ports Setup Infrared resources allow Medialon Manager V5 generating Infrared signal. Click on Infrared Ports node to display the resources present in your project. You may add InfraRed ports to your project by right clicking the “New Resource” menu and choosing which port you wish to add. Infrared Ports are used by MxM Medialon InfraRed. 2 52 Refer to ANNEXES page 215 for Infrared Resources description. PROJECT & SYSTEM SETUP Devices Saving Resource Configurations Once you have set up the resources, they will be saved in your project, not in the program itself. The “Virtual” resources can be different for each project, and will automatically become “Real” if the necessary hardware is available on startup. If you open a project and do not have the available resources, they will become “Virtual” so the project can be work on “OffLine” on a different system. You may also choose, in MxM setups, to use the Unspecified options for the necessary resource. This allows you to program your project before configuring the final resources that will be available. If you will need to use the same resource configuration for different projects, you may find it useful to save a Default Resource Configuration with the desired resources being simulated. This Default Resource Configuration will be recalled each time you start Medialon Manager V5. 2 Note: “Virtual” resources are not connected to any physical hardware, but they act as real resources for your Medialon Manager V5 project. Testing Devices After creating a Device, Medialon Manager V5 allows to quickly test the device settings and connections without any programming. Testing Device Control Panels 1. Type F2 to switch Manager V5 to Debug Mode. 2. Select the device in the Browser tab (or in the Device Map tab): use the right click menu to open the Device Control Panel in the Control Center. 3. Check that the device is online. PROJECT & SYSTEM SETUP 53 4. Control the real world device with the buttons. Testing Commands 1. Select the Device in the Object Browser, the full list of available commands will appear in the Object Lister. 2. Select a Command in this list. 3. Enter parameter values if needed in the Object Properties. 54 PROJECT & SYSTEM SETUP Devices 4. Click on Test command button in the Object Properties. 2 Arrows indicate the direction of parameters. It could be Output, Input or Both. Input (right arrow) indicates that the parameter is given to the command (used by the command during execution), Output (left arrow) indicates that the parameter is updated by the command (after the command was executed). Device Help Medialon Manager V5 gives access to a Help file for each Device. Select the device in the Browser tab (or in the Device Map tab): use the right click menu to open the Device Help. PROJECT & SYSTEM SETUP 55 Each MxM is provided with a complete Help file. This document contains: • Overview of the real Device. • Information about MxM installation, like third part driver or software needed. • Manager Device Creation and Setup. • List of Commands with comments and parameters. • List of Variables with the description of feedback information available. • Release Note of the MxM. 2 56 All MxMs are available for free download on the Medialon web site: www.medialon.com PROJECT & SYSTEM SETUP SHOW PROGRAMMING In this section you will learn show programming from the basic single show structure to the complex multiple shows using timeline structures. SHOW PROGRAMMING 57 58 SHOW PROGRAMMING Timebased Tasks Timebased Tasks Show Structure When you create a time based show, many structures can be used with single or multiple timelines. This has to be thought about in advance and will depend on your operational needs. Among the many show structures that Medialon Manager V5 allows you to build, here are two basic examples usually used when programming. Single Timeline The main show is built on one single timeline. Segments of the show can be played consecutively one after the other. Multiple timeline The main show is subdivided into several timelines. They can be played individually, or simultaneously by synchronizing them with the same timecode (internal or external). Creating a TimeBased Task A TimeBased task is the simplest type of task that Manager V5 provides. A TimeBased task is made of tracks that contain cues. The TimeBased tasks (Timeline) current position is the reference time which may be either internal or external. Cues are triggered when the reference time reaches their positions. SHOW PROGRAMMING 59 Creating a TimeBased task: 1. Select the “Object/Task/New Task...” menu item Or select the Tasks item in the Browser tab and use the right mouse click to open the contextual menu. 2. the Create Task dialog box will be displayed: 3. Type a name. 4. You can create variables that will reflect various statuses of the task by checking the Create task variables box. 5. Select the “Timeline” type. 6. Medialon Manager will automatically open the new task in a Task Editor. The Task Editor The Task editor shows the tasks contents and is where you will be programing your TimeBased shows. Task toolbar Time Ruler 60 Track SHOW PROGRAMMING Time Scroller Timebased Tasks Track Management Tracks are a way to organize your work: you may want to put all of the cues for the different devices on the same track or you may want to use one track for each device. You can create and use as many tracks as you want to. Clicking with the mouse’s right button on the left part of the track displays a contextual menu that allows you to customize the tracks aspect: You can change the color, the height or the Setup of the track. You can create new tracks or delete existing tracks. SHOW PROGRAMMING 61 You may also decide to allow only one device’s commands on the track. Track Note Track note are used to mark sections of the timeline graphically. They are static and do not send information to the system, but can be very useful during the programming to rapidly identify sections of your show. To add a note to your timeline, right click on the section between the Time ruler and the first track and choose the “Insert note” option. Once the note has been added, simply double click on it to edit the note text field. You may choose to have colors of the note be automatically managed by the system. Once the note has been inserted, you can change the color or delete it by right clicking on the selected note. Note may be resized by clicking and dragging the right edge of the note, and moved by clicking and dragging the left edge. Creating Cues Method A 1. Select the desired device in the Browser tab to display the commands in the Lister tab. 2. Select a command in the Lister tab. 62 SHOW PROGRAMMING Timebased Tasks 3. «Drag and Drop» this command where you want to insert the cue in the Tasks timeline. Method B 1. Move the mouse pointer to the desired cue position on the timeline. 2. Right click and select “Insert Cue”. 3. Then browse to the desired device command and select it. SHOW PROGRAMMING 63 4. Select “Transport/Play” for instance. 5. The desired Command Cue will be inserted in the timeline. Testing To test the cues, type F2 to switch to Debug Mode and click on the Play button of the Task toolbar. Cue Properties Select a Cue in the task to display its properties in the Properties tab: • Devices: Name of the selected Device. • Command: Name of the selected Command. • Comment: You can add a comment about this Cue or Command. • Label: Cue is identified by its Time Position. A “Label” may be added to it. The Label is associated with the Cue and thus cannot be changed as the Time Position can shift in the event of a time-lag. • Time Position: Time Position of the Cue. • Command Parameters depending of the selected command. Inserting a Message Cue Message cues are cues that have no effect on external devices but are used to dynamically document the show and give back information while is running. These cues will be displayed in the Task Control Panel and will also be available 64 SHOW PROGRAMMING Timebased Tasks if you have created task variables when the task was created. To insert a Message cue: • Type Shift+M or select the “Insert a message” menu item, or right click inside the track. • Enter the Message text and hit Enter. Inserting a Countdown Cue Countdown Cues are similar to Message Cues but with advanced functionalities. The Task Control Panel will display the remaining time before the next Countdown Cue with an associated message. To insert a Countdown Cue: • Type Alt+C or select the “Insert Countdown Cue” menu item, or right click inside the track. SHOW PROGRAMMING 65 • Type a message text and hit Enter. • Auto Time Countdown means that the countdown will start from the previous countdown cue or from the beginning of the timeline if there is no previous countdown cue. • When “No” is selected, the countdown will count either from the Countdown Time (X time from the countdown cues position), or from the end of the last countdown cue if it is within the Countdown Time period. Editing Cues Changing Cue Properties Select the cue to display the Cue Properties to modify Comment, Label and Time Position of the cue. The Cues properties will automatically be displayed in the Object Properties for editing when you create them or select them. Only properties with orange corners can be changed. 2 Don’t forget to validate your changes with Enter key. The number and type of parameters will depend on the cue type (device command, message, countdown, etc.). 66 SHOW PROGRAMMING Timebased Tasks Some parameters have a wizard to help you choose a value. To open the wizard click on the Magic wand on the right side of the parameter. If no wizard is available, you can select one of the last value you already entered. Selecting Cues There’s often the need to select cues before using cue related commands, that’s why the Task Editor provides a variety of ways to select cues. Selected cues are highlighted with a red line. To select cues: • Click on the cue to select one cue. • Press the Ctrl key and click on another cue to add it to the selection. • Press the Shift key and click on a cue to add of the cues which are between the last selected cue and this cue. • Type Ctrl+A to select all of the cue of the task if no track is selected, or all of the cues of a track if a track is selected. • Drag the mouse over the cues you want to select. SHOW PROGRAMMING 67 To deselect cues: • Click on an empty part of the task editor to deselect all of the cues. • Press the Ctrl key and click on a selected cue to remove it from the selection. • Type Esc to deselect all of the cues. The “Cue Selection” menus The Cue Selection can be done inside the active track or in all tracks of the Timeline. In both cases, the list of commands is the same. These menus allow more sophisticated types of cue selection. Managing Cues Cut/Paste and Delete Cut and paste commands are supported with the familiar keyboard shortcuts: • Type the Del key to delete the selected cues. • Type Ctrl+C to copy the selected cues. • Type Ctrl+X to cut the selected cues. • Type Ctrl+V to paste cues to the current position of the timeline. Moving Cues There are several handy keyboard shortcuts to precisely move selected cues: • Hold the Alt key down and use arrow keys to move the selected cues by 1/ 10th second increments. Use Ctrl+Alt and arrow keys to move them by 1/ 100th second increments. • Type the + key and a time to move the selected cues forward. • Type the - key and a time to move the selected cues backward. 68 SHOW PROGRAMMING Timebased Tasks The «Cue Management» menu The Task Editor also provides various commands in the “Cue Management” submenu to automatically change relationships between cues. Cue Disable/Enable • Disable / Enable cues: Cues are not executed during Task execution. To disable a selected cue: • Type Shift+S. • If Flash Control feature is activated, click on the Enable/Disable Flash Control Button. • Choose the «Cues Management/Disable Cues» menu item. To enable a selected cue: • Type Shift+N. • If Flash Control feature is activated, click on the Enable/Disable Flash Control Button. • Choose the «Cues Management/Enable Cues» menu item. Grouping Cues Cues may also be grouped while in the TimeBased task’s Track View Mode in order to ease cue handling. Once a group of cues is created, clicking on any cue of the group selects all of the members of the group. This is particularly handy to make sure that the time relationship between cues of a group is not modified by mistake while dragging cues. • To group cues: select the cues to be grouped and either choose the Edit/ Group menu item or type Ctrl+G. • To ungroup a group of cues: click on one cue of the group to select the whole group and either choose the Edit/Ungroup menu item or type Ctrl+U. SHOW PROGRAMMING 69 Expanding and Compressing Cues • Expand the time between the selected cues by a percentage or by time. Add X percent of time to the selection, or add X second(s) to the selection. • Compress the time between the selected cues by a percentage or by time. Distributing Cues • Distribute the selected cues evenly on the timeline. Distribute Cues 70 SHOW PROGRAMMING Timebased Tasks Cues time…(+/- keyboard shortcuts) • Enables you to modify, relatively or absolutely, the time of several cues by increasing or decreasing the time. Size Cues & Cue size options • Enable you to change the size of a cue to its default size or to the size required for all the text it contains to be displayed in its entirety. The Cue Library The Cue Library is a convenient way to store cues which are often used. Cues can be easily added to the library and retrieved from the library by typing keyboard shortcuts. See details in The Cue Library/The Cue Library (New in V5) chapter page 161. Time-X “Time-X” enables selected cues to be placed across a given time at defined points; i.e: when listening to a musical rhythm or whilst watching a video. This function works as follow: 1. Select the required cues either by passing the mouse pointer over them with the right mouse button pressed down, or by selecting them one by one with the mouse pointer and keeping the Shift key on the keyboard pressed down. SHOW PROGRAMMING 71 2. Click on Time-X button. 3. A dialog box will ask for the start time of the distribution. When the field has been filled in, press the Space-Bar to start the “Timeline” running. 4. Each time you press the Space-Bar, cues will be “placed” in the order they were in on the “Timeline” before their selection. 2 72 Note: Due to Positrack engine, Start time = 0:00:00/00 is not allowed. SHOW PROGRAMMING Timebased Tasks Timeline Management There are several indicators, controls and menus that allow you to modify the current timeline time and what part of the timeline is displayed. Below is a quick summary of their uses. Task End Time Task time Left window time Scroller Begin Range Time Ruler Current timeline position Time scroller Time zoom Right window time Scroller End Range Indicators • Task Time: displays the current time of the Timeline. Clicking on this control allows changing this time (Keyboard Shortcut = G). • Current time position: this thin white bar shows the current position in the timeline. • Mouse time: the thin red line and associated dark grey time display shows the time at the mouse position. • Task End Time: this thin orange line shows Task duration limit. • Left window time: time of the leftmost displayed part of the timeline. • Right window time: time of the rightmost displayed part of the timeline. Controls • Time Scroller: scrolls the visible part of the timeline (but doesn’t change the current timeline time). • Time Zoom: sets the zoom level of the view. • Scroller Begin Range: Sets/Displays the Begin Range of the Scroller Bar. • Scroller End Range: Sets/Displays the End Range of the Scroller Bar. Time Ruler contextual Menu Clicking with the right mouse button over the Time Ruler displays the Time Ruler contextual menu which allows you to set time display format, zoom levels and other settings. SHOW PROGRAMMING 73 Time Zoom Allows you to set the Zoom level of the Timeline from 0.1% to 1000%, and to adapt the span of the timeline to your needs. Smooth Scrolling When Smooth Scrolling is active, you will visualize the current time position at a fixed point as the timeline scrolls by. When it is off, the current Timeline position will move and the Timeline will refresh when the curser moves off the display. Timecode Display Allows you to change the time display format between Time and Frame views. Hint Delay Cues can be resized to the point that the description is no longer visible. The hint delay allows you to set the time, in seconds, that the cues information will take to be displayed. Blind Mode Blind mode allows you to run your task without having any of the cues fired. Lock Task The Lock Task prohibits the task to be launched automatically when the start condition becomes true or when a Start Task command is sent. The task may still be fired by using the play buttons in the Task Control Panel and Task Edition Tab, or with the Flash Controls. Positrack Position Tracking (or “Positrack”) is a mechanism that enables an event sequencer to recalculate the state that the objects monitored had at any moment in the sequence. When Positrack mode is enabled, just locate the timeline at the desired time (for example, by clicking on the Time Ruler) and all devices compatible with Positrack will be set at the correct state. 74 SHOW PROGRAMMING Timebased Tasks This feature is especially useful for long shows where it wouldn’t be practical to restart the show from the beginning just to check something at the end of it. In the above illustration, “Positrack” is engaged, following a return to time T, enabling the lighting to be reset to 30% and the video player to be repositioned at 0.5 second from the start of its sequence. Medialon Manager recalculates the states at a given time, but the speed at which the return to these states is made depends on the type of machine monitored. This “Positrack” mechanism enables you to reduce the programming time of a sequence of events when it is necessary to run this sequence several times so as to adjust each event (here the position of the object) whilst enabling you to restart the sequence at any time position. Positrack can be enabled or disabled for the whole timeline with the “Positrack” button located on the task toolbar. Timecode TimeBased Tasks use timecode as reference to execute a cue. The reference time may be either internal or external. The choice is made via a popup menu at the top of the Task Editor. Internal Timecode When using internal timecode, the reference time of the timeline is controlled by Medialon Manager based on the internal computer clock. If the timeline is running the reference time increases. If the timeline is paused the reference SHOW PROGRAMMING 75 time is frozen, etc. This is the default mode of the timeline. External Timecode You can slave the timeline to any Time variable available in the current project. The Timecode pull down menu displays all timecode sources available. Several settings on the Task Setup dialog box define the behavior of the timeline regarding timecode drop out or jumps. Recording Cues The device record function of Manager V5 allows you to record information from certain devices directly into a timeline. • Medialon_Basic_MIDI_In_Out • Medialon_MIDI_Show_Control • Medialon_Low_Level_Communicator • Medialon_DMX512 Device Record process is activated using the setup button in the task’s toolbar and if the selected device provides this feature. Cues are recorded by the device and inserted in the task at the end of the recording session. Cue contents depend on the device type. Select the device to be recorded. Note that if the device does not support cue record capability, the Record button is not accessible. 76 SHOW PROGRAMMING Timebased Tasks 1. Select the start position on the task (timeline) where recorded cues will be inserted. Start Recording Stop Recording 2. Press the Start Recording Button. 3. If the recording needs to be configured, the Record Setup window will appear. In this example of DMX Recording, you may choose to record the Data as one single cue or as multiple cues. . 4. Start the timeline to activate the recording process. 5. At the end of the recording, press Stop Recording button. Then Medialon Manager V5 updates the Timeline with recorded cues. SHOW PROGRAMMING 77 Manager Commands in TimeBased Tasks Medialon Manager itself is viewed as a device and can receive commands as regular devices do. These commands control the tasks, change device settings or control user interfaces. UserScreen Commands This set of commands allows you to control the custom user interface. Open UserScreen From a user's point of view, the constituent parts of a program may be several “UserScreens”. The appearance of these screens, linked to the user's request (choice, various consultations), the requirements of the creator (organization of a game, of a dispatching, etc.), or practical necessities (information, warnings, etc.), is controlled by the “Open UserScreen” command. Parameters: UserScreen Name: [Type: String]: Name of UserScreen to be opened. Position: [Type: Enum]: Position mode. Available values: •“Default”: Uses default UserScreen position, does not take care of Left and Top parameters. •“Absolute”: UserScreen position is given by Left and Top parameter. Left: [Type: Integer]: Left position of UserScreen. Top: [Type: Integer]: Top position of UserScreen. There is no limit to the number of screens that can be opened simultaneously, except for the screen surface and thus the legibility of all of the displayed elements required by the user. Close UserScreen The opposite of the previous action; the closing of a “UserScreen” is carried out by the “Close UserScreen” command. Parameters: UserScreen Name: [Type: String]: Name of UserScreen to be closed. Goto Page You can display several “UserScreens” simultaneously, but only one out of the 999 pages that a given “UserScreen” can contain. The Goto Page command is used to select the desired page. This choice may be selected by the user or be provided by the programming. 78 SHOW PROGRAMMING Timebased Tasks Parameters: UserScreen Name: [Type: String]: Name of UserScreen to goto page to. Page: [Type: Integer]: Page number to goto. Task Commands This set of commands allows you to control the current task where you insert the cue but also gives you control of all the other tasks in your project. Start Task The execution of a task may be conditioned by the state of an object, the Start Condition which appears in the Task Lister Tab. But a task may itself launch another task, via the “Start Task” command. When programming the “Start Task” command, you will define the parameters of the task name to be launched. If the Task is already running, this command has no effect. Parameters: Task Name: [Type: String]: Name of task to be launched. Pause Task A task may be suspended momentarily and then continued again from where it was paused. To restart a task use the “Start Task” command. Parameters: Task Name: [Type: String]: Name of task to pause. Stop Task This command serves not only to stop a task, but to take it back to the start (its line 0 or Time 00:00:00/00), so that the next “Start Task” command will make it restart from the beginning. Parameter: Mode: [Type: Enum]: Available values: •Specified Task: stops the task specified in the Task Name property. SHOW PROGRAMMING 79 •All Tasks (Inclusive): Stops all tasks including the active task handling the Stop Task command. •All Tasks (Exclusive): Stops all tasks excluding the active task handling the Stop Task command. Task Name: [Type: String]: Name of task to stop. Sync Task Launches a “TimeBased” task by attributing a time-reference Variable to it (reference Timecode). This time can be taken from any point on the “Time Line”. This command may be used where the clock of the “Time Line” concerned is already in execution. Parameters: Task Name: [Type: String]: Name of task to synchronize. Sync Mode: [Type: Enum]: Synchronization mode. Available values: •“Internal”: The given task is internally synchronized. •“External”: The given task is synchronized to the variable “Time Variable”. Time Variable: [Type: Time]: Time Variable used for synchronization reference. Lock Task A task may be protected to be started using this command (Locked). This protection could be removed also using this command (Unlocked). Parameters: Task Name: [Type: String]: Name of task to lock/unlock. Lock Mode: [Type: Enum]: Available values: •“Unlocked”: The given task is unlocked. •“Locked”: The given task is locked. Goto Label A “cue” is identified by an index number (StepBased task) or a time (TimeBased task). A “Label” may be added to it. The advantage of a “Label” associated with the “cue” is that cannot be changed as a “cue” index can do in the event of an insertion, or as the time can shift in the event of a time-lag. The purpose of the “Goto Label” command is to reach the cue associated with the Label and to launch the execution of the task from this Label. The same Label may be used in several different tasks. Parameters: Task Name: [Type: String]: Name of task to goto label. Label: [Type: String]: Label to goto in task. Goto Time This command is exclusive to the “TimeBased” tasks and enables you to reach a given time in a “TimeBased” task and then to launch its execution starting at this time. 80 SHOW PROGRAMMING Timebased Tasks Parameters: Task Name: [Type: String]: Name of task to goto time. Time: [Type: Time]: Time to goto in task. Show Task Open or close a Task Editor with the given task inside. Parameters: Task Name: [Type: String]: Name of task to show/hide. Status: [Type: Enum]: Show or hide. Available values: •“Show”: The Task Editor is opened. •“Hide”: The Task Editor is closed. Left: [Type: Integer]: Left position of Task Editor. Top: [Type: Integer]: Top position of Task Editor. Width: [Type: Integer]: Width of Task Editor. Height: [Type: Integer]: height of Task Editor. 2 Note: When Task Name parameter is empty, command is applied to the active task itself. System Commands Medialon Manager V5 can trigger a Sound Beep from the motherboard speaker or take control of a Device. SHOW PROGRAMMING 81 Device Control This command is used to change the behavior or to control a device. With this command, you change the Device behavior and open Control Panel. If the Device Activity is disabled, no command generated by Medialon Manager are sent to the real world device. Positrack can be disabled for a specific device so that no repositioning command is sent when a jump is made in a timeline. Device Control Panels can be opened or set to a container in a UserScreen. Parameter: Device Name: [Type: String]: Name of device to control. Control Type: [Type: Enum]: Type of control to apply to the device. Available values: •“Activity”: enables or disables device activity. •“Positrack”: enables or disables device positrack mechanism. •“Control Panel”: shows or hides the device Control Panel. •“Display”: shows or hides the device display (i.e the video window of the Local Media Player MxM). Control Status: [Type: Enum]: Status of command. Available values: •“Enable”: The control type is enabled. •“Disable”: The control type is disabled. Container Name: [Type: String]: Name of container in the UserScreen into which the Control Panel will be opened. Left: [Type: Integer]: Left position of Control Panel if no Container is specified. Top: [Type: Integer]: Top position of Control Panel if no Container is specified. Width: [Type: Integer]: Width of Control Panel if no Container is specified and Control Panel is resizable. Height: [Type: Integer]: Height of Control Panel if no Container is specified and Control Panel is resizable 82 SHOW PROGRAMMING Timebased Tasks Sound Beep This command allows you to send a sound beep directly from the Motherboard speaker with the desired parameters (frequency and duration) in increments of 1/100 second. Parameters: Frequency: [Type: Integer]: Sound frequency from 20Hz to 20KHz. Duration: [Type: Integer]: Duration of sound in 1/100s. Wait: [Type: Enum]: This parameter has no effect in TimeBased Task Expression This provides the normal functions of computer programming, with its Boolean operators. The writing of expressions is accelerated by the provision of dialog boxes and drop-down menus, reducing direct writing of code to a minimum. Parameter: Expression: [Type: Private]: Click on Magic wand button to open Expression Edit window (more details in “Expressions” page 117). Controlling the Task The Task Control Panel shows the main runtime information and commands of a TimeBased task. It is displayed by clicking on the “Control Panel” button on the Task Edition window. When the window is resized, inner controls are resized automatically in order to ease far away reading. Task Name Task Controls Positrack Mode Edit Task button Current Timecode Countdown to the next Countdown Cue Text of the last Message Cue Message of the next Countdown Cue With the Task Control Panel, you can now start your timeline. Medialon Manager V5 needs to be in debug mode to start a task. SHOW PROGRAMMING 83 Switch Medialon Manager V5 to Debug Mode by pressing the F2 key. 2 A warning dialog box will ask you to switch in Debug mode, if Medialon Manager is in Stop Mode Use the Task Control buttons • Click on the task «Play» button to start the show. • Click on the task «Pause» button to pause the show. • Click on the task «Stop» button to stop the show. 2 Note that the timeline stops automatically after the last cue and will not run if no cues are inserted, unless a task duration has been increased. Views The task editor offers two types of views for a TimeBased task. Clicking on View button will toggle between the two. Timeline View In this view, cues are organized in tracks and time position. A time ruler allows to move in the timeline. When the timeline is running, tracks are scrolling right, current time position is always in the center of the window. List View This view presents the TimeBased task as a cue list. The cue list will scroll down when the task is executed. In this view, “Flash Control Buttons” are present. 84 SHOW PROGRAMMING Timebased Tasks Flash Control The “Flash Controls” give the capability of controlling the cues in a task regardless of the current position or status. Execute Cue Button Cue executed With Flash Control Enable/Disable Cue Button Disabled Cue The Flash Button on the left of each Command Cue allows to execute the cue. The Round button allows to disable (Red) or enable (Green) the cue. Cue «Message» and «CountDown Message» do not have Flash Control. Pause Points Pause Points allow to debug complicated tasks. This function is not available in Run Mode. See details in Advanced Options/Pause Point chapter page 190. Tasks in a Project All tasks created in a project are listed in the Browser Tab. Status LED Flash Controls Start / Stop Select the Tasks node to all tasks in the Lister. The status of each task is displayed by a LED (Off = Stopped, Yellow = Paused, Blue = Running). Flash controls are available in the Lister tab to start or stop a task. SHOW PROGRAMMING 85 Task Properties Expand the Tasks node in the Browser tab to see all tasks. Select a task in the Browser or in the Lister, its properties are displayed in the Object Properties tab. • Name: You can rename the task, don’t forget to validate your changes with the Enter key. • Description: Description of this task • User Mode Rights: Defines if this task is visible or editable in User Mode • Comment: You can add a comment about this task • Condition: Condition to start the task. Task Variables Select a task and expand it in the Browser tab to display the list of variables or the tracks in the Lister tab. 86 SHOW PROGRAMMING Timebased Tasks Task Management Once you have created your task, you may access the task management menu by right clicking on the desired task in the Object tab or in the Lister tab. The contextual menu will appear giving you access to the management options. • New Task: Allows you to create a new task. • Duplicate Task: Duplicates the selected task and name the duplicate with a numerical incremental value. • Edit Task: Opens the task editor in the Task tab or switch to the selected tasks editor if it already is open. • Setup Task: Opens the selected tasks setup window. • Delete Task: Deletes the selected task from the project after prompting confirmation. • Show Task Control Panel: Only available for TimeBased task, this command will open the selected tasks Control Panel inside the Control Tab. • New Task Editor: Opens a new Task Tab. when this Tab is open, selecting the Edit Task option will open the Task Editor of the selected task in this Tab. Task Setup Clicking on the Task Setup button or right clicking on the task in the browser and selecting the “Setup Task...” option, opens a Task Setup dialog for the currently selected task. SHOW PROGRAMMING 87 Use Task Variables If this option is checked, task variables are created. Restart if start condition changes to true during execution If this option is checked, a task is restarted when it reaches the end if its start condition changes to true while the task is running.This is useful to guarantee that a variable change which causes the condition to become true is correctly taken into account inside the task. Task Duration Specifies the duration of the task. 88 SHOW PROGRAMMING Timebased Tasks Timecode Setup An additional tab is displayed on the Task Setup dialog for TimeBased tasks. This tab allows you to configure the positrack behavior of the task depending on its timecode reference. Timecode Loss Conditions Defines the behavior of the task when the Timecode is lost (Timecode stops). The tolerance is the time (in tenths of a second) between the expected position of the Timecode and its true position. A value of 10 means that the task will consider that the Timecode is lost if the gap between the reference Timecode and the expected Timecode is greater than 1 second. The Action parameter defines what the task must do if the Timecode is lost: • Pause: the tasks pauses. • Continue: the task ignores the incoming time code and continues on its internal clock (Free Running). • Stop: the task aborts and goes in stop mode. Timecode Sync Conditions • Timeslave: allows continuous enslavement (follows the incoming Timecode). • Forward Only: enables you to enslave the Timecode only if it is greater than or equal to the current time position of the task. For example, if you don’t want the positracked “Devices” to reposition themselves each time the reference Timecode goes back, then choose this option, in which case the task will wait for the reference Timecode to reach the value of its position before going to “Run”. SHOW PROGRAMMING 89 Timecode Jump Conditions Defines the time tolerance (1/10 second) before considering that the reference Timecode has skipped forward. Timecode Offset Defines an offset to add to the external Timecode reference incoming value. It could be a constant value or any time variable. Timecode display Allows you to setup the frame rate of the task. If “Comply with TC” is checked, the frame rate of the task will automatically clock to the Timecode source. 90 SHOW PROGRAMMING AUTOMATION PROGRAMMING In this section you will learn how to turn a show program into an automated application or how to create your Graphical User Interfaces. AUTOMATION PROGRAMMING 91 92 AUTOMATION PROGRAMMING Graphical UserScreens Graphical UserScreens The “UserScreen” will be the only visible part of the Medialon Manager V5 application in Run mode, where you will choose, make decisions, get information, play, and act on everything that will have been programmed in your project. UserScreens are a very important part of the programming process and should in no case be neglected. Creating a UserScreen Select the “Object/UserScreen/New UserScreen...” menu item. Or Select the UserScreen item in the Browser tab and use the mouse right click to open the contextual menu. Or right click inside the Screens tab. Medialon Manager V5 automatically opens the new UserScreen in the Screens tab. AUTOMATION PROGRAMMING 93 The Screens Tab The Screens tab shows the UserScreens inside the virtual screen so you may create your interface while still having complete access to Browser, Listers and Properties of your project. Virtual Screen Virtual Screen Scrollers Toolbar UserScreen The upper part of the UserScreen Editor contains the toolbar which gives access to all graphical objects that can be inserted in a UserScreen. The UserScreen is represented by a window inserted in the Virtual Screen. Virtual Screen The Virtual Screen is a powerful feature of Medialon Manager V5. Designed specifically for programming and debugging, Virtual Screen allows you to simulate your screen resolution while keeping all the other Areas and windows visible. Furthermore, Virtual Screen allows you to create graphical user interfaces at a higher resolution than your current screen setting will handle allowing you to program on a different system than the final runtime system. There are two modes for the UserScreen debug location: • Inside Virtual Screen • Real Screen (outside the virtual screen) In Virtual Screen Mode, the UserScreens will be displayed inside the virtual screen in Debug Mode. When you set the mode to Real Screen, your UserScreen will be displayed as a separate window in debug. These settings do not affect the Run mode of Manager V5. 94 AUTOMATION PROGRAMMING Graphical UserScreens To change the virtual screen mode, right click in the Screen Tab on the workspace. Virtual screen settings are made in Preferences/UserScreen chapter page 203 UserScreen Properties The Properties tab displays the UserScreens settings. • Object Name: to give a name to the UserScreen, it will help you to select it in cues. • Description: Enter extra information. • User Mode Rights: Defines if this UserScreen Object is visible in User Mode. • Position of upper left corner (Left / Top): Use the mouse to move the UserScreen, or you can enter new value in the property field. • The size of the UserScreen is defined by its Width and Height. The mouse can be used to resize the UserScreen. • You can customize the Text displayed in the title bar of the UserScreen • When «Always on Top» option is active, the UserScreen will be always in front of all other UserScreens when they overlap. UserScreen Style A UserScreen can be displayed with 4 UserScreen styles, the choice will effect the way the UserScreen appears in Run Mode. • Single Window: The UserScreen is a fixed position window without border. The user cannot move it. • Border Window: This style adds a thin border to the Single Window, and AUTOMATION PROGRAMMING 95 still cannot be moved. • Movable Window: The UserScreen has a title bar and borders. The user can move the window on the screen. It’s the default style when you create a new UserScreen. • Full Screen: With this style, the UserScreen will fill the Screen. This option is useful to hide and protect the computer desktop. UserScreen Pages A UserScreen can be composed of several pages (up to 999). When you create a new UserScreen, a first page will automatically be generated. The UserScreen Toolbar gives you buttons to navigate inside the UserScreen. Previous/Next Page Goto Page # Use the «Next Page» button in the Toolbar to add a new page. Page Properties Page properties can be displayed in the Properties tab by clicking in the UserScreen page or from the Lister tab. Notice, a page can have another page as its background, all the objects on the background page will be visible and functional in Debug or Run modes. • Color: Defines the background color of the page, use the magic wand on the right side to open the Color Selector box. • Bitmap: To select a background bitmap, use the magic wand to open the Image Selector. 96 AUTOMATION PROGRAMMING Graphical UserScreens • Motif Type: Depending of the background bitmap you select, you can define the type of motif used (Stretch/Patern). • Background Page: Same Objects can be used in several pages. Instead of duplicating these objects, you can use a page as background. All objects present in this page are displayed and active in the current page. UserScreen Management To manage UserScreens once they have been created, you can access the Management menu by right clicking on the UserScreen inside the Browser tab or inside the Lister tab. From the Browser or lister tabs: • New UserScreen: Creates a new UserScreen. • Show UserScreen: Opens the selected UserScreen in the Screens tab. • Delete UserScreen: Deletes the selected UserScreen from the Project. • Close UserScreen: Closes the selected UserScreen. From the menu bar: • New UserScreen: Creates a new UserScreen. • Goto previous page: Changes the current page to the previous one (if any) on the focused UserScreen. • Goto Next page: Changes the current page to the next one on the focused UserScreen. If there is no next page, a new one is created. • Goto page...: Changes the current page to specific page on the focused UserScreen if it exists. • Goto First page: Changes the current page to the first one on the focused UserScreen. • Goto Last page: Changes the current page to the last one on the focused UserScreen. • Move Objects: Enables you to move one or several objects selected from one page to another. This command works not only in the current “UserScreen” but also between various “UserScreen” already created. AUTOMATION PROGRAMMING 97 2 If you whish to move an object that has been “linked” to start conditions or cue parameters, you MUST use this command. If you cut/copy/paste the objects from one UserScreen to another, all links to the objects will be lost! Graphical Objects UserScreen Toolbar The UserScreen Toolbar contains 2 types of graphical objects: Dynamic Static • Dynamic objects that can perform actions and have variable statuses. • Static objects cannot be modified and cannot trigger any action in the system. Dynamic Objects There are two different types of dynamic objects. Those who are primarily designed to perform actions, and those who are designed to monitor information. Advanced functionalities however, allow you to use these inversely, that is monitoring with Action Objects and acting with Monitoring Object. • Button • Slider • Digital Slider • List • Text Edit • Text Display • Led • Gauge • Container Static Objects Static Objects are standard drawing objects that allow you to complement your Graphical Interface with information and design. • Square/Circle/Line • Static Text • Bitmap Image 2 Before you can type in a different language than the one installed, you must configure the keyboard to match the language. See “Regional and Language Options”, page 279. 98 AUTOMATION PROGRAMMING Graphical UserScreens Creating Graphical Objects Inserting an object 1. Use the UserScreen Toolbar to select the type of object. 2. Use the mouse to define the top left hand corner of the object. 3. Hold the left button and drag the pointer to define the size of the object. 4. Medialon Manager will generate an automatic name for the object. This name is based on object type and ID index. An object is identified in a project by its name. You can change this name in the Object Properties. 2 Giving a detailed name to all your dynamic objects will help you during the programming and debugging of your project. Graphical Object Properties Common Properties Position & Size • Left: Defines the left position of the top left hand corner of the Object with regards to the screens resolution. • Top: Defines the top position of the top left hand corner of the Object with regards to the screens resolution. • Width: Defines the width of the graphical object. • Height: Defines the height of the graphical object. AUTOMATION PROGRAMMING 99 Design Properties • Colors: Use the magic wand on the right side to open the Color Selector Box. • Text Font: Click on the magic wand to open the Text Font box. All fonts installed in the computer can be used in Medialon Manager V5. • Frame Width and Embossed Width: Define a number of pixels for objects border. • Smooth Relief option: makes embossed transition smoother on Dynamic Objects. • Hint: Hint message displayed when cursor is over the Object. Bitmaps • Use the magic wand to open the Image Selector and define the bitmap. • Bitmaps have background color, make them transparent with Transparent Bitmap option. When this option is active, all pixels in the bitmap with same color as the Upper and left hand corner pixel are replaced by the objects color. • Motif: Defines the display of the Bitmap. • Bitmap position can be defined. Buttons • Status: Button status (0 = Off; 1 = On) • Text Position: The vertical and horizontal positions of the text in the button can be set. • Shape option: changes the button from rectangle to round form. • Effect: Instead of having one different color per status, you can mix two colors and having a gradation effect. • Transparent option: makes the button invisible but active on the page. You can use this option to create hidden button or active zone on a bitmap. • Text in the button can be a single or multi line. • If Single Line option is inactive, automatic carriage return can be activated with the Word Wrap option. Single Line and Word Wrap are mutually exclusive. Use Shift + Enter key combination to insert a carriage return when both options are inactive. Button Behavior: Buttons in Manager V5 have three modes: • Normal: Push button behavior, the button is On (1) while you press it. When you release it, its status goes to Off (0). • Toggle: In this mode the button keeps its last status. You press it a first time, button status is On (1). You press it a second time, the status goes to Off (0). • One Time: In this mode, the user can press the button only once. You need to implement a command in a task to release this button. • Still Down option: keeps the button in down position when its status is On. 100 AUTOMATION PROGRAMMING Graphical UserScreens Variable • Name:[Button_name].Status Type: Integer Values: Min. 0, Max 1 Sliders Slider is used to define a level. you need to set the minimal value (Min Status) and the maximum value (Max Status). The current position of the slider gives the current status. • Ruler: Defines the graduation marks and their color. • Slot: Defines the width and the color of the slot. • Background Color: Defines the color of the object, use the magic wand to select the color. • Shape: With this option you can create a rotary knob. • Effect section: allows replacing background color by a gradation between 2 colors. Variable • Name:[Slider_name].Status Type: Integer Values: Default: Min. 0, Max 100; Editable through Object Properties. Digital Sliders Digital Sliders have similar properties as Sliders. • Ruler: defines the graduation marks and their color. • Background Color: defines the color of the object, use the magic wand to select the color. • Shape: With this option you can create round bar graph. Variable • Name:[Digitalslider_name].Status Type: Integer Values: Default: Min. 0, Max 100; Editable through Object Properties. Text Edits User may need to enter text or number with the keyboard, Text Edit object offers fields to do that. Select the «Text Edit» tool in the UserScreen toolbar and with the mouse draw your text field. • Text: This property contains the result of keyboard typing. • If you need to limit the length of typing, set the Max Length parameter. 0 means no limit. • Text Edit can be used to enter a password, define a Password Character to display this character instead of the real entry. AUTOMATION PROGRAMMING 101 • By default a Text Edit is a string, you can force another Edit Type. • If Single Line option is inactive, automatic carriage return can be activated with the Word Wrap option, for multi line text.Single Line and Word Wrap are mutually exclusive. Variable • Name:[Edit_name].Text Type: String Lists Manager V5 offers a powerful tool: the list. The final user is able to choose an item from several propositions. Select the «List» tool in the UserScreen toolbar and with the mouse draw your list. • The position of the selected item in the list is given by the Status parameter (-1= no selection, 0= first item, 1= second item, etc.). • Text Items: Click on the magic wand to open the Edit Items box and add items in the list. • Text Position: The position of the text in the edit field can be set. • Sorted: The list can be logically sorted. When Sorted is activated, only one item of the list may have the same value. Variables • Name:[List_name].Status Type: Integer Values: Min. -1, Max 2147483647 • Name:[List_name].Text Type: String • Name:[List_name].SelectedText Type: String • Name:[List_name].Count Type: Integer Text Displays Text information can be displayed in a UserScreen with a «Text Display» object. Select the «Text Display» tool in the UserScreen toolbar and with the mouse draw your display. • Text Position: The position of the text in the display can be set. • Inset: Defines bitmap border size inserted in the display. Bitmap motif type selection must be "stretch". • If Single Line option is inactive, automatic carriage return can be activated with the Word Wrap option, for multi line text displays. 102 AUTOMATION PROGRAMMING Graphical UserScreens Variables • Name:[Textdisplay_name].Text Type: String • Name:[Textdisplay_name].Click Type: Integer Values: Min. 0, Max 1 Usage: Text Display can be used as an invisible button. A click on it acts like a push button. LEDs Using default parameters, the color of the LED depends upon the value of its associated “Status” property. A “Status” value of 0 would set a black color, a “Status” value of 1 would set a red color and so on. You can however change the color associated with each “Status” value by editing the Color/State property in the Object Inspector. You can also use bitmaps instead of colors to reflect the LED state by editing its bitmap/State property. Note that if a bitmap is associated to a state, this setting takes precedence over the color setting. At runtime, a LED Object can be programmed to blink automatically by setting the value of its associated “Flash Frequency” and “Sequence” variable which appear in the Variable Lister. Frequency values are expressed in hundredth of a second. For example, setting the “Flash Frequency” variable to 50 will change the “Status” of the LED every half of a second when Manager is in Run Mode or Debug Mode. To disable LED blinking, just set its “Flash Frequency” variable to 0. The “Sequence” specifies the sequence of states that would be traversed by the LED if blinking mode is on. Each state number must be separated by a non numerical symbol. For example, setting the value of the “Sequence” variable to “1,3,10” will automatically change the state of the LED from 1, to 3, then to 10, then to 1 and so on. Properties • Status: Current status of the LED from 0 to 255. • Color: Indicates the color per status of the (0-255). • Bitmap: Allows you to insert one bitmap for each status of the LED (0-255). • Shape: Shape of the led from round to rectangle. Variables • Name:[LED_name].Status Type: Integer Values: Min 0, Max 255 • Name:[LED_name].FlashFrequency Type: Integer AUTOMATION PROGRAMMING 103 Values: Min 0, Max 2147483647 • Name:[LED_name].Sequence Type: String Value: The sequence defines the pattern of statuses the LED will run through when the Flash Frequency is other than 0. Use a non numerical symbol to separate the different status values within the pattern. Example: 0,1,2,3,2,1 • Name:[LED_name].Click Type: Integer Values: Min 0, Max 1 Usage: LED can be used as an invisible button. A click on it acts like a push button. Gauges • Status: Current status of the Gauge. • Min/Max Status: defines the Min. and Max values of the Gauge status. • Direction: defines in which direction the gauge will move. Variable • Name:[Gauge_name].Status Type: Integer Values: Default: Min. 0, Max 100; Editable through Object Properties. Containers Containers are a very specific active device. They are active since they are used to dynamically display Device Control Panels, as well as MxM specific information, such as Database or Scheduler. Other than the standard graphical configuration properties, containers do not have any specific properties or any variables. They are in fact “windows” that are used to display the information or media in a specific and controlled location. To set a container, you must use the Manager Device Control Command. 104 AUTOMATION PROGRAMMING Graphical UserScreens Graphical Object Tools Font Selector Allows you to edit the style and size of the graphical objects text properties. Color Selector Allows you to edit and store the various color properties of the selected object. Define a new color in the Color Editor and save it as a Custom Color by clicking on Update button. AUTOMATION PROGRAMMING 105 2 106 You can add custom color at any time when you add graphical object. Use keyboard shortcut Ctrl + Alt and click on wanted color. The color picker add the pointed color to the custom color list. AUTOMATION PROGRAMMING Graphical UserScreens Image Selector The Image selector list the Bitmap that will be used as the objects property. You may select from the predefined images available or import your own. 2 Note that, Manager V5 only handles the *.BMP format. Value Selection Window When you need to type several times the same information in the Property fields of the different objects, you may find it useful to use the value selection window. Every time a numerical or alphabetical field is filled out, the values are stored in this window. By clicking on the “Select a Value Icon”, you can access this list and insert the value without typing. The values are stored in a separate window whether they are numerical or alphabetical value, you cannot have access to the numerical values from an alphabetical property field. AUTOMATION PROGRAMMING 107 108 AUTOMATION PROGRAMMING Variables Variables Defining Variables Variables are containers of value. They are expressed as alphanumeric values which will be used for the calculation and execution of tasks. This value changes according to the state of an object, the result of a calculation, a user's action or the information sent back from a device. The Variables may characterize the states or actions of “Devices” and objects present in the “UserScreen”. Independently of the Variables associated with the “Devices” and “UserScreens”, “User” Variables may be created according to programming necessities. Categories System These are the Variables pertaining to Manager and to other “Devices”. They cannot be deleted. (Except Manager On Network). The Manager Variables concern the date, hour, states and actions of the keyboard and the mouse. Screen Each “UserScreen” is associated with a Variable (its page numbers). Each active object also generates one or several Variables. The Variables linked to the “UserScreens” cannot be deleted. They disappear only when the object or “UserScreen” that created them is deleted. User These are the Variables created by the programmer. They can be easily modified or deleted. Types of Variables Integer This Variable expresses a whole number, characterizing the state of an object, the X/Y position of the mouse pointer, the value of a slider, or a visitor count, for example. The initial value must be indicated. The default value is zero. The “Min. value” and “Max value” fields indicate, by default, the maximum values that they can take. The values of these fields will be used for programming, calculations and displays. Real A Real Variable is similar to the integer variable with the additional advantage of having Floating-point representation of integer subsets. The precision of the display can be set to the desired precision (Manager V5 will round off the closest subset value). String The String Variable is a chain of characters that can be displayed as such or else integrated into a sentence. Such a chain of characters will be displayed with the typographical choices attributed to its display system. AUTOMATION PROGRAMMING 109 Enum “Enum” is a Variable listing pre-determined values: periodical information or days of the week for example. Time Various modes for dividing and displaying time are possible, on the basis of the time code standard (24, 25 or 30 images per second) and a decimal timesplitting of seconds (1/100 and 1/1000 second). Date A Variable to which contains a date. This may be used for date calculations, comparisons or programming periodical, exceptional or random events. Medialon Manager V5 follows PC regional options to display a date. 2 Note: Date format has to be complete format, e.g. DD/MM/YYYY, YYYY-MM-DD or MM.DD.YYYY. ’8/4/07’ will not be recognized by Manager V5. Persistent Variable A persistent Variable will have its value memorized when Medialon Manager V5 is switched off or even after an unforeseen power cut, and re-established the next time that Medialon Manager V5 is opened. Creating User Variables You can create a Variable either by right clicking on the “User Variables” Object in the Browser tab, right clicking in the Lister, or by using the keyboard shortcut Shift+Ins. The type of Variable must be chosen and given a name, which has not already been used, and which does not include characters used for calculations, for example: / +: -, etc. For example: it is not possible to name a Variable “on/off”, but “on_off”. When Variables are created, Medialon Manager proposes, by default, the values of the Variable created previously. In the same way, when a Variable is duplicated, the Variables thus created take the [name of the Variable copied]2. 110 AUTOMATION PROGRAMMING Variables Variable Properties Just like any other Object in Manager V5, Variables have properties. If you wish to edit them, you must take into account the category and the type, as some elements are not modifiable. Variables Names Variables are referenced in the system by their names. System and Screen variables are automatically named using a logical procedure. The names are divided into two parts. [ObjectName].[Description] For instance: Manager.CurrentTime or Button.Status You may choose to follow this nomenclature when creating User Variables or to use another one. However it is very important to give a precise name to each Variable you create, this will ease navigation and search for the variable when programming. System Variable Properties As we have seen, System variables are created with the devices. Medialon Manager being seen as a device automatically generated in the project, it will create Manager System Variables. Every device created will also have it’s variables as well as tasks if you choose so. To access the list of one objects variables, select the Variables folder of the desired device or task and the Lister will automatically be updated. AUTOMATION PROGRAMMING 111 Then to display one variable’s properties, select the desired Variable to update the Properties tab. System variables are linked to status and information of the devices that are active within the session, therefore, not all parameters are editable. System variables cannot be Persistent since their parameters are linked to the actual status of the devices, not the last instance they where in when the project was shut down. The editable properties of system variables are marked with orange high lighters. User Mode Rights defines if this variable is visible in the User Mode. 112 AUTOMATION PROGRAMMING Variables Screen Variable Properties All screen Objects created in your project, whether UserScreens or Graphical Objects will also have variables linked to them. To access the variable Properties of the Screen Objects, you must browse to the correct UserScreen or Page and open the variables folders in the Lister tab. Please note that the graphical Object Properties and the Graphical Object’s Variable Properties are two different and separate properties. User Mode Rights defines if this variable is visible in the User Mode. Screen Variables can be set to Persistent allowing you to retrieve the last position they were in when the Project was last closed. AUTOMATION PROGRAMMING 113 User Variable Properties When you create a User Variable, there is no direct link to any object in your project, therefore all the properties are editable, including the name and values. User Mode Rights defines if this variable is visible in the User Mode. User Variables can be set to Persistent allowing you to retrieve the last position they were in when the Project was last closed. Using Variables as Cue Parameters Variables may be used as parameters for Command Cues to dynamically control one or all the parameters. This very powerful function allows you to “dynamically” update the parameters of a command before it is sent. All the editable parameters of Command Cues are able to use variables as their value. Medialon Manager does not process any of these values, so the variable that is used MUST have a value that is interpretable by the recipient. For example a “Locate to Time” Command can only be valid if the variable is a “Time” or a “Time formatted String” or an integer (Integers are translated to Time, based on the Frame Rate of the Time parameter; if the frame rate is 1/ 100s, and the integer 100, the corresponding time value will be “00:00:01/00”). 114 AUTOMATION PROGRAMMING Variables To use a variable as a parameter for the Command Cue, select the Command Cue you want to configure and click on the “arrow” to the right of the desired Command Parameter. This will open the Variable Selection Window where you can search and select the variable to use. Variable selection list can be filtered by User Group. AUTOMATION PROGRAMMING 115 Variable selection list can also be filtered by Variable Name. You can also use Category and Type buttons to show or hide variables. 116 AUTOMATION PROGRAMMING Expressions Expressions Logical Expressions Logical Expressions provide the normal functions of computer programming, with its Boolean operators. An expression is a mathematical (or logical) string named “Regular Expression”, which contains variables, constants and operators (+, -, *, /, (, ), etc.). This expression is evaluated using operators between variables and constants to provide a result. This result could be used as logical result (true or false) or could be stored into a variable for a future use. Operators Several operators are available and could be divided in two main categories: arithmetical operators and logical operators. Operators have also priority between them. 2 + 4 * 3 is equals to 14 and not to 18 because * operator has a highest priority than + operator. Priorities of operators are ,==,!=,>,<,<=,<=,|,&,=,#. digressive Arithmetical in Logical the list: ^,-(Neg),%,*,/,+,- Fx Variables Functions Arithmetical operators: + Add a value to another one. - Subtract a value to another one or use as negative operator when there is only one value. * Multiply a value by another one. / Divide a value to another one. % Retrieve the rest of the division from the first value by the second. ^ Power operator. = Assignment operator, set the first value to the contents of the second. Logical (boolean) operators: == Equality comparison operator, compares the contents of two values, if they AUTOMATION PROGRAMMING 117 are equal the result is true otherwise false. != Difference comparison operator, compares the contents of two values, if they are equal the result is false otherwise true. > Greater operator. < Less operator. >= Greater or equal operator. <= Less or equal operator. | OR operator, one or the other value must be true. & AND operator, the both parts of the Expression must be true. # Change operator, used only with variables. The content of a variable is compared to its previous value to define if it has changed. ( ) Parenthesis symbol. They are used to force priorities between operators. Evaluation expressions Evaluation expressions are either true or false. Those expressions are used for conditions (i.e If/Then/Else, While/EndWhile, WaitFor, etc.): Button_StartShow_1.Status == 1 If Button_StartShow_1.Status is equal to 1, the expression is true and the command is executed. Assignment expressions Assignment expressions are used to store a value into a variable: ShowSelection = 2 TimeToShow = “01:00:05/00” ShowSelection variable is set to 2 whereas TimeToShow variable is set to time “01:00:05/00”. Both evaluation and assignment expression can be combined to take advantage of regular expression: ShowSelection = (Slider_SelectShow.Status == 5) If Slider_SelectShow.Status is equal to 5, the expression is true and then ShowSelection variable is set to 1 (true is considered as 1), else If Slider_SelectShow.Status is equal to 0, the expression is false and then ShowSelection variable is set to 0 (false is considered as 0). 118 AUTOMATION PROGRAMMING Expressions The Expression Window When you create an Expression Cue within a task, you will need to write the expression out so that the calculation is performed. To access the “Edit Expression” window, select the cue and click on the “Magic Wand” of the Expression Property to open the Edit Expression Window or double click on the expression field in the Properties Tab. To create Expressions you will need to choose what variables you wish to use. To do so simply click on the Variable Selection Icon, which will open the Variable Selection Window. All the filters will be opened when you first open this window. If you do not wish to display the variables of one category or type, simply click on the Icon and they will be filtered out. AUTOMATION PROGRAMMING 119 Variable selection list can be filtered by User Group, also filtered by Variable Name. You can also use Category and Type buttons to show or hide variables. As soon as you select a variable in the list, the variable appears in the “Edit Expression” as it is named in your project. 120 AUTOMATION PROGRAMMING Expressions You will also need to select the operators that will perform the calculation you desire. Select the operators by clicking once on their icon; they will appear automatically in the Expression. All the command lines can also be entered on the keyboard as long as the programming syntax is scrupulously respected. 2 All strings value must be enclosed with quote: «textvalue» «00:01:25/15» «08/ 07/2007». AUTOMATION PROGRAMMING 121 Operations Conversion Rule In an operation the type of the result is the type of the left most operand of the operation. The other operand is converted before the operation. Table 1: Conversion results 1Left \ Right Integer Real String Time Date Enum Integer Integer Integer Integer Integer Integer Real Real Real Real Real Real String String (1) String (1) String (2) String (2) String (2) String (1) Time Time (3) Time (3) Time (3)(5) Time (3) Date Date (4) Date (4) Date (4)(6) Enum Enum Integer Real Enum Time (3) Date (4) Date (2) Enum Operations restrictions: 1. Addition, Subtract, Multiply, Modulo 2. Addition only 3. Addition, Subtract, Multiply, Divide 4. Addition, Subtract 5. String must have a Time format «00:00:00/00» 6. String must have a Date format (for example: «00/00/0000»), See “Date”, page 110. 2 To convert an integer which ranges from 0 to 100 to a real which ranges from 0.0 to 1.0, use this kind of expression: Float = (0.0+Integer)/100. In case of evaluation expression, the right side of the operator is first converted in the left side type before the evaluation. Examples String < Integer (Edit.Text < 10): Integer variable is first converted into String variable. Date >= String (Manager.CurrentDate >= «2007-08-13»): String variable is first converted into Date variable Operations on Strings Arithmetical operators can be used to perform some kinds of string managements: - Truncate the string from the right: String = String - 4: suppresses the last 4 characters from the String. If the String has the value “ABCDEFGH”, then the new value will be “ABCD”. 122 AUTOMATION PROGRAMMING Expressions + Concatenate two strings: String = String + “enation”: adds the sub string “enation” to the contents of the String. If the String has the value “Concat”, then the new value will be “Concatenation”. * Concatenate a string multiples time: String = String * 3: Concatenates 3 times the contents of the String. If the String has the value “W”, the new value will be “WWW”. % Truncate the string from the left: String = String % 3: Keeps the last 3 characters of the String. If the String has the value “ABCDEFGH”, then the new value will be “FGH”. Converting Time Time can be converted into integer like MyInteger = Manager.CurrentTime. MyInteger contains a value which represents the number of frame or hundreth. Comparing Time To compare two time values, it's logical to use == operator. But because expressions are evaluated one after another, it may append that expression Manager.CurrentTime == “01:00:05/00” is not true when current time is “01:00:05/00”. It's better to create a time window to compare time values. The expression (Manager.CurrentTime >= “01:00:04/90”) & (Manager.CurrentTime <= “01:00:05/10”) is correct and guarantees that the condition will occur. The width of the time window has to be adjusted depending on the required precision. Calculating/Converting Date Date can be converted into integer like MyInteger = Manager.CurrentDate. MyInteger contains a value which represents the number of days elapsed since the reference date: 31/12/1899. MyDate = 38314 causes the variable MyDate to take the value 23/11/2004 because 38314 is the number of days elapsed since the reference date (1/1/1900). This mechanism can be used to calculate a new date based on a known date and a number of days. For instance we may want to calculate which is the date in 12 days: MyDate = Manager.CurrentDate + 12 causes MyDate to take the value of the date into 12 days. Creating a toggle value It's often useful to have a value which alternatively swaps between two values (for instance 0 and 1). This could be done using If/Then/Else commands but it's faster and more simple to use an expression for that: ToggleValue = 1 - ToggleValue This expression makes the variable ToggleValue to be set to 1 when its value is 0 and 0 when its value is 1, each time the expression is executed. Creating a value selector with buttons When a choice has to be done between options using buttons, for instance choosing between 5 options, an expression can take place instead of a complex AUTOMATION PROGRAMMING 123 task which compares each button status to determine the selection. After creating 5 buttons named Button_1 to Button_5, those buttons are programmed to start the same task with the following expression: ((Button_1.Status==1) & (Button_1.Status#)) | ((Button_2.Status==1) & (Button_2.Status#)) | ((Button_3.Status==1) & (Button_3.Status#)) | ((Button_4.Status==1) & (Button_4.Status#)) | (Button_5.Status==1) & (Button_5.Status#)) Once the task is started by one of those buttons, the goal is to know which button has started the task. The expression: Selection = (Button_1.Status == 1)*1 + Button_2.Status == 1)*2 + (Button_3.Status == 1)*3 + (Button_4.Status == 1)*4 + (Button_5.Status == 1)*5 Gives a value from 1 to 5 depending on the button which has started the task. Only one button can start the task at a time, so when a button status has the value 1, all others buttons status have the value 0. This expression can be evaluated as follow: Selection = 1*1 + 0*2 + 0*3 + 0*4 + 0*5 = 1 when Button_1 is down. Selection = 0*1 + 1*2 + 0*3 + 0*4 + 0*5 = 2 when Button_2 is down. Selection = 0*1 + 0*2 + 1*3 + 0*4 + 0*5 = 3 when Button_3 is down. Selection = 0*1 + 0*2 + 0*3 + 1*4 + 0*5 = 4 when Button_4 is down. Selection = 0*1 + 0*2 + 0*3 + 0*4 + 1*5 = 5 when Button_5 is down. 124 AUTOMATION PROGRAMMING Expressions Function Operators Medialon Manager V5 integrates Function Operators allowing you to extract information from complex variables or create “equations” using variables. • Hours(TIMEVAR) Description: Extracts the [Hours] value from a time variable. Input: TIMEVAR: time variable. Output: Integer corresponding to hours Example: Hours(12:34:15/30) = 12 • Minutes(TIMEVAR) Description: Extracts the [Minutes] value from a time variable. Input:TIMEVAR: time variable. Output: Integer corresponding to minutes Example: Minutes(12:34:15/30) = 34 • Seconds(TIMEVAR) Description: Extracts the [Seconds] value from a time variable. Input: TIMEVAR: time variable. Output: Integer corresponding to seconds Example: Seconds(12:34:15/30) = 15 • Frames(TIMEVAR) Description: Extracts the [Frames] value from a time variable. Input: TIMEVAR: time variable. Output: Integer corresponding to frames Example: Frames(12:34:15/30) = 30 • Day(DATEVAR) Description: Extracts the [Day] value from a date variable. Input: DATEVAR: date variable. Output: Integer corresponding to day of DATE. Example: Day(01/18/2006) = 18 • DayOfTheWeekAsName(DATEVAR) Description: Extracts the [Day_Name] value from a date variable. Input: DATEVAR: date variable. Output: String corresponding to day name Example: Day(01/18/2006) = "Wednesday" • DayOfTheWeekAsNumber(DATEVAR) Description: Extracts the [Day_Number] value from a date variable. Input: DATEVAR: date variable. Output: Integer corresponding to day number. Example: Day(01/18/2006) = 3 • Month(DATEVAR) Description: Extracts the [Month] value from a date variable. Input: DATEVAR: date variable. AUTOMATION PROGRAMMING 125 Output: Number corresponding to month number Example: Day(01/18/2006) = 1 • Year(DATEVAR) Description: Extracts the [Year] value from a Date variable. Input: DATEVAR: date variable. Output: Integer corresponding to year number Example: Day(01/18/2006) = 2006 • LowerCase(STRINGVAR) Description: Converts the desired String to Lower Case characters. Input: STRINGVAR: string variable, enum field variable. Output: STRINGVAR in lower case Example: LowerCase("TesT stRINg") = "test string" • UpperCase(STRINGVAR) Description: Converts the desired String to Upper Case characters. Input: STRINGVAR: string variable, enum field variable. Output: STRINGVAR in upper case Example: UpperCase("TesT stRINg") = "TEST STRING" • Length(STRINGVAR) Description: Returns the count of character of the selected String variable. Input: STRINGVAR: string variable, enum field variable. Output: Integer corresponding to length of STRINGVAR. Example: Length ("TesT stRINg") = 11 • CharAt(STRINGVAR,INDEX) Description: Get a character of the selected string variable at a specified position. Input: • STRINGVAR: string variable, enum field variable. • INDEX: number, integer variable, real variable rounded. INDEX range is 0based (start from 0 included). Output: Single character string corresponding to character of STRINGVAR at INDEX position. If INDEX is bigger than STRINGVAR length, CharAt() returns an empty string. Example: • CharAt("TesT stRINg",3) = "T" • CharAt("TesT stRINg",35) = "" • GetFieldOfEnum(ENUMVAR,INDEX) Description: Get field (string part) of the selected enum variable at specified index. Input: • ENUMVAR: enum variable. • INDEX: number, integer variable, real variable rounded. INDEX range is 0based (start from 0 included). Output: String corresponding to field of ENUMVAR at INDEX. If INDEX outside range, GetFieldOfEnum() returns an empty string. Example: MyEnum = {"Medialon","Manager","v4"} • GetFieldOfEnum(MyEnum,2) = "v4" • GetFieldOfEnum(MyEnum,4) = "" 126 AUTOMATION PROGRAMMING Expressions • GetIndexOfEnum(ENUMVAR,STRING) Description: Searches for STRING in fields of the selected enum variable. If STRING is found in the variable, index of field is returned. If no matches, GetFieldOfEnum() returns -1. Input: • ENUMVAR: enum variable. • STRING: string, string variable. Output: INDEX: Integer corresponding to the index of ENUMVAR containing STRING. Enum index is 0-based (start from 0 included) 2 Special case: If several fields of ENUMVAR contain STRING, GetFieldOfEnum() returns the last field. Example: MyEnum = {"Medialon","Manager","v4"} •GetFieldOfEnum(MyEnum,"Manager") = 1 •GetFieldOfEnum(MyEnum,"manager") = -1 •GetFieldOfEnum(MyEnum,"test") = -1 • Random(MAXNUMBER) Description: Returns a Random integer value between 0 and [current Value of Selected Variable], process only available on Integers, Reals (units only) and Enums. Input: MAXNUMBER: number, integer variable, real variable rounded. Output: Integer value. Example: Random(123456) = 5637 • Random(MAXUNIT,MAXDECIMAL) Description: Returns a Random real value between 0 and [current Value of Selected Variables], process only available on Integers, Reals (units only) and Enums. Input: • MAXUNIT: number, integer variable, real variable rounded. Part before decimal digit is between 0 and (MAXUNIT-1). • MAXDECIMAL: number, integer variable, real variable rounded. Part after decimal digit is between 0 and (MAXDECIMAL-1). Output: Real value. Example: • Random(123456,34) = 5637.8 • Random(1,1000) = 0.387 • Sqrt(NUMBERVAR) Description: Returns square root of selected number. Input: NUMBERVAR: Integer variable, real variable, must be superior to zero! Output: Real value. Example: Sqrt(123.456) = 11.11107 • Round(NUMBERVAR) Description: Round selected number to nearest integer Input: NUMBERVAR: real variable. Output: Integer value. Example: • Round(1.6) = 2 AUTOMATION PROGRAMMING 127 • Round(1.5) = 2 • Round(1.4) = 1 • Ceil(NUMBERVAR) Description: Round selected number to the superior integer. Input: NUMBERVAR: real variable. Output: Integer value. Example: • Ceil(1.6) = 2 • Ceil(1.4) = 2 • Ceil(1.0) = 1 • Floor(NUMBERVAR) Description: Round selected number to the inferior integer. Input: NUMBER: real variable. Output: Integer value. Example: • Floor(1.6) = 1 • Floor(1.4) = 1 • Floor(1.0) = 1 • Abs(NUMBERVAR) Description: Returns Absolute value of selected number. Input: NUMBERVAR: integer variable, real variable. Output: Integer or Real value (depending on input type). Examples: • Abs(-12.3) = 12.3 • Abs(134) = 134 • Max(NUMBER1VAR,NUMBER2VAR) Description: Returns the maximum value between 2 selected numbers. Input: • NUMBER1VAR: integer variable, real variable. • NUMBER2VAR: integer variable, real variable. Output: Integer or real value (depending on input type). Example: • Max(12.3,4) = 12.3 • Max(-3,-134.34) = -3 • Min(NUMBER1VAR,NUMBER2VAR) Description: Returns the minimum value between 2 selected numbers. Input: • NUMBER1VAR: integer variable, real variable. • NUMBER2VAR: integer variable, real variable. Output: Integer or real value (depending on input type). Example: • Min(12.3,4) = 4 • Min(-3,-134.34) = -134.34 • Sin(ANGLEVAR) 128 AUTOMATION PROGRAMMING Expressions Description: Returns the sinus of selected angle; angle unit in radians. Input: ANGLEVAR: real variable, real. Output: Real value. value min= -1 max= +1 Example: • Sin(0) = 0.0 • Sin(-1.25) = -0.94898 • Asin(REALVAR) Description: Returns the arc-sinus of selected real, result in radians. Input: REALVAR: real, real variable. Value must be between -1 and 1 included. Output: Real value. Example: • Asin(1) = 1,57079 • Asin(-0.94898) = -1.25 • Tan(ANGLEVAR) Description: Returns the tangent of selected angle; angle unit in radians Input: ANGLEVAR: real variable, real. Value must be between -PI/2 (-1.570796) and PI/2 (1.570796) excluded. Output: Real value. Example: • Tan(1) = 1.55741 • Tan(-0.12) = -0.12058 • Atan(REALVAR) Description: Returns the Arc-tangent of selected real, result in radians. Input: REALVAR: real variable, real. Output: Real value. Example: • Atan(1) = 0.78540 • Atan(0.14112) = 0.14019 • Cos(ANGLEVAR) Description: Returns the Cosine of selected angle, angle unit in radians Input: ANGLEVAR: real variable, real. Output: Real value. value min= -1 max= +1 Example: • Cos(1) = 0.5403 • Cos(-0.12) = 0.99281 • Acos(REALVAR) Description: Returns the arc-cosines of selected real, result in radians. Input: REALVAR: real, real variable. Value must be between -1 and 1 included. Output: Real value. Example: • Acos(1) = 0.0 • Acos(-0.5) = 2.0944 • Ln(NUMBERVAR) Description: Returns the Napierian logarithm of selected number. AUTOMATION PROGRAMMING 129 Input: NUMBERVAR: number, integer variable, real variable. Value must be superior to zero. Output: Real value. Example: • Ln(1) = 0.0 • Ln(123.456) = 4.81588 • Log(NUMBERVAR) Description: Returns the logarithm base 10 of selected number. Input: NUMBERVAR: number, integer variable, real variable. Value must be superior to zero. Output: Real value. Example: • Log(1) = 0.0 • Log(12.5) = 1,09691 • Exp(NUMBERVAR) Description: Returns the Exponential of selected number. Input: NUMBERVAR: number, integer variable, real variable. Output: Real value. Example: • Exp(0) = 1.0 • Exp(12.34) = 228861.95206 Start Conditions All tasks whether StepBased or TimeBased have start conditions that allow you to control when the Task is executed automatically. These start conditions are written out in the form of an Evaluation Expression. When the evaluation returns the answer “true” the task will be executed. The expression acts as a trigger. Start Conditions can only function with Evaluation Expressions. Should you use an Assignment Expression, the effect would be null and the Task Trigger will not be activated. Setting the Start Condition of a task By default, there is no start condition for a task when it is created. In that case, the Task can only be started manually via the Flash Controls or a Start Task command in another task. However a task can also be started automatically by specifying a start condition for this task. To create a start condition, just click on the “magic wand” in the Task Properties 130 AUTOMATION PROGRAMMING Expressions for the condition property. This will open the “Edit Expression” window, for you to write out the evaluation expression. A classic expression used to start a Task is: (Button_StartShow_1.Status==1) & (Button_StartShow_1.Status#) This expression is divided in two parts that must be evaluated to true to make the entire expression true. The first part compares the variable But_StartShow_1.Status to 1 whereas the second part tests if But_StartShow_1.Status has changed (since the last evaluation). AUTOMATION PROGRAMMING 131 132 AUTOMATION PROGRAMMING StepBased Tasks StepBased Tasks StepBased tasks are composed of a succession of command lines which are executed consecutively. StepBased tasks are real “sub programs” capable of performing from simple to complex logical operations. Creating a StepBased task To create a StepBased task, the procedure is the same as the creation of TimeBased Tasks. Select the “Object/Task/New Task...” menu item or Select the Tasks item in the Object Browser and use the right mouse click to open the contextual menu. The Create Task dialog box will be displayed: Select the “Step B.” type. You can create variables that will reflect various properties of the task by checking the Create task variables box. Manager will automatically open the new task in a Task Edit tab. The StepBased tasks editor view is similar to the list view of TimeBased tasks but without any time reference. The cues will be played in the order they are placed in the task. AUTOMATION PROGRAMMING 133 Creating Cues Creating cues in StepBased Tasks is identical to creating them in TimeBased tasks. Method A 1. Select a command in the Lister tab. 2. «Drag and Drop» this command where you want to insert the cue in the Tasks. Method B 1. Right click inside the Task Editor Tab and select “Insert Cue”. 2. Then browse to the desired device command and select it. Selecting Cues There’s often the need to select cues before using cue related commands, that’s why the Task Editor provides a variety of ways to select cues. Selected cues are highlighted with a red line. To select cues: • Click on the cue to select one cue. • Press the Ctrl key and click on another cue to add it to the selection. • Press the Shift key and click on a cue to add of the cues which are between the last selected cue and this cue. 134 AUTOMATION PROGRAMMING StepBased Tasks • Type Ctrl+A to select all of the cue of the task. • Drag the mouse over the cues you want to select. To deselect cues: • Click on an empty part of the task editor to deselect all of the cues • Press the Ctrl key and click on a selected cue to remove it from the selection. • Type Esc to deselect all of the cues. The “Cue Selection” menus This menus allows more sophisticated types of cue selection. Managing Cues Cut/Paste and Delete Cut and paste commands are supported with the familiar keyboard shortcuts: • Type the Del key to delete the selected cues. • Type Ctrl+C to copy the selected cues. • Type Ctrl+X to cut the selected cues. • Type Ctrl+V to paste cues to the current position of the timeline. Moving Cues There are several handy keyboard shortcuts to precisely move selected cues: • Hold the Alt key down and use arrow keys to move the selected cues up or down. AUTOMATION PROGRAMMING 135 The «Cue Management» menu The Task Editor also provides various commands in the “Cue Management” submenu to automatically change relationships between cues. Cue Disable/Enable • Disable / Enable cues: Cues are not executed during Task execution. To disable a selected cue: • Type Shift+S. • If Flash Control feature is activated, click on the Enable/Disable Flash Control Button. • Choose the «Cues Management/Disable Cues» menu item. To enable a selected cue: • Type Shift+N. • If Flash Control feature is activated, click on the Enable/Disable Flash Control Button. • Choose the «Cues Management/Enable Cues» menu item. Grouping Cues Cues may also be grouped. Once a group of cues is created, clicking on any cue of the group selects all of the members of the group. This is particularly handy to make sure that the relationship between cues of a group is not modified by mistake while dragging cues. • To group cues: select the cues to be grouped and either choose the Edit/ Group menu item or type Ctrl+G. • To ungroup a group of cues: click on one cue of the group to select the whole group and either choose the Edit/Ungroup menu item or type Ctrl+U. 136 AUTOMATION PROGRAMMING StepBased Tasks Blind Mode Blind mode allows you to run your task without having any of the cues fired. Lock Task The Lock Task prohibits the task to be launched automatically when the start condition becomes true or when a Start Task command is sent. The task may still be fired by using the play buttons in the Task Control Panel and Task Edition Tab, or with the Flash Controls. Manager Commands in StepBased Tasks Manager itself is viewed as a device and can receive commands as regular devices do. These commands control the tasks, change device settings or control user interfaces. UserScreen Commands Open UserScreen From a user's point of view, the constituent parts of a program may be several “UserScreens”. The appearance of these screens, linked to the user's request (choice, various consultations), the requirements of the creator (organization of a game, of a dispatching, etc.), or practical necessities (information, warnings, etc.), is controlled by the “Open UserScreen” command. Parameters: UserScreen Name: [Type: String]: name of UserScreen to be opened. Position: [Type: Enum]: Position mode. Available values: •“Default”: Uses default UserScreen position, does not take care of Left and Top parameters. •“Absolute”: UserScreen position is given by Left and Top parameter. Left: [Type: Integer]: Left position of UserScreen. Top: [Type: Integer]: Top position of UserScreen. There is no limit to the number of screens that can be opened simultaneously, except for the screen surface and thus the legibility of all of the displayed elements required by the user. Close UserScreen The opposite of the previous action; the closing of a “UserScreen” is carried out by the “Close UserScreen” command. Parameters: UserScreen Name: [Type: String]: name of UserScreen to be closed. Goto Page You can display several “UserScreens” simultaneously, but only one out of the 999 pages that a given “UserScreen” can contain. The Goto Page command is AUTOMATION PROGRAMMING 137 used to select the desired page. This choice may be selected by the user or be provided by the programming. Parameters: UserScreen Name: [Type: String]: name of UserScreen to goto page to. Page: [Type: Integer]: Page number to goto. List Control This command generates all of the actions necessary to the management of a list, for example: display, update, select/deselect, delete. This command is only available in StepBased task Parameters: List Name: [Type: String]: Name of list object in the UserScreen. Action: [Type: Enum]: Control to apply the list. Available values: •“Insert”: Add one new item to the list. •“Delete”: Delete one item from the list. •“Get Item”: Retrieve the text content of one item. •“Set Item”: Replace the text content of one item. Index: [Type: Integer]: Item index on which the action is made. Text: [Type: String]: is a bidirectional parameter, according to the action. Either is the text value you give to the item, or the result from the get Item action. 2 Note: If you want to add one new item to the top of the list, the index parameter must be “0”. If you want to add one new item to the bottom of the list, the index parameter must be set to “-1”. This is available if the “Sorted” property of the list object is not selected. Object Text Control This command enables to set or retrieve dynamically the text of all dynamic graphic objects. This command is only available in StepBased task. Parameters: Object Name: [Type: String]: Name of object in the UserScreen. Action: [Type: Enum]: Action to perform. Available values: •“Get”: Get back the value of the text property of the given object into the given variable. •“Set”: Change the text property of the given object. Property: [Type: Enum]: Type of text property. Available values: •“Text”: Sets both On and Off text properties. •“Text Off”: Sets the Off text property. 138 AUTOMATION PROGRAMMING StepBased Tasks •“Text On”: Sets the On text property. Value: [Type: String]: is a bidirectional parameter, according to the action. Either is the text value you give to the object, or the result from the get action. Task Commands Start Task The execution of a task may be conditioned by the state of an object, a condition which appears in the Task Inspector Tab window. But a task may also launch another task, via the “Start Task” command. When programming the “Start Task” command, you will define the task name to be launched. Parameters: Task Name: [Type: String]: Name of task to start. Pause Task A task may be suspended momentarily and then continued again from where it was paused. To restart a task use the “Start Task” command. Parameters: Task Name: [Type: String]: Name of task to pause. Stop Task This command serves not only to stop a task, but to take it back to the start (its line 1), so that the next “Start Task” command will make it restart from the beginning. Parameter: Mode: [Type: Enum]: Available values: •“Specified Task”: Stops the task specified in the Task Name property. •“All Tasks (Inclusive)”: Stops all tasks including the active task handling the Stop Task command. •“All Tasks (Exclusive)”: Stops all tasks excluding the active task handling the Stop Task command. Task Name: [Type: String]: Name of task to abort. Sync Task Launches a TimeBased task by attributing a time-reference Variable to it (reference Timecode). This time can be taken from any point on the “Timeline”. This command may be used where the clock of the “Timeline” concerned is already in execution. Parameters: Task Name: [Type: String]: Name of task to synchronize. Sync Mode: [Type: Enum]: Synchronization mode. Available values: AUTOMATION PROGRAMMING 139 •“Internal”: The given task is internally synchronized. •“External”: The given task is synchronized to the variable “Time Variable”. Time Variable: [Type: Time]: Time Variable used for synchronization reference. Lock Task A task may be protected to be started using this command (Locked). This protection could be removed also using this command (Unlocked). Parameters: Task Name: [Type: String]: Name of task to lock/unlock. Lock Mode: [Type: Enum]: Available values: •“Unlocked”: The given task is unlocked. •“Locked”: The given task is locked. Goto Label A “cue” is identified by a number (StepBased task) or a time (TimeBased task). But a “Label” may be added to it. The advantage of a “Label” is that it is associated with the “cue” and thus cannot be changed as a “cue” n° can do in the event of an insertion, or as the time can shift in the event of a time-lag. The purpose of the “Goto Label” command is to reach the cue associated with the Label and to launch the execution of the task from this Label. The same Label may be used in several different tasks. Parameters: Task Name: [Type: String]: Name of task to goto label. Label: [Type: String]: Label to goto in task. Goto Time This command is exclusive to the TimeBased tasks and enables you to reach a given time in a TimeBased task and then to launch its execution starting at this time. Parameters: Task Name: [Type: String]: Name of task to goto time. Time: [Type: Time]: Time to goto in task. Goto Line This enables you to access a “cue” index in a task and to launch the execution from this “cue”. To programme this command, you have to set the name of the task and the line number of the “cue” in the task. This command is only available in StepBased task Parameters: Task Name: [Type: String]: Name of task to goto line number. Line: [Type: Integer]: Line to goto in task. 140 AUTOMATION PROGRAMMING StepBased Tasks Call Task Cause the calling task to be suspended while the given task is running. This command is only available in StepBased task Parameters: Task Name: [Type: String]: Name of task to call. It is important to understand the difference between “Call Task” and “Start Task”. “Call Task” is a command in a given task (A) which launches the execution of another given task (B) but that interrupts the running of task A while the task B is in execution. Call Task TaskA TaskB Call Task B End of Task B Task A Restart Pause Task A Start Task TaskA TaskB Start Task B End of Task B Show Task Open or close a Task Editor with the given task inside. Parameters: Task Name: [Type: String]: Name of task to show/hide. Status: [Type: Enum]: Show or hide. Available values: •“Show”: The Task Editor is opened. •“Hide”: The Task Editor is closed. Left: [Type: Integer]: Left position of Task Editor. Top: [Type: Integer]: Top position of Task Editor. Width: [Type: Integer]: Top position of Task Editor. Height: [Type: Integer]: Top position of Task Editor. 2 Note: When Task Name parameter is empty, command is applied to the active task itself. Expression This provides the normal functions of computer programming, with its Boolean operators. The writing of expressions is accelerated by the provision of dialogue boxes and drop-down menus, reducing direct writing of code to a minimum. AUTOMATION PROGRAMMING 141 Parameters: Expression: [Type: Private]: Click on Magic wand button to open Expression Edit window (more details in “Expressions” page 117). Logical Cues These commands are only available in StepBased task Wait Enables you to introduce a delay time between two command lines, from 1/100 second to 99 hours, 59 minutes, 59 seconds and 99 hundredths of a second. Parameters: Time: [Type: Time]: Duration of wait cue. While/EndWhile This function enables you to create a loop: as long as the specified condition is fulfilled, then the “cues” between the “While” cue and the “EndWhile” cue will be executed. This loop stops when this condition is no longer fulfilled. Parameters: Expression: [Type: Private]: Expression to be evaluated during the while condition. Click on Magic wand button to open Expression Edit window (more details in Expression chapter). If/Else/Endif This Cue triggers a command only if the required condition is confirmed. Otherwise, another command may be activated. The “Else” function is 142 AUTOMATION PROGRAMMING StepBased Tasks automatically created but can be deleted or ignored if unnecessary. Parameters: Expression: [Type: Private]: Expression to be evaluated during the while condition. Click on Magic wand button to open Expression Edit window (more details in Expression chapter). Wait For This function enables to wait for an expression (e.g. waiting for a device status) to be true, with a time-out and a label where to goto in case of time-out. Parameters: Expression: [Type: Private]: Expression to be evaluated during the while condition. Click on Magic wand button to open Expression Edit window (more details in Expression chapter). Time-out: [Type: Time]: If the condition is not satisfied within this delay, the task jump to the given label. On time-out goto label: [Type: String]: Label to goto when time-out occurred. If no label is specified, the task will execute the next cue in the task. AUTOMATION PROGRAMMING 143 OnExpression/Case This command block evaluates the given “Case” expressions until it reaches an expression which is true or reach the end of block “EndOnExpression”. Once a true case has been reached, the process exits the “OnExpression/case”. Parameters for each Case statement: Expression: [Type: Private]: Expression to be evaluated during the while condition. Click on Magic wand button to open Expression Edit window (more details in Expression chapter). 144 AUTOMATION PROGRAMMING StepBased Tasks System Commands Device Control This command is used to change the behavior or to control a device. With this command, you change the Device behavior and open Control Panel. If the Device Activity is disabled, no commands generated by Manager are sent to the real world device. Positrack can be disabled for a specific device so that no repositioning command is sent when a jump is made in a timeline. Device Control Panels can be opened or set to a container in a UserScreen. Parameters: Device Name: [Type: String]: Name of device to control. Control Type: [Type: Enum]: Type of control to apply to the device. Available values: •“Activity”: enables or disables device activity. •“Positrack”: enables or disables device positrack mechanism. •“Control Panel”: shows or hides the device Control Panel. •“Display”: shows or hides the device display (e.g. the video window of the Local Media Player MxM). Control Status: [Type: Enum]: Status of command. Available values: •“Enable”: The control type is enabled. •“Disable”: The control type is disabled. Container Name: [Type: String]: Name of container in the UserScreen into which the Control Panel will be opened. Left: [Type: Integer]: Left position of Control Panel if no Container is specified. Top: [Type: Integer]: Top position of Control Panel if no Container is specified. Width: [Type: Integer]: Width of Control Panel if no Container is specified and Control Panel is resizable. AUTOMATION PROGRAMMING 145 Height: [Type: Integer]: Height of Control Panel if no Container is specified and Control Panel is resizable Load New Data File When persistent Variables are created, a file saving their values is created (.mvs5). This command can be used to create user profiles, for example, according to certain criteria (centres of interest, access rights, etc.). The “Load New Data File” command enables you to change this storage file, updating the Variables concerned, adapting them to a user or reopening a query aborted some time before. This command is only available in StepBased task Parameters: File Name: [Type: String]: Path name of Persistent variable file. Sound Beep This command opens a window inviting you to set the parameters (frequency and duration) of the Sound Beep, in increments of 1/100 second. Parameters: Frequency: [Type: Integer]: Sound frequency from 20Hz to 20KHz. Duration: [Type: Integer]: Sound Duration in 1/100s. Wait: [Type: Enum]: This parameter has no effect in TimeBased task. Available values: •“Yes”: Current task is paused during sound duration. •“No”: Current task is not paused during sound duration. Mouse Control This command enables to change the mouse cursor and mouse position. This command is only available in StepBased task Parameters: UserScreen Name: [Type: String]: UserScreen Name concerned by the command. If this value is empty, the whole screen is concerned. Cursor: [Type: Enum]: Type of cursor to set. Available values: •“Default”: Default Windows cursor. •“None”: Cursor is invisible. •“Arrow” •“Cross” •“Arrow” •“I Beam” •“Size NESW”: Size arrow, North-East-South-West. •“Size NS”: Size arrow, North-South. 146 AUTOMATION PROGRAMMING StepBased Tasks •“Size NWSE”: Size arrow, North-West-South-East. •“Size WE”: Size arrow, West-East. •“Up Arrow” •“Hour Glass”: Wait cursor. •“Drag” •“No Drop” •“H Split” •“V Split” •“Multi Drag” •“SQL Wait” •“No”: No cursor. •“App Start” •“Help” •“Hand Point” •“Size All” •“User (File)”: The cursor is in a file, file name is indicated in field Cursor File. X Position: [Type: Integer]: Horizontal position for the cursor. -1 means no change for this position. Y Position: [Type: Integer]: Vertical position for the cursor. -1 means no change for this position. Quit Manager This command allows you to quit Manager and also quit Windows, Power Off or Reboot your machine. Remember to save any work before testing this command. This command is only available in StepBased task. Parameters: Shutdown PC: [Type: Enum]: Quit mode. Available values: •“No”: Only Manager quits. •“Shutdown”: Windows is asked to shutdown. •“Reboot”: Windows is asked to reboot. •“Power Off”: Windows is asked to shutdown and power off the PC. •“Log Off”: Windows is asked to log out of the windows session. 2 Note: This command is only executed in RUN mode. AUTOMATION PROGRAMMING 147 Flash Control The “Flash Controls” give the capability of controlling the cues in a task regardless of the current position or status. Execute Cue Button Cue executed With Flash Control Enable/Disable Cue Button Disabled Cue The Flash Button on the left of each Command Cue allows to execute the cue. The Round button allows to disable (Red) or enable (Green) the cue. Cue «Message» do not have Flash Control. The Cue Library The Cue Library is a convenient way to store cues which are often used. Cues can be easily added to the library and retrieved from the library by typing keyboard shortcuts. See details in The Cue Library/The Cue Library (New in V5) chapter page 161 Pause Points Pause Points allow to debug complicated tasks. This function is not available in Run Mode. See details in Advanced Options/Pause Point chapter page 190 148 AUTOMATION PROGRAMMING StepBased Tasks Tasks in a Project All tasks created in a project are listed in the Browser Tab. Status LED Flash Controls Start / Stop Select the Tasks node to display all tasks in the Lister. The status of each task is displayed by a LED (Off = Stopped, Yellow = Paused, Blue = Running) Flash controls are available in the Lister tab to start or stop a task. Expand the Tasks node in the Browser tab to see all tasks. Task Properties Expand the Tasks node in the Browser tab to see all tasks. Select a task in the Browser or in the Lister, its properties are displayed in the Object Properties tab: • Name: You can rename the task, don’t forget to validate your changes with the Enter key. • Description: Description of this task • User Mode Rights: defines if this task is visible or editable in User Mode • Comment: You can add a comment about this task • Condition: Condition to start the task. AUTOMATION PROGRAMMING 149 Task Variables Select a task and expand it in the Browser tab to display the list of variables or the tracks in the Lister tab. Task Management Once you have created your task, you may access the task management menu by right clicking on the desired task in the Object tab or in the Lister tab. The contextual menu will appear giving you access to the management options. • New Task: Allows you to create a new task. • Duplicate Task: Duplicates the selected task and name the duplicate with a numerical incremental value. • Edit Task: Opens the task editor in the Task tab or switch to the selected tasks editor if it is already open. • Setup Task: Opens the selected tasks setup window. • Delete Task: Deletes the selected task from the project after prompting confirmation. • New Task Editor: Opens a new Task Tab. When this Tab is open, selecting the Edit Task option will open the Task Editor of the selected task in this Tab. • Show Task Variable(s): Displays variables of the selected Task in the Lister. 150 AUTOMATION PROGRAMMING StepBased Tasks Task Setup Clicking on the Task Setup button or right clicking on the task in the browser and selecting the “Setup Task...” option, opens a Task Setup dialog for the currently selected task. Use Task Variables If this option is checked, task variables are created. Restart if start condition changes to true during execution If this option is checked, a task is restarted when it reaches the end if its start condition changes to true while the task is running.This is useful to guarantee that a variable change which causes the condition to become true is correctly taken into account inside the task. AUTOMATION PROGRAMMING 151 152 AUTOMATION PROGRAMMING ADVANCED PROGRAMMING This section will teach you how to get the most of your Medialon Manager software using programming wizards, network interconnection, imports and exports of sub programs etc. Your ultimate lesson to become an expert in show control and maximize your efficiency. ADVANCED PROGRAMMING 153 154 ADVANCED PROGRAMMING Task Creation Wizards Task Creation Wizards Dynamic Objects are capable of being linked to tasks in order to send commands, process information or display monitored variables available in Manager V5. In order to create these tasks, Manager V5 uses a powerful wizard that allows you to create these tasks without any writing or programming. There are several wizards at your disposal each one designed for specific situations. Graphical Object Wizards Right clicking on a Dynamic Graphical Object will open a specific contextual menu that allows you to create a task related to that object. Create a task started by this object Allows you to create either a StepBased or TimeBased Task related to the status change of the object. The task that is created is automatically named with the name of the object and the action that it performs to trigger the task [objectname+action]. For instance a task created from a button called “PLAY” will take the name “PLAYClick”. The start condition of the created task will be updated by an evaluation expression that monitors the state of the object trigger variable. These start condition are case sensitive, and are different depending on the type of object that is to trigger the task. For instance, a button called “PLAY” will create a task with the following start condition: PLAY.Status# & PLAY.Status==1 But a slider will create a different start condition: SLIDER.Status# If a task is already linked to this object, the contextual menu will not offer the possibility to create a task started by the object, but will allow you to edit the task that is started. This function allows you to have very quick access to the tasks and edit them without having to browse for them. Add start condition to selected task If a task is selected in the Lister, the contextual menu will allow you to update the start condition of the selected task by the selected object. The task will not be modified or renamed, only the start condition will be updated. ADVANCED PROGRAMMING 155 when a start condition already exists for the selected task, Manager will ask you to replace this start condition or to add it. In that case the new start condition will be: (Old Condition) | (New Condition) Create a task to monitor a variable with this object Dynamic object can monitor variables and update their status automatically. When you create a task to monitor a variable, the object will reflect the variables status. The task will be StepBased and will have a start condition as follows: [Selected Variable]# Furthermore, an assignment expression cue will be inserted into the task with the following operation: [Objectname.status]=[selected Variable] The object has to be able to take the value of the variable. For this reason the Variable Selection Window will only allow you to select a compatible variable to monitor. For instance a button cannot monitor a String variable since the button’s status variable is an integer. Create a task to perform a device command from this object This options is very simple but very useful and very time saving. It allows you to create a StepBased task, with the correct start condition, that inserts the device command cue you will have selected. All the devices available in the project will be listed, simply browse through the list until you reach the desired one. If the command has parameters that need to be entered you will have to do so in order to send a valid command when the task is triggered. 156 ADVANCED PROGRAMMING Task Creation Wizards Variable Wizards When a variable is selected in the Lister tab, right clicking on the variable will open a contextual menu allowing you to create a task started by variable change. The task will be created with the start condition’s evaluation expression as follows: [Selected Variable]# But the task will not be linked to any graphical object nor will it have any cues automatically inserted. You will have to edit the task to your needs. ADVANCED PROGRAMMING 157 Drag and Drop Wizards This feature of Medialon Manager V5 is very similar to the contextual task creation menus of graphical objects and variables, but are by far much more time saving and useful when programming your project. Dragging Device Commands onto Graphical Objects To create a task started by a graphical object by Drag and Drop that will send a device command, simply select the desired command in the devices Command Lister, and drag it onto the desired graphical object. The task will be created with the correct start condition and the device command cue will be inserted into the task. This function will only create StepBased task, should you need to create a TimeBased task, you will have to create the task “manually”. Dragging Devices on Container Objects (New in V5) To open a Device Control Panel inside a Container, select a Device in the object browser or lister and drag and drop it onto a Container. This function is identical to create a task with a Manager Device Control Cue. For instance, you wish insert a Doremi Control Panel in your UserScreen. 158 ADVANCED PROGRAMMING Task Creation Wizards This function is also available for Device Display command, in this example, you will open Local Media Player Display inside a container. Dragging Variables onto Graphical Objects Similarly to creating device commands, you may drag a variable onto an object to monitor the variable with it. This function is identical to the “create a task to monitor a variable with this object”, but much easier to create. For instance, you wish to create a display that will show the current time of the system. Create your display and edit it, then just drag the ManagerCurrentTime variable onto it and you are good to go. As soon as you enter Debug or Run mode, the display will be showing you the current time. ADVANCED PROGRAMMING 159 Dragging Task onto Graphical Objects To start a task with a graphical object, you could also drag a task onto the object. This function is similar to "Add Start Condition to selected Task". For instance, you wish to start your TimeBased task with a button called "Start". Select "Task_1" in the Lister and drag it onto «Start» button. The start condition of Task_1 becomes: START.Status# & START.Status==1 Dragging Task onto Task To start a task from another task, you could also drag a task onto the task. It generates a StartTask Cue command. For instance, select Task_2 in the Lister and drag it onto Task_1, a new cue (Start Task(Task_2)) is inserted. Dragging Variable onto Task Select a variable in the Lister and drag it onto a Task, a new expression cue is inserted (selected_variable = ""). Dragging Cue onto Task You can use drag and drop to move a cue into a task. If you hold Ctrl key when you drop the cue, you copy it instead of moving it. 160 ADVANCED PROGRAMMING The Cue Library The Cue Library (New in V5) The Cue Library During your programming process, some cues will be used several times within the same project. Medialon Manager V5 offers a Cue Library where cues can be stored. Cues can be easily added to the library and retrieved by typing keyboard shortcuts or dragged and dropped. The Cue Library is saved in the project file so its content will remain when the project is reloaded. Adding Cues to the Cue Library From a Task Select a cue and type Shift+A. The cue is added to the cue library. Alternatively the «Cue Library/Add Selected Cues» menu item from the Cue contextual menu can be used. 2 Note: Structured Logical Cues (If/Else/EndIf, While/EndWhile and OnExpression...) cannot be added in the Cue Library. ADVANCED PROGRAMMING 161 From The Device Command List You can add a Device Command directly to the Cue Library to prepare your library before task creation. You can for instance prepare a lighting memory with a DMX Send Cue command and "store" it in the Cue Library. 1. Select a Device in the Object Browser. 2. Select a command in the Object Lister. 3. Drag’n Drop it into the Cue Library. Inserting Cues from the Cue Library Inserting cues into a task from the Cue Library is very easy. Method A 1. Select the Cue Library in the Browser tab to display the cues in the Lister tab. 2. Select a cue in the Lister tab. 3. «Drag and Drop» this cue where you want to insert the cue in the Task. 162 ADVANCED PROGRAMMING The Cue Library Method B Type Shift+I to display the Cue Library window and then click on the cue you want to insert: the cue is added to the currently edited task. Alternatively the «Insert Cue / Cue Library» menu item from the Cue context menu can be used. Deleting Cues from Library To delete a cue from the Cue Library, select it and use right click menu. 2 Note that multi selection is available if you need to delete several cues. ADVANCED PROGRAMMING 163 164 ADVANCED PROGRAMMING User Groups User Groups You may want to setup the structure of your project in separate parts like Show Timeline, Device remote, Treatment process, etc. With the User Groups, you can create groups and sub-groups of objects of the same class (Devices, Variables, Tasksor UserScreens), this allows you to regroup information that is important for your program. By default Medialon Manager V5 creates a first User Group with all variables of the project. User Groups are also used to share objects with other Manager Projects. User Group Creation Select User Groups node and right click to create a new User Group. ADVANCED PROGRAMMING 165 The name of this new group can be modified in the Properties tab. User Mode Rights defines if this User group is visible in User Mode. Sub Group Creation User Group can only contains one type of object. If you need to group several types of objects, you can create sub groups, one by type of object. 1. Select or create an empty User Group in the Browser. 2. Right click to create a new group. 3. Rename it if needed. 166 ADVANCED PROGRAMMING User Groups Adding Object to User Groups A User Group can contain only one type of object. The first object added to a User Group defines the type of the User Group. For example: to create a User Group with variables. Select some variables and drag and drop them into the User Group. Then the User Group gives a filtered Object Lister. Another example with tasks. ADVANCED PROGRAMMING 167 Share Objects (New in V5) If you wish to exchange information and commands with other Medialon Manager V5 Project, activate the Shared option Networked variables are no longer a property of Variable object as it used to be in previous versions of Manager. Shared groups are now used by Manager V5 to publish variables, tasks, UserScreens. In the case of Manager On Network Device only tasks and UserScreens contained in a shared group will be available for commands. 168 ADVANCED PROGRAMMING User Mode User Mode (New in V5) Manager V5 User Mode allows the programmer to decide what will be accessible to the user (which task, which devices, which commands for a device etc...). The User Mode works like the Debug Mode with selected objects. User Mode is only accessible from Stop Mode by typing the Ctrl+F2 key or clicking on the User Mode Project button. User Mode Rights User Mode Rights property defines the behavior of objects when Medialon Manager V5 is in User Mode. In User Mode, an object with no rights, will not be listed in the Browser. So the user cannot select or monitor it. All commands sent to this object will be executed like in Run Mode. Objects with View rights are listed in the Browser; the user can select or monitor them. An object with View rights can be used in tasks if the task has Edit rights. See below, User Mode Rights and Objects interactions. Rights Device None Device is not visible in the browser. Cues (in tasks) can’t be edited. Device is visible in the browser. Cues (in tasks) can be edited. Task is not visible in the browser. Task is visible in the browser. Task can be opened in a Task Editor (read only)*. Task Control Panel can be opened. UserScreen is not visible in the browser. UserScreen is visible in the browser. Variable is not visible in the browser. Variable is visible in the browser. Task UserScreen Variables View ADVANCED PROGRAMMING Edit Task is visible in the browser. Task can be opened in a Task Editor like in Debug Mode. 169 View Rights None Cue Library Cue Library is not visible in the browser. Cue Library is visible in the browser. User Group User Group is not visible in the browser. User Group is visible in the browser. * Option available in Tasks Preferences page 199. 170 ADVANCED PROGRAMMING Edit User Mode Task Editor in User Mode When you open a Task with Edit user rights in User Mode, Cues edition is possible when the object had View user rights. ADVANCED PROGRAMMING 171 If the Device rights is none, all its cues are locked (Orange writing). You are not allowed to change, move or delete the cues. If Device rights are set to View, cues can be modified like you can do it in Debug Mode. 172 ADVANCED PROGRAMMING Networking Networking When Medialon Manager V5 is connected to a network, it acts as a server and shares Manager objects with external clients. OpenCap (New in V5). Medialon Manager V5 integrates a new architecture called OpenCap to share Manager objects such as Tasks, Variables, UserScreens, Devices Commands, etc. with external clients. Those clients are currently a Manager Over the Network (MON Device) or another application. Medialon Manager V5 User Groups Shared Tasks UserScreens Cues Published External application OpenCap Command Command Execute (from CUE Library) Variables Modify MON already had this capability, but with OpenCap it has been enhanced. Manager V5 shares Tasks, UserScreens and Variables, like a server (Slave). Another Medialon Manager V5, seen as a client (Master), is able to detect shared objects. Shared Variables are handled by both Manager stations. The Master can send commands across the network to shared Tasks or UserScreens. Medialon Manager V5 Slave Medialon Manager V5 Master User Groups Shared Tasks Command Tasks UserScreens Command Published Variables Modify ADVANCED PROGRAMMING MON Device Variables 173 External applications can now have access to Medialon Manager V5 objects. Medialon Scheduler is one of these. This application is able to discover Medialon Manager Tasks, Variables and Cues from the Library. It schedules Manager V5 actions, where a task can be started, a variable can be changed or a cue can be executed. Medialon Manager V5 User Groups Shared Published Tasks Command Cues Execute Medialon Scheduler Events (from Cue Library) Set Value Variables Modify Event’s Variables OpenCap is also available as an API offering powerful interoperability tool to communicate with third party software or develop add on modules in C++ or C#. 174 ADVANCED PROGRAMMING Networking Manager on Network Device A “Manager on Network” must be created in the “Device” menu, so that a Medialon Manager V5 station may benefit from the servers services. This station then acts as Master of the slave station, benefiting from the Variables shared by the server station and may respond to internal commands of this station. Creating a device 1. Select in the menu bar Object/Device/New Device: this opens the Create Device dialog window OR select the Devices item in the Object Browser and use the right mouse click to open the contextual menu.You may also right click in the device map to access the device creation menu. 2. Give a name to the Device. 3. In Device Setup dialog box. Name/IP Addr: Specifies the computer name or the IP address of the targeted Manager to be Slaved. A wizard can scan the network and find all Medialon Manager V5 present. IP Mask (Optional): Specifies, if the Slave in on a different sub network, an IP Mask to reach the Slave. IP Port: Defines the IP port used by the Medialon Manager V5 Slave Station(s) to listen to the connections of the Manager on Network Device. Default IP port is 9255. Group: Select a Group of objects (Task, Variables, UserScreens) shared by the Slave Manager. Use the wizard to get the list of available groups. Login/Password: Manager On Network connection can be protected by a login. Enter, if needed, the login and password required by the selected Slave. Auto re-connection: The Manager on Network Device will automatically attempt to reconnect to the Slaved Manager if the connection is lost. Deconnection on timeout: Specifies the deconnection time if no response is received from the Slaved Manager. ADVANCED PROGRAMMING 175 Use Network Detection: Enables network detection of Medialon Manager V5 host. It prevents "anti hacker" security policy before Medialon Manager V5 initiates its connection with the Slave. 4. Once you have finished configuring the device, click “OK”. The new device will be created and will appear in the Browser tab and Device Map tab. 2 Networked objects are not available like it used to be in previous version of Medialon Manager. How select objects shared with Manager On Network device is described in User Groups/Share Objects (New in V5) chapter page 168 Device Commands Medialon Manager can send commands to Manager On Network Device. 176 ADVANCED PROGRAMMING Networking These commands can only be performed for shared Tasks and UserScreens. Use the wizard to select available object in the cue properties. Load Project A command "Load Project" allows to load another Medialon Manager V5 project in the slave. You could choose (Autorun, Run, User...) Parameters: Project Name: [Type: String]: pathname of the project to be opened. Run mode: [Type: Enum]: Select in witch mode the project starts. Available values: •“Project Autorun”: Uses project autorun preferences. •"Stop" •"Debug" •"User" •"Run" 2 Note that new loaded project must use the same shared group. If not, Medialon Manager V5 will not be allowed to access to variables, tasks... Open UserScreen This command allows the Master to open a UserScreen in the Slave station. Parameters: UserScreen Name: [Type: String]: name of UserScreen to be opened. Use the wizzard to select available UserScreen. Position: [Type: Enum]: Position mode. Available values: •“Default”: Uses default UserScreen position, does not take care of Left and Top parameters. •“Absolute”: UserScreen position is given by Left and Top parameter. Left: [Type: Integer]: Left position of UserScreen. Top: [Type: Integer]: Top position of UserScreen. Close UserScreen The opposite of the previous action; close a UserScreen in the Slave station. Parameters: UserScreen Name: [Type: String]: name of UserScreen to be closed. Use the wizzard to select available UserScreen. Goto Page: Switch to the desired page of the UserScreen. Parameters: UserScreen Name: [Type: String]: name of UserScreen to goto page to. Use the wizzard to select available UserScreen. Page: [Type: Integer]: Page number to goto. Start Task Launch a task in the Slave station. ADVANCED PROGRAMMING 177 Parameters: Task Name: [Type: String]: Name of task to start. Use the wizzard to select available Task. Pause Task: A task may be suspended momentarily and then continued again from where it was paused. To restart a task use the “Start Task” command. Parameters: Task Name: [Type: String]: Name of task to pause. Use the wizzard to select available Task. Stop Task This command serves not only to stop a task, but to take it back to the start, so that the next “Start Task” command will make it restart from the beginning. Parameter: Mode: [Type: Enum]: Available values: •“Specified Task”: Stops the task specified in the Task Name property. •“All Tasks (Inclusive)”: Stops all tasks including the active task handling the Stop Task command. •“All Tasks (Exclusive)”: Stops all tasks excluding the active task handling the Stop Task command. Task Name: [Type: String]: Name of task to stop. Use the wizzard to select available Task. Goto Label A “cue” is identified by a number (StepBased task) or a time (TimeBased task). But a “Label” may be added to it. The advantage of a “Label” is that it is associated with the “cue” and thus cannot be changed as a “cue” index can do in the event of an insertion, or as the time can shift in the event of a time-lag. The purpose of the “Goto Label” command is to reach the cue associated with the Label and to launch the execution of the task from this Label. The same Label may be used in several different tasks. Parameters: Task Name: [Type: String]: Name of task to goto label. Use the wizzard to select available Task. Label: [Type: String]: Label to goto in task. Goto Time This command is exclusive to the TimeBased tasks and enables you to reach a given time in a TimeBased task and then to launch its execution starting at this time. Parameters: Task Name: [Type: String]: Name of task to goto time. Use the wizzard to select available Task. Time: [Type: Time]: Time to goto in task. 178 ADVANCED PROGRAMMING Networking Goto Line This enables you to access a “cue” index in a task and to launch the execution from this “cue”. Parameters: Task Name: [Type: String]: Name of task to goto line number. Use the wizzard to select available Task. Line: [Type: Integer]: Line to goto in task. Show Task Open or close a Task into a Task Editor in the Slave station. Parameters: Task Name: [Type: String]: Name of task to show/hide. Use the wizzard to select available Task. Status: [Type: Enum]: Show or hide. Available values: •“Show”: The Task Editor is opened. •“Hide”: The Task Editor is closed. Left: [Type: Integer]: Left position of Task Editor. Top: [Type: Integer]: Top position of Task Editor. Width: [Type: Integer]: Top position of Task Editor. Height: [Type: Integer]: Top position of Task Editor. Device Variables A Shared Variable will be available to the other Medialon Manager V5 stations that are connected with Manager on Network devices. Variables detection is made when both applications are in Debug Mode. It can be used by any remote station, as a local Variable. The list of variables depends on variables group shared by the other Manager station. Manager_On_Network.Status variable reflects Device connection status: •Not Connected: No Manager On Network found •Connected: Manager On Network connection is established •Network Error: Manager V5 couldn’t find Slave Host •Identifying: Connection is opened, Manager V5 is sending authentification •Connection Denied: Connection is rejected, bad User or Password. ADVANCED PROGRAMMING 179 •Sensing: Manager V5 trying to detect Slave Host •Connecting: Manager V5 trying to open connection. 2 Networked variables are no longer a property of Variable object like it used to be in previous version of Medialon Manager, see User Groups/Share Objects (New in V5) chapter page 168 Network Architectures These configurations serve as examples, other configurations may be setup depending on your needs. Single Slave In a single slave network architecture, one Medialon Manager shares its variables and accepts network Start Task Commands from several Masters on the Network. Slave Master MON Device UserGroup A 180 Master MON Device UserGroup A ADVANCED PROGRAMMING SHARED UserGroup A UserGroup B UserGroup C Master Master MON Device UserGroup B MON Device UserGroup C Networking Multiple Slaves In a Multiple slave network configuration, the Master Medialon Manager acts as the Supervisor. It monitors the slave’s shared variables (read status of shows & devices),and can start local tasks on the Slaves. Slave3 Slave2 Slave1 SHARED UserGroup A SHARED UserGroup M Master SHARED UserGroup F MON Device1 UserGroup A MON Device2 UserGroup M MON Device3 UserGroup F Medialon Manager Panel Medialon Manager Panel is a remote control software for Medialon Manager software. Manager Panel is based on Medialon Manager V5 software and is therefore completely compatible with Manager V5. There are however limitations: • MxMs: Manager Panel does not support MxMs and therefore does not allow you to communicate with any external devices other than Manager on Network devices. • Tasks: Manager Panel can only manage StepBased Tasks, no Timelines are available. A main Medialon Manager show controller station take the control of all devices. This main station can be monitored and remote controlled by one or multiple Medialon Manager Panels programmed as a remote control. ADVANCED PROGRAMMING 181 Network Example The following example demonstrates some of the communication possibilities of Medialon Manager V5. A main Medialon Manager V5 show controller station takes the control of all devices. This main station can be monitored and remotely controlled by another Medialon Manager V5 programmed as a remote control. A third Medialon Manager is used as software digital player. 182 ADVANCED PROGRAMMING The Finder The Finder Medialon Manager V5 integrates a search engine that allows you to quickly find the object you are looking for in your program. You will discover that this tool is very time saving, especially as your project evolves and your program grows bigger and more complex. The Finder Window The Finder can be launched in the Edit menu, by clicking on the Finder icon of Manager V5’s main toolbar, or with Shift+Ctrl+F keyboard shortcut. The Find window will appear. String The String field is where your, partial or whole, search text must be written down to be taken into account for your search. Where You may limit your search to specific areas of your project to avoid unnecessary results. Devices When this option is selected, the search engine will scan the Device Names, until it finds a match. Tasks The Search engine will Scan the Task to find a matching String. If both the Contents and the Containers options are selected, the engine will search both the Task list, for names matching the request String, and the cues inside the tasks with the request String (Cue Comment are not taken into account). UserScreens The search engine will scan the UserScreens and the Dynamic Graphical Objects inside them to find matching Screens or Graphical Objects. ADVANCED PROGRAMMING 183 Variables The User Variables names and values will be scanned by the search engine to find the matching String. Resources The resources will be scanned for a matching String. User Groups The search engine will scan all the variables in user defined User Groups. Options Use Regular Expression This option enables the Regular Expression Syntax Rules for the search query. Examples: ".at" matches any three-character string like hat, cat or bat "[hc]at" matches hat and cat "[^b]at" matches all the matched strings from the regex ".at" except bat "^[hc]at" matches hat and cat but only at the beginning of a line "[hc]at$" matches hat and cat but only at the end of a line If you are not familiar with Regular Expression Syntax, the internet is a good place to start for more information. Whole word only If you choose to perform the query with the Whole Word Only option activated, the search engine will only return the exact matches and will not display partial results Case sensitive When the Case Sensitive option is enabled, only exact matches of Upper and Lower case characters will be returned in the results window. Combined with the Whole Word Only option, only identical results will be returned. Search in contents When the Search engine performs its scan, it has the option to search certain object by its contents. For instance, if you wish to find a Cue inside a task, you must enable this function as well in the selecting “Tasks” in the “Where” menu. The engine will search the “Content” of the Tasks for the desired String. Search in containers Search in containers enables the search to take place in the objects listed in the “where” menu. For instance if you are searching for a Task, you must enable this option to scan the Task Names. 184 ADVANCED PROGRAMMING The Finder The Results Window All the successful results for the search query will be displayed in the Results Window. Right Clicking on the desired object will open a contextual menu allowing to force the browser and lister to display the selected object. You may also choose to create a User Group from the selected result (s). Multiple selection is available using the Ctrl and/or Shift Keys. ADVANCED PROGRAMMING 185 186 ADVANCED PROGRAMMING Advanced Options Advanced Options Cue Multi Devices When you need to send the same command to several devices of same type, you could insert a cue at the same position for each device or insert 1 cue to all device. Method to insert a Cue multi Devices 1. Display all Devices in the Lister. 2. Select the Devices of same type (MxM) you need in the lister. Use Shift and or Ctrl key to add Devices to the selection. 3. Use Right click inside the task editor to insert the command. ADVANCED PROGRAMMING 187 Device Replacement Medialon Manager V5 integrates a useful function that allows you to reassign a cue to a different device, or replace a device by another. Device Cue Reassignment If a device command Cue has been inserted into a task, it can be reassigned to a different device as long as the New device is identical. This allows you to keep your existing cues as they are while sending the command to a different device. To access the Cue Replace Device function you must first select the Device the Cue will be assigned to, either in the Browser tab, the Lister tab or the Device Map. Once the target Device is selected, right click on the desired Cue and go to the “Devices” sub-menu. Select “Replace Device” to perform the reasignment. 188 ADVANCED PROGRAMMING Advanced Options Device Replacement It is also possible to completely replace a Device by another Device, as long as they are identical. All the Device Command Cues and Variables that have been used in the project will be reassigned to the target device. To completely replace a Device by another, right click on the device in the Browser tab, Lister tab or Device Map and select the “Replace By” option. If there is no Device to replace it by, you will not have access to the option. If there is however, only the compatible devices will be shown. Select the target device in the list to perform the replacement. All Task Cues and Variables will be reassigned to the new Device. Device Auto selection When this option is active, each time you select a cue in a task, the device assigned to this cue is selected. So the next Insert Cue you made will use this device. ADVANCED PROGRAMMING 189 Pause Point This function is not available in Run Mode and is handy to debug complicated tasks. When a task is running and reaches a Pause Point, the task pauses just before executing the cue and waits to be started again before resuming from this point. Any existing cue in a task can be set as a Pause Point. Select a cue and type Alt+P (or choose the «Pause Points/Toggle» menu item) to toggle a Pause Point. Choose the «Pause Points/Delete All» menu item to remove all of the Pause Points from the task. 190 ADVANCED PROGRAMMING Project Files Project Files Project Files A Medialon Manager V5 project is saved in a file with the .mpf5 extension (Manager Project File). Each time a new version of a project is saved a file with the same name but with a .mbf5 (Manager Backup File) is created in the same directory. The .mbf5 file is a copy of the previous version of the project. Image Folder If a project uses User Bitmap Images in UserScreens or in the Device Map, the bitmap files are saved in a folder which is located in the same directory. 2 Note that, Medialon Manager V5 only handles the *.BMP format Persistent Variable File The values of all of the persistent variables defined in a project are saved in a file with the same name but with the .mvs5 (Manager Variable Storage) extension. This variable storage file is updated each time a persistent variable changes. 2 A project can be easily moved from one computer to another by a standard file copy operation. Note however that the .mvs5 and the image folder (if any) have to be copied along with the project .mpf5 file to copy the entire project environment. Converting a Project Medialon Manager V5 projects can be converted into document for analysis. • XML document (*.xml) • HTML document (*.html) • Text document (*.txt) All the information of the project will be converted into the selected format, but cannot be re-opened or converted back to a valid Project File (.mpf5). To convert a project, select the “Convert Project...” from the File menu. The “Save Export” dialog box will appear, choose the Name of the converted file. ADVANCED PROGRAMMING 191 Exports/Imports Importing a Project file (.mpf5) Medialon Manager V5 was designed to allow projects to be imported into another one. This allows you to integrate previous projects into your current projects to minimize programing time and avoid repeat programming. In the case of multiple imports, or if you import a project including names already used in the current project, (Devices, Variables, tasks, UserScreens), Manager will rename the elements concerned by adding an incremental number to them. Exporting a task Tasks may be exported to a specific file in order to be imported into another project. Each task you wish to export will be stored in a separate .mef5 file (Manager export file) that cannot be opened by its self, only imported into a project. To export a task, first you must select the desired task in the Browser or the Lister. The select the “Export...” option in the File menu. The “Save Export...” dialog box will appear, for you to choose a name and destination for the export file. Importing a Task file (.mef5) Tasks that have been exported from a project into a .mef5 file can be imported using the “Import” option in the File menu. The import file dialog box will open with the default file filter set to “Manager Export Files” (.mef5). Select the desired export file to be imported and click “Open”. If the name of the imported task is identical to a task in the project is imported into, the “Import Task Conflict” dialog box will appear. You may choose to create a new task with the imported task with a new name. The name will be composed of [imported tasks name]_NEW[#]. Or you may choose to update the existing task by the imported task and keep the same name. This cannot be undone and should only be chosen after having saved the project as a new version. Exported tasks should only be imported in an identical project where the Device’s names and types are identical. 192 ADVANCED PROGRAMMING Project Files Recovering the Previous Versions of a Project When a project file is saved, two files are created or updated. • Manager Project File (.mpf5) • Manager Backup File (.mbf5) “Manager Backup File”, appear following the second backup under the same name, while keeping the previous backup name under the extension “.mbf5”. The Backup File is a copy of the previously saved version of the project. Upgrading Manager V5 & MxMs Manager V5 and MxMs are regularly updated for correction of minor problems or to add functionality and commands. It is therefore very important, especially when starting a project to have the latest version of the MxMs. Manager V5 and MxMs are never updated automatically, even if a internet connection is available. This operation must be performed by the system administrator. To download the new versions of Manager and MxMs, you can access the download pages through the Help menu, “Manager Internet Resources / Manager & MxMs Upgrades” option. This will direct your default browser to the download pages of the www.medialon.com. You will have access to all recent versions of Medialon Manager V5 and to the latest version of Medialon MxMs. The downloaded files will be Zipped .exe files to be launched on the Show Control system to be updated. Unzip the file and double click on the exe file to perform the update. ADVANCED PROGRAMMING 193 194 ADVANCED PROGRAMMING SETTINGS & PREFERENCES This section will present your Medialon Manager software preferences and menus. SETTINGS & PREFERENCES 195 196 SETTINGS & PREFERENCES Preferences Preferences Medialon Manager V5 behavior and the current project behavior can be customized to fit your needs via the Preferences dialog which can be displayed with the File/Preferences menu or with right click on Project node in the Browser. Some preferences need a restart of Manager V5 to take effects. General These settings are about the general Manager V5 behavior and are not specific to the current project. Maximum Instance(s) of Manager Enables you to determine the number of times the Medialon Manager V5 applications can be opened (started) simultaneously on the same machine. Setting this option for 1 “Maximum instance of Manager” allows only one Medialon Manager V5 application to be open at any one time; this will be displayed on the foreground each time that a fresh attempt to open another instance is made. Show Last Instance Enables you to call up the last Medialon Manager V5 application opened, in the event that an attempt to open another Medialon Manager V5 application has been made. Theme Selector (New in V5) Medialon Manager V5 offers several workspace themes to change the look of Manager V5 environment. SETTINGS & PREFERENCES 197 New theme will be used after Medialon Manager has been restarted. Project Defines Medialon Manager V5 current project information. Title This is an information field for the project. Title is displayed in the default loading splash window and in the Import templates menu. Author This is an information field for the project. Subject This is an information field for the project. User defined loading splash bitmap Enables to choose a user bitmap to be displayed in the load splash window instead of the default one. Bitmap can be selected either double-clicking in the image preview field or in the bitmap file name field. This function is only available once the New Project has been created and saved once. 198 SETTINGS & PREFERENCES Preferences Task General Don't ask to switch to Run/Debug Mode if needed Enables or not to prompt the user to confirm the switch to Run or Debug mode when needed. Don't unlock locked tasks when switch to Debug/Run mode If this option is checked, locked tasks stay locked when Manager V5 switches to Run, User or Debug mode. Otherwise, locked tasks are automatically unlocked. Create task’s variables when task created Enables or not to create Task variables when the task is created. This is the default state of variable creation check box in the Create Task dialog box. Open content of "View" Tasks in User Mode Enables or not to open tasks in a read only Editor where tasks user mode rights are set to View, when Manager V5 is switched to User Mode. TimeBased (Timeline) Prompt before sending Flash Control command Enables or not to prompt the user when a Flash command is about to be sent (User click on Flash command button). StepBased Use Pause Points in Run Mode Enables or not to use Pause Points in Run Mode. This option is unchecked by default and it's strongly recommended to not use this option except for specific purpose. Don't ask to switch to Run/Debug Mode when there is Pause Points Enables or not to prompt the user to confirm to switch to Run mode when in SETTINGS & PREFERENCES 199 tasks there are some Pause Points. This option makes sense only if “Use Pause Points in Run Mode” option is checked and it's strongly recommended to use this option in this case. Task priority Determines the priority of execution of all of theStepBased” tasks in relation to the other Manager V5 modules and any other applications. Execution priority stands for the extent to which the choice of precision for “StepBased” tasks is to be respected. The higher the priority, the more the selected precision will be respected. Task accuracy Determines the execution precision of all of the Manager StepBased Tasks engine. The precision has an effect on the rapidity of execution of the commands present in the tasks. The higher the precision, the more precisely and quickly the tasks will be executed. But increasing the precision also increases the load on the machine's processor and so must be adjusted according to the overall use of the processor by other applications. 2 200 Note: TimeBased tasks are not concerned by these parameters since they are based on a very precise time reference that is independent of the “StepBased” tasks. SETTINGS & PREFERENCES Preferences Runtime Organizes the automation of the opening of Medialon Manager, of its automatic start-up, of the end of its operation and even its exit from Windows. The halting of the execution of a project may also be inhibited or protected by a password. Auto Run Manager when Opened Determines if Medialon Manager should be launched in Run/User/Debug mode when a project is opened. This option only applies when Medialon Manager V5 is opened via a project, by double-clicking on a Project File icon, for example. 2 We strongly recommend to register your license if you start your project with «autorun» option. The register dialog box will continue to be displayed each time you launch your project. See “Registration” on page 26. Autorun mode Determines which mode to switch to if Autorun option is checked. The *.mpf5 shortcut can copied in the Windows startup folder to launch it at Windows startup. Prohibit Stop Conditions the switching of Manager from Run mode to Stop mode by a password. Always ask for password Enables or not to ask user for password even if Manager was manually started. Prohibits Quit Manager Makes it impossible to quit Medialon Manager using standard commands; Alt+F4, for example. Delayed Startup Defines, in seconds, the time delay at startup between the moment Medialon Manager is launched and the moment Medialon Manager is active. This can be useful in certain configurations; for example when Medialon Manager V5 will start before the Key is detected by the system. SETTINGS & PREFERENCES 201 Quit Quit Manager Defines a time at which Medialon Manager will automatically quit. This option takes priority over “Prohibit Quit Manager”. Quit Windows Defines a time at which Medialon Manager and Windows will automatically quit. This option takes priority over “Prohibit Quit Manager”. Enable Multi Processor Support When this preference is enable, Medialon Manager V5 distributes its working load between all processors present on your system, instead of leaving Windows manage itself. Network Defines network settings and Manager On Network login Manager Server Port Defines the IP port used by Medialon Manager V5 to “listen” to the connections of the Manager client stations. IP Port • Default Port: Selects the default port (9255); in this case the clients must also have the “Default port” option selected in “Manager On Network” (“Device” setup). • Specify a port: Allows you to choose an IP port number. Manager On Network Login (New in V5) • MON User: Defines the User login when this project needs to have a restricted access. • MON Password: Defines the User password. It needs to be confirmed. Option Network Detection (New in V5) For added security, Medialon Manager V5 now implements network detection of Medialon Manager V5 hosts before initiating its connection with the Slave. 202 SETTINGS & PREFERENCES Preferences UserScreen Defines default settings for UserScreens objects and screens or monitors used by your project. Target screens Defines the Virtual Screens resolution. When auto-select is chosen, the virtual screen will take the current screen resolution of the system. If you need to create a project, that will eventually need a higher screen resolution, you can define the screen(s) resolution(s) by editing the User Defined Screen resolutions. Default UserScreen Settings Default UserScreen Type Defines the default type of a UserScreen when it's created. Default UserScreen Size Defines the default size of new UserScreens when they are created. SETTINGS & PREFERENCES 203 Default UserScreen Object Color Defines the default color for all dynamic graphical objects and UserScreens. UserScreen Object Default Font Allows you to select a default font, or specify a particular font to be used when creating an object in a UserScreen that requires text. Text of object persistent by default Makes persistent by default the content of text Variables related to “Edit”, “List” or “Display” objects. Default UserScreen Object Color Allows you to select a default UserScreen object color. This option is used to specify a color to use for UserScreen objects instead of system color. Userscreens Debug Location Allows you to determine where UserScreen(s) will open in Debug Mode. • Inside Virtual The Screen: The UserScreens will open inside the Virtual Screen. • Real Screen: The UserScreens will open as separate windows. Watchdog A watchdog is an external program which regularly controls the proper running of Medialon Manager V5 and can reboot it if it freezes up. See more about “Medialon Watchdog (New in V5)” on page 273. Setup Activated/Not Activated Defines whether Medialon Manager uses the services of “Medialon Watchdog” or not. Activity time out Defines the frequency (in seconds) of Manager's sending of the proper operation signal. Restart delay Defines the time (in seconds) that “Watchdog” must wait before proceeding with the reboot. The actual time before the project is operational will depend on its size. 2 204 Note: Watchdog is active only when Medialon Manager is in RUN mode. SETTINGS & PREFERENCES Preferences Log Traces When you enable the Log Traces Option, Medialon Manager V5’s activity will be traced. This option is only to be used if you are encountering problems or wish to follow closely how your project is running. This option should not be activated unless there are specific reasons, and should be de-activated when it is no longer necessary. Target Trace into File Enables the Trace function into a file, either in one single file, or in a new file every Month, Week, Day or Session. The maximum size of this or these files can be limited by entering the desired value in the “Max File Size” field. Trace into Console Enables the trace function into Medialon Manager V5 modsEConsole to monitor the activity without creating a log file. This function is used for occasional activity debugging of your project. SETTINGS & PREFERENCES 205 Trace options Enable Manager Cue traces This option allows you to enable or disable the tracing of all cues played by Manager V5. If the program is large and has lots of cues, the file will quickly become very large. It is therefore preferable to use the Trace into Console option when tracing cue activity. Enable MxM Traces Enables the tracing of the MxMs activity within the active session. This function can be useful to trace Network or serial connection problems to external devices. Enable Runtime Information Traces Every Should you wish to trace Manager’s System information at regular intervals, you can do so by activating this option and determining the intervals (in seconds) when these information will be logged. 206 SETTINGS & PREFERENCES Menus Menus File Menu New Project (Ctrl+N) Creates a new project. Open Project (Ctrl+O) Opens a saved project. Open Recent Project... Shows the last recently used files. Up to 10 files are listed. Convert Project... Converts the current project to XML file format. Save Project (Ctrl+S) Saves the current project under the current name and in the current directory. Save Project as… Saves the current project under another name and/or in another directory. Import... To merge a current project with all or part of another project. You can thus include “UserScreens”, Variables and tasks already created in previous projects. In the case of multiple imports, or if you import a project including names already used in the current project, (Devices, Variables, Tasks), Manager will rename the elements concerned by adding a number to them. Export Opens the Export dialog box. Stop (Esc) Stops the program. Debug (F2) Runs a project with the work windows still open. This enables you to visualize and test the project, whilst still being able to adjust some Variables and tasks. User (Ctrl+F2) Runs a project with the work windows still open. This enables you to visualize and test selected objects in your project. Run (F3) Runs the project in its user format (i.e. no interventions possible). Printer Setup Opens the standard Windows Printer Configuration dialog. SETTINGS & PREFERENCES 207 Print (Ctrl+P) If the active tab is a Variable Lister tab, it prints the list of all of the variables in the Lister. If the active tab is the Task Lister tab, it prints the list of all of the tasks of the project. Otherwise the content of the active Area will be printed. Preferences… Opens the “Preferences” window for the configuration of Medialon Manager V5. See “Preferences”, page 197. MxM Activation... This menu opens the MxM Activation dialog which allows to select which MxMs are available on this machine. See “Activating MxMs”, page 27. Quit (Ctrl+Q) Quits Manager. A save request is displayed if the current project has been modified since it was open. Edit Menu The actions triggered by the menu items under the Edit menu depend upon the currently active element in the active window. If an action is not allowed the corresponding menu item is disabled. 2 Note also most of the menu items which are at the bottom of this menu are only applicable to graphic objects in a UserScreen. Undo (Ctrl+Z) Undoes the last modifications. Redo (Shift+Ctrl+Z) Re-applies the modifications which where undone by the Undo menu. Cut (Ctrl+X) Cuts the selected element in the clipboard. Copy (Ctrl+C) Copies the selected element to the clipboard. Paste (Ctrl+V) Pastes the content of the clipboard. Select All (Ctrl+A) Selects all of the elements in the active window. This command is available for: • Graphic elements in a UserScreen • Cues in a Task Editor • Devices in the Lister Group (Ctrl+G) Groups the selected objects. 208 SETTINGS & PREFERENCES Menus UnGroup (Ctrl+U) Ungroups the selected group. Lock (Ctrl+Y) Locks the selected Graphic Objects. Locked graphical objects cannot be moved. Unlock (Shift+Ctrl+Y) Unlocks the selected Graphic Objects. Send To Front Brings up the selected Graphic Objects to the foreground. Send To Back Pushes the selected Graphic Objects to the background. Pull To Front (Ctrl+F) Pulls the selected Graphic Objects one level towards foreground. Push To Back (Ctrl+B) Pushes the selected Graphic Objects one level towards background. Align... (Ctrl+L) Opens the Align dialog box which allows to align the selected Graphic Objects. Find... (Shift+Ctrl+F) Opens the Find dialog box which allows to find an element in the Project. See “The Finder” on page 183. Magnetic grid Turns the UserScreen Magnetic Grid On/Off. In the “UserScreens”, the Magnetic Grid enables you to position objects in relation to each other at distances defined by the virtual grid. This grid is shown by points on the “UserScreens”. Object Menu Edit... Opens the Editor of the selected Task Object. Duplicate (Ctrl+D) Duplicates the selected object. Delete Deletes the selected object (cannot be undone). Setup Opens the setup window of the selected object. Control Panel If the selected object has a Control Panel (TimeBased Tasks or Devices), the SETTINGS & PREFERENCES 209 Control Panel will be opened in the Control Tab. UserScreens The menu items of this menu apply only to the UserScreens. The “UserScreens” are graphic interfaces which enable you to dialogue and interact with the application. The “UserScreens” are the visible parts of the programming. They handle user requests and send them to the task monitors. There is a large graphic capacity available to modify the ergonomics and aesthetics of these man-machine interfaces. 2 Note, many commands of this menu are also available in the UserScreen Editor. New UserScreen Creates a new UserScreen. Goto Previous Page Changes the current page of the active UserScreen to the previous one. Goto Next Page Changes the current page of the active UserScreen to the next one. Goto First Page Changes the current page of the active UserScreen to the first one. Goto Last Page Changes the current page of the active UserScreen to the last one. Move Objects Enables you to move one or several objects selected from one page to another. This command works not only in the current “UserScreen” but also between various “UserScreens” already created. Devices The menu items of this menu allow the manipulation of Devices. New Device… (Ctrl+Ins) Creates a new device. Replace by Replaces the selected device by a compatible device currently in the project. This option is only available if a compatible device is present. Activity… Activates or deactivates the selected device. The commands associated with the deactivated “Devices” will not be executed. However Variables of a deactivated device still reflect the actual state of the device. When a device is deactivated, an icon (a red cross) is drawn on it to remind you of its state. Positrack… Activates or deactivates “Positrack”. “Positrack” is a mode which allows to slave the selected device to the current 210 SETTINGS & PREFERENCES Menus time of a TimeBased task provided that the device supports that functionality. When a device positrack mode is deactivated, an icon (a red link) is drawn on it to remind you of its state. 2 Note that the “Manager” device itself can't be deactivated or set to positrack mode. Show Device Variables Displays variables from the selected device in the Lister. Variables New Variable… (Shift+Ins) Creates a new user variable. The type of the variable to create must be then chosen. Delete Unused Variable… This command shows all unused user variables and allows the user to delete them. When the variable list dialog box appears, unused variables can be selected, either individually or by group, for deletion. Tasks New Task (Ctrl+T) Creates a new task. New Task Editor (Shift+Ctrl+T) Opens an empty Task Editor window. Windows Menu Workspace Save as Template Saves the current Workspace configuration as a template, which can be recalled at any time. Rename Allows you to rename your custom workspaces. Delete Allows you to delete your custom workspaces. Tools Timecode Calculator (Ctrl+F11) Opens the Timecode Calculator. Timecode calculator provides basic operators like + (add), - (subtract), / (divide), (multiply). It also provides timecode units selector (24 SMPTE fps, 25 EBU fps, 30 & 30DP NTSC fps, 100 fps, 1000 fps) and timecode format selector (timecode or frames). Changing this setting will automatically convert the content of fields SETTINGS & PREFERENCES 211 'Input' and 'Result' according to selection. This tool works as a stack, input a value and then click on the desired operator will give the result. View Browser (F5) Sets the focus on the Browser Tab, or switches to it if the Tab is hidden by another Tab in the Area. Lister (F6) Sets the focus on the Lister Tab, or switches to it if the Tab is hidden by another Tab in the Area. Properties (F7) Sets the focus on the Properties Tab, or switches to it if the Tab is hidden by another Tab in the Area. Device Map (F8) Sets the focus on the Deice Map Tab, or switches to it if the Tab is hidden by another Tab in the Area. Userscreens (F9) Sets the focus on the Screens Tab, or switches to it if the Tab is hidden by another Tab in the Area. Control Center (F10) Sets the focus on the Control Tab, or switches to it if the Tab is hidden by another Tab in the Area. UserScreen List (Ctrl+F5) Opens the UserScreens item in the Browser Tab and displays the list of available UserScreens in the Lister Tab. Device List (Ctrl+F6) Opens the Device item in the Browser Tab and displays the list of the projects Devices in the Lister Tab. Variable List (Ctrl+F7) Opens the User Variables item in the Browser Tab and displays the list of these variables in the Lister Tab. Task List (Ctrl+F8) Opens the Tasks item in the Browser Tab and displays the Tasks of the project in the Lister Tab. Close All UserScreens Closes all the UserScreens that are currently open. All Control Panels Closes all the Control Panels that are opened as separate windows, the Control 212 SETTINGS & PREFERENCES Menus Panels that are open in the Control tab stay open. Help This menu gives access to helps, tutorial and information about your computer. Manager Help This is the reference guide of Manager (this document content). MxM Help This window contains the list of installed MxMs and associated help. Tutorial link access is also accessible if a tutorial is provided with a MxM. Manager Internet resources Gives you direct access to www.medialon.com’s web pages. Register your License If you have NOT chosen to register your Medialon Manager V5 software on installation, you may choose to do so at any time with the “Register Your License” option in the Help Menu. You must be connected to the internet to do so. You must be connected to an internet page asking you to fill out your Product Serial and License numbers as well as other information. An e-mail will be sent to you with your registration number to enter into the proper field so you can register your software. About Medialon Manager V5 This is the cover page of Medialon Manager V5. Here you will find the number of the current version, as well as the license number. About Your Computer This window contains the main available information concerning your computer (system, memories, display graphic capabilities, etc.) and informs you of your work in Manager, as well as the number of Manager applications opened and the number of Manager applications connected to the network. SETTINGS & PREFERENCES 213 214 SETTINGS & PREFERENCES ANNEXES Medialon Resource Connector ANNEXES 215 MRC AMX NetLinx . . . . . . . . . . . . . . . . . . . . . . . . page 217 MRC Advantech ADAM . . . . . . . . . . . . . . . . . . . . page 231 MRC Opto22 SNAP Ethernet IO (New in V5). . . . page 233 MRC Adlink NuDAM (New in V5). . . . . . . . . . . . . page 237 MRC Adlink PCI7432 (New in V5) . . . . . . . . . . . page 243 MRC ICP DAS PISO P32x32 (New in V5) . . . . . . page 247 MRC Adrienne . . . . . . . . . . . . . . . . . . . . . . . . . . . page 253 MRC SoundLight . . . . . . . . . . . . . . . . . . . . . . . . . page 255 MRC ArtNet . . . . . . . . . . . . . . . . . . . . . . . . . . . . page 259 MRC RedRat (New in V5) . . . . . . . . . . . . . . . . . . page 263 216 ANNEXES MRC AMX NetLinx MRC AMX NetLinx MRC AMX NetLinx gives access to: •Serial Ports •MIDI Ports •I/O Ports •Infrared Ports AMX NetLinx AMX is a worldwide leader in Remote Control systems offering a wide range of controllers, keypads and touch panels. With smart processors and powerful memory reserves, the AMX NetLinx© Controllers can simultaneously carry out multiple commands to produce instant, flawless results from the devices they control. When connected to a Medialon Manager V5 system via Ethernet, AMX NetLinx© Controllers offer their hardware resources to Manager V5 Software. There is no need for programming in the AMX NetLinx© itself. Medialon Manager V5 remains the master and sends commands from its own MxMs and drivers. 2 The AMX/Medialon protocol driver needs to be downloaded in the AMX NetLinx© Medalon modules is available on AMX partner page (AMX registration is needed) http://amx.com/inconcert/trednet.asp?page=device , enter "Medialon" in "Search Devices / Manufacturer" field. The combination of the two systems, Medialon Manager V5 powerful Show Control software and AMX highly reliable hardware, creates the best solution for many applications where Timeline, accurate synchronization, logical operations, database links, digital media control, wide network deployment etc. are necessary. ANNEXES 217 AMX NetLinx Resources Addressing AMX NetLinx hardware is made of: • Integrated Controllers with Ethernet input to connect to the network, and a various numbers of outputs, from Serial to Infrared and relays. Output depends of the Integrated Controller model. • CardFrame Controllers with Ethernet input to connect to the network and a number of slots in which various types of output cards can be inserted, from Serial to Infrared and relays, Midi etc. All connected devices have a unique address in the system, the DPS [Device:Port:System]. [Device:Port:System] The AMX [Device:Port:System] addressing scheme is used to uniquely identify an AMX resource. An AMX installation can be made of one or several 'Systems'. Each 'System' is defined by a Master Device which is connected to the network and has a unique System ID. Besides the Master, a System is composed of one or several 'Devices' connected to the Master. Each of these 'Devices' (Master included) has a unique Device ID in the scope of the System. 218 ANNEXES MRC AMX NetLinx Each resource of a Device is defined by a Port ID, unique in the scope of the Device. Usually, this Port ID is written at the back of the device. In order to access to a specific AMX resource from Medialon Manager V5, you have to know the triplet identifier [Device:Port:System] and the System Master IP Address (the default TCP port is 60000). Basically, Manager V5 communicates with the Master Device of a System and accesses to a specific resource by specifying the [Device:Port:System] or [D:P:S]. 2 Refer to AMX NetLinx documentation for further information. ANNEXES 219 AMX NetLinx Resources Scan By using AMX NetLinx Resources, you'll be able to access to: • Serial resources • MIDI resources • I/O resources • Infrared resources If AMX NetLinx are connected to the network, Medialon Manager V5 offers a Scan feature. Select the Resources node in the Medialon Manager Browser. And use right click New Resource Menu to start the scan process. 220 ANNEXES MRC AMX NetLinx The scan process starts and displays all of the resources found over the network. An icon next to a resource means that the resource is already declared in Medialon Manager V5. To add resources, select desired resources and click on the 'Add Resources' button (multi selections are allowed). "Scan" button initiates a new scanning resources. ANNEXES 221 Serial Ports Setup If AMX NetLinx Serial Ports are available in the network, you can use AMX NetLinx Resources Scan. Select a Serial Port and click on «Add Resources». If AMX NetLinx resource is not connected, you can add Serial port by creating new resource with "New Resource\AMX NetLinx Serial" Menu. 222 ANNEXES MRC AMX NetLinx You can access to the Setup of a selected resource. •Enter the IP address of the master (default TCP port is 60000) •Enter the Device ID of the serial resource to control •Enter the Port ID of the serial resource to control •Enter the System ID of the serial resource to control •Click on 'OK' ANNEXES 223 MIDI Ports Setup If AMX NetLinx MIDI Ports are available in the network, you can use AMX NetLinx Resources Scan. Select a MIDI Port and click on «Add Resources». If AMX NetLinx resource is not connected, you can add MIDI port by creating new resource with "New Resource\AMX NetLinx MIDI" Menu. 224 ANNEXES MRC AMX NetLinx AMX NetLinx MIDI Port settings can be edited. • Enter the IP address of the master (default TCP port is 60000) • Enter the Device ID of the serial resource to control • Enter the Port ID of the serial resource to control • Enter the System ID of the serial resource to control • Select Input or Output MIDI Port • Click on 'OK' ANNEXES 225 Input/Output Ports Setup If AMX NetLinx Input/Output Ports are available in the network, you can use AMX NetLinx Resources Scan. Select a Port and click on «Add Resources». If AMX NetLinx resource is not connected, you can add I/O port by creating new resource. 226 ANNEXES MRC AMX NetLinx •Enter the IP address of the master (default TCP port is 60000) •Enter the Device ID of the serial resource to control •Enter the Port ID of the serial resource to control •Enter the System ID of the serial resource to control •Select the type of I/O •Define how many channels are available •Click on 'OK' Type of I/O •Digital I/O: sensor inputs or switches •Relay: outputs relays •Analog I/O: analog channels (input or output) or levels •Volume: audio channels volume control ANNEXES 227 Infrared Ports Setup If AMX NetLinx Infrared Port are available in the network, you can use AMX NetLinx Resources Scan. Select a Port and click on «Add Resources». 2 228 MedialonIR MxM needs AMX utility "FileTransfert" to load selected IR Driver into AMX NetLinx resource (consult MxM MedialonInfraRed help). ANNEXES MRC AMX NetLinx If AMX NetLinx resource is not connected, you can add IR port by creating new resource. •Enter the IP address of the master (default TCP port is 60000) •Enter the Device ID of the serial resource to control •Enter the Port ID of the serial resource to control •Enter the System ID of the serial resource to control •Click on 'OK' ANNEXES 229 230 ANNEXES MRC Advantech ADAM MRC Advantech ADAM MRC Advantech ADAM gives access to I/O Ports. Advantech ADAM Module Advantech ADAM-6000, Ethernet-based data acquisition and control module, provides I/O, data acquisition and networking in one module to build distributed monitoring, and control solutions for a wide variety of applications. Through standard Ethernet networking, ADAM-6000 retrieves I/O values from sensors and publishes these real-time I/O values. 2 Advantech provides free download Manual and Utility software for ADAM-6000 modules’ operation and configuration on their web site: www.advantech.com Advantech ADAM modules, Real or “Virtual”, Resources in your project will be accessed by the MxM Medialon IO. Input/Output Ports Setup Medialon Manager V5 can manage Advantech ADAM modules as Input/Output resources. Select I/O Ports node to display Advantech ADAM resources. ANNEXES 231 To add a new module, select New Resource Menu. Select a Module Type and configure its address. Resource Name: Name given to the resource. Module Type: •ADAM-60178-ch Analog Input w/DO Module •ADAM-602412-ch Universal Input/Output Module •ADAM-605018-ch Isolated Digital I/O Module •ADAM-605116-ch Isolated Digital I/O w/Counter Module •ADAM-60606-ch Digital Input/Relay Module •ADAM-60666-ch Digital Input/Power Relay Module Module IP Address: Each ADAM-6000 has same default IP address 10.0.0.1. Auto Reconnect: this option allows Medialon Manager V5 to initiate a new connection if communication is lost during run time. Module Unit ID: Use this option if ADAM module firmware is 4.xx or higher (default ID 1). 232 ANNEXES MRC Opto22 SNAP Ethernet IO MRC Opto22 SNAP Ethernet IO (New in V5). MRC Opto22 SNAP Ethernet IO gives access to I/O Ports. Opto22 SNAP Ethernet I/O Opto22 SNAP Ethernet I/O is an Input/Output connection module. Using Opto22 SNAP Ethernet I/O systems, you can connect a wide variety of electronic and mechanical devices, such as lights, temperature and pressure sensors, motors, serial devices, and more to computers using Ethernet networks, wireless LAN networks, and even the Internet. 2 Note: This version of MRC Opto22 SNAP Ethernet IO only supports Digital Input modules and Digital Output modules. Opto22 SNAP digital I/O modules handle devices that can be in only one of two states: either on or off (true or false, 0 or 1, running or stopped, etc.). Push buttons and LEDs are examples of digital devices. SNAP digital input modules send data from the device to the computer, translating signals from the device into a form computers can understand, while maintaining a protective barrier between the computer and the dangerous high voltages or other hazards of the real world. 2 Opto22 SNAP Ethernet I/O must be configured in term of IO modules and IP settings. Opto22 ioManager software is used for this purpose (IP settings & IO declarations). See the Opto 22 SNAP Ethernet IO documentation for more informations on their web site: www.opto22.com Opto22 SNAP digital I/O modules, Real or “Virtual”, Resources in your project will be accessed by the MxM Medialon IO. ANNEXES 233 Input/Output Ports Setup Opto22 SNAP is no longer managed by MxM Opto22 SNAP Ethernet IO as it was in previous version of Medialon Manager. Medialon Manager V5 can manage Opto22 SNAP digital I/O modules as Input/ Output resources. Select I/O Ports node to display Opto22 SNAP resources. To add a new module, select New Resource Menu. Configure the Unit IP address of the Opto22 SNAP Ethernet brain. Local Address: Defines the local IP address set to the ethernet adapter on which the SNAP Ethernet Brain is connected. 234 ANNEXES MRC Opto22 SNAP Ethernet IO Select a digital output or input module and click on the rack position to assign a module. Select a HD output or input module and click on the rack position to assign a HD module. ANNEXES 235 236 ANNEXES MRC Adlink NuDAM MRC Adlink NuDAM (New in V5). MRC Adlink NuDAM gives access to I/O Ports. Adlink NuDAM ADLINK’s Intelligent Remote Data Acquisition & Control Modules (NuDAM) are designed for data acquisition systems based on PCs and other processor based equipment with standard serial I/O ports (RS-232 or RS-485 with auto-direction control). The modules convert input/output signals to engineering units and transmit/receive, in ASCII format, to/from any host computer with RS-232 or RS-485 port. Digital modules supported : 6050, 6052, 6053, 6054, 6056, 6058, 6060, 6063. Analog modules supported : 6021, 6017. Digital and analog modules supported : 6024. 2 For more information, refer to the Adlink documentation: www.adlinktech.com Adlink NuDAM modules, Real or “Virtual”, Resources in your project will be accessed by the MxM Medialon IO. Input/Output Ports Setup Adlink NuDAM modules are no longer managed by MxM Adlink NuDAM as it was in previous version of Medialon Manager. Medialon Manager V5 can manage Adlink NuDAM modules as Input/Output resources. Select I/O Ports node to display Adlink NuDAM resources. ANNEXES 237 To add a new board, select New Resource Menu. Select a Serial Port and a Module Type. Baud Rate: Communication speed with the PC. Available Baud rates are : 1200, 2400, 4800, 9600, 19200, 38800 and 115200. Address ID: Enter the current address of the module (from 2 to 255). Initialize or diagnose NuDAM module : Opens the initialize/diagnose tools for the NuDAM Modules. Click OK to add the I/O Port. NuDAM Module Type 6050: Digital I/O module • 7 TTL input channels • 8 Open collector output channels 6052: Isolated Digital Input module • 6 fully independent isolated input channels • 2 isolated input channels with common ground 6053: 16 Channels Digital Input module • 16 dry contact 6054: Isolated Digital Input module • 15 input channels with common power 238 ANNEXES MRC Adlink NuDAM 6056: Isolated Digital Output module • 15 output channels with common power 6060: Relay Output & Digital Input module • 4 relay output channels • 4 switch or transistor input channels 6063: 8 Channels Relay Output module • 8 relay output channels 6021: Analog Output module • 1 analog output channel • Analog Output Range : Select the desired output range. You can also calibrate the output values, as described in details in ND-6021 documentation. 6017: 8 Channels Analog Input module • 6 differential input channels • 2 single-ended input channels 6024: Analog Output & Digital Input module • 4 analog output channels • 7 TTL digital input channels 6058: 28 channels Programmable I/O module • 4 digital input channels • 24 programmable Input or Output channels • Programmable I/O Mode : For each block of consecutive switches, indicate if you want these switches to be configured as input or output switches. ANNEXES 239 Initialize or Diagnose NuDAM module The MRC provides a initialize/diagnose tools for the NuDAM Modules. You can either use this tool or the NuDAM Administrator Utility provided by Adlink on the installation CD-ROM or on the Adlink WEB site http://www.adlinktech.com. 2 In order to access and use properly the facilities proposed by this tool, there must be only one single NuDAM module connected to the current COM port. Serial Port : Indicates current COM number. Search for BaudRate : When clicking this button, the user launches a process that will scan for all possible addresses (from 0 to 255) for the NuDAM module, with or without checksum, at every available baud rates, until a NuDAM module answers. If this is the case, the corresponding parameters are updated (BaudRate, Name, Checksum and Address). Diagnose (using current BaudRate) : When clicking this button, the user launches a process that will scan for all possible addresses (from 0 to 255) for the NuDAM module, with or without checksum, using current baud rate, until a 240 ANNEXES MRC Adlink NuDAM NuDAM module answers. If this is the case, the corresponding parameters are updated (Name, Checksum and Address). This tool is faster than the previous one, because the COM port does not need to be closed and opened for each new baud rate. BaudRate : Current Baud rate, or last Baud rate detected (using Search for BaudRate button). Name : Name of the NuDAM module that answered during scanning of COM port. Checksum : Indicates if the NuDAM module that answered during scanning of COM port is configured to use or not checksum. 2 IMPORTANT NOTE : Checksum must be OFF (value must be No) to let the NuDAM module be used by Medialon Manager V5. Address : Indicates the address (from 0 to 255) of the NuDAM module that answered during scanning of COM port. Default Mode : Indicates whether the module is in Default Mode, that is powered on with the DEFAULT pin grounded. ANNEXES 241 Set Address : The user selects the desired address (from 2 to 255) for the NuDAM module. Set Programmable I/O Mode : For each block of consecutive switches, indicate if you want these switches to be configured as input or output switches. Set Analog Output Range : Select the desired output range. You can also calibrate the output values, as described in details in ND-6021 documentation. 2 As mentioned, the NuDAM module must be powered on with the DEFAULT pin grounded to perform these following operations properly. CAUTION: once the setting is done, the DEFAULT pin must be ungrounded in order for the module to be controlled by Medialon Manager V5. Set BaudRate : The user selects the desired Baud rate (1200, 2400, 4800, 9600, 19200, 38800 or 115200) for the NuDAM module. Disable Checksum : This option is enabled only if checksum is ON (value is Yes). 2 IMPORTANT NOTE : A NuDAM module cannot be operated by Medialon Manager V5 if checksum is ON. 242 ANNEXES MRC Adlink PCI7432 MRC Adlink PCI7432 (New in V5) . MRC Adlink PCI-7432 gives access to I/O Ports. Adlink PCI-7432 Board The 7432 product is a 32 isolated digital input and 32 isolated digital output (open collector) channels board. Each output can sink 5Vdc to 32Vdc loads with a maximum of 500mA in total. Each input can handle from 0-24V dc with a resistance of [email protected]. The isolation voltage is up to 5000 Vrms. DIN-100S terminal board can be connected to the card using a SCSI 100Pins cable. Wiring & Pins Assignment Pin out of the PCI-7432 board is matched to the pin out of the DIN-100S terminal board. ANNEXES 243 Input connection could be either a current source (common ground) or current sink (common power) Output connection could be common ground connection or common power connection. When the output goes "ON" the sink current will be conducted through the transistor whereas when the output goes "OFF" no current is conducted. If the load is of an inductance nature such as a relay, coil or motor, the VDD pin must be connected to an external power source.The extra connection is utilized for the fly-wheel diode to form a current-release closed loop, so that the transistor are protected from any high reverse voltage which can be generated by the inductance load when the output is switched from "On" to "OFF". 2 244 For more information, refer to the Adlink documentation: www.adlinktech.com ANNEXES MRC Adlink PCI7432 Adlink PCI-7432 boards, Real or “Virtual”, Resources in your project will be accessed by the MxM Medialon IO. Input/Output Ports Setup Adlink PCI-7432 board is no longer managed by MxM Adlink PCI7432 as it was in previous version of Medialon Manager. Medialon Manager V5 can manage Adlink PCI-7432 boards as Input/Output resources. Select I/O Ports node to display Adlink PCI-7432 resources. To add a new board, select New Resource Menu. Select a board. Click on Ok. ANNEXES 245 246 ANNEXES MRC ICP DAS PISO P32x32 MRC ICP DAS PISO P32x32 (New in V5) . MRC ICP DAS PISO-P32x32 gives access to I/O Ports. PISO P32C32/PISO P32A32 Board The PISO-P32C32 and PISO-P32A32 have 32 channels of optically isolated digital inputs and 32 channels of optically isolated digital outputs, arranged into four isolated banks. Each input channel uses a photo-coupler input which allows either internal isolated power supply or external power selected by jumper. Each digital output offers a darlington (P32C32) or PNP (P32A32) transistor and integral suppression diode for inductive load. Isolated input channels 0-15 are designed into group A and channels 16-31 are designed into group B. Isolated output channels are designed into group C and Group D. . Wiring can be done using two DN-37 terminal board, one for each 16 channels group. ANNEXES 247 Board Layout This interface board is easily installed in any PC. The board interface to field logic signals, eliminating ground-loop problems and isolating the host computer from damaging voltages. They have one 37-pin D-Sub Connector and one 40-pin male header. The 40-pin to DB-37 flat cable is used to fix with the case. The user can connect the digital signal through the second D-Sub connector. Each D-Sub connector contains 16 input channels and 16 output channels. The power supply of the input port may use the external power or the power from the PC side using DC/DC converter. The power supply of the output port should use the external power. • JP1: Select internal/external power for DI_0 to DI_15 (3000V isolation) • JP2: Select internal/external power for DI_16 to DI_31 (3000V isolation) • LED1: Power indicator for DO_0 to DO_15 • LED2: Power indicator for DI_0 to DI_15 • LED3: Power indicator for DO_16 to DO_31 • LED4: Power indicator for DI_16 to DI_31 248 ANNEXES MRC ICP DAS PISO P32x32 Wiring & Pin Assignment Pin out of the board is matched to the pin out of the DN-37 terminal Digital Inputs: with internal power supply. ANNEXES 249 with external power supply. Digital Outputs: Current sinking (PISO-P32C32) Current sourcing (PISO-P32A32) 2 For more information, please refer to ICP DAS PISO documentation of web site: www.icpdas.com ICP DAS PISO-P32x32 board, Real or “Virtual”, Resources in your project will be accessed by the MxM Medialon IO. 250 ANNEXES MRC ICP DAS PISO P32x32 Input/Output Ports Setup ICP DAS PISO-P32x32 board is no longer managed by MxM IcpDas PC32x32 Board as it was in previous version of Medialon Manager. Medialon Manager V5 can manage ICP DAS PISO-P32x32 boards as Input/ Output resources. Select I/O Ports node to display ICP DAS PISO-P32x32 resources. To add a new board, select New Resource Menu. Select a board. Click OK. ANNEXES 251 252 ANNEXES MRC Adrienne MRC Adrienne MRC Adrienne gives access to TimeCode Ports. Adrienne RG1 PCI Card The Adrienne RG1 is a time code LTC reader and generator board that fits into a PCI slot in a regular PC. It can either sync to video or freerun with very high precision. The AD RG1 can read and generate LTC simultaneously. Adrienne USB-TC Adrienne USB-TC is a time code readers for the Universal Serial Bus. These tiny but rugged and nicely styled metal boxes are perfect for laptop and other slotlimited applications, and are both USB 1.1 and 2.0 compliant. 2 For more information, please refer to Adrienne documentation on web site: www.adrielec.com You may setup up to 16 Adrienne Timecode Boards or USB, Real or “Virtual”, in your project Adrienne Timecode Resources will be accessed by the Medialon Timecode MxM. TimeCode Ports Setup Adrienne TimeCode Board is no longer managed by MxM Adrienne Timecode as it was in previous version 3 of Medialon Manager. TimeCode ports are used by MxM Medialon TimeCode. ANNEXES 253 Medialon Manager can handle Adrienne TimeCode boards as Resources for your project. If Adrienne resources are scanned on startup, they will appear as available TimeCode resources. To add a “Virtual” card, right click menu New Resource. Select a board then OK to create the new TimeCode resource. 254 ANNEXES MRC SoundLight MRC SoundLight MRC SoundLight gives access to DMX Ports. DMX Resources are managed by Medialon Manager and no longer by the MxMs, as it was in previous version 3 of the software. DMX ports are used by MxM Medialon DMX512. SoundLight 1514PCI The SoundLight DMX PCI is a versatile DMX-512 interface card that fits into any PC running Medialon Manager V5 with a PCI Slot. The SoundLight DMX PCI offers up to 1024 DMX input channels or 1024 DMX output channels or combination (512 inputs and 512 outputs). This card handles two complete DMX in/out links in parallel. Up to four cards can be installed in one PC. DMX Ports Setup If SoundLight resources are scanned on startup, they will appear as available DMX resources. ANNEXES 255 If you create a “Virtual” resource, the setup window will open to configure it. If you wish to configure the DMX Resources, select a resource in the Lister and right click. SoundLight DMX Resources configuration window will open. • Name: Name given to the resource. • Direction: Determines whether Input or Output. • Board: Select the Physical Board (maximum 4). • Connector: Lets you choose which connector is used for the DMX line. 256 ANNEXES MRC SoundLight 2 WARNING: At this time of writing, there is a known problem with the Soundlight resource: if you setup the resource as an input on connector A and an output on connector B, it does not work. • Patch: Any channel of the DMX resource can be redirected through a Patch modified to your needs. Resource Index DMX Channel Orange channels are patched. Red channels indicate a conflict with another index. 2 indexes are patched to the same channel. • Initial Output Level: You may choose to Reset all the Outputs to 0 when the project is started, or keep the last values that were sent. ANNEXES 257 258 ANNEXES MRC ArtNet MRC ArtNet MRC ArtNet gives access to DMX Ports. DMX Resources are managed by Medialon Manager and no longer by the MxMs, as it was in previous version 3 of the software. DMX ports are used by MxM Medialon DMX512. ArtNet Art-Net is a communication system that allows DMX512 to be sent over Ethernet. It was invented by Artistic Licence and is now published into the public domain. ArtNet Scan If you have already launched your project and wish to scan for ArtNet Devices present over the network, you can use the Scan Button.The scan process looks for the presence of Art-Net modules on the following subnets: • Local subnet • 2.0.0.0 • 10.0.0.0 • 126.0.0.0 Select DMX Ports node and right click to select Scan ArtNet Resources. Select an ArtNet DMX Line and press «Add Line» to add the selected line to available resources list. ANNEXES 259 An icon indicates lines already added. • Change Address: allows to re-program the IP address of the selected Artistic Licence Art-Net node, if the node's firmware allows it (version 1.10 or higher). DMX Ports Setup ArtNet DMX 512 resources can be mounted in your project. Select DMX Ports node in the Browser to display them. If you wish to configure the DMX Resources, select the resource in the Lister and use right click menu. 260 ANNEXES MRC ArtNet Open the Setup Resource window • Name: Name given to the resource. • Direction: Determines whether Input or Output. • Universe: Lets you configure which Universe is used (0 to 255) • IP Address: Lets you configure the IP Address of the ArtNet Device. 2 Note: Input Lines have no IP address, in ArtNet protocol only Universes are needed to define an Input Line. • Use Limited Broadcast: ArtNet standard protocol sends DMX levels to Universe via broadcast IP address (e.g. 192.168.1.225). If several output modules share the same universe and you want to send DMX to a specific module and not to all the universes, uncheck this option. ANNEXES 261 • Patch: Any channel of the DMX resource can be redirected through a Patch modified to your needs. Resource Index DMX Channel Orange channels are patched. Red channels indicate a conflict with another index. 2 indexes are patched to the same channel. • Initial Output Level: You may choose to Reset all the Outputs to 0 when the project is started, or keep the last values that were sent. 262 ANNEXES MRC RedRat MRC RedRat (New in V5) . RedRat is no longer managed by MxM RedRat as it was in previous version of Medialon Manager. MRC RedRat gives access to Infrared Ports. Infrared ports are used by MxM Medialon InfraRed. The following software packages must be installed before using this MRC. • Microsoft DotNet Framework • Lantronix Device Installer • RedRat SDK • RedRat IR Signal Database Utility • RedRat irNetBoxManager • RedRat USB Driver (for RedRat3 only) These software packages can be found in the "Runtime For MxMs" directory on the Medialon Manager distribution CD or in the "Download/Manager MxMs Help & Download" section of the Medialon WEB site: www.medialon.com . They may also be downloaded from the RedRat WEB site: www.redrat.co.uk . Supported Red Rat models are RedRat3 and irNetBox (also known as RedRat 4). RedRat3 The RedRat3 is a USB based infrared remote control input and output device for your computer.. ANNEXES 263 irNetBox The irNetBox is a networked device with multiple outputs for IR-emitters. It uses a simple and open TCP/IP based communication protocol. Features include 16 independently addressable IR outputs, an IR learning detector for recording of IR signals and front panel indicator LEDs.. irNetBox installation Connect an ethernet cable between the irNetBox and an Ethernet port of your computer. If there is no DHCP server installed on your computer, you need to assign an IP address to the irNetBox with the following procedure : • Run the Lantronix Device Installer. • Choose the "Device/Search" menu and wait until the irNetBox is discovered. • Select the irNetBox. • Choose the "Device/Assign IP Address" menu. • Select "Assign a specific IP address" and click "Next". • Type the desired IP Address, Subnet Mask and Gateway and click "Next". Gateway entry may be left as "0.0.0.0" if no gateway is used. • Click on the "Assign" button. • Click on the "Finish" button. • Quit the Lantronix device installer. 2 CAUTION : DO NOT USE the "Device/Upgrade" or "Device/Configure" menus. For more details about RedRat device installation see the RedRat documentation or the RedRat WEB site: www.redrat.co.uk . 264 ANNEXES MRC RedRat Learning IR Signals IR Signals can be learned via the RedRat Signal DB Utility programs. IR Signal definitions are stored in a file named "RedRatSignalDB.xml" which is located in the Medialon MRC Folder. Opening a signal database • Run the RedRat IR Signal DB Utility from the Windows Start menu. • Select the "File/Open Signal DB" menu. • Select "MedialonRedRatIRDrivers.xml" in the MRC Manager directory (by default : "C:\Program Files\Medialon Manager 5\MRC\mrcRedRatIR\data\IRDriver"). • A windows displays all of the IR Remotes devices recorded in the database. Creating a new IR Remote • Select the "Edit/New Device/Remote Wizard" menu. ANNEXES 265 • Fill the relevant fields of the first step. • Click Next. Check the list of commands. 266 ANNEXES MRC RedRat • Click Next to step 3. • Select a command and "Start Capture" to learn IR signal. • Repeat the above steps until you've recorded all of the commands you're interested in. • Click Finish to end Device creation. Testing IR Commands • Select the "View/IR Net Box Output Config" menu. • Click on the "Enable All" button. The test output LEDs on the front panel of the irNetBox should light on. • Select the signal to test in the tree view. ANNEXES 267 • Select the "Edit/Test Signal Output" menu. The output LEDs should blink. 2 268 Additional signal databases can also be found on the RedRat WEB site. ANNEXES MRC RedRat RedRat Scan If you have already launched your project and wish to scan for RedRat Devices present, you can use the Scan Button. Select a Port and click on «Add Resources». Infrared Ports Setup RedRat resources can be mounted in your project. Select Infrared Ports node in the Browser to display them. ANNEXES 269 If you wish to configure the Infrared Resources, select the resource in the Lister and use right click menu. Select a model, set the number of outputs. Click OK to create the new Infrared resource. 270 ANNEXES ANNEXES Medialon Watchdog ANNEXES 271 272 ANNEXES Medialon Watchdog Medialon Watchdog (New in V5) Medialon Watchdog is an external program which regularly controls the proper running of Medialon Manager V5 and can reboot it if it freezes up. Medialon Watchdog is able to send a failure report by e-mail. Watchdog Overview The operating principle of “Watchdog” is as follows: • Manager V5 “announces” its presence to “Medialon Watchdog” and how often it will report its activity to it. • According to the frequency of these reports, Manager sends a signal to “Medialon Watchdog” indicating its proper operation. • If a problem occurs in Manager, “Medialon Watchdog”, which will have ceased to receive these signals, proceeds with a reboot according to the chosen option. 2 Medialon Watchdog is automatically installed during Medialon Manager V5 installation. Medialon Watchdog Window Medialon Watchdog is started during Windows startup. To open Medialon Watchdog window, double click on Medialon Watchdog icon in the notification area. ANNEXES 273 A Quit button allows to stop Medialon Watchdog. The Hide button only closes Medialon Watchdog window. Failure Action Defines the behavior of Medialon Watchdog when one of the monitored applications freezes. Restart Application Medialon Watchdog will restart the application when its activity is no longer detected. Restart Computer Medialon Watchdog will start computer reboot procedure when one of the applications is frozen. This option will stop all running applications. Activity LED blinks when an application is monitored. Frequency depends of Medialon Manager V5 timeout. Countdown The Countdown starts when a Manager V5 failure is detected. Restart delay is set in Medialon Manager V5 Preferences/Watchdog chapter page 204 Client Count Displays how many applications are monitored by Medialon Watchdog. Applications The Applications tab displays the list of applications monitored by Medialon Watchdog. For each application PID, timeout and restart delay are displayed. 274 ANNEXES Medialon Watchdog Log Event The Log Event tab displays all actions of Medialon watchdog. Purge Log All events of Medialon Watchdog are record into a log file. The Purge Log button allows to close the current logfile and clear the LogEvent list. A new logfile is automatically created. Logfile are saved by default in Windows/system32 directory. Edit "MedialonWatchDog.cfg" file ( in Medialon Watchdog folder) with a text editor to change file location. ANNEXES 275 Email Medialon Watchdog can send an email in case of failure detection. Email settings can be done inside email.xml file in Medialon Watchdog folder. Check Email buton allows you to send a test email to validate your settings. 276 ANNEXES ANNEXES Regional and Language Options ANNEXES 277 278 ANNEXES Regional and Language Options Regional and Language Options This chapter discusses the installation and configuration requirements and explains how to type in East Asian languages in Medialon Manager on computers that are running Microsoft Windows XP. To configure the operating system to type in the appropriate language, you must configure the keyboard to type in that language. If the keyboard that you want is not listed by default, you may have to install additional files. Configure Windows to type in multiple languages Before you can type in a language other than English, you must configure the keyboard to match the language. For example, to type Chinese-based characters, configure the keyboard to map the same way as a localized Chinese keyboard. To do this, follow these steps. 1. Click Start, and then click Control Panel. 2. In Control Panel, click Language, and Regional Options. 3. Click Add other languages, and then click Languages tab. ANNEXES 279 4. Under Text services and input languages, click Details. The Text Services and Input Languages dialog box appears. 5. If the language that you want to type in is not listed under Installed Services, or if the language that you want is listed but the keyboard is not listed under it, click Add. 280 ANNEXES Regional and Language Options 6. In the Input Language list, select the language that you want to type in. The Keyboard layout/IME field is automatically populated for you. 2 Note If the language that you want to type in is not listed, see “How to install additional languages” section.. 7. Click OK. 8. Under Installed Services, you see the selected language with a keyboard installed. 9. Click OK to close the Text Services and Input Languages dialog box, and then click OK to close the Regional and Language Options dialog box. Specify the language that is used for Medialon Manager To specify the language that is used by Medialon Manager, follow these steps: 1. Click Start, and then click Control Panel. 2. In Control Panel, click Language, and Regional Options. 3. Click the Advanced tab. 4. Select the language version of the non-Unicode programs you want to use. 5. Click OK. ANNEXES 281 How to install additional languages If the language that you want to type in is not listed in the "Configure Windows to type in multiple languages" section, you can add languages by modifying the Regional Options. The Regional Options are in Control Panel. To do this, follow these steps. 1. Click Start, and then click Control Panel. 2. In Control Panel, click Language, and Regional Options. 3. Click Add other languages. 4. On the Languages tab, click to select the Install files for East Asian languages check box. 5. Click Apply, and then click OK. 6. Restart your computer when prompted. If you are not prompted, click Start, click Shut Down, and then click Restart. 282 ANNEXES REFERENCES In this section, find Medialon Manager software shortcuts list and index. REFERENCES 283 284 REFERENCES Keyboard Shortcuts Keyboard Shortcuts File main menu New Project Ctrl+N Create e new empty project Open Project Ctrl+O Open and load an existing project file Save Project ctrl+S Save the current project into file Debug F2 Switch to Debug mode User Ctrl+F2 Switch to User Mode Run F3 Switch to Run mode Stop ESC Switch to Stop mode Print Ctrl+P Print the selected view Quit Ctrl+Q Quit the application Edition main menu Undo Ctrl+Z Undo the last action Redo Shift+Ctrl+Z Redo action previously undone Cut Ctrl+X Cut the selected item or text into the clipboard Copy Ctrl+C Copy the selected item or text into the clipboard Paste Ctrl+V Paste the content of the clipboard Select All Ctrl+A Select all items or text Group Ctrl+G Group selected objects Ungroup Ctrl+U Ungroup selected objects Lock Ctrl+Y Lock selected object Unlock Shift+Ctrl+Y Unlock selected objects Push to Back Ctrl+B Push selected graphical to the background Pull to Front Ctrl+F Pull selected graphical object to the foreground Find... Shitf+Ctrl+F Launch the Finder window REFERENCES 285 Object main menu Duplicate Ctrl+D Duplicate selected object New Device Ctrl+Ins Create a new Device New Variable Shift+Ins Create a new User variable New Task Ctrl+T Create a new TimeBased task New Task Editor Shift+Ctrl+T Open a empty task editor Windows main menu Browser F5 Show and give the focus to the Browser tab Lister F6 Show and give the focus to the Lister tab Properties F7 Show and give the focus to the Properties tab Device Map F8 Show and give the focus to the Device Map tab UserScreens F9 Show and give the focus to the Screens tab Control Center F10 Show and give the focus to the Control Center tab UserScreens List Ctrl+F5 Show the UserScreen node in the Browser and give the focus to the list of UserScreens in the Lister Devices List Ctrl+F6 Show the Devices node in the Browser and give the focus to the list of Devices in the Lister Variable List Ctrl+F7 Show the Variables node in the Browser and give the focus to the list of Variables in the Lister Task List Ctrl+F8 Show the Tasks node in the Browser and give the focus to the list of Tasks in the Lister TimeCode Calculator Ctrl+F11 Show the TimeCode Calculator tool Help main menu Manager Help F1 Launch Manager V5 User Guide MxM Help Shift+F1 Launch MxMs’ Help index 286 REFERENCES Keyboard Shortcuts Workspace navigation Area switch forward F4 Switch between opened Areas in forward direction Area switch backward Shift+F4 Switch between opened Areas in backward direction Tab switch forward Ctrl+F4 Switch between opened Tabs inside an Area in forward direction Tab switch backward Shitft+Ctrl+F4 Switch between opened Tabs inside an Area in backward direction Browser Tab Navigation Select Next Down Arrow Select the next item in the list Select Previous Up Arrow Select the previous item in the list Expand / Select Next Right Arrow Expand selected node or Select next node in the expanded node Collapse / Select Previous Left Arrow Collapse selected node or Select previous node in the collapsed node Lister Tab Navigation Select Next Down Arrow Select the next item in the list Select Previous Up Arrow Select the previous item in the list Create New Object INS Create a new Object of the same type the Lister is being listed Properties Tab Navigation Select Next Down Arrow Select the next editable item in the list Select Previous Up Arrow Select the previous editable item in the list Select Next Mouse Wheel Down Select the next editable item in the list Select Previous Mouse Wheel Up Select the previous editable item in the list Edit Selected Right Arrow Begin edition of the selected parameter Validate edition Enter When a parameter is edited, validate the edition REFERENCES 287 Cancel edition Esc When a parameter is edited, cancel the edition Test Command Enter When selected object is a command, execute the command Select Next Ctrl + Mouse Wheel Down Select the next item in the list Select Previous Ctrl + Mouse Wheel Up Select the previous item in the list Task Editor Tab Navigation Insert Cue INS Open the contextual menu to create a cue Create Expression Cue Ctrl+E Create an Expression Cue Create Wait Cue Ctrl+W Create a Wait cue (StepBased task only) Create While/EndWhile Cue Ctrl+H Create While/EndWhile Cue (StepBased task only) Create If/Else/EndIf Cue Ctrl+I Create If/Else/EndIf Cue (StepBased task only) Create WaitFor Cue Ctrl+K Create a WaitFor Cue (StepBased task only) Create OnExpression/ Case Cue Ctrl+J Create OnExpression/Case/EndOnExpression Cue (StepBased task only) Create Case/EndCase Cue Ctrl+J Create new Case/EndCase Cue inside an OnExpression/EndOnExpression Cue Re-Insert last Cue Alt+R Re-Insert the last Cue created Create Message Cue Shift+M Create a Message Cue Create Comment Cue Alt+Shift+C Create a Comment Cue Create CountDown Cue Alt+C Create CountDown Cue (TimeBased task only) Add Cue to Library Shift+A Add selected Cue to the Library Insert Cue from Library Shift+I Open Library Menu to insert a Cue Desactivate cue Shift+S Desactivate selected Cue Activate Cue Shift+N Activate selected Cue Toggle Pause Point Alt+P Toggle Pause Point Edit Cue ENTER Edit selected Cue (default parameter) 288 REFERENCES Keyboard Shortcuts Delete Cue DEL Delete selected Cue Expand Cues Shift+X Expand in time selected Cues (TimeBased task only) Compress Cues Shift+C Compress in time selected Cues (TimeBased task only) Distribute Cues Shift+D Distribute regularly in time selected Cues (TimeBased task only) Offset Cue Time + or - Allow to enter an offset to apply to the time position of selected Cue (TimeBased task only) Offset/Modify Cue Time = Allow to add/substitute an offset or modify the time position of selected Cue (TimeBased task only) Select next Cue Right Arrow Select next Cue in the Timeline view Select previous cue Left Arrow Select previous Cue in the Timeline view Select next Cue Down Arrow Select next Cue in the List view Select previous cue Up Arrow Select previous Cue in the List view Select next Track Down Arrow Select the next track in the Timeline Select previous Track Up Arrow Select the previous Track in the Timeline Navigate from Tab to Tab Ctrl+Tab Navigation from Tab to Tab inside Task Editor Move Cue by 1/10s Forward Alt+Right Arrow Move selected Cue in the Timeline by 1/10s Forward Move Cue by 1/10s Backward Alt+Left Arrow Move selected Cue in the Timeline by 1/10s Backward Move Cue by 1/100s Forward Ctrl+Alt+Right Arrow Move selected Cue in the Timeline by 1/100s Forward Move Cue by 1/100s Backward Ctrl+Alt+Left Arrow Move selected Cue in the Timeline by 1/100s Backward Move Cue to next Track Alt+Down Arrow Move Cue to the next Track in the Timeline Move Cue to previous Track Alt+Up Arrow Move Cue to the previous Track in the Timeline Move Time Cursor by 1/ 10s Forward Shift+Right Arrow Move the Time Cursor by 1/10s forward in the Timeline Move Time Cursor by 1/ 10s Backward Shift+Right Arrow Move the Time Cursor by 1/10s Backward in the Timeline REFERENCES 289 Select All Cues Ctrl+A Select All Cues in the List view Select All Cues in Track Ctrl+A Select All Cues in the selected Track in the Timeline Select All Cues in Timeline Ctrl+Shift+A Select All Cues in the Timeline Select Cues from Start Shift+F Select all Cues from the start of the Timeline to cursor position in the active track Select Cues to End Shift+T Select all Cues from cursor position to the end of the Timeline in the active track Select Cues from Start Ctrl+Shift+F Select all Cues from the start of the Timeline to cursor position in all tracks Select Cues to End Ctrl+Shift+T Select all Cues from cursor position to the end of the Timeline in all track Select First Cue HOME Select the first Cue of the task (TimeBased task only) Select Last Cue END Select the last Cue of the task (TimeBased task only) Deselect all ESC Deselect All Start/Pause SPACEBAR Start or Pause the task Time X window navigation Start/Insert Cue SPACEBAR Start Time X distribution or Insert the next Cue in the timeline End of Time X ESC Terminate Time X distribution UserScreens manipulation Move Object Left Alt+Ctrl+Left Arrow Move left the selected Object Move Object Right Alt+Ctrl+Right Arrow Move right the selected Object Move Object Up Alt+Ctrl+Up Arrow Move up the selected Object Move Object Down Alt+Ctrl+Down Arrow Move Down the selected Object Resize Object (decrease width) Alt+Shift+Left Arrow Decrease width of the selected Object 290 REFERENCES Keyboard Shortcuts Resize Object (increase width) Alt+Shift+Right Arrow Increase width of the selected Object Resize Object (decrease height) Alt+Shift+Up Arrow Decrease height of the selected Object Resize Object (increase height) Alt+Shift+Down Arrow Increase height of the selected Object Color Picker Ctrl+Alt+Mouse Click Add pointed object color to custom color Action on Double click The use of the double click is widely implemented in Manager and can greatly accelerate your programing speed. Cue double click Opens up the default parameter in the properties tab for editing. Variable double click In the Lister, opens the properties for editing (if possible). Device Map double click Double clicking the background will open the bitmap property. Task double click • Name or Browser Icon: Opens the task in an editor. • Start Condition: opens the Edit Expression window of the start condition. • Comments: Opens the comment property. Ctrl + Task double click In the Browser or on the name in the Lister, opens the Task Setup window. Shift + Task double click In the Browser or on the name in the Lister (TimeBased tasks only), opens the Task Control Window in the Control Center. Alt + Task double click In the Browser or on the name in the Lister (TimeBased tasks only), opens the Task Control Window as a floating window. Device double click Opens the device commands in the Lister. Ctrl + Device double click Opens the device setup window. Shift + Device double click Opens the device control panel in the Control Center Tab. REFERENCES 291 Alt + Device double click Opens the device control panel as a floating window. Command double click Opens up the default parameter in the properties tab. UserScreen double click Opens the UserScreen in the Screen tab. User Group double click Opens the content of the group. 292 REFERENCES INDEX INDEX A One Time 100 Still Down 100 Toggle 100 Effect 100 Status 100 Text Single Line 100 Word Wrap 100 Transparent 100 Variables 101 About Medialon Manager 213 Your Computer 213 Adlink NuDAM Module 238 NuDAM Resources I/O Port 237 PCI-7432 Board Wiring 243 PCI-7432 Resources I/O Port 243 C Close Control Panels 212 Menu 212 User Screen 97, 212 Adrienne 253 RG1 PCI Resources TimeCode Port 253 USB-TC Resources TimeCode Port 253 Color Custom Color 105 Editor 105 Selector 105 Advantech ADAM Resources I/O Port 231 Container 104 AMX NetLinx Resources I/O Port 226 IR Port 228 MIDI Port 224 Scan 220 Serial Port 222 Resources Addressing 218 Device ID 218 IP Address 219 Port ID 219 System ID 218 ArtNet Scanner 259 See also DMX B Bitmap 107 Device Control Panel 82, 145 Display 82, 145 Drag Device 158 Control Center 35, 53 View 212 Control Panel Close All 212 Device 13, 53, 82, 145 Object 209 Task 12, 83 Convert Project 191, 207 XML File 191 Cue Copy 68, 135 Countdown 65 Delete 68, 135 Device Auto Selection 189 Double Click 291 Edit 66 Expand 70 Expression 119 Variables Filtered Selection 120 Flash Control Disable 85, 148 Execute 85, 148 Library 71, 148, 161 Add Cue 161 See also Image Blind Mode 74, 137 Browser 33 Object 33 Resources 33 Task 85 User Group 33 View 212 Button 100 Behavior Normal 100 REFERENCES 293 Delete Cue 163 Insert Cue 162 Logical Command 142 If/Else/Endif 142 OnExpression/Case 144 Wait 142 Wait For 143 While/EndWhile 142 Management 68, 135 Compress 70 Disable 69, 136 Distribute 70 Group 69, 136 Size 71 Time +- 71 Message 64 Move 68, 135 New 62, 134 Properties 66 Recording 76 Replace Device 188 Selection 67, 134 Time-X 71 Tools Value Selector 67 Value Wizard 67 Variable Parameter 114 Cues Drag and Drop 160 D Debug Mode 16, 207 Delete Cue 68, 135 Object 209 Task 87, 150 Unused Variable 211 User Screen 97 Workspace 211 Description Device 43 Device 41, 220 Activity 82, 145, 210 Auto Selection 189 Browser 212 Commands 54 Device Control 82, 145 Container 82 Control Panel 13, 53, 82, 145 Description 43 Device Map 35, 212 Device Replacement Cue Replace 188 Replace By 189 Disable 82 294 REFERENCES Double click 291 Drag and Drop Command 158 Help 55 Manager On Network New 175 Shared Group 168 Variables 179 Manager on Network 175 Commands 176 Menu 210 Name 43 New 41, 210 Positrack 82, 145, 210 Properties 43 Replace by 210 Resources 44 Default Configuration 53 DMX Ports 48, 255, 260 Infrared Ports 52 AMX NetLinx 228 Input/Output Ports 51, 226, 231, 234, 237, 245, 251 MIDI Ports 47, 224 Serial Ports 45, 222 TimeCode Ports 50, 253, 269 Testing 53 User Mode Rights 43 Variables 211 Digital Slider 101 Status 101 Variables 101 Disable Cue 69, 136 Device 82 DMX ArtNet Scanner 259 Setup 259 Patch 50, 257, 262 Setup 48 SoundLight Setup 255 DMX Ports ArtNet 259 Setup 48 SoundLight 255 Virtual Resources 49 Double click 291 Command 292 Cue 291 Device 291 Device Map 291 Task 291 User Group 292 INDEX User Screen 292 Variable 291 Logical 117 Start Condition 130 Drag and Drop 158 Cues 160 F Device Commands 158 Graphical Object 158 Tab 37 Tasks 160 Variables 159, 160 Duplicate Object 209 Task 87, 150 E East Asian languages 279 Edit Copy 208 Cue 66 Cut 208 Group 208 Paste 208 Select All 208 Task 87, 150 Undo 208 Editor Expressions 119 Object 209 StepBased 150 Task 60, 81, 211 Read Only 199 TimeBased 73 User Screen 94 Toolbar 98 Export 192 Menu 207 Task 192 Expression 83, 141 Expressions 117 Assignment 118 Editor 119 Evaluation 118 Operations 122 Calculating Date 123 Comparing time 123 Conversion rule 122 Converting Date 123 Converting Time 123 On Strings 122 Toggle Value 123 Value Selector 123 Operators 117 Arithmetical 117 Boolean 117 Function 125 REFERENCES Finder 183 Menu 209 Flash Control 85, 148 Disable 85, 148 Execute 85, 148 StepBased Task 148 Task Lister 85, 149 TimeBased Task 85 Function 125 see also Expression G Gauge 104 Status 104 Variables 104 Graphical Object 98 Align 209 Button 100 Behavior 100 Status 100 Variables 101 Color 100 Color Picker 106 Custom Color 105 Editor 105 Selector 105 Container 104 Digital Slider 101 Status 101 Variables 101 Drag and Drop 158 Dynamic Object 98 Gauge 104 Status 104 Variables 104 Hint 100 Image Bitmaps 100 Transparent 100 LED 103 Status 103 Variables 103 List 102 Status 102 Variables 102 Lock 209 Magnetic grid 209 Move Objects 210 New 99 Order 295 Pull To Front 209 Push To Back 209 Send To Back 209 Send To Front 209 Properties 99 Relief 100 Slider 101 Status 101 Variables 101 Static Object 98 Task Wizard 155 Text Control 138 Text Display 102 Variables 103 Text Edit 101 Status 101 Variables 102 Text Font 100 Tools Font Selector 105 Image Selector 107 Value Selector 107 Learning IR RedRat 265 RedRat Scan 269 Setup 52 Infrared Ports AMX NetLinx 228 RedRat 3 263 RedRat IRNetBox 264 Setup 52, 228, 269 Input/Output Resources 51, 226, 231, 234, 237, 245, 251 Input/Output Ports Adlink NuDAM 237 Adlink PCI-7432 243 Advantech ADAM 231 AMX NetLinx 226 ICP DAS PISO-P32x32 247 Opto22 SNAP 233, 234 Setup 51, 226, 231, 234, 237, 245, 251 Virtual Resources 231, 233, 237, 245, 250 H Help Device 55 Manager 213 Manager Internet Resources 213 Menu 213 MXM 56, 213 Hint Keyboard Shortcuts 285 L Label 80, 140 LED 103 Graphical Object 100 Hint Delay Color/State 103 Flash Frequency 103 Status 103 Variables 103 TimeBased 74 I ICP DAS PISO-P32x32 Board Wiring 249 PISO-P32x32 Resources I/O Port 247 Image Bitmaps 100 Image Folder 191 Selector 107 Transparent 100 Import 192 Menu 207 Project 192 Task 192 Infrared AMX NetLinx Scan 228 Setup 229 296 K REFERENCES Library 71, 148, 161 Add Cue 161 Delete Cue 163 Insert Cue 162 License 16 Lite 16 Panel 17 Pro 16 Registration 26, 213 List 102 Control 138 Items 102 Status 102 Variables 102 Lister 34 Flash Control 85, 149 Object 34 Task 85, 149 INDEX View 212 Virtual Resources 48 Windows MIDI 47 Log Traces 205 Manager Cue 206 MxM Traces 206 Trace into Console 205 Trace into File 205 MRC 44 See also Resources MXM 9 Activation 28, 208 Help 56, 213 Information 43 Low Level Communicator 11 Unused 29 Upgrade 193 M Magnetic grid 209 Manager Help 213 Internet Resources 213 Manager On Network Command Close UserScreen 177 Goto Label 178 Goto Line 179 Load Project 177 Open UserScreen 177 Pause Task 178 Show Task 179 Start Task 177 Device Setup Connection 175 Group 175 IP Port 175 Loggin/Password 175 Name/IP Addr 175 Network Detection 176 Login 202 User Group Shared 168 Manager Panel 181 Menu 207 Edit 208 File 207 Find 209 MXM Activation 208 Object 209 Device 210 Tasks 211 UserScreen 210 Variables 211 Preferences 208 Windows 211 Close 212 Help 213 Tools 211 View 212 Workspace 211 MIDI Ports AMX NetLinx 224 Setup 47, 224 N Network 173 Architectures 180 Device Commands 176 Network Detection 176 Setup 175 Variables 179 Manager On Network Login 175, 202 Manager Panel 181 Project Setup 202 Network Detection 202 Server IP Port 202 User Group Selection 175 Shared 168 Network Detection Setup 202 New Cue 62, 134 Device 41, 175, 210 Graphical Object 99 Project 207 Resource 45 Resources 45 StepBased Task 133 Task 87, 150, 211 Task Editor 211 TimeBased Task Track 61 User Group 165 User Screen 93, 210 Variable 110, 211 Notes TimeBased 62 O Object Browser 33 Control Panel 209 REFERENCES 297 Delete 209 Device 210 Duplicate 209 Editor 209 Group 208 Lister 34 Menu 209 Properties 34 Setup 209 Tasks 211 User Screen 210 Variables 211 Wizards 155 Resources Configuration 53 Runtime 201 Save 207 Properties Cue 66 Device 43 Graphical Object 99 Button 100 Digital Slider 101 Gauge 104 LED 103 List 102 Slider 101 Text Display 102 Text Edit 101 Page 96 Task 86, 149 User Screen 95 Variables 110, 111 View 212 Open Project 207 Opto22 SNAP Resources I/O Port 233 P Pause Point 85, 148, 190 Positrack 74 Device 82, 145, 210 Preferences 197 General 197 Log Traces 205 Menu 208 Network 202 Project 198 Runtime 201 Task 199 User Screen 203 Watchdog 204 Print 208 Printer Setup 207 Project Backup File 193 Browser 33 Convert 191, 207 First Start 25 Image Folder 191 Import 192 Q Quit 147, 208 R Recording Cues 76 RedRat IRNetBox Resources Infrared Port 264 Learning IR Signals 265 RedRat 3 Resources Infrared Port 263 Scan 269 Registration 26 Rename Device 43 Task 86, 149 Workspace 211 Requirement 17 Resources 33 Mode Debug 16, 207 Run 16, 207 Stop 15, 207 User 16, 207 Network 180 New 207 Open 207 Persistent Variable File 146, 191 Preferences 198 Recover 193 Resources 44 298 REFERENCES AMX Scan 220 Browser 33 Default Configuration 53 DMX Ports 48, 260 ArtNet 259 SoundLight 255 Infrared Ports 52 AMX NetLinx 228 RedRat 3 263 RedRat IRNetBox 264 Input/Output Ports 51, 226, 231, 234, 237, 245, 251 Adlink NuDAM 237 INDEX Adlink PCI-7432 243 Advantech ADAM 231 AMX NetLinx 226 ICP DAS PISO-P32x32 247 Opto22 SNAP 233 Management 44 MIDI Ports 47, 224 AMX NetLinx 224 Windows MIDI 47 MRC 44 New 45 Save 53 Serial Ports 45, 222 AMX NetLinx 222 Windows COM 46 TimeCode Ports 50, 253, 269 Adrienne RG1 PCI 253 Adrienne USB-TC 253 Virtual Resources 53 DMX ports 49 Input/Output ports 231, 233, 237, 245, 250 MIDI ports 48 Serial ports 46 TimeCode ports 253 Run Mode 16, 207 S Save Project 207 Resources 53 Workspace 38, 211 Screen User Screen 93, 94 Virtual Screen 94 Workspace 35 Select All 208 Cue 67, 134 Variable 115 Serial Ports AMX NetLinx 222 Setup 45, 222 Virtual Resources 46 Windows COM 46 Setup Manager On Network 175 Object 209 Resources ArtNet 259 DMX 48 Infrared 52 Input/Output 51, 226, 231, 234, 237, 245, 251 SoundLight 255 REFERENCES TimeCode 50, 253, 269 StepBased 150 TimeBased 87 Track 61 Slider 101 Status 101 Variables 101 Software Installation 23 Sound Beep 83, 146 SoundLight 255 See also DMX Start Condition 88, 130, 155 StepBased 133 Blind Mode 137 Command Expression 141 Logical Cues 142 If/Else 142 OnExpression/Case 144 Wait 142 Wait For 143 While 142 System 145 Device Control 145 Load New Data File 146 Mouse Control 146 Quit Manager 147 Sound Beep 146 Task 139 Call 141 Goto Label 140 Goto Line 140 Goto Time 140, 178 Lock 140 Pause 139 Show 141 Start 139 Stop 139, 178 Sync 139 UserScreen 137 Close 137 Goto Page 137, 177 List Control 138 Object Text Control 138 Open 137 Cue New 134 Editor 150 Flash Control 148 Disable 148 Execute 148 New 133 Pause Point 148 Setup 150, 151 Stop Mode 15, 207 299 System Command 81, 145 Device Control 82, 145 Load New Data File 146 Mouse Control 146 Quit Manager 147 Sound Beep 83, 146 T Task 12 Blind Mode 74, 137 Browser 85, 212 Command Expression 83, 141 Logical Cues 142 If/Else 142 OnExpression/Case 144 Wait 142 Wait For 143 While 142 System 81, 145 Device Control 82, 145 Load New Data File 146 Mouse Control 146 Quit Manager 147 Sound Beep 83, 146 Task 79, 139 Call 141 Goto Label 80, 140 Goto Line 140 Goto Time 80, 140, 178 Lock 80, 140 Pause 79, 139 Show 81, 141 Start 79, 139 Stop 79, 139, 178 Sync 80, 139 User Screen 78 UserScreen 137 Close 78, 137 Goto Page 78, 137, 177 List Control 138 Object Text Control 138 Open 78, 137 Control Panel 12, 83 Cue Countdown 65 Edit 66 Message 64 New 62, 134 Delete 87, 150 Double click 291 Duplicate 87, 150 Edit 87, 150 Editor 60 Read Only 199 Export 192 300 REFERENCES Flash Control 85, 148 Disable 85, 148 Execute 85, 148 Import 192 Lister 85, 149 Lock Task 74, 137 Menu 211 Name 86, 149 New 60, 87, 133, 150, 155, 211 New Editor 211 Pause Point 85, 148, 190 Positrack 74 Preferences 199 Properties 86, 149 Recording Cues 76 Start Condition 88, 130, 155 Status 85, 149 StepBased 12, 133 Setup 150, 151 TimeBased 12, 59 Duration 88 Setup 87 TimeCode 89 Time-X 71 Track 61 View List 84 Timeline 84 TimeCode 75 User Mode 171 Variables 86, 88, 151 Wizards 155 Tasks Drag and Drop 160 Text Display 102 Text Single Line 102 Word Wrap 102 Variables 103 Text Edit 101 Password Character 101 Status 101 Text Single Line 102 Type 102 Word Wrap 102 Variables 102 Theme 197 TimeBased 59 Blind Mode 74 Command Expression 83 System 81 Device Control 82 Sound Beep 83 INDEX Task 79 Goto Label 80 Goto Time 80 Lock 80 Pause 79 Show 81 Start 79 Stop 79 Sync 80 User Screen 78 UserScreen Close 78 Goto Page 78 Open 78 Control Panel 83 Cue Countdown 65 Edit 66 Message 64 New 62 Duration 88 Editor 60, 73 Flash Control 85 Disable 85 Execute 85 Hint Delay 74 New Positrack 74 Recording Cues 76 Setup 87 Smooth Scrolling 74 Time Zoom 74 TimeCode 75 Display 74 External 76 Internal 75 Jump conditions 90 Loss conditions 89 Setup 89 Sync conditions 89 TimeCode Offset 90 Time-X 71 Track 61 New 61 Notes 62 Setup 61 User Mode Rights 86, 149 View List 84 Timeline 84 TimeCode Calculator 211 Resources 50, 253, 269 Task 75 Tools 211 TimeCode Ports Adrienne RG1 PCI 253 Adrienne USB-TC 253 Setup 50, 253, 269 Virtual Resources 253 TimeLine 59 See also TimeBased Time-X 71 Toolbar User Screen 98 Workspace 32 Tools 211 Cue Value Selector 67 Value Wizard 67 Graphical Object Font Selector 105 Image Selector 107 Value Selector 107 Menu 211 Timecode Calculator 211 Variable Selection 115 Track 61 Notes 62 Setup 61 U Undo 208 Upgrade 193 User Group 33 Add Object 167 Double click 292 New 165 Shared 168 User Mode Rights 166 Variables Filtered Selection 115 User Interface 12 Built In 12 Device Control Panel 13 Task Control Panel 12 Custom 13 User Screen 13 User Mode 16, 207 Device 43 Rights 169 Task 86, 149 User Group 166 User Screen 95 Variable Screen 113 System 112 User 114 User Screen 13, 93 REFERENCES 301 Browser 212 Close 97 Close All 212 Command 78, 137 Close 137 Goto Page 137, 177 List Control 138 Object Text Control 138 Open 137 Delete 97 Double click 292 Editor 94 Graphical Object 98 Button 100 Container 104 Digital Slider 101 Dynamic 98 Gauge 104 LED 103 List 102 New 99 Slider 101 Static 98 Text Display 102 Text Edit 101 Magnetic grid 209 Menu 210 Move Objects 97, 210 New 93, 210 Open 97 Page 96 Background Page 97 Color 96 Goto First 210 Goto Last 210 Goto Next 210 Goto Previous 210 Image 96 Properties 96 Preferences 203 Properties 95 Screen Tab 35, 93, 94 Style Border Window 95 Full Screen 96 Movable Window 96 Single Window 95 Target screens 203 Toolbar 98 User Mode Rights 95 View 212 Virtual Screen 94 UserScreen V Variable Date 110 Double click 291 Integer 109 Name 111 New 110 Persistent 110 Properties 111 Real 109 Screen User Mode Rights 113 String 109 System User Mode Rights 112 Time 110 User User Mode Rights 114 Variables 14, 109 Browser 212 Cue Parameter 114 Filtered Selection 116 Selection 115 Delete Unused 211 Device 211 Drag and Drop 159, 160 Graphical Object Button 101 Digital Slider 101 Gauge 104 LED 103 List 102 Slider 101 Text Display 103 Text Edit 102 Menu 211 Network 179 New 211 Persistent Variable File 146, 191 Properties 110 Screen 14, 109 Properties 113 System 14, 109 Properties 111 Task 86, 88, 151 User 14, 109, 110 Properties 114 Wizards 157 View Browser 212 Control Center 212 Device List 212 Device Map 212 Command Close 78 Goto Page 78 302 Open 78 REFERENCES INDEX Lister 212 Menu 212 Properties 212 Task List 212 TimeBased List 84 Timeline 84 User Screen 212 User Screen List 212 Variable List 212 Detached 38 Move 37 Themes 39, 197 Toolbar 32 Virtual Resources 53 DMX Ports 49 Input/Output Ports 231, 233, 237, 245, 250 MIDI Ports 48 Serial Ports 46 TimeCode Ports 253 Virtual Screen 94 W Watchdog 273 Activity time out 204, 274 Email 276 Failure Action 274 Log Event 275 Preferences 204 Restart delay 204 Windows MIDI Resources 47 Serial Resources 46 Wizard Cue Parameter Value 67 Drag and Drop 158 Graphical Object 155 Task 155 Variable 157 Workspace 31 Area Resize 36 Split 36 Browser tab 33 Control Center 35 Control tab 35 Custom 36 Delete 211 Device Map tab 35 Lister tab 34 Menu 211 Properties tab 34 Rename 211 Save 38, 211 Screens tab 35, 93 Tab Copy 37 REFERENCES 303 304 REFERENCES NOTE NOTE Medialon 101 rue Pierre Sémard F92324 Châtillon Cedex France Tel: +33 (0)1 46 55 60 70 Fax: +33 (0)1 46 55 54 83 www.medialon.com Medialon Inc. 2977 McFarlane Road, Suite 301 Miami, FL 33133, USA Tel: +1 305 445 4045 Fax: +1 305 445 4048 www.medialon.com