1
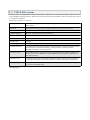
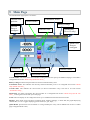
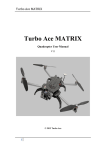
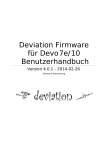
Deviation Firmware
for Devo 7e/10/12E
User's Manual
version 4.1-dev
June 10, 2015
Contents
1 Overview
3
1.1 Disclaimer
4
1.2 Notices
4
1.3 Legal status and copyright
4
2 Installation
5
2.1 New installation
5
2.2 Upgrade notes
6
2.3 USB & File-system
7
3 Reporting Bugs
8
4 A Note About this Manual
9
5 Main Page
5.1 Safety System
6 Navigating
6.1 Navigating with the physical buttons
10
11
12
12
1 Overview
Deviation is a replacement firmware for the Walkera Devention™ series (Devo) transmitters. The primary goal is to
add support for multiple protocols, opening the full potential of this platform. The core of the deviation firmware is
the mixer system, which is modeled after the system used in the Er9X firmware for the Turnigy/Flysky9x™
transmitters.
Deviation also brings USB file-system support, making it easy to manage the transmitter from any PC without the
need for specialized upload/download tools.
Deviation has been designed for ultimate configurability. All model and transmitter configuration is controlled
through text files which the firmware (or user) can read and write. It is easy to know exactly what is configured, as
well as to modify the configuration either through the transmitter or with a text editor. The main screen is very
customizable; any mix of inputs, switches, channel data, or timers can be displayed, and configured per-model.
Deviation supports multiple protocols without any modifications to the transmitter:
• Walkera Devo 6/7/8/10/12
• Walkera WK2401 / WK2601 / WK2801
• DSM2 / DSMX
• Nine Eagles J6 Pro (requires telemetry module)
Deviation can support other protocols with very easy transmitter modifications (appropriate transceiver module
needed):
• Flysky (also for WLToys V911, V9x9, and Xieda 9938)
• Hubsan-X4
• Skyartec
• V202
• SLT
• HiSky
Deviation supports (flight) simulators connected via DSC cable (PPM) or USB cable (USBHID). Deviation also
allows Buddy-Box and FPV setups.
Deviation can store up to 255 different models, and uses a portable syntax that allows sharing models between any
transmitter supported by Deviation.
Deviation has been internationalized and comes with translations for English, Afrikaans, Traditional Chinese, Dutch,
Spanish, French, German, Hungarian, Italian, Romanian, Russian and Chinese. New languages can be added by
installing the proper translation file.
1.1 Disclaimer
Deviation is experimental software. There are no guarantees made or implied about the quality or reliability of this
software. RC models can cause serious injury or even death if flown improperly. By deciding to use the Deviation
software, you are taking sole responsibility for the control of your models. The authors of Deviation will not be held
responsible for any injury or damage whatsoever caused by the use of the Deviation firmware. Be careful and
cautious.
1.2 Notices
Deviation is an independent work. The Deviation project is not affiliated, supported or acknowledged by Walkera®.
The authors have never been in contact with Walkera nor do they know of Walkera’s stance on this project. The
Deviation team provides no guarantee that the Deviation firmware will not harm your transmitter (although this
should not be possible). There is also no guarantee that Walkera® will not make changes to future versions of the
hardware, firmware of Dfuse tool which would make it incompatible with Deviation.
1.3 Legal status and copyright
This project is free software: you can redistribute it and/or modify it under the terms of the GNU General Public
License as published by the Free Software Foundation, either version 3 of the License, or (at your option) any later
version.
Deviation is distributed in the hope that it will be useful, but WITHOUT ANY WARRANTY; without even the
implied warranty of MERCHANTABILITY or FITNESS FOR A PARTICULAR PURPOSE. See the GNU General
Public License for more details.
You should have received a copy of the GNU General Public License along with Deviation. If not, see
www.gnu.org/licenses.
The Deviation Project is hosted at www.deviationtx.com and the Source are available at
http://bitbucket.org/deviationtx/deviation.
2 Installation
2.1 New installation
Installation of Deviation is done in exactly the same manner as upgrading the Walkera Devention firmware. Note
that Deviation will NOT overwrite Walkera models stored on the transmitter. While they cannot be accessed by
Deviation, they will be safely preserved should the Walkera firmware ever need to be reinstalled
NOTE: As a result of memory limitations with the Devo12 firmware, the original models will be lost when
switching to Deviation.
First
download
and
unzip
the
deviation-devoXX-x.y.z.zip
firmware
from
http://www.deviationtx.com/repository/Deviation-Releases/ where XX is the number of your Walkera Devo™
transmitter. x.y.z identifies the deviation version number. Normally you should use the latest one.
Upgrading is done using the Walkera ‘DfuSe USB Upgrade’ tool for Windows. You can download this tool directly
from Walkera:
http://www.walkera.com/en/upload/upgrade/DevoDfuSe%20V2.0.zip.
NOTE: Do NOT attempt to use the DfuSe tool from STMicroelectronics!
Unzip the upgrade tool and install locally. It is recommended that you test the DFU tool by first upgrading your TX
to a different version of Walkera firmware.
Plug the transmitter into the PC via USB, and turn on the transmitter while holding ‘EXT’ to enter programming
mode. On the Devo12, this is done by holding the trainer switch instead.
Several users have reported compatibility issues with Windows™ and/or USB ports when running this tool. If Dfuse
do not recognition your TX, try removing all USB devices and restart your PC with only the USB connection to the
TX.
If your transmitter has been connected correctly 'STM Device in DFU Mode' will be displayed under 'Available DFU
Devices'. Otherwise this field will remain blank.
1. Press the '...' button and select the deviation-devoXX-vx.y.z.dfu file to install.
2. Select 'Upgrade' to install the firmware. This will be grayed-out if your transmitter is not detected. Do NOT
use ‘Upload’ as this will destroy the dfu file on your PC.
3. Devo12 Only: Select the 'Library' tab, click '…' select the devo12-lib.dfu from the zip file. Then select
'Upgrade' again to install the library.
Turn off the transmitter, and turn back on while holding ‘ENT’. There should be a USB logo on the screen. If this is
a first-time install of Deviation, the PC should prompt to format a drive. Format using default options.
Open the folder of the zip and copy all the files and directories inside this folder to the root of the transmitter USB
drive. For details of the file-system please see 2.3 USB & File-system . The files with the extension zip, and dfu need
not to be copied.
2.2 Upgrade notes
If you are upgrading from a previous Deviation release, it is strongly recommended that you back-up the ‘models’
directory from the transmitter as well as the tx.ini file to ensure you don’t lose any model or transmitter
configuration. Copy all directories except for the ‘models’ directory and the tx.ini file to the transmitter. Optionally,
copy the ‘models’ directory to the transmitter except for the currently configured model files. This last step will
ensure that the defaults for newly created models have the latest options set. If the tx.ini file is overwritten, the stick
calibration must be repeated and any settings reset.
2.3 USB & File-system
Deviation stores all configuration, bitmaps, and models as regular files on the USB file-system. USB can be most
easily enabled by holding down the ‘ENT’ button while powering up the transmitter. Files can then be easily copied
to or from the transmitter.
The directory structure is as follows:
\tx.ini
Transmitter configuration. Includes trim settings, calibration data, and the last-used
model number
\errors.txt
If the firmware crashes or reboots, debug information will be stored in this file
\datalog.bin
File for telemetry data
\media\config.ini
The color scheme and fonts for the transmitter
\media\sound.ini
Contains notes to play for various alarms
\media\*.bmp
Images used for the current transmitter theme
\media\*.fon
Font files
\models\default.ini
The default model, loaded whenever a model is cleared
\models\model*.ini
Configuration files for each model. Due to a limitation in the firmware, deviation cannot
create new files. It is therefore necessary to have a modelxx.ini for each model
regardless of whether it is currently in use.
\modelico\*.bmp
All available model icons (96x96 pixels is recommended but not required). Model icons
must be saved as 16-bit BMP files in either RGB565 (non-transparent) or ARGB1555
(transparent) format.
\templates\*.ini
Configuration files used when loading predefined templates. These are nearly identical
to the model configuration files, however they do not necessarily define all parameters
\language\lang*.*
Language translation files. These are UTF-8 text files containing the English string and
the respective translated string.
Note: Deviation only supports 8.3 style file names. That means file names should be no larger than
'xxxxxxxx.yyy'**
3 Reporting Bugs
Nobody is perfect.
This firmware has been developed carefully and has been successfully tested by many users around the world.
Nevertheless under some circumstances it could happen that the transmitter does not work as you expect. Sometimes
this behavior will be a handling problem and sometimes a real bug. Do not hesitate to ask the community at
http://www.deviationtx.com/forum. Please bear in mind that the firmware can only improved with your help.
If you find a bug in Deviation, please report it here: http://www.deviationtx.com/mantisbt
You will need to register for an account on the Deviation forums to submit a bug. That account will also allow you to
communicate with the Deviation community, and will enable you to get email updates when the bug is
updated/fixed.
Please provide as much information as possible in your ticket. Include: * Build version (you can find this on the
'USB' page of the transmitter) * Did you compile yourself, or download the dfu? * Type of transmitter (Devo8,
Devo7e, Devo8-emulator,...) * Have you tried reproducing this on the emulator? * Is this easily reproducible? If so,
please provide step-by-step instructions * What protocol are you using? * If your transmitter rebooted, please
provide the errors.txt on the root file-system of the transmitter along with the 'debug-devo???.zip file that came with
the dfu
The more detail you can provide, the faster fixing the issue will be.
4 A Note About this Manual
The images in this manual will generally show the Devo7e/10/12E interface. In some cases the Devo7e may not
support a given feature or the screen may be slightly different. Situations where the Devo7e, 10, or 12E behave
differently will be noted accordingly.
5 Main Page
The standard main page layout is as follows:
Throttle stick
position
Tx Icon
Press to
configure
Transmitter Power
Current Model
Battery Voltage
Vertical Trims
Current time
(Devo 12 only)
Model Icon
Press to
configure
Countdown
Stop watch
Switch Indicators
Channel values
Horizontal Trims
Current Model: The name of the current model. Clicking the label will open up the Model Load page. The model is
configured from section `Model setup (Std & Adv GUI)`_.
Battery Voltage: Numerical representation of current transmitter battery state.
Transmitter Power: This indicates the currently selected transmitter power. It is configured from section `Model
setup (Std & Adv GUI)`_.
Current Time: This indicates the current time (on Devo12 transmitters only). The time is set from section
`Transmitter config`_.
Model Icon: An image representing the current model. It is configured from section `Model setup (Std & Adv
GUI)`_. Pressing the icon will take you to that page.
Trims: The trim display can be configured to show up to 10 different horizontal and vertical trims.
Displays: These items can be text-boxes containing input, channel, telemetry, or timer data; bar graphs displaying
channel data; or icons / toggles displaying specific states (ex. gear, flaps,…).
Quick Menus: Quick menus can be reached via a long UP/DN press. They can be defined from section 8.7 Main
page config (Std & Adv GUI).
5.1 Safety System
Deviation has a safety system to prevent starting up in a
dangerous state (for instance spinning up the main rotor of a
helicopter accidentally). The safety system works by verifying
that specific conditions are met before starting to transmit to
the model. By default the output channel associated with the
throttle stick must be minimum. The Deviation firmware does
not include a mechanism to define new safety conditions,
however, they can be added my directly modifying the
model.ini file. While the safety message is displayed, the
transmitter will not communicate with the model. This message
may appear either when initially turning on the transmitter, or
when switching to a different model. The message will disappear automatically once all safety conditions have been
met or when 'OK' is pressed. In either case, Deviation will start communication with the model once the dialog is
dismissed.
6 Navigating
The transmitter menus can be navigated via the physical buttons UP, D(ow)N, L(eft), R(ight), ENT(er), EX(i)T. All
buttons and switches have been marked with the same descriptions as used in this manual.
The main menu is accessed by pressing ‘ENT’ on the main menu.
There are two types of spin-boxes available: 1. Spin-boxes consisting of both arrows and an oval may act both as
spin-boxes (for selecting a value) and as a button (which can have various effects). 2. Spin-boxes that contain only
arrows and no oval do not act as buttons, and are only used for value selection. Note that a spin-box may change
between being pressable or not for different values of the spin-box.
Button: Press 'ENT' to activate
Pressable Spin-Box:
Press 'ENT' to activate
L/R to change selection
Spin Box: L/R to change selection
Unselected
Selected
6.1 Navigating with the physical buttons
• On all menu pages, ‘UP’ and ‘DN’ are used to navigate to the previous/next item.
• The ‘R+’ and ‘L-’ buttons are used on spin-box widgets to increase or decrease the selected value. In some
cases holding down the button will use larger step values to move more quickly to the desired value.
• For buttons and rounded-spin-boxes, pressing ENT’ will press the button,
• Pressing ‘EXT’ will remove selection form the current item. A long-press of ‘EXT’ will exit one (1) menu
level.