Transcript
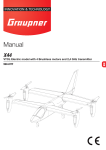
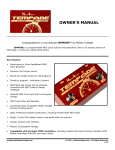
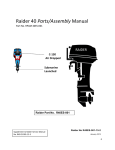
RC Helicopter
Close-up of Helicopter
14 +
Ove
r 10
Stabilizer bar
Propeller A
Parts Identification
Tail rotor
O
Motor
Power switch
Landing gear
Close-up of Remote Control
Helicopter
Omni-directional
control stick
Throttle
Antenna
Charging
indicator
Power switch
Forward/backward trim
Left/right trim
Assembling the Remote Control
1. Screw the antenna into the top of the remote control and tighten. Do NOT over tighten. (Fig. 1)
2. Battery Installation
Helicopter
charging
jack
a. Make sure the power is switch off on the remote control before installing the batteries.
Remote control
Fig. 1
et
fe
feet
Fig. 7
Lift-Off Procedure
Charging the Helicopter
1. On the helicopter, make sure the two green connecting plugs are connected.
2. Plug in the DC 8.4V power adapter into an
outlet (Fig. 3).
3. Insert the other end of the DC 8.4V power
adapter into adapter input port of the battery
charger. The power indicator (green light) will
turn on. (Fig.4).
Fig. 3
Fig. 4
Fig. 5
4. Insert the white 3 pin plug on the helicopter
battery into the helicopter charging jack located
on the battery charger. The charging indicator (red light) will turn on. The red light will turn off
once the helicopter battery is completely charged. (Fig. 5).
b. Using a Phillips screwdriver, unscrew the battery cover on the back of the remote control and insert
8 ‘AA’ 1.5V alkaline batteries (not included) into the battery compartment. Make sure to follow
indicated polarities (Fig. 2). Replace the battery cover and screw in. Do NOT over tighten.
c. When the power light remains on after the remote is turned on, the batteries are working. When
the power light begins blinking, the batteries are dying and need to be replaced.
Battery Notes: Do not mix old and new batteries. Do not mix different types of batteries. Only use
‘AA’ alkaline batteries for this product. Remove batteries if this product not going to be used for a
long time. Always remove exhausted batteries from the product and dispose of safely.
1. Once the helicopter is on and you have pushed the throttle to the high, low, and middle positions you
can slowly increase the throttle.
2. DO NOT look at the transmitter but focus on the helicopter.
3. As soon as the helicopter leaves the ground, reduce the throttle slightly.
4. GENTLY add the throttle if the helicopter goes down too far.
5. GENTLY reduce the throttle if helicopter goes up too high.
6. For turning, give short and small inputs to the omni-directional control stick. (Most beginners will over
control the helicopter)
Battery Charger Notes: Use the included adapter and no other to charge the battery charger. Wait
30 minutes after flying the plane to re-charge the helicopter battery.
Hovering
Flight Environment
1. Fly this helicopter in an outdoor environment with calm air conditions. Flying in extreme heat or cold
may affect the operation of this helicopter.
2. It is recommended to fly this helicopter in a space large enough to create a 10 foot radius from the pilot.
3. Please keep the flying space clear of any obstructions. Please keep the helicopter clear of people and
animals as you are flying it.
Forward
and
Backward
When you push up the omnidirectional control stick, the nose
points down and the helicopter is
moving forward. When you push
down the omni-directional control
stick, the nose inclines up and the
helicopter is moving backward.
(Fig. 12 & 13)
Turning Left
and Right
When the helicopter flies steadily,
you can slowly push the throttle
stick up to make it fly higher or
release the stick a bit to make it fly
lower. Only small amounts of stick
position change are required for
smooth flight. (Fig. 8 & Fig. 9)
Hold the helicopter at a desired
height. Push the omni-directional
control stick toward the left to turn
the helicopter left (Fig. 10) and
push the omni-directional control
stick toward the right to turn the
helicopter right (Fig. 11).
Fig. 10
Troubleshooting:
Problem
Cause
Solution
Power switch is off.
Turn power switch on.
Remote control has no
power/weak power.
Batteries are improperly
installed.
Make sure batteries are
inserted according to
indicated polarity.
LED light on remote control
is blinking.
Batteries are weak.
Replace old batteries with
fresh ones.
The helicopter doesn’t
receive a signal.
Helicopter is not turned on.
Make sure to turn the small
power switch on the side of
the helicopter on.
NOTE: If the helicopter is less than 1 foot from the ground, the vortex from the spinning blades can create
flying issues. Please make sure to fly the helicopter above this height.
The helicopter doesn’t
receive a signal.
Antenna is improperly
inserted.
Remove antenna and
re-insert into remote control.
NOTE: The tail blade may not always spin as you are flying. Please note that this is normal as long as
you are able to control the helicopter.
Unable to control helicopter.
Strong winds.
Make sure to use
the helicopter in calm
conditions only.
Helicopter does not lift.
Main rotor blades are
rotating too slowly.
Push up on the throttle.
Helicopter does not lift.
Battery is not fully charged.
Make sure the battery is
completely charged.
Helicopter lands too
quickly/hard.
Loss of control on the throttle
or pulling down on the
throttle too quickly.
Pull down the throttle slowly
until the helicopter lands
smoothly.
Fig. 13
Trimming the Helicopter
1. Gently push the throttle up to raise your helicopter about 3 feet high.
2. If the helicopter dips forward or backward (Fig. 14), turn and release the forward/backward trim in the
opposite direction repeatedly until the balance is adjusted.
3. If the helicopter spirals left or right (Fig. 15), turn and release the left/right trim in the opposite direction
repeatedly until the balance is adjusted.
Fig. 14
Fig. 8
Fig. 9
Fig. 12
Remote control has no
power/weak power.
Controlling Your Helicopter:
5. The battery takes approximately 150 minutes to charge fully for approximately 6 minutes of continuous
flight time.
*When the helicopter is not in use, disconnect the green connecting plugs to avoid the battery from
discharging.
Power light
0
r1
Flight Radius
Propeller B
Receiver
(not visible)
Battery charger
Ove
ve
Tail motor
Power adapter
feet
Fig. 6
r 10
Main rotor shaft
Power
indicator
1. Turn on the power switch to the helicopter, set it on the ground, and step back at least 10 feet (Fig. 6).
2. Make sure the antenna on the remote control is fully extended.
3. Turn on the power switch to the remote control. The power light will begin to blink. Push the throttle
to the highest position, then to the lowest position, and then back to the middle. This will allow you to
control the helicopter (Fig. 7).
AGES
As with any aircraft, this is a precision flying machine. Treat it well and enjoy
all the fun it has to offer, flight after flight.
Adapter
input
port
Fig. 2
*One spare set of propellers A
and B is included
Thank you for your purchase of Protocol’s Heli-Raider with Gyro RC
Helicopter. You are about to experience the best of what remote control
flight has to offer. We strongly recommend that you take the time to read
this manual thoroughly. It contains many tips and instructions on how to
get the most out of this aircraft, and maintain it for long life.
Turning On the Helicopter
Over 8 feet
Instruction Manual for
Heli-Raider with Gyro
Fig. 15
Caution:
The control of the helicopter starts to diminish beyond the range of 30 meters.
Do not crash the helicopter from high altitude. Damage can occur to the helicopter due to its size.
LIMITED WARRANTY
Fig. 11
At Protocol, we’re dedicated to bringing you innovative and well-designed products that make living
fun and easy. We stand behind all of our products and warrant this to be free from defects in
workmanship and materials for 30 days from the date of purchase. The warranty does not cover
transportation damage, misuse, accident or similar events. Specific legal rights pertaining to this
warranty may vary by state.
For service claims or questions please consult our website ProtocolNY.com.