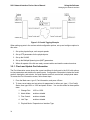
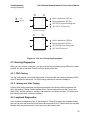
1
9161 Network Interface Device
User’s Manual
NOTICE
Canoga Perkins has prepared this manual for use by customers and Canoga Perkins
personnel as a guide for the proper installation, operation and/or maintenance of Canoga
Perkins equipment. The drawings, specifications and information contained in this document are the property of Canoga Perkins and any unauthorized use or disclosure of such
drawings, specifications and information is prohibited.
Canoga Perkins reserves the right to change or update the contents of this manual and
to change the specifications of its products at any time without prior notification. Every
effort has been made to keep the information in this document current and accurate as of
the date of publication or revision. However, no guarantee is given or implied that the
document is error free or that it is accurate with regard to any specification.
CANOGA PERKINS CORPORATION
20600 Prairie Street
Chatsworth, California 91311-6008
Business Phone: (818) 718-6300
(Monday through Friday 7 a.m. - 5 p.m. Pacific Time)
FAX: (818) 718-6312 (24 hrs.)
Web Site: www.canoga.com
E-mail: [email protected]
Copyright © 2004 to 2008 Canoga Perkins Corporation
All Rights Reserved
EdgeAccess®
9161 Network Interface Device
User Manual
Model Number 9161
Part Number 6913203
Rev. D 03/2009
s4.0
TG
EdgeAccess and Canoga Perkins are registered trademarks of Canoga Perkins Corp.
To reference Technical Advisories and Product Release Notes, go to the Canoga Perkins
web site at http://www.canoga.com.
9161 Ethernet Network Interface Device User’s Manual
CAUTION!
This product may contain a laser diode emitter operating at a wavelength of 1300 nm - 1600 nm.
Use of optical instruments (for example: collimating optics) with this product may increase eye
hazard. Use of controls or adjustments or performing procedures other than those specified
herein may result in hazardous radiation exposure.
Under normal conditions, the radiation levels emitted by this product are under the Class 1 limits
in 21 CFR Chapter 1, Subchapter J.
ATTENTION!
Ce produit peut contenir un émetteur de diode de laser fonctionnant à une longueur d'onde 1300
de nm - nm 1600. Utilisation des instruments optiques (par exemple: la collimation du système
optique) avec ce produit peut augmenter le danger. L'utilisation des commandes ou des ajustements ou les procédures d'exécution autre que ceux indiquées ci-dessus peut avoir comme
conséquence l'exposition de la radiation dangereuse.
Dans des conditions normales, les niveaux de rayonnement émis par ce produit sont sous les
limites de la classe 1 en chapitre 1, Subchapter J de 21 CFR.
NOTICE!
This device contains static sensitive components. It should be handled only with proper Electrostatic Discharge (ESD) grounding procedures.
AVIS!
Ce dispositif contient les composants sensibles statiques. Il devrait être manipulé seulement
avec la Décharge Electrostatique (DES) appropriée procédures.
i
9161 Ethernet Network Interface Device User’s Manual
General Safety Considerations
Installation
The 9161 is suitable for installation in Network telecommunication facilities and locations where
the National Electric Code (NEC) applies.
Cabling
The 9161 has been designed and tested and has passed all the pertinent sections of GR-1089
and GR-63 for Type 2 and Type 4 equipment. This equipment does not have direct electrical
connection to outside plant equipment.
The ports of the 9161 are not intended for direct connection to “Outside Plant” conductors and
shall be isolated (by channel banks or office repeaters) from any connections to network or terminal equipment that lie outside of the same building. The telecommunication interface connections
are considered to be, and meet the requirements of, SELV circuits (not TNV).
Power
WARNING: The 9161 with redundant power supplies must have both power supply cords
disconnected before servicing.
Wiring methods used for the connection of the equipment to the AC or DC MAINS SUPPLY shall
be in accordance with the National Electrical Code, ANSI/NFPA 70, and the Canadian Electrical
Code, Part I, CSA C22.1.
The 9161 AC and DC units do not incorporate a disconnect device. The plug on the power supply
cord is intended to serve as the disconnect device. It is also recommended that the AC socketoutlet shall be installed near the equipment and shall be easily accessible.
The 9161 DC has a nominal operating DC voltage of 48 VDC and passes the minimal steady
state DC operating voltage of 40 VDC in accordance with GR-1089 Issue 4 which References
American National Standards Institute (ANSI) T1.315, Table 1. Additionally, Canoga Perkins
design allows for a minimal steady state of 36VDC.
The 9161 DC model is configured for a DC-I, Isolated DC return.
Fuses
The 9161 is equipped with internal fuses. The AC model is fused at 3.18A and the DC at 4.0A.
Surge Protection
The AC powered 9161 does not contain an internal Surge Protective Device. An external Surge
Protective Device (SPD) should be used at the AC input of the network equipment according to
facilities procedures and as defined by the National Electric Code (NEC).
ii
9161 Ethernet Network Interface Device User’s Manual
Grounding
The 9161 AC & DC models are suitable for installation as part of the Common Bonding Network
(CBN).
The 9161 AC and DC are provided with a safety ground connection which is capable of conducting any fault current likely to be imposed such as fault current from sources within the chassis.
For the DC model use an approved 18ga insulated wire connected to the terminal block’s middle
conductor. The plus and minus 48VDC conductors should be a minimum of 20ga.
The AC will be grounded via the ground conductor of the power cord and must be connected to
an earthed mains socket-outlet.
An electrical conducting path should exist between the 9161 chassis and the metal surface of the
enclosure or rack in which it is mounted or to a grounding conductor. Electrical continuity should
be provided by using thread-forming type mounting screws that remove any paint or nonconductive coatings and establish a metal-to-metal contact. Any paint or other nonconductive coatings
should be removed on the surfaces between the mounting hardware and the enclosure or rack.
The surfaces should be cleaned and an antioxidant applied before installation.
ESD
The 9161 has been tested and passes the ESD requirements of Test level 4 for air and contact
discharges. However to protect the exposed components from electrostatic damage when removing or replacing the XFP optical modules requires the proper use of static mitigation procedures
such as properly wearing a wrist strap.
Operation Temperature
The 9161 is designed and Nationally Recognized Test Laboratory (NRTL) tested and verified to
operate between 0°C to 50°C, and type tested for short term emergency ambient temperature of
-5°C to 55°C.
Fans
The 9161fans are constructed with a Mid-front to mid-rear (EC class F2-R2) airflow scheme i.e.
draws air from the front and exhausts to the rear.
Emissions and Immunity
This device complies with part 15 of the FCC rules. Operation is subject to the following two
conditions:
1. This device may not cause harmful interference
2. This device must accept any interference received, including interference that may cause
undesired operation.
The authority to operate this equipment is conditioned by the requirements that no modifications
will be made to the equipment unless the changes or modifications are expressly approved by
the Canoga Perkins Corporation.
iii
9161 Ethernet Network Interface Device User’s Manual
To Users of Digital Apparatus in CanadaThis Class A digital apparatus meets all requirements of the Canadian interference-causing equipment regulations.
Aux utilisateurs des appareillages de Digital au CanadaCet appareil numérique de la
classe A respecte toutes les exigences du règlement sur le matérial brouilleur du Canada.
Special Accessories
The 9161 does not require any special accessories to achieve compliance for emission and
immunity criteria.
Double Pole/Neutral Fusing
On the 9161 a fuse may be in place in the neutral path on the AC power supply. After operation
of the fuse, parts of the equipment that remain energized might represent a hazard during servicing.
Waste Electrical and Electronic Equipment (WEEE)
Product Disposal Information
Do not dispose of this product in unsorted municipal waste. This product is recyclable, and
should be recycled according to your local standards. For more information, contact Canoga
Perkins technical support.
iv
9145 Ethernet Network Interface Device User’s Manual
Contents
1 Overview ............................................................................................... 1
1.1 Install the 9161 .................................................................................................. 3
2 Hardware Installation ........................................................................... 3
2.1 Power-Up, Hardware Functions, and LEDs ...................................................... 5
2.1.1 Alarms ..................................................................................................................... 6
2.1.2 Remote Fault ........................................................................................................... 6
2.1.3 Link Loss Forwarding .............................................................................................. 7
2.2 Setting Up for Network Management ................................................................ 7
2.2.1 Set Up the Network Management Platform ............................................................. 7
3 Using the Software ............................................................................... 7
3.0.1 Set Up the Terminal Server for SLIP ....................................................................... 8
3.0.1.1 Terminal Server Serial Port Configuration .......................................................8
3.0.2 Set Up the PC for Terminal Operation .................................................................... 8
3.1 Management User Interface .............................................................................. 9
3.1.1 General Screen Format ........................................................................................... 9
3.1.2 User Interface Organization .................................................................................. 10
3.1.3 Login and the 9161 Main Menu ............................................................................. 15
v
9145 Ethernet Network Interface Device User’s Manual
3.2 Managing the 9161 .......................................................................................... 16
3.2.1 Configure the 9161 for the System ........................................................................ 16
3.2.2 View Device Information ........................................................................................ 17
3.2.3 Manage the Date and Time ................................................................................... 17
3.2.4 Manage SNMP and Host Access .......................................................................... 18
3.2.5 View System Events and Traps ............................................................................ 20
3.2.6 Control Management Packets ............................................................................... 20
3.2.7 Update Software .................................................................................................... 21
3.3 Managing Security ........................................................................................... 21
3.3.1 Set General Security Parameters .......................................................................... 21
3.3.2 Set Up User Accounts ........................................................................................... 22
3.3.3 Change Your Password ........................................................................................ 24
3.3.4 Manage Logged In Users ...................................................................................... 24
3.3.5 Set Up Host Access .............................................................................................. 25
3.3.6 Set Up the Notification Destination for Traps ........................................................ 25
3.4 Managing the Network Interface ..................................................................... 27
3.4.1 Check and Update Port Information ...................................................................... 28
3.4.2 Set Up Spanning Tree Parameters ....................................................................... 29
3.4.3 Set Up VLANs ....................................................................................................... 30
3.4.4 Set Up Optional Double Tagging ........................................................................... 31
3.4.5 Set Up Multiple Spanning Tree Parameters .......................................................... 31
3.4.6 Check Global Spanning Tree Data......................................................................... 32
3.4.7 Check the Forwarding Database........................................................................... 32
3.4.8 Check the Static and Dynamic ARP Tables .......................................................... 32
3.5 Optical Power Loss ......................................................................................... 33
3.6 Fault Conditions .............................................................................................. 33
3.6.1 Remote Fault (RMTF) ........................................................................................... 33
vi
9145 Ethernet Network Interface Device User’s Manual
4 Troubleshooting ................................................................................. 33
4.0.1 Link Loss Forwarding ............................................................................................ 34
4.1 Running Diagnostics ....................................................................................... 35
4.1.1 PING Testing ......................................................................................................... 35
4.1.2 Latency and Jitter Testing ..................................................................................... 35
4.2 Loopback Diagnostics ..................................................................................... 35
4.2.1 User Mode ............................................................................................................. 36
4.2.2 Network Mode ....................................................................................................... 36
4.3 General Maintenance ...................................................................................... 37
4.4 Check Optical Power Levels ........................................................................... 37
4.4.1 Measuring Transmitter Output Power ................................................................... 37
5 Maintenance ........................................................................................ 37
5.0.1 Measuring Receiver Input Power .......................................................................... 38
5.0.2 Calculating Fiber Link Attenuation ......................................................................... 39
5.1 9161 Specifications ......................................................................................... 41
5.1.1 Regulatory Compliance ......................................................................................... 41
6 Specifications ..................................................................................... 41
6.0.1 EIA-232 Pinout ...................................................................................................... 42
6.1 9161 XFP Module Model Numbers ................................................................. 42
7 Warranty Information ......................................................................... 41
vii/(viii Blank)
Overview
9161 Ethernet Network Interface Device User’s Manual
Chapter 1
Overview
The 9161 is a 2-Port 10 Gbps Network Interface Device that provides intelligent optical demarcation and terminates managed transport at the point of delivery.
In addition, the 9161 offers Layer 2 statistics, remote software upgrade, remote control and monitoring, and management through CanogaView.
The 9161 supports two ports that receive and transmit 10 Gigabit Ethernet data over single mode
fiber (SMF) at 1310 or 1550 nm wavelength or multimode fiber (MMF) at 850 nm wavelength.
The 9161 front panel, shown in Figure 1-1 includes:
•
Two 10 Gbps ports
•
Console port for management through VT100 emulation
•
LEDs for system management and various module functions; for details, see Chapter 3
CAUTION: Pressing the reset button on the 9161 will interrupt data flow
and cause link disruption
•
Reset switch to reinitialize the 9161
RESET
BUTTON
Figure 1-1. The 9161 Front Panel
1/(2 Blank)
Hardware Installation
9161 Ethernet Network Interface Device User’s Manual
Install the 9161
Chapter 2
Hardware Installation
This chapter describes how to set up and install the 9161 and the interface modules as well as
the hardware features and functions of the 9161.
Before setting up the 9161, make sure the serial cable (required to connect the chassis to a
VT100 type terminal or PC) and the Ethernet and fiber cables needed for your system are available. If the 9161 uses AC power, plan to install it within 7 ft. (2 m) of the AC power source.
2.1 Install the 9161
The 9161 is tested and inspected before shipment from the factory. If there is obvious damage to
the shipping container, contact the carrier immediately.
CAUTION: Follow electrostatic discharge (ESD) safety precautions
when handling Canoga Perkins products, as with all electronic devices with static sensitive components.
1. Unpack the 9161. Keep the shipping container until the unit is installed and fully operational. In the unlikely event that the unit is defective, contact Canoga Perkins for a Return
Authorization Number (RMA) and instructions for return shipment.
2. Mount the 9161 in a rack or as a standalone unit.
a. Use the standard rackmount kit with brackets and screws to install the 9161 in a
19-inch rack or use the optional 23-inch rackmount kit. The 9161 includes two
sets of mounting holes.
•
For a front chassis mount, align the screw holes in the brackets with the
screw holes at the front of the side panel of the 9161, then secure the
screws.
•
For a mid- or recessed chassis mount, align the screw holes in the brackets with the screw holes in the middle of the side panel of the 9161, then
secure the screws.
b. To use the 9161 as a standalone unit, place it on a secure, flat surface within reach
of the power and fiber optic connections.
3
9161 Ethernet Network Interface Device User’s Manual
Hardware Installation
Install the 9161
3. Connect the power. The 9161 can be equipped for either redundant or non-redundant
power supplies; AC or DC power.
a. Plug the AC power cord into the socket at the rear of the 9161 and the wall socket.
b. The 9161 is shipped with a compatible DC Power terminal block. Connect DC
power to the 9161 as follows:
NOTE: The DC Power Terminal Block is removable for ease of installation and replacement. It is recommended the Terminal Block be
removed when connecting power to avoid accidentally crossed
or shorted power leads from damaging the 9161 or your DC
Power Source.
•
Loosen the terminal screws for +, -, and GND
•
Slide the wires one at a time (green = GND, red = +, black = -) into the
square openings in the bottom of the terminal block.
•
Tighten the terminal screws as wires are installed.
•
Use an ohmmeter to verify that power leads are not shorted to GND.
•
Connect the power cables to the power source.
•
Plug the XFP(s) into the 10G x port(s); the slot is keyed. To remove an
XFP, either lift the bail or press the button on the XFP, then gently pull it
out.
•
Insert the terminal block into the DC power receptacle at the rear of the
9161.
4. Cabling for the 9161 includes the serial cable to the Terminal port and the fiber optic link
to the Tx and Rx ports.
CAUTION: If the PC is connected to a powered 9161, the PC inadvertently
adds a driver, which will cause the mouse to behave erratically.
5. Plug the serial cable into the Terminal port on the rear panel and your PC. For the pinouts, see Chapter 5, Specifications.
•
The EIA 232 Terminal port provides serial access to the management software.
•
The SLIP port provides IP management via the serial (DB-9) connector.
Dirty optical connectors are a common cause of link loss or attenuation problems, especially for
SMF. Clean the connectors before plugging in a cable and whenever there is a significant or
unexplained light loss. To prevent contamination, always install protective dust covers on unused
fiber optic connectors.
CAUTION: To avoid damaging the fiber end-surface or connector, use
extreme care when installing or removing cables.
4
Hardware Installation
9161 Ethernet Network Interface Device User’s Manual
Power-Up, Hardware Functions, and LEDs
Connect the Optical Fiber cables to the XFP modules as follows:
1. Plug in the optical cable connectors with proper Tx to Rx or Rx to Tx orientation.
2. Ensure cable locks in place.
3. Label each cable and connector with the signal name and direction.
Canoga Perkins recommends that you determine and record link attenuation and transmission
power before starting normal link traffic. The attenuation factor and transmission power identify
potential problems with links near the lower limit of receiver limitations.
For details on link attenuation and transmission power, reference Chapter 4, Maintenance and
Troubleshooting.
2.2 Power-Up, Hardware Functions, and LEDs
During the initial power-up sequence, all LEDs light amber. When start-up is complete, the setup
and installation are correct, and data is transmitting normally across the link, the Rx and Tx LEDs
for both ports light green or blink green when transmiting or receiving data.
The LEDs show the system and port conditions. The P1, P2, Fans, and Management LEDs
show the management conditions; see Table 2-1. Table 2-2 lists all possible LEDs. For details
about the LEDs, see your interface module and Tables 2-1 and 2-2.
Table 2-1. 9161 Management LEDs
LED
Tx
Rx
FUNCTION
transmit status
10G-1/10G-2
receive status
COLOR
STATUS
DESCRIPTION
amber
green
on
blinking
system self-test
normal operation
port disabled; may be due to link loss forwarding (LLF)
no power/power supply not installed
system self-test
link established
receiving activity
receiving remote fault
no link
system self-test
normal operation
Ethernet packets are being sent to the CPU
for processing
system self test/over temp
system self test/over temp with management traffic
diagnostic failure or CPU failure
power off
red
amber
green
off
on
on
blinking
on
off
on
on
green
blinking
amber
on
amber
blinking
red
on
off
amber
green
green
red
NET
not supported
MGR management status
on
5
9161 Ethernet Network Interface Device User’s Manual
Hardware Installation
Power-Up, Hardware Functions, and LEDs
Table 2-1. 9161 Management LEDs
green
amber
FAN
P1/P2
fan status
power supply status
(primary/secondary)
red
green
amber
red
on
on
on
blinking
off
on
on
on
off
normal
system self test/one fan failed
more than one fan failed
fans not installed
power off
normal operation
Self test
power failure/major alarm
no power/power supply not installed
Table 2-2. 9161 Interface LEDs
LED
TX
RX
NET
FUNCTION
transmit status
10G-1/10G-2
receive status
non- functional
LED set manually
COLOR
STATUS
amber
green
off
on
blinking
red
on
green
green
Amber
Red
Green
amber
off
on
blinking
on
on
off
on
on
Description
No transmission activity
System self-test
Transmission activity
Port disabled; may be due to Link Loss Forwarding (LLF)
No link
Link established
Receiving activity
System self-test
Receiving Remote Fault
Non-network connection
Network connection
System self-test
NOTE: The NET LED is non-functional. It is turned ON/OFF manually, and
does not affect, nor is it affected by, the operation of the 9161
2.2.1 Alarms
The 9161 can generate Traps and Major and Minor Alarms. For details about the Traps Log and
setting up notification, see Chapter 4.
2.2.2 Remote Fault
If the 10G1 or 10G2 port Rx loses the signal, it sends a Remote Fault (RMTF) signal from its Tx,
the Rx LED is off, and an alarm flags the link loss on the 10G1 or 10G2 port (see Figure 2-1).
When the 10G1 or 10G2 port receives a Remote Fault signal, the Rx LED lights red and an alarm
flags the remote side optical link failure. Both local and remote link partners must be configured
to the same RMTF enable/disable setting. RMTF complies with the Remote Fault standard.
6
Hardware Installation
9161 Ethernet Network Interface Device User’s Manual
Power-Up, Hardware Functions, and LEDs
10G1
PORT
10G2
PORT
Tx
Rx
Rx
Tx
10G2
PORT
x
10G1
PORT
Tx
Rx
Rx
Tx
LOCAL DEVICE
Local device Rx detects link loss
Tx transmits RMTF to remote device
Local device Rx turns OFF
Remote device Rx LED turns red
REMOTE DEVICE
Figure 2-1. Remote Fault Signal
2.2.3 Link Loss Forwarding
When LLF is enabled, a fault on one side of the 9161 propagates to the other side to notify that
device and stops signal transmission (brings down the link) (see Figure 2-2). Set the LLF propagation to 10G1 to 10G2, 10G2 to 10G1, or both directions. Set this in the User Interface.
x
10G2
PORT
10G1
PORT
Tx
Rx
Rx
Tx
FAULT
NO DATA
x
Link loss detected on 10G1 Port
Fault propogated to 10G2 Port
10G2 Port Tx stops transmitting data
10G2 Port Tx LED turns red
10G1 PORT TO 10G2 PORT
10G1
PORT
10G2
PORT
Tx
Rx
Rx
Tx
x
RMTF
Link loss detected on 10G2Port
Fault propogated to 10G1Port
10G1 Port stops transmitting data
10G1 Port LED turns red
10G2 PORT TO 10G1 PORT
Figure 2-2. Link Loss Forwarding Propagation
7/(8 Blank)
Using the Software
9161 Network Interface Device User’s Manual
Setting Up for Network Management
Chapter 3
Using the Software
You can manage the system through VT100 Terminal Emulation, which is accessible by a Telnet
session, HyperTerminal or similar terminal emulation software, a standard SNMP network manager, and CanogaView.
3.1 Setting Up for Network Management
Typically, the 9161 runs within the network on an Ethernet connection, communicating with your
Network Management Platform.
3.1.1 Set Up the Network Management Platform
You must run several Management Information Bases (MIBs) on your Network Management
Platform in order to successfully manage this module. Before you start, check that these industry-standard MIBs are loaded:
•
Standard MIB
•
Etherlike.my
•
If.my
•
Bridge.my
•
Pbridge.my
In addition, download these private mibs, available from the Canoga Perkins web site; go to
www.Canoga.com, click Support, then click Software Download, and follow the prompts on
screen.
•
Cpsysinf.my Supports SNMP access
•
Cphost.my Supports Host Table and Host Access functions
•
Cptraptb.my Supports the Trap Table
Setting up the VT100 session depends on which connection, serial port or Ethernet, you have
available for access to the VT100 management program. Canoga Perkins suggests that you use
HyperTerminal for your first session. You must set up TCP/IP before you can use Telnet.
7
9161 Network Interface Device User’s Manual
Using the Software
Setting Up for Network Management
3.1.2 Set Up the Terminal Server for SLIP
SLIP mode can be initiated and terminated from the console port, or in band using the VT100
under the IP setting on the System Menu. To terminate SLIP mode, press <Enter> 3 times from
the serial port. SLIP mode can also be terminated from the VT100 using the IP setting on the
System Menu. Once SLIP mode has been set up, it will be initiated automatically upon power up.
3.1.2.1 Terminal Server Serial Port Configuration
1. In the terminal server port Setup Menu, the Speed field is defaulted to 9600. This field
can be user configured to match the speed of your particular terminal server.
2. Change Flow Control field to None.
3. Change the Input Flow field to Disabled
4. Change the Output Flow field to Disabled.
5. Enter the Destination Field IP address assigned to the 9161.
NOTE: The terminal server IP address and the SLIP IP address MUST be
on the same subnet.
6. In the User Terminal Type field, enter VT100.
7. In the Access field, select SLIP.
8. Leave the remaining fields at the default settings.
3.1.3 Set Up the PC for Terminal Operation
These steps briefly describe how to set up your PC for a terminal connection. For details on
using Windows, see your Windows documentation.
1. Click Start, highlight Programs, Accessories, Communications, then click the HyperTerminal folder to access saved profiles, or click HyperTerminal to create a new profile.
2. At the Connection Description dialog, select an icon, enter a name for the connection to
the system, and click OK.
3. At the Connect To dialog, pull down the Connect using menu, select the COM port, and
click OK.
8
Using the Software
9161 Network Interface Device User’s Manual
Management User Interface
4. At the COM Properties dialog, on the Port Settings tab, check for these selections:
•
Bits per second: 9600 bps
•
Data bits: 8
•
Parity: None
•
Stop bits: 1
•
Flow control: None
5. Click Apply, then OK. HyperTerminal connects to the system and the VT100 terminal
emulation starts.
3.2 Management User Interface
The Management User Interface for the 9161 provides screens for setup, monitoring, and diagnostics. You can access the screens directly by connecting to the console port of the 9161
These sections discuss the screens for the 9161, using a Telnet session for access.
3.2.1 General Screen Format
A typical screen, shown in Figure 3-1, includes standard descriptions and reference designations. Use this and other screens to configure the system, set operational parameters, and verify
the system status. All screens use a common method for navigation.
Not all screens and menus provide options that you can change. Some menu items reach
screens that only report status, such as revision numbers, module type, or traps. On other
screens, you can move through and select options, and enter data.
Use these keys to navigate the screens:
•
Space bar When a menu item is highlighted, press <Space> to cycle through all options
for that item.
•
Tab Press <Tab> to move the highlight to the next column to the right.
•
Enter Press <Enter> to select the highlighted option for a menu item.
•
Escape Press <Esc> to return to the previous screen.
9
9161 Network Interface Device User’s Manual
Using the Software
Management User Interface
Navigation
instructions
Model number
Messages and
Urgent status
Menu Options
Figure 3-1. General Screen Format
3.2.2 User Interface Organization
The user interface consists of selectable, nested screens, described in this chapter and available
in this order:
Main Menu
1
System
1.1 System Information
1.1.1- System Name
1.1.2- Contact
1.1.3- Location
1.1.4- Customer
1.1.5- Information 1
1.1.6- Information 2
1.1.7- Circuit Info 1
1.1.8- Circuit Info 2
1.1.9- Service Code
1.1.10- Date-in-Service
1.1.11- Date-out of-Service
1.1.12- Equipment Type
1.1.13- Equipment Type
1.1.14- Vendor
1.1.15- CLEI
1.1.16- Mfg Date
10
Using the Software
9161 Network Interface Device User’s Manual
Management User Interface
1.2 Module Information
This screen only reports status of the following:
·Fan Status
·Temperature
·Power Supply Status 1 and 2
·Mainboard 12v Voltage
· Module types installed in the Ports.
·If no module is installed it will report an Empty Slot
1.3 IP Settings
1.3.1- Local IP Address
1.3.2- Subnet Mask
1.3.3- Gateway IP Address
1.3.4- Enable BOOTP Mode
1.3.5- Management VLAN ID
1.3.6- Management VLAN Double Tagged
1.3.7- Telnet/SSH Host Verification
1.3.8- Static ARP Table
1.4 Host Access Table
1.4.1- View/Change Host
1.4.2- Add Host
1.4.3- Delete Host
1.5 Notification Settings
1.5.1- View/Change Host
1.5.2- Add Host
1.5.3- Delete Host
1.6 Security Configuration
Password Configuration
1.6.1- Minimum Length
1.6.2- Minimum Alpha Characters
1.6.3- Minimum Numeric Characters
1.6.4- Minimum Punctuation Characters
1.6.5- Maximum Consecutive Character Types
1.6.6- Maximum Consecutive Same Characters
1.6.7- Allow username in password
1.6.8- Password Expiration Time
1.6.9- Password Reuse Count
Lockout/Logout Configuration
1.6.10- Lockout After Failed Attempts
1.6.11- Lockout Type
1.6.12- Lockout Time
1.6.13- Display Lockout Message
1.6.14- Lockout Message
1.6.15- Lockout Console Port
1.6.16- Inactivity Lockout Time
11
9161 Network Interface Device User’s Manual
Using the Software
Management User Interface
1.7 Account Configuration
1.7.1- View/Change Account
1.7.2- Add Account
1.7.3- Delete Account
1.8 Management Packets Control
1.8.1- 10G1
1.8.2- 10G2
1.9 Trap Configuration
1.9.1- Master Trap Control
1.9.2- Cold Start Traps
1.9.3- Link Loss Forwarding Traps
1.9.4- Remote Fault Received Traps
1.9.5- Monitor Systems Traps
1.9.6- Monitor Port Module Traps
1.9.7- VLAN Settings Traps
1.9.8- Link Up/Down Traps
1.9.9- Authentication Traps
1.9.10- Spanning Tree Traps
1.10 SNTP Settings
1.10.1- SNTP Enaable
1.10.2- SNTP Server IP Address
1.10.3- Time Resync Interval in hours
1.10.4- Offset from GMT in hours
1.10.5- Summertime
2
Switch Configuration
2.1 Global Spanning Tree Parameters
2.1.1- Admin Mode
2.1.2- Version
2.1.3- Configuration Name
2.1.4- Configuration Revision
2.1.5- Priority
2.1.6- Hello Time
2.1.7- Forward Delay
2.1.8- Max Age
2.1.9- BPDU Forwarding Mode
2.1.10- View/Change Interface
2.2 Multiple Spanning Tree Parameters
2.2.1- View/Change MST
2.2.2- View MST Status
2.2.3- Create MST
2.2.4- Delete MST
12
Using the Software
9161 Network Interface Device User’s Manual
Management User Interface
2.3 Global Spanning Tree Report
2.3.1- View Interface Statistics
2.3.2- View Interface Status
2.4 VLAN Configuration
2.4.1- Create VLAN(s)
2.4.2- View/Change VLAN
2.4.3- Delete VLAN(s)
2.4.4- List From VLAN ID
2.4.5- VLAN Id Translation
2.4.6- VLAN Priority Translation
2.4.7- Configure Port VLAN
2.5 Double Tagging Configuration
2.5.1- Enable double tagging on port
2.5.2- Disable double tagging on port
2.5.3- Accept configuration and exit
3 Port Information
3.1 Port Config/Status
3.2 Port Statistics
3.3 Clear Counters on All Ports
4
Reports
4.1 Device Description
4.2 System Log
4.2.1- View First Page
4.2.2- View Last Page
4.2.3- View Previous Page
4.2.4- View Next Page
4.2.5- Clear The Log
4.3 Traps Log
4.3.1- View Previous Page
4.3.2- View Next Page
4.3.3- Clear The Log
4.4 FDB Log
4.4.1- View Previous Page
4.4.2- View Next Page
4.4.3- Choose start item
4.4.4- Create file fdb.csv
4.5 User Log
4.5.1- Log Off Session
13
9161 Network Interface Device User’s Manual
Using the Software
Management User Interface
4.6 Dynamic ARP Table
4.6.1- View Previous Page
4.6.2- View Next Page
4.6.3- Clear Table
5
Diagnostics
5.1 Latency/Jitter Test
5.1.1- Test IP Address
5.1.2- Test Duration
5.1.3- Test Packets Size
5.1.4- Min Test Packets Size
5.1.5- Max Test Packet Size
5.1.6- Test Packet Timeout
5.1.7- Start/Stop Test
5.2 PING Generation
5.2.1- Ping Address
5.2.2- Ping Count
5.2.3- Ping Size
5.2.4- Start Pinging
5.3 Network Performance
5.3.1- Profile
5.3.2- Address List
5.3.3- Test Distribution Connection
5.3.4- Trap Configuration
5.3.5- Statistics
5.3.6- PM Scheduler
5.3.7- PM Test Results
5.3.8- PM Manual Test
5.3.9- SAM Scheduler
5.3.10- SAM Results Log
6
Utilities
6.1 Set Date & Time
6.2 Restore Defaults
6.3 Restart System
6.4 Swap Bank & Restart
7
14
Logout
Using the Software
9161 Network Interface Device User’s Manual
Management User Interface
3.2.3 Login and the 9161 Main Menu
The first screen is the Login. If this is your initial setup and no user name or password has been
set, type admin and press <Enter> at the prompts for the username and password. Otherwise,
type your username and press <Enter>, then type your password and press <Enter>.
The Main Menu (see Figure 3-2) appears after you log in and provides access to all functions for
the 9161: setup, diagnostics, and reports. Reference Table 3-1.
Figure 3-2. 9161 Main Menu
Table 3-1. 9161 Main Menu Options
Menu Option
Functions
1) System
Set values for basic system parameters, communication, and security
as well as view basic system information
2) Switch Configuration
Set and view values for network switch parameters
3) Port Information
Set and view values for each port
4) Reports
View various system information and events
5) Diagnostics
Testing and trouble-shooting functions
6) Utilities
Manage software versions and defaults
7) Log Out
Ends your session
15
9161 Network Interface Device User’s Manual
Using the Software
Managing the 9161
3.3 Managing the 9161
You can manage the hardware and software for the 9161, including communication access.
3.3.1 Configure the 9161 for the System
The System Information screen provides various categories of optional information that system
administrators may track. To access the System Information screen, and follow these steps:
1. From the System menu type 1, System Information, and press <Enter>.
2. At the System Information screen, type the number for an item and press <Enter>, then
type the information and press <Enter>.
•
System Name – This is the name of the group this unit belongs to and can be up
to a maximum of 25 characters.
•
Contact – This enables you to add contact information, such as names, and telephone
numbers up to a maximum of 25 characters.
•
Location – you can specify a location for this unit up to a maximum of 25 characters.
•
Customer – you can use this field to specify your customer’s name and/or designator up to a maximum of 25 characters.
•
Information 1/2 – these two fields maybe used for additional information, such as
additional contact information, phone numbers, addresses, etc. up to a maximum of
40 characters.
•
Circuits Info 1/2 – these two fields are used of circuit identification purposes up to
a maximum of 25 characters
•
Service Code – this field maybe used to identify the type of service this unit will
be used for up to a maximum of 10 characters
•
Date-in-Service/Date-Out-of-Service – These tow fields maybe used to keep
track of service dates up to a maximum of 10 characters and also has to be in a date format
[mm/dd/yyyy]
•
Equipment Type/Code – These two fields is for your internal tracking of equipment up to a maximum of 10 characters
•
Vendor – this field maybe used to identify your circuit vendor up to a maximum of 25
characters
•
CLEI - COMMON LANGUAGE® Equipment Identification, These are codes used primarily by Service Providers to identify equipment for ordering and stocking. You may enter a
maximum of 10 characters for this field.
•
Mfg Date – This field maybe populated with the units manufactured date up to a
maximum of 10 characters and also has to be in a date format [mm/dd/yyyy]
3. To return to the System menu, press <Esc>.
16
Using the Software
9161 Network Interface Device User’s Manual
Managing the 9161
3.3.2 View Device Information
The Description Report shows the current information, including the device type and software
information for the 9161. To access the Report menu, follow these steps:
1. From the Main menu, type 4, Reports, and press <Enter>.
2. From the Reports menu, type 1, Device Description, and press <Enter>..
3. To return to the Main Menu, type 4.
Figure 3-3. . 9161 Device Description Report
3.3.3 Manage the Date and Time
An accurate date and time in the 9161 assures accuracy for events listed in the System Log and
for traps and alarms sent to the system administrator. You can choose either of two methods for
setting the date and time, depending on your access to an external network and your need for
accuracy.
For accuracy within a large network, you can set up the 9161 to synchronize the system date and
time to an SNTP server.
When the 9161 contacts the SNTP server to synchronize the time, the event appears in the System Log, whether or not the SNTP server responds.
If you choose to not use SNTP to maintain the date and time, or do not have access to the Internet and an SNTP server, you can set it directly at the 9161.
17
9161 Network Interface Device User’s Manual
Using the Software
Managing the 9161
To set up synchronization with SNTP, follow these steps:
1. At the System menu, type 10, SNTP Configuration and press <Enter>.
2. At the SNTP Client Configuration screen, type the number for a parameter and press
<Enter>, then follow the prompts on the screen.
•
SNTP Enable: Enable (yes) or disable (no) synchronized time
•
SNTP Server IP Address: Enter the address for the server; 0.0.0.0 indicates no
server
•
Time Resync Interval in hours: Set how often, in hours, that the 9161 tries to synchronize its time to the Sntp server; Range is 0 (attempt to synchronize at bootup,
only) to 24 (once daily)
•
Offset from GMT in hours: Set the difference, in hours, between this 9161 and
Greenwich Mean Time (GMT), which is similar to Coordinated Universal Time
(UTC); Range is -12 to 12
•
Summertime: Enable (yes) or disable (no) Daylight Saving Time
3. To return to the System menu, press <Esc>.
To directly set the date and time, follow these steps:
1. From the Main Menu, type 6, Utilities, and press <Enter>.
2. At the Utilities menu, type 1, Set Date and Time and press <Enter>.
3. At the prompt to enter the current date and time, type the current information in DD/MM/
YYYY HH:MM format.
4. To return to the Main Menu, press <Esc>.
3.3.4 Manage SNMP and Host Access
To set values for basic system parameters, including some parameters used by SNMP, go to the
IP Settings screen and follow these steps:
1. From the System menu type 3, IP Settings, and press <Enter>.
2. At the IP Settings screen, type the number for an item and press <Enter>, then enter data
or press <Space> to cycle through the options and press <Enter> to select an option.
18
•
Local IP Address: Set the IP address for this 9161
•
Subnet Mask: Mask that sets the network ID part of the IP address
•
Gateway IP Address: Address of the network node that connects to another network
•
Enable BOOTP Mode: Enable or disable BOOTP requests
•
Management VLAN Id: Set the number for the VLAN
Using the Software
9161 Network Interface Device User’s Manual
Managing the 9161
•
Management VLAN double Tagged: Enable or disable double tagging for the
VLAN
•
Telnet Host Verification: Enable or disable checking whether host is listed in host
table; default is disabled, which allows access to all hosts
3. To return to the System menu, press <Esc>.
The SNMP agent allows access to up to 8 Host IP addresses. Set up and edit the Host information for the 9161 at the Host Access Table screen. To access the Host Access Table, follow these
steps:
1. From the System menu type 4, Host Table/ SNMP Settings, and press <Enter>.
2. At the Host Access Table screen, type 2 to add a host, then at the prompt, enter the host
IP address and mask, or type 1 to edit a host. At the Add Host Access Entry screen, set
values for these parameters:
•
Telnet Access: Allow (Yes) or disallow (No) Telnet
•
FTP/TFTP: (S)FTP/TFTP Access : Select None, (S)FTP, TFTP, orBoth
•
SNMP Access: Select Write (also allows Read access), Write, or None
•
SNMP Protocol: Select V1V2cV3, V1V2c, or V3
•
V1/V2c Read and Write Communities: Enter name of community, up to 32 characters
•
V1/V2c Access Level: Select Supervisor, Operator, or Observer
3. To remove a host, type 3, then follow the prompts.
4. To return to the System Menu, press <Esc>.
Traps are messages that require management attention and are routed to the Network Manager
and the 9161 Traps Log, but do not trigger alarms. Use the Trap Configuration screen to view
the current configuration and to enable or disable traps for the 9161. For a list of events that trigger traps, see Table. To set up the traps, follow these steps:
1. From the System menu type 9, Trap Configuration, and press <Enter>.
2. At the Trap Configuration screen, type the number for a trap, then press <Space> to cycle
between Enabled or Disabled and press <Enter>
3. To return to the System menu, press <Esc>.
19
9161 Network Interface Device User’s Manual
Using the Software
Managing the 9161
These selections do not affect how the Major and Minor LEDs report alarms.
Table 3-2. Trap Configuration Options
Trap
When enabled, sends a Trap if. . .
Cold Start
The 9161 is reset by a power failure or forced reset
Link Loss Forwarding
A port loses a received link and transmits notification to the next port
Remote Fault
Received
A port receives an RMTF
Monitor System
RMON, internal temperature, or a power supply is out of range or the fan
failed
Monitor Port Module
A port module is inserted or removed
VLAN Settings
A user tries to delete the default or all VLANs
Link Up/Down
The link went down and came back up
Authentication
An unauthorized host attempts SNMP access
Spanning Tree
An STP change occurs
3.3.5 View System Events and Traps
The System Log lists all events that have occurred since the log was last cleared. The Traps Log
lists the traps that have occurred since the last power-up. Both logs list items in reverse chronological order and are available from the Reports menu. To access the logs, follow these steps:
1. From the Main menu, type 4, Reports, and press <Enter>.
2. To view system events, type 2, System Log, and press <Enter>.
3. To view traps, type 3, Traps Log, and press <Enter>.
4. To view the User log, type 5, User Log, and press <Enter>
5. To return to the Main Menu, press <Esc>.
3.3.6 Control Management Packets
Use the Management Packet Control screen to enable or disable transmission of management
packets through any specific port on the 9161. If you disable a port, that limits that port to only
network traffic, the port cannot receive or send any packets that would manage the 9161. To
access the Management Packets Filter screen, follow these steps:
1. From the System menu type 8, Management Packets Filter, and press <Enter>.
2. At the Management Packets Filter screen, type the number for a port, then press
<Space> to cycle between Enabled or Disabled.
3. To return to the System menu, press <Esc>.
20
Using the Software
9161 Network Interface Device User’s Manual
Managing Security
3.3.7 Update Software
Each 9161 has two flash memory banks that store software:
•
The Active Flash Memory holds the software currently in use
•
The Inactive Flash Memory holds the new software from a download or the older version
of software
Software is downloaded to the inactive memory to avoid disrupting service. Resetting the 9161
and swapping banks will affect the traffic. The ports will temporary go down during initialization..
You can check the current version of software at the Description Report screen.
If you need to upgrade the software, follow these steps:
1. Download the new software to your computer.
2. Go to the Host Access Table and verify that the entry for the host you will use for the file
transfer allows FTP access.
3. From your computer, follow these steps at the DOS prompt:
a. Go to the directory that holds the new software.
b. Type FTP and the IP address for the 9161.
c. Log on with your username and password.
d. Put the filename for the new software.
5. When Transfer complete appears, you can log on in a regular VT100 session, access the
Utilities menu, and type 4, Swap Banks to reset the 9161 and start using the new software.
3.4 Managing Security
To effectively provide system security for a variety of network applications, the 9161 works with
SNMPv3. To use SNMPv3 security, set up the engine ID for the SNMPv3 agent in the device.
3.4.1 Set General Security Parameters
General security parameters include values for passwords, lockout, and logout, which are basic
to maintaining security regardless of which security application runs on your network. To set values for general parameters, access the Security Configuration screen and follow these steps:
1. From the System menu type 6, Security Configuration, and press <Enter>.
2. At the Security Configuration menu, type the number for an item and press <Enter>, then
enter data or press <Space> to cycle through the options and press <Enter> to select an
option.
21
9161 Network Interface Device User’s Manual
Using the Software
Managing Security
3. At the Security Configuration screen, type the number for an item and press <Enter>,
then type a value or press <Space> to cycle through the options and press <Enter> to
select the value or option.
•
Minimum Length/Minimum Alpha Characters/Minimum Numeric Characters/Minimum Punctuation Characters/Maximum Consecutive Character Types/Maximum
Same Character: Define characteristics of passwords; the range for all fields is
from 0 through 15
•
Allow Username in Password: Enable or disable the username appearing as or
within the password
•
Password Expiration Time: Set how often in days, 1 through 365, that the passwords must be reset; 0 = disabled
•
Password Reuse Count: Set whether the password must be changed or can be
used again immediately; values are 0 (new password can be the same) or 1 (new
password must be different)
•
Lockout After Failed Attempts: Set how many times, from 1 to 10, that a user can
try to log in before a lockout; 0 = disabled
•
Lockout Type/Lockout Time: Set the type and length of lockout
>
Hard requires another user with Supervisor access to unlock the account
on the User Accounts screen
>
Timed requires that the user wait for Lockout time before trying again
>
Lockout Time is from 0 (none) to 30 minutes
•
Display Lockout Message/Lockout Message: Enable or disable and set the message, up to 30 characters, that appears at lockout
•
Lockout Craft Port: Disable access to the serial port to prevent any unauthorized
access; to re-enable the craft port, run a Telnet session
•
Inactivity Logout Time: Set the time, between 1 and 30 minutes, before automatic
log-out with no activity; 0 = disabled
4. To return to the System menu, press <Esc>.
3.4.2 Set Up User Accounts
You can set up an account for a user, whether another supervisor, operator, or observer, to
access the 9161. You can also update or delete usernames or permissions. Settings for certain
values for some parameters, such as SNMPv3 Authentication and Privacy Protocols, can determine or limit which values you can set for other parameters. To manage a user account, access
the User Accounts screen and follow these steps:
1. At the Main Menu, type 1, System, and press <Enter>.
2. At the System menu, type 7, Account Configuration, and press <Enter>. The User
Accounts screen appears.
22
Using the Software
9161 Network Interface Device User’s Manual
Managing Security
3. To add a user, type 2, or to edit an existing user, type 1, and press <Enter>, then type the
Username and follow the prompts on the Edit User Account screen to enter values or
press <Space> to cycle through options for these parameters:
•
Account State: enabled or disabled
•
Access From: UI, SNMP, or all (UI/SNMP)
>
UI indicates access through Telnet, Console, SSH, FTP, or SFTP, and
requires additional parameter setup
>
SNMP enhances security and requires additional parameter setup; for
details, see the documentation for your SNMPv3 application and server
•
Access level: Supervisor, Operator, or Observer
•
Description: optional; up to 17 characters
•
UI Password: password that allows access through Telnet, Console, SSH, FTP, or
SFTP; 8 to 15 characters
•
UI Password Expires: Yes or No
•
UI Password Expires in (days): 0 (never) to 365
•
Allow UI Lockout of User: Yes or No; can disable access for this user after exces
sive failed attempts to log in
•
Allow UI Logout of User: Yes or No; can automatically log user out after excessive
inactivity
•
UI Logout Locked State: shows current state as Locked, Unlocked, Logged out,
or Logged in
•
SNMPv3 Authentication Protocol: MD5, SHA, or None; sets how to authenticate
the user
•
SNMPv3 Authentication Password: password that generates the authentication
key for the user if the authentication protocol is MD5 or SHA; 8 to 15 characters.
•
SNMPv3 Authentication Key: Shows the key that authenticates the user for MD5
or SHA Authentication Protocol; this is generated automatically for the Authentication Password, but can be changed if the user's host uses a different Authentication Key generation algorithm; 16 Hex characters for MD5 protocol or 20 Hex
characters for SHA protocol.
•
SNMPv3 Privacy Protocol: DES or None; sets the protocol for encryption
•
SNMPv3 Privacy Password: password that generates the encryption key for the
user if the privacy protocol is DES; 8 to 15 characters
•
SNMPv3 Privacy Key: Shows the key that encrypts messages for DES Privacy
Protocol; this is generated automatically for the Privacy Password, but can be
changed if the user's host uses a different Privacy Key generation algorithm; 16
Hex characters
23
9161 Network Interface Device User’s Manual
Using the Software
Managing Security
4. To delete a user, type 3, then follow the prompts to select the user name and confirm the
choice; the User Accounts screen reappears.
5. To return to the Systems menu, press <Esc>.
3.4.3 Change Your Password
Whether you have supervisor, operator, or observer access, you can update your password for
the domain in order to maintain system security. You cannot change the password for any other
users. To update your password, follow these steps:
1. At the Main Menu, type 1, System, and press <Enter>.
2. At the System menu, type 7, Account Configuration, and press <Enter>. The User
Accounts screen appears.
3. To add a user, type 2, or to edit an existing user, type 1, and press <Enter>, then type the
Username and follow the prompts on the Edit User Account screen to enter values or
press <Space> to cycle through options for these parameters:
4. To change your password, type 1, and press <Enter>, then select your account User
name.
5. On the Edit User Account screen, type 5, UI Password, and enter your new password, 8
to 15 characters, and press <Enter>.
6. To return to the Main Menu, press <Esc>.
3.4.4 Manage Logged In Users
At times, you may need to monitor which users are currently logged in to the 9161 and, if needed,
you can force a specific session off (requires supervisor access). The User Log shows information about the current users by session number; an asterisk (*) next to the session number indicates your session. To access the User Log, follow these steps:
1. From the Main menu, type 4, Reports, and press <Enter>.
2. From the Reports menu, type 5, User Log, and press <Enter>.
3. To force a session off, type the number for that session and press <Enter>.
NOTE: Although a user with any level of access can view the information, a
user must have supervisor access to force a session off.
4. To return to the Main Menu, press <Esc>.
24
Using the Software
9161 Network Interface Device User’s Manual
Managing Security
3.4.5 Set Up Host Access
The SNMP agent allows access to up to 8 Host IP addresses. Set up and edit the Host information for the 9161 at the Host Access Table screen. To access the Host Access Table, follow these
steps:
1. From the System menu type 4, Host Table/ SNMP Settings, and press <Enter>.
2. At the Host Access Table screen, type 2 to add a host, then at the prompt, enter the host
IP address and mask, or type 1 to edit a host. At the Add Host Access Entry screen, set
values for these parameters:
•
Telnet Access: Allow (Yes) or disallow (No) Telnet
•
FTP/TFTP: Select FTP, TFTP, Both, or None
•
SNMP Access: Select Write (also allows Read access), Write, or None
•
SNMP Protocol: Select V1V2cV3, V1V2c, or V3
•
V1/V2c Read and Write Communities: Enter name of community, up to 11 characters
•
V1/V2c Access Level: Select Supervisor, Operator, or Observer
3. To remove a host, type 3, then follow the prompts.
4. To return to the System Menu, press <Esc>.
3.4.6 Set Up the Notification Destination for Traps
Use the Trap Notification/Destination Table to view and set up the destination for Trap messages.
In addition to setting the host address and port, you can set the security level for the notification,
then set values for various parameters, depending on the security level. For details on and values for security parameters for your system, see the documentation for your network security
system. To access and update the Trap Notification/Destination Table, follow these steps:
1. At the System menu, type 5, Notification Settings, and press <Enter>. The Notification
Destination Table screen appears.
2. To edit an existing destination, type 1 and press <Enter>, use <Space> to toggle through
the hosts, and use <Enter> to select the destination you wish to edit.
3. On the Edit Notification Destination screen, select the number, 1 through 8, of the parameter(s) you want to change. When complete, press <Esc> to return to the Notification
Destination Table screen.
4. To add a destination, type 2 and press <Enter>, then type in an IP address and press
<Enter>. Enter the required values as follows:
a. Edit the IP Address you originally entered, if required, and press <Tab>.
b. Enter Trap Notification Port for the destination; Range is 1 to 65535; typically set to
162 and press <Tab>.
25
9161 Network Interface Device User’s Manual
Using the Software
Managing Security
c. Use <Space> to toggle through the Notification Types to set the security level for
the destination, from V1-Trap through V3-Inform
V1-Trap:
Unacknowledged message with SNMPv1 protocol
V2-Trap:
Unacknowledged message with SNMPv2c protocol
V2-Inform: Acknowledged message with SNMPv2c protocol
V3-Trap:
Unacknowledged message with SNMPv3 authentication and optional
encryption
V3-Inform: Acknowledged message with SNMPv3 authentication and optional
encryption
d. If V1-Trap, V2-Trap, or V2c-Inform or V3-Inform is the Notificaiton Type:
•
Enter the community name, up to 32 characters, and press <Tab>
•
Enter the SNMP Engine ID and press <Tab>.
•
Use <Space> to toggle through the Authentication Protocols; MD5, SHA,
or None, and press <Tab>.
•
Type an Authentication Password of at least 8 characters, press <Enter>,
then retype the Authentication Password and press <Enter> again
•
Use <space> to select an Privacy Protocol; DES for MD5 or SHA, or
None, and press <Tab>
•
If the Privacy Protocol is DES, type a Privacy Password of at least 8 characters, press <Enter>, then retype the Privacy Password and press
<Enter> again
•
Use <Space> to toggle the Security Level to select No Auth/No Priv, Auth/
No Priv, or Auth/Priv and press <Tab>
•
Type in the number of times to try to resend the message if not acknowledged between 0 and 10
•
Type in how long to wait for an acknowledgement before retrying between
1 to 30 seconds
e. If V3-Trap is the Notification Type:
•
Use <Space> to toggle through the usernames and press <Tab> to select
•
Press <Space> to cycle through the options for the Security Level, and
press <Enter> to return to the Notification Destination Table screen.
6. To delete a destination, type 3 and press <Enter>, then at the prompt, highlight the IP
Address for that Host and press <Enter>. The host table appears again with your
changes.
7. To return to the System Menu, press <Esc>.
26
Using the Software
9161 Network Interface Device User’s Manual
Managing the Network Interface
3.5 Managing the Network Interface
The Switch Configuration menu offers options to set network parameters. Ethernet bridges or
switches use the Spanning Tree Protocol (STP), an algorithm that creates a logical topology that
connects all network segments and ensures only one path between any two stations (reference
Table 3-3). When STP is enabled, the 9161 monitors the incoming data packets and periodically
sends Bridge Protocol Data Units (BPDU). STP monitors the incoming BPDUs to detect any
loops. If the same BPDU arrives on two ports, STP blocks one port to remove the loop. Because
this tree-like structure spans all nodes in the network, it is called Spanning Tree. Figure 3-4
shows a typical STP application.
Table 3-3. Network Spanning Tree Parameters Options
Menu Item
Description
1. Global Spanning Tree Parameters
Set the network-wide parameters
2. Multiple Spanning Tree Parameters
Set and view Multiple Spanning Tree instances
3. Global Spanning Tree Report
View current network-wide parameters
5. VLAN Configuration
Set the VLAN parameters
NOTE: For details on the Spanning Tree Algorithm, see the IEEE 802.1
specifications.
Figure 3-4. Typical Spanning Tree Application
In a service provider environment, you can include VLANS from different customers. The tagging
and double tagging features, when enabled, keep the ID tag on a packet as it exits a port; or
when disabled, strip the ID tag as it exits a port. The customer's tag for a VLAN is assigned
through the VLAN; the double (service provider's) tag is derived from the PVID and assigned
before the packet exits the 9161. See Figure and follow these guidelines:
•
Enable double tagging on the service provider port and disable it on the customer's port.
•
The SP tag priority is derived from the port priority.
•
If you set up Pbit translation, the translation occurs before the Pbit is copied to the SP tag
27
9161 Network Interface Device User’s Manual
Using the Software
Managing the Network Interface
Figure 3-5. Double Tagging Example
When setting up ports in the various switch configuration options, set up and configure options in
this order:
1. Set up the physical layer, such as port speeds.
2. Set up STP parameters for the physical ports.
3. Set up the VLANS.
4. Set up the Multiple Spanning tree (MST) parameters.
5. When all aspects of the link are ready, connect cables and start the network services.
3.5.1 Check and Update Port Information
The Port Information screen shows the current conditions for both ports in the 9161 with options
to view parameters and statistics for specific ports. Configuration information includes the model
number, description, and revision, the serial number, and link, remote fault, and physical status.
To access the Port Information screen, follow these steps:
1. From the Main menu, type 3, Port Information, and press <Enter>.
2. To view current status and set values for parameters for either port, type 1, Port Config/
Status, then type 10G1 or 10G2 and press <Enter>. You can set values for these parameters:
1. Change Port:
10G1 or 10G2
2. Admin Mode:
enable or disable
3. Flow Control:
enable or disable
4. Link Trap:
enable or disable
5. Physical Mode: Dependent on Interface Type
28
Using the Software
9161 Network Interface Device User’s Manual
Managing the Network Interface
NOTE: The Network LED may be turned on and off manually to indicate the
status of the Network
6. Network LED:
on or off
7. LLF Partner:
LLF Direction:
10G1, 10G2, or Disable
10G1 to 10G2, 10G2 to 10G1, Bidirectional, or disable
8. Remote Fault:
enable or disable
To view current statistics for traffic through a selected port, type 2, Port Statistics, then type the
port name and press <Enter>.
To clear the counters on all ports, type 3, “Clear Counters on All Ports,” then type <Enter>.
To return to the Main Menu, type <Esc>.
3.5.2 Set Up Spanning Tree Parameters
Use the Global Spanning Tree Parameters menu to set various STP parameters for the 9161
within the network. To access the Global Spanning Tree Parameters menu, follow these steps:
1. From the Switch Configuration menu, type 1, Global Spanning Tree Parameters, and
press <Enter>.
2. At the Global Spanning Tree Parameters menu, type the number for an item and press
<Enter>, then follow the prompts to set values for these parameters:
•
Admin Mode: Enable or disable STP protocol.
•
Version: Shows which IEEE specification this meets; d = Standard; w = Rapid; s =
Multiple
•
Configuration Name: Name for configuration, typically MAC address, up to 32
characters
•
Configuration Revision: Set a revision level between 1 and 65535
•
Priority: Set the relative precedence within the STP control structure for the 9161,
from 1 (highest) to 65534 (lowest). The highest priority sets the root bridge, the
bridge that controls the spanning tree. If two or more bridges share the same priority, the lowest MAC address defines the highest priority.
•
Hello Time (sec): Set how often the 9161 sends BPDUs if this 9161 is the Spanning Tree root.
•
Forward Delay (sec): Set the time between port state transitions from Learning to
Forward if this bridge is the STP root.
•
Max Age (sec): Set the Timeout value, how fast the 9161 deletes addresses from
the forwarding database.
•
BPDU Forwarding Mode: Normal, Blocking, or Forwarding On Same VLAN
29
9161 Network Interface Device User’s Manual
Using the Software
Managing the Network Interface
3. To view or update parameters for a specific port, type 10, View/Change Interface, and
press <Enter>, then press <Space> to cycle through the port names. You can edit various parameters, such as Admin Mode, Priority, Path Cost, and Edge Port.
4. To return to the Switch Configuration menu, press <Esc>.
3.5.3 Set Up VLANs
Use the VLAN Configuration screen to view and set VLAN parameters for the 9161. To access
the VLAN Configuration screen, follow these steps:
1. From the Switch Configuration menu, type 5, VLAN Configuration, and press <Enter>.
2. At the VLAN Configuration screen, type 1 to add a VLAN or type 2 to view or edit VLAN
information and press <Enter>, then follow the prompts on the screen. You can view a
specific port or set the VLAN Name, up to 20 characters.
3. At the VLAN Configuration screen, to view a part of the VLAN list that does not appear on
the screen, type 4, then enter the number of the VLAN where you want to start viewing
the list.
4. To set up ID translation for a specific port, type 5, then press <Space> to select that port;
and follow the prompts on the SPx VLAN ID Translation screen.
5. To set up Priority translation for a specific port, type 6, then press <Space> to select that
port; and follow the prompts on the SPx VLAN Priority Translation screen.
6. To remove a VLAN, type 3 and press <Enter>, then type or select the VLAN number.
7. To set up VLAN information for a specific port, type 7, then press <Space> to select that
port; and set values for these parameters on the SPx Information screen:
•
Participation Include/Exclude/Auto: Select specific numbers of VLANs that this
port will Include (always), Exclude (never), or Auto (dynamically) participate in
•
Tagging Enable/Disable: Enable, allow tags to remain on packets as they exit the
9161; or Disable, strip tags from packets before they exit the 9161
•
Double Tagging Enable/Disable: Enable, add service provider ID tags to packets
as they exit the 9161; or Disable, strip service provider ID tags from packets
before they exit the 9161
•
Accept Frame: Accept frames for this VLAN Only or Accept All frames
•
Ingress Filter: Enable, filter out received frames that are not for this VLAN, or Disable, forward all received frames.
•
PVID: Enter the VLAN ID to be assigned to any received untagged or priority
tagged frames
•
Default User Priority: Set the priority for any tagged packets received at this port
8. At the VLAN x Information screen, you can view or update parameters for a specific
VLAN. Type 2, View/Change Interface, and press <Enter>. You can edit various parameters, such as Admin Mode, Priority, Path Cost, and Edge Port.
9. To return to the Switch Configuration menu, press <Esc>.
30
Using the Software
9161 Network Interface Device User’s Manual
Managing the Network Interface
3.5.4 Set Up Optional Double Tagging
If you are using the 9161 within a service provider environment, you can include VLANS from different customers that are connected to individual ports. You can view and set service provider ID
tags for those ports at the Double Tagging Configuration screen, which lists the ports and associated PVIDs. The double tag is derived from the PVID. When enabled, double tagging adds the
double tag to a packet as it exits a port; or when disabled, strips the double tag as it exits a port.
When you set values for ports on the Double Tagging Configuration screen, it automatically
adjusts associated parameters on the VLAN port x Information screen.
To access the Double Tagging Configuration screen, follow these steps:
1. From the Switch Configuration menu, type 6, Double Tagging Configuration, and press
<Enter>.
2. At the Double Tagging Configuration screen, type 1 to enable or 2 to disable double tagging, then at the prompts, enter the port number and PVID, then press <Enter> to set the
tag.
3. To save the changes and return to the Switch Configuration menu, type 3, Accept configuration and exit, and press <Enter>.
3.5.5 Set Up Multiple Spanning Tree Parameters
Use the Multiple Spanning Tree (MST) Instance Configuration screen to view and set up
instances of grouped or associated VLANs in independent STPs. To access the MST Instance
Configuration screen, follow these steps:
1. From the Switch Configuration menu, type 2, Multiple Spanning Tree Parameters, and
press <Enter>.
2. At the MST Instance Configuration screen, type 1 to view or edit MST information and
press <Enter>, then follow the prompts on the screen to add or edit the VLANS in the
MST instance.
3. To view or update parameters for a specific MST, type 1, View/Change Mst, and press
<Enter>. You can edit various parameters, such as Admin Mode, Priority, Path Cost, and
Edge Port.
4. To return to the Switch Configuration menu, press <Esc>.
31
9161 Network Interface Device User’s Manual
Using the Software
Managing the Network Interface
3.5.6 Check Global Spanning Tree Data
Use the Global Spanning Tree Report screen to view Global STP parameters and interface statistics and status for the 9161. To access the Global Spanning Tree Report screen, follow these
steps:
1. From the Switch Configuration menu, type 3, Global Spanning Tree Report, and press
<Enter>.
2. At the Global Spanning Tree Report screen, type 1 to view statistics or 2 to view status for
a port, and then follow the prompts to select the specific port. The Statistics or Status
screen appears.
3. To return to the Switch Configuration menu, press <Esc>.
3.5.7 Check the Forwarding Database
To view the listings of VLAN ID, MAC address, port name, and status in the Forwarding database
(Fdb log), follow these steps:
1. From the Main menu, type 4, Reports, and press <Enter>.
2. From the Reports menu, type 45, Fdb Log, and press <Enter>. View the listings of VLAN
ID, MAC address, port name, and status.
3. To return to the Main Menu, press <Esc>.
3.5.8 Check the Static and Dynamic ARP Tables
The Static ARP table lets you set or change specific IP and MAC addresses for up to 10 ports.
The Dynamic ARP table lists currently-assigned IP and MAC addresses for various 9161 ports.
To view, set, or remove a static ARP address, follow these steps:
1. From the IP Settings screen, type 8, Static ARP Table, and press <Enter>.
2. At the prompt, type a number to edit a port, and then follow the prompts.
3. To return to the IP Settings screen, press <Esc>.
To view the current addresses on the dynamic ARP table, follow these steps:
1. From the Main menu, type 4, Reports, and press <Enter>.
2. From the IP Settings screen, type 6, Dynamic ARP Table, and press <Enter>.
3. To return to the Main Menu, press <Esc>.
32
Troubleshooting
9161 Ethernet Network Interface Device User’s Manual
Optical Power Loss
Chapter 4
Troubleshooting
This chapter covers identifying fault conditions and determining corrective action. The front panel
LEDs provide both normal and fault information. To aid troubleshooting, Tables 5-1and 5-2 list all
LED functions and indications.
4.1 Optical Power Loss
Whenever there is a significant signal loss, the Rx indictor turns off. Check cable integrity, and
remove and inspect the cable connectors, being careful not to damage the fiber end-face surface
or the connector housing. Clean all optical connectors before reinstalling them.
4.2 Fault Conditions
The 9161 front panel and interface module LEDs show fault conditions. Additional information
about fault conditions appears on the System Alarms Log. Use the System Alarms Screen to
view alarms and faults on the 9161 (reference Chapter 3).
4.2.1 Remote Fault (RMTF)
If an optical port loses the RX optical signal, it sends a Remote Fault (RMTF) signal on its Transmit to the distant end on the optical link. The SPD LED is off, and an alarm flags the link loss on
the optical port. When an optical port receives a Remote Fault signal, the Rx LED lights red and
an alarm flags the remote side optical link failure. Both local and remote link partners must be
configured to the same RMTF enable/disable setting (See Figure 5-1).
10G1
PORT
10G2
PORT
Tx
Rx
Rx
Tx
LOCAL DEVICE
10G2
PORT
x
10G1
PORT
Tx
Rx
Rx
Tx
Local device Rx detects link loss
Tx transmits RMTF to remote device
Local device Rx turns OFF
Remote device Rx LED turns red
REMOTE DEVICE
Figure 4-1. Remote Fault Signal
33
9161 Ethernet Network Interface Device User’s Manual
Troubleshooting
Fault Conditions
Table 4-1. 9161 Management LEDs
LED
Status
Off
Green
P1 (Primary) or
P2 (Secondary) Power
Amber
Red
Fans
No power/power supply not installed
Normal operation
System self-test
Power failure/Major alarm
Green
Normal operation
Amber
System self-test/one fan failed
Red
Red blinking
Off
Green
Management
Description
Green blinking
Amber
Amber blinking
Red
More than one fan failed
Fan not installed
No power
Normal operation
Management traffic
System self-test/over-temperature
Management traffic with over-temperature
Diagnostic or CPU failure
Table 4-2. 9161 Interface LEDs
LED
Status
Off
Green blinking
TX
Amber
RX
Description
No transmission activity
Transmission activity
System self-test
Red
Port disabled; may be due to Link Loss Forwarding (LLF)
Off
No link
Green
Link established
Green blinking
Receiving activity
Amber
Red
Off
NET
System self-test
Receiving Remote Fault
Non-network connection
Green
Network connection
Amber
System self-test
NOTE: The NET LED is non-functional. It is turned ON/OFF manually, and
does not effect the operation of the 9161
4.2.2 Link Loss Forwarding
When Link Loss Forwarding (LLF) is enabled, a fault on one side of the 9161 propagates to the
other side to notify that device and stops signal transmission (see Figure 5-2). Set the LLF propagation to 10G1 to 10G2, 10G2 to 10G1, or both directions. Set this in the User Interface at the
Functional Configuration screen (reference Chapter 3).
34
Troubleshooting
9161 Ethernet Network Interface Device User’s Manual
Running Diagnostics
x
10G2
PORT
10G1
PORT
Tx
Rx
Rx
Tx
FAULT
NO DATA
x
Link loss detected on 10G1 Port
Fault propogated to 10G2 Port
10G2 Port Tx stops transmitting data
10G2 Port Tx LED turns red
10G1 PORT TO 10G2 PORT
10G1
PORT
10G2
PORT
Tx
Rx
Rx
Tx
x
RMTF
Link loss detected on 10G2Port
Fault propogated to 10G1Port
10G1 Port stops transmitting data
10G1 Port LED turns red
10G2 PORT TO 10G1 PORT
Figure 4-2. Link Loss Forwarding Propagation
4.3 Running Diagnostics
When you set up a new connection, you can verify the link connectivity using PING prior to sending data. A Latency and Jitter Test will verify the quality of the link.
4.3.1 PING Testing
You can verify network connectivity with another IP device within the subnet by sending a PING
to the IP address for that device. For PING testing instructions, reference Chapter 3.
4.3.2 Latency and Jitter Testing
Latency/Jitter Testing measures and reports performance and quality of the link between the
9161 and another Canoga Perkins capable device. Results reported include the Frame Loss
Ratio (FLR), and the minimums, average, and maximums for latency and jitter. For latency and
jitter testing instructions, reference Chapter 3.
4.4 Loopback Diagnostics
Use Loopbacks to diagnose a fault on the optical link. The 9161 supports two loopback modes
that you can set at the local site for both the local and remote 9161s. These modes loop the data
through either the physical layer on the User side or the Network side.
35
9161 Ethernet Network Interface Device User’s Manual
Troubleshooting
Loopback Diagnostics
When performing loopback diagnostics, the 9161 uses a unique MAC address, designated as
the Loop Test MAC Address, which is displayed on the Loopback Setup Screen (reference Chapter 3). When in loopback mode, the 9161 filters and discards all service frames.
The 9161 is configurable to swap the origination and destination MAC Addresses and to recalculate the looped frame's CRC. Test packets are returned to the source according to the selected
options. To display current loopback status, initiate loopbacks, configure address swapping and
CRC recalculation options, and to run a loopback test, reference Chapter 3.
4.4.1 User Mode
User Mode loops data received on the local 10G1 Port Rx through the FPGA to the 10G1 Port
Tx. Data is not sent out the 10G2 Port Tx and incoming data on the 10G2 Port Rx is ignored (see
Figure 5-3). To set this mode, set the Loopback State for the Local Module to Local (reference
Chapter 3).
10G1
PORT
10G2
PORT
10G2
PORT
10G1
PORT
Tx
Rx
Tx
Rx
Rx
Tx
Rx
Tx
LOCAL DEVICE
NO DATA TRANSMISSION
DATA IGNORED
REMOTE DEVICE
Figure 4-3. User Mode
4.4.2 Network Mode
Network Mode loops data received on the 10G2 Port Rx through the Local User side to the 10G2
Port Tx. Data is not sent out the local 10G1 Port Tx and incoming data on the local 10G1 Port Rx
is ignored (see Figure 5-4). To set this mode, set the Loopback State for the Remote module to
Remote (reference Chapter 3).
10G1
PORT
10G2
PORT
10G2
PORT
10G1
PORT
Tx
Rx
Tx
Rx
Rx
Tx
Rx
Tx
LOCAL DEVICE
NO DATA TRANSMISSION
DATA IGNORED
REMOTE DEVICE
Figure 4-4. Remote-Remote Loopback Mode
36
Maintenance
9161 Ethernet Network Interface Device User’s Manual
General Maintenance
Chapter 5
Maintenance
5.1 General Maintenance
Well maintained components and clearly identified cables help assure optimum system operation. Damaged fiber optic cables and dirty connectors are a common source of signal loss or
attenuation. Fiber optics are especially susceptible to contamination. Inspect, clean, and test all
components to maintain optimum performance. Inspect the surface of the fiber optic ferrules and
clean as required.
CAUTION:
To avoid damage and signal loss, do not over-tighten or forcefit optical connectors.
5.2 Check Optical Power Levels
NOTE: For accurate results, warm up each unit for at least 30 minutes before
checking power levels. Ensure the Transmit laser is turned on when
the unit is powered up.
To ensure proper performance levels, measure Transmitter Output Power, Receiver Input Power,
and attenuation for all fiber links. Each 9161 is shipped with a document that lists the output
power for each optical transceiver.
5.2.1 Measuring Transmitter Output Power
To measure the output power, follow these steps (see Figure 6-1):
1. Inspect and clean connectors on a fiber optic test cable with a known loss, then connect it
to the Tx connector on the 9161.
2. Set the optical power meter to the proper wavelength.
3. Connect the other end of the optic test cable to the optical power meter, wait two or three
minutes for the power reading to stabilize, and read the output power.
4. Add the test cable loss, then record the power level and compare it to the value on the
performance sheet that was included for that transceiver. Measurement tolerance is +/0.5 dBm.
37
9161 Ethernet Network Interface Device User’s Manual
Maintenance
Check Optical Power Levels
5. If the reading is low, repeat the measurement with a different test cable. If the power level
is still not within range, call Canoga Perkins Technical Support.
FIBER OPTIC
TRANSMITTER
FIBER OPTIC
RECEIVER
-7dBm
λ = 1300 nm
OPTICAL
POWER
METER
Figure 5-1. Measuring Transmitter Output Power
5.2.2 Measuring Receiver Input Power
To measure receiver input power, follow these steps (seeFigure 6-2):
1. Connect the transmit fiber to the transmit side of the equipment at the local site.
2. Connect a calibrated optical power meter to the end of the transmit fiber at the remote
site.
3. Measure and record the optical power on the transmit fiber at the remote site. This is the
receiver input power for the transmit fiber from the local site.
4. Connect the transmit fiber to the transmit side of the equipment at the remote site.
5. Connect a calibrated optical power meter to the end of the transmit fiber at the local site.
6. Measure and record the optical power on the transmit fiber at the local site. This is the
receiver input power for the transmit fiber from the remote site.
7. Compare the receiver input power with the sensitivity level listed on the optical specifications sheet, located in the Client Support Area of the Canoga Perkins web site. The
power level must be within the sensitivity range listed on the data sheet. If not, contact
Canoga Perkins Technical Support.
8. Compare the receiver input power to the receiver’s saturation (overdrive) level shown on
the optical specifications sheet, located in the Client Support Area of the Canoga Perkins
web site. The power level must be lower than the saturation level. If not, contact Canoga
Perkins Technical Support.
38
Maintenance
9161 Ethernet Network Interface Device User’s Manual
-24dBm
λ = 1300 nm
LOCAL SITE
OPTICAL
POWER
METER
Check Optical Power Levels
FIBER OPTIC
TRANSMITTER
FIBER OPTIC
RECEIVER
FIBER OPTIC
RECEIVER
FIBER OPTIC
TRANSMITTER
-24dBm
λ = 1300 nm
OPTICAL
POWER
METER
REMOTE SITE
Figure 5-2. Measuring Receiver Input Power
5.2.3 Calculating Fiber Link Attenuation
Link attenuation measurement identifies potential problems with links that are on the threshold of
receiver sensitivity. Measure optical fiber links at the shortest wavelength of operation, as it is the
limiting factor in the loss budget. Use a power meter calibrated for the laser source, then factor in
approximately 1 dB for the connector loss from the patch cables between the 9161 and the local
device. (Each fiber connection can generate 0.5 dB of additional loss.)
NOTE: If you cannot determine the Rx sensitivity, contact Canoga Perkins
Technical Support for assistance.
Follow these steps to calculate fiber link attenuation:
1. Determine transmitter output power as described in paragraph 6.2.1 above.
2. Determine receiver input power as described in paragraph 6.2.2 above.
3. Subtract receiver input power from transmitter output power. The result is the fiber link
attenuation.
Transmit Output Power
-7.0 dBm
Receiver Input Power
-28.2 dBm
Fiber Link Attenuation
21.2 dB
39/(42 Blank)
Specifications
9161 Ethernet Network Interface Device User’s Manual
9161 Specifications
Chapter 6
Specifications
6.1 9161 Specifications
Standards:
IEEE 802.3
Dimensions:
2.5 H x 17.0 W x 14.0 D (63.5 x 431.8 x 355.6 mm)
Weight:
14 lb. (6.35 Kg)
Operating Temperature:
0° to 50° C
Operating Humidity:
Up to 90% (non-condensing)
Power Consumption:
AC = 36W
DC = 32W
Optical Connectors:
LC
6.1.1 Regulatory Compliance
•
ETL, cETL & LVD (UL 60950 CAN/CSA C22.2 No. 60950, EN/IEC 60950)
•
EMC Directive (EN55022 Class A, EN 55024, EN 61000-3-2/-3-3)
•
CE Mark
•
FCC Part 15B (U.S.)/ICES-003 (CAN)
•
VCCI Class A (Japan)
•
C-Tick (AS/NZS 3548 - Australia)
•
CDRH CFR21/IEC 60825-1 (Laser Safety)
•
NEBS Level 3 Certified & Tested
41
9161 Ethernet Network Interface Device User’s Manual
Specifications
9161 XFP Module Model Numbers
6.1.2 EIA-232 Pinout
5
4
9
3
8
2
7
1
1
6
2
3
4
5
6
7
8
9
3
7
DCD
RX DATA
TX DATA
DTR
SIG GND
DSR
RTS
CTS
RI
6.2 9161 XFP Module Model Numbers
10GigE XFP Modules
XFP1-0265
10 GBase-SR 850nm MM 300m LC
XFP1-2265
10 GBase-LR 1310nm SM 10km LC
XFP1-3465
10 GBase-ER 1550nm SM 40km LC
XFP1-3665
10 GBase-ER 1550nm SM 80km LC
NOTE: Reference http://product.canoga.com/media/datasheet/
9161_Optical_Specs.pdf for the lastest available XFPs
42
4
8
5
9
TO PC SERIAL PORT
DTE
DE9 MALE
TO 9145E CRAFT PORT
DCE
DE9 FEMALE
1
2
6
1
2
3
4
5
6
7
8
9
Warranty Information
9161 Ethernet Network Interface Device User’s Manual
Appendix A
Warranty Information
Current Warranty information is available on-line in the Client Login Area of the Canoga Perkins
web site (www.canoga.com) or by contacting Technical Support at 800-360-6642 (voice) or
[email protected] (email).
41/(46 Blank)
CANOGA PERKINS CORPORATION
20600 Prairie Street
Chatsworth, California 91311-6008 USA
Phone: (818) 718-6300 FAX: (818) 718-6312
Web Site: www.canoga.com
Email: [email protected]