1
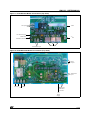
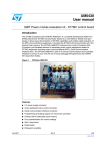
UM0122
USER MANUAL
Motor Drive Reference Design Kit
INTRODUCTION
The Motor Drive Reference Design Kit is comprised of three power boards that can be driven by a control
board via six in-line connectors. The power boards can work directly from an AC or DC power supply (the
PowerBD-3000 uses only DC power). The auxiliary power supply is located on the power boards and
works with applications rated above 50VDC. Some of the many advantages include:
– The kit is quick to set up and install, and is easy to run.
– The design is re-usable (the Gerber files are available for free).
– The original partition design between the power board and the control board provides very effective
system noise immunity.
Note: Please read the SAFETY AND OPERATING INSTRUCTIONS section before attempting any operation with this manual.
The Motor Drive Reference Design Kit provides customers with a reference design for a three-phase power inverter using ST’s dedicated chip set. When they are connected to a motor, they allow the user to demonstrate smooth, silent, and efficient motor operation.
The design boards are well-suited for several kinds of applications which required six-step commutation
or 6-signal PWM (sine wave-modulated) output, including
■
3PH AC Induction motor control,
■
3PH PMDC/AC or BLDC/AC (Trapezoidal driven) motor control,
■
3PH PMAC or BLAC (sinusoidal driven) motor control, and
■
Single- and 3-phase UPS (Uninterruptable Power Supply).
This kit offers customization options as well, making it an excellent choice as an original platform for a
more complete and dedicated system. Special care has been taken during the layout process to provide
a very low level of interference between the Power and the Signal noise. This makes the system quite solid
under almost all operating conditions.
There are three (3) power boards for 3-phase inverters of different power rates and a control board:
■
PowerBD-300 (300W nominal rated power)
■
PowerBD-1000 (1000W nominal rated power)
■
PowerBD-3000 (3000W nominal rated power)
■
ControlBD-7FMC2
WARNING: The high voltage levels used to operate the motor drive could present a serious electrical shock hazard. This kit must be used only in a power laboratory only by engineers and technicians who are experienced in power electronics technology.
Rev 2
March 2006
1/36
UM0122 - USER MANUAL
TABLE OF CONTENTS
INTRODUCTION . . . . . . . . . . . . . . . . . . . . . . . . . . . . . . . . . . . . . . . . . . . . . . . . . . . . . . . . . . . . . . . . . . . 1
SAFETY AND OPERATING INSTRUCTIONS . . . . . . . . . . . . . . . . . . . . . . . . . . . . . . . . . . . . . . . . . . . . 5
General . . . . . . . . . . . . . . . . . . . . . . . . . . . . . . . . . . . . . . . . . . . . . . . . . . . . . .
Reference Design Board Intended Use . . . . . . . . . . . . . . . . . . . . . . . . . . . .
Reference Design Board Installation. . . . . . . . . . . . . . . . . . . . . . . . . . . . . .
Electronic Connection . . . . . . . . . . . . . . . . . . . . . . . . . . . . . . . . . . . . . . . . .
Reference Design Board Operation. . . . . . . . . . . . . . . . . . . . . . . . . . . . . . .
......
......
......
......
......
......
......
......
......
......
.....5
.....5
.....5
.....5
.....5
KIT-ACCESSIBLE ST7FMC2S4T6 MICROCONTROLLER FUNCTIONS . . . . . . . . . . . . . . . . . . . . . . . 6
Main Features . . . . . . . . . . . . . . . . . . . . . . . . . . . . . . . . . . . . . . . . . . . . . . . . . . . . . . . . . . . . . . . . . 6
Table 1. ST7FMC2S4T6 Functions . . . . . . . . . . . . . . . . . . . . . . . . . . . . . . . . . . . . . . . . . . . . . . . . . 6
DEMONSTRATION BOARD ELECTRICAL CHARACTERISTICS . . . . . . . . . . . . . . . . . . . . . . . . . . . . 8
Table 2. Power Board Electrical Characteristics . . . . . . . . . . . . . . . . . . . . . . . . . . . . . . . . . . . . . . . 8
Table 3. Control Board Electrical Characteristics . . . . . . . . . . . . . . . . . . . . . . . . . . . . . . . . . . . . . . 8
ELECTRICAL MOTOR CONTROL DEMONSTRATION SETUP . . . . . . . . . . . . . . . . . . . . . . . . . . . . . . 9
Environmental Considerations . . . . . . . . . . . . . . . . . . . . . . . . . . . . . . . . . . . . . . . . . . . . . . . . . . . 9
Power Board Connections . . . . . . . . . . . . . . . . . . . . . . . . . . . . . . . . . . . . . . . . . . . . . . . . . . . . . . 10
Table 4. Recommended Bulk Capacitor Values (typ) . . . . . . . . . . . . . . . . . . . . . . . . . . . . . . . . . . 10
Figure 1. PowerBD-300 Board Connections (Top View) . . . . . . . . . . . . . . . . . . . . . . . . . . . . . . . . 11
Figure 2. PowerBD-1000 Board Connections (Top View) . . . . . . . . . . . . . . . . . . . . . . . . . . . . . . . 11
Figure 3. PowerBD-3000 Board Connections (Top View) . . . . . . . . . . . . . . . . . . . . . . . . . . . . . . . 12
Figure 4. ControlBD-7FMC2 Board (Top View) . . . . . . . . . . . . . . . . . . . . . . . . . . . . . . . . . . . . . . . 12
Power Board Switches . . . . . . . . . . . . . . . . . . . . . . . . . . . . . . . . . . . . . . . . . . . . . . . . . . . . . . . . . 13
Setting up the Control Board . . . . . . . . . . . . . . . . . . . . . . . . . . . . . . . . . . . . . . . . . . . . . . . . . . . . 13
Figure 5. STGP14NC60KD Gate Resistor Turn OFF Voltage Slope . . . . . . . . . . . . . . . . . . . . . . . 13
Mandatory Checks Before Operation . . . . . . . . . . . . . . . . . . . . . . . . . . . . . . . . . . . . . . . . . . . . . 13
ControlBD-7FMC2 and 3PH AC INDUCTION MOTOR CONTROL SOFTWARE (Open Loop) v1.0 14
Download the Firmware into the ST7FMC Microcontroller . . . . . . . . . . . . . . . . . . . . . . . .
Start-up Procedure . . . . . . . . . . . . . . . . . . . . . . . . . . . . . . . . . . . . . . . . . . . . . . . . . . . . . . . .
Commands . . . . . . . . . . . . . . . . . . . . . . . . . . . . . . . . . . . . . . . . . . . . . . . . . . . . . . . . . . . . . . .
Motor Direction . . . . . . . . . . . . . . . . . . . . . . . . . . . . . . . . . . . . . . . . . . . . . . . . . . . . . . . . . . .
Potentiometer Commands . . . . . . . . . . . . . . . . . . . . . . . . . . . . . . . . . . . . . . . . . . . . . . . . . .
. . . . 14
. . . . 14
. . . . 15
. . . . 15
. . . . 15
ControlBD-7FMC2 and 3PH AC INDUCTION MOTOR CONTROL SOFTWARE (Closed Loop) v1.016
Download the Firmware into the ST7FMC Memory . . . . .
Start-up Procedure . . . . . . . . . . . . . . . . . . . . . . . . . . . . . . .
Commands . . . . . . . . . . . . . . . . . . . . . . . . . . . . . . . . . . . . . .
Motor Direction . . . . . . . . . . . . . . . . . . . . . . . . . . . . . . . . . .
Potentiometer Commands . . . . . . . . . . . . . . . . . . . . . . . . .
2/36
......
......
......
......
......
.......
.......
.......
.......
.......
......
......
......
......
......
......
......
......
......
......
. . . . 16
. . . . 16
. . . . 17
. . . . 17
. . . . 17
UM0122 - USER MANUAL
ControlBD-7FMC2 and 3PH PMDC/AC or BLDC/AC (TRAPEZOIDAL DRIVEN) MOTOR CONTROL
SOFTWARE (Open Loop) v1.0 . . . . . . . . . . . . . . . . . . . . . . . . . . . . . . . . . . . . . . . . . . . . . . . . . . . . . . 18
Download the Firmware into the ST7FMC Microcontroller . . . . . . . . . . . . . . . . . . . . . . . .
Start-up Procedure . . . . . . . . . . . . . . . . . . . . . . . . . . . . . . . . . . . . . . . . . . . . . . . . . . . . . . . .
Commands . . . . . . . . . . . . . . . . . . . . . . . . . . . . . . . . . . . . . . . . . . . . . . . . . . . . . . . . . . . . . . .
Motor Direction . . . . . . . . . . . . . . . . . . . . . . . . . . . . . . . . . . . . . . . . . . . . . . . . . . . . . . . . . . .
. . . . 18
. . . . 18
. . . . 18
. . . . 18
ControlBD-7FMC2 and 3PH PMDC/AC or BLDC/AC (TRAPEZOIDAL DRIVEN) MOTOR CONTROL
SOFTWARE (Closed Loop) v1.0 . . . . . . . . . . . . . . . . . . . . . . . . . . . . . . . . . . . . . . . . . . . . . . . . . . . . . 19
Download the Firmware into the ST7FMC Memory . . . . .
Start-up Procedure . . . . . . . . . . . . . . . . . . . . . . . . . . . . . . .
Commands . . . . . . . . . . . . . . . . . . . . . . . . . . . . . . . . . . . . . .
Motor Direction . . . . . . . . . . . . . . . . . . . . . . . . . . . . . . . . . .
......
......
......
......
.......
.......
.......
.......
......
......
......
......
......
......
......
......
. . . . 19
. . . . 19
. . . . 19
. . . . 19
ControlBD-7FMC2 and 3PH PMAC or BLAC (SINUSOIDAL DRIVEN) MOTOR CONTROL SOFTWARE (Open Loop) v1.0 . . . . . . . . . . . . . . . . . . . . . . . . . . . . . . . . . . . . . . . . . . . . . . . . . . . . . . . . . . . 20
Hardware Modifications . . . . . . . . . . . . . . . . . . . . . . . . . . . . . . . . . . . . . . . . . . . . . . . . . . . .
Download the Firmware into the ST7FMC Microcontroller . . . . . . . . . . . . . . . . . . . . . . . .
Start-up Procedure . . . . . . . . . . . . . . . . . . . . . . . . . . . . . . . . . . . . . . . . . . . . . . . . . . . . . . . .
Commands . . . . . . . . . . . . . . . . . . . . . . . . . . . . . . . . . . . . . . . . . . . . . . . . . . . . . . . . . . . . . . .
Motor Direction . . . . . . . . . . . . . . . . . . . . . . . . . . . . . . . . . . . . . . . . . . . . . . . . . . . . . . . . . . .
Potentiometer Commands . . . . . . . . . . . . . . . . . . . . . . . . . . . . . . . . . . . . . . . . . . . . . . . . . .
. . . . 20
. . . . 20
. . . . 20
. . . . 21
. . . . 21
. . . . 21
ControlBD-7FMC2 and 3PH PMAC or BLAC (SINUSOIDAL DRIVEN) MOTOR CONTROL SOFTWARE (Closed Loop) v1.0 . . . . . . . . . . . . . . . . . . . . . . . . . . . . . . . . . . . . . . . . . . . . . . . . . . . . . . . . . . 22
Hardware Modifications . . . . . . . . . . . . . . . . . . . . . . . . . . .
Download the Firmware into the ST7FMC Memory . . . . .
Start-up Procedure . . . . . . . . . . . . . . . . . . . . . . . . . . . . . . .
Commands . . . . . . . . . . . . . . . . . . . . . . . . . . . . . . . . . . . . . .
Motor Direction . . . . . . . . . . . . . . . . . . . . . . . . . . . . . . . . . .
Potentiometer Commands . . . . . . . . . . . . . . . . . . . . . . . . .
......
......
......
......
......
......
.......
.......
.......
.......
.......
.......
......
......
......
......
......
......
......
......
......
......
......
......
. . . . 22
. . . . 22
. . . . 22
. . . . 23
. . . . 23
. . . . 23
APPENDIX A.PowerBD-300 CHARACTERISTICS AND SCHEMATIC . . . . . . . . . . . . . . . . . . . . . . . 24
Front-end . . . . . . . . . . . . . . . . . . . . . . . . . .
Auxiliary Power Supply. . . . . . . . . . . . . . .
Power Stage . . . . . . . . . . . . . . . . . . . . . . . .
Figure 6. PowerBD-300 Schematic. . . . . . .
......
......
......
......
.......
.......
.......
.......
......
......
......
......
.......
.......
.......
.......
......
......
......
......
......
......
......
......
. . . . 24
. . . . 24
. . . . 25
. . . . 26
APPENDIX B.PowerBD-1000 CHARACTERISTICS AND SCHEMATIC . . . . . . . . . . . . . . . . . . . . . . 27
Front-end . . . . . . . . . . . . . . . . . . . . . . . . . .
Auxiliary Supply . . . . . . . . . . . . . . . . . . . .
Power Stage . . . . . . . . . . . . . . . . . . . . . . . .
Figure 7. PowerBD-1000 Schematic. . . . . .
......................................
......................................
......................................
......................................
. . . . 27
. . . . 27
. . . . 28
. . . . 29
APPENDIX C.PowerBD-3000 CHARACTERISTICS AND SCHEMATIC . . . . . . . . . . . . . . . . . . . . . . 30
3/36
UM0122 - USER MANUAL
Front-end . . . . . . . . . . . . . . . . . . . . . . . . . .
Auxiliary Supply . . . . . . . . . . . . . . . . . . . .
Power Stage . . . . . . . . . . . . . . . . . . . . . . . .
Figure 8. PowerBD-3000 Schematic. . . . . .
......................................
......................................
......................................
......................................
. . . . 30
. . . . 30
. . . . 31
. . . . 32
APPENDIX D.ControlBD-7FMC2 CHARACTERISTICS AND SCHEMATIC. . . . . . . . . . . . . . . . . . . . 33
Gate Drive Circuit . . . . . . . . . . . . . . . . . . . . . . . . . . . . . . . . . . . . . . . . . . . . . . . . . . . . . . . . . . . . . 33
Microcontroller User Interfaces . . . . . . . . . . . . . . . . . . . . . . . . . . . . . . . . . . . . . . . . . . . . . . . . . . 33
Figure 9. ControlBD-7FMC2 Schematic . . . . . . . . . . . . . . . . . . . . . . . . . . . . . . . . . . . . . . . . . . . . . 34
REVISION HISTORY. . . . . . . . . . . . . . . . . . . . . . . . . . . . . . . . . . . . . . . . . . . . . . . . . . . . . . . . . . . . . . . 35
Table 5. Document Revision History . . . . . . . . . . . . . . . . . . . . . . . . . . . . . . . . . . . . . . . . . . . . . . . 35
4/36
UM0122 - USER MANUAL
SAFETY AND OPERATING INSTRUCTIONS
General
During assembly and operation, the Motor Drive Reference Design Kit poses several inherent hazards,
including bare wires, moving or rotating parts, and hot surfaces. There is danger of serious personal injury
and damage to property, if the Kit or its components are improperly used or installed incorrectly.
All operations involving transportation, installation and use, as well as maintenance are to be carried out
by skilled technical personnel (national accident prevention rules must be observed). For the purposes of
these basic safety instructions, “skilled technical personnel” are suitably qualified people who are familiar
with the installation, use, and maintenance of power electronic systems.
Reference Design Board Intended Use
The Motor Drive Reference Design boards are components designed for demonstration purposes only,
and shall not be used for electrical installation or machinery. The technical data as well as information concerning the power supply conditions shall be taken from the documentation and strictly observed.
Reference Design Board Installation
The installation and cooling of the Reference Design boards shall be in accordance with the specifications
and the targeted application (see ELECTRICAL MOTOR CONTROL DEMONSTRATION
SETUP, page 9).
– The motor drive converters shall be protected against excessive strain. In particular, no components
are to be bent, or isolating distances altered during the course of transportation or handling.
– No contact shall be made with electronic components and contacts.
– The boards contain electrostatically sensitive components that are prone to damage through improper
use. Electrical components must not be mechanically damaged or destroyed (to avoid potential health
risks).
Electronic Connection
Applicable national accident prevention rules must be followed when working on the main power supply
with a motor drive. The electrical installation shall be completed in accordance with the appropriate requirements (e.g., cross-sectional areas of conductors, fusing, PE connections; for further information, see
ELECTRICAL MOTOR CONTROL DEMONSTRATION SETUP, page 9).
Reference Design Board Operation
A system architecture which supplies power to the Reference Design Boards shall be equipped with additional control and protective devices in accordance with the applicable safety requirements (e.g., compliance with technical equipment and accident prevention rules).
Note: Do not touch the Design Boards after disconnection from the voltage supply, as several parts and
power terminals which contain possibly energized capacitors need to be allowed to discharge.
5/36
UM0122 - USER MANUAL
KIT-ACCESSIBLE ST7FMC2S4T6 MICROCONTROLLER FUNCTIONS
Main Features
■
■
■
■
■
■
■
TQFP44 package
16K dual voltage FLASH program memory with read-out protection capability
768 bytes RAM
Low voltage supervisor with:
– clock security system
– nested interrupt controller with 14 interrupt vectors
– two 16-bit timers
– one 8-bit auto-reload timer
Serial Peripheral Interface (SPI)
Local Interconnect Network Serial Communication Interface (LINSCI™)
Motor Controller (MTC) peripheral with:
– 6 high sink Pulse Width Modulator (PWM) output channels
– asynchronous Emergency Stop
– 4 analog inputs for rotor position detection
– Op Amp and Comparator for current limitation
– 10-bit Analog-to-Digital Converter (ADC) with 11 inputs
– In-circuit Communication Interface (ICC, debug)
Table 1. ST7FMC2S4T6 Functions
Function
I/O Name
MCO0 to MCO5
MCIA, MCIB, MCIC
MTC
SPI
LINSCI™
6/36
Description (depends on embedded software)
PWM outputs
Analog or Digital input for position sensor or B.E.M.F. detection
MCVREF
B.E.M.F. Detection Comparator reference
NMCES
Emergency Stop
MCAOP
Operational Amplifier Positive Input
MCAON
Operational Amplifier Negative Input
MCAOZ
Operational Amplifier Output
MCCREF
Current Limitation reference
MCPWMU
PWM Output U
MCPWMV
PWM Output V
MCPWMW
PWM Output W
MISO
Master In/Slave Out data
MOSI
Master Out/Slave In data
SCK
Serial Clock
RDI
Received Data Input
TDO
Transmit Data Output
UM0122 - USER MANUAL
Function
I/O Name
Description (depends on embedded software)
AIN0
Temperature sensor input
AIN1
Line voltage sensing input
AIN7
Trimmer reading input
AIN11
Trimmer reading input
AIN12
Trimmer reading input
AIN13
A/D input
10-bit ADC
ICC
ICCCLK
Output Serial Clock
ICCDATA
Input/Output Serial Data
ICCSEL/Vpp
Programming Voltage Input
PB7
PE0/OCMP2
Others
PE1/OCMP1
High Sink LED Output
PE2/ICAP2
PE3/ICAP1
High Sink I/O or Timer B Output Compare 2
I/O or Timer B Output Compare 1
I/O or Timer B Input Capture 2
I/O or Timer B Input Capture 1
7/36
UM0122 - USER MANUAL
DEMONSTRATION BOARD ELECTRICAL CHARACTERISTICS
Table 2. Power Board Electrical Characteristics
PowerBD-300
PowerBD-1000
PowerBD-3000
Min
Max
Min
Max
Min
Max
Range with on-board
auxiliary supply and
double rectification
50
260
50
260
50
260
V
Range with on-board
auxiliary supply and
voltage doubler
25
135
25
135
25
135
V
Range with on-board
auxiliary supply
70
370
70
370
70
370
V
14
15
14
15
14
15
V
Power Board Parameters
Unit
AC Input Voltage
DC Input Voltage
External Auxiliary Supply Source
Current Consumption in Idle State
30
50
40
mA
Recommended Power Switches
12VDC Input Voltage
STB100NF04T4
STB150NF04T4
N/A
N/A
24VDC Input Voltage
STB60NF06T4
STB80NF5508T4
N/A
N/A
42VDC Input Voltage
STB30NF10T4
STB75NF75T4
N/A
N/A
120VAC (with Voltage Doubler) or 230VAC Input
Voltage
STGB6NC60HD
STGF10NC60KD
STGP14NC60KD
STGW20NC60VD
Note: NA = Not Applicable
Table 3. Control Board Electrical Characteristics
ControlBD-7FMC2
Control Board Parameters
Unit
Min
Max
15V Auxiliary Supply range
14
15
V
5V Auxiliary Supply range
4.5
5.5
V
J6 Driving Current capability
BEMF Input Current capability
15V Bias Current (typ)
5V Bias Current (typ)
T1, T2 Input Voltage capability
8/36
UM0122 - USER MANUAL
ELECTRICAL MOTOR CONTROL DEMONSTRATION SETUP
Most of the system features are covered in this user manual, starting from the main power supply frontend to the power stages, including the operation of the +5V/+15V power supply and microcontroller.
This kit includes the following key components:
■
Motor control-dedicated microcontrollers
■
L6386 half-bridge drivers
■
60V MOSFET or 600V Insulated Gate Bipolar Transistor (IGBT)
■
VIPer12 auxiliary supply smart power switch
■
Small-Signal Bipolar Transistors
■
STTH108 and BAS70W Diodes
■
78L05 voltage regulator
■
M95040 EEPROM memory
■
P6KE400A and 1.5KE400A Transil™ diodes (optional)
WARNING: The starter kit has no isolation shield or any other type of protection case.
The demonstration board must be handled very carefully, as high potential (energy) parts are open and
can be touched. The user MUST avoid connecting or removing cables during operation of an electric motor, or touching any part of the system when it is connected to the main power supply.
Note: After turning the motor off, the DC-link capacitor may still hold voltage for several minutes (refer to
the LEDs on the control board - Figure 9., page 34).
Note: Do NOT expose the kits to ambient temperatures of over 35°C, as this may harm the components
or reduce their lifetimes.
For more information on the demonstration software and libraries, refer to Application Notes AN1291,
AN1083, and AN1276.
Environmental Considerations
The Motor Drive Reference Design Kit must only be used in a power laboratory. The high voltage used in
any AC drive system presents a serious shock hazard. A complete laboratory setup consists of an isolated
AC power supply, the Reference Design Kit, an AC Induction motor, and isolated (laboratory) power supplies for +15V (as needed).
The Kit is not electrically isolated from the AC input. This topology is very common in AC drives. The microprocessor is grounded by the integrated Ground of the DC bus. The microprocessor and associated
circuitry are hot and MUST be isolated from user controls and serial interfaces.
Note: Any measurement equipment must be isolated from the main power supply before powering
up the motor drive. To use an oscilloscope with the Kit, it is safer to isolate the AC supply AND the
oscilloscope. This prevents a shock occurring as a result of touching any SINGLE point in the circuit, but does NOT prevent shocks when touching TWO or MORE points in the circuit.
An isolated AC power supply can be constructed using an isolation transformer and a variable transformer. A schematic of this AC power supply is in the Application Note, “AN438, TRIAC + Microcontroller: Safety Precautions for Development Tools.” (Although this Application Note was written for TRIAC, the
isolation constraints still apply for fast switching semiconductor devices such as IGBTs.)
Note: Isolating the application rather than the oscilloscope is highly recommended in any case.
9/36
UM0122 - USER MANUAL
Power Board Connections
Note: Before supplying power to the boards, verify the connection integrity and make sure there are no
unintended earth/ground loops caused by peripheral (e.g., test) equipment (e.g., PC or oscilloscope).
■
Cables
Choose the appropriate gauge wiring for the motor’s current ratings.
Note: Electrostatic charges may accumulate on a floating motor and increased voltage may be
present due to energized capacitors which need to be allowed to discharge.
■
■
Straps and Jumpers
Several jumpers allow the two bulk capacitors to function in serial (current with one path to follow) or
parallel (current with at least two paths to follow) configuration:
– Three jumpers allow for operation with Double Rectification.
This is enabled by soldering jumpers J1-J3, J9-J10, and J4-J5, and keeping J12-J13 open (see
Figure 6., page 26, Figure 7., page 29, and Figure 8., page 32).
This configuration is recommended when the main power supply voltage ranges from 180VAC to
260VAC.
– Three jumpers enable the Voltage Doubler.
This is enabled by soldering jumpers J1-J6, J7-J11, and J12-J13, and keeping J4-J5 open (see
Figure 6., Figure 7., and Figure 8.).
This configuration is recommended when the main power supply stays below 130VAC.
This will double the main power supply voltage and, consequently, the output voltage available to
the motor. For example, a main power supply voltage of 120VAC will produce a bus voltage of
about 320VDC. This higher output voltage allows the motor to draw less current.
Note: Care must be taken when operating the motor in this mode. Input voltage must be kept
below 135VACRMS. If this value is exceeded for any reason, the bulk capacitors will be protected
by the optional Transil™ diode TR1 (P6KE400A D0-15 or 1.5KE400A D0-201; see Figure 6.,
Figure 7., and Figure 8.). It will clamp to the high voltage DC bus, causing the input protection fuse
to blow.
Bulk Capacitor Jumpers
– AC Input
AC Input bulk capacitors must be installed according to the line voltage and power ratings
BEFORE plugging in the board.
– DC Input
DC Input bulk capacitors must be installed according to the supply line inductance and soft-start
conditions BEFORE plugging in the board.
Table 4. Recommended Bulk Capacitor Values (typ)
AC Input
10/36
DC Input
Capacitance
(µF/100W)
Input Voltage
(VAC)
Capacitance
(µF/100W)
Line Voltage
(VDC)
47
230
4700
12
220
120
2200
24
1000
48
1000
44
UM0122 - USER MANUAL
Figure 1. PowerBD-300 Board Connections (Top View)
+VDC
AC Input
15V Power Supply
BEMF and
Hall Effect Sensors
–VDC
Tachometer Input
Motor Output
Figure 2. PowerBD-1000 Board Connections (Top View)
Motor
Output
Tachometer
Input
+VDC
AC Input
–VDC
BEMF and
Hall Effect
Sensors
15V
Power
Supply
11/36
UM0122 - USER MANUAL
Figure 3. PowerBD-3000 Board Connections (Top View)
Breaking
Resistors
Motor
Output
Tachometer
Input
BEMF and
Hall Effect Sensors
15V Power Supply
+VDC
–VDC
Figure 4. ControlBD-7FMC2 Board (Top View)
ICC Connector:
HE10 male type
12/36
S2 SW
Push-button
S1 SW
DIP-2
Potentiometers
P1, P2, P3
LEDs
UM0122 - USER MANUAL
Power Board Switches
Table 2., page 8 lists the appropriate power switches which must be installed on the power board. The
packaging with the “FP” suffix are fully insulated by molding, and do not require any external insulators.
The D2 packages are insulated from each other by the PC board (PCB).
Note: Care must be taken to ensure TO220, TO247, and MAXTO247 are NOT insulated. They require
external insulator pads (i.e., polyimide foil between the heat sink and power switches).
Setting up the Control Board
The gate drive resistor value is 100Ω. This must be adjusted according to the power switch gate capacitance and the expected switching dV/dt. Figure 5. allows the user to determine the correct value, depending on the maximum dV/dt specified for the motor.
Note: The L6386 High Voltage High and Low Side Driver requires a power supply voltage of 15VDC (typ).
If the motor operation requires less than 14VDC, the L6387 is preferred because the operation supply voltage range goes down to 6VDC.
Figure 5. STGP14NC60KD Gate Resistor Turn OFF Voltage Slope
9
8
dV/dt (V/ns)
7
6
5
4
3
0
20
40
60
RG (Ω)
80
100
120
AI11102
Note: Conditions: VCC = 390V, VGE = 15V, ICC = 7A, TJ = 125°C
Mandatory Checks Before Operation
The following verifications must be performed before operating the Demonstration Board:
– jumpers are correctly configured,
– the motor is connected and earth-grounded,
– a control board with validated software is plugged into the power board,
– there is no metal part on, below, or around the PC boards, and there are no unintended earth/ground
loops caused by peripheral (e.g., test) equipment (e.g., PC or oscilloscope), and
– the motor and mechanical load are safely housed so that rotating parts cannot be inadvertently
accessed and cause injury (e.g., loose clothing, long hair).
13/36
UM0122 - USER MANUAL
ControlBD-7FMC2 and 3PH AC INDUCTION MOTOR CONTROL SOFTWARE
(Open Loop) v1.0
The software operates the ControlBD-7FMC2 board in a standalone manner, with the operation controlled
by the Push-button S2 and the on-board trimmer potentiometers (P2, P3). S2 controls ON/OFF function,
P2 sets the voltage, and P3 sets the frequency.
Download the Firmware into the ST7FMC Microcontroller
For configuring the ControlBD-7FMC2 as 3PH AC Induction motor controller, it is necessary to download
the proper binary source code (.S19 file) into the microcontroller.
For open loop operations, the binary file provided with AC software library can be downloaded into the
ST7FMC code memory as it is. This can be done with the Datablaze Programmer utility. Please refer to
User Manual UM0121, “ControlBD-7FMC2 Reference Design Graphical User Interface (GUI)” for details.
The settings provided for this binary code can be viewed in the “Basic Parameter” window of the Reference Design RDK-GUI tool when the “3 PH AC Induction” motor option has been selected.
Start-up Procedure
1. Connect a 3 phase induction motor (mechanically unloaded) to connectors FST4, FST6, and FST7.
Sequencing is arbitrary and the direction of rotation will be set later.
2. Remove the control board jumpers J11 and J12, and set jumper J10 between 1-2.
3. Set all potentiometers (P2 and P3) to full Counter Clockwise (CCW) position.
Potentiometer P3 is the FREQUENCY setting. Full CCW to full Clockwise (CW) corresponds to a
range of 10Hz to 340Hz, with increments of 1Hz.
4. Monitor one of the three motor currents with an isolated current probe.
5. Apply the main voltage supply to connectors FST3 and FST5, or a DC voltage supply to connectors
FST1 (+) and FST2 (–).
Note: In the Idle state, a green LED will be flashing, and then it will stay on.
6. Set P3 to about 60Hz (1/4 turn CW).
7. Switch ON S2.
Note: In the Run state, the red LED will light up. The motor current should remain at zero, although
some switching noise may be observed.
8. Slowly rotate potentiometer P2 CW to begin increasing the Voltage setting from zero.
You should start to see a 60Hz (approximately) current build-up in the motor and then the motor
should begin to rotate.
9. Continue to increase the setting until the motor has come up to the expected speed for this excitation
frequency.
Keep in mind that some slip will be expected. The current waveform should remain fairly sinusoidal.
If the waveform becomes highly distorted or exceeds the motor rating, decrease the Voltage setting.
WARNING: The entire circuit board and motor output terminals are always “hot” with respect to earth
ground, even when the drive is in a stopped condition.
14/36
UM0122 - USER MANUAL
Commands
If the S2 button is pushed, it starts the motor. When the drive is running and the S2 button is pushed, it
stops the motor. The controller always enforces a maximum slew limit on changes to the frequency of excitation applied to the motor. In practice this softens the motion of the motor, causing it to ramp up to the
commanded frequency (speed) when going from STOP to RUN. Decreasing the frequency and voltage
applied to the motor slowly decreases the speed (to zero).
Note: It is acceptable to start or stop the drive at any time and speed because of the slew limit.
Motor Direction
If you wish to change the running direction of the motor, simply disconnect the drive from the main voltage
supply, wait for the bulk capacitors to discharge, then swap any two of the three motor wires.
Potentiometer Commands
P2. Sets the Voltage applied from the minimum value (0) to the maximum VBUS. This setting is internally
limited with a V/F curve (refer to User Manual UM0121).
P3. Sets the motor frequency and thus the motor speed. Use P3 to set the stator frequency as well. The
contribution of P3 is 10Hz when it is in the maximum CCW position and will increment downward by 1Hz
resolution to reach 340Hz by rotating the potentiometer to full CW position.
Note: For configuration of the software library with the RDK-GUI, see User Manual UM0121.
15/36
UM0122 - USER MANUAL
ControlBD-7FMC2 and 3PH AC INDUCTION MOTOR CONTROL SOFTWARE
(Closed Loop) v1.0
The software operates the ControlBD-7FMC2 board in a standalone manner, with the operation controlled
by the Push-button S2 and the on-board trimmer potentiometer (P3). S2 controls ON/OFF function and
P3 sets the target rotor frequency from 10 to 340Hz (for one pole pair motor).
Download the Firmware into the ST7FMC Memory
For configuring the ControlBD-7FMC2 as a “3PH AC Induction” motor controller, it is necessary to download the proper binary source code into the MCU flash memory.
Unlike the “Open Loop” operation, a new “.S19” binary file must be generated using the RDK-GUI PC software tool provided with the companion CD-ROM. Please refer to User Manual “UM0121, ControlBD7FMC2 Reference Design Graphical User Interface (GUI)” for details.
Start-up Procedure
1. Connect a 3 phase induction motor (mechanically unloaded) to connectors FST4, FST6, and FST7.
Sequencing is arbitrary and the direction of rotation will be set later.
2. Remove the control board jumpers J11 and J12, and set jumper J10 between 1-2.
3. Connect the two tachogenerator terminals into connectors FST8 and FST9.
4. Set the pot (P3) to full CCW position.
Potentiometer P3 is the target rotor FREQUENCY setting. Full CCW to full CW corresponds to a range
of 10Hz to 340Hz (for one pole pairs motor), with increments of 1Hz.
5. Monitor one of the three motor currents with an isolated current probe.
6. Apply the main voltage supply to connectors FST3 and FST5, or a DC voltage supply to connectors
FST1 (+) and FST2 (–).
Note: In the Idle state, a green LED will be flashing, and then it will stay on.
7. Set P3 to about 60Hz (1/4 turn CW).
8. Switch ON S2.
Note: In the Run state, the red LED will light up. The motor current should remain at zero, although
some switching noise may be observed.
The motor should reach the target rotor frequency set by P3. The current waveform should remain
fairly sinusoidal. If the waveform becomes highly distorted or exceeds the motor rating, modify the V/
F curve (refer to User Manual UM0121).
WARNING: The entire circuit board and motor output terminals are always “hot” with respect to earth
ground, even when the drive is in a stopped condition.
16/36
UM0122 - USER MANUAL
Commands
If the S2 button is pushed, it starts the motor. When the drive is running and the S2 button is pushed, it
stops the motor. The controller always enforces a maximum slew limit on changes to the frequency of excitation applied to the motor. In practice this softens the motion of the motor, causing it to ramp up to the
commanded frequency (speed) when going from STOP to RUN. Decreasing the frequency and voltage
applied to the motor slowly decreases the speed (to zero).
Note: It is acceptable to start or stop the drive at any time and speed because of the slew limit.
Motor Direction
If you wish to change the running direction of the motor, simply disconnect the drive from the main voltage
supply, wait for the bulk capacitors to discharge, then swap any two of the three motor wires.
Potentiometer Commands
P3. Sets the rotor target frequency and thus the motor speed. The contribution of P3 is 10Hz when it is in
the maximum CCW position and will increment downward by 1Hz resolution to reach 340Hz (for one pole
pair motor) by rotating the potentiometer to full CW position.
Note: For configuration of the software library with the RDK-GUI, see User Manual UM0121.
17/36
UM0122 - USER MANUAL
ControlBD-7FMC2 and 3PH PMDC/AC or BLDC/AC (TRAPEZOIDAL DRIVEN)
MOTOR CONTROL SOFTWARE (Open Loop) v1.0
The software operates the ControlBD-7FMC2 board in a standalone manner, with the operation controlled
by the Push-button S2 and the on-board trimmer potentiometer (P1). S2 controls the ON/OFF function.
Download the Firmware into the ST7FMC Microcontroller
For configuring the ControlBD-7FMC2 as a “3PH PMDC (trapezoidal)” motor controller, it is necessary to
download the proper binary source code (.S19 file) into the microcontroller.
For open loop operations, the binary file provided with PMDC software library can be downloaded into the
ST7FMC code memory as it is. This can be done with the Datablaze Programmer utility. Please refer to
User Manual UM0121, “ControlBD-7FMC2 Reference Design Graphical User Interface (GUI)” for details.
The settings provided for this binary code can be viewed in the “Main” window of the RDK-GUI tool when
the “3PH PMDC (Trapezoidal)” motor has been selected.
Start-up Procedure
1. Connect a 3 phase BLDC motor (mechanically unloaded) to connectors FST4, FST6, and FST7.
Sequencing is arbitrary and the direction of rotation will be set later.
2. Set the control board jumpers J10 between 2-3, J11, and J12 between 1-2.
3. Set the pot (P1) to a predetermined position (e.g., center).
4. Apply the main voltage supply to connectors FST3 and FST5, or a DC voltage supply to connectors
FST1 (+) and FST2 (–).
Note: In the Idle state, the green LED will light up.
5. Switch ON S2.
Note: In the Run state, the red LED will stay on.
The motor will be pulled into alignment position first, then it will start to turn. If the motor starts
successfully, adjust P1 to change the motor speed.
Note: When S2 is switched ON, the starting ramp-up will be executed until the BEMF is detected, and
the motor is successfully started.
Commands
If the S2 button is pushed, it starts the motor. When the drive is running and the S2 button is pushed, it
stops the motor.
The potentiometer P1 sets the motor speed command. Since this is voltage mode, open loop control, it
sets the PWM duty cycle from 0% to 97%. In order to sense the back EMF, the motor must first be started
and brought up to a certain speed where the back EMF voltage (BEMF) can be detected.
Before the motor is started, the controller will bring the rotor to a predetermined position. This is called the
“alignment phase”. After the rotor is in the alignment position, a fixed accelerating commutation command
will be invoked by the microcontroller. If the acceleration rate is correct, the motor will be accelerated until
the microcontroller can detect the BEMF and switch to auto-switched mode.
Note: When PowerBD-300 is used with high voltage, it is necessary to add a STTH108 diode in series
with a 1K ¼Ω resistor, and connect it in parallel with the BEMF resistors as is done for the PowerBD-1000.
Motor Direction
If you wish to change the running direction of the motor, simply disconnect the drive from the main voltage
supply, wait for the bulk capacitors to discharge, then swap any two of the three motor wires.
Note: For configuration of the software library with the RDK-GUI, see User Manual UM0121.
18/36
UM0122 - USER MANUAL
ControlBD-7FMC2 and 3PH PMDC/AC or BLDC/AC (TRAPEZOIDAL DRIVEN)
MOTOR CONTROL SOFTWARE (Closed Loop) v1.0
The software operates the ControlBD-7FMC2 board in a standalone manner, with the operation controlled
by the Push-button S2 and the on-board trimmer potentiometer (P1). S2 controls the ON/OFF function.
Download the Firmware into the ST7FMC Memory
For configuring the ControlBD-7FMC2 as a “3PH PMDC/AC or BLDC/AC (trapezoidal driven)” motor controller, it is necessary to download the proper binary source code into the MCU flash memory.
Unlike the “Open Loop” operation, a new “.S19” binary file must be generated using the RDK-GUI PC software tool provided with the companion CD-ROM. Please refer to User Manual “UM0121, ControlBD7FMC2 Reference Design Graphical User Interface (GUI)” for details.
Start-up Procedure
1. Connect a 3 phase induction motor (mechanically unloaded) to connectors FST4, FST6, and FST7.
Sequencing is arbitrary and the direction of rotation will be set later.
2. Set the control board jumpers J10 between 2-3, J11, and J12 between 1-2.
3. Set the pot (P1) to a predetermined position (e.g., center).
4. Apply the main voltage supply to connectors FST3 and FST5, or a DC voltage supply to connectors
FST1 (+) and FST2 (–).
Note: In the Idle state, the green LED will light up.
5. Switch ON S2.
Note: In the Run state, the red LED will stay on.
The motor will be pulled into alignment position first, then it will start to turn. If the motor starts
successfully, adjust P1 to change the motor speed.
Note: When S2 is switched ON, the starting ramp-up will be executed until the BEMF is detected, and
the motor is successfully started.
Commands
If the S2 button is pushed, it starts the motor. When the drive is running and the S2 button is pushed, it
stops the motor.
The potentiometer P1 sets the motor target frequency speed command, and sets the rotor frequency from
50Hz to 200Hz (for two pole pairs motor). In order to sense the back EMF, the motor must first be started
and brought up to a certain speed where the back EMF voltage (BEMF) can be detected.
Before the motor is started, the controller will bring the rotor to a predetermined position. This is called the
“alignment phase”. After the rotor is in the alignment position, a fixed accelerating commutation command
will be invoked by the microcontroller. If the acceleration rate is correct, the motor will be accelerated until
the microcontroller can detect the BEMF and switch to auto-switched mode.
Note: When PowerBD-300 is used with high voltage, it is necessary to add a STTH108 diode in series
with a 1K ¼Ω resistor, and connect it in parallel with the BEMF resistors as is done for the PowerBD-1000.
Motor Direction
If you wish to change the running direction of the motor, simply disconnect the drive from the main voltage
supply, wait for the bulk capacitors to discharge, then swap any two of the three motor wires.
Note: For configuration of the software library with the RDK-GUI, see User Manual UM0121.
19/36
UM0122 - USER MANUAL
ControlBD-7FMC2 and 3PH PMAC or BLAC (SINUSOIDAL DRIVEN) MOTOR
CONTROL SOFTWARE (Open Loop) v1.0
Hardware Modifications
–
To use the PowerBD-300 to drive a PMAC sensor motor, the user needs to remove the R8, R11, and
R13 resistors and mount the (4.7kΩ) R14, R15, and R16 resistors.
– To use the PowerBD-1000 to drive a PMAC sensor motor, the user needs to remove the R27, R28,
R29, R12, R15, and R17 resistors and mount the (4.7kΩ) R19, R20, and R21 resistors.
– To use the PowerBD-3000 to drive a PMAC sensor motor, the user needs to remove R30, R31, R32,
R12, R15, and R17 resistors and mount the (4.7kΩ) R19, R20, and R21 resistors.
Note: In each of these cases, the ControlBD-7FMC2 needs to have the (10nF) C22, C23, and C24 capacitors mounted on it.
The software operates the ControlBD-7FMC2 board in a standalone manner, with the operation controlled
by the Push-button S2 and the on-board trimmer potentiometers (P1 and P3). S2 controls the ON/OFF
function, P1 sets the voltage level index, and P3 can set the Phase Shift angle.
Download the Firmware into the ST7FMC Microcontroller
For configuring the ControlBD-7FMC2 as a “3PH PMAC (Sinusoidal)” motor controller, it is necessary to
download the proper binary source code (.S19 file) into the microcontroller.
For open loop operations, the binary file provided with PMAC software library can be downloaded into the
ST7FMC code memory as it is. This can be done with the Datablaze Programmer utility. Please refer to
User Manual UM0121, “ControlBD-7FMC2 Reference Design Graphical User Interface (GUI)” for details.
The settings provided for this binary code can be viewed in the “Main” window of RDK-GUI tool when the
“3PH PMAC (Sinusoidal)” motor has been selected.
Start-up Procedure
1. Connect a 3 phase PMAC motor (mechanically unloaded) to connectors FST4, FST6, and FST7.
Sequencing is arbitrary and the direction of rotation will be set later.
2. Connect at least 1 Hall sensor signal into pin1 of the CON1 connector of PowerBD-300, PowerBD1000, or PowerBD-3000.
Note: The CON1 connector has the following pin connections:
– PIN1: Hall sensor signal 1
– PIN2: Hall sensor signal 2
– PIN3: Hall sensor signal 3
– PIN4: +5 Volt
– PIN5: GND
3. Connect the control board Jumpers J11 and J12, and set Jumper J10 between 2-3.
4. Set P1 between full CW position and full CCW position and P3 to full CCW position.
5. Monitor one of the three motor currents with an isolated current probe.
6. Apply the main voltage supply to connectors FST3 and FST5, or a DC voltage supply to connectors
FST1 (+) and FST2 (–).
Note: In the Idle state, the green LED will stay on.
7. Switch ON S2.
Note: In the Run state, the red LED will light up.
The motor could run poorly (e.g., discontinuous mode or oscillation) until the correct Phase Shift is set
by P3.
20/36
UM0122 - USER MANUAL
8. Slowly rotate potentiometer P3 CW to find the correct Phase Shift. The correct value is reached when
the user notices the motor running well (without discontinuity).
Note: Make final adjustments to the Phase Shift by monitoring the current on the oscilloscope. The
optimal Phase Shift normally minimizes the motor current amplitudes (see the Application Note
AN1947 for more information).
9. Rotate P1 in the CW direction until the motor has come up to the expected speed for this excitation
level.
Note: The current waveforms should remain fairly sinusoidal.
WARNING: The entire circuit board and motor output terminals are always “hot” with respect to earth
ground, even when the drive is in a stopped condition.
Commands
If the S2 button is pushed, it starts the motor. When the drive is running and the S2 button is pushed, it
stops the motor. The controller always enforces a maximum slew limit on changes to the frequency of excitation applied to the motor. In practice this softens the motion of the motor, causing it to ramp up to the
commanded frequency (speed) when going from STOP to RUN. Decreasing the frequency and voltage
applied to the motor slowly decreases the speed (to zero).
Note: It is acceptable to start or stop the drive at any time and speed because of the slew limit.
Motor Direction
If you wish to change the running direction of the motor, simply disconnect the drive from the main voltage
supply, wait for the bulk capacitors to discharge, swap any two of the three motor wires, and execute the
start-up procedure, beginning at Step 9.
Potentiometer Commands
P1. Sets the Voltage applied from the minimum value (0) to the maximum VBUS. This setting is internally
limited with a V/F curve (refer to User Manual UM0121).
P3. Sets the Phase Shift (if this feature is selected by the user).
Note: For configuration with the RDK-GUI, see User Manual UM0121.
21/36
UM0122 - USER MANUAL
ControlBD-7FMC2 and 3PH PMAC or BLAC (SINUSOIDAL DRIVEN) MOTOR
CONTROL SOFTWARE (Closed Loop) v1.0
Hardware Modifications
–
To use the PowerBD-300 to drive a PMAC sensor motor, the user needs to remove the R8, R11, and
R13 resistors and mount the (4.7kΩ) R14, R15, and R16 resistors.
– To use the PowerBD-1000 to drive a PMAC sensor motor, the user needs to remove the R27, R28,
R29, R12, R15, and R17 resistors and mount the (4.7kΩ) R19, R20, and R21 resistors.
– To use the PowerBD-3000 to drive a PMAC sensor motor, the user needs to remove R30, R31, R32,
R12, R15, and R17 resistors and mount the (4.7kΩ) R19, R20, and R21 resistors.
Note: In each of these cases, the ControlBD-7FMC2 needs to have the (10nF) C22, C23, and C24 capacitors mounted on it.
The software operates the ControlBD-7FMC2 board in a standalone manner, with the operation controlled
by the Push-button S2 and the on-board trimmer potentiometers (P1, P2, and P3). S2 controls ON/OFF
function, P1 sets the target rotor speed from the minimum (maximum CCW position) to maximum speed
(maximum CW position), P2 is disabled by default or sets the integral coefficient of the PI controller if this
feature is selected by the user, and P3 sets the Phase Shift (by default) or the proportional coefficient of
the PI controller if this feature is selected. The user can set either the Phase Shift by using P3 or the PI
parameter by using P2 and P3. It is impossible to select both features together (this feature must be selected with the RDK-GUI, see User Manual UM0121).
Download the Firmware into the ST7FMC Memory
For configuring the ControlBD-7FMC2 as a “3PH PMAC (Sinusoidal-driven)” motor controller, it is necessary to download the proper binary source code into the MCU flash memory.
Unlike the “Open Loop” operation, a new “.S19” binary file must be generated using the RDK-GUI PC software tool provided with the companion CD-ROM. Please refer to User Manual “UM0121, ControlBD7FMC2 Reference Design Graphical User Interface (GUI)” for details.
Start-up Procedure
1. Connect a 3 phase PMAC motor (mechanically unloaded) to connectors FST4, FST6, and FST7.
Sequencing is arbitrary and the direction of rotation will be set later.
2. Connect at least 1 Hall sensor signal into pin1 of the CON1 connector of PowerBD-300, PowerBD1000, or PowerBD-3000.
Note: The CON1 connector has the following pin connections:
– PIN1: Hall sensor signal 1
– PIN2: Hall sensor signal 2
– PIN3: Hall sensor signal 3
– PIN4: +5 Volt
– PIN5: GND
3. Connect the control board Jumpers J11 and J12, and set Jumper J10 between 2-3.
4. Set P1 between full CW position and full CCW position and P3 to full CCW position.
5. Monitor one of the three motor currents with an isolated current probe.
6. Apply the main voltage supply to connectors FST3 and FST5, or a DC voltage supply to connectors
FST1 (+) and FST2 (–).
Note: In the Idle state, the green LED will stay on.
7. Switch ON S2.
Note: In the Run state, the red LED will light up.
The motor could run poorly (e.g., discontinuous mode or oscillation) until the correct Phase Shift is set
by P3.
22/36
UM0122 - USER MANUAL
8. Slowly rotate potentiometer P3 CW to find the correct Phase Shift. The correct value is reached when
the user notices the motor running well (without discontinuity).
Note: Make final adjustments to the Phase Shift by monitoring the current on the oscilloscope. The
optimal Phase Shift normally minimizes the motor current amplitudes (see the Application Note
AN1947 for more information).
9. Set P1 in the middle, between the maximum CCW and maximum CW position, and push the S2
button.
10. Rotate P1 until the motor has come up to the expected speed for this excitation level.
WARNING: The entire circuit board and motor output terminals are always “hot” with respect to earth
ground, even when the drive is in a stopped condition.
Commands
If the S2 button is pushed, it starts the motor. When the drive is running and the S2 button is pushed, it
stops the motor. The controller always enforces a maximum slew limit on changes to the frequency of excitation applied to the motor. In practice this softens the motion of the motor, causing it to ramp up to the
commanded frequency (speed) when going from STOP to RUN. Decreasing the frequency and voltage
applied to the motor slowly decreases the speed (to zero).
Note: It is acceptable to start or stop the drive at any time and speed because of the slew limit.
Motor Direction
If you wish to change the running direction of the motor, simply disconnect the drive from the main voltage
supply, wait for the bulk capacitors to discharge, swap any two of the three motor wires, and execute the
start-up procedure, beginning at Step 9.
Potentiometer Commands
P1. Sets the rotor target mechanical frequency and thus the motor speed from the minimum (maximum
CCW position) to the maximum speed (maximum CW position). The PI regulator gives the value of the
voltage index to reach the target speed. This setting is always internally limited with a V/F curve (refer to
User Manual UM0121).
P2. Disabled by default or sets the integral coefficient of the microcontroller (when this feature is selected
by the user).
P3. Sets the Phase Shift (by default) or sets the proportional coefficient of the microcontroller (when this
feature is selected by the user).
Note: For configuration of the software library with RDK-GUI, see User Manual UM0121.
23/36
UM0122 - USER MANUAL
APPENDIX A. PowerBD-300 CHARACTERISTICS AND SCHEMATIC
Front-end
The front-end section allows supply voltage from the AC source via FST3 and FST5, or from the DC
source via FST1 and FST2.
The Jumper settings are:
– The DC source is preferred during development. When operating with low DC voltage (<30VDC),
external 15V auxiliary voltage must be supplied via CON2, and J14 and J8 must be removed.
– When operating with double rectification, three straps will be installed between J4-J5, J1-J3, and J9J10, respectively.
– When operating with the voltage doubler, three straps will be installed between J1-J6, J7-J11, and
J12-J13, respectively.
The Inrush current protection is provided by NTC1.
Auxiliary Power Supply
This Buck converter uses a VIPer12A regulator that provides charging current for reliable start-up capability, an integrated PWM controller, and thermal as well as over-current protection. The PWM controller
is very simple and does not require an external feedback compensation network.
The regulation circuit is decoupled from the supply circuit using a separate diode (D2) and capacitor (C2)
to supply the zener diode (D3) on the FB pin. D1 is a low voltage diode (e.g. 1N4148) that allows the voltage on VDD to reach the start-up value. D2 and C2 are essentially used to detect peak output voltage. To
prevent disturbance resulting in possible output over-voltage or incorrect start-up, a zener diode (D6) is
connected across the output circuit. For further details, refer to Application Notes AN1317 and AN1357.
An insulated axial inductor may be used to provide a voltage oscillation filter. This type of inductor meets
low cost considerations but it produces a high series resistance that adversely affects the efficiency of the
converter. The current capacity of this type of inductor is determined, for any given package, by its series
resistance. For example, a 1.5mH inductor has a current capacity of about 100mA since its series resistance is about 30R.
The 5V zener diode (D5) decreases the voltage regulator temperature for lifetime-sensitive applications.
The 5V is supplied from the 15V using a L78L05 three-terminal positive regulator. It provides with internal
current limiting and thermal shutdown. The 5V Zener diode D5 decreases the voltage regulator temperature for lifetime-sensitive applications.
Note: When the line voltage is lower than 30V, an external 15V auxiliary power supply is mandatory. It
must be plugged into CON2, and J14 and J8 must be removed.
24/36
UM0122 - USER MANUAL
Power Stage
The board is designed to fit D2Pack packages, but DPack packages may also be assembled as well for
testing purposes (see Table 2., page 8 to select a suitable part number).
The default value of the sense resistor is 0.1R. It must be adjusted depending on actual operating conditions.
The RSENSE value, together with resistors R38, R20, and R14 (put in the ControlBD-ST7FMC2), sets the
maximum limit threshold for the motor current above which a hardware overcurrent protection event is validated. In this condition, the red LED starts to blink and the controller passes into the Reset state, where
the motor does not run anymore. To rearm the controller, the AC (or DC) power supply must be turned off
and it is necessary to wait for the bulk capacitors to discharge completely.
For the PowerBD-300W, the maximum limit for the motor current is fixed at 7A (peak value).
Note: If the board is going to drive a sensorless BL(PM)DC motor, six phase voltage sense resistors must
be present (default configuration).
If the power board is linked to three Hall Effect sensors via CON1, resistors R14, R15, R16, and capacitors
C22, C23, and C24 (1nF) in the ControlBD-7FMC2 must be assembled while removing resistors R7, R10,
and R12.
To provide over-temperature protection during the Power Stage, U1 (LM335) must be installed after assembly of Q5. It is a precision temperature sensor circuit which operates as a 2-terminal zener diode and
has the following features:
– can be easily calibrated if needed;
– breakdown voltage directly proportional to the absolute temperature at 10mV/°K;
– dynamic impedance of less than 1Ω and operates within a range of current from 450µA to 5mA without
alteration of its characteristics; and
– if calibrated at +25°C, it has a typical error rate of less than 1°C over a 100°C temperature range.
Unlike other sensors, the LM335 has a linear output. The over-temperature protection threshold can be
adjusted via R17 and R18 on the control board.
25/36
A
B
TP5
3A
FST5
FST3
For mechanical robustness
NEUTRAL
120/ 230-VAC
NTC1
FST2
1
F1
PHASE
BA'
2
1
C
–VDC
15 - 5A
BB'
1
BC'
3
1
J12
BD'
1
+
-
C10
1
J13
4
D4
2KBPO8M
0.22µF 275V-X2
2
D
4
3
2
1
BE'
1
J4
1
J5
R17
J9
BF'
2
J10
J2
R5
1
J11
1
D2
STTH106
CON2
CON1
TACHO2
TACHO1
2
1
1
2
3
4
5
FST9
FST8
Transil™
See manual
TR1
J3
15VDC-EXT
C7
J7
J6
1
1
J1
2
13
12
11
10
9
8
7
6
5
4
3
2
1
2
1
4
3
2
1
2
1
3
2
1
2
1
3
+15V
BF
BE
BD
BC
BB
BA
1
C1
CONTROL BOARD
1
1
2.2µF
25V
C2
2
1
12/ 24/ 42-VDC
2
1
2
3
2
1
3
R9
33K
C4
22nF
50V
FB
0.23V
VDD
4
+5V
10K
R21
R14
+5V
+15V
HV Monitoring
R20
10K
10µF
35V
3
C3
C9
100nF
50V
D3
BZX84C15
1N4148
1
2
D1
–
+
SOURCE
RES
SET
DRAIN
4
R16
4
TP1
Q6
Q5
Q4
Q3
Q2
Q1
J8
R11 120K-1/2W
R13 120K-1/2W
R10 56K-1/2W
R12 56K-1/2W
U1
LM335Z
TP9
100µF
25V
C5
R8 120K-1/2W
Com
R6
0.1R
2.5W
1 2
+15V
56K-1/2W
R7
C8
22nF
400V
TOKO 00499
L1
1 mH
IC1
VIPer12ADIP
J14
VIPer12 ON/OFF
R14, R15, R16
NOT INSTALLED
1
1
1
1
1
1
D7
STTH106
R19
10K
+5V
R15
4.7K
+VDC
2
1
100K-1/2W
1
12
11
10
9
8
7
6
5
4
3
2
1
1
2
4.7K
2 1
8
7
6
5
1
2
1
4.7K
2
3
2
3
2
3
2
3
2
3
2
3
26/36
2
2
R18
100K-1/2W
1
R1 100K-1/2W
t°
FST1
5
D6
BZX85C16
VIN
FST7
FST6
FST4
3
1µF
16V
C6
+5V
Phase C
Phase B
Phase A
TP2
TP4
Number
Tuesday, October 18, 2005
Size
Date:
6
HV Monitoring
TP3
AI11103b
6
Sheet
1 of 1
Revision A1
ALL OF THE RESISTORS'
ACCURACIES MUST BE <1%.
R4
12K
R3
330K
R2
680K
SYSTEMS LAB
PowerBD-300
TP8
TP6
2
GND
VOUT
IC2
L78L05ACZ
Organization Name
Title
TP7
D5
BZX85C5V1
1 1
5
A
B
C
D
UM0122 - USER MANUAL
Figure 6. PowerBD-300 Schematic
100K-1/2W
1
UM0122 - USER MANUAL
APPENDIX B. PowerBD-1000 CHARACTERISTICS AND SCHEMATIC
Front-end
The front-end section allows supply voltage from the AC source via FST3 and FST5, or from the DC
source via FST1 and FST2.
The Jumper settings are:
– The DC source is preferred during development. When operating with low DC voltage (<30VDC),
external 15V auxiliary voltage must be supplied via CON2, and J14 and J8 must be removed.
– When operating with double rectification, three straps will be installed between J4-J5, J1-J3, and J9J10, respectively.
– When operating with the voltage doubler, three straps will be installed between J1-J6, J7-J11, and
J12-J13, respectively.
The Inrush current protection is provided by resistor R6. This resistor is bypassed with Relay12A after voltage ramp-up.
Auxiliary Supply
This Buck converter uses a VIPer12A regulator that provides charging current for reliable start-up capability, an integrated PWM controller, and thermal as well as over-current protection. The PWM controller
is very simple and does not require an external feedback compensation network.
The regulation circuit is decoupled from the supply circuit using a separate diode (D1) and capacitor (C2)
to supply the zener diode (D3) on the FB pin. D1 is a low voltage diode (e.g. 1N4148) that allows the voltage on VDD to reach the start-up value. D2 and C2 are essentially used to detect peak output voltage. To
prevent disturbance resulting in possible output over-voltage or incorrect start-up, a zener diode (D6) is
connected across the output circuit. For further details, refer to Application Notes AN1317 and AN1357.
An insulated axial inductor may be used to provide a voltage oscillation filter. This type of inductor meets
low cost considerations but it produces a high series resistance that adversely affects the efficiency of the
converter. The current capacity of this type of inductor is determined, for any given package, by its series
resistance. For example, a 1.5mH inductor has a current capacity of about 100mA since its series resistance is about 30R.
The 5V is supplied from the 15V using an L78L05 three-terminal positive regulator. It provides internal current limiting and thermal shutdown. The 5V zener diode (D5) decreases the voltage regulator temperature
for lifetime-sensitive applications.
Note: When the line voltage is lower than 30V, an external 15V auxiliary power supply is mandatory. It
must be plugged into CON2, and J14 and J8 must be removed.
27/36
UM0122 - USER MANUAL
Power Stage
The board is designed to fit TO220 packages (see Table 2., page 8 to select a suitable part number).
The default value of the sense resistor is 0.047R. It must be adjusted depending on actual operating conditions.
The RSENSE value, together with the resistors R38, R20, and R14 (put in the ControlBD-ST7FMC2), sets
the maximum limit threshold for the motor current above which a hardware overcurrent protection event
is validated. In this condition, the red LED starts to blink and the controller passes into the Reset state,
where the motor does not run anymore. To rearm the controller, the AC (or DC) power supply must be
turned off and it is necessary to wait for the bulk capacitors to discharge completely.
For the PowerBD-1000W, the maximum limit for the motor current is fixed at 14.5A (peak value).
Note: If the board is going to drive a sensorless BL(PM)DC motor, six phase voltage sense resistors must
be present.
If the power board is linked to three Hall Effect sensors via CON1, resistors R19, R20, R21, and capacitors
C22, C23, and C24 (1nF) in the ControlBD-7FMC2 must be assembled while removing resistors R7, R10,
and R12.
To provide over-temperature protection during the Power Stage, a temperature sensor (e.g., LM335Z)
must be installed on the heat sink and connected to CON3.
The LM335Z is a precision temperature sensor circuit which operates as a 2-terminal zener diode and has
the following features:
– can be easily calibrated if needed;
– breakdown voltage directly proportional to the absolute temperature at 10mV/°K;
– dynamic impedance of less than 1Ω and operates within a range of current from 450µA to 5mA without
alteration of its characteristics; and
– if calibrated at +25°C, it has a typical error rate of less than 1°C over a 100°C temperature range.
Unlike other sensors, the LM335Z has a linear output. The over-temperature protection threshold can be
adjusted via R17 and R18 on the control board.
28/36
A
B
C
D
FST2
PHASE
TP5
8A
3
4
FST5
Relay4 4
BA'
BB'
1
BC'
5
3
Relay3 3
for mechanical robustness
NEUTRAL
FST3
F1
Relay4
R6
Relay3
120/ 230- VAC
4
3
–VDC
BD'
BE'
J4
1
1
2
J5
1
BC337-25
Q7
R11
10K
D8
1N4148
R9
100
+15V
0.22µF 275V-X2
C10
2
RELAY12A
NOT INSTALLED
1
1
U2
J13
J12
D4
BF'
2
J10
R5
J2
R1
J11
C7
J7
1
1 J6
1
1
15VDC-EXT
CON2
CON1
2
1
1
2
3
4
5
3
2
1
FST9
FST8
See manual.
TR1
Transil™
J3
R23
TEMPERATURE SENSOR CON3
Strap if not used.
R22
J9
J1
C1
1
12/ 24/ 42-VDC
2
1
3
BF
BE
BD
BC
BB
BA
3
13
12
11
10
9
8
7
6
5
4
3
2
1
2
1
4
3
2
1
2
1
3
2
1
2
1
D2
STTH106
2
1
FST1
4
3
2
1
2
CONTROL BOARD
+VDC
3
2
1
100K-1/2W
2
1
1
+
–
4
2
1
2
1
13
12
11
10
9
8
7
6
5
4
3
2
1
1
1
1
1N4148
1
2
D1
R14
33K
C3
FB
C9
100nF
50V
+5V
R26
10K
+5V
+15V
HV Monitoring
R25 10K
R24 10K
R19
4.7K
10µF VDD
35V 0.23V
–
3
+
4
Hs-Current Sense
C4
22nF
50V
D3
2.2µF BZX84C15
25V
C2
2
1
2 1
SOURCE
SET
RES
DRAIN
+5V
R20
4.7K
1
R21
4.7K
4
R10
0.047
2.5W
1
C5
100µF
25V
D9
STTH106
2
Com
1 2
J8
+15V
1
D10 STTH106
2
D11 STTH106
1
2
R17 56K-1/2W R18 56K-1/2W
R29 1K
R15 56K-1/2W R16 56K-1/2W
R28 1K
R12 56K-1/2W R13 56K-1/2W
R27 1K
C12
22nF
400V
C8
100nF
400V
C11
22nF
400V
TOKO00499
L1
1mH
IC1
VIPER12A DIP
R19, R20, R21
NOT INSTALLED
Q6
1
Q5
1
Q4
1
Q3
1
Q2
1
Q1
D7
STTH106
4
J14
VIPER12 ON/OFF
8
7
6
5
1
2
2
2 3
2 3
2 3
3
2
2 3
3
100K-1/2W
5
TP2
TP9
5
TP7
R7
R8
2.2K
2
1
U1
R4
12K
4
3
4
3
Tuesday, October 18, 2005
Date:
6
Sheet
+5V
1 of 1
Revision A1
Hs-Current Sense
HV Monitoring
TP3
SYSTEMS LAB
Number
Size
6
ALL THE RESISTORS'
ACCURACIES MUST BE <1%.
TP4
R3
330K
R2
680K
SFH615A-2
2
1
PowerBD-1000
Phase C
FST7
Phase B
FST6
Phase A
FST4
0.047
2.5W
1µF
16V
C6
+5V
Organization Name
Title
TP8
TP6
2
GND
IC2
D5
BZX85C5V1 L78L05ACZ
11
3
VIN
VOUT
D6
BZX85C16
2
TP1
2
100K-1/2W
1
1
A
B
C
D
UM0122 - USER MANUAL
Figure 7. PowerBD-1000 Schematic
100K-1/2W
AI11104b
29/36
UM0122 - USER MANUAL
APPENDIX C. PowerBD-3000 CHARACTERISTICS AND SCHEMATIC
Front-end
The front-end section allows supply voltage from the DC source via FST1 and FST2.
The Jumper settings are:
– When operating with low DC voltage (<30VDC), external 15V auxiliary voltage must be supplied via
CON2, and J14 and J8 must be removed.
Auxiliary Supply
This Buck converter uses a VIPer12A regulator that provides charging current for reliable start-up capability, an integrated PWM controller, and thermal as well as over-current protection. The PWM controller
is very simple and does not require an external feedback compensation network.
The regulation circuit is decoupled from the supply circuit using a separate diode (D1) and capacitor (C2)
to supply the zener diode (D3) on the FB pin. D1 is a low voltage diode (e.g. 1N4148) that allows the voltage on VDD to reach the start-up value. D2 and C2 are essentially used to detect peak output voltage. To
prevent disturbance resulting in possible output over-voltage or incorrect start-up, a zener diode (D6) is
connected across the output circuit. For further details, refer to Application Notes AN1317 and AN1357.
An insulated axial inductor may be used to provide a voltage oscillation filter. This type of inductor meets
low cost considerations but it produces a high series resistance that adversely affects the efficiency of the
converter. The current capacity of this type of inductor is determined, for any given package, by its series
resistance. For example, a 1.5mH inductor has a current capacity of about 100mA since its series resistance is about 30R.
The 5V is supplied from the 15V using an L78L05 three-terminal positive regulator. It provides internal current limiting and thermal shutdown. The 5V zener diode (D5) decreases the voltage regulator temperature
for lifetime-sensitive applications.
Note: When the line voltage is lower than 30V, an external 15V auxiliary power supply is mandatory. It
must be plugged into CON2, and J14 and J8 must be removed.
30/36
UM0122 - USER MANUAL
Power Stage
The board is designed to fit TO247 packages (see Table 2., page 8 to select a suitable part number).
The default value of the sense resistor is 0.02R. It must be adjusted depending on actual operating conditions.
The RSENSE value, together with the resistors R38, R20, and R14 (put in the ControlBD-ST7FMC2), sets
the maximum limit threshold for the motor current above which a hardware overcurrent protection event
is validated. In this condition, the red LED starts to blink and the controller passes into the Reset state,
where the motor does not run anymore. To rearm the controller, the AC (or DC) power supply must be
turned off and it is necessary to wait for the bulk capacitors to discharge completely.
For the PowerBD-3000W, the maximum limit for the motor current is fixed at 34A (peak value).
Note: If the board is going to drive a sensorless BL(PM)DC motor, six phase voltage sense resistors must
be present.
If the power board is linked to three Hall Effect sensors via CON1, resistors R19, R20, R21, and capacitors
C22, C23, and C24 (1nF) in the ControlBD-ST7FMC2 must be assembled.
To provide over-temperature protection during the Power Stage, a temperature sensor (e.g., LM335Z)
must be installed on the heat sink and connected to CON3.
Note: Install a strap between pins 1 and 2 or CON3 if a thermal sensor is not used.
The LM335Z is a precision temperature sensor circuit which operates as a 2-terminal zener diode and has
the following features:
– can be easily calibrated if needed;
– breakdown voltage directly proportional to the absolute temperature at 10mV/°K;
– dynamic impedance of less than 1Ω and operates within a range of current from 450µA to 5mA without
alteration of its characteristics; and
– if calibrated at +25°C, it has a typical error rate of less than 1°C over a 100°C temperature range.
Unlike other sensors, the LM335Z has a linear output. The over-temperature protection threshold can be
adjusted via R17 and R18 on the control board.
31/36
A
B
C
–VDC
VDC INPUT
for mechanical robustness
BA'
2
1
BB'
1
BC'
Brake Motor
FST2
FST1
BD'
4
3
2
1
+VDC
FST5
BE'
Q7
F1 20A
FST3
2
1
R23
1
BF'
Q8
Q9
R26
47K
R33
10K
R25
BC547B
+15V
C11
C1
R24
2
R34
47K
CON2
CON1
CON3
FST9
FST8
R35 10K
TR1
Transil™
See manual.
C7
15VDC-EXT
TEMPERATURE SENSOR
Strap if not used.
R11
47k
STTH306
D8
C10
R22
2
1
1
2
3
4
5
3
2
1
STTH106
BF
BE
BD
BC
BB
BA
2
1
4
3
2
1
2
1
3
2
1
2
1
D1
1N4148
2
FB
C9
100nF
50V
+5V
R29
10K
+5V
+15V
HV Monitoring
10K
R28
10K
R27
R20
4.7K
1
R21
4.7K
Q6
1
Q5
1
Q4
1
Q3
1
Q2
1
4
J8
4
R19, R20, R21
NOT INSTALLED
R17 56K-1/2W
R32 1K
R15 56K-1/2W
R31 1K
1
mH
TP9
1
1
R13 120K-1/2W
R16 120K-1/2W
D19 STTH106
2
R18 120K-1/2W
D20 STTH106
2
D6
BZX85C16
VIN
5
TP8
Phase C
Phase B
Phase A
2.2K
R6
1µF
16V
C6
+5V
2
1
U1
R4
12K
4
3
TP4
R3
330K
R2
680K
4
3
HV Monitoring
+5V
Hs-Current Sense
TP3
6
Number
Tuesday, October 18, 2005
Size
Date:
SYSTEMS LAB
AI11105b
6
Sheet
1 of 1
Revision A1
ALL THE RESISTORS'
ACCURACIES MUST BE <1%.
SFH615A-2
2
1
PowerBD-3000
FST7
FST6
FST4
0.047
5W
R7
3
TP2
Organization Name
Title
TP6
2
GND
VOUT
IC2
L78L05ACZ
5
TP7
D5
BZX85C5V1
2
1 1
TP1
D18 STTH106
1
2
100µF
25V
C5
+15V
R10
0.02R
5W
Com
R12 56K-1/2W
R30 1K
22nF-400V
C13
400V
C8
100nF
22nF-400V
C12
TOKO 00499
L1
1mH
IC1
VIPER12A DIP
J14
VIPER12 ON/OFF
Q1
D7
STTH106
SOURCE
RES
SET
DRAIN
+5V
R19
4.7K
10µF VDD
35V
0.23V –
3
+
C3
4
Hs-Current Sense
C4
22nF
50V
D3
BZX84C15
1
R14
33K
2.2µF
25V
C2
3
+15V
13
12
11
10
9
8
7
6
5
4
3
2
1
D2
3
1
2
TP5
13
12
11
10
9
8
7
6
5
4
3
2
1
2
1
D
3
2
1
100K-1/2W 100K-1/2W
2
1
BC557B
2
1
2
3
2
CONTROL BOARD
2
1
2 1
8
7
6
5
1
2
2
2 3
2 3
3
2
3
2
3
2
100K-1/2W 100K-1/2W
3
2
32/36
1
1
A
B
C
D
UM0122 - USER MANUAL
Figure 8. PowerBD-3000 Schematic
UM0122 - USER MANUAL
APPENDIX D. ControlBD-7FMC2 CHARACTERISTICS AND SCHEMATIC
Gate Drive Circuit
–
–
–
–
–
–
–
Each half bridge is driven by an L6386 high voltage integrated circuit which is able to operate at
voltages of up to 600V. The logic inputs are CMOS logic-compatible, and the driving stages can
source current up to 400mA and sink current up to 600mA. It integrates one upper and one lower side
channel with two under-voltage lockout circuits and a comparator referenced to 0.5V.
The bootstrap auxiliary supply is integrated in the IC, which helps to reduce the number of parts on
the PC Board, therefore increasing the layout flexibility. This function is normally accomplished by a
high voltage, fast recovery diode. The L6386 contains a patented integrated structure which replaces
the external diode. It is comprised of a high voltage DMOS, driven synchronously with a low side driver
(LVG) (refer to Application Note AN1299). An internal charge pump provides driving voltage to the
DMOS. A diode connected in series to the DMOS is added to avoid inadvertent power-up, so using
an external fast recovery diode can be avoided (usually exhibits high leakage current).
Gate drive resistors R1, R3, R5, R7, R9, and R11 have been set to 100Ω. This value must be adjusted
according to Figure 5., page 13.
The cell comprised of Q1-C1-R2 is used to split the issues of canceling the switching cross-conduction
and controlling the winding dV/dt, whatever the operating conditions and IGBT junction temperature.
The cell provides a low impedance path to the Miller current when the adjacent power switch is turning
ON, canceling any cross-conduction current. This way, the half-bridge power ON switching dV/dt is
only defined by the gate drive resistor value produced by R1, R3, R5, R7, R9, and R11.
The comparator integrated in the L6386 (IC2) provides output with over-current protection which shuts
down the three half-bridges. If the voltage applied to pin 6 reaches 0.5V (typ), the Diagnostic output
(pin 5) is pulled down, as well as the shut-down input (pin 2).
The same circuit can be implemented to provide over-temperature protection. This is done via the IC3
comparator input. An OR function is made paralleling the diagnostic output of IC2 and IC3. In regular
operation this protection is never triggered because the microcontroller is monitoring the temperature
sensor via PA3.
A third type of protection may be implemented using the IC1 input comparator (e.g., high side overcurrent protection with the PowerBD-1000 or PowerBD-3000).
Microcontroller User Interfaces
WARNING: The Reference Design kit has no isolation shield or any other type of protection case.
The demonstration board must be handled very carefully, as high potential (energy) parts are open and
can be touched. The user MUST avoid connecting or removing cables during operation of an electric motor, or touching any part of the system when it is connected to the main power supply.
33/36
A
B
C
D6
BAS70W
D7
10K
R35
BAS70W
4
3
2
1
NC
R34
CK
HOLD
V CC
1
R45
2.7K
R44
2.7K
+5V
VS S DATA
W
Q
S
IC5 / 4Kbit
M95040-MN6
LED
D5
LED
5
6
7
8
+5V
CHIP-SELECT
X1
100
+5V
R36
C28
100nF
100nF
C27
Q7
BC817-25
R32
10K
CSTCE16MOV53-RO
+5V
100nF
C26
T2
T1
R31
10K
+5V
BEMFA
STRAP
D4
short
connection
R41
10K
100nF
C33
C29
10nF
C25
15nF
2
1
J11
R29
0
STRAP
D
1
2
2
BEMFB
STRAP
R46
68K
Not Mount
1
2
3
4
5
6
7
8
9
10
11
12
13
14
15
16
17
18
19
20
21
22
1nF
BA'
BB'
2
J7
R33
10K
BC'
BD'
100nF
C40
BE'
R40
33K
R43
27K
Not Mount
BF'
+5V
ST7FMC2S4T6-TQFP44
44
43
42
41
40
39
38
37
36
35
34
33
32
31
30
29
28
27
26
25
24
23
+5V
ICC connector: HE10 male type
IC4
J6
2 x 6 Pin
S2
SW PUSH
R24
100K
3
MCO2 (HS)
MCO3 (HS)
MCO1 (HS)
MCO4 (HS)
MCO0 (HS)
MCO5 (HS)
VPP
MCES
OSC1
PE3/ICAP1_B
OSC2
PE2/ICAP2_B
VSS_1
PE1/OCMP1_B
VDD_1
PEO (HS)/OCMP2_B
PA3/PWM0/AIN0
PD7 (HS)/TDO
PA5/ARTIC1/AIN1
PD6 (HS)/RDI
PD5/AIN15/ICCDATA
PB0/MCVREF
PD4/EXTCLK_A/AIN14/ICCCLK
PB1/MCIA
PD3/ICAP1_A/AIN13
PB2/MCIB
PB3/MCIC
PD2/ICAP2_A/MCZEM/AIN12
PB4/MISOPD1 (HS)/OCMP1_A/MCPWMV/MCDEM
PD0/OCMP2_A/AIN11
PB5/MOSI/AIN3
RESET
PB6 (HS)/SCK
VDD_0
PB7 (HS)/SS/AIN4
VSS_0
PC2/OAP
PC3/OAN
VSSA
OAZ/MCCFI1/AIN6
VAREF
PC7/MCPWMW/AIN7
PC4/MCCREF
R23
100K
for mechanical robustness
t.b.d.
R42
10K
LSCS
R38
56K
S1
R22
100K
SW DIP-2
C39
R39 C34
N.M.
47pF N.M.
C30
10nF
LS
3
2
1
J10
47pF N.M.
C24
47pF N.M.
C23
C22
2
1
J12
R27
0
R26
0
2
1
BEMFC
4
3
2
1
1
1
2
+5V
1
2
3
4
2
3
2
1
9
7
5
3
1
10
8
6
4
2
34/36
2
1
Note: All 2-lead components are “0805,” except where they are not available.
3
1
2
3
4
5
6
7
8
9
10
11
12
13
1
10nF
C36
P1
10nF
C37
+5V
R28
47K
+5V
R25
47K
50k
+5V
RBC
P2
10nF
C38
C31
100nF
25V
50k
IP
R21
10K
P3
50k
4
1µF
C35
C32
470nF
25V
CHIP-SELECT
+5V
R30
100K
+5V
HSCS
R19
390R
C18
R14 N.M.
1.5K
1nF 4.7k
L6386D
LVG
GND
CIN
GND
NC
NC
OUT
HVG
DIAG
VCC
HIN
SD
LIN V BOOT
IC1
8
9
10
11
12
13
14
D1
STTH108A N.M.
1
2
5
7
6
5
4
3
2
1
LSCS
SG
4.7K
5
R18 1%
R4
BC807-25
10K
+15V
Number
Tuesday, October 18, 2005
Size
Date:
GQ1
Q6
GQ6
EQ5
Q5
GQ5
Q4
GQ4
EQ3
Q3
GQ3
EQ2
Q2
GQ2
EQ1
Q1
AI11106b
6
Sheet
EQ6
SYSTEMS LAB
R47
+5V
C6
100pF
220R
BC807-25
R12
220R
C5
100pF
R10
BC807-25
C4
100pF EQ4
220R
BC807-25
R8
220R
C3
100pF
BC807-25
R6
220R
C2
100pF
ControlBD-7FMC2
Organization Name
Title
RBC
IP
BEMFC
BEMFB
BEMFA
T2
T1
LS
TS
BC807-25
R2
220R
C1
100pF
LSCS
R7
100R
R5
100R
R3 100R
Hs-Current Sense
HSCS
100R
C7 C8
2.2µF 2.2µF (N.M.)
R1
16V 16V
C11 C12
D3
STTH108A N.M. 2.2µF 2.2µF (N.M.) R9
1
2
100R
16V 16V
IC3 L6386D
14
LIN V BOOT
13
SD
HVG
12
HIN
OUT
11
VCC
NC
R11
10
100R
DIAG
NC
9
CIN
LVG
8
GND GND
12K
R20
6
BF1
BF2
BF3
BF4
BF5
BF6
BF7
BF8
BF9
BF10
BF11
BF12
BF13
BE2
BE1
BD1
BD2
BD3
BD4
BC2
BC1
BB3
BB2
BB1
BA2
BA1
1 of 1
Revision A1
1
2
3
4
5
6
7
8
9
10
11
12
13
BF
2
1
BE
1
2
3
4
BD
2
1
BC
3
2
1
BB
2
1
BA
Note: Six (6) connectors are in a line, with
5.08mm pitch between each other.
C10
C9
D2 STTH108A N.M. 2.2µF 2.2µF (N.M.)
2
1
16V 16V
IC2 L6386D
1
14
LIN V BOOT
2
13
SD
HVG
3
12
HIN
OUT
11
4
VCC
NC
10
5
DIAG
NC
6
9
CIN
LVG
7
8
GND GND
7
R16 820R 1%
1nF
C21
5
4
3
2
1
R13 6
C15
R17 6.8K 1%
1nF
+5V 470nF
25V
1nF
C20
+15V
470nF
25V
1K
C17
470nF
25V
1nF
C19
R37
100R
+5V
C16
C14
+15V
C13
R15
+15V
Hs-Current Sense
4
A
B
C
D
UM0122 - USER MANUAL
Figure 9. ControlBD-7FMC2 Schematic
UM0122 - USER MANUAL
REVISION HISTORY
Table 5. Document Revision History
Date
Version
09-November-2005
1.0
24-Mar-06
2
Description
First edition
Correct table error (Table 2)
35/36
UM0122 - USER MANUAL
Information furnished is believed to be accurate and reliable. However, STMicroelectronics assumes no responsibility for the consequences
of use of such information nor for any infringement of patents or other rights of third parties which may result from its use. No license is granted
by implication or otherwise under any patent or patent rights of STMicroelectronics. Specifications mentioned in this publication are subject
to change without notice. This publication supersedes and replaces all information previously supplied. STMicroelectronics products are not
authorized for use as critical components in life support devices or systems without express written approval of STMicroelectronics.
The ST logo is a registered trademark of STMicroelectronics.
All other names are the property of their respective owners
© 2006 STMicroelectronics - All rights reserved
STMicroelectronics group of companies
Australia - Belgium - Brazil - Canada - China - Czech Republic - Finland - France - Germany - Hong Kong - India - Israel - Italy - Japan Malaysia - Malta - Morocco - Singapore - Spain - Sweden - Switzerland - United Kingdom - United States of America
www.st.com
36/36