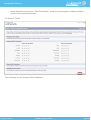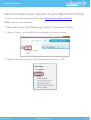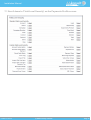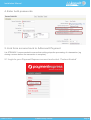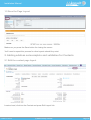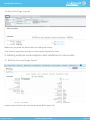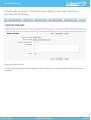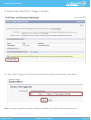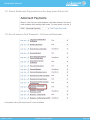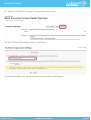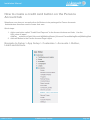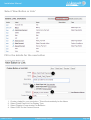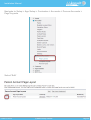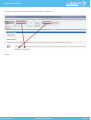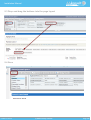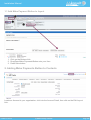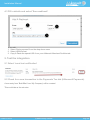
1
Installation Manual
Last updated: 2015-7-31 14:14:45 (c) AAkonsult Pty Ltd 2015
Installation Manual
Table of Contents
Introduction........................................................................................................................................... 4
Legal Information ...................................................................................................................... 5
How to get AAkonsult Payments Installed and Running ........................................................... 6
How to order AAkonsult Payments ........................................................................................... 7
What is required beforehand? ................................................................................................... 8
What are the steps to for a complete install? ............................................................................ 9
eCommerce Merchant Facility............................................................................................................ 10
How to obtain a eCommerce Merchant Facility ...................................................................... 11
How to obtain an eCommerce Merchant Facility for Authorize.Net ........................................ 14
AppExchange ..................................................................................................................................... 15
How to download from the AppExchange ............................................................................... 16
How to preview your new AAkonsult Payments product ......................................................... 25
Force.com Sites ................................................................................................................................. 29
How to enable Force.com Sites .............................................................................................. 30
How to create a new Force.com Site ...................................................................................... 34
How to set up error checking for Force.com Sites .................................................................. 38
How to test your site................................................................................................................ 43
How to connect your new site to your Merchant Facility ......................................................... 48
How to add a custom URL - Optional...................................................................................... 53
Security .............................................................................................................................................. 61
How to set up external site security (older version) ................................................................ 62
How to set up external site security (enhanced version)......................................................... 79
How to set up internal security (Salesforce users) .................................................................. 81
Payment Gateways ............................................................................................................................ 84
How to set up Payment Express - standard ............................................................................ 85
How to set up Payment Express - PxPay ............................................................................... 87
How to set up Payment Express - PxFusion ........................................................................... 90
How to set up PayPal .............................................................................................................. 92
How to setup Authorize.Net .................................................................................................. 100
Address autocomplete and validation .............................................................................................. 101
Which address tool?.............................................................................................................. 102
How to setup Google Places Address Validation .................................................................. 105
How to setup DataTools Kleber............................................................................................. 110
How to setup DataTools Kleber for Leads, Contacts and Accounts ...................................... 115
Customisation - Optional .................................................................................................................. 128
How to adjust the Contacts Page layout ............................................................................... 129
How to adjust the Accounts Page layout............................................................................... 131
How to adjust settings for the Not-for-profit Starter Pack ...................................................... 133
How to setup Annual Statements .......................................................................................... 138
Workflows - Optional ........................................................................................................................ 140
Which workflow will suit?....................................................................................................... 141
How to send out first automated reminders - contact level ................................................... 143
Installation Manual
(c) AAkonsult Pty Ltd 2014
Page 2
Installation Manual
How to send out second automated reminders - contact level ............................................. 164
How to send out first automated reminders - account level .................................................. 177
How to send out second automated reminders - account level ............................................ 197
How to activate the Membership Confirmation workflow ...................................................... 210
How to set up recurring payments ........................................................................................ 214
How to send out Recurring Payments Card Expiry and Update Notifications....................... 224
How to set up a recurring payment restart reminder ............................................................. 232
How to set up the batch payments process restart reminder ................................................ 245
How to set up the batch payments process not running notification ..................................... 258
How to activate Refund approvals ........................................................................................ 271
How to activate New Online Payment Notification ................................................................ 276
How to activate New Online Membership Payment Notification ........................................... 282
Buttons - Optional............................................................................................................................. 288
How to create a button on the Accounts tab ......................................................................... 289
How to create a button on the Contacts tab .......................................................................... 292
How to create a button on the Opportunity tab ..................................................................... 296
How to create a button on the Campaign tab........................................................................ 299
How to create a button on the Campaign Member ............................................................... 303
How to create a credit card button on the Persons Account tab ........................................... 307
How to create a manual payment button on the Persons Account tab ................................. 313
How to create a button on any object.................................................................................... 319
How to add Make Payment button ........................................................................................ 322
How to setup Import Files Email Listner ........................................................................................... 329
Email to Import File ............................................................................................................... 330
High Data Volume ............................................................................................................................ 335
How to deal with high volume data ....................................................................................... 336
Shopify ............................................................................................................................................. 337
How to set up Shopify ........................................................................................................... 338
Website Setup .................................................................................................................................. 342
How to add your form to your website................................................................................... 343
How to provide accessibility and text resizing ....................................................................... 344
Implimentation Tips .......................................................................................................................... 348
How to Upload Recurring Credit Card Payments.................................................................. 349
Installation Manual
(c) AAkonsult Pty Ltd 2014
Page 3
Installation Manual
Introduction
Installation Manual
(c) AAkonsult Pty Ltd 2014
Page 4
Installation Manual
Legal Information
Proprietary Statement
Copyright (C) 2011 AAkonsult Pty Ltd
This document contains confidential and proprietary information and is the property of AAkonsult Pty
Ltd. This document was prepared for the requesting party for the sole purpose of evaluating the
products and services proposed. It is submitted to you in confidence, on the condition that you and
your representatives have, by receiving it, agreed not to reproduce or copy it, in whole or in part, or
to furnish such information to others, or to make any other use of it except for the evaluation
purposes stated above, and to return it to AAkonsult Pty Ltd upon request. The previous statement
shall not apply to the extent that such statement violates any federal or state laws requiring such
information to be made available to the public. In the event this document results in a contract, you
may retain this document for use, including making any necessary copies related to the products and
services covered by such contract. The offerings and prices presented in this document, excluding
any leasing quotes or rates, shall remain valid for a period of 120 days from the document date
unless AAkonsult Pty Ltd authorizes an extension.
Limitation of Liability
To the fullest extent permitted by law, and not withstanding any other provision of this Agreement,
the total liability, in the aggregate, of the AAkonsult Pty Ltd and the AAkonsult Pty Ltd’s officers,
directors, partners, employees and sub-contractors, and any of them, to the Client and anyone
claiming by or through the Client, for any and all claims, losses, costs or damages, including
attorneys’ fees and costs and expert-witness fees and costs of any nature whatsoever or claims
expenses resulting from or in any way related to the Project or the Agreement from any cause or
causes shall not exceed the total compensation received by the AAkonsult Pty Ltd under this
Agreement. It is intended that this limitation apply to any and all liability or cause of action however
alleged or arising, unless otherwise prohibited by law.
Installation Manual
(c) AAkonsult Pty Ltd 2014
Page 5
Installation Manual
How to get AAkonsult Payments Installed and Running
The steps below provide an overview of how you can evaluate and then later get AAkonsult
Payments up and running for your organisation
1. Install AAkonsult Payments from the AppExchange
2. Create a demo facility so you can take test transactions (go to About AAkonsult Payments
Tab, Create Samples button)
3. Apply for a Merchant Facility (This can take upto a few weeks, so best to start early)
4. Complete the post install instructions
5. Work through a day in the life of your organisation using AAkonsult Payments - configure
workflows, receipts, email templates to meet your needs (see User Manual)
6. When the bank provides Merchant Details (Step 3), order and sign up for AAkonsult
Payments and we will start the payment gateway provisioning
7. Once provisioning is complete, you will be given a username and will need to call in for a
password. Enter these details into Salesforce Merchant Facility and do a test live
transaction.
Installation Manual
(c) AAkonsult Pty Ltd 2014
Page 6
Installation Manual
How to order AAkonsult Payments
To obtain an AAkonsult Payments Account, you will need to:
• To have an eCommerce Merchant Facility
• Send AAkonsult ([email protected]) your company details. These include: Organisation
Legal Name, Trading as Name, Company No/ABN/ACN, Postal Address, Delivery Address,
website Finance or Executive Persons Name (including Saluation), Phone, Fax, Email, Title.
• Pay for first years subscription at aakonsultpayments.com/pricing
• You will receive a Direct Payment Solutions (DPS) username/password from AAkonsult these will be entered into the Merchant Facility in Salesforce and your account will be live.
Contact AAkonsult at [email protected] or phone +61 (3) 9020 7067 if you have any further
questions
NOTE: Contact AAkonsult if you require a Test/demo Facility.
Installation Manual
(c) AAkonsult Pty Ltd 2014
Page 7
Installation Manual
What is required beforehand?
You will need:
A Merchant Facility from your Bank
One of the following versions of Saleforce:
•
•
•
•
Enterprise Edition (EE)
Performance Edition
Unlimited Edition (UE)
Developer Edition (DE)
AAkonsult Payments application
Installation Manual
(c) AAkonsult Pty Ltd 2014
Page 8
Installation Manual
What are the steps to for a complete install?
Thank you for using AAkonsult Payments.
This guide will step you through the installation process and initial setup of AAkonsult Payment. The
installation requires a moderate level of salesforce.com administration experience. If you prefer, you
can engage an AAkonsult consultant to assist.
Steps
The steps required for installation are:
1.
2.
3.
4.
5.
6.
Set up an eCommerce Merchant Facility
Install AAkonsult Payments from the AppExchange
Activate Force.com Sites
Set up security for users
Customise to your requirements (workflows, page layout, buttons etc)
Publish payment forms on your website (User Manual)
Installation Manual
(c) AAkonsult Pty Ltd 2014
Page 9
Installation Manual
eCommerce Merchant Facility
Installation Manual
(c) AAkonsult Pty Ltd 2014
Page 10
Installation Manual
How to obtain a eCommerce Merchant Facility
Your bank can provide you with Visa/MasterCard Merchant Facilities.
1. Contact your bank for an eCommerce Merchant Facility for Direct
Payment Solutions (DPS)
In order or use AAkonsult Payments, you need to have both a Payment Gateway (Included with
AAkonsult Payments) and a Merchant Facility.
Please note the following in regards to getting a Merchant Facility:
• This is a key requirement before you are able to go live with AAkonsult Payments.
• It can take a few weeks.
If you are planning on using Authorize.Net, then please see How to obtain an eCommerce Merchant
Facility for Authorize.Net
When contacting your bank, you need to ask for an "eCommerce Merchant Facility for Payment
Express by Direct Payment Solutions (DPS)".
If you are with the Commonwealth Bank of Australia, you will also need to specific that you need and
internet merchant account via CommWeb and that you would like to have the following transactions
Purchase/Refund/Authorisation/Complete
If you are in North America, please contact AAkonsult at [email protected] and we can provide a
contact.
If you are unsure if your bank is supported, please check the Payment Express website at:
http://paymentexpress.com.au/Knowledge_Base/Bank_Guides If your bank is not listed, there is
often options available, so please contact AAkonsult at [email protected]
2. Ensure you have the following policies on your website:
2.1 Contact Information
Your website will be checked items such as:
Installation Manual
(c) AAkonsult Pty Ltd 2014
Page 11
Installation Manual
•
•
•
•
•
The domain name matches the domain name on the registration form
Your trading name (eg. Logo) is clearly visible
Your organisation is the owner of the domain
Your address, including country code are on the site
Contact email and contact phone number
2.2 Privacy policy
Names/addresses are stored securely in Salesforce. We also store IP address and browser
information for diagnostics and fraud prevention. Credit Card No's and CCV's are NOT stored in
Salesforce, but tokens for recurring billing might.
You should check with your legal advisor when creating the Privacy Policy. In addition, there are
many organisations that provide generators of privacy policies on the web to provide you with a
starting point, plus organisations such as LawLive that can assist.
2.3 Refund policy
You will need to include a details on your policy for refunds. These should comply with local laws.
An example (please contact your legal advisor before basing your policy on this):
Refund Policy:
Please choose carefully. We do not normally give refunds if you simply change your mind or make a
wrong decision. You can choose between a refund, exchange or credit where goods are faulty, have
been wrongly described, are different to the product purchased on the website or don’t perform as
advertised.
3. Check your PCI DSS compliance
Your bank may insist on PCI DSS compliance scans. Check the organisation is currently approved
for PCI compliance checking. Some scanning vendors are:
• McAfee PCI Security service: http://www.mcafeesecure.com/us/products/pci.jsp
• Trust Guard: http://www.trust-guard.com/PCI-Compliance-s/65.htm
4. Notify your bank that the payment form is hosted by Salesforce
(SaaS)
It is the Salesforce website that is capturing and transmitting the details and not your own. This
means the solution you are are using is known as Software as a Service (SaaS) or cloud based.
Salesforce has all the security accreditation levels required. You can see these are:
• https://trust.salesforce.com/trust/learn
Installation Manual
(c) AAkonsult Pty Ltd 2014
Page 12
Installation Manual
• Salesforce PCI Level 1 compliance as announced at: http://blogs.salesforce.com/product/
2012/01/announcing-pci-certification.html
5. Other notes:
5.1 Contact AAkonsult if your bank is not one of the major banks
We'll check compatibility and will provide guidance for moving forward.
5.2 Contact credit card organizations if you require American Express, Diners
Club or other card types.
Contact these organisations separately and ask for a Merchant Account to be setup. AAkonsult
Payments includes the first Merchant Facility free of charge. The second and subsequent ones incur
a one off fee.
6. Activate the Merchant Facility by signing up with AAkonsult
Payments.
See How to order AAkonsult Payments
Installation Manual
(c) AAkonsult Pty Ltd 2014
Page 13
Installation Manual
How to obtain an eCommerce Merchant Facility for
Authorize.Net
AAkonsult Payments licensing is for use with Authorize.net Accounts that have signed up through.
Payment Gateway by using the following link: AAkonsult Authorize.Net
Should you already have an Authorize.Net account, please contact [email protected] for pricing
information as our published rates are for those accounts that are linked to AAkonsult Authorize.Net
1. Setting up a demo/test Authorize.Net Facility
You can request an Authorize.net test account from Authorize.Net at: https://developer.authorize.net/
sandbox/ This is known as a sandbox account.
Once you have your login details, please proceed to step How to setup Authorize.Net making sure
you select "Sandbox" as the environment.
Authorize.net includes a number of test cards that can be used. There are a number of scenarios
that you can be tested, including both successful and failed transactions. Please see
http://developer.authorize.net/tools/errorgenerationguide/ for more details.
2. Requesting a production Authorize.Net Facility
To use AAkonsult Payments with Authorize.Net, you need to register for Authorize.net Payment
Gateway by using the following link: AAkonsult Authorize.Net
In order or use AAkonsult Payments, you need to have both a Payment Gateway and a Merchant
Facility.
If your location is in the US/Cananda then you can sign up for both the Payment Gateway and
Merchant Facility using the link: AAkonsult Authorize.Net
If your location is in UK/Europe or Australia, then you can sign up for the Payment Gateway using
the link: AAkonsult Authorize.Net and obtain the Merchant Facility from your local bank. Please see
How to obtain a eCommerce Merchant Facility for details on getting a Merchant Facility from your
bank.
Once you have your Authorize.Net credentials, please see How to setup Authorize.Net
Installation Manual
(c) AAkonsult Pty Ltd 2014
Page 14
Installation Manual
AppExchange
Installation Manual
(c) AAkonsult Pty Ltd 2014
Page 15
Installation Manual
How to download from the AppExchange
The AppExchange holds extra applications that can be downloaded for Salesforce.
1. Check prerequisites
Before installing AAkonsult Payments from the AppExchange, check you have the following Developer Edition (DE), Enterprise Edition (EE) or Unlimited Edition (UE) of Salesforce
More information about Salesforce can be found at www.salesforce.com
2. Navigate to the AppExchange - www.appexchange.com
Or you can go to the AppExhange within Saleforce (see 2.1)
2.1 Find the AppExchange within Salesforce by using the drop down menu at
the top RHS of the screen.
Installation Manual
(c) AAkonsult Pty Ltd 2014
Page 16
Installation Manual
2.2 Search for our application 'AAkonsult Payments'
3. Install AAkonsult Payments
3.1 Double click to open the AAkonsult Payments app
Installation Manual
(c) AAkonsult Pty Ltd 2014
Page 17
Installation Manual
3.2 Click on the 'Get It Now' button
3.3 Enter your Salesforce login details
Installation Manual
(c) AAkonsult Pty Ltd 2014
Page 18
Installation Manual
3.4 Choose either Production (live) or Sandbox (test) version of Salesforce
Installation Manual
(c) AAkonsult Pty Ltd 2014
Page 19
Installation Manual
3.5 Confirm and install your choice
• Read and tick the Terms and Conditions box
• Salesforce will redirect you into an Installation Wizard
4. Follow the Salesforce Installation Wizard
Installation Manual
(c) AAkonsult Pty Ltd 2014
Page 20
Installation Manual
4.1 Select the user(s) that will receive the AAkonsult Payments application
After clicking on the user, please wait while Salesforce loads the Installation Wizard.
4.2 Click on 'Continue'
This step lists the components that are being brought into your Saleforce version.
Installation Manual
(c) AAkonsult Pty Ltd 2014
Page 21
Installation Manual
4.3 Grant Third-Party Access to all websites shown
AAkonsult uses the web service provided by third party Direct Payment Solutions, PayPal,
Geonames.org and Google.
These 3rd party integrations are mainly used on the checkout forms, refund forms, tokenisation and
token charge forms.
• ssl.geoplugin.net - obtains the users city and country by IP address. This enables the forms
to be prefilled
• www.google.com - is used for the CAPTCHA on checkout form
• maps.google.com - Google Places API. Used for autocomplete on address fields in checkout
and manual payments
• secure.geonames.org - provides auto-complete for suburb and post codes
• ...paypal.com - allow for paypal transactions - purchase/refund/authorisation/auth-complete
• ...paymentexpress.com - allow for credit card transactions - purchase/refund/authorisation/
auth-complete/expiry date updates and recurring charges
• api.authorize.net - Authorize.net production
• apitest.authorize.net - Authorize.net Sandbox/testing environment
Installation Manual
(c) AAkonsult Pty Ltd 2014
Page 22
Installation Manual
• kleber.datatoolscloud.net.au - DataTools Kleber - used for autocomplete on address fields in
checkout and manual payments
4.4 Select 'Next'
These settings can be changed after installation
Installation Manual
(c) AAkonsult Pty Ltd 2014
Page 23
Installation Manual
4.5 Choose your security settings
Granting access to admins only (System Administrators) allows for internal testing before the the
application is fully deployed to all users.
4.6 Click 'Install' to continue
4.7 Await email notification when install is complete
This should take between 3 to 5 minutes.
You can test out AAkonsult Payment's capabilities with our Quick Start templates
Installation Manual
(c) AAkonsult Pty Ltd 2014
Page 24
Installation Manual
How to preview your new AAkonsult Payments product
Select the 'About AAkonsult Payments' tab
Select 'View' on one of our sample payment forms
There are six quick-start templates to choose from that can be used by your organisation
Installation Manual
(c) AAkonsult Pty Ltd 2014
Page 25
Installation Manual
Fill in the test form (Step 1 of 3)
Use the following demo cards:
•
•
•
•
Visa - 4111111111111111
MasterCard - 5431111111111111
Amex - 371111111111114
Diners - 36000000000008
For Visa/MasterCard, any 3 digit CCV will work and for Amex/Diners and 4 digit CCV.
Installation Manual
(c) AAkonsult Pty Ltd 2014
Page 26
Installation Manual
Expiry dates can be any date that is in the future.
Check test form and select 'Pay Now' (Step 2 of 3)
Installation Manual
(c) AAkonsult Pty Ltd 2014
Page 27
Installation Manual
Receive test confirmation details (Step 3 of 3)
Set-up an eCommerce Merchant Account
Click here to find out more about eCommerce Merchant Accounts
Contact AAkonsult if you have any questions
Email: [email protected]
Phone: +61 (3) 9397 0443
Website: http://www.aakonsult.com/AAKPayments.html
Installation Manual
(c) AAkonsult Pty Ltd 2014
Page 28
Installation Manual
Force.com Sites
Installation Manual
(c) AAkonsult Pty Ltd 2014
Page 29
Installation Manual
How to enable Force.com Sites
Force.com Sites enables the public facing web pages to be made visible to internet users and/or
internal intranet users.
If you haven't already enabled Force.com Sites or are unsure if it's already enabled, this step
through will guide your progress.
1. Navigate to the Site Detail page (Setup > Develop > Sites)
1.1 Select 'Setup' on the RHS of your Salesforce home screen
1.2 Select 'Develop' from the App Setup section on the LHS
Installation Manual
(c) AAkonsult Pty Ltd 2014
Page 30
Installation Manual
1.3 Select 'Sites'
Installation Manual
(c) AAkonsult Pty Ltd 2014
Page 31
Installation Manual
2. Create a Force.com domain name
1.
2.
3.
4.
Create a unique name that matches your organisation
Check availability
Agree to the 'Site Terms of Use'
Register your Force.com site
Installation Manual
(c) AAkonsult Pty Ltd 2014
Page 32
Installation Manual
2.1 Confirm your domain name
Note: You can only create a domain once so choose its name wisely.
It is not possible to amend the domain once it has been registered.
Installation Manual
(c) AAkonsult Pty Ltd 2014
Page 33
Installation Manual
How to create a new Force.com Site
1. Navigate to the Site Detail page (Setup > Develop > Sites)
1.1 Select 'Setup' on the RHS of your Salesforce home screen
1.2 Select 'Develop' from the App Setup section on the LHS
Installation Manual
(c) AAkonsult Pty Ltd 2014
Page 34
Installation Manual
1.3 Select 'Sites'
Installation Manual
(c) AAkonsult Pty Ltd 2014
Page 35
Installation Manual
2. Select 'New'
Installation Manual
(c) AAkonsult Pty Ltd 2014
Page 36
Installation Manual
2.1 Fill in the details for your site
1. Create a meaningful Site Label for visitors to your site
2. Create a Site Name for referencing the site in the Force.com API (This will default to the Site
Label)
3. Write a short Site Description (optional)
4. Tick the box to set your site as 'Active'
5. Type 'checkout' into the Active Site Home Page
6. Type 'URLRewriter' into the URL Rewriter Class
7. Keep the default settings for other fields
8. Select 'Save'
Installation Manual
(c) AAkonsult Pty Ltd 2014
Page 37
Installation Manual
How to set up error checking for Force.com Sites
This is an optional step but provides more detailed error logging should there be a problem with the
web page.
Note: This step should only be carried out if this site is only used for AAkonsult Payments.
1. Navigate to the Site Detail page (Setup > Develop > Sites)
1.1 Select 'Setup' on the RHS of your Salesforce home screen
1.2 Select 'Develop' from the App Setup section on the LHS
Installation Manual
(c) AAkonsult Pty Ltd 2014
Page 38
Installation Manual
1.3 Select 'Sites'
Installation Manual
(c) AAkonsult Pty Ltd 2014
Page 39
Installation Manual
1.4 Select the Site from the list
Installation Manual
(c) AAkonsult Pty Ltd 2014
Page 40
Installation Manual
2. Scroll down the Site Details screen to the 'Error Pages'
Installation Manual
(c) AAkonsult Pty Ltd 2014
Page 41
Installation Manual
2.1 Select the 'Page Assignment' button
2.2 Type 'checkoutError' for the two fields shown below
2.3 Select 'Save'
Installation Manual
(c) AAkonsult Pty Ltd 2014
Page 42
Installation Manual
How to test your site
Enough details have now been setup to enable your site to run in a test mode. You won’t be able to
do make transactions until you have completed the Merchant Account facility.
1. Navigate to the Site Detail page (Setup > Develop > Sites)
1.1 Select 'Setup' on the RHS of your Salesforce home screen
1.2 Select 'Develop' from the App Setup section on the LHS
Installation Manual
(c) AAkonsult Pty Ltd 2014
Page 43
Installation Manual
1.3 Select 'Sites'
Installation Manual
(c) AAkonsult Pty Ltd 2014
Page 44
Installation Manual
2. Click on the Site URL from the list
You may have more than one URL to choose from.
Select the URL that provides a secure service. For example: https
Installation Manual
(c) AAkonsult Pty Ltd 2014
Page 45
Installation Manual
3. Confirm that your site is in operation.
Installation Manual
(c) AAkonsult Pty Ltd 2014
Page 46
Installation Manual
3.1 Check the steps in this manual if your site does not load or you receive an
error message.
If you do not see a similar screenshot to above, then your package may not have been deployed.
Check the AppExchange section earlier in this manual.
Installation Manual
(c) AAkonsult Pty Ltd 2014
Page 47
Installation Manual
How to connect your new site to your Merchant Facility
To obtain an eCommerce Merchant Facility, follow 'How to set up a Merchant Facility'.
NOTE: This may take a few weeks.
1. Navigate to the Site Detail page (Setup > Develop > Sites)
1.1 Select 'Setup' on the RHS of your Salesforce home screen
1.2 Select 'Develop' from the App Setup section on the LHS
Installation Manual
(c) AAkonsult Pty Ltd 2014
Page 48
Installation Manual
1.3 Select 'Sites'
Installation Manual
(c) AAkonsult Pty Ltd 2014
Page 49
Installation Manual
2. Copy the secure URL of your site
Copy shortcut - Highlight & Cntr C
Make sure you choose the SECURE URL (not shown below). A secure URL will begin with https//
Installation Manual
(c) AAkonsult Pty Ltd 2014
Page 50
Installation Manual
3. Navigate to the 'Merchant Facilities' tab
Installation Manual
(c) AAkonsult Pty Ltd 2014
Page 51
Installation Manual
4. Select the Merchant Facility you wish to use
5. Select 'Edit'
6. Paste the site URL into the field 'Site URL'
Paste shortcut - Ctrl V
7. Select 'Save'
Installation Manual
(c) AAkonsult Pty Ltd 2014
Page 52
Installation Manual
How to add a custom URL - Optional
Should you wish to make the URL shown to payees more custom to match your domain or branding,
then you can add a custom domain.
It can use useful to use custom domains/URL's when sending out emails or SMS/Text's with links in
them. For SMS/Text's, this is particularly important as this provides a way of having a shorter URL.
An example of a custom URL is pay.aakonsultpayments.com (vs. the default of
https://aakonsultpayments.secure.force.com
Before starting this section, you will need to ensure you have access to your website domain
management
Quick Steps:
1.
2.
3.
4.
5.
Setup > domain management - add a new domain
From step 1, note details and login to your domain management and apply
Enter domain in domain management - add a new domain - Save
Link domain to your site - setup > domain management > custom URL
Optionally, add a new formula field to URL Token. Formula is based on:
"https://pay.mydomain.com/U/"&AAkPay__Tiny_Token__c
Installation Manual
(c) AAkonsult Pty Ltd 2014
Page 53
Installation Manual
1. Setup > Administration > Domain Management
2. Add Domain
Please note and read the instructions as detailed here. You will need to copy these details and use
them in the next step. Keep this screen in Salesforce open as you will need to come back to here in
step 3.
Installation Manual
(c) AAkonsult Pty Ltd 2014
Page 54
Installation Manual
3. Add CNAME and Text records
To do these steps, you will need to be an administrator of your domain. As each providers is
different, please check with your provider for exact instructions
3.1 Add CNAME record
For our example domain, we are choosing to use pay.aakonsultpayments.com. We have copied the
sample given is step 2, point (1) and replaced [domain] with the one we wish to use.
3.2 Add text record
Copy the id as shown is step 2, point (2) and paste into the text value.
4. Add the domain to Salesforce
Navigate back to the tab that was opened in step 2, enter your domain name and press save.
Please note, the CNAME records in step 3 make take upto 24 hours before they become available.
Installation Manual
(c) AAkonsult Pty Ltd 2014
Page 55
Installation Manual
5. Setup > Domain management > Custom URL: Link domain to
custom URL and site
Link the domain created in step 4 to the Site that was created when setting up Force.com sites.
Your new URL is now ready to use.
6. URL Token - Short URL
Optional step:
It is useful to have a URL field created on the URL Token for use with email merges or SMS/Text
Message merge.
Installation Manual
(c) AAkonsult Pty Ltd 2014
Page 56
Installation Manual
6.1 Setup > Create > Custom Objects. URL Tokens
After navigating to setup > Create > Custom Objects. Click on the "URL Token" object.
Installation Manual
(c) AAkonsult Pty Ltd 2014
Page 57
Installation Manual
6.2 Add a new field
Scroll down to the Custom Fields & Relationships section. Then press the New button
6.3 Select Type formula
Installation Manual
(c) AAkonsult Pty Ltd 2014
Page 58
Installation Manual
6.4 Add name and select type text
6.5 Add formula
Add the formula "https://pay.mydomain.com/U/"&AAkPay__Tiny_Token__c
Make sure you replace "pay.mydomain.com" with your domain as setup in steps 2 through 5 above.
Press NEXT
Installation Manual
(c) AAkonsult Pty Ltd 2014
Page 59
Installation Manual
Continue through the new field wizard keeping the defaults shown upto and including the SAVE step.
Installation Manual
(c) AAkonsult Pty Ltd 2014
Page 60
Installation Manual
Security
Installation Manual
(c) AAkonsult Pty Ltd 2014
Page 61
Installation Manual
How to set up external site security (older version)
How you set up security will depend on the needs of your organisation.
1. Navigate to the Site Detail page (Setup > Develop > Sites)
1.1 Select 'Setup' on the RHS of your Salesforce home screen
1.2 Select 'Sites' from the 'Develop' menu
Installation Manual
(c) AAkonsult Pty Ltd 2014
Page 62
Installation Manual
1.3 Select the Site from the list
Installation Manual
(c) AAkonsult Pty Ltd 2014
Page 63
Installation Manual
2. Select the 'Public Access Settings' button
Installation Manual
(c) AAkonsult Pty Ltd 2014
Page 64
Installation Manual
3. Check the diagram below. If it looks the same, follow these steps:
These instructions are for older versions of Salesforce.
If the diagram does not match below, follow these instructions (enhanced version of Salesforce) to
revert Salesforce back to the older version.
4. Set 'Record Types'.
Installation Manual
(c) AAkonsult Pty Ltd 2014
Page 65
Installation Manual
4.1 Scroll down to 'Record Type Settings' heading
Installation Manual
(c) AAkonsult Pty Ltd 2014
Page 66
Installation Manual
4.2 Select 'Edit' on the Payment Txn's label
Installation Manual
(c) AAkonsult Pty Ltd 2014
Page 67
Installation Manual
4.3 Select all 'Available Record Types' to add them to 'Selected Record Types'
Installation Manual
(c) AAkonsult Pty Ltd 2014
Page 68
Installation Manual
4.4 Set the 'Default Record Type' to Payment and Save.
5. Allocate Permissions.
Installation Manual
(c) AAkonsult Pty Ltd 2014
Page 69
Installation Manual
5.1 Scroll down to 'Standard Object Permissions' on the Payment Profile screen.
5.2 Select 'Edit'.
Installation Manual
(c) AAkonsult Pty Ltd 2014
Page 70
Installation Manual
5.3 Match the permissions shown below.
You may need to scroll across to see all the diagram.
5.4 Select 'Save'.
6. Assign users.
6.1 Select 'View Users' on the Payments Profile screen.
Installation Manual
(c) AAkonsult Pty Ltd 2014
Page 71
Installation Manual
6.2 Select user to be assigned AAkonsult Payments access.
6.3 Check 'Name' and 'Time Zone'
You may wish to edit the name of the Sites Payment User as this is the one the payment receipts will
come from by default. Also, check the timezone to make sure it is your local time zone so that
payment creation dates reflect the right date.
Installation Manual
(c) AAkonsult Pty Ltd 2014
Page 72
Installation Manual
6.4 Select 'Edit Assignments'
Installation Manual
(c) AAkonsult Pty Ltd 2014
Page 73
Installation Manual
6.5 Add 'AAkonsult Payment Sites' to the Enabled Permission Sets.
6.6 Select 'Save'
7. Review fields visible to website.
Installation Manual
(c) AAkonsult Pty Ltd 2014
Page 74
Installation Manual
7.1 Scroll down to 'Field-Level Security' on the Payments Profile screen
Installation Manual
(c) AAkonsult Pty Ltd 2014
Page 75
Installation Manual
7.2 Click into each area shown.
Check the fields held in Account, Campaign, Campaign Member, Contact and Opportunity.
7.3 Check that the individual fields relevant to you are visible
As a minimum, Name, Address and Amount fields should be ticked at 'Visible'.
Installation Manual
(c) AAkonsult Pty Ltd 2014
Page 76
Installation Manual
8. Revert Salesforce to the enhanced version (if originally unticked for
security set up)
Only follow this step if you originally unticked the Enhanced Version of Salesforce for a simpler set
up.
8.1 Navigate to Setup > App Setup > Customize and Select 'Customize your
User Interface'
Installation Manual
(c) AAkonsult Pty Ltd 2014
Page 77
Installation Manual
8.2 Tick the boxes shown below and 'Save'
Installation Manual
(c) AAkonsult Pty Ltd 2014
Page 78
Installation Manual
How to set up external site security (enhanced version)
It is simpler to revert Salesforce back to the older version while adjusting Security settings. Be sure
to reset back to enhanced version.
1. Navigate to Setup > App Setup > Customize and Select 'Customize
your User Interface'
Installation Manual
(c) AAkonsult Pty Ltd 2014
Page 79
Installation Manual
2. Untick the boxes shown below and 'Save'
Remember to return to this screen and tick enhanced version when you have completed setting up
your security.
3. Refer to the 'How to set up external site security (older version)'
procedure
How to set up external site security (older version)
Installation Manual
(c) AAkonsult Pty Ltd 2014
Page 80
Installation Manual
How to set up internal security (Salesforce users)
The below suggestions for security should also be used in conjunction with security best practices.
For details on security best practices, visit trust.salesforce.com, then click on the security tab,
followed by the best practices link.
1. Read the Salesforce Security Implementation Guide
Security Implementation Guide
2. Select which users should have access to AAkonsult Payments
Only users that need access to AAkonsult Payments should be given access
3. Select which users will have access to the Merchant Facilities tab
Only a few select and trusted users should have access to the Merchant Facilities tab
4. Check approvals
Review which users have access to the Object “Payment Txn”, Field “Approved” button
(AAkPay__Payment_Txn__c. AAkPay__Approved__c). For profiles that have users that should not
be able to approve refunds then this field should be made read only for them and an Approval
Workflow process setup so they can request a refund.
Installation Manual
(c) AAkonsult Pty Ltd 2014
Page 81
Installation Manual
5. Set up profile object security as a maximum per user as shown
• Profiles will need to have Apex Pages with “AAkPay_...” added and also Apex Classes of
“AAkPay__...” added.
• Encrypted fields should not be visible for any profile unless absolutely necessary.
Installation Manual
(c) AAkonsult Pty Ltd 2014
Page 82
Installation Manual
6. Assigning permission sets to users
There are two permission sets that are applicable to internal (Salesforce CRM Users). These need
to be allocated to the users that will be using AAkonsult Payments.
The Permission Sets to use are:
1. AAkonsult Payments Admin Users - Assign this to users that need to update AAkonsult
Payments Payment Forms, Text or are able to approve Refunds.
2. AAkonsult Payments Standard Users - Use this for non approvers and persons that don't
need to change any of the AAkonsult Payments Forms or text.
To assign permission sets, locate the user, click into view the details of the user, scroll down to the
related "Permissions Set" list. Click the Edit Assignment button and assign.
Installation Manual
(c) AAkonsult Pty Ltd 2014
Page 83
Installation Manual
Payment Gateways
Installation Manual
(c) AAkonsult Pty Ltd 2014
Page 84
Installation Manual
How to set up Payment Express - standard
1. Obtain your Payment Express username from AAkonsult
An email will provide instructions on how to obtain your password.
2. Navigate to the Merchant Facilities tab
3. Select 'Payment Express' from the Payment Gateway drop down
menu
Installation Manual
(c) AAkonsult Pty Ltd 2014
Page 85
Installation Manual
4. Enter your Payment Express UserID and password
5. Save
Installation Manual
(c) AAkonsult Pty Ltd 2014
Page 86
Installation Manual
How to set up Payment Express - PxPay
Payment Express provides a DPS hosted payment gateway called PxPay. Some banks may prefer
this option over the standard Payment Express offering.
1. Obtain your PxPay username from AAkonsult
An email will provide instructions on how to obtain your password.
2. Navigate to the Merchant Facilities tab
3. Select 'Payment Express PxPay' from the Payment Gateway drop
down menu
Installation Manual
(c) AAkonsult Pty Ltd 2014
Page 87
Installation Manual
4. Enter both passwords
5. Link form screens back to AAkonsult Payment
It is STRONGLY recommended to ensure that nothing stops the processing of a transaction (eg
closing a screen before the transaction is complete).
5.1 Login to your Payment Express account and select 'Custom Hosted'
Installation Manual
(c) AAkonsult Pty Ltd 2014
Page 88
Installation Manual
5.2 Scroll down to the 'Hide Page 2' field and select 'Skip Page2, HTTP Redirect'
This will ensure that the payment form will return to AAkonsult Payments when the transaction is
complete.
Installation Manual
(c) AAkonsult Pty Ltd 2014
Page 89
Installation Manual
How to set up Payment Express - PxFusion
Obtain your PxFusion username from AAkonsult
An email will provide instructions on how to obtain your password.
Navigate to the Merchant Facilities tab
Select 'Payment Express PxFusion' from the Payment Gateway drop
down menu
Installation Manual
(c) AAkonsult Pty Ltd 2014
Page 90
Installation Manual
Enter both passwords
Save
Installation Manual
(c) AAkonsult Pty Ltd 2014
Page 91
Installation Manual
How to set up PayPal
You can configure AAkonsult Payments to work with a PayPal Sandbox (Test) account or Production
account. AAkonsult supports PayPal offerings that support the PayPal Express Checkout option.
1. Sign up to PayPal
1.1 Go to http://developer.paypal.com
Select 'Sign Up'
Installation Manual
(c) AAkonsult Pty Ltd 2014
Page 92
Installation Manual
1.2 Enter details for your organisation
You will need to select your country for the relevant sign up form.
2. Set up a test (sandbox) version of PayPal
2.1 Login from the confirmation URL
2.2 Select 'Test Accounts' in the left menu
2.3 Set up some of the pre-configured accounts
Select 'Buyer', 'Seller' and 'Website Seller Pro' and set some amounts in each.
Installation Manual
(c) AAkonsult Pty Ltd 2014
Page 93
Installation Manual
2.4 Select the 'API' and 'Payment Card Credentials' on the top left side of screen
Installation Manual
(c) AAkonsult Pty Ltd 2014
Page 94
Installation Manual
2.5 Copy the API Username, API Password and API Signature to the fields with
the same name on the Merchant Facility tab
Ensure you select the correct PayPal Environment
3. Set up a live (production) version of PayPal
3.1 Login to your production version of PayPal
Installation Manual
(c) AAkonsult Pty Ltd 2014
Page 95
Installation Manual
3.2 Select More from the tools section
On your home screen, there should be a Tools Pallet Visible. Select the More option.
Installation Manual
(c) AAkonsult Pty Ltd 2014
Page 96
Installation Manual
3.3 API Access
Select API Access from the "Manage your business" section.
Press the GO TO API access area when prompted.
Installation Manual
(c) AAkonsult Pty Ltd 2014
Page 97
Installation Manual
3.4 Select the 'Option 2 - Request API credentials to create your own API
username and password'
Installation Manual
(c) AAkonsult Pty Ltd 2014
Page 98
Installation Manual
3.5 Select the 'Request API Signature' option and 'Agree and Submit' button
You will be shown a screen that has;
• API Username
• API Password
• Signature
3.6 Copy these values to PayPal fields on the Merchant Facility tab
3.7 Set the PayPal Environment to 'Production'
Installation Manual
(c) AAkonsult Pty Ltd 2014
Page 99
Installation Manual
How to setup Authorize.Net
1. Obtain your Authorize.net Payment Gateway Details
Please refer to the How to obtain an eCommerce Merchant Facility for Authorize.Net if you do not
already have your Authorize.net credentials.
2. Setup AAkonsult Payments for Authorize.Net
Once you your login details (API Login Id and Transaction Key), then you need to enter these into
the Merchant Facility.
Navigate to the Merchant Facility Tab, press [GO] to see all facilities and click into the one you wish
to use or press NEW button to create a new one.
On the Merchant Facility, make sure the following details are entered/updated
1.
2.
3.
4.
Payment Gateway is set to "Authorize.Net"
Payment Gateway userId is set to the API Login Id provided
Payment Gateway Password is set to the Transaction Id provided
Environment is set to Sandbox or Production
Installation Manual
(c) AAkonsult Pty Ltd 2014
Page 100
Installation Manual
Address autocomplete and
validation
Installation Manual
(c) AAkonsult Pty Ltd 2014
Page 101
Installation Manual
Which address tool?
AAkonsult currently Supports the following address autocomplete tools:
1. Google Places
2. DataTools Kleber
The following provides some notes on which option to consider for each of the above.
1. Google Places
Google Places is powered by the same information used by Google in Google Maps and Google+
Local
Installation Manual
(c) AAkonsult Pty Ltd 2014
Page 102
Installation Manual
Google may charge for this service at some stage, but at the time of writing, this offering is currently
free. All you need to do is sign up for a Google Places API Key.
The Google Places option is fast.
The Google Places option is not as good as Kleber for its completeness of addresses. For example
levels of buildings and unit numbers. In addition, this option does not return post identifiers such as
Delivery Point ID (DPID) in Australia or the equivalent in other countries.
To setup and use Goolge Places, please see How to setup Google Places Address Validation
2. DataTools Kleber
Kleber by Datatools provides a very complete world wide address database.
AAkonsult Payments will not charge any fee for the Kleber integration, providing organisations sign
up to Kleber through the AAkonsult Kleber Link. You will need a AAkonsult Kleber license key that is
provided after signing up for Kleber.
Kleber is a paid product and in our opinion the prices are very competitive.
Installation Manual
(c) AAkonsult Pty Ltd 2014
Page 103
Installation Manual
Kleber has a more complete address listing than Google Places and includes details such as Unit
No, building level etc.
It is AAkonsult's current intention to expand the functionality of AAkonsult Payments to take more
advantage of other API's and data validation provided by DataTools over time.
To setup and use DataTools Kleber, please see How to setup DataTools Kleber
Installation Manual
(c) AAkonsult Pty Ltd 2014
Page 104
Installation Manual
How to setup Google Places Address Validation
Quick Steps:
1. Sign up for a Google Places API Key
2. Enter key into Merchant Facility and select Google Places as the Address Helper
1. Login to the Google API Console
Navigate to the Google API Console. This is located at: https://code.google.com/apis/console
You will be asked to login. If you do not already have an account then sign up for a free account.
2. Create or using an existing project
Installation Manual
(c) AAkonsult Pty Ltd 2014
Page 105
Installation Manual
3. Locate Places API and Start
Type "Places" in the browse APIs selection.
Once you have located the "Places API", press the "OFF" button to activate the API
4. Agree to Terms and Conditions
Read, understand and agree to the Terms and Conditions
Installation Manual
(c) AAkonsult Pty Ltd 2014
Page 106
Installation Manual
5. Create Credentials
Click on the "Credentials" link under the APIs & Auth menu option.
Then click on the "Create New Key" button
6. Create a new Server Key
Installation Manual
(c) AAkonsult Pty Ltd 2014
Page 107
Installation Manual
7. Assign Salesforce Server IP addresss
See the current Salesforce IP server IP Addresses in the following IP addresses to whitelist article
(Please make sure you use the addresses in this article under the required for access section as
these addresses can vary from the ones shown above screenshot as Salesforce updates IP ranges)
Copy test values in and press Create button
Installation Manual
(c) AAkonsult Pty Ltd 2014
Page 108
Installation Manual
8. Copy your API Key
Copy this API key as it needs to be entered into the Merchant Facility in Salesforce
9. Update Salesforce with your Google API Key
Navigate to the "Merchant Facility" Tab in Salesforce. Press GO button and and for Merchant
Facility that you wish to have google Places/Auto complete enabled update the following:
1. Set the Address Helper to Google Places
2. Update the Address Password/Token to be your Google Places API code.
Press Save
Installation Manual
(c) AAkonsult Pty Ltd 2014
Page 109
Installation Manual
How to setup DataTools Kleber
Quick Steps:
1. Sign up for a Kleber API Key through AAkonsult Kleber
2. Enter key into Merchant Facility and select Google Places as the Address Helper
1. Sign up for Kleber
Kleber currently includes a credit for organisations to trial their tool
AAkonsult will not be charging anything additional for the Kleber Integration, providing organisations
sing up through the AAkonsult Kleber link. If you are already a DataTools Kleber customer, then
please contact [email protected] for the Kleber pricing information.
After clicking on AAkonsult Kleber link, then select the Learn More Tab, followed by "you can
register here" link in the Easy to Try section.
Installation Manual
(c) AAkonsult Pty Ltd 2014
Page 110
Installation Manual
2. Register for the free trial
Enter your details in this and the following screen.
Installation Manual
(c) AAkonsult Pty Ltd 2014
Page 111
Installation Manual
3. Setup Kleber API
Click the "Start by Setting up your product link"
Installation Manual
(c) AAkonsult Pty Ltd 2014
Page 112
Installation Manual
4. Copy the Kleber API
Copy the Request key as this needs to be entered into Salesforce Merchant Facility in the next step.
5. Update Salesforce with your Kleber Request Key
Navigate to the "Merchant Facility" Tab in Salesforce. Press GO button and and for Merchant Facility
that you wish to have google DataTools Kleber Auto complete enabled update the following:
1. Set the Address Helper to DataTools Kleber
2. Update the Address Password/Token to be your Kleber Request key.
Installation Manual
(c) AAkonsult Pty Ltd 2014
Page 113
Installation Manual
3. Leave the Address Helper URL as blank
Press Save
Installation Manual
(c) AAkonsult Pty Ltd 2014
Page 114
Installation Manual
How to setup DataTools Kleber for Leads, Contacts and
Accounts
Address auto-complete and validation is available for the following objects in Salesforce CRM:
• Leads
• Contacts
• Accounts
You must first have DataTools Kleber setup.
Quick Steps for installation:
•
•
•
•
•
On the objects you wish to add validation, do the following:
Edit the Page Layout
Make standard address fields read only
optionally add the Address Update Button
optionally at the Address Update link below address fields
1. Adding address autocomplete and validation for Leads
1.1 Edit the lead page layout
Locate a lead, click into the lead and press Edit Layout link.
Installation Manual
(c) AAkonsult Pty Ltd 2014
Page 115
Installation Manual
Alternatively, click on setup at the top to the screen, navigate to Customize > Leads > Page Layouts.
Click edit next to the page layout you wish to update
1.2 Make address fields read only
1. Double click on the address field, or alternatively click on the spanner icon that appears when
you hover over the address
2. Select Read Only
3. Click OK to exit
Installation Manual
(c) AAkonsult Pty Ltd 2014
Page 116
Installation Manual
1.3 Add address update link
Click on the Address Update field and drag this below the address details.
This will provide a link where users can edit the address. You can use this with or without the
Address Update button option
Installation Manual
(c) AAkonsult Pty Ltd 2014
Page 117
Installation Manual
1.4 Add Address Update button
1. Click on the Buttons selection object
2. Drag Address Update button from the available buttons to the Custom Buttons Section
You can use this with or without the Address Update link option
Installation Manual
(c) AAkonsult Pty Ltd 2014
Page 118
Installation Manual
1.5 Save the Page Layout
Make sure you press the Save button for closing the screen
You'll need to repeat this process for other layouts should they exist
2. Adding address autocomplete and validation for Contacts
2.1 Edit the contact page layout
Locate a lead, click into the Contact and press Edit Layout link.
Installation Manual
(c) AAkonsult Pty Ltd 2014
Page 119
Installation Manual
Alternatively, click on setup at the top to the screen, navigate to Customize > Contacts > Page
Layouts. Click edit next to the page layout you wish to update
2.2 Make address fields read only
1. Double click on the address field, or alternatively click on the spanner icon that appears when
you hover over the address
2. Select Read Only
3. Click OK to exit
Installation Manual
(c) AAkonsult Pty Ltd 2014
Page 120
Installation Manual
2.3 Add address update link
Click on the Address Update field and drag this below the address details.
This will provide a link where users can edit the address. You can use this with or without the
Address Update button option
Installation Manual
(c) AAkonsult Pty Ltd 2014
Page 121
Installation Manual
2.4 Add Address Update button
1. Click on the Buttons selection object
2. Drag Address Update button from the available buttons to the Custom Buttons Section
You can use this with or without the Address Update link option
Installation Manual
(c) AAkonsult Pty Ltd 2014
Page 122
Installation Manual
2.5 Save the Page Layout
Make sure you press the Save button for closing the screen
You'll need to repeat this process for other layouts should they exist
3. Adding address autocomplete and validation for Accounts
3.1 Edit the Account page layout
Locate a lead, click into the Contact and press Edit Layout link.
Installation Manual
(c) AAkonsult Pty Ltd 2014
Page 123
Installation Manual
Alternatively, click on setup at the top to the screen, navigate to Customize > Accounts > Page
Layouts. Click edit next to the page layout you wish to update
3.2 Make address fields read only
1. Double click on the address field, or alternatively click on the spanner icon that appears when
you hover over the address
2. Select Read Only
3. Click OK to exit
Installation Manual
(c) AAkonsult Pty Ltd 2014
Page 124
Installation Manual
3.3 Add address update link
Click on the Address Update field and drag this below the address details.
This will provide a link where users can edit the address. You can use this with or without the
Address Update button option
Installation Manual
(c) AAkonsult Pty Ltd 2014
Page 125
Installation Manual
3.4 Add Address Update button
1. Click on the Buttons selection object
2. Drag Address Update button from the available buttons to the Custom Buttons Section
You can use this with or without the Address Update link option
Installation Manual
(c) AAkonsult Pty Ltd 2014
Page 126
Installation Manual
3.5 Save the Page Layout
Make sure you press the Save button for closing the screen
You'll need to repeat this process for other layouts should they exist
Installation Manual
(c) AAkonsult Pty Ltd 2014
Page 127
Installation Manual
Customisation - Optional
Installation Manual
(c) AAkonsult Pty Ltd 2014
Page 128
Installation Manual
How to adjust the Contacts Page layout
It can be useful to have extra information on a preferred screen
1. Navigate to Setup > App Setup > Customise > Contacts > Page
Layouts
1.1 Select App Setup > Customise > Contacts > Page Layouts
Installation Manual
(c) AAkonsult Pty Ltd 2014
Page 129
Installation Manual
2. Select 'Edit' on 'Contact layout'
3. Drop and drag a field button onto the Contact Detail page
Installation Manual
(c) AAkonsult Pty Ltd 2014
Page 130
Installation Manual
How to adjust the Accounts Page layout
1. Navigate to Setup > App Setup > Customise > Accounts > Page
Layouts
1.1 Select App Setup > Customise > Accounts > Page Layouts
Installation Manual
(c) AAkonsult Pty Ltd 2014
Page 131
Installation Manual
2. Select 'Edit' on 'Account Layout'
3. Drop and drag a field button onto the Account Detail page
Installation Manual
(c) AAkonsult Pty Ltd 2014
Page 132
Installation Manual
How to adjust settings for the Not-for-profit Starter Pack
AAkonsult Payments has been tested and works with the Nonprofit Starter Pack (available from
Salesforce) with the following notes.
Disclaimer: Salesforce Foundation is constantly updating the Nonprofit starter pack and we cannot
guarantee that this updates will never have an adverse affect on AAkonsult Payments. Please
ensure testing new options and updates in Sandbox before deploying to production.
1. Activate the Not-for-profit Starter
1.1 Navigate to the Merchant Facility tab
1.2 Scroll down to Account, Contact, Opportunity Matching heading
Installation Manual
(c) AAkonsult Pty Ltd 2014
Page 133
Installation Manual
1.3 Double click into the Account Matching Method field
1.4 Select 'Contacts and Organisations For Nonprofits' from the drop down
menu and SAVE
2. Allow Household settings
For organisations using the NPSP version 2 or earlier, there is a requirement to disable the
Household Opportunity Rollup trigger. This will mean that contact and account roll-up summary
fields will only be recalculated once per day.
If you are using versino 3 of the NPSP or later then you do NOT need to disable this trigger.
Installation Manual
(c) AAkonsult Pty Ltd 2014
Page 134
Installation Manual
2.1 Navigate to Setup > App Setup > Develop > Custom Settings
2.2 Select Manage next to 'Household Settings'
2.3 Untick the checkbox for 'DISABLE_Household_Opportunity_trigger' field
3. Schedule Roll-up processor to automatic
The Batch Payment Processor (started on the Merchant Facility Tab) is not compatible with this part
of the Nonprofit Starter pack for versions 2.0 or earlier.
The below steps enable the scheduling of the roll-ups so totals on Accounts and Contacts get recalculated daily.
Installation Manual
(c) AAkonsult Pty Ltd 2014
Page 135
Installation Manual
3.1 Navigate to Opportunity Roll-ups Tab
Click "+" at the end of the Tabs, the select Opportunity Rollups
3.2 All Tabs ~ salesforce.com - Developer Edition - Mozilla Firefox
Installation Manual
(c) AAkonsult Pty Ltd 2014
Page 136
Installation Manual
3.3 Select Apex Class 'SCHED_OppRollup'
Press the Continue button to start run now. This will run the calculation now and will schedule the
calculation to occur each day.
Installation Manual
(c) AAkonsult Pty Ltd 2014
Page 137
Installation Manual
How to setup Annual Statements
In order to use the Annual Statements, you need to setup a Remote Site setting that AAkonsult
Payment to mass generate the Annual Statement PDF documents.
Quick Steps:
1. Copy the salesforce.com domain from the URL
2. Add a new Remote Site setting for the salesforce domain
1. Copy the Salesforce URL from any screen
Installation Manual
(c) AAkonsult Pty Ltd 2014
Page 138
Installation Manual
2. Navigate to setup > Administration setup > Security Controls >
Remote Site Settings
Add a new Remote Site.
Enter a name “Salesforce”, then paste the URL from step 1 into the Remote Site URL, select active
and Save.
Installation Manual
(c) AAkonsult Pty Ltd 2014
Page 139
Installation Manual
Workflows - Optional
Installation Manual
(c) AAkonsult Pty Ltd 2014
Page 140
Installation Manual
Which workflow will suit?
Workflow rules are actions happening behind the scenes in Salesforce that are triggered by an event
or time.
AAkonsult has a variety of workflow rules that can be activated for your organisation depending upon
its needs.
For receipting workflows, please check the Payment Form Send Receipt by Options first before
amending. More information is available in the user manual under Receipting section.
Memberships
If you are a membership based organisation, these workflows are recommended
• Renewal reminders to individuals - How to send out first automated reminders - contact level
and How to send out second automated reminders - contact level
• Renewal reminders to organisations - How to send out first automated reminders - account
level and How to send out second automated reminders - account level
Refunds
If your organisation is looking for some basic approval refunds, these workflows are recommended
• Refund Approvals
Notifications and Alerts
There are a number of pre-built notifications and alert workflows that are enabled by default.
The following are options that organisations can choose to enable should the need arise
• New Online Payment Notification
• New Online Membership Payment Notification
Recurring Payments
If your organisation relies on recurring payments, these workflows are recommended
• How to set up recurring payments
• How to set up a recurring payment restart reminder
Installation Manual
(c) AAkonsult Pty Ltd 2014
Page 141
Installation Manual
Batch Processing
If you use batch processing, it is very useful to have these workflow rules set up if the
processing is stopped.
• If you need to deliberately stop the batch process, this workflow reminds you to restart it How to set up the batch payments process restart reminder
• If the batch process stops unexpectedly, this workflow sends a notification to let you know How to set up the batch payments process not running notification
Installation Manual
(c) AAkonsult Pty Ltd 2014
Page 142
Installation Manual
How to send out first automated reminders - contact
level
This workflow setup is required if you wish to send out a first automated reminder to Contact level
members/subscribers.
Quick Steps:
1. Clone Workflow rule "1st Renewal Reminder [ADD TIME BASED WORKFLOW]" and rename
to "1st Renewal Reminder"
2. Add Immediate Workflow Actions. Select Existing - Field Update "set 1st Reminder Due"
3. Add a Time-Dependant Action. Set it to fire 30 days before subscription end date (or time
period you would like).
Add Action - use existing workflow - "Email Alert: send 1st Renewal Reminder Email"
Add Action - use existing workflow - "Field Update: set 2nd Reminder Due"
4. Optionally review and update the renewal email templates
1. Navigate to Setup > App Setup > Create > Workflow & Approvals >
Workflow Rules
Installation Manual
(c) AAkonsult Pty Ltd 2014
Page 143
Installation Manual
1.1 Select 'Workflow Rules'
Installation Manual
(c) AAkonsult Pty Ltd 2014
Page 144
Installation Manual
2. Read about Workflows and select 'Continue'
This page can be turned off.
Installation Manual
(c) AAkonsult Pty Ltd 2014
Page 145
Installation Manual
3. Select '1st Renewal Reminder [ADD TIME BASED WORKFLOW]'
Open the circled rule
Installation Manual
(c) AAkonsult Pty Ltd 2014
Page 146
Installation Manual
4. Select 'Clone'
4.1 Re-name the workflow rule '1st Renewal Reminder' and select 'Save & Next'
Installation Manual
(c) AAkonsult Pty Ltd 2014
Page 147
Installation Manual
5. Select the 'Add Workflow Action'
Select Add Workflow Action under the "Immediate Workflow Actions" Sections. Then 'Select Existing
Action'.
Installation Manual
(c) AAkonsult Pty Ltd 2014
Page 148
Installation Manual
5.1 Add existing field update - Set First Reminder Due
Then select Field Update from the Action Type and move "Set First Reminder" to the 'Selected
Actions' and Save.
Installation Manual
(c) AAkonsult Pty Ltd 2014
Page 149
Installation Manual
6. Select the 'Add Time Trigger' button
6.1 Set Time Trigger to '30 days before Subscription End Date' and Save
Note: You can change the number of days as required if you wish to give more/less notice.
Installation Manual
(c) AAkonsult Pty Ltd 2014
Page 150
Installation Manual
7. Select the 'Add Workflow Action' button in the Time Dependent
Workflow Action section.
Installation Manual
(c) AAkonsult Pty Ltd 2014
Page 151
Installation Manual
7.1 Select 'Select Existing Action from the drop down menu
7.2 Select 'Email Alert' from the Choose Action Type drop down menu
Installation Manual
(c) AAkonsult Pty Ltd 2014
Page 152
Installation Manual
7.3 Add 'Email Alert: send 1st Renewal Reminder Email' and Save
Installation Manual
(c) AAkonsult Pty Ltd 2014
Page 153
Installation Manual
8. Select the 'Add Workflow Action' button in the Time Dependent
Workflow Action section.
This Workflow Action is set as a trigger for the 2nd Reminder.
Installation Manual
(c) AAkonsult Pty Ltd 2014
Page 154
Installation Manual
8.1 Select 'Select Existing Action' from the drop down menu
8.2 Select 'Field Update' from the Choose Action Type drop down menu
Installation Manual
(c) AAkonsult Pty Ltd 2014
Page 155
Installation Manual
8.3 Select Field Update: Set 2nd Reminder Due
Installation Manual
(c) AAkonsult Pty Ltd 2014
Page 156
Installation Manual
9. Select the 'Add Workflow Action' button in the Immediate Workflow
Actions section.
Make sure you are NOT adding a time based workflow, but an immediate one
Installation Manual
(c) AAkonsult Pty Ltd 2014
Page 157
Installation Manual
9.1 Select Field Update
Installation Manual
(c) AAkonsult Pty Ltd 2014
Page 158
Installation Manual
9.2 Select Field Update: Set 1st Reminder Due
10. Select 'Done' button to complete the workflow rule
Installation Manual
(c) AAkonsult Pty Ltd 2014
Page 159
Installation Manual
10.1 Select 'Activate' to begin the workflow process
10.2 Set 'Default Workflow User' and Save
If a Default Workflow User has already been set, this step will be skipped.
Installation Manual
(c) AAkonsult Pty Ltd 2014
Page 160
Installation Manual
11. Review email template for 1st Reminder [Setup > Administration
Setup> Communication Templates > Email Templates]
Installation Manual
(c) AAkonsult Pty Ltd 2014
Page 161
Installation Manual
11.1 Select AAkonsult Payments from the drop down Folder list
11.2 Scroll down to find 'Renewal - 1st Reminder'
Installation Manual
(c) AAkonsult Pty Ltd 2014
Page 162
Installation Manual
11.3 Edit and test your template
Installation Manual
(c) AAkonsult Pty Ltd 2014
Page 163
Installation Manual
How to send out second automated reminders - contact
level
This workflow setup is required only if you wish to send out a second automated reminder to
members/subscribers.
Quick Steps:
1. Clone Workflow rule "2nd Renewal Reminder [ADD TIME BASED WORKFLOW]" and
rename to "2nd Renewal Reminder"
2. Add a Time-Dependant Action. Set it to fire 10 days after subscription end date (or time
period you would like).
Add Action - use existing workflow - "send 2nd Renewal Reminder Email"
3. Optionally, update the Email and/or PDF templates
Navigate to Setup > App Setup > Create > Workflow & Approvals >
Workflow Rules
Installation Manual
(c) AAkonsult Pty Ltd 2014
Page 164
Installation Manual
Select 'Workflow Rules'
Installation Manual
(c) AAkonsult Pty Ltd 2014
Page 165
Installation Manual
Read about Workflows and select 'Continue'
This page can be turned off.
Installation Manual
(c) AAkonsult Pty Ltd 2014
Page 166
Installation Manual
Scroll down and select '2nd Renewal Reminder [ADD TIME BASED
WORKFLOW]'
Open the circled rule
Installation Manual
(c) AAkonsult Pty Ltd 2014
Page 167
Installation Manual
Select 'Clone'
Re-name the workflow rule '2nd Renewal Reminder' and select 'Save & Next'
Installation Manual
(c) AAkonsult Pty Ltd 2014
Page 168
Installation Manual
Select the 'Add Time Trigger' button
Set Time Trigger to '10 days after Subscription End Date' and Save
Note: You can change the number of days as required if you wish to give more/less notice.
Installation Manual
(c) AAkonsult Pty Ltd 2014
Page 169
Installation Manual
Select the 'Add Workflow Action' button in the Time Dependent
Workflow Action section.
Installation Manual
(c) AAkonsult Pty Ltd 2014
Page 170
Installation Manual
Select 'Select Existing Action from the drop down menu
Select 'Email Alert' from the Choose Action Type drop down menu
Installation Manual
(c) AAkonsult Pty Ltd 2014
Page 171
Installation Manual
Add 'Email Alert: send 2nd Renewal Reminder Email' and Save
Select 'Done' button to complete the workflow rule
Select 'Activate' to begin the workflow process
Installation Manual
(c) AAkonsult Pty Ltd 2014
Page 172
Installation Manual
Set 'Default Workflow User' and Save
If a Default Workflow User has already been set, this step will be skipped.
Installation Manual
(c) AAkonsult Pty Ltd 2014
Page 173
Installation Manual
Review email template for 2nd Reminder [Setup > Administration
Setup> Communication Templates > Email Templates]
Installation Manual
(c) AAkonsult Pty Ltd 2014
Page 174
Installation Manual
Select AAkonsult Payments from the drop down Folder list
Scroll down to find 'Renewal - 2nd Reminder'
A template with a PDF attachment is also available.
Installation Manual
(c) AAkonsult Pty Ltd 2014
Page 175
Installation Manual
Edit and test your template
Installation Manual
(c) AAkonsult Pty Ltd 2014
Page 176
Installation Manual
How to send out first automated reminders - account
level
For first membership reminders at an Account (organisational) level.
The workflow setup process is very similar to the “WORKFLOW: First Renewal Reminder Contact
Level” and “WORKFLOW: Second Renewal Reminder Contact Level” processes described above.
With the exception of basing the template workflows from “1st Account Subscription Renewal
Reminder [ADD TIME BASED WORKFLOW]” and “2nd Account Subscription Renewal Reminder
[ADD TIME BASED WORKFLOW]”.
Quick Steps:
1. Clone Workflow rule "1st Account Subscription Renewal Reminder [ADD TIME BASED
WORKFLOW]" and rename to "1st Account Subscription Renewal Reminder"
2. Add Immediate Workflow Actions. Select Existing - Field Update "Set 1st Account Reminder"
3. Add a Time-Dependant Action. Set it to fire 30 days before Account Subscription End Dates
(or time period you would like).
Add Action - use existing workflow - "Email Alert: send 1st Account Subscription Renewal
Reminder Email"
Add Action - use existing workflow - "Field Update: set 2nd Reminder Due"
4. Optionally review and update the renewal reminder email templates.
1. Navigate to Setup > App Setup > Create > Workflow & Approvals >
Workflow Rules
Installation Manual
(c) AAkonsult Pty Ltd 2014
Page 177
Installation Manual
1.1 Select 'Workflow Rules'
Installation Manual
(c) AAkonsult Pty Ltd 2014
Page 178
Installation Manual
2. Read about Workflows and select 'Continue'
This page can be turned off.
Installation Manual
(c) AAkonsult Pty Ltd 2014
Page 179
Installation Manual
3. Select '1st Account Subscription Renewal Reminder [ADD TIME
BASED WORKFLOW]'
Open the circled rule
Installation Manual
(c) AAkonsult Pty Ltd 2014
Page 180
Installation Manual
4. Select 'Clone'
4.1 Re-name the workflow rule '1st Account Subscription' and select 'Save &
Next'
Installation Manual
(c) AAkonsult Pty Ltd 2014
Page 181
Installation Manual
5. Select the 'Add Workflow Action'
Select Add Workflow Action under the "Immediate Workflow Actions" Sections. Then 'Select Existing
Action'.
Installation Manual
(c) AAkonsult Pty Ltd 2014
Page 182
Installation Manual
5.1 Add existing field update - Set First Reminder Due
Then select Field Update from the Action Type and move "Set First Reminder" to the 'Selected
Actions' and Save.
Installation Manual
(c) AAkonsult Pty Ltd 2014
Page 183
Installation Manual
6. Select the 'Add Time Trigger' button
6.1 Set Time Trigger to '30 days before Subscription End Date' and Save
Note: You can change the number of days as required if you wish to give more/less notice.
Installation Manual
(c) AAkonsult Pty Ltd 2014
Page 184
Installation Manual
7. Select the 'Add Workflow Action' button in the Time Dependent
Workflow Action section.
Installation Manual
(c) AAkonsult Pty Ltd 2014
Page 185
Installation Manual
7.1 Select 'Select Existing Action from the drop down menu
7.2 Select 'Email Alert' from the Choose Action Type drop down menu
Installation Manual
(c) AAkonsult Pty Ltd 2014
Page 186
Installation Manual
7.3 Add 'Email Alert: send 1st Renewal Reminder Email' and Save
Installation Manual
(c) AAkonsult Pty Ltd 2014
Page 187
Installation Manual
8. Select the 'Add Workflow Action' button in the Time Dependent
Workflow Action section.
This Workflow Action is set as a trigger for the 2nd Reminder.
Installation Manual
(c) AAkonsult Pty Ltd 2014
Page 188
Installation Manual
8.1 Select 'Select Existing Action from the drop down menu
8.2 Select 'Field Update' from the Choose Action Type drop down menu
Installation Manual
(c) AAkonsult Pty Ltd 2014
Page 189
Installation Manual
8.3 Add 'Field Update: set 2nd Reminder Due' and press Save
9. Select the Add Immediate Workflow Actions Section
Installation Manual
(c) AAkonsult Pty Ltd 2014
Page 190
Installation Manual
9.1 Select 'Select Existing Action'
9.2 Select 'Field Update' from the Choose Action Type drop down menu
Installation Manual
(c) AAkonsult Pty Ltd 2014
Page 191
Installation Manual
9.3 Add 'Field Update: Set 1st Account Reminder'
10. Select 'Done' button to complete the workflow rule
Installation Manual
(c) AAkonsult Pty Ltd 2014
Page 192
Installation Manual
10.1 Select 'Activate' to begin the workflow process
10.2 Set 'Default Workflow User' and Save
If a Default Workflow User has already been set, this step will be skipped.
Installation Manual
(c) AAkonsult Pty Ltd 2014
Page 193
Installation Manual
11. Review email template for 1st Reminder [Setup > Administration
Setup> Communication Templates > Email Templates]
Installation Manual
(c) AAkonsult Pty Ltd 2014
Page 194
Installation Manual
11.1 Select AAkonsult Payments from the drop down Folder list
11.2 Scroll down to find 'Renewal - 1st Account Reminder'
A template with a pdf attachment is also available.
Installation Manual
(c) AAkonsult Pty Ltd 2014
Page 195
Installation Manual
11.3 Edit and test your template
Installation Manual
(c) AAkonsult Pty Ltd 2014
Page 196
Installation Manual
How to send out second automated reminders - account
level
For second membership reminders at an organisational level.
The workflow setup process is very similar to the “WORKFLOW: First Renewal Reminder Contact
Level” and “WORKFLOW: Second Renewal Reminder Contact Level” processes described above.
With the exception of basing the template workflows from “1st Account Subscription Renewal
Reminder [ADD TIME BASED WORKFLOW]” and “2nd Account Subscription Renewal Reminder
[ADD TIME BASED WORKFLOW]”.
Quick Steps:
1. Clone Workflow rule " 2nd Account Subscription Renewal Reminder [ADD TIME BASED
WORKFLOW]" and rename to "2nd Account Subscription Renewal Reminde"
2. Add a Time-Dependant Action. Set it to fire 10 days after Account Subscription End Dates (or
time period you would like).
Add Action - use existing workflow - "Email Alert: send 2nd Account Subscription Renewal
Reminder Email"
3. Optionally review and update the renewal reminder email templates.
Navigate to Setup > App Setup > Create > Workflow & Approvals >
Workflow Rules
Installation Manual
(c) AAkonsult Pty Ltd 2014
Page 197
Installation Manual
Select 'Workflow Rules'
Installation Manual
(c) AAkonsult Pty Ltd 2014
Page 198
Installation Manual
Read about Workflows and select 'Continue'
This page can be turned off.
Installation Manual
(c) AAkonsult Pty Ltd 2014
Page 199
Installation Manual
Scroll down and select '2nd Account Subscription Renewal Reminder
[ADD TIME BASED WORKFLOW]'
Open the circled rule
Installation Manual
(c) AAkonsult Pty Ltd 2014
Page 200
Installation Manual
Select 'Clone'
Re-name the workflow rule '2nd Account Subscription' and select 'Save & Next'
Installation Manual
(c) AAkonsult Pty Ltd 2014
Page 201
Installation Manual
Select the 'Add Time Trigger' button
Set Time Trigger to '10 days after Subscription End Date' and Save
Note: You can change the number of days as required if you wish to give more/less notice.
Installation Manual
(c) AAkonsult Pty Ltd 2014
Page 202
Installation Manual
Select the 'Add Workflow Action' button in the Time Dependent
Workflow Action section.
Installation Manual
(c) AAkonsult Pty Ltd 2014
Page 203
Installation Manual
Select 'Select Existing Action from the drop down menu
Select 'Email Alert' from the Choose Action Type drop down menu
Installation Manual
(c) AAkonsult Pty Ltd 2014
Page 204
Installation Manual
Add 'Email Alert: send 2nd Renewal Reminder Email' and Save
Select 'Done' button to complete the workflow rule
Select 'Activate' to begin the workflow process
Installation Manual
(c) AAkonsult Pty Ltd 2014
Page 205
Installation Manual
Set 'Default Workflow User' and Save
If a Default Workflow User has already been set, this step will be skipped.
Installation Manual
(c) AAkonsult Pty Ltd 2014
Page 206
Installation Manual
Review email template for 2nd Reminder [Setup > Administration
Setup> Communication Templates > Email Templates]
Installation Manual
(c) AAkonsult Pty Ltd 2014
Page 207
Installation Manual
Select AAkonsult Payments from the drop down Folder list
Scroll down to find 'Renewal - 2nd Account Reminder'
A template with a PDF attachment is also available.
Installation Manual
(c) AAkonsult Pty Ltd 2014
Page 208
Installation Manual
Edit and test your template
Installation Manual
(c) AAkonsult Pty Ltd 2014
Page 209
Installation Manual
How to activate the Membership Confirmation workflow
This workflow triggers the sending of a Subscriber/Membership Confirmation letter. This is used by
organisations that have a membership approval process and after the new member has been
approved, they then send out a confirmation letter.
The same process can be applied to organisational subscriptions. Activate 'Account Membership
Confirmation' instead.
Quick Steps - Contact Level memberships
1. Activate workflow: Membership Confirmation
2. Optionally, review the Email Template associated with the confirmation email
Quick Steps - Account Level memberships
1. Activate workflow: Account Membership Confirmation
2. Optionally, review the Email Template associated with the confirmation email
1. Navigate to Setup > App Setup > Create > Workflow & Approvals >
Workflow Rules
Installation Manual
(c) AAkonsult Pty Ltd 2014
Page 210
Installation Manual
2. Select 'Workflow Rules'
Installation Manual
(c) AAkonsult Pty Ltd 2014
Page 211
Installation Manual
3. Read about Workflows and select 'Continue'
This page can be turned off.
Installation Manual
(c) AAkonsult Pty Ltd 2014
Page 212
Installation Manual
4. Use the alphabetical look-up to find 'Membership Confirmation'
5. Select 'Activate'
Installation Manual
(c) AAkonsult Pty Ltd 2014
Page 213
Installation Manual
How to set up recurring payments
Please note, this workflow is ONLY required if you wish to use the Variable Recurring Payments
process and want to have the recurring payments processed automatically after they transactions
are generated.
This workflow is generally superseded by using the Regular Recurring Payment option (as defined
on the Payment Form related to the Merchant Facility Tab). This is the default option for all new
installations of AAkonsult Payments.
Salesforce already comes with workflow templates that cannot be altered. These instructions show
how to create a copy of the template which is then updated to suit AAkonsult Payment's functionality.
This workflow reminds administrators to restart the Recurring Payment Processor, such someone
stop the Recurring Payment Processor, but for some reason forgets to restart it within 1 day.
Salesforce already comes with workflow templates that cannot be altered. These instructions show
how to create a copy of the template which is then updated to suit AAkonsult Payment's functionality.
Quick Steps:
1. Clone Workflow rule "Payments - Recurring Process [ADD TIME BASED WORKFLOW]" and
rename to "Payments - Recurring Process"
2. Add a Time-Dependant Action. Set it to fire 1 hour after Rule Trigger date.
3. Add Action - Use existing workflow - "Field Update: set Status Payment Start"
1. Navigate to Setup > App Setup > Create > Workflow & Approvals >
Workflow Rules
Installation Manual
(c) AAkonsult Pty Ltd 2014
Page 214
Installation Manual
1.1 Select 'Workflow Rules'
Installation Manual
(c) AAkonsult Pty Ltd 2014
Page 215
Installation Manual
2. Read about Workflows and select 'Continue'
This page can be turned off.
Installation Manual
(c) AAkonsult Pty Ltd 2014
Page 216
Installation Manual
3. Scroll down to find 'Payments - Recurring Process [ADD TIME
BASED WORKFLOW]' and select
Open the circled rule
Installation Manual
(c) AAkonsult Pty Ltd 2014
Page 217
Installation Manual
4. Select 'Clone'
4.1 Re-name the workflow rule 'Payments - Recurring'
Installation Manual
(c) AAkonsult Pty Ltd 2014
Page 218
Installation Manual
5. Select the 'Add Time Trigger' button
5.1 Set Time Trigger to '1 Hours After Rule Trigger Date' and Save
Installation Manual
(c) AAkonsult Pty Ltd 2014
Page 219
Installation Manual
6. Select the 'Add Workflow Action' button
6.1 Select 'Select Existing Action from the drop down menu
Installation Manual
(c) AAkonsult Pty Ltd 2014
Page 220
Installation Manual
6.2 Select 'Field Update' from the Choose Action Type drop down menu
Installation Manual
(c) AAkonsult Pty Ltd 2014
Page 221
Installation Manual
6.3 Add 'Field Update: set Status Payment Start' and Save
7. Select 'Done' button to complete the workflow rule
Installation Manual
(c) AAkonsult Pty Ltd 2014
Page 222
Installation Manual
8. Select 'Activate' to begin the workflow process
Installation Manual
(c) AAkonsult Pty Ltd 2014
Page 223
Installation Manual
How to send out Recurring Payments Card Expiry and
Update Notifications
This workflow enables your organisation to automatically send out a notification to card holders when
their Credit Card is about to Expiry. They can then update their own details online saving you the
need to individually contact card holders.
Quick Steps:
•
Clone Workflow rule “Recurring Payment Card Expire [ADD TIME BASED WORKFLOW]"
and rename to “Recurring Payment Card Expire”
•
Add a Time-Dependant Action. Set it to fire 1 hour after Rule Trigger date.
•
Add Action – Use existing workflow – “Field Update: set Status Payment Start”
1. Navigate to Setup > App Setup > Create > Workflow & Approvals >
Workflow Rules
Installation Manual
(c) AAkonsult Pty Ltd 2014
Page 224
Installation Manual
1.1 Select ‘Workflow Rules’
Installation Manual
(c) AAkonsult Pty Ltd 2014
Page 225
Installation Manual
2. Scroll down to find ‘Recurring Payment Card Expire [ADD TIME
BASED WORKFLOW]’ and select
Installation Manual
(c) AAkonsult Pty Ltd 2014
Page 226
Installation Manual
2.1 Select ‘Clone’
2.2 Re-name the workflow rule ‘Recurring Payment Card Expire'
Installation Manual
(c) AAkonsult Pty Ltd 2014
Page 227
Installation Manual
3. Select the ‘Add Time Trigger’ button
3.1 Set Time Trigger to ‘7 Days before Card Expiry Date’ and Save
Installation Manual
(c) AAkonsult Pty Ltd 2014
Page 228
Installation Manual
3.2 Select the ‘Add Workflow Action’ button
Installation Manual
(c) AAkonsult Pty Ltd 2014
Page 229
Installation Manual
3.3 Select ‘Email Alert’ from the Choose Action Type drop down menu
1.
2.
3.
4.
Search "Email Alert"
Select "Email Alert: Send Credit Card is about to expire"
Move to selected actions
Save
3.4 Select ‘Done’ button to complete the workflow rule
Installation Manual
(c) AAkonsult Pty Ltd 2014
Page 230
Installation Manual
3.5 Select ‘Activate’ to begin the workflow process
Installation Manual
(c) AAkonsult Pty Ltd 2014
Page 231
Installation Manual
How to set up a recurring payment restart reminder
This workflow setup is required only if you are using recurring payments. The recurring payments
run a scheduler that can be easily started or stopped by an authorised person from the Merchant
Facility Tab. This time based workflow creates a reminder in case the processor is stopped and
someone forgets to restart it again.
Quick Steps:
1. Clone Workflow rule "Recurring Payments Restart Reminder [ADD TIME BASED
WORKFLOW]" and rename to "Recurring Payments Restart Reminder"
2. Add a Time-Dependant Action. Set it to fire 1 day after Rule Trigger date.
3. Add Action - Use existing workflow - "Email Alert: send reminders that Recurring Payments
Processor has been stopped…"
4. Update the recipient of the Email Action "Email Alert: send reminders that Recurring
Payments Processor has been stopped…" to be a contact in your organisation that will follow
up this email alert.
1. Navigate to Setup > App Setup > Create > Workflow & Approvals >
Workflow Rules
Installation Manual
(c) AAkonsult Pty Ltd 2014
Page 232
Installation Manual
1.1 Select 'Workflow Rules'
Installation Manual
(c) AAkonsult Pty Ltd 2014
Page 233
Installation Manual
2. Read about Workflows and select 'Continue'
This page can be turned off.
Installation Manual
(c) AAkonsult Pty Ltd 2014
Page 234
Installation Manual
3. Scroll down and select 'Recurring Payments Restart Reminder
[ADD TIME BASED WORKFLOW]'
This may be located on the second or third page.
Installation Manual
(c) AAkonsult Pty Ltd 2014
Page 235
Installation Manual
4. Select 'Clone'
4.1 Re-name the workflow rule 'Recurring Payments Restart' and select 'Save &
Next'
Installation Manual
(c) AAkonsult Pty Ltd 2014
Page 236
Installation Manual
5. Select the 'Add Time Trigger' button
5.1 Set Time Trigger to '1 day after Rule Trigger Date' and Save
Note: You can change the number of days as required if you wish to give more/less notice.
Installation Manual
(c) AAkonsult Pty Ltd 2014
Page 237
Installation Manual
6. Select the 'Add Workflow Action' button in the Time Dependent
Workflow Action section.
Installation Manual
(c) AAkonsult Pty Ltd 2014
Page 238
Installation Manual
6.1 Select 'Select Existing Action from the drop down menu
6.2 Select 'Email Alert' from the Choose Action Type drop down menu
Installation Manual
(c) AAkonsult Pty Ltd 2014
Page 239
Installation Manual
6.3 Add 'Email Alert: send reminders that Recurring Payments Processor has
been stopped…' and Save
Installation Manual
(c) AAkonsult Pty Ltd 2014
Page 240
Installation Manual
7. Select 'Edit' on the Actions list for the new rule
Installation Manual
(c) AAkonsult Pty Ltd 2014
Page 241
Installation Manual
7.1 Select 'User' from the 'Recipient Type' drop down list
Installation Manual
(c) AAkonsult Pty Ltd 2014
Page 242
Installation Manual
7.2 Add chosen Admin User to receive email notification and 'Save'
8. Select 'Done' button to complete the workflow rule
Installation Manual
(c) AAkonsult Pty Ltd 2014
Page 243
Installation Manual
8.1 Select 'Activate' to begin the workflow process
8.2 Set 'Default Workflow User' and Save
If a Default Workflow User has already been set, this step will be skipped.
Installation Manual
(c) AAkonsult Pty Ltd 2014
Page 244
Installation Manual
How to set up the batch payments process restart
reminder
The Batch Payment Processor is started from the “Start” button on the Merchant Facility and
processes new transactions every 10 minutes. This workflow is used if the Batch Payment Processor
has been running and has been turned off for more than 24 hours.
Quick Steps:
1. Clone Workflow rule " Batch Payments Process Restart Reminder [ADD TIME BASED
WORKFLOW]" and rename to "Batch Payments Process Restart Reminder"
2. Add a Time-Dependant Action. Set it to fire 1 day after Rule Trigger date.
3. Add Action - Use existing workflow - "Email Alert: send reminder that Batch Payments
Processor has been stopped and should be restarted [UPDATE WHO RECEIVES THIS
NOTIFICATION]"
4. Update the recipient of the Email Action "Email Alert: send reminder that Batch Payments
Processor has been stopped and should be restarted [UPDATE WHO RECEIVES THIS
NOTIFICATION]" to be a contact in your organisation that will follow up this email alert.
1. Navigate to Setup > App Setup > Create > Workflow & Approvals >
Workflow Rules
Installation Manual
(c) AAkonsult Pty Ltd 2014
Page 245
Installation Manual
1.1 Select 'Workflow Rules'
Installation Manual
(c) AAkonsult Pty Ltd 2014
Page 246
Installation Manual
2. Read about Workflows and select 'Continue'
This page can be turned off.
Installation Manual
(c) AAkonsult Pty Ltd 2014
Page 247
Installation Manual
3. Scroll down and select 'Batch Payments Process Restart Reminder
[ADD TIME BASED WORKFLOW]'
This may be located on the second page.
Installation Manual
(c) AAkonsult Pty Ltd 2014
Page 248
Installation Manual
4. Select 'Clone'
4.1 Re-name the workflow rule 'Batch Payments Process Restart Reminder' and
select 'Save & Next'
Installation Manual
(c) AAkonsult Pty Ltd 2014
Page 249
Installation Manual
5. Select the 'Add Time Trigger' button
5.1 Set Time Trigger to '1 day after Rule Trigger Date' and 'Save'
Installation Manual
(c) AAkonsult Pty Ltd 2014
Page 250
Installation Manual
6. Select the 'Add Workflow Action' button in the Time Dependent
Workflow Action section.
Installation Manual
(c) AAkonsult Pty Ltd 2014
Page 251
Installation Manual
6.1 Select 'Select Existing Action from the drop down menu
6.2 Select 'Email Alert' from the Choose Action Type drop down menu
Installation Manual
(c) AAkonsult Pty Ltd 2014
Page 252
Installation Manual
6.3 Add 'Email Alert: send reminder that Batch Payments Processor has been
stopped and should be restarted …' and 'Save'
Scroll across image to see actions.
Installation Manual
(c) AAkonsult Pty Ltd 2014
Page 253
Installation Manual
7. Select 'Edit' on the Actions list for the new rule
Installation Manual
(c) AAkonsult Pty Ltd 2014
Page 254
Installation Manual
7.1 Select 'User' from the 'Recipient Type' drop down list
Installation Manual
(c) AAkonsult Pty Ltd 2014
Page 255
Installation Manual
7.2 Add chosen Admin User to receive email notification and 'Save'
8. Select 'Done' button to complete the workflow rule
Installation Manual
(c) AAkonsult Pty Ltd 2014
Page 256
Installation Manual
8.1 Select 'Activate' to begin the workflow process
8.2 Set 'Default Workflow User' and Save
If a Default Workflow User has already been set, this step will be skipped.
Installation Manual
(c) AAkonsult Pty Ltd 2014
Page 257
Installation Manual
How to set up the batch payments process not running
notification
The Batch Payment Processor is started from the “Start” button on the Merchant Facility and
processes new transactions every 10 minutes. This workflow is used to notify if the Batch Payments
Processor has been started, but for some reason is no longer working. This scenario should never
happen, but sometimes can be caused by Salesforce.com maintenance.
If the Recurring Payment Processor is running, it will do daily checks to ensure the Batch Processor
is running if it should be running. These checks should reduce the need to have this workflow
reminder rule setup.
Quick Steps:
1. Clone Workflow rule " Batch Payment Processor Not Running [ADD TIME BASED
WORKFLOW]" and rename to "Batch Payment Processor Not Running"
2. Add a Time-Dependant Action. Set it to fire 1 day after Rule Trigger date.
3. Add Action - Use existing workflow - "Email Alert: send reminder that Batch Payments
Processor has been stopped and should be restarted [UPDATE WHO RECEIVES THIS
NOTIFICATION]"
4. Update the recipient of the Email Action "Email Alert: send reminder that Batch Payments
Processor has been stopped and should be restarted [UPDATE WHO RECEIVES THIS
NOTIFICATION]" to be a contact in your organisation that will follow up this email alert.
Navigate to Setup > App Setup > Create > Workflow & Approvals >
Workflow Rules
Installation Manual
(c) AAkonsult Pty Ltd 2014
Page 258
Installation Manual
Select 'Workflow Rules'
Installation Manual
(c) AAkonsult Pty Ltd 2014
Page 259
Installation Manual
Read about Workflows and select 'Continue'
This page can be turned off.
Installation Manual
(c) AAkonsult Pty Ltd 2014
Page 260
Installation Manual
Scroll down and select 'Batch Payments Processor Not Running [ADD
TIME BASED WORKFLOW]'
This may be located on the second page.
Installation Manual
(c) AAkonsult Pty Ltd 2014
Page 261
Installation Manual
Select 'Clone'
Re-name the workflow rule 'Batch Payment Processor Not Running' and select
'Save & Next'
Installation Manual
(c) AAkonsult Pty Ltd 2014
Page 262
Installation Manual
Select the 'Add Time Trigger' button
Set Time Trigger to '1 day after Last Batch Processor Run' and 'Save'
Installation Manual
(c) AAkonsult Pty Ltd 2014
Page 263
Installation Manual
Select the 'Add Workflow Action' button in the Time Dependent
Workflow Action section.
Installation Manual
(c) AAkonsult Pty Ltd 2014
Page 264
Installation Manual
Select 'Select Existing Action from the drop down menu
Select 'Email Alert' from the Choose Action Type drop down menu
Installation Manual
(c) AAkonsult Pty Ltd 2014
Page 265
Installation Manual
Add 'Email Alert: send reminder that Batch Payments Processor has been
stopped and should be restarted …' and 'Save'
Scroll across image to see actions.
Installation Manual
(c) AAkonsult Pty Ltd 2014
Page 266
Installation Manual
Select 'Edit' on the Actions list for the new rule
Installation Manual
(c) AAkonsult Pty Ltd 2014
Page 267
Installation Manual
Select 'User' from the 'Recipient Type' drop down list
Installation Manual
(c) AAkonsult Pty Ltd 2014
Page 268
Installation Manual
Add chosen Admin User to receive email notification and 'Save'
Select 'Done' button to complete the workflow rule
Installation Manual
(c) AAkonsult Pty Ltd 2014
Page 269
Installation Manual
Select 'Activate' to begin the workflow process
Set 'Default Workflow User' and Save
If a Default Workflow User has already been set, this step will be skipped.
Installation Manual
(c) AAkonsult Pty Ltd 2014
Page 270
Installation Manual
How to activate Refund approvals
AAkonsult Payments comes with a basic approval process for refunds. By default, refund approvals
process is not enabled and this procedure walks you through how you can do this.
If you wish to have multi-level and more advanced approvals, you can setup Approval Workflows to
do this. The final approval step simply needs to do a field update that checks the "Approved"
checkbox on the Payment Txn. For setting up Approval workflows, please consult the Salesforce
online help, or alternatively just use the more simpler version enabled in this procedure.
For organisations wanting to use Refund Approval Processes, we recommend you review the
internal security setup procedure. You need to ensure that only approvals have update access to the
Approval field on the Payment Txn Object.
Quick Steps:
1. Locate workflow: Refund Approval
2. Update the recipient of the workflow email
3. Enable this workflow
1. Navigate to Setup > App Setup > Create > Workflow & Approvals >
Workflow Rules
Installation Manual
(c) AAkonsult Pty Ltd 2014
Page 271
Installation Manual
2. Select 'Workflow Rules'
Installation Manual
(c) AAkonsult Pty Ltd 2014
Page 272
Installation Manual
3. Use the alphabetical look-up to find 'Refund Approval', and Activate
4. Click into the Refund Workflow Approval and into the Email Alert
Installation Manual
(c) AAkonsult Pty Ltd 2014
Page 273
Installation Manual
5. Edit the Email Alert - Send Refund Approval Email request
Installation Manual
(c) AAkonsult Pty Ltd 2014
Page 274
Installation Manual
6. Update the recipient(s) and Save
Installation Manual
(c) AAkonsult Pty Ltd 2014
Page 275
Installation Manual
How to activate New Online Payment Notification
Turn this workflow on if you wish to be notified of all new online payments (exception memberships).
Quick Steps:
1. Locate workflow: New Online Payment Notification
2. Update the recipient of the workflow email
3. Enable this workflow
1. Navigate to Setup > App Setup > Create > Workflow & Approvals >
Workflow Rules
Installation Manual
(c) AAkonsult Pty Ltd 2014
Page 276
Installation Manual
2. Select 'Workflow Rules'
Installation Manual
(c) AAkonsult Pty Ltd 2014
Page 277
Installation Manual
3. Use the alphabetical look-up to find 'New Online Payment
Notification', and Activate
Installation Manual
(c) AAkonsult Pty Ltd 2014
Page 278
Installation Manual
4. Click into the New Online Payment Notification and into the Email
Alert
Installation Manual
(c) AAkonsult Pty Ltd 2014
Page 279
Installation Manual
5. Edit the Email Alert - Send Send an internal notification that a new
online payment has been made
Installation Manual
(c) AAkonsult Pty Ltd 2014
Page 280
Installation Manual
6. Update the recipient(s) and Save
Installation Manual
(c) AAkonsult Pty Ltd 2014
Page 281
Installation Manual
How to activate New Online Membership Payment
Notification
Turn this workflow on if you wish to be notified of all new Membership/Subscription Payments are
made.
Quick Steps:
1. Locate workflow: New Online Membership Payment Notification
2. Update the recipient of the workflow email
3. Enable this workflow
1. Navigate to Setup > App Setup > Create > Workflow & Approvals >
Workflow Rules
Installation Manual
(c) AAkonsult Pty Ltd 2014
Page 282
Installation Manual
2. Select 'Workflow Rules'
Installation Manual
(c) AAkonsult Pty Ltd 2014
Page 283
Installation Manual
3. Use the alphabetical look-up to find 'New Online Membership
Payment Notification', and Activate
Installation Manual
(c) AAkonsult Pty Ltd 2014
Page 284
Installation Manual
4. Click into the New Online Membership Payment Notification and
into the Email Alert
Installation Manual
(c) AAkonsult Pty Ltd 2014
Page 285
Installation Manual
5. Edit the Email Alert - Send an internal notification that a new online
MEMBERSHIP payment has been made
Installation Manual
(c) AAkonsult Pty Ltd 2014
Page 286
Installation Manual
6. Update the recipient(s) and Save
Installation Manual
(c) AAkonsult Pty Ltd 2014
Page 287
Installation Manual
Buttons - Optional
Installation Manual
(c) AAkonsult Pty Ltd 2014
Page 288
Installation Manual
How to create a button on the Accounts tab
Cash, Cheque, Money Orders and Credit Card payment buttons are available for Accounts,
Contacts, Opportunities and Campaign Member tabs. For other objects and custom objects, custom
buttons can be created by administrators. To see how to do this, please see the salesforce.com
online help.
Quick Steps:
1. Edit the Account Page Layout and drag/drop the following buttons onto the Page Layout
Credit Card Payment Button - To launch the Credit Card payment/checkout form and link the
transaction with the account (Optionally, you can set this to include Manual Payments as
well)
Manual Payment Button - To launch the Manual Payment form and pre-fill/link with Account
Details.
Make Payment Button - Enables Credit Card Payment or Manual Payment. Also allows for
selection of merchant facility and payment form, plus allows for token charge payments and
membership/subscription renewal payments.
1. Navigate to Setup > App Setup > Customize > Accounts > Page
Layouts
Installation Manual
(c) AAkonsult Pty Ltd 2014
Page 289
Installation Manual
2. Select 'Edit' next to the page layout that you would like to add the
buttons to
3. Select 'Buttons' from the list under 'Fields'
Installation Manual
(c) AAkonsult Pty Ltd 2014
Page 290
Installation Manual
4. Drop & drag the 'Credit Card Payment' and 'Manual Payment'
buttons onto the page layout
You can choose buttons to suit.
5. Save
Installation Manual
(c) AAkonsult Pty Ltd 2014
Page 291
Installation Manual
How to create a button on the Contacts tab
Cash, Cheque, Money Orders and Credit Card payment buttons are available for Accounts,
Contacts, Opportunities and Campaign Member tabs. For other objects and custom objects, custom
buttons can be created by administrators. To see how to do this, please see the salesforce.com
online help.
Quick Steps:
1. Edit the Contact Page Layout and drag/drop the following buttons onto the Page Layout
Credit Card Payment Button - To launch the Credit Card payment/checkout form and link the
transaction with the Contact (Optionally, you can set this to include Manual Payments as
well)
Manual Payment Button - To launch the Manual Payment form and pre-fill/link with Contact
Details.
Make Payment Button - Enables Credit Card Payment or Manual Payment. Also allows for
selection of merchant facility and payment form, plus allows for token charge payments and
membership/subscription renewal payments.
Annual Statement Button - Generates a statement for all transactions relating to the Contacts
- Account for the last financial year.
Installation Manual
(c) AAkonsult Pty Ltd 2014
Page 292
Installation Manual
Navigate to Setup > App Setup > Customize > Contacts > Page
Layouts
Installation Manual
(c) AAkonsult Pty Ltd 2014
Page 293
Installation Manual
Select 'Edit' next to the page layout that you would like to add the
buttons to
Select 'Buttons' from the list under 'Fields'
Installation Manual
(c) AAkonsult Pty Ltd 2014
Page 294
Installation Manual
Drop & drag the 'Credit Card Payment' and 'Manual Payment' buttons
onto the page layout
You can choose buttons to suit.
Save
Installation Manual
(c) AAkonsult Pty Ltd 2014
Page 295
Installation Manual
How to create a button on the Opportunity tab
Cash, Cheque, Money Orders and Credit Card payment buttons are available for Accounts,
Contacts, Opportunities and Campaign Member tabs. For other objects and custom objects, custom
buttons can be created by administrators. To see how to do this, please see the salesforce.com
online help.
Quick Steps:
1. Edit the Opportunity Page Layout and drag/drop the following buttons onto the Page Layout
Credit Card Payment Button - To launch the Credit Card payment/checkout form and link the
transaction with the Opportunity (Optionally, you can set this to include Manual Payments as
well)
Manual Payment Button - To launch the Manual Payment form and pre-fill/link with
Opportunity Details.
Make Payment Button - Enables Credit Card Payment or Manual Payment. Also allows for
selection of merchant facility and Payment Form.
Navigate to Setup > App Setup > Customize > Opportunity > Page
Layouts
Installation Manual
(c) AAkonsult Pty Ltd 2014
Page 296
Installation Manual
Select 'Edit' next to the page layout that you would like to add the
buttons to
Select 'Buttons' from the list under 'Fields'
Installation Manual
(c) AAkonsult Pty Ltd 2014
Page 297
Installation Manual
Drop & drag the 'Credit Card Payment' and 'Manual Payment' buttons
onto the page layout
You can choose buttons to suit.
Save
Installation Manual
(c) AAkonsult Pty Ltd 2014
Page 298
Installation Manual
How to create a button on the Campaign tab
Cash, Cheque, Money Orders and Credit Card payment buttons are available for Accounts,
Contacts, Opportunities and Campaign Members tabs. For other objects and custom objects,
custom buttons can be created by administrators. To see how to do this, please see the
salesforce.com online help.
For Campaigns, there are buttons and links to manage events registration and annual statements.
Quick Steps:
1. Edit the Campaign Page Layout and drag/drop the following buttons onto the Page Layout
Add Event Attendee Button - Launches the Events Registration button and allows for new
attendees to be added
Statement Generation Button - Generates statements and stores annual statement PDFs
against the related contacs
Statement Send Button - Generates and sends the annual statement to the related contact.
2. Edit the Campaign Pay Layout and drag/drop the following customer links onto the Page
Layout. This links show related Event Attendee reports
Event Attendee Group List
Event Attendee List
Installation Manual
(c) AAkonsult Pty Ltd 2014
Page 299
Installation Manual
1. Navigate to Setup > App Setup > Customize > Campaigns > Page
Layouts
2. Select 'Edit' next to the page layout that you would like to add the
buttons to
Installation Manual
(c) AAkonsult Pty Ltd 2014
Page 300
Installation Manual
3. Select 'Buttons' from the list under 'Fields'
4. Drop & drag the buttons onto the page layout
Add Event Attendees provides a way of adding new attendees to an Event.
Statement Generation enables the generation of Annual Statements for all payments/donations of
contacts associated with the Campaign
Installation Manual
(c) AAkonsult Pty Ltd 2014
Page 301
Installation Manual
5. Add Custom Links
The custom links contains links to Campaign specific reports that will show lists of attendees for the
Campaign
6. Save
Installation Manual
(c) AAkonsult Pty Ltd 2014
Page 302
Installation Manual
How to create a button on the Campaign Member
Cash, Cheque, Money Orders and Credit Card payment buttons are available for Accounts,
Contacts, Opportunities and Campaign Members tabs. For other objects and custom objects,
custom buttons can be created by administrators. To see how to do this, please see the
salesforce.com online help.
Quick Steps:
1. Edit the Campaign Member Page Layout and drag/drop the following buttons onto the Page
Layout
Credit Card Payment Button - To launch the Credit Card payment/checkout form and link the
transaction with the Campaign Member - Contact (Optionally, you can set this to include
Manual Payments as well)
Manual Payment Button - To launch the Manual Payment form and pre-fill/link with Campaign
Member - Contact Details.
Annual Statement Button - Generates a statement for the related contact using the
parameters last entered at the Campaign - Annual Statement Generation
Installation Manual
(c) AAkonsult Pty Ltd 2014
Page 303
Installation Manual
1. Navigate to Setup > App Setup > Customize > Campaigns >
Campaign Members > Page Layouts
Installation Manual
(c) AAkonsult Pty Ltd 2014
Page 304
Installation Manual
2. Select 'Edit' next to the page layout that you would like to add the
buttons to
3. Select 'Buttons' from the list under 'Fields'
Installation Manual
(c) AAkonsult Pty Ltd 2014
Page 305
Installation Manual
4. Drop & drag buttons onto the page layout
5. Save
Installation Manual
(c) AAkonsult Pty Ltd 2014
Page 306
Installation Manual
How to create a credit card button on the Persons
Account tab
Salesforce.com does not currently allow for Buttons to be packaged for Person Accounts.
Administrators therefore need to create their own.
Quick steps:
1. Add a new button called "Credit Card Payment" to the Account buttons and links. Use the
URL value of /apex/
AAkPay__mcheckout?aId={!Account.Id}&MailingStreet={!Account.PersonMailingStreet}&MailingSta
2. Add new button to the Person Account Page Layout
Navigate to Setup > App Setup > Customize > Accounts > Button,
Links and Actions
Installation Manual
(c) AAkonsult Pty Ltd 2014
Page 307
Installation Manual
Select 'New Button or Link'
Fill in the details for the new button
1.
2.
3.
4.
Create a Label for your new button. This will automatically be the Name
Select 'Detail Page Link' for Display Type
Select 'Display in new window' for Behavior
Select 'URL' for the Content Source
Installation Manual
(c) AAkonsult Pty Ltd 2014
Page 308
Installation Manual
Installation Manual
(c) AAkonsult Pty Ltd 2014
Page 309
Installation Manual
Cut and paste the following code into the text field
/apex/
AAkPay__checkout?aId={!Account.Id}&MailingStreet={!Account.PersonMailingStreet}&MailingState={!Acco
Add the new button to your page layout
Installation Manual
(c) AAkonsult Pty Ltd 2014
Page 310
Installation Manual
Navigate to Setup > App Setup > Customize > Accounts > Person Accounts >
Page Layouts
Select 'Edit'
Installation Manual
(c) AAkonsult Pty Ltd 2014
Page 311
Installation Manual
Drop and drag the buttons into the page layout
Save
Installation Manual
(c) AAkonsult Pty Ltd 2014
Page 312
Installation Manual
How to create a manual payment button on the Persons
Account tab
Salesforce.com does not currently allow for Buttons to be packaged for Person Accounts.
Administrators therefore need to create their own.
Quick steps:
1. Add a new button called "Manual Payments" to the Account buttons and links. Use the URL
value of /apex/
AAkPay__manualPayment?aId={!Account.Id}&MailingStreet={!Account.PersonMailingStreet}&Mailin
2. Add new button to the Person Account Page Layout
1. Navigate to Setup > App Setup > Customize > Accounts > Button,
Links and Actions
Installation Manual
(c) AAkonsult Pty Ltd 2014
Page 313
Installation Manual
2. Select 'New Button or Link'
3. Fill in the details for the new button
1.
2.
3.
4.
Create a Label for your new button. This will automatically be the Name
Select 'Detail Page Link' for Display Type
Select 'Display in new window' for Behavior
Select 'URL' for the Content Source
Installation Manual
(c) AAkonsult Pty Ltd 2014
Page 314
Installation Manual
Installation Manual
(c) AAkonsult Pty Ltd 2014
Page 315
Installation Manual
4. Cut and paste the following code into the text field
/apex/
AAkPay__manualPayment?aId={!Account.Id}&MailingStreet={!Account.PersonMailingStreet}&MailingState
5. Add the new button to your page layout
Installation Manual
(c) AAkonsult Pty Ltd 2014
Page 316
Installation Manual
5.1 Navigate to Setup > App Setup > Customize > Accounts > Person Accounts
> Page Layouts
5.2 Select 'Edit'
Installation Manual
(c) AAkonsult Pty Ltd 2014
Page 317
Installation Manual
5.3 Drop and drag the buttons into the page layout
5.4 Save
Installation Manual
(c) AAkonsult Pty Ltd 2014
Page 318
Installation Manual
How to create a button on any object
You may link AAkonsult to almost any object in salesforce.com, including Custom Objects.
a) Create a lookup from Payment Txn’s Object to your destination Object.
b) Create a Custom Button(s)
c) Add these to the page layout.
Note: For an example, if you wanted to allow for payments with leads, then a new field of type
lookup, would be added to the Payment Txn’s (AAkPay__Payment_Txn__c) Object.
Installation Manual
(c) AAkonsult Pty Ltd 2014
Page 319
Installation Manual
How to create custom buttons
The button must be created on the destination object. In the above example, the button would be
created on the leads Object.
Use the following URL's
• For Credit Card Payments, “/apex/
AAkPay__Checkout?customRefFieldName={xxxxx}&customRefFieldId ={yyyyy}"
• For Manual Payments “/apex/
AAkPay__manualPayment?customRefFieldName={xxxxx}&customRefFieldId ={yyyyy}"
Installation Manual
(c) AAkonsult Pty Ltd 2014
Page 320
Installation Manual
Where {xxxxx} is the internal fieldname that was created on Payment_Txn__c object, for example
lead__c
Where {yyyyy} is a record id of the object that is being linked to. In the lead example, this would be
the button merge field of {!Lead.Id}
Installation Manual
(c) AAkonsult Pty Ltd 2014
Page 321
Installation Manual
How to add Make Payment button
The Make Payment Button is a button the can be added to Accounts, Contacts, Opportunities.
It is designed to work in conjunction with Publisher Actions making it suitable for Salesforce1 Mobile
(non native mode)
Make Payment Button provides a launch pad for four existing functions. These are:
1.
2.
3.
4.
Credit Card/Checkout Form
Manual Payment Form
Token Charge Form
Membership/Subscription Renewal
Only the available options will be shown. If for example, there is no related Recurring Payment, then
Token Charge will not be available.
Make Payment includes a number of URL parameter options to allow for some fine tuning. Please
see the Make Payment URL Options for more info.
1. Adding Make Payments Button to Accounts
Locate an Account in your organisation, click into the Account Detail, then click on the Edit Layout
Link.
Alternatively, navigate to setup > Customize > Accounts > Page Layouts. Click edit next to the
layout you wish to edit.
Installation Manual
(c) AAkonsult Pty Ltd 2014
Page 322
Installation Manual
1.1 Add Make Payment Button to layout
1. Click on the Buttons Link
2. Drag/Drop Make Payments Button onto your form
3. Press Save button
2. Adding Make Payments Button to Contacts
Locate an Account in your organisation, click into the Account Detail, then click on the Edit Layout
Link.
Installation Manual
(c) AAkonsult Pty Ltd 2014
Page 323
Installation Manual
Alternatively, navigate to setup > Customize > Contacts > Page Layouts. Click edit next to the layout
you wish to edit.
2.1 Add Make Payment Button to layout
1. Click on the Buttons Link
2. Drag/Drop Make Payments Button onto your form
3. Press Save button
Installation Manual
(c) AAkonsult Pty Ltd 2014
Page 324
Installation Manual
3. Adding Make Payments Button to Opportunities
Locate an Account in your organisation, click into the Account Detail, then click on the Edit Layout
Link.
Alternatively, navigate to setup > Customize > Opportunities > Page Layouts. Click edit next to the
layout you wish to edit.
3.1 Add Make Payment Button to layout
1. Click on the Buttons Link
2. Drag/Drop Make Payments Button onto your form
Installation Manual
(c) AAkonsult Pty Ltd 2014
Page 325
Installation Manual
3. Press Save button
4. Custom Make Payment or Adding to any Object
1. Navigate to setup and section for adding a new button. For example on Opportunities,
navigate to setup > Customize > Opportunities > Buttons and Links.
2. Press the New Button on Link button
Installation Manual
(c) AAkonsult Pty Ltd 2014
Page 326
Installation Manual
4.1 Add custom make payment button details
1. Give the button a name
2. Select button if you wish to use a button on the page
3. Select to open in a new window (or you can use existing window with no sidebars or
headers)
4. Enter the URL of "/apex/AAkPay__MakePayment"
You can also use Make Payment URL Parameters here, such as ?hideCheckout=true. So
the value entered would be /apex/AAkPay__ManualPayment?hideCheckout=true
See Make Payment URL Parameters for more information.
5. Save the form. Don't forget to add the new button to the page layout (See the previous
sections for adding make payments to the page layouts for guidance)
5. Make Payment URL Parameters
The Make Payment URL Parameters provide options that enable you to tailor how the button
operations.
There are entered as part of the URL when creating a custom make payment button.
Options are:
•
•
•
•
•
•
oppid=xxxx : Links the make payment to an opportunity id (xxx = an Opportunity Record Id)
aid=xxx : Links the make payment to a Account id (xxx = an Account Record Id)
cid=xxx: Links the make payment to a Contact id (xxx = an Contact Record Id)
hideCheckout=true: Hides any checkout (Credit Card) options from being displayed
hideManual=true : Hides the manual payment options from being displayed
hideRecurring=true : Hides the recurring payment options from being displayed
Installation Manual
(c) AAkonsult Pty Ltd 2014
Page 327
Installation Manual
• hideRenewal=true: Hides any subscription/membership options from being displayed
• paymentFor=xxxx : passes in the paymentFor reason. Especially useful when doing a Token
Charge from an opportunity
• Amount=nnn : passes in the amount for the payment
Installation Manual
(c) AAkonsult Pty Ltd 2014
Page 328
Installation Manual
How to setup Import Files
Email Listner
Installation Manual
(c) AAkonsult Pty Ltd 2014
Page 329
Installation Manual
Email to Import File
Import Files supports 3 modes of uploading files, these are:
1. Upload from file on your PC/Mac
2. Copy/Paste
3. Email to Salesforce
In order to use the Import Files email-to-salesforce, you will need to setup the following:
• An Apex Email Listener for the importFileEmailListener Class
This procedure takes you through how to setup the email listener.
1. Add a new Email Service
Under Setup > Develop > Email Service. Click the New Email Service button
Installation Manual
(c) AAkonsult Pty Ltd 2014
Page 330
Installation Manual
2. Link Email service to importFileEmailListener
1. Ensure you link the service to the Apex Class: importFileEmailListener
2. Accept all attachments
3. Put authorised individual emails and/or your companies domain here. If the email is
forwarded from a different email then it will not be accepted.
4. Requeue if you go over your daily limit
5. Enable Error Routing
6. Send any errors to a support person in your organisation.
Installation Manual
(c) AAkonsult Pty Ltd 2014
Page 331
Installation Manual
Press Save and New Email address
3. Save the email address
Installation Manual
(c) AAkonsult Pty Ltd 2014
Page 332
Installation Manual
4. Copy email address for use
This is the email address that you can email details into
Installation Manual
(c) AAkonsult Pty Ltd 2014
Page 333
Installation Manual
5. Send a test email
Send an email to the email address created in the previous step.
TIP: If you include in the body of the email "AAkPay__Import_Type__c: XXXX" where XXXX is the
Import File objects - Import File Type picklist value, then this is the value that will be used for the
upload.
For the technically minded, if you use the api_file_name:xxxx then this will work upload/apply this
value for any field on the Import File Object
Installation Manual
(c) AAkonsult Pty Ltd 2014
Page 334
Installation Manual
High Data Volume
Installation Manual
(c) AAkonsult Pty Ltd 2014
Page 335
Installation Manual
How to deal with high volume data
1. Contact Salesforce.com if you know your organization will be using
high volume account or contact data
High volume data = Account or Contact data over 100,000
2. Request custom indexing for the following fields:
• Accounts: AAkPay__ Account_Search_Name__c
• Contacts: AAkPay__ Phone_Search__c, AAkPay__MobilePhone_Search__c
3. If custom indexing is not set up, check for the following error
message
“System.QueryException: Non-selective query against large object type (more than 100000 rows).
Consider an indexed filter or contact salesforce.com about custom indexing.”
Installation Manual
(c) AAkonsult Pty Ltd 2014
Page 336
Installation Manual
Shopify
Installation Manual
(c) AAkonsult Pty Ltd 2014
Page 337
Installation Manual
How to set up Shopify
The Shopify Integration allows organisations to create an online shopping cart and to have orders
that have been paid for details stored in salesforce.com. This provides a complete view of all
purchases that a customer has made with your organisation.
1. Set up a Shopify account
1.1 Navigate to the Spotify website (link below)
http://www.shopify.com/?ref=aakonsult-pty-ltd
1.2 Set-up an account that suits your organization's needs
2. Obtain a license key from AAkonsult
Contact AAkonsult - [email protected]
Installation Manual
(c) AAkonsult Pty Ltd 2014
Page 338
Installation Manual
2.1 Enter your license details into the Merchant Facilities tab
3. Find the 'webhook' to link AAkonsult Payments to Shopify
3.1 Navigate to the Merchant Facilities Tab
3.2 Scroll down to 'Payment' Types and select the one you would like to
integrate with Shopify
3.3 Scroll down and take note of the 'Shopify Webhook' URL
This URL will be required in your Shopify set up.
4. Integrate your Shopify account
Login to your Shopify account
Installation Manual
(c) AAkonsult Pty Ltd 2014
Page 339
Installation Manual
4.1 Navigate to Settings > Notifications
4.2 Scroll down to 'Webhooks' and select 'Create a webhook'
Installation Manual
(c) AAkonsult Pty Ltd 2014
Page 340
Installation Manual
4.3 Fill in details and select 'Save webhook'
1. Select 'Order payment' from the drop down menu
2. Select JSON format
3. Copy & Paste the special URL from your AAkonsult Merchant Facilities tab
5. Test the integration
5.1 Select 'send test notification'
5.2 Check for a new transaction in the Payments Txn tab (AAkonsult Payments)
A new entry from 'Bob Biller' from 'My Company' will be created.
This could take a few minutes.
Installation Manual
(c) AAkonsult Pty Ltd 2014
Page 341
Installation Manual
Website Setup
Installation Manual
(c) AAkonsult Pty Ltd 2014
Page 342
Installation Manual
How to add your form to your website
The AAkonsult Payments forms can be added to your website in a number of ways. These methods
available inlcude:
• Embedded using an iframe
• Embedded using a lightbox
• Launched from a button or a link
If choosing to embed the form, you may need to consider getting a security certificate for your
website as the AAkonsult Payment form must be httpS for secure and if the surrounding website is
not, then this may cause the user to receive a message saying mixed secure and non secure
content. It might also lead the user to the perception that the form is not secure as they cannot see
the secure padlock (even though the AAkonsult Payments part is)
Please consult the User Manual for more details in the following sections:
• How to publish a web form using URL tokens (preferred method)
• How to publish a web form
Installation Manual
(c) AAkonsult Pty Ltd 2014
Page 343
Installation Manual
How to provide accessibility and text resizing
If your website provides the ability for users to adjust text sizes, then you can interface this with
AAkonsult Payments.
This will require a technical resource to assist with the setup. In summary,we are using the
javascript postMessage listener in the iframe to receive details of the user selected font size.
The following external forms support font resizing:
• Checkout
Installation Manual
(c) AAkonsult Pty Ltd 2014
Page 344
Installation Manual
1. Website communicating with iframed form
In the above example, the font size selector (1) is part of the main website CMS. The AAkonsult
Payments form (2) is iframed in.
Installation Manual
(c) AAkonsult Pty Ltd 2014
Page 345
Installation Manual
2. postMessage Javascript setup
An example of the javascript code using the sample page is shown above.
1. The iframe of the AAkonsult Payments Form. Note the id="theFrame" tag
2. The <div>'s show the text size and have an onclick event. This event calls the
"changemysize" function and passes in the size. Note, the size is in "em".
3. The change my function creates an object with the font size that was passed in. This then
converts the object into a JSON string
4. postMessage is used to communicate with the iframe. Note the iframe element is retrieved
by the "theFrame" id attribute as noted in step 1.
Installation Manual
(c) AAkonsult Pty Ltd 2014
Page 346
Installation Manual
3. Merchant Facility Our Website setup
For security reasons, the website that is hosting using the postMessage must be secure and using
https.
Also, the post message is checking the origin and this MUST match the domain that is passing in the
new font size. This domain is setup inside Salesforce on the Merchant Facility tab.
To do this update, in Salesforce navigate to the "+" at the end of the tabs, then click into Merchant
Facility. Press GO button and for each Merchant Facility, scroll down to the Receipting section and
update the "Our Website" field to have your domain. Please be sure to include the "https" part.
Installation Manual
(c) AAkonsult Pty Ltd 2014
Page 347
Installation Manual
Implimentation Tips
Installation Manual
(c) AAkonsult Pty Ltd 2014
Page 348
Installation Manual
How to Upload Recurring Credit Card Payments
This procedure is for organisations that already have a list of regular Credit Card donors / payments
and want now use AAkonsult Payments to process them.
This guide is for intermediate or advanced administrator level. Should you need assistance, you can
engage AAkonsult Professional Services by contact us at [email protected]
1. Create Recurring Payment Records
Import details in AAkPay__Recurring_Payment__c
• Status “Inactive”
• Frequency “Eg. Monthly”
• Amount and/or Donation Amount. If you don't have a value for one of this fields, please
upload with 0.
• Record TypeId for "Credit Card"
• Contact Id
• Account Id
• Name (You can generate this – eg. Persons Name)
• Last Payment Date – when they last paid (or set to todays date if not known). Please note,
this is important as missing very old dates may cause catch up transactions
• Next Payment Date (Date next due – eg. 16/4/2015)
• Expiry date and Expiry date MMYYYY (eg. 112015 for November 2015
Keep in mind that after the upload, you'll need to link the created Recurring Payment - record id with
the Credit Card number and CCV that you have.
2. Exporting for Tokenisation
Once you have an Activate Payment Gateway, you'll need to contact AAkonsult and request the bulk
tokenisation feature be turned on.
We now need to export from Salesforce so we can prepare a CSV file for bulk tokenising. You can
do this by running a report on the "Recurring Payment" object and then exporting the details. Make
sure you include:Export AAkPay__Recurring_Payment__c.id (record id), Expiry MMYYYY.
Now that you have the details from Salesforce, you'll need to make sure you link the exported
information with your Credit Card numbers. Excel Vooklookups are good, but watch out for the credit
card numbers going into exponential format.
Installation Manual
(c) AAkonsult Pty Ltd 2014
Page 349
Installation Manual
3. Tokenising the Credit Cards
This process takes the Credit Card numbers, uploads them into Payment Express and then returns a
token that we can then use for billing/charging to at a later date.
Before starting this step, you'll need to have an Active Payment Express Account (Contact AAkonsult
for this - DO NOT go directly to Payment Express). You'll also need to contact AAkonsult and ask for
the bulk tokenisation feature to be enabled.
NOTE, when dealing with lists of credit cards:
1. NEVER email the list of cards to anyone (including fellow work mates)
2. NEVER open/save with XLS (this will turn the card numbers into exponential format).
When getting an AAkonsult Payments - Payment Express account, there are two usernames/
passwords. One is for Salesforce and the other is for PayLine (Online/web access). It is the Payline
account that is used here.
You need to create a CSV file needs to following specifications: https://www.paymentexpress.com/
Technical_Resources/Other_Components/Payline_Batch_Processor Please see the “Authorisation
transactions” transaction section as that is the one we need to get the tokens. For the ref, use the
contactId or even the recurring payment id (as extracted in step 2)
For the “Account” column, please contact AAkonsult [email protected] for details
Process and generate the Tokens:
1. Log into Payline
2. Upload the CSV file for bulk tokenisation
3. Wait for the process to complete, then download from the reports section
4. Upload Token into Salesforce
The CSV file generated in step 3 contains the Recurring Payment Record id (Reference) and Token.
Use these details to update the dpsBillingId in Salesforce
Installation Manual
(c) AAkonsult Pty Ltd 2014
Page 350