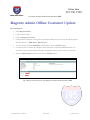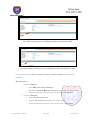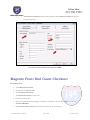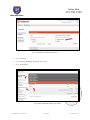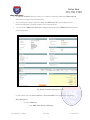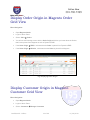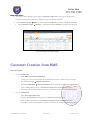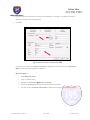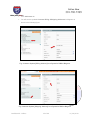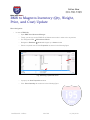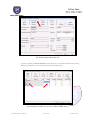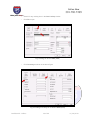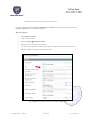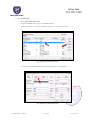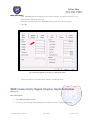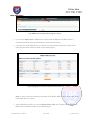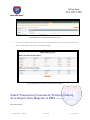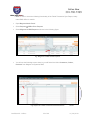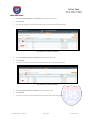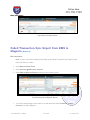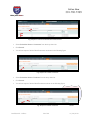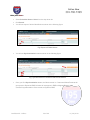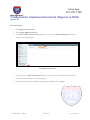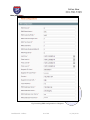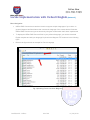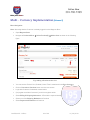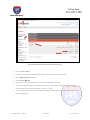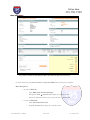
1
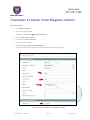
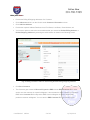
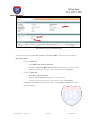
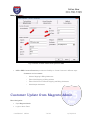
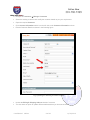
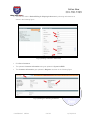
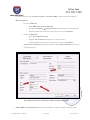
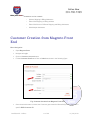
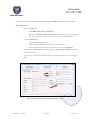
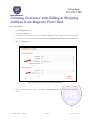
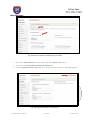
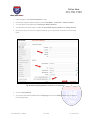
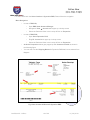
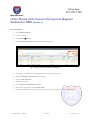
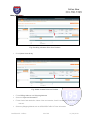
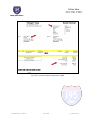
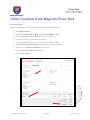
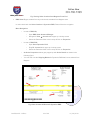
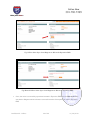
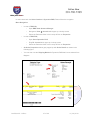
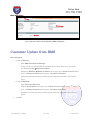
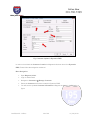
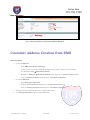
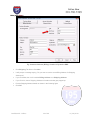
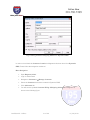
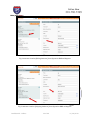
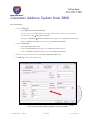
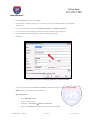
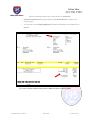
i95Dev Magento RMS Connect User Manual – ‘Silver Edition’ Version 2.0 i95Dev One Church Street, Suite 401, Rockville, MD 20850 Tel: 301.760.7499 Fax: 301.576.3655 Document Details Document Number Authorized by Version No Signature / Date 2.0 i95Dev 2.0 i95Dev / November 28, 2012 Call us Now 301.760.7499 Contents i95Dev Magento RMS Connect User Manual - Silver .....3 CUSTOMER CREATION FROM MAGENTO ADMIN ................................................................................ 4 CUSTOMER UPDATE FROM MAGENTO ADMIN .................................................................................... 7 CUSTOMER CREATION FROM MAGENTO FRONT END ..................................................................... 11 CREATING CUSTOMER WITH BILLING & SHIPPING ADDRESS FROM MAGENTO FRONT END .... 13 ORDER CREATION FROM MAGENTO ADMIN ..................................................................................... 16 ORDER PLACED WITH CUSTOM PRICING FROM MAGENTO BACKEND TO RMS [RELEASE II] .... 19 ORDER CREATION FROM MAGENTO FRONT END ............................................................................ 23 MAGENTO ADMIN OFFLINE CUSTOMER UPDATE ............................................................................. 28 MAGENTO FRONT END GUEST CHECKOUT ...................................................................................... 30 DISPLAY ORDER ORIGIN IN MAGENTO ORDER GRID VIEW............................................................ 34 DISPLAY CUSTOMER ORIGIN IN MAGENTO CUSTOMER GRID VIEW ............................................. 34 CUSTOMER CREATION FROM RMS .................................................................................................... 35 CUSTOMER UPDATE FROM RMS ....................................................................................................... 37 CUSTOMER ADDRESS CREATION FROM RMS .................................................................................. 39 CUSTOMER ADDRESS UPDATE FROM RMS ..................................................................................... 43 RMS TO MAGENTO INVENTORY (QTY, WEIGHT, PRICE, AND COST) UPDATE ............................. 46 RMS CONNECTIVITY SIGNAL DISPLAY IMPLEMENTATION [RELEASE II] ........................................ 52 FAILED TRANSACTION [CUSTOMERS/PRODUCT/ORDERS] SYNC REPORT FROM MAGENTO TO RMS [RELEASE II] ................................................................................................................................. 54 FAILED TRANSACTION SYNC REPORT FROM RMS TO MAGENTO [RELEASE II] ............................ 57 LOCALE IMPLEMENTATION WITH DEFAULT ENGLISH [RELEASE II] ................................................ 62 MULTI - CURRENCY IMPLEMENTATION [RELEASE II] .......................................................................................... 63 Confidential: i95Dev 2 of 66 11/28/2012 Call us Now 301.760.7499 i95Dev Magento RMS Connect User Manual S i l ve r Magento is a different entity that falls under eCommerce software where as Microsoft Dynamics RMS is another kind of entity that falls under stand-alone POS unlike Magento. i95Dev Magento-RMS Connect is an extension that’s developed under the i95Dev Research & Development which helps to integrate these two entities i.e. Magento & Dynamics RMS. As there is no easier way to directly integrate these two i.e. Magento & Dynamics RMS, a Comprehensive Customization tools are invented to enable .Net developers to create a real-time, transactional connections between Magento & Microsoft Dynamics RMS to expand a potential for new features and functionality. i95Dev RMS Connect Extension Silver version supports the following Features: 1. 2. 3. 4. 5. Customer Update from Magento to RMS Inventory Update from RMS to Magento Customer Order Data Update from Magento to RMS Customer Offline Update from Magento to RMS Order Offline Update from Magento to RMS i95Dev Magento RMS Connect User Manual: The following User Manual document helps the Silver users in knowing much about the features and the way it works. It also educates the users to know the in depth of each and every functional feature Confidential: i95Dev 3 of 66 11/28/2012 Call us Now 301.760.7499 Customer Creation from Magento Admin Menu Navigation: Open Magento Admin Login to the Admin Panel Navigate to Customers Manage Customers Click on Add New Customer It navigates to New Customer Provide Customer Details Set Associate to Website = Main Website All the mandatory fields must be provided as shown in the following figure Fig: Creating a Customer from Magento Admin Confidential: i95Dev 4 of 66 11/28/2012 Call us Now 301.760.7499 Provide the Billing & Shipping addresses of a Customer Click Addresses which is on the left side under Customer Information column Click Add New Address Provide the required Address Details such as First Name, Last Name, Street Address, etc You have an option to select the current address that you entered as Default Billing Address or Default Shipping Address by selecting the radio buttons as shown in the following screen Fig: Creating Customer Address & Selecting Default Billing/Shipping Address Click Save Customer The Customer gets created in Microsoft Dynamics RMS with the RMS Customer ID. In other words, once the customer is created in Magento, it also creates the same customer in Dynamics RMS and a Customer ID from Dynamics RMS is sent to Magento in order to identify that particular customer at Magento. You can see the RMS Customer ID in the following figure Confidential: i95Dev 5 of 66 11/28/2012 Call us Now 301.760.7499 Fig: Customer with saved Addresses In order check back the Customer Creation in Dynamics RMS, Please follow the navigation Menu Navigation: o o o In case of RMS HQ, o Open RMS Head Quarters Manager o Navigate to Database Global Customers which pops up a lookup screen o Select the Particular Customer in the Lookup & Click on Properties In case of RMS POS, o Open Store Operation POS o Ring F7: Set Customer which pops up a lookup screen o Select the Particular Customer in the Lookup & Click on Properties A Customer Properties window gets popped up with Customer Details as shown in the following figure Confidential: i95Dev 6 of 66 11/28/2012 Call us Now 301.760.7499 Fig: Customer Created in Microsoft Dynamics RMS i95Dev RMS Connect Extension provides the flexibility to Create Customer in different ways: Customers can be created: o Without Shipping & Billing Addresses o Either With Shipping or Billing address o Either With Same or Different Shipping and Billing Addresses o With Multiple Addresses Customer Update from Magento Admin Menu Navigation: Open Magento Admin Login to Admin Panel Confidential: i95Dev 7 of 66 11/28/2012 Call us Now 301.760.7499 Navigate to Customers Manage Customers Select the existing customer and modify the customer details as per your requirement Open the required Customer Click Account Information which is on the left side under Customer Information column Edit the Customer Details as shown in the following figure Fig: Updating the Existing Customer Details Update the Billing & Shipping Address details of customer You also have an option to update different addresses that you have saved earlier Confidential: i95Dev 8 of 66 11/28/2012 Call us Now 301.760.7499 You can also edit the Default Billing & Shipping Addresses by selecting radio buttons as shown in the following figure Fig: Updating Customer Addresses Click Save Customer The updated Customer Information also gets updated in Dynamics RMS The Customer Information gets updated in Magento as shown in the following figure Fig: Updating the Existing Customer Confidential: i95Dev 9 of 66 11/28/2012 Call us Now 301.760.7499 In order check back the Customer Creation in Dynamics RMS, Please follow the navigation Menu Navigation: o o o In case of RMS HQ, o Open RMS Head Quarters Manager o Navigate to Database Global Customers which pops up a lookup screen o Select the Particular Customer in the Lookup & Click on Properties In case of RMS POS, o Open Store Operation POS o Ring F7: Set Customer which pops up a lookup screen o Select the Particular Customer in the Lookup & Click on Properties A Customer Properties window gets popped up with Customer Details as shown in the following figure Fig: Updated Customer Information in Microsoft Dynamics RMS i95Dev RMS Connect Extension provides the flexibility to update customer in different ways: Confidential: i95Dev 10 of 66 11/28/2012 Call us Now 301.760.7499 Customers can be created: o Without Shipping & Billing Addresses o Either With Shipping or Billing address o Either With Same or Different Shipping and Billing Addresses o With Multiple Addresses Customer Creation from Magento Front End Menu Navigation: Open Magento Store Navigate to Login Click on Create an Account button Fill the Customer Details and Click on Submit as shown in the following figure Fig: Customer Creation from Magento Front End Once the submit button is clicked, the Customer gets created in Microsoft Dynamics RMS with a specific RMS Customer ID Confidential: i95Dev 11 of 66 11/28/2012 Call us Now 301.760.7499 In order check back the Customer Creation in Dynamics RMS, Please follow the navigation Menu Navigation: o o o In case of RMS HQ, o Open RMS Head Quarters Manager o Navigate to Database Global Customers which pops up a lookup screen o Select the Particular Customer in the Lookup & Click on Properties In case of RMS POS, o Open Store Operation POS o Ring F7: Set Customer which pops up a lookup screen o Select the Particular Customer in the Lookup & Click on Properties A Customer Properties window gets popped up with Customer Details as shown in the following figure o You can also view the email address that you provided in Magento over Dynamics RMS Fig: Customer Created in Microsoft Dynamics RMS Confidential: i95Dev 12 of 66 11/28/2012 Call us Now 301.760.7499 Creating Customer with Billing & Shipping Address from Magento Front End Menu Navigation: Open Magento Store Navigate to Register It navigates you to the next screen i.e. Create an Account page as shown in the following figure Provide required information such as First Name, Last Name, Email Address, Password, etc. Click on Submit button Fig: Customer Creation from Magento Front End Once you click the submit button, it navigates to My Dashboard page as shown in the following figure Confidential: i95Dev 13 of 66 11/28/2012 Call us Now 301.760.7499 Fig: Customer Creation from Magento Front End Click on the Address Book that is on the left side under My Account column You will see the Default Billing & Shipping Addresses Click the Add New Address Tab which is on the right side top as shown in the following figure Fig: Adding New Address of a Customer Confidential: i95Dev 14 of 66 11/28/2012 Call us Now 301.760.7499 It will navigate to the Add New Address screen Provide the required Address details such as First Name, Last Name, Address details You can add this new address to Shipping or Billing address You will have two check marks i.e. Use as my default shipping address or billing address Check mark any one of the two options based on your requirement as shown in the following figure Fig: Default Shipping Address Creation of a Customer Click on Save Address You will see the different addresses for Shipping as well as for Billing addresses as shown in the following figure Confidential: i95Dev 15 of 66 11/28/2012 Call us Now 301.760.7499 Fig: Different Billing & Shipping Address of a Customer Order Creation from Magento Admin Menu Navigation: Open Magento Admin Login to Admin Panel Navigate to SalesOrders Click on Create New Order Select the Customer Name from the list of customers Select Order Currency as US Dollar Click on Add Products Select the Products Click on Add Selected Product(s) to Order Select one of the Payment Method Confidential: i95Dev 16 of 66 11/28/2012 Call us Now 301.760.7499 For Shipping Methods, Click on the Get Shipping Methods and Rates link and select one of the method Check the Grand Total Click on Submit Order Once you click on Submit Order, the order gets created in Microsoft Dynamics RMS with Dynamics RMS Order ID If you able to see the RMS Order ID at Magento, then it indicates that the order is successfully synced from Magento to Dynamics RMS RMS Order ID gets created for every order that is submitted from Magento store as shown in the following figure Fig: Order Created from Magento to RMS Confidential: i95Dev 17 of 66 11/28/2012 Call us Now 301.760.7499 In order check back the Order Creation in Dynamics RMS, Please follow the navigation Menu Navigation: o o o In case of RMS HQ, o Open RMS Head Quarters Manager o Navigate to View Journals which pops up a lookup screen o Select the Particular Order in the Lookup & Click on Properties In case of RMS POS, o Open Store Operation POS o Ring F4: Journal which pops up a lookup screen o Select the Particular Order in the Lookup & Click on Properties An Order Properties window gets popped up with Customer Details as shown in the following figure o You can also view the Shipping Method in Dynamics RMS that’s been selected from Magento Fig: Order Created in Microsoft Dynamics RMS Confidential: i95Dev 18 of 66 11/28/2012 Call us Now 301.760.7499 Order Placed with Custom Pricing from Magento Backend to RMS [Release II] Menu Navigation: Open Magento Admin Login as Admin Select SalesOrders Click Create New Order as shown in the following figure Fig: Creating an Order Created in Magento You will get a Create New Order page with all the existing Customers Select any Registered Customer by clicking Click on Add Products Select the products Click Add Selected Products to Cart Check mark the option called Custom Price Provide the Price that you would like to sell the product for, as shown in the following figure Confidential: i95Dev 19 of 66 11/28/2012 Call us Now 301.760.7499 Fig: Providing a Custom Price for a Product Click Update Items & Qty Fig: Added Custom Price to a Product Fill the Billing Address and Shipping Address Select the Payment Information Fill the Credit Card details like, Name of the card member, Credit Card Number, Expiry date, CVV code etc. Select any Shipping Method such as UPS/USPS/FedEx & Fill the information Confidential: i95Dev 20 of 66 11/28/2012 Call us Now 301.760.7499 Click Place Order button In order check back the Order Creation in Dynamics RMS, Please follow the navigation Menu Navigation: o o o In case of RMS HQ, o Open RMS Head Quarters Manager o Navigate to View Journals which pops up a lookup screen o Select the Particular Order in the Lookup & Click on Properties In case of RMS POS, o Open Store Operation POS o Ring F4: Journal which pops up a lookup screen o Select the Particular Order in the Lookup & Click on Properties An Order Properties window gets popped up with Customer Details as shown in the following figure o You can also view the Shipping Method in Dynamics RMS that’s been selected from Magento Confidential: i95Dev 21 of 66 11/28/2012 Call us Now 301.760.7499 Fig: Order Created in Microsoft Dynamics RMS Confidential: i95Dev 22 of 66 11/28/2012 Call us Now 301.760.7499 Order Creation from Magento Front End Menu Navigation: Note: Assuming that the Customer is already logged in to the Magento Store Open Magento Store Navigate to Products Menu Select Product(S) Add to Cart Click on Proceed to Checkout button over the next screen Login with Customer Credentials created earlier (Or) else register as a New Customer if you did not register earlier Select Billing & Shipping Addresses & Provide the required details Select one of the Shipping Methods and Continue Select Payment Information and Continue Click on Place Order Confidential: i95Dev 23 of 66 11/28/2012 Call us Now 301.760.7499 Fig: Viewing Order Creation from Magento Front End RMS Order ID gets created for every order that is submitted from Magento store In order check back the Order Creation in Dynamics RMS, Please follow the navigation Menu Navigation: o o o In case of RMS HQ, o Open RMS Head Quarters Manager o Navigate to View Journals which pops up a lookup screen o Select the Particular Order in the Lookup & Click on Properties In case of RMS POS, o Open Store Operation POS o Ring F4: Journal which pops up a lookup screen o Select the Particular Order in the Lookup & Click on Properties An Order Properties window gets popped up with Order Details as shown in the following figure o You can also view the Shipping Method in Dynamics RMS that’s been selected from Magento Fig: Order Created in Microsoft Dynamics RMS Confidential: i95Dev 24 of 66 11/28/2012 Call us Now 301.760.7499 Magento Admin Offline Order Update In case of any interruptions happened such as failure of any server or server going down, there is always a chance of Microsoft Dynamics RMS going down which will drop the connection that’s been there between Magento and Dynamics RMS. This indeed would make online Orders to fail in syncing. In that particular scenario we provide an option called ‘Offline Order Sync’ that allows admin to manually sync the orders that’s been placed from Magento to RMS Menu Navigation: Open Magento Admin Login Admin Panel Click on Sales Order If the particular Order is not synced to Dynamics RMS, then you will see the following figure with two options i.e. RMS Sync & Manual Sync You can directly select the RMS Sync radio Button & Click on Submit button In case, if there is a chance of having the same Order in Dynamics RMS with which you would like to sync with the Order that’s been in Magento, then you have to do a manual sync Select the Manual Sync radio button & Click on Submit button Fig: Offline Order Sync from Magento to Microsoft Dynamics RMS Confidential: i95Dev 25 of 66 11/28/2012 Call us Now 301.760.7499 Fig: Offline Order Sync from Magento to Microsoft Dynamics RMS Fig: Manual Offline Order Sync from Magento to Microsoft Dynamics RMS Once, the order is successfully synced and created in Dynamics RMS then the RMS Order ID is sent back to Magento which indicates a successful creation of that particular order in Dynamics RMS Confidential: i95Dev 26 of 66 11/28/2012 Call us Now 301.760.7499 In order check back the Order Creation in Dynamics RMS, Please follow the navigation Menu Navigation: o o o In case of RMS HQ, o Open RMS Head Quarters Manager o Navigate to View Journals which pops up a lookup screen o Select the Particular Order in the Lookup & Click on Properties In case of RMS POS, o Open Store Operation POS o Ring F4: Journal which pops up a lookup screen o Select the Particular Order in the Lookup & Click on Properties An Order Properties window gets popped up with Order Details as shown in the following figure o You can also view the Shipping Method in Dynamics RMS that’s been selected from Magento Confidential: i95Dev 27 of 66 11/28/2012 Call us Now 301.760.7499 Fig: Order Created in Microsoft Dynamics RMS Magento Admin Offline Customer Update Menu Navigation: Open Magento Admin Login to Admin Panel Click on Manage Customers If the particular Customer is not synced to Dynamics RMS, then you will see the following figure with two options i.e. RMS Sync & Manual Sync You can directly select the RMS Sync radio Button & Click on Submit button In case, if there is a chance of having the same Customer in Dynamics RMS with which you would like to sync with the Order that’s been in Magento, then you have to do a manual sync Select the Manual Sync radio button & Click on Submit button Fig: Offline Customer Sync from Magento to Microsoft Dynamics RMS Confidential: i95Dev 28 of 66 11/28/2012 Call us Now 301.760.7499 Fig: Offline Customer Sync from Magento to Microsoft Dynamics RMS Fig: Manual Offline Customer Sync from Magento to Microsoft Dynamics RMS In order check back the Offline Customer Creation in Dynamics RMS, Please follow the navigation Menu Navigation: o o In case of RMS HQ, o Open RMS Head Quarters Manager o Navigate to Database Global Customers which pops up a lookup screen o Select the Particular Customer in the Lookup & Click on Properties In case of RMS POS, Confidential: i95Dev o Open Store Operation POS o Ring F7: Set Customer which pops up a lookup screen o Select the Particular Customer in the Lookup & Click on Properties 29 of 66 11/28/2012 Call us Now 301.760.7499 o A Customer Properties window gets popped up with Customer Details as shown in the following figure Fig: Order Created in Microsoft Dynamics RMS Magento Front End Guest Checkout Menu Navigation: Open Magento Front End Navigate to the Product List Select Required Products Add Selected Products to your cart Proceed to Check Out Once you reach the checkout page, you will see an option to enter details based on different Checkout Methods Select Checkout as a Guest radio button as shown in the below figure Confidential: i95Dev 30 of 66 11/28/2012 Call us Now 301.760.7499 Fig: Checkout as a Guest Customer Click Continue Fill the Billing, Shipping, Payment, etc. details Click Place Order Fig: Guest Customer Placing an Order Confidential: i95Dev 31 of 66 11/28/2012 Call us Now 301.760.7499 As a Guest Customer places an Order, it is created in Dynamics RMS with a RMS Order ID along with the Guest Customer Information Once the Order is placed in Dynamics RMS, the RMS Order ID is sent to Magento from Dynamics RMS after successful creation of the particular Order You can see the RMS Order Creation at Magento Backend with the RMS Order ID as shown in the following figure Fig: Guest Customer Placing an Order In order check back the Order Creation in Dynamics RMS, Please follow the navigation Menu Navigation: o In case of RMS HQ, o Confidential: i95Dev Open RMS Head Quarters Manager 32 of 66 11/28/2012 Call us Now 301.760.7499 o o o Navigate to View Journals which pops up a lookup screen o Select the Particular Order in the Lookup & Click on Properties In case of RMS POS, o Open Store Operation POS o Ring F4: Journal which pops up a lookup screen o Select the Particular Order in the Lookup & Click on Properties An Order Properties window gets popped up with Order Details as shown in the following figure o You can also view the Shipping Method in Dynamics RMS that’s been selected from Magento Fig: Order Placement by a Guest Customer Confidential: i95Dev 33 of 66 11/28/2012 Call us Now 301.760.7499 Display Order Origin in Magento Order Grid View Menu Navigation: Open Magento Admin Login to Admin Panel Select Sales Orders You will see the following screen with the Order Origin which lets you know about the Orders that’s been placed from Magento as well as Dynamics RMS If the Order Origin RMS, it indicates that the Order is placed from Dynamics RMS If the Order Origin Website, it indicates that the Order is placed from Magento Fig: Displaying Order Origin Display Customer Origin in Magento Customer Grid View Menu Navigation: Open Magento Admin Login to Admin Panel Select Customers Manage Customers Confidential: i95Dev 34 of 66 11/28/2012 Call us Now 301.760.7499 You will see the following screen with the Customer Origin which lets you know about the Customers that’s been placed from Magento as well as Dynamics RMS If the Customer Origin RMS, it indicates that the Customer is placed from Dynamics RMS If the Customer Origin Website, it indicates that the Customer is placed from Magento Fig: Displaying Customer Origin Customer Creation from RMS Menu Navigation: o o In case of RMS HQ, o Open RMS Head Quarters Manager o Firstly, you have to set the RMS HQ in Maintenance mode in order to do any actions o So, Navigate to File Maintenance Mode o Navigate to Database Global Customers which pops up a Lookup Account window o Click on New which pops up a Customer Properties: New Customer window o Provide the required information to create a Customer as shown in the following figure In case of RMS POS, o Open Store Operation POS o Ring F7: Set Customer which pops up a Lookup Account window o Click on New which pops up a Customer Properties: New Customer window o Provide the required information to create a Customer as shown in the following figure Confidential: i95Dev 35 of 66 11/28/2012 Call us Now 301.760.7499 Provide Customer Information such as Account Number, First Name, Last Name & Address Details as shown in the following figure Click OK Fig: Customer Creation in Dynamics RMS In order to check back the Customer Creation in Magento that’s been done from Dynamics RMS, Please follow the navigation mentioned Menu Navigation Open Magento Admin Login to Admin Panel Navigate to Customers Manage Customer Select the Customer that’s been created in Dynamics RMS You will see the Customer Information in Magento as shown in the following figure Confidential: i95Dev 36 of 66 11/28/2012 Call us Now 301.760.7499 Fig: Customer Creation from Dynamics RMS to Magento Customer Update from RMS Menu Navigation: o In case of RMS HQ, o Open RMS Head Quarters Manager o Firstly, you have to set the RMS HQ in Maintenance mode in order to do any actions o So, Navigate to File Maintenance Mode o Navigate to Database Global Customers which pops up a Lookup Account window o Click on Existing Customer which pops up a Customer Properties o Update the required information of that particular Customer as shown in the following figure o In case of RMS POS, o Open Store Operation POS o Ring F7: Set Customer which pops up a Lookup Account window o Click on Existing Customer which pops up a Customer Properties o Update the required information of that particular Customer as shown in the following figure Click OK Confidential: i95Dev 37 of 66 11/28/2012 Call us Now 301.760.7499 Fig: Customer Update in Dynamics RMS In order to check back the Customer Creation in Magento that’s been done from Dynamics RMS, Please follow the navigation mentioned Menu Navigation Open Magento Admin Login to Admin Panel Navigate to Customers Manage Customer Select the Customer that’s been created in Dynamics RMS You will see the updated Customer Information in Magento as shown in the following figure Confidential: i95Dev 38 of 66 11/28/2012 Call us Now 301.760.7499 Fig: Customer Update from Dynamics RMS to Magento Customer Address Creation from RMS Menu Navigation: o o In case of RMS HQ, o Open RMS Head Quarters Manager o Firstly, you have to set the RMS HQ in Maintenance mode in order to do any actions o So, Navigate to File Maintenance Mode o Navigate to Database Global Customers which pops up a Lookup Account window o Click on Existing Customer which pops up a Customer Properties In case of RMS POS, o Open Store Operation POS o Ring F7: Set Customer which pops up a Lookup Account window o Click on Existing Customer which pops up a Customer Properties Select a particular Customer who has no addresses created Click Billing Information Tab to Create Addresses Confidential: i95Dev 39 of 66 11/28/2012 Call us Now 301.760.7499 Fig: Customer Address (Billing) Creation in Dynamics RMS Click Shipping Tab & then Click New It will prompt a message saying, ‘Do you want to use the same Billing Address for Shipping Address too’ If you Click Yes, then it will consider Billing Address as a Shipping Address If you Click No, then a Shipping Address Information window gets popped up Provide Shipping Address details as shown in the following figure Click OK Confidential: i95Dev 40 of 66 11/28/2012 Call us Now 301.760.7499 Fig: Creating Customer Shipping Address in Dynamics RMS In order to check back the Customer Creation in Magento that’s been done from Dynamics RMS, Please follow the navigation mentioned Menu Navigation Open Magento Admin Login to Admin Panel Navigate to Customers Manage Customer Select the Customer that’s been created in Dynamics RMS Click Addresses tab You will see the updated Customer Billing & Shipping Addresses in Magento as shown in the following figure Confidential: i95Dev 41 of 66 11/28/2012 Call us Now 301.760.7499 Fig: Customer Creation [Billing Address] from Dynamics RMS to Magento Fig: Customer Creation [Shipping Address] from Dynamics RMS to Magento Confidential: i95Dev 42 of 66 11/28/2012 Call us Now 301.760.7499 Customer Address Update from RMS Menu Navigation: o o In case of RMS HQ, o Open RMS Head Quarters Manager o Firstly, you have to set the RMS HQ in Maintenance mode in order to do any actions o So, Navigate to File Maintenance Mode o Navigate to Database Global Customers which pops up a Lookup Account window o Click on Existing Customer which pops up a Customer Properties In case of RMS POS, o Open Store Operation POS o Ring F7: Set Customer which pops up a Lookup Account window o Click on Existing Customer which pops up a Customer Properties Select a particular Customer who has Billing & Shipping addresses Click Billing Tab to Update Addresses Fig: Customer Address (Billing) Update in Dynamics RMS Confidential: i95Dev 43 of 66 11/28/2012 Call us Now 301.760.7499 Click Shipping Tab & then Click New It will prompt a message saying, ‘Do you want to use the same Billing Address for Shipping Address too’ If you Click Yes, then it will consider Billing Address as a Shipping Address If you Click No, then a Shipping Address Information window gets popped up Provide Shipping Address details as shown in the following figure Click OK Fig: Updating Customer Shipping Address in Dynamics RMS In order to check back the Customer Creation in Magento that’s been done from Dynamics RMS, Please follow the navigation mentioned Menu Navigation Open Magento Admin Login to Admin Panel Navigate to Customers Manage Customer Select the Customer that’s been created in Dynamics RMS Confidential: i95Dev 44 of 66 11/28/2012 Call us Now 301.760.7499 Click Addresses tab You will see the updated Customer Billing & Shipping Addresses in Magento as shown in the following figure Fig: Customer Update [Billing Address] from Dynamics RMS to Magento Fig: Customer Update [Shipping Address] from Dynamics RMS to Magento Confidential: i95Dev 45 of 66 11/28/2012 Call us Now 301.760.7499 RMS to Magento Inventory (Qty, Weight, Price, and Cost) Update Menu Navigation: o In case of RMS HQ, o Open RMS Head Quarters Manager o Firstly, you have to set the RMS HQ in Maintenance mode in order to do any actions o So, Navigate to File Maintenance Mode o Navigate to Database Items which pops up a Items window o Select a required Item & Click Properties as shown in the following figure Fig: Selecting a particular Item o It pops up an Item Properties window o Click Store Quantity tab as shown in the following figure Confidential: i95Dev 46 of 66 11/28/2012 Call us Now 301.760.7499 Fig: Selecting Store Quantity Tab o It pops up shows you Store Quantity screen where in you will find different stores having different quantities for a an Item as shown in the following figure Fig: Quantities available for an Item in different RMS Stores Confidential: i95Dev 47 of 66 11/28/2012 Call us Now 301.760.7499 o The Inventory of an Item in RMS HQ is calculated as Store 1(Qty) + Store 2(Qty) + Store 3(Qty) o Click OK which navigates to the Item look up window wherein you will see the Total Inventory for the SamsungS3 = 6 Fig: Total Quantity for an Item RMS o In Case of RMS (POS), o Open Store Operation POS o Ring F2: Lookup which pops up an Items window as shown in the following figure Fig: Looking up for an Item Confidential: i95Dev 48 of 66 11/28/2012 Call us Now 301.760.7499 o Search for any existing Item in the Item Lookup window o Click Ok to open Fig: Viewing an Item in RMS (POS) o Click Inventory as shown in the above figure Fig: Providing Inventory for an Item in RMS (POS) Confidential: i95Dev 49 of 66 11/28/2012 Call us Now 301.760.7499 o Click Ok to save the Inventory of the particular Item In order to check back the Inventory Update for a Product in Magento that’s been done from Dynamics RMS, Please follow the navigation Menu Navigation Open Magento Admin Login to Admin Panel Select Catalog Manage Products Search for the required Product & Open You will see the required inventory Information in Magento that’s been updated from Dynamics RMS as shown in the following figure Fig: Updated Inventory Check for an Item in Magento Confidential: i95Dev 50 of 66 11/28/2012 Call us Now 301.760.7499 o In case of RMS POS, o Open Store Operation POS o Ring F2: Lookup which pops up an Items window o Select a required Item & Click Properties as shown in the following figure Fig: Selecting a Particular Item o It pops up an Item Properties window as shown in the following figure Fig: Selecting a Particular Item Confidential: i95Dev 51 of 66 11/28/2012 Call us Now 301.760.7499 o Click Inventory tab which displays the On hand, Available, Committed inventory of the particular item that’s been selected o Provide required quantity in the On hand field as shown in the following figure o Click Ok Fig: Inventory Update of an Item in a Particular Store o This is the inventory of an Item that’s availed in a particular Store. RMS Connectivity Signal Display Implementation [Release II] Menu Navigation: Open Magento Admin Panel You will see the following Blinking Signal in the header as shown in the following figure Confidential: i95Dev 52 of 66 11/28/2012 Call us Now 301.760.7499 Fig: RMS Connectivity Blinking Signal = Green If you see the Signal Color = Green, then it implies that the Magento to RMS Connect is successfully working and the both entities are synchronized in nature If you click the Green Blinking Icon, you will see a window which provides you with the last 5 failed & 5 successful Orders as shown in the following figure Fig: Displaying Last 5 Failed & Successful Orders Note: In order to check the following functionality of the i95Dev RMS Connect failure case, kindly make RMS offline for a while Once the RMS goes offline, you see the Signal Color = Red, the it implies that the Magento to RMS connect is failed as shown in the following figure Confidential: i95Dev 53 of 66 11/28/2012 Call us Now 301.760.7499 Fig: RMS Connectivity Blinking Signal = Red If you click the Red Blinking Icon, you will see a window which provides you with the last 5 failed & 5 successful Orders as shown in the following figure Fig: Displaying Last 5 Failed & Successful Orders Failed Transaction [Customers/Product/Orders] Sync Report from Magento to RMS [Release II] Menu Navigation: Confidential: i95Dev 54 of 66 11/28/2012 Call us Now 301.760.7499 Note: In order to check the following functionality of the Failed Transaction Sync Report, kindly make RMS offline for a while Open Magento Admin Panel Select Reports i95Dev Error Reports Select Magento to RMS Reports as shown in the following figure Fig: Magento to RMS Failed Reports You will see the following screen where in you will find all the failed Customers, Orders, Products from Magento to Dynamics RMS Fig: Report of Failed Customer/Products/Orders Confidential: i95Dev 55 of 66 11/28/2012 Call us Now 301.760.7499 Select Scheduler Name = Customers from the drop down list Click Search You will see report of all the failed Customers as shown in the following figure Fig: Report of Failed Customer Select Scheduler Name = Products from the drop down list Click Search You will see report of all the failed Products as shown in the following figure Fig: Report of Failed Products Select Scheduler Name = Order from the drop down list Click Search You will see report of all the failed Order as shown in the following figure Confidential: i95Dev 56 of 66 11/28/2012 Call us Now 301.760.7499 Fig: Report of Failed Orders Failed Transaction Sync Report from RMS to Magento [Release II] Menu Navigation: Note: In order to check the following functionality of the Failed Transaction Sync Report, kindly make GP offline for a while Open Magento Admin Panel Select Reports i95Dev Error Reports Select RMS to Magento Reports as shown in the following figure Fig: Selecting GP to Magento Report You will see the following screen where in you will find all the failed Customers, Orders, Products from GP to Magento Confidential: i95Dev 57 of 66 11/28/2012 Call us Now 301.760.7499 Fig: Report of Failed Customer/Products/Orders Select Scheduler Name = Customers from the drop down list Click Search You will see report of all the failed Customers as shown in the following figure Fig: Report of Failed Customer Select Scheduler Name = Products from the drop down list Click Search You will see report of all the failed Products as shown in the following figure Fig: Report of Failed Products Confidential: i95Dev 58 of 66 11/28/2012 Call us Now 301.760.7499 Select Scheduler Name = Order from the drop down list Click Search You will see report of all the failed Order as shown in the following figure Fig: Report of Failed Orders You will see Synchronization button as shown in the following figure Fig: Synchronization of Customers/Orders/Products Once you Click Synchronization button, the failed records i.e. Customers/Orders/Products will get synced to Dynamics RMS & further will not appear in RMS to Magento Reports upon successful synchronization of the records to Dynamics RMS Confidential: i95Dev 59 of 66 11/28/2012 Call us Now 301.760.7499 Configuration Implementation from Magento to RMS [Release II] Menu Navigation: Open Magento Admin Panel Select System Configuration Click i95Dev RMS Connect Setting where in you will see the RMS Configuration button as shown in the following figure Fig: RMS Configuration Once you click the RMS Configuration button, you will see the Configuration Fields that you need to provide as shown in the following figure Provide required fields of the RMS Configurations in Magento & Click Save Confidential: i95Dev 60 of 66 11/28/2012 Call us Now 301.760.7499 Fig: Providing RMS Configuration in Magento Confidential: i95Dev 61 of 66 11/28/2012 Call us Now 301.760.7499 Locale Implementation with Default English [Release II] Menu Navigation: i95Dev RMS Connect has customized Locale to support multiple languages of your choice. In general, Magento itself has feature that converts the language of the content but the fields that i95Dev RMS Connect uses get converted only using the customization that’s been implemented To display the i95Dev RMS Connect fields in your preferred language, you need to download English template and add your language & upload to the Magento FTP as shown in the following figure Below is the figure that is an example for French Language Fig: Uploading French Locale to Magento Confidential: i95Dev 62 of 66 11/28/2012 Call us Now 301.760.7499 Multi - Currency Implementation [Release II] Menu Navigation: Note: Assuming that the Customer is already logged in to the Magento Store Open Magento Store Navigate to Products Menu Select Product(S) Add to Cart as shown in the following figure Fig: Adding a Product to the Cart You can see the Product Cost, Subtotal, Grand Total is mentioned in the Euro Currency Click on Proceed to Checkout button over the next screen Login with Customer Credentials created earlier (Or) register as a New Customer if you did not register earlier Select Billing & Shipping Addresses & Provide the required details Select one of the Shipping Methods and Continue Select Payment Information and Continue Confidential: i95Dev 63 of 66 11/28/2012 Call us Now 301.760.7499 Fig: Checking Out a Product with Euro Currency Click on Place Order In order to check back at Magento Back End, follow the navigation mentioned Open Magento Admin Panel Select Sales Order Open the required order that’s been placed from Magento Front End You will see the following screen with all the details of the Order in the Euro Currency, but the Order was placed in Admin with Base Currency i.e. USD You can even find the Euro Currency getting applied for each and individual line item as shown in the following figure Confidential: i95Dev 64 of 66 11/28/2012 Call us Now 301.760.7499 Fig: Order Creation at the Magento Back End with the Specified Currency In order check back the Order Creation in Dynamics RMS, Please follow the navigation Menu Navigation: o o In case of RMS HQ, o Open RMS Head Quarters Manager o Navigate to View Journals which pops up a lookup screen o Select the Particular Order in the Lookup & Click on Properties In case of RMS POS, Confidential: i95Dev o Open Store Operation POS o Ring F4: Journal which pops up a lookup screen 65 of 66 11/28/2012 Call us Now 301.760.7499 o o Select the Particular Order in the Lookup & Click on Properties An Order Properties window gets popped up with Order Details as shown in the following figure o You can also view the Shipping Method in Dynamics RMS that’s been selected from Magento Fig: Order Created in Microsoft Dynamics RMS with Base Currency [USD] Confidential: i95Dev 66 of 66 11/28/2012