1
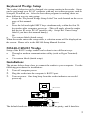
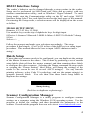
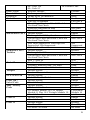
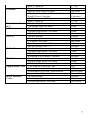
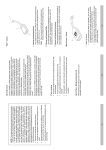
User’s Manual
MS140-3 or MS140I-3
Keyboard Wedge
Slot Reader
PC Keyboard Wedge Setup Label
1
Overview
There are two models of the MS140 decoded slot reader available:
•
The MS140-3 keyboard wedge slot reader which supports PC/AT, XT,
notebooks and Macintosh computers
•
The MS140-2 RS232 interface slot reader that supports computers with
RS232 serial port.
Both of these readers support the most popular bar code symbologies, like
Code 39, UPC/EAN, Interleaved 2 of 5, Standard 2 of 5, Code 128, Codabar,
MSI, Code 11, Code 93, etc.
MS140-3 Keyboard Wedge
Setup of the keyboard wedge reader can be done in three different ways:
•
Via computer keyboard of a desktop PC.
Or
•
By Scanner Configuration Manager Software to configure the scanner
setting through the keyboard port.
Or
•
By using the custom labels (batch setup).
Installation:
The picture below illustrates how to connect the reader to your computer.
Follow these procedures for installation:
1. Turn off computer power.
2. Unplug keyboard from computer. Plug the reader into computer’s
keyboard port and the keyboard into the reader.
3. Turn on power. One long beep from the reader indicates successful
power-up.
MS140
The default device ID of the reader is set to PC/AT. If your computer is not a
PC/AT, please perform the setup on a PC/AT machine first in order to select a
correct device ID. The device ID “06” (Keyboardless) is for notebook
computers.
2
Keyboard Wedge Setup
The reader’s behavior can be changed via a setup routine in the reader. Setup
can be performed on a PC/AT computer with any text editor program, such as
Notepad, WordPad, etc. After the text editor program is running, there are
three different ways to enter setup:
•
Swipe the “Keyboard Wedge Setup Label” bar code located on the cover
page of this manual.
Or
•
Press the left and right SHIFT keys simultaneously within the first 20
keystrokes after computer power up. (This will apply when the reader
has device ID set to PC/AT interface only. Swipe the “Enter Setup”
label if you have this manual handy.)
Or
•
Use custom labels (batch setup).
When the reader enters the setup mode, a selection menu will be displayed on
the screen. Please refer to the MS140 Setup Manual Section.
MS140-2 RS232 Wedge
Setup of the RS232 wedge reader can be done in two different ways:
•
Through a modem communication utility (such as HyperTerminal).
Or
•
Via custom labels (batch setup).
Installation:
The picture below shows how to connect the reader to your computer. Use the
following procedures for installation:
1. Turn off computer power.
2. Plug the reader into the computer’s RS232 port.
3. Turn on power. One long beep from the reader indicates successful
power-up.
DB9 Connector
Power
Supply
MS140
The default baud rate of the reader is set to 9600, no parity, and 8 data bits.
3
RS232 Interface Setup
The reader’s behavior can be changed through a setup routine in the reader.
Setup can be performed (at 9600 baud rate, 8bits and no parity) with any
modem communication utility, such as Windows’ HyperTerminal. To enter
Setup mode, start the Communication utility on the PC and swipe “RS232
Interface Setup Label” bar code label located on the back page of this manual.
On entering the Setup mode, a selection menu will be displayed on the screen
as follow:
MS140 SETUP MENU
Hamster_S V3.03 Nov.15,2000
Use numeric keys on the top of alphabetic keys for digit input.
0-Device 1-Scanner 2-Barcode 3-MSR 4-Others 5-RS232 6-Default 7-dump
8-Exit
Select==> _
Follow the prompts and make your selections accordingly. The setup
procedure is that simple. (Use Ctrl_R in lieu of the shift key in a string input
procedure. This method allows the user to input ASCII characters into a
string.)
Batch Setup
If more than one scanner needs to be configured, you can duplicate the settings
of the Master Scanner to the others. This is done by producing a set of custom
setup labels (derived from the master scanner) and then scanning these labels
to configure the other scanners. Selecting the Dump command in setup mode
or swiping the “Dump Setting” label below will dump the settings of the
reader to the screen as one or several ASCII string(s). Use any barcode
printing software, select Code 39 symbology, and use the output string(s) to
generate barcode labels. You can then scan these batch setup labels to
duplicate the settings.
Dump Setting
(Feel free to duplicate or photocopy)
Scanner Configuration Manager
Scanner Configuration Manager is a utility program to configure scanner
settings on a computer using the Windows 95/98 operating system. Use the
program to define the settings and then download the parameters to the
scanner. Download the program from our web site at www.unitech-adc.com.
4
Selectable Parameters and their Defaults
Parameters
Selections
Default
Keyboard Wedge
Device Selection
IBM PC/AT, PS/2 mod 40, 60, 80 etc
IBM
IBM PS/2 Model 25, 56, 70, 90
PC/AT
Macintosh ADB bus
Keyboardless Wedge (Notebook)
RS232 Interface
0-300; 1-600; 2- 1200; 3-2400; 4-4800;
9600
Baud Rate
5-9600; 6-19200
Parity
0-Even;1-Odd;2-Mark;3-Space;4-None
None
Data bits
0-7 bits; 1-8 bits
8 bits
CTS/RTS
0-Ignore; 1-RTS Enabled at Power on; 2- Ignore
RTS Enabled in communication
ACK/NAK
0-Off; 1-On
Off
BCC Character
0-Off; 1-On
Off
Xon/Xoff Time out 0-1 sec; 1-3 sec; 2-10 sec; 3-Unlimited
1 sec
Beep Tone
None/Low/Medium/High/Low to High/
Medium
High to Low
Beep Tone
None/Low/Medium/High/Low to High/
High
(On ACK)
High to Low
Intercharacter delay 0 ms/1 ms/2 ms/5 ms/10 ms/30 ms/50
0 ms
ms/100 ms
Interblock delay
0 ms/10 ms/50 ms/100 ms/500 ms/1
0 ms
second/3 second/5 second
Function Code
On/Off
On
CapsLock
Auto_trace/Low Case/Upper Case
Auto_trace
Language
US/UK/Swiss/Swedish/Spanish/
US
Norwegian/Italian/German/French/
Alt Key Mode/Danish
Double verification
Off/1~7 On(Verify 1~7 times)
Off
Label Type
Positive /Positive and Negative
Positive
Output of Wand
Bar high, space low/
Bar high,
Bar low, space high
space low
Level Duration
200 us/600 us
200 us
Terminator
Enter/Return /Field Exit/None
Enter
Code ID
Disable/Enable
Disable
Define Code ID
00- Code 39 Full ASCII
10- S 2 of 5
01- Code 39 Standard
11- MSI
02- EAN-13
12- EAN 128
03- UPC-A
13- Code 32
04- EAN-8
14- Delta Code
05- UPC-E
15- Label Code
06- I 2 of 5
16- Plessey Code
07- Codabar
17- Code 11
5
Data Length
Preamble
Postamble
Code 39
Interleaved 2 of 5
Standard 2 of 5 /
Toshiba
Code 32
Telepen
UCC/EAN 128
Code 128 /
Label Code
MSI / Plessey
Code
Code 93
Code 11
08- Code 128
18-Toshiba Code
09- Code 93
Exclude/ Include
Exclude
Define up to 16 characters
None
Define up to 16 characters
None
Disable/Enable
Enable
Full ASCII/Standard
Full ASCII
Check Digit Check and Send/ Check but
Not Check
Not Send/ Not Check
Send/Not Send Start & Stop
Not Send
Min 0 / Max 48
0 / 48
Disable/Enable
Enable
Fix Length On/Off (by first three reads)
Off
Check Digit Check and Send/ Check but
Not Check
Not Send/ Not Check
First Digit Suppressed/ Last Digit Not
Not
Suppressed/ Not Suppressed.
Suppressed
Min 4 / Max 64
10 / 64
Disable/Enable
Disable
Fix Length On/Off
On
Check Digit Check and Send/ Check but
Not Check
Not Send/ Not Check
Min 1 / Max 48
4/48
Disable/Enable
Disable
Leading Character Send / No Send
Send
Tailing Character Send /No Send
Send
Disable/Enable
Disable
Standard/Numeric Set
Standard
Disable/Enable
Enable
Code ID Disable/Enable
Disable
Disable/Enable
Enable
Min 1 / Max 64
1 / 64
Disable/Enable
Disable
CD Send / No Send
No Send
CD Double Module 10/ CD Double
CD Double
Module 11 Plus 10/CD single Module 10 Module 10
Min 1 / Max 16
1 / 16
Disable/Enable
Enable
Min 1 / Max 48
1 / 48
Disable/Enable
Disable
One/Two CD
Two CD
CD Send / No Send
No Send
6
Codebar
Label Code IV
&V
UPC-A
UPC-E
EAN-13
EAN-8
Supplement Code
Delta Distance
Code
Min 1 / Max 48
1 / 48
Disable/Enable
Disable
Start & Stop Send/No Send
No Send
CD Calculate & Send/CD Calculate but no CD not
Send/CD not Calculate
Calculate
CLSI Format On/Off
Off
Min 3 / Max 48
3 / 48
Disable/Enable
Disable
Checksum Send/No Send
Send
Disable/Enable
Enable
Leading Digit Send / No Send
Send
CD Send / No Send
Send
Disable/Enable
Enable
Leading Digit Send / No Send
Send
CD Send / No Send
No Send
Zero Expansion On / Off
Off
Disable/Enable NSC=1
Disable
Disable/Enable
Enable
Leading Digit Send / No Send
Send
CD Send / No Send
Send
Bookland EAN Enable / Disable
Disable
Disable/Enable
Enable
Leading Digit Send / No Send
Send
CD Send / No Send
Send
Two Add-on Code Off / On
Off
Five Add-on Code Off / On
Off
Transmitted if Present/ Must Present
Must Present
Space Added / Not Added
Not Added
Disable/Enable
Disable
Check Digit Calculated / Not Calculated
Calculated
Check Digit Send / No Send
No Check
7
User’s Manual
MS140-2 or MS140I-2
RS232 Interface
Slot Reader
RS232 Interface Setup Label
8