Download Infinity Server. - Infinity Virtualization Platform
Transcript
User Manual Version 1.2 TechSologic Inc. http://www.techsologic.com Table of Contents Why Infinity 4 Terminology 6 Architecture 12 Infinity Server 13 Installing Infinity on your server Admin Console Admin Console Introduction VM Templates VM Group Tasks Backups Host Configure a Host Host Group Agent Agent configuration settings Bare Metal Support 16 19 22 33 36 39 40 41 43 46 48 50 54 Users 56 Virtual Machines 59 VM Settings VM Comments VM Hard Drive Properties Hard Drives Sparse Hard Drives Dynamic Reservation Hard Drive Compression VM Users Properties VM Snapshot Properties VM Network Properties VM Audio Properties VM Tasks Properties VM Advanced Properties VM Teleportation 61 64 65 67 69 70 71 72 73 74 75 76 77 77 VM Remote Access 79 Data Protection 83 Backup Profiles Replication Snapshots 83 91 94 How to Create a VM Install VM OS Import VM Import Virtual Hard Disks Backup a VM Restore From a File Restore From a Host Restore From a Snapshot Copying Hard Drives between Servers Configure EMail Clone a VM Execute a Command in a VM Add a Server Enable the Agent service on an Infinity Server Set Time Server Set Static IP in Solaris Index 97 97 102 105 107 109 111 114 115 116 118 119 120 122 123 125 126 128 Infinity Help - Infinity is the most flexible and affordable solution for IT professionals to run, manage and share virtual machines in a centralized way. Why Infinity™? Infinity is the most flexible and affordable solution for IT professionals to run, manage and share virtual machines in a centralized way. Infinity was designed for IT professionals who need to create many VMs and have the maximum flexibility in snapshotting, cloning and running those VMs where they want, when they want and how they want. Users can create and run Virtual Machines on their workstations , laptops and servers, but when the computer is powered off the VMs are still available to be run on other computers. No VM data is kept on the users computer. VMs can be teleported between compatible computers. Your valuable data is safe on the Infinity server. Infinity gives users centralized management of virtual machines (VMs) and their data, but unlike traditional virtualization solutions, Hosts running the VMs can be any computer. You do not need dedicated servers for running VMs. Your computers, workstations and servers, which are running Windows, Mac, Linux, BSD or Solaris can be used to host VMs alongside their current applications. VMs can also be run on the Infinity server like most virtualization products. Users can run VMs locally on their workstations giving them maximum performance and flexibility, or they can run VMs on other Hosts and access them remotely. An Infinity server is an independent SAN storing VM data and managing VMs. You do not need to have a separate expensive storage infrastructure. The Infinity server can be running Solaris 11, OpenIndiana or OmniOS. The Infinity server can even be installed in a VM since you do not have to run VMs on the server. • Infinity has built-in scheduled snapshots, replication and disk based backups with VM data stored and managed on the Infinity server. Third party tools are not needed to provide these services. • Snapshots can be configured to protect your files from accidental deletion and corruption. Infinity snapshots are highly efficient and do not affect VM performance. Snapshots can be turned into VMs allowing you to not only access the VMs data as it was when the snapshot was taken, but also to boot the OS and run its services. Disaster recovery testing made simple. • VMs can be replicated between multiple Infinity servers. Asynchronous replication can be configured per VM protecting the VM from an Infinity server failure. Replicated VMs can be quickly restarted and access their virtual hard disks from another server. 4 / 128 Infinity Help - Infinity is the most flexible and affordable solution for IT professionals to run, manage and share virtual machines in a centralized way. • Multiple Infinity servers automatically replicate configuration data between them so no configuration data will be lost in the event of a failure • VMs can be backed up as single files and stored offsite for disaster recovery purposes. Infinity supports scheduled Full, Differential and Incremental block level backups that can be directed to any computer. Block level backups are a highly efficient backup method which is much faster and uses much less space than traditional file based backup. • Virtual networks can be created connecting VMs running on different hosts. Virtual networks allow you to create isolated networks for groups of VMs without the need for VLAN capable switches. • Groups of VMs can be deployed to groups of Hosts as a single step. This feature greatly simplifies and accelerates the deployment of more complicated services which are composed of multiple services running in different VMs. • Bare Metal support allows VMs to be run on computers with no operating system or hard drive but still have a local user interface to the running VMs. Simply boot from the network and you have a Host to run VMs. Bare metal support can also be used to temporarily repurpose a computer for running VMs. Easy to install and deploy. Infinity was designed with ease of use and flexibility in mind. Users can configure any computer as a Host to run VMs in minutes and new Infinity servers can be added just as quickly. Infinity™ puts the power of virtualization in the hands of its users Users can manage their own VMs. Users can create VMs, Clone, Snapshot, Backup, and deploy new Hosts to run VMs, all independently without the need of an Administrator. Users can share VMs with other users. 5 / 128 Infinity Help - Terminology Terminology To assist with understanding Infinity, here some common terms are defined: Virtual machine (VM). This is the special environment for your guest operating system while it is running. Normally, a VM will be shown as a window on your computer’s desktop, but it can be displayed in full-screen mode or remotely on another computer. VMs run on a Host. Guest operating system. This is the operating system that is running inside the VM and used by your users. Theoretically, VirtualBox can run any x86 operating system (DOS, Windows, OS/2, FreeBSD, OpenBSD), but to achieve near-native performance of the guest code on your machine, a lot of optimizations had to be made to VirtualBox that are specific to certain operating systems. So while your favorite operating system may run as a guest, VirtualBox officially supports and is optimized for Windows, Linux, BSD and Solaris. Guest Additions. This refers to special software packages which are shipped with VirtualBox but designed to be installed inside a VM to improve performance of the guest OS and to add extra features. Infinity Server. This is a server which defines and manages VMs and their data. The infinity Server runs scheduled events like snapshots, backups and replication. It is managed by regular users and administrators with the Infinity Administration program and the Infinity Agent . User. A user is a person with an account on the Infinity Server. Users can have administration rights to manage all VMs, or users can be limited only to running VMs created for them. Users can be given the right to create or destroy VMs, or not. Regular Users (users without administration rights) only have access to VMs assigned to them whereas users with administration rights can access all VMs. 6 / 128 Infinity Help - Terminology Storage Pool. Storage Pools are made up of one or more physical hard drives on the Infinity server. The Infinity server makes disk space available from Storage Pools available to VMs as virtual hard drives. An Infinity Server can have multiple Storage Pools. Storage Pools can and should be created with redundancy to protect them from hard drive failure. Host. This is a physical computer where virtual machines can be run. These computers must have VirtualBox, Java and the Infinity Agent software installed. A single Infinity server supports many Hosts depending on licensing. Infinity Agent. The Infinity Agent is software installed on the Host. It manages the creating and execution of the VMs. Users can use its interface to boot and access their VMs. The Agent can be configured to run VMs in kiosk mode where the VM runs full-screen and access to the Host is restricted. Host Group. A Host Group is a grouping of one or more Hosts where VMs run. Each VM created with Infinity is assigned to a Host Group. When a VM is booted, it will boot on one or all of the Hosts in the Host Group depending on the Host Group type. The Infinity Agent on the Host will create a local VM with VirtualBox and the VM will run using the resources of the Host. VM Group. A VM Group is a group of VMs and Templates created by users that can be quickly Cloned and applied to a Host Group as a single unit. Infinity Administration Console. This is the main administration interface used by users with the appropriate rights to create and manage VMs and the Infinity Servers. Snapshot. A Snapshot is a point-in-time copy of a VM or hard drive. Snapshots are used for protecting data from accidental deletion and corruption within a VM. Snapshots are also used when Cloning 7 / 128 Infinity Help - Terminology (Copying), Backing up and Replicating VMs. Snapshots are located on the server so they do not provide protection from server pool failure. Snapshots are quick and efficient, the storage space used starts near zero and only grows as data is changed on the snapshoted drive by the VM. VMs can be regularly snapshotted by Infintiy. The number of Snapshots per VM is technically practically unlimited, but should be limited to a few thousand. To protect from server Storage Pool failure, Backups or Replication should also be configured on the Infinity Server. Backup. A Backup is a copy of a hard drive or VM as a file. Backups can therefore be stored off site and provide protection in the event of disaster. Infinity supports Full, Incremental and Differential block level backups of VMs. Backups can be manually created or scheduled to run automatically by the Infinity server. Replication. When multiple Infinity Servers are available, a VMs hard drives can be configured to exist on two servers. While the VM is running, it will be accessing data from one server, but any data changes will automatically and regularly be copied to the other server. This is a form of asynchronous replication. In the event of server failure, the VM can access data on the second server. VMs can be up and running again in a couple of minutes. Clone. A Clone is an exact copy of a VM or hard drive and all its data. Clones are “Thin” which means that they only store the differences between the original VM and the clone. A Clone of a 10 Gigabyte VM starts off only using Kilobytes of storage on the server. As data on the Clone changes, the space used by the Clone will increase. Template. Is used to quickly create preconfigured VMs. A Template is technically a VM but is not used directly by users. An authorized user first creates a VM and installs the guest OS and applications in it. That VM is then designated as a Template. Later when creating VMs, users will be presented with a list of Templates. If the user selects a Template, the Template will be cloned. The new VM is an exact copy of the Template. Disk space in the Servers Pool will also be saved as the new VM will share most of its disk usage with the Template. Backup Profile. 8 / 128 Infinity Help - Terminology A Backup Profile is similar to a Template but is used for configuring Snapshots, Backups and Replication. A number of Backup profiles can be created to protect VMs in different ways. When a Back Profile is applied to a VM, that VM will be protected as specified in the Backup Profile. VMs are not tied to a Backup Profile. Sparse Drives. A Sparse virtual hard drive, commonly called a "Thin" drive only uses as much space in the servers storage pool as is written to the drive by the VM. Regular non sparse,"Thick", virtual hard drives, use as much space in the servers storage pool as the size of the drive regardless of the amount of data written to the drive. Sparse drives allow you to configure many more virtual hard drives than the server actually has space for in its storage pool. A 1 TB sparse virtual drive can be created even if the servers storage pool only has 1 GB of space available, but the VM would only be able to write 1 GB of data to the drive. See Sparse Hard Drives for more information. Dynamic Reservation. Dynamic reservation is a feature of Infinity used with sparse(thin) disks to ensure that some amount of space is guaranteed to be available to a VM if the Infinity servers storage pool reaches its maximum capacity. See Dynamic Reservation for more information. Virtual Network. Infinity supports the creation of Virtual Networks. VMs with network interfaces attached a Virtual Network can only communicate with other VMs with network interfaces on the same Virtual Network. Virtual Network interfaces can communicate across Hosts. Network packets sent on a Virtual Network are sent between Hosts by multicasting the datagrams on the Hosts actual network. Infinity supports up to 50 Virtual Networks. Teleportation. Moving a VM while it is running from one Host to another is called teleportation. Balloon Memory. VirtualBox can change the amount of host memory that a VM uses while the machine is running. Because of how this is implemented, this feature is called "memory ballooning".VirtualBox supports memory ballooning only on 64-bit hosts, and it is not supported on Mac OS X hosts. Normally, to change the amount of memory allocated to a virtual machine, one has to shut down the virtual machine entirely and modify its settings. With memory ballooning, memory that was allocated 9 / 128 Infinity Help - Terminology for a virtual machine can be given to another virtual machine without having to shut the machine down. When memory ballooning is requested, the VirtualBox Guest Additions (which run inside the guest) allocate physical memory from the guest operating system on the kernel level and lock this memory down in the guest. This ensures that the guest will not use that memory any longer: no guest applications can allocate it, and the guest kernel will not use it either. VirtualBox can then re-use this memory and give it to another virtual machine. The memory made available through the ballooning mechanism is only available for re-use by VirtualBox. It is not returned as free memory to the host. Requesting balloon memory from a running guest will therefore not increase the amount of free, unallocated memory on the host. Effectively, memory ballooning is therefore a memory overcommitment mechanism for multiple virtual machines while they are running. This can be useful to temporarily start another machine, or in more complicated environments, for sophisticated memory management of many virtual machines that may be running in parallel depending on how memory is used by the guests. Page Fusion. Whereas memory ballooning simply reduces the amount of RAM that is available to a VM, Page Fusion works differently: it avoids memory duplication between several similar running VMs. In a server environment running several similar VMs (e.g. with identical operating systems) on the same host, lots of memory pages are identical. VirtualBox's Page Fusion technology, introduced with VirtualBox 3.2, is a novel technique to efficiently identify these identical memory pages and share them between multiple VMs. VirtualBox supports Page Fusion only on 64-bit hosts, and it is not supported on Mac OS X hosts. Page Fusion currently works only with Windows guests (2000 and later). The more similar the VMs on a given host are, the more efficiently Page Fusion can reduce the amount of host memory that is in use. It therefore works best if all VMs on a host run identical operating systems (e.g. Windows XP Service Pack 2). Instead of having a complete copy of each operating system in each VM, Page Fusion identifies the identical memory pages in use by these operating systems and eliminates the duplicates, sharing host memory between several machines ("deduplication"). If a VM tries to modify a page that has been shared with other VMs, a new page is allocated again for that VM with a copy of the shared page ("copy on write"). All this is fully transparent to the virtual machine. You may be familiar with this kind of memory overcommitment from other hypervisor products, which call this feature "page sharing" or "same page merging". However, Page Fusion differs significantly from those other solutions, whose approaches have several drawbacks: 10 / 128 Infinity Help - Terminology 1. Traditional hypervisors scan all guest memory and compute checksums (hashes) for every single memory page. Then, they look for pages with identical hashes and compare the entire content of those pages; if two pages produce the same hash, it is very likely that the pages are identical in content. This, of course, can take rather long, especially if the system is not idling. As a result, the additional memory only becomes available after a significant amount of time (this can be hours or even days!). Even worse, this kind of page sharing algorithm generally consumes significant CPU resources and increases the virtualization overhead by 10-20%. 2. Page Fusion in VirtualBox uses logic in the VirtualBox Guest Additions to quickly identify memory cells that are most likely identical across VMs. It can therefore achieve most of the possible savings of page sharing almost immediately and with almost no overhead. 3. Page Fusion is also much less likely to be confused by identical memory that it will eliminate just to learn seconds later that the memory will now change and having to perform a highly expensive and often service-disrupting reallocation. PXE. Pre boot eXecution Environment allows computers to boot directly from the network instead of a local drive. Java. Java is a computing platform used by infinity allowing you to run Infinity from any computer that has Java installed. Infinity needs Java version 6 or higher. Web Start. Web Start automates the installing and running of the Infinity Agent, Administrator Console and Remote Access programs when selecting them from the Infinity Servers web page. ZFS ZFS is a combined file system and logical volume manager designed by Sun Microsystems. The features of ZFS include data integrity verification against data corruption modes, support for high storage capacities, integration of the concepts of file system and volume management, snapshots and copy-on-write clones, continuous integrity checking and automatic repair. 11 / 128 Infinity Help - Architecture Architecture The following a basic architectural view of the Infinity Virtualization Platform. The Infinity server runs Solaris 11, OpenIndiana, OmniOS, Red Hat or CentOS, and stores the configuration of all VMs and their virtual hard drives. The Infinity server is an iSCSI SAN. The Server also runs regular tasks such as snapshot's for VMs, running backups and replication. The servers can be configured to host VMs. Multiple servers can be used and managed with the Administration Console. VMs are assigned to Host Groups. Host Groups are composed of one or more Hosts. VMs run on Hosts. A Host has Java, VirtualBox and the Infinity Agent software installed. Depending on the type of Host Group, a VM booted on a Host Group of multiple Hosts will either boot on the Host with the most free resources, or be cloned and run on every Host in the Host Group at the same time. 12 / 128 Infinity Help - Architecture The Agent software can be used on a User's desktop without VirtualBox to give the User a simple interface to basically manage and access their VMs through RDP. All VM data is kept on, and managed by the Infinity server. The Infinity server uses the Agent to create and manage VMs on Hosts. VMs virtual hard drives on the Infinity server, are access by VirtualBox through the iSCSI protocol. 13 / 128 Infinity Help - Viewing servers with the Administration Console Infinity Server. The Infinity Server is a computer with OpenIndiana, OmniOS, Solaris 11 or Centos/Red Hat Linux OS installed on it as well as the Infinity Server software package. Infinity and your VMs use the disk storage configured on the server. When virtual hard drives are created by an Infinity user through the Administration console, Infinity creates ZFS Volumes and shares them through iSCSI. When a VM is booted its virtual hard drives will be shared with security settings that allow only the Host running the VM to access them. The server should be configured with at least Gigabyte networking and the Storage Pools should be configured with data protection eg. mirroring. Proper network configuration is essential and the server should be configured with a static IP address. Infinity includes a simple web server to facilitate the installing and running of the Infinity Agent, Administration Console and Remote Access interface. Viewing servers with the Administration Console Users with the Administration Role can view and manage Infinity servers with the Administration Console. 14 / 128 Infinity Help - Viewing servers with the Administration Console Each Infinity server will have at least one Storage Pool, which needs to be "OnLine". Only online Storage Pools will be used to create virtual hard drives for VMs. Storage pools are ZFS pools on the server. "Service Reset" restarts the Infinity Server service on the server "Reboot" reboots the physical server. "Power off" powers off the physical server. If there is an upgrade for the Infinity software available, the Upgrade button will be enabled. "Logs" will show the servers system logs. 15 / 128 Infinity Help - Installing Infinity on your server Installing Infinity on your server Infinity installs on any computer running Solaris 11, OpenIndiana 151a and greater, OmniOS, Red Hat or CentOS with ZFS on Linux installed. Solaris 11, OpenIndiana and OmniOS use software repositories located on the Internet to make software available to install. The root user can use the pkg command to search the repositories and select software to download and install. TechSologic has made the Infinity software available for download in such a repository. By using this method of software distribution, your server will automatically have access to the latest software updates. An RPM is available for Red HaT and CentOS. The software will install to /infinity. Prerequisites • • • • • • • • • • If Infinity is installed in a VM, the VM must have a bridged network interface. Internet access to http://repository.techsologic.com during the installation. Servers must have static IP address if clustered. See Setting a static IP in Solaris11 Root access or equivalent on your server. Servers hardware and OS must be properly configured, in particular, network name resolution should be fully configured for both forward and reverse lookups. Port 80 should be free as it is used by the Infinity service. Port 81 is used for network communication Port 443 is used by the Proxy service. You can disable this service if you do not plan to use it. Linux requires "ZFS on linux" installed. A ZFS Pool to be used as a Storage Pool. You can use the default root ZFS pool, but it is recommended that you create a separate ZFS Pool for your VMs and disable the root pool from use by Infinity with the Administration Console after the installation is complete. Name resolution In the /etc/hosts file, associate the hostname with the IP # hostname infinityserver1 # cat /etc/hosts # 16 / 128 Infinity Help - Installing Infinity on your server # Internet host table # ::1 localhost loghost 127.0.0.1 localhost loghost 192.168.1.52 infinityserver1 Solaris Adding the software repository To be able to install Infinity, your server has to be configured with the location of the TechSologic repository on the Internet. Add the Infinity software repository. # pkg set-publisher -g http://repository.techsologic.com techsologic.com If all goes well you will see the new publisher added to your OS. # pkg publisher PUBLISHER solaris techsologic.com TYPE STATUS URI origin online http://pkg.oracle.com/solaris/release/ origin online http://repository.techsologic.com/ Installing the software To install infinity, run the following command: # pkg install infinity/server When the installation completes, start the Infinity/server service. # svcadm enable infinity/server Once the server configuration is completed, the infinity/server service will be "online". This could take a couple of minutes. # svcs infinity/server STATE STIME FMRI 17 / 128 Infinity Help - Installing Infinity on your server online 13:31:16 svc:/service/infinity/server:default Services installed As part of the installation, four services will have been added: # svcs -a | grep infinity disabled Jun_27 svc:/service/infinity/agent:default online Jun_27 svc:/service/infinity/proxy:default online Jul_01 svc:/service/infinity/server:default The server service is the actual server service. The agent service can be configured and enabled to allow running VMs on the server. The proxy service allows remote access to the VMs by users through RDP from a Java enabled computer. Bare Metal PXE support The PXE support package is 771MB. To add Bare Metal support, install one of the following packages: For Solaris 11, install the infinity/pxe package. For OmniOS and OpenIndiana, install the infinity/pxecfg package. # pkg install infinity/pxecfg Linux The server service can be factory reset with the /infinity/bin/factoryReset script. All configuration will be lost, but configured VM hard disks will be preserved. The servers logs are located under /infinity/logs Your server is now ready and listening on port 80 for web access. 18 / 128 Infinity Help - Installing Infinity on your server From a computer with Java 6 or higher installed, click on the "Administrator" link to install and run the Administrator Console. If asked what to run the link with, select "Web Start". Trust the presented certificate. The administrator account is "admin" and its default password is "admin" The default password should be changed. 19 / 128 Infinity Help - Infinity Administration Console. Infinity Administration Console. The Infinity Administration Console is used by Users and Administrators to manage VMs and the Infinity servers. The Administration Console can be accessed and installed in the same way as the Agent by clicking on the administration link on the Infinity Server with a Java enabled web browser. The default administrator account is “admin” and its default password is “admin”. Regular user accounts should be created for users. The console uses port 81 to communicate with the Infinity server for management activities. Other ports may need to be opened for backups. 20 / 128 Infinity Help - Infinity Administration Console. 21 / 128 Infinity Help - Introduction to the Administration Console Introduction to the Administration Console The Administration Console is the main user interface used to manage Infinity. To use the interface, the users computer must have Java installed and the user must have an account on the Infinity Server. The users account privileges restrict what the user can do when using the console. Regular users will only have access to objects that are assigned to them or created by them, but Administrators will have access to everything. The Administration Console makes extensive use of "Drag and Drop" and "Context Sensitive Menus (Right Clicking)". If you want to do something, "Right Click" on it. If you want to move something or give access to something "Drag and Drop" it. To access context sensitive help press the help key board button, usually F1. The examples below are with the Admin account so they show everything configured on the servers. The following is an overview of the interface. At the top of the interface there are a six tabs. • Home: The Home tab is used to manage most objects ( Hosts, Users, VMs, Virtual hard drives and Servers). • Templates: Where VM templates are viewed and managed • VM Groups: VM groups are groups of VMs that can be applied together to a Host Group • Tasks: Tasks are reoccurring jobs performed by the server such as snapshots and backups. All server tasks can be viewed and managed from this tab. • Back Profiles: Where Backup Profiles are listed, created and applied to VMs • Backups: Shows jobs that are moving data between computers ( Hosts and Servers ). Currently running and completed backups can be managed here. The Home Tab 22 / 128 Infinity Help - Host groups: The Home tab has buttons at the top left that allow you to select what category of objects you want to manage. Host Groups: Users: VMs: Servers Host groups: "Host Groups" shows the groups and Hosts of those groups. By selecting (clicking or double clicking) objects in the tree view, you will see details of the selected object (Group or Host) on the details panel to the right. 23 / 128 Infinity Help - Host groups: In this view we can see that there are four Host Groups, group “Lab1” which has five Hosts, “solaris11” with one Host called solaris11, , “test” which has no online Hosts, and lydia-desktop. Five VMs are assigned to Host Group "solaris11". Host solaris11 has been selected. The details of Host solaris11 are shown. Host solaris11 of the Host Group solaris11 has 5 VMs running on it. The Hosts configuration can be changed here. The Hosts agent software must be restarted for any changes to take effect. Restarting the Hosts agent will not affect any running VMs. The Host has a configuration property “Host Group Name” if you change this property, the Host will become part of a Host Group of the name you use. If a Host Group of this name already exists, the Host will be added to the existing Host Group. If the Host Group does not already exist, one will automatically be created. By default each host will be part of a Host Group with the same name. 24 / 128 Infinity Help - Users: You can also change the Host Group of an Host by dragging it to another Host Group. Users: "Users" shows user accounts configured in Infinity. By selecting (clicking or double clicking) users in the tree view, you will see details of the selected user on the details panel to the right. 25 / 128 Infinity Help - VMs: There are currently three Users, the default admin account, mike, and andy who has administration rights. The account mike currently has access to four VMs which are all running. To create a new user you can “right click” in the tree view to the left or in the menu at the top File # New # User VMs: "VMs" shows VMs configured in Infinity. By selecting (clicking or double clicking) VMs in the tree view, you will see details of the selected VM on the details panel to the right. 26 / 128 Infinity Help - VMs: There are currently fourteen VMs created in Infinity. The settings of Win7 are shown in the details panel to the right of the tree view. It is currently powered off and is assigned to Host Group lydia-desktop. Win7 currently has one hard dive Win7-0. The hard drive Agent-1-0 has a single snapshot. Infinity easily supports hundreds of snapshots. Both hard drives and VMs can be snapshotted. The bars at the bottom of the VM details panel can be clicked to expand them which allows you to change additional settings of the VM. 27 / 128 Infinity Help - Servers: Here we have clicked on the Hard Drive bar where we can manage the VMs virtual hard drives. In the button bar in the middle of the details panel there are buttons which can use be to perform various actions to the VM. The “Template” button is used to change a VM into a Template. To create a new VM, “right click” in the tree view to the left or in the menu at the top File # New # virtual machine Servers: 28 / 128 Infinity Help - Servers: "Servers" shows available Infinity Servers. By selecting (clicking or double clicking) Servers in the tree view, you will see details of the selected Server on the details panel to the right. There are three Infinity servers, “solaris11”, "mslatop" and “main”. The Infinity Server “solaris11” has eleven virtual hard drives. One virtual hard drive "PXECore" is not assigned to a VM (Brown), and a virtual hard drive called Agent-0-0 is a secondary drive used in replication. The server "main" has an error in its logs as indicated by the red X symbol. 29 / 128 Infinity Help - Servers: Infinity Servers can be added by users with administration rights by Edit # Add Server. Storage Pools represent storage on the Infinity Server that can be used to create virtual hard drives. Only Storage Pools marked “OnLine” will be used for creating hard drives. By clicking on a storage pool you can see details about that pool. Activity logs of the selected server can be viewed my clicking the “Logs” button. If Email has been configured, pressing the Email button will Email the selected log to the configured Email address. Clearing the servers Error log will clear any warnings. Email support can be configure by users with administration rights by Edit # Configure Email. Statistics of the Server. 30 / 128 Infinity Help - Details By buttons: Disk I/O shows the load of the busiest hard drive on the server. Details By buttons: The Details By buttons change how objects are viewed in the object tree. For viewing VMs you can choose by Snapshot or Hard Drive: Shows The VMs hard drives. Shows the VMs snapshots. For Host Groups you can choose to view by Host or VM. Shows the Host Groups Hosts Shows the Host Groups VMs 31 / 128 Infinity Help - List Tabs: For Hard Drives you can choose to view by Snapshot or Replication. Shows the Hard Drives Snapshots Shows the Hard Drives Secondary drive. List Tabs: The List Tabs allow you to see your objects (VMs, Host Groups, Servers, Users and Hard Drives) as Lists. This provides two major benefits. 1. In the list you can select multiple objects and perform functions on them such as deleting many VMs. 2. “Drag and Drop” can be used in many places within the Administration Console and the list along with the object tree facilitate using this feature. 32 / 128 Infinity Help - List Tabs: For example if you wanted to give a user access to a VM, you could select “Users” view in the object tree, and “VMs” in the List Tabs. You would see “Users” to the left and a list of “VMs” to the right: You could then drag VMs from the right and drop them on the user you what give access to those VMs. 33 / 128 Infinity Help - Templates Templates Templates are VMs that you have created but do not use directly. Templates are cloned to create VMs that you boot on Hosts. Templates can not be assigned to Hosts, so the data on their drives is protected. Once a VM is changed into a Template, it can not be undone. But you could create a VM from the template, the delete the template effectively accomplishing the same thing. If changes are made to a template, they will not take effect unless the template is later snapshotted. This is due to the fact that VMs are actually created from the last snapshot of the template. The templates snapshots can be delete but a new snapshot will be created the next time a VM is created from the template. VMs can be changed into Templates by pressing the “Template” button at the far right of the VMs “Actions” bar. Available Templates can be see in the “Templates” Tab. Users must be assigned Template. When creating VMs, the Template can be selected 34 / 128 Infinity Help - Templates . Multiple VMs can quickly be created from a Template by increasing the number of copies. The VMs names will have a number appended to them. The VMs could renamed as you like afterwards. 35 / 128 Infinity Help - VM Groups VM Groups Users can create groups of VMs and Templates that can be applied to Host Groups. When a VM Group is applied to a Host Groups, clones of the VMs and Templates will be assigned to the Host Group. This feature helps you to quickly deploy a set of VMs in one simple step. To create a VM Group log into the Administration console. Select the VM Groups tab. Right click -> Create in the VM Group list or press the New button at the bottom left. A dialog will appear prompting for the VM Group name. 36 / 128 Infinity Help - VM Groups Enter the name of the group you want to create. Once the Group is created, VMs and Templates to be deploy as a single unit can be added. Select the VM Group name you just created from the VM Group list. Click the add button at the bottom of the VMs list. A Dialog listing you VMs and Templates will appear. Select the VMs or Templates and press OK. (you can select multiple entries by holding down the SHIFT or CTRL button). Your VM Group is now ready to apply to a Host Group. To apply a VM Group, press the Apply button at the bottom right of the VM Groups tab. A dialog will appear allowing you to chose the Host Group you would like to apply the VM Group to. 37 / 128 Infinity Help - VM Groups Select the Host Group and press OK. Infinity will now clone each of the VMs in the group and assign them to the Host Group. If the Host Group is configured as a Replicated Host Group, the clones will then be cloned again for each of the Hosts in the Replicated Host Group. You can confirm the operation by ... • Selecting the Hosts Groups list view then • Select the Host Group which you applied the VM group to, then • Select the radio button 'Host Group details By' ... VM (at the bottom center of administration console). 38 / 128 Infinity Help - Tasks Tasks Tasks are units of work regularly performed by the Infinity server such as scheduled snapshots, backups and replication. Tasks performed for a VM can be managed from the tasks properties of the VM in the Infinity Console by a user with access to that VM. When a user with administration rights is logged into the Administration Console, they can view and manage all tasks for all VMs and Users. 39 / 128 Infinity Help - Backups Tab Backups Tab When ever the Infinity server is moving data between servers or to Hosts a backup job is created that can be viewed and managed by administrators from the Infinity Console. Selecting a job and right clicking will give the User the option to cancel the job. Deleting a job does not stop the job, deleting only removes the job status from the Backups Tab. 40 / 128 Infinity Help - Host. Host. A Host is a computer that has Java, VirtualBox and the Infinity Agent installed on it. Hosts can be running any OS supported by VirtualBox. A Host can be headless (no graphical screen) in which case the VMs must be accessed remotely. VirtualBox can be downloaded from www.virtualbox.org. If the VirtualBox Extensions have been installed, the VMs can be accessed remotely through RDP. When a VM is booted on a host, The Infinity Server uses the Infinity Agent to create a VM in VirtualBox using the VM setting configured on the server combined with settings on the Agent. VirtualBox has a built-in iSCSI initiator that is used by the VM to access its virtual hard disks from the Infinity Server. If the Bare Metal PXE package has been installed on the infinity server, a computer can be turned into a host simply by booting it from the network. When the Agent is started on a Host, it authenticates to the Infinity server and either joins an existing Host Group or creates a new one. By default the Agent will try to join a Host Group of the same name as the Host the Agent is running on. Hosts can be managed with the Administration Console or through the Agent settings on the Host. 41 / 128 Infinity Help - Host. Host solaris11 belongs to the Host Group solaris11. It has 369 GB or space for backing up VMs and hard drives. 11.7 GB or RAM are available to VMs. The Hosts CPU is only 1% used. One VMs is configured on the Host and it is running (blue). A Host can be moved to another Host Group by either changing the "Host Group Name" property and restarting the Agent software, Or by "Drag and Dropping" the Host to another Host Group. The amount of RAM available to used by VMs on a Host can be capped or over committed by the RAM Cap entry in Agents settings. Typically a Host is a users workstation. This allows the user to run their VMs independently and take advantage of the processing power of their workstation. VMs can be run in full screen or seamless mode and can have access to local devices and files. Hosts can also be configured to run a VM in Kiosk mode where the VM is in full screen mode and anyone using the VM can not gain access to the actual Host OS. VMs can be configured to automatically start when the Agent software starts by selecting the "auto boot" check box in the VMs properties. 42 / 128 Infinity Help - Configuring a Host to run VMs Configuring a Host to run VMs If the Bare Metal PXE package has been installed on the server, a supported computer can be booted from the network to use it as a Host. A Host used to run VMs must have Java 6 or greater and VirtualBox installed. Or if the PXE package is installed on the Infinity server, the computer can be booted from the network. You must have an account on your Infinity server. Java can be downloaded from http://www.java.com or you can use OpenJDK if it is available for your OS. VirtualBox can be downloaded from http://www.virtualbox.org. For RDP remote access to running VMs, the VirtualBox extentions must be installed.They are available for download from the same site. Once Java and VirtualBox have been installed, the Infinity Agent software can be installed on the host by clicking on the Agent link on your servers web page. If prompted what to run the link with, select "Web Start" You will have to trust the certificate presented by the server. The Agent software will be installed and started automatically. A shortcut to start the Agent might be created on your desktop for you to start the Agent in the future. 43 / 128 Infinity Help - Configuring a Host to run VMs A login dialog will appear. The default Host Group will be the Hosts name. You can change the Host Group by entering your preferred name. You can have the password saved so that you will not be prompted each time the Agent starts. If the Agent finds your VirtualBox installation, the amount of free memory on your agent for running VMs will be shown at the bottom right of the Agent Console. 44 / 128 Infinity Help - Configuring a Host to run VMs If you had not installed VirtualBox in the default location, you will have to configure the Agent with its location. Edit -> Configuration The configuration settings affect how VMs are configured in VirtualBox and how the Agent connects to servers. If the Host Group the Host belongs to is configured as a Distributed Host Group, any VMs assigned to the user account that was used to login will be listed.If the Host Group is a Replicated Host Group, the VMs assigned to the Host will be listed. See the virtual machines section for more information. When a VM is powered off, its configuration will be removed from VirtualBox unless the Agents Log Level is set to ALL . 45 / 128 Infinity Help - Host Group Host Group VMs are assigned to Host Groups to control where they run. A Host Group is made up of one or more Hosts There are three types of Host Groups: Distributed VMs assigned to a Distributed Host Group will run on one of the Hosts in the group. When the VM is booted, the Infinity server will poll the Hosts in the group and select the Host with the most available resources. If non of the Hosts in the group have enough RAM to run the VM an Error will be shown. Distributed Host Groups allow you to treat many Hosts as a single place to run VMs. Replicated VMs assigned to a Replicated Host Group will be cloned for each of the Hosts in the group, and each Host will be assigned its clone. Replicated Host Groups are used when you want each Host to have an independent copy of all VMs in the Host Group. If a new Host joins the group, a copy of each VM in the group will be created for the Host. The VMs assigned to Hosts will be named with the VM name and the Hosts name. Users logged into the Host will see only the VMs assigned to the Host and not the usual list of VMs assigned to the user. When VMs are powered off, their configuration in VirtualBox will persist. If a VM is removed from the Host Group, the clones will be removed from the Hosts and deleted from the server. If a VM is added to the group, the VM will be cloned and each Host will be assigned a clone. VMs in a Replicated Host Groups are easier to manage if applied from a VM Group. An example use case is a classroom where each student needs the same set of VMs. The classrooms computers are represented by a Replicated Host Group. For each course, a VM Group could be created. At the beginning of a class, the appropriate VM Group is applied to the classrooms Host Group. The VMs are quickly ready and can all be booted simultaneously from the Host Group. BareMetal Some operating system support booting directly from iSCSI targets. If the PXE service has been installed on the Infinity server and an OS has been installed properly on a virtual hard drive of the Infinity server, a computer can boot directly from the Infinity server without any virtualization. A Bare Metal Host Group support one physical host and is identified by its ethernet address. This feature is currently in beta testing mode and not fully supported. 46 / 128 Infinity Help - Host Group Renaming a Host Group Technically a Host Group can not be renamed. Create a new Host Group and move the Hosts to the new Host Group. Users can be assigned existing Host Groups to run their VMs on. If a user does not have access to a Host Group and they attempt to create a Host Group of the same name, the conflict will be resolved by appending the users name to the new Host Group. Users sharing a Host Group will not be able to access each others VMs. But the VMs could affect each other performance wise if they ran on the same Host. Removing VMs from a Replicated Host Group If the original VM is deleted, all its clones will also be deleted and removed from the Hosts. The original VMs are assigned to the Host group, so you can select the VM from the Host Groups details and "Right click, Delete". 47 / 128 Infinity Help - Infinity Agent. Infinity Agent. The Infinity Agent is a Java program installed on a Host and is used by users and the Infinity Servers to manage VMs. Configuration settings on the Agent control VM settings like network, sound, 3D and Kiosk mode. Any Changes made to a VM with the VirtualBox tools are temporary and will be lost. The Agent includes a GUI that allows configuration of the Agent and presents the logged in user with a list of their VMs. Users can choose to boot VMs locally or access a VM running on a remote Host through RDP if the Host running the VM has the VirtualBox extensions installed. The Agent can be configured to automatically login with predefined credentials. The Agent software can be installed by using Java WebStart by pointing a web browser at the address of the Infinity Server and clicking the Agent link. Javaws program is used to run the link. If your web browser does not recognize the link, install Java from www.java.com . The Agent can be run on computers that do not have VirtualBox installed (non Hosts). Users then will still be able to access their VMs and connect through RDP to VMs running on a remote Host. If the "Save Password" check box is selected, the next time the agent is started, it will automatically connect with the account entered. The saved login settings can be cleared with the Agent GUI, File -> clear saved password. 48 / 128 Infinity Help - Infinity Agent. If the VirtualBox installation is found by the Agent, the amount of free memory available on the Hosts will be shown in the box at the bottom right of the Agent GUI. When a user starts the Agent on a Host, if the Agent belongs to a Distributed Host Group, the user will have access to their VMs. If the Host Group is a Distributed Host Group, the user will have access to the VMs assigned to that Host. VMs running on a Host are created in VirtualBox using both the VMs configuration settings on the Infinity server and the Agents configuration settings. 49 / 128 Infinity Help - Agent configuration settings Agent configuration settings VirtualBox Path This is the location of the VirtualBox binaries on the Host. Agent Name This is the hostname of the Host that the Agent software is installed on. Host Group Name This is the name of the Host Group that the agent belongs to. Images assigned to this group can be run on this Host. Server List 50 / 128 Infinity Help - Agent configuration settings This is the list of Infinity servers known by the agent. If there are multiple servers configured and the server the Agent is logged into fails to respond, the Agent will automatically attempt to connect to the other servers in the list. The Agent regularly polls its server to detect failure. Backup Directory This is the location the Agent will write VM backups too. The agent will execute preBackup and postBackup scripts if they exist. The scripts must be located in the backup directory. preBackup is run as "preBackup <backup file name> <VM name>". postBackup is run as "postBackup <backup file name> <VM name> <backup job status>". Possible backup job status messages are "Completed", "Cancelled" or "Error". Login ID and Password If the Login ID and password are set, on Agent start up, the Agent will use these settings to automatically login. If the login fails, the Agent will display the login dialog. Log Level This sets the Agents logging Level. INFO is the default level. For debugging purposes, the Agent can be configured to log more details. All logs all messages. When the Log Level is set to ALL, the VirtualBox configuration for VMs will not be removed as usual when a VM is powered off to allow the use of VirtualBox tools to help debug VM issues. Agent Interface This is the network card the Infinity server will contact the Agent on. Bridged Interface VMs configured to use Bridged Interfaces will be connected to this NIC Audio Support VMs configured with audio support will use this facility on the Host to produce sound. RDP Command 51 / 128 Infinity Help - Agent configuration settings If the user attempts to make an RDP connection to a remote VM, By default the built in Java RDP client will be used. You can configure the Agent to use another program instead by entering the command here. Variables %username, %password, %address and %port are supported. For example: mstsc /v:%address:%port RAM Cap Maximum Host RAM used by VMs. A cap of zero means that there is no cap on RAM, VMs can use all RAM available on the Host. Setting it higher than the Hosts actual amount of ram will allow the running of more VMs but could lead to problems if the VMs actively use all the RAM configured to them. Headless If Headless is enabled, VMs will be started on the host in the background. VM access will be remote only. Full Screen VMs will be started in full screen mode. 3D 3D acceleration will be available on all VMs. If the 3D checkbox is greyed out, 3D support is not available on this Host. To take advantage of 3D support, the VMs must have the VirtualBox utilities installed with 3D support enabled in the VM. Use Host Cache By default the VirtualBox will not cache disk IO between the Host and the Infinity server but this option can be enabled. Kiosk 52 / 128 Infinity Help - Agent configuration settings In Kiosk mode, VMs will be started in full screen and access the the VirtualBox tools will be disabled. But if the VM is shut down, users will have access to the host system. Host RDP By default the Agent configures VirtualBox to use Infinity accounts to control remote RDP access to the VMs running on the Host. If Host RDP is enabled, the Agent will configure VirtualBox to use accounts on the Host system to authenticate RDP access to VMs. Auto Reset When enabled, causes the Agent to restart VMs that fail. SeamLess The individual windows that are displayed on the desktop of the virtual machine can be mapped on the host's desktop, as if the underlying application was actually running on the host. Page Fusion In a server environment running several similar VMs (e.g. with identical operating systems) on the same host, lots of memory pages are identical. Page Fusion technology is technique to efficiently identify these identical memory pages and share them between multiple VMs. Note Page Fusion supports only on 64-bit hosts, and it is not supported on Mac OS X hosts. Page Fusion currently works only with Windows guests (2000 and later). 53 / 128 Infinity Help - Bare Metal Support Bare Metal Support VMs can be run on computers that do not have a hard drive or operating system installed. This is useful for security reasons or simply to use computers for running VMs without the need to access the OS installed on the computers. Data on the hosts hard drive is totally unaffected. Infinity makes use of PXE to allow a computer to boot from the network when the infinity/PXE package is installed on an Infinity server. Bare Metal Support is not "Thin Client". VMs run on and use the resources of the local Host computer. A preconfigured Arch Linux OS image with Java and the Infinity software will boot from the network. The infinityPXE service automatically configures proxy DHCP through dnsmasq. Install the PXE service on the Infintiy server The PXE package is almost 900MB and includes support for both 32bit and 64bit computers. On an Infinity server running Solaris11, install the infinity/pxe package. # pkg install infinity/pxe For OpenIndiana and OmniOS, install the infinity/pxecfg package. # pkg install infinity/pxecfg For Linux, install the TSOLInfinityPXE rpm. # yum install TSOLInfinityPXE The name of the service is infinityPXE. # service infinityPXE status Booting the default Bare Metal host Consult your computers documentation to enable PXE and boot from the network. The Infinity Bare Metal Agent is a network bootable OS called Tiny Core with VirtualBox OSE and the Infinity software pre installed. 54 / 128 Infinity Help - Bare Metal Support The Infinity Agent is started automatically. By enabling "Kiosk" and "Full Screen" mode in the Agents configuration, VMs can be effectively run on the computer without users being aware that they are using a VM. Remote access is provided by VNC for VMs running on the Infinity Bare Metal Agent. The user name and password to access the VMs is that of the user who logged into the Agent. 55 / 128 Infinity Help - User Accounts User Accounts To access Infinity, users must authenticate to the Infinity server with a user account. The users account settings control what the user can access and do with Infinity. There are two broad groups of users in Infinity, Administrators and non administrators. Users who have administrative accounts have unrestricted access to everything on the infinity server therefor they can access all VMs and the VMs data. Administrative accounts should be used sparingly. The default administrator account is "admin" and the default password for the admin account is "admin". You must/should change the default admin account password. The admin account can not be deleted or renamed because it is used by the Infinity server. You should create at least one administrator account for you to use. Regular users can create and manage only their own VMs, they do not have access to VMs and other objects they have not created themselves or been granted access to. Restricted users can not create or delete VMs or other objects. Andy has administrator access, mike does not. Users accounts with Administrator access will have a brown icon and non administrator account are blue. 56 / 128 Infinity Help - User Accounts A users Role controls what access they are granted with Infinity. Users can be granted access to VMs, Templates, Hard Drives and Host Groups by adding the objects to the users account. Regular User Regular User accounts have the right to create and delete things, this means they can add Hosts, create VMs and boot their VMs on their Hosts. If a regular user deletes something, Infinity will simply unassign it from the users account if other users also have access to it. When the last user with access to the object deletes it, Infinity will then delete it. Regular Users can not create Users or change their account Role. Restricted User 57 / 128 Infinity Help - User Accounts These users to not have the right to create or delete anything, This means they can only run and access VMs and other objects assigned to them. Administrator Administrator accounts have unrestricted access to all objects of all users. If an Administrator deletes something it is immediately and completely deleted from the system. 58 / 128 Infinity Help - Virtual machines Virtual machines Infinity is primarily used by Users to manage their virtual machines (VMs). VMs are create by Administrators and Regular users with the Administrator Console. VMs are assigned to Host Groups and ultimately boot on Hosts. When a VM is booted on a Host, the Agent software temporarily creates a VM configuration in VirtualBox on the Host. Usually, once the VM is powered off, the VMs configuration in VirtualBox on the Host is removed. The RDP Auth setting controls the Authentication method used to control Remote GUI access to a running VM. "Host" means that authentication settings are enabled and the specific method used is configured on the Host in the Agents configuration settings. None means that there is no authentication for remote access. When the VMs RDP Auth setting is set to None, anyone can connect to the running VM with any RDP client software without being prompted to login. Details of remote access can be found here. 59 / 128 Infinity Help - Virtual machines When a user starts the Agent on a Host, if the Agent belongs to a Distributed Host Group, the user will have access to their VMs. If the Host Group is a Replicated Host Group, the user will have access to the VMs assigned to that Host. If a VM is currently assigned to a remote host and is not currently running, the user can press "Boot Remotely" to cause the VMs to boot on the remote host. Pressing "Boot Locally" will move the VM to the local Host and boot the VM on the users computer. 60 / 128 Infinity Help - VM Settings VM Settings Most changes to settings are saved immediately but require a reboot of the VM to take effect. Changing the VM OS type does not change any of the advanced VM settings. 64 bit OSs usually need IOAPIC enabled. Changing from 32 bit to 64 bit will not automatically enable this property. RAM and Video RAM To run the VM on a Host, the Host must have at least RAM+VRAM memory available to run the VM. The maximum RAM available to VMs on a Host can be capped in the Hosts "RAM Cap" configuration setting. % Shared and Fusion 61 / 128 Infinity Help - VM Settings * only supported on 64 bit Hosts. The VirtualBox client utilities must be installed in the VM. Setting %Shared configures the VM to use VirtualBoxes Balloon Memory facility. The setting represents the percentage of VM Ram that will be used as Balloon Memory. Setting Fusion enables VirtualBoxes Page Fusion for this VM. 3D Enables 3D support in the VM. The guest utilities must be installed in the VM with 3D video drivers enabled, and the Host running the VM must have 3D support enabled. Changing the VMs Host Group while it is running will cause Infinity to attempt to teleport the VM. RDP Auth controls the authentication method used when connecting to a running VM by RDP. • Host RDP Authentication is enabled and configured on the Host running the VM. • None RDP Authentication is disabled. Anyone can connect to the VM while it is running without being prompted for a user name and password. CDROM and USB support can be enabled or disabled. Auto Boot When an images Auto Boot property is enabled, this causes the the VM to be started automatically when a Host starts. Clicking on the VM icon or image at the top right opens a realizable, auto updating image of the VMs screen as seen below. 62 / 128 Infinity Help - VM Settings Double clicking on the VM image will start an RDP connection to the VM. Right clicking will bring up the usual popup menu to manage the VM. Double clicking on the background will resize the VM images to fit the window. 63 / 128 Infinity Help - VM Comments VM Comments Each VM can have a comment/description associated with it. Press Apply to save. 64 / 128 Infinity Help - VM hard drive properties VM hard drive properties The VMs virtual hard drives are listed and managed here. • • • • Selecting a hard drive will cause its properties to be displayed to the right. Size is the configured size of the drive. Used is the actual space this drive uses in the servers Storage Pool. The selected hard drives comments can be seen and edited in the "Comment" section. o Typing in the Comment window and pressing <Enter> will save the comment to the hard drive. Virtual hard drives can be added and removed by pressing "Manage Drives". 65 / 128 Infinity Help - VM hard drive properties Each VM has a hard disk controller type shown in the advanced settings of the VM. Each hard drive has a type. When a drive is selected on the left, its type is shown under the comments section. When a drive is added to a VM, you will have the option to change its type to match the VMs controller type. A VMs controller type is set when the first hard drive is added to it. Hard drives that are assigned to VMs are shown as green. Unassigned hard drives are brown. Adding a hard drive that is currently assigned to another VM will give you the option to either Move or Clone the drive. 66 / 128 Infinity Help - Hard Drives Hard Drives Hard drives created for VMs are ZFS volumes created in disk pools on the Infinity server. When a VM is booted on a Host, the ZFS volumes for that VM are shared through iSCSI to that Host. The Agent creates the VM in VirtualBox and attaches the iSCSI drive to the VM. The hard drives of an Infinity server can be viewed by selecting the server in the "Servers" view of the Administration Console. The details of a hard drive can be viewed by clicking or double clicking on the hard drive in the tree view. 67 / 128 Infinity Help - Hard Drives The size of a hard drive can be increased by pressing the "Grow Disk" button. Some configuration in the VM is likely needed to be able to use the added space depending on the file system type. Sparse drives and Dynamic reservation allow you to create many more hard drives and save space on the Infinity server. Compression is another way to save space and in some circumstances can even improve performance. Or make performance worse... Read Only. When a VM accesses a read only drive, a differencing drive will be created on the Host. The VM will have write access to its file systems, but those write will be lost when the VM is shut down. Primary. When hard drives are replicated, the primary copy is the copy of the hard drive used by the VM. Unselecting the primary check box will trigger a failover and force the secondary to become the primary and the primary to become the secondary. Auto Failover is used when the hard drive is replicated to another Infinity server. If auto failover is enabled and the server holding the primary copy of the hard drives fails, the secondary copy will automatically be promoted to the primary and the VM can be restarted. If auto failover was not enabled when a failure happend and is enabled, the hard drive will immediately fail over. IO Sync controls whether or not the Infinity server caches data writes to the iSCSI targets. Caching writes improves performance, but could result in some data loss in the case of an Infinity server failure. If IO Sync is enabled, writes are not cached and the VM will have to wait for every disk IO to be written to stable storage on the server. "Standard" enables write caching. Protecting the data stored in virtual hard drives is covered in Data Protection. and includes snapshots and backups. Hard drives can be copied between Infinity servers by drag and drop 68 / 128 Infinity Help - Sparse Hard Drives Sparse Hard Drives When you create hard drives, there is an option to make them sparse, sometimes called "Thin". Normally when you create a hard drive, space is reserved on the server equal to the configured size of the drive such that if the servers storage pool had 500GB of free space, you would only be able to create ten 50GB drives. Attempts to create more would fail even though the VMs hard drives might contain no data at all. So a 50GB VM hard drive uses 50GB of space on the server. Sparse drives are different. The space used by them is equal to the space "Used" by the VM. You wold be able to create a 50TB drive in a storage pool with only 50GB of free space. Sparse drives allow you to make better use of the space available in your servers storage pools. The problem with sparse drives is that if the servers storage pool reaches its maximum capacity, all the sparse drives in that pool will immediately be full but the OS running in the VMs will think they have space on their hard drives. This will result in and unexpected failure to write data by the VM often resulting in a hang or crash of the VM. It is therefor extremely important to monitor the free space available in the servers storage pool. If EMail is configured the Infinty server will send emails warning that the pool is close to full. Infinity has a feature called Dynamic Reservation to help protect you from the VMs failing due to a full storage pool when using sparse drives. 69 / 128 Infinity Help - Dynamic Reservation Dynamic Reservation Hard drives have the option to be sparse sometimes called thin. Sparse drives do not have space reserved for then in the Infinities storage Pool. When dynamic reservation is enabled on a sparse drive the infinity server will prereserve some space in the servers storage pool over and above the actual pace used. As a VM writes data to the drive the server monitors the drive. If a VM had a 10GB drive which it had written 1GB of data to, it would be using 1GB of space in the servers storage pool. If the storage pool on the server became full, the next write by the VM would fail. Dynamic reservation prereserves extra space by adding some configurable percentage to the used space and reserves it in advance. The hard drive above is 50GB and configured as a sparse drive with dynamic reservation set to 10%. A drive created this way would start with 5GB of space garanteed to be available even if the servers storage pool became full. If a VM wrote 25GB of data to the drive, 5GB more would still be available guaranteeing 30GB in total. The infinity server regularly checks the drives actual used space and adjust a reservation in the server pool for the drive. The end result is that if the storage pool reaches its maximum capacity, the VMs would not immediately fail as they would without dynamic reservation. 70 / 128 Infinity Help - Hard Drive Compression Hard Drive Compression Hard drives with compression enabled can use much less space in the servers Storage Pool. Compression usually does no have a large negative affect on performance and in many cases can actually increase the performance. Changes made to the drives compression setting only affect new data written to the drive. 71 / 128 
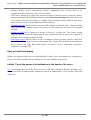
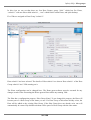
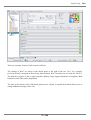
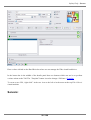
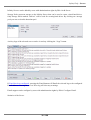
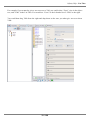
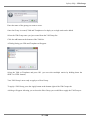
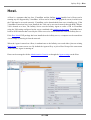
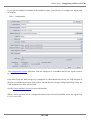
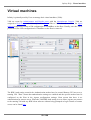
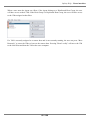
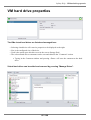
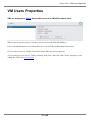
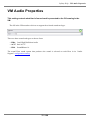
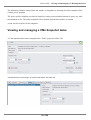
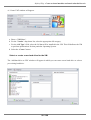
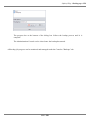
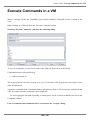
Infinity Help - VM Users Properties VM Users Properties VMs are assigned to Users. Users with access to a VM will be shown here. When a user is given access to a VM, they are free to boot the VM and modify it. Users with Administrator access always have access to all VMs whether shown here or not. If a User has access to a VM the VM will be shown under the Users properties. A User can be give access to a VM by selecting "Add User" under the VMs "Users" properties, or by adding the VM to the Users account. 72 / 128 Infinity Help - VM Snapshot Properties VM Snapshot Properties The VMs Snapshots can be managed here. The properties of selected VM Snapshots are shown. If a Snapshot was made by a scheduled Task, its task ID will be shown. Comments for the selected Snapshot can be changed here. Press "Update" to save comment changes. Multiple Snapshots can be selected and deleted. 73 / 128 Infinity Help - VM Network Properties VM Network Properties VMs can have up to 8 network interface cards (NICs). There are six different types of NICs to choose from. The OS installed in the VM must have drivers for the selected NIC. Each NIC can be connected to the network in one of three ways: • NAT. NAT is the simplest way to have a VM networked. The VM will be able to access the Hosts network, but can not act as a server. • Bridged. The VM will be directly connected to the same network as the Host running the VM. The "Bridged Interface" configuration setting on each Host specifies which of the Hosts network interfaces will be used for bridging. VMs connected this way can act as servers. • Virtual. Virtual networks are private networks created over your Hosts physical network. Infinity support up to 50 different Virtual networks. Each Virtual network acts as a network hub connecting all VMs of the same network number regardless of the Host they are running on. The Hosts physical network must be able to pass multicast packets. 74 / 128 Infinity Help - VM Audio Properties VM Audio Properties This setting controls what kind of sound card is presented to the OS running in the VM. The OS in the VM must have drivers to support the selected sound card type. There are three sound card types to choose from: • HDA. Intel High Definition Audio • AC97 Intel AC'97 • SB16 SoundBlaster 16 The actual Host sound system that produces the sound is selected on each Host in its "Audio Support" configuration setting. 75 / 128 Infinity Help - VM Tasks Properties VM Tasks Properties Task are reoccurring jobs performed by the Infinity servers. Tasks can be created to snapshot and backup VMs. All Tasks related to a VM will be shown in the VMs Tasks properties and under the general Tasks tab when logged in to the Administration Console as an Administrator. After making changes to a VMs Task, the "Update" button must be pressed to save the changes. To create a VM Task, Snapshot the VM and select "Schedule". 76 / 128 Infinity Help - VM Advanced Properties VM Advanced Properties Settings here need to be supported by the OS installed in the VM. Some settings like IOAPIC must be set before installing the OS, changing them later will likely cause the VM to fail to boot. Descriptions of the settings are show on the right when the mouse is moved over them. 77 / 128 Infinity Help - Teleportation Teleportation A VM running on a Host can be able to be moved to another Host while it is running if the CPUs of both hosts are compatible. Changing the Host Group setting of a Running VM will cause Infinity to attempt to teleport the VM. If teleportation fails, the VM should continue running on the original Host. Selecting a VM that is running on another Host with a Agent GUI will give the option to attempt teleportation to the local machine. VMs can also be teleported by changing the Host Group of a VM while it is running by dragging the VM to a different Host Group in the Administration Console or by selecting the VM and changing its Host Group in the drop down list. 78 / 128 Infinity Help - Remote Access Remote Access Remote access to VMs is available in the Administration Console, the Infinity Agent and the Remote Proxy client. For remote access to work, VirtualBox on the Hosts must have the VirtualBox extensions installed. If the VM setting for "RDP Auth" is set to "None", no user name or password is needed to remotely access a VM running on a host. RDP authentication depends on the VMs settings, settings of the Agent the VM is running on and what type of user account was used to log into the Infinity Agent. Authentication is performed based on the configuration of the Agent and the type of user who started the Agent. If the Agent configuration has "Host RDP" selected, user accounts of the OS the Agent is running on are used for authentication instead of Infinity user accounts. VirtualBox must be configure appropriately for OS accounts to be used for remote access authentication. The user name and password needed to access the VM depends on a few things. If the Host is a PXE Bare Metal computer booted from the network, or the user that logged into the Infinity Agent was a regular user, the remote access password is that of the account used to log into the Agent for all VMs. If the user account used to log into the Infinity Agent was an Admin account, users get remote access using their Infinity user name and password and they must have access to the VM in Infinity. If the user account used to log into the Infinity Agent was Not an Admin account, the remote access name and password is that of the user that started the Infinity Agent. Administration Console: 79 / 128 Infinity Help - Remote Access Right click on a VM and select "Connect" or press the "Connect" button on the selected VM. If the "VM View" window is open, double clicking on a VM in the window will start a remote connection. To a a VM to the VM view window, click on the Image of the VM in the VM deatils window. 80 / 128 Infinity Help - Remote Access Proxy Agent Infinity Agent: Select a VM and press the "Connect" button. Remote Access Proxy Agent Infinity can allow users basic remote access to their VMs. Network traffic is tunneled through port 443. The remote computers need Java installed. The remote proxy service is installed by default on each Infinity server, but can be run from any java enabled server. There is a link to the Remote Access applet on the Infinity Servers web page. 81 / 128 Infinity Help - Remote Access Proxy Agent The service on the Infinity Server is infinity/proxy and it must be enabled to allow remote access. $ svcs infinity/proxy STATE STIME FMRI online 12:00:07 svc:/service/infinity/proxy:default Users can see their VMs and the state of those VMs. VMs can be viewed through RDP by Connecting to them. 82 / 128 Infinity Help - Infinity provides robust protection for Virtual Machines. Data Protection Infinity provides robust protection for Virtual Machines. • Snapshots • Replication • Backups Snapshots are Point in Time copies of your VMs and or hard drives. Infinity allows you to take hundreds of snapshots that can be scheduled or manually created. Snapshots are very useful when making changes to a VM and you would like to be able to access the VM as it was before the change. Snapshots can be cloned to create VMs. VM replication between Infinity servers not only protects a VMs data from server failure, but also allows VMs to recover from a server failure by simple rebooting. VMs can be backup up as files that you can move off site. Infinity supports block level incrementals and differentials Backup Profiles Backup profiles makes it easier to protect VMs. A backup profile defines how VMs are protected by snapshots, backups and replication. When a backup profile is applied to a VM, scheduled tasks are created to do the work defined in the profile. 83 / 128 Infinity Help - Backup Profiles simplify the task of protecting your VMs. Backup Profiles Backup Profiles simplify the task of protecting your VMs. Backup profiles define how you want VMs to be backed up, snapshotted and or replicated between servers. Lets say that you had some VMs that host critical business data, and other VMs that were used for testing purposes, you would not have to protect them in the same way. Two “Backup Profiles” could be created. 1. Business Critical a. Replicate. b. Snapshot every ten minutes, keep twenty four hours. c. Snapshot daily, keep for a month. d. Backup nightly. 84 / 128 Infinity Help - Replication: 2. Testing a. Snapshot every ten minutes, keep twenty four hours. b. Snapshot daily, keep for a month. “Left click” in the list or press the New button at the bottom left. After creating the new Backup Profile, you add how you want that profile to protect VMs. Replication: If the VMs hard drive in on one of the selected servers, it will be replicated to the other. If the hard drive is neither server, it will be replicated to the first server “Server A”. Snapshot every 10 minutes, keep for 24 hours. 6 snapshots an hour for 24 hours = 144 snapshots. 85 / 128 Infinity Help - Replication: We are also limiting the Snapshots to use less that 1GB of space. The oldest snapshots will be automatically deleted if there are more than 144 or 1GB of space used. Snapshot daily, keep for a month. Snapshots will be done at midnight each day, we will keep 30 days of snapshots and no more than 10GB of space will be used. 86 / 128 Infinity Help - Replication: The backup locations are Host Groups. The actual location on the Host is configured in the Agents configuration of that Host. The special Host Group “VM HOST” causes the backup to go the the host group the VM is assigned to. The Backup types are Full, Incremental and Differential. All backups are raw block level backups. Incremental and Differential backups backup only changed file system blocks where as a Full backup backs up all data. Differential Backups backup all changes since the last Full backup was run. To restore a Differential, it’s Full backup must also be available. Incremental Backups backup up all changes since the last backup of any type. An example backup strategy could be to do monthly Full, weekly Differential, and daily Incremental. Of course you would have to configure your backups to fulfill your specific needs keeping storage needs and the restore process in mind. When restoring, you will be restoring a full hard drive or VM image. Individual file restore is not supported, but once your restore is completed, you can attach the drive with the file you want to a VM to access the file. Clicking the Add button show this window: 87 / 128 Infinity Help - Apply the backup profile Backups performed at some Interval and or at a specific hour of the day. Once all changes have been made to the profile, you must save it. Apply the backup profile You can now apply the backup profile to your VMs. Select the Backup Profile you want to apply in the list of profiles, then either “Right Click” or press the apply button located at the bottom left. A list of images will be shown. 88 / 128 Infinity Help - Apply the backup profile Once the Backup Profile has been applied to a VM, you can see the Tasks that do the work in the VMs configuration. Note: Snapshots will only be taken if the VM is running. The tasks will also show in the Task panel when logged in with an administrator account. 89 / 128 Infinity Help - Apply the backup profile 90 / 128 Infinity Help - Replication in Backup Profiles Replication The hard drives of VMs can be replicated between Infinity servers to protect from loss of access to an Infinity server. When a drive is replicated it is copied to a second Infinity server and the copies are kept synchronized by a regularly running task. One copy will be the Primary which is used by the VM and the other is the Secondary. Changes made to the primary are copied to the secondary drive on the other server. In the event that the Primary becomes unavailable, the Secondary can be promoted to be the Primary. The VM will now use the copy as its hard drive. If the old Primary becomes available again, it will be demoted to be the new Secondary. Replication will now continue in the opposite direction. Replication in Infinity is configured at the VM level so you can choose which VMs are replicated and which copy is the Primary copy. This system allows you to spread the network load across multiple Infinity servers by having some Primary drives on one server and other Primary drives on another server. Manual Replication Replication can be configured at the drive level by dragging the drive to another server and selecting the Replication option in the dialog. Replication in Backup Profiles Replication can also be configure in a Backup Profile and applied to VMs. 91 / 128 Infinity Help - Replication in Backup Profiles Two servers are selected in the Backup Profile. When the profile is applied to a VM if the hard dive is on one server, it will be replicated to the other. If the VMs hard drive is on neither server, it will be replicated from the server it is currently on to Server A. The copy on Server A will be the Secondary. Replicated drives can be seen by changing the Hard drive Details By radio button to show Replication. Replicated drives will then be seen as below Selecting the Primary shows the hard drive properties below. 92 / 128 Infinity Help - Replication in Backup Profiles Unchecking the Primary check box will cause immediate fail over making the Secondary the Primary and the Primary the Secondary. Do not do this while the VM is running. The Failover check box will have Infinity automatically fail over the drives if Infinity detects that the Primary is no longer available when the VM attempts to mount the drive. Selecting the Secondary drive shows the properties below. 93 / 128 Infinity Help - Creating a VM Snapshot Snapshots Snapshots are instant point in time copies of VMs and hard drives. Infinity snapshots do not negatively affect VM performance and each VM can have many snapshots, hundreds are easily supported. Snapshots allow you to preserve a VM or hard drive as it is and later access the data as it was when the snapshot was taken. Snapshots can be cloned and accessed directly. A VM snapshot when cloned creates a new VM exactly as the original was when the snapshot was taken without affecting the original VM or snapshot. Snapshots can be manually created or configured to happen regularly by Infinity. Snapshots can be backed up as a files and moved offsite protecting you from disaster. When a VM is snapshotted, each of its hard drive are also snapshotted. Creating a VM Snapshot Right clicking on a VM and selecting "Snapshot" will show the following dialog. If you want to schedule regular snapshots select "Schedule". Selecting "Now" will immediately snapshot the VM. Snapshots can be configured to occur regularly at some interval you select. If you select an interval of Daily or more you can set the hour the snapshot will be taken. 0 is midnight. 94 / 128 Infinity Help - Viewing and managing a VMs Snapshot tasks. The Maximum Number setting limits the number of snapshots by deleting the oldest snapshot when creating a new snapshot. The space used by snapshots can also be limited by setting some maximum amount of space you want the snapshots to use. The oldest snapshots will be deleted until the desired limit is reached. A task will be created to do the snapshots. Viewing and managing a VMs Snapshot tasks. A VMs snapshot tasks can be managed in the "Tasks" properties of the VM. An administrator can manage all system tasks under the tasks tab. 95 / 128 Infinity Help - Viewing and managing a VMs Snapshot tasks. To view the VM snapshots under VMs in the object tree, select Snapshots in the "VM Details By" radio buttons at the bottom of the Administration Console. VMs in the object tree will now show snapshots instead of hard drives. A VMs snapshots can also be seen in the "Snapshot" properties of a VM. Multiple snapshots can be selected and deleted in this view. 96 / 128 Infinity Help - How To... How To... This section shows various ways to accomplish different tasks with Infinity Create a VM Clone a VM Install VM OS Import VM Import Virtual Hard Drive Backup VM Restore From File Restore From Host Restore From Snapshot Copying Hard Drives between Infinity Servers Configure Email Execute an OS Command in a VM Cluster Infinity Server by adding a Server Enable the Agent service on an Infinity Server Set NTP Time Server Set a Static IP in Solaris 11 97 / 128 Infinity Help - Create a virtual machine and attach a hard drive to it. Create a virtual machine and attach a hard drive to it. 1. Start the infinity server Administration console via the web browser. 2. Log in with an unrestricted account. In the Administration console, select the “Main” Tab. This will allow you to see the new VM that you will create in the next step. Ensure that the icon to display the VM list is selected as shown in image below. 1. Select the File menu a. Select the New Sub-menu Item b. Select the virtual machine item. Or right click in the tree view and select "Create" 98 / 128 Infinity Help - Create a virtual machine and attach a hard drive to it. A “Create VM” window will appear. a. Enter a ‘VM Name’. b. For the ‘Vendor’ drop down list, select the appropriate OS category. c. For the ‘OS Type’ field, select the OS that will be installed in the VM. This field allows the VM to perform optimizations for that particular Operating System. d. Select the ‘Create’ button. Select or create a new hard drive for the VM. The ‘Add hard drive to VM’ window will appear in which you can create a new hard drive or select a pre existing hard drive. 99 / 128 Infinity Help - Create a virtual machine and attach a hard drive to it. If a hard drive that is in use by another VM is added to the new VM, the option to move or clone the hard drive is given. Selecting "New hard drive" shows the following dialog. Select a server and disk pool to create the hard drive on. Compression and sparse settings allow you to create more hard drives than would normally be possible gives the space available on the server. Once a hard drive has been added to a VM, the hard drive will be shown in the VMs details. 100 / 128 Infinity Help - Boot the VM on your local host and install the OS Adjust the VM properties as needed, particularly the amount of RAM. Boot the VM on your local host and install the OS 101 / 128 Infinity Help - Installing an Operating System onto a virtual machine Hard drive. Installing an Operating System onto a virtual machine Hard drive. 1. Ensure that a Host has the Agent software installed and has been configured properly. 2. Start the Agent either from the desktop short cut on the Host or by using your servers web page link. 3. Boot the VM on the local Host. a. Select the VM from the list. b. Click on the Boot Locally button to set the VMs Host Group to the Agents Host Group and boot the VM locally. 4. Add the OS install media to the VM. Once VirtualBox starts-up, it will complain with the following error message “FATAL: No bootable medium found! System halted”. This is normal since an OS has not yet been installed on the VMs hard drive. i. Select the Devices menu from VirtualBox ii. Select CD/DVD Devices and then select the location of the bootable media. For this demonstration, we will select an ISO file which will boot TinyCore Linux as our O.S. 1. Reset the VM so that is boots from the CD ROM i. Select the Machine menu from Virtual box and Select Reset. ii. Press the Reset button when prompted with the “VirtualBox – Question” dialog. 1. Follow the Installation steps from your Operating Systems installation process just as you would on any other machine (virtual or not). 102 / 128 Infinity Help - Install the guest additions 1. Once the installation completes, power off the VM. Install the guest additions 103 / 128 Infinity Help - Install the guest additions For optimal performance of your VM, the Guest Additions should be installed in the VM. The Guest Additions are installed from VirtualBox. Boot the VM locally, then select Devices->Install Guest Additions. A CDROM with the files to install will be attached to the VM. Run the installation program from the VM. 104 / 128 Infinity Help - Import VMs Import VMs VMs currently configured in VirtualBox on Hosts can be imported to an Infinity Server. During an import, Infinity will use the settings of the VM to be imported to create a VM on the Infinity Server. The VMs virtual hard drives will be copied to the server and attached to the imported VM. Depending on network bandwidth and drive size, this operation can take some time. • VMs should not be running during the import process. • Currently the import process only supports one hard drive controller. If your VM has multiple hard drive controllers, one controller type will be selected and the hard drives will be attached to that controller. • After the import is completed you should review the settings of the imported VM and make changes as necessary. • Network configuration is not imported. • The VM on the Host will not be affected. 1. Start the Agent on the Host with the VM. 2. Select File -> Import VM. A list of available VMs is presented. 1. Select the VMs you want to import and click "Next" A panel showing the import process is presented. 105 / 128 Infinity Help - Import VMs 1. Select the Infinity server to import the VM hard drives to. 2. Press "Import VM" to start the import process As the import progresses, status updates will be shown. 106 / 128 Infinity Help - Importing virtual hard drives Importing virtual hard drives The Infinity Agent on a Host with VirtualBox installed can be used to import virtual hard drives created by VirtualBox or other virtualization products to the Infintiy server . VDI, VMDK and VHD files are supported. To import a virtual hard disk file, start the Infinity Agent and select File -> Import HD Select the file you want to import. A window showing the files details should show if the file can be imported. Select Next to continue. 107 / 128 Infinity Help - Importing virtual hard drives Select the server to import the hard drive to. The hard drives name and comment can be changed. Press "OK" to start importing the drive. Depending on the drive size and network bandwidth, this operation can take a long time. Progress will be indicated in the window below the hard disk comments. Once the import has completed, the window will close. The hard drive can now be added to a VM or selected while creating a new VM. 108 / 128 Infinity Help - Backing up a VM Backing up a VM VM backups can be configured using a Backup Profile or manually. To manually backup a VM: 1. Log into the Administration console from the computer you would like to save the VMs backup on if backing up locally. It does not have to be a Host. 2. Go to the VM list view, right-click the VM and select the “Backup” menu option. a. When a VM backup is performed, all VM settings are backed up along with all the data contained within the attached hard drive(s), as a single file. 1. A dialog box will appear allowing the selection of where the backup will be sent. Locally. The VM will be backup to the computer you are running the Administration console on. Host. The VM will be backed up to a Host you select. 109 / 128 Infinity Help - Backing up a VM If the "Locally" option is selected, a dialog will appear allowing you to select the file name and directory of the backup file. Backup files have the default file extension of .tsb The progress bar at the bottom of the dialog box follows the backup process until it is complete. The dialog can be closed while the backup is running, but do not close the Administration Console until the backup is complete. Note: An individual Hard Disk can be backed up in a similar manner. If the "Host" option is selected, a dialog allowing the selection a particular Host as the backup location is displayed. 110 / 128 Infinity Help - Backing up a VM The progress bar at the bottom of the dialog box follows the backup process until it is complete. The Administration Console can be closed once the backup has started. All backup job progress can be monitored and managed under the Consoles "Backups" tab. 111 / 128 Infinity Help - Restoring a VM Backup from a local file Restoring a VM Backup from a local file 1. Log into the Administration Console from the computer with the VMs backup file. 2. Select the “File” menu and select “Restore” 1. A Dialog box titled “Restore” will appear allowing the selection of a previously saved “VMBackup.tsb” file which contains the VM along with its attached hard drive(s). a. Select the Filename from the appropriate directory and press the “Restore” button. b. The Restore process can be viewed by process bar at the bottom of the dialog box The dialog can be closed while the restore is running, but do not close the Administration Console until the restore is complete. 112 / 128 Infinity Help - Restoring a VM Backup from a local file The jobs progression can be monitored under the Consoles "Backups" tab. Once complete, a pop-up dialog box titled “Restore Ended” with the message “job has completed” will be displayed. You can start the restored VM from the VM list view like any other VM. The restored VM will will have a name that is equal to the original filename used to restore it alone with the appended string “-Restored”. You can simply right-click your restored VM and select “Rename” to modify it. 113 / 128 Infinity Help - Restoring a VM Backup from a Host Restoring a VM Backup from a Host The Administration Console can be used to restore a VM backup from a host. Select the Host. At the bottom of the Hosts details panel, there is a "Restore" button. Pressing Restore displays the following dialog. Select the backup to be restored and click "Restore" Progress of the restore is displayed in the dialog as well as under the Administration Consoles "Backups" tab. The Administration Console can be closed while the restore is in progress. 114 / 128 Infinity Help - Creating a hard drive from a hard drive snapshot Restore from a Snapshot Data can be retrieved from a snapshot by cloning the snapshot to create a VM or hard drive. If a VM snapshot is cloned it produces an new VM. You can safely boot the VM and access it's data as it was when the snapshot was taken. Then new VM can be safely deleted without affecting the original VM snapshot. The ability to effectively boot snapshots allows you to test for when a system last worked properly and analyze the changes that caused the problem. A hard drive snapshot when cloned produces a new hard drive with its contents matching the original hard drive when the snapshot was taken. Then newly created hard drive can then be attached to a VM and accessed by the VM. Hard drives can be attached to running VMs. Creating a VM from a VM snapshot Selecting a VM snapshot and "Right Clicking" will give you the option to clone the snapshot. Infinity will clone each of the VM snapshots drives and create a new VM of the name you entered. You can set the VMs HostGroup and boot the VM. Creating a hard drive from a hard drive snapshot Selecting a hard drive snapshot and "Right Clicking" will give you the option to clone the snapshot The new hard disk will be shown under the snapshot in the object tree of the "Home" tab. 115 / 128 Infinity Help - Creating a hard drive from a hard drive snapshot The hard disk "Agent-0-0-C" depends of the snapshot "Wed Jun 27 21:17:22 EDT 2012" The snapshot can not be deleted as long as it has clones. The hard disk "Agent-0-0-C" can be attached to a VM to access its contents. 116 / 128 Infinity Help - Copying Hard Drives between Servers and Replication Copying Hard Drives between Servers and Replication “Drag and Drop” is a useful feature and can be used in many places. An example is copying a hard drive from one server to another. If you drag a hard drive from one server to another, this dialog will appear: A Backup Job would be created to copy the hard drive. And if you had selected “Replicate” a replication task would be created as well to keep the two copies in sync. 117 / 128 Infinity Help - Configuring Email Configuring Email To help monitor your servers, the Infinity servers can be configured to send Email when there are problems reported in the servers logs. The email account information needs to be configured with the Administration console by a user with Administrator rights. Edit -> Configure Email The email ServerAddress is the address of an SMTP server. User and Password are for authenticating to the SMTP server. The Destination address is the email address the Infinity Servers will send email to. The Source address will be set as the source address in the emails sent by the Infinity Servers. 118 / 128 Infinity Help - Cloning a VM Cloning a VM VMs can be cloned. A clone is an exact copy of the VM. Cloning is a very efficient way for creating VMs. Right clicking on a VM and selecting clone will show the following dialog Many clones of a VM can be created in seconds. Clones are VMs, so they too can be cloned. Hundreds of clones can easily be created. If the "Set Host Group" check box is selected, the clones Host Group will be set to match that of the VM being cloned. The clones will initially only use a few kilobytes of space in the servers storage pool. VMs are created from Templates by creating clones of them. If you intend to have a VM for the purpose of cloning, you could change the VM into a Template. and create new VMs from the Template. 119 / 128 Infinity Help - Execute Commands in a VM Execute Commands in a VM When a running VM has the VirtualBox guest utilities installed, commands can be executed in the VM. Right clicking on a VM will show the "Execute Command" option. Selecting "Execute Command" will show the following dialog. To execute commands, you need an account in the VMs OS. Enter the account details. Commands must be fully qualified eg: c:\windows\notepad.exe The Sysprep button will cause sysprep to be run in a Windows VM. Sysprep does not require a user name and password. Typing the command in the Command window and pressing <Enter> will execute the command in the VM. Any output from the command will be displayed. To avoid typing the full path repeatedly, a default prefix can be selected or added to the left of the Command window. Lists of commonly run commands can be saved under the "Scripts" dialog. 120 / 128 Infinity Help - Execute Commands in a VM 121 / 128 Infinity Help - Add a Server Add a Server Multiple servers can be managed as one by adding them to your existing server. New servers being add should not have configuration data on them. Doing a factory reset on the server to add will ensure this. #/infinity/bin/factoryReset To add the server, log into your exiting server with the Administration console using an account which has administration rights. Select Edit -> Add Server The following dialog will be shown. You should be able to select the server in the combination box at the top, if not you can type in its host name or IP. Enter the user name and password of an account on the new server to add which has administrator rights. press OK. In about a minute your new server will be added and ready for use. The servers will now each store copies of all configuration data to protect you from server failure. Note that this does not include VM hard drives created in the Infinity servers storage pools. The VMs hard drives should be protected by proper configuration of the storage pools on the Infinity server and by doing regular backups of the VMs. 122 / 128 Infinity Help - Enable the Agent service on an Infinity server Enable the Agent service on an Infinity server An Infinity server can be a Host if VirtualBox is installed on the server and the agent service is configured and enabled. For remote access the VirtualBox extensions should also be installed. The VirtualBox Solaris packages can be downloaded from www.virtualbox.org. OmniOS and OpenIndiana also use the Solaris packages. On the Infinity Server: Unzip the downloaded package. # gzcat VirtualBox*SunOS.tar.gz | tar xvf Install the package. # pkgadd -d ./VirtualBox*.pkg If you downloaded the VirtualBox extensions, install them. # VBoxManage extpack install *vbox-extpack Configure the Agent: # svcs infinity/agent STATE STIME FMRI disabled Jul_04 svc:/service/infinity/agent:default The Agent service will need an account name and password to authenticate with the Infinity service even though it is on the same server. To configure the Agent service and enable it, run the /infinity/agent command as the root account on the Infintiy server. config <user name> <password> <server> For example: # /infinity/agent config admin admin localhost 123 / 128 Infinity Help - Enable the Agent service on an Infinity server From the Administration Console you should now see the Infinity server listed as a Host. 124 / 128 Infinity Help - Set NTP time server Set NTP time server The time on multiple Infinity servers must be the same. The Administration console can set the NTP server for all Infinity servers. The default NTP server is pool.ntp.org Edit -> NTP Time Server address All Infinity servers must be able to access the NTP host. The NTP service can also be manually configured on the Infinity servers. 125 / 128 Infinity Help - Setting a static IP in Solaris11 Setting a static IP in Solaris11 The following is an example of setting the servers IP address to 192.168.1.201 with a netmask of 255.255.255.0, adding a default route to 192.168.1.1, and configuring the server to use 8.8.8.8 and 8.8.4.4 as its DNS servers Disable the NWAM service. # netadm enable -p ncp DefaultFixed Set the static IP address. # ipadm create-ip net0 # ipadm create-addr -T static -a 192.168.1.201/24 net0/v4 Adding a default static route. # route -p add default 192.168.1.1 Configure the DNS service. # svccfg -s dns/client svc:/network/dns/client> setprop config/nameserver = (8.8.8.8 8.8.4.4) svc:/network/dns/client> exit # svcadm refresh dns/client # svcadm restart dns/client Enable the DNS service. # svccfg -s name-service/switch svc:/system/name-service/switch> setprop config/host = "files dns" svc:/system/name-service/switch> exit # svcadm refresh name-service/switch 126 / 128 Infinity Help - Setting a static IP in Solaris11 # svcadm restart name-service/switch Set host name. # svccfg -s node setprop config/nodename = "Host Name" # svcadm refresh node # svcadm restart node 127 / 128 Index U Users (56) A Admin Console (19) Admin Console Introduction (22) VM Templates (33) VM Group (36) Tasks (39) Backups (40) Agent (48) Agent configuration settings (50) Bare Metal Support (54) Architecture (12) D Data Protection (83) Backup Profiles (83) Replication (91) Snapshots (94) H Host (41) Configure a Host (43) Host Group (46) How to (97) Create a VM (97) Install VM OS (102) Import VM (105) Import Virtual Hard Disks (107) Backup a VM (109) Restore From a File (111) Restore From a Host (114) Restore From a Snapshot (115) Copying Hard Drives between Servers (116) Configure EMail (118) Clone a VM (119) Execute a Command in a VM (120) Add a Server (122) Enable the Agent service on an Infinity Server (123) Set Time Server (125) Set Static IP in Solaris (126) V Virtual Machines (59) VM Settings (61) VM Comments (64) VM Hard Drive Properties (65) Hard Drives (67) Sparse Hard Drives (69) Dynamic Reservation (70) Hard Drive Compression (71) VM Users Properties (72) VM Snapshot Properties (73) VM Network Properties (74) VM Audio Properties (75) VM Tasks Properties (76) VM Advanced Properties (77) VM Teleportation (78) VM Remote Access (79) W Why Infinity (4) I Infinity Server (13) Installing Infinity on your server (16) T Terminology (6) 128 / 128