1
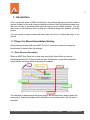
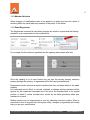
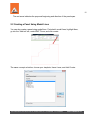
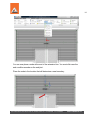
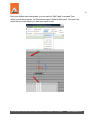
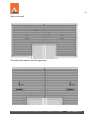
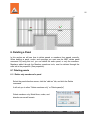
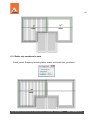
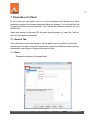
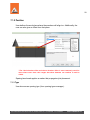
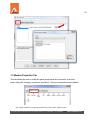
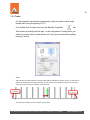
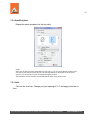
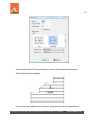
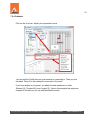
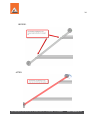
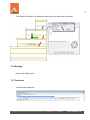
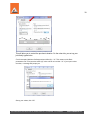
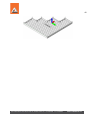
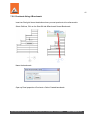
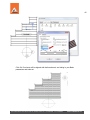
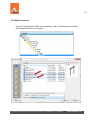
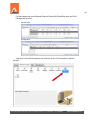
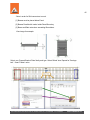
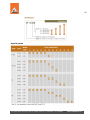
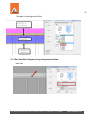
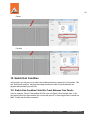
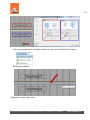
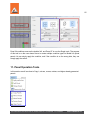
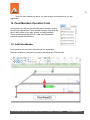
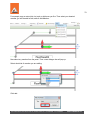
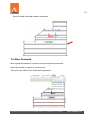
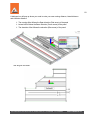
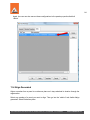
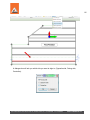
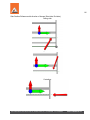
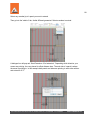
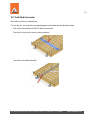
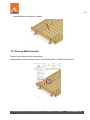
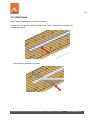
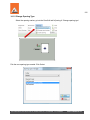
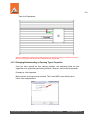
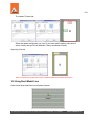
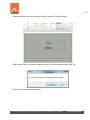
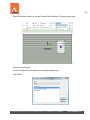
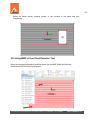
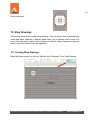
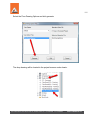
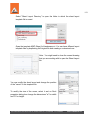
MWF Pro Floor User Guide th Last Updated on July 27 2015 2 Table of contents 1. Introduction ......................................................................................................................... 5 1.1 Things You Should Know Before Starting ......................................................................... 5 1.1.1 Floor Structure Orientation ......................................................................................... 5 1.1.2 Member Selection ...................................................................................................... 6 1.1.3 Panel Regenerate ...................................................................................................... 6 1.1.4 Revit Detail Levels ..................................................................................................... 7 1.2 Family Types .................................................................................................................... 7 1.3 Loading Families .............................................................................................................. 8 1.4 Creating New Family Members Properly........................................................................... 9 2. Creating a Floor Panel ..........................................................................................................10 2.1 Creating a Panel Using Revit Floor Element ....................................................................10 2.2 Creating a Panel Using Model Lines ................................................................................12 3. Splitting Panels .....................................................................................................................13 3.1 Spitting Panels Using Nodes ...........................................................................................13 3.1.1 Placing a Node ..........................................................................................................13 3.2 Spitting Panels Using Model Lines...................................................................................17 4. Merging Panels .....................................................................................................................21 4.1 Merging Panels................................................................................................................21 5. Changing Joist Direction .......................................................................................................22 5.1 Changing Joist Direction Using MWF Set Beam Direction Tool .......................................22 5.2 Changing Joist Direction Using Revit’s Rotate Tool .........................................................24 6. Deleting a Panel....................................................................................................................25 6.1 Deleting panels ................................................................................................................25 6.1.1 Delete only members of a panel ................................................................................25 6.1.2 Delete only members of a panel ................................................................................26 7. Properties of a Panel.............................................................................................................27 7.1. General Tab ...................................................................................................................27 7.1.1 Name ........................................................................................................................27 7.1.2 Position.........................................................................................................................28 455 Fénelon Blvd., Suite 200, Dorval, QC, Canada, H9S 5T8 T: 514-538-6862 F: 514-538-6864 StrucSoftSolutions.com 3 7.1.3 Type ..........................................................................................................................28 7.2 Member Properties Tab ...................................................................................................29 7.2.1 Tracks .......................................................................................................................30 7.2.2 Start/End joists ..........................................................................................................31 7.2.3 Joist ..........................................................................................................................31 7.2.4 Cutbacks ...................................................................................................................33 7.2.5 Side Tracks ...............................................................................................................35 7.2.6 Bridging .....................................................................................................................37 7.2.7 Punchouts .................................................................................................................37 7.2.8 Punchouts Using A Benchmark ................................................................................41 7.2.8 Skid Connectors ........................................................................................................43 7.2.9 Config Selector .........................................................................................................47 7.3 Edits tab ..........................................................................................................................51 8. Saving / Using Floor Templates ............................................................................................51 8.1 Saving panel templates ...................................................................................................51 8.1.1 Export/Import Templates ...........................................................................................54 9. End Condition / Side Rimtrack ..............................................................................................54 9.1 Applying an End Condition ..............................................................................................55 9.1.1 End condition/ Side rim track & panel end VS panel join ...........................................59 9.1.2 End Condition Diagram of Layer Alignment to Wall ...................................................61 9.1.3 End Condition Diagram of Layer Alignment to Beam .................................................62 10. Switch End Condition ..........................................................................................................63 10.1 Switch End Condition/ Side Rim Track Between Two Panels ........................................63 11. Panel Operation Tools ........................................................................................................65 11.1 Mirror panel(s) ...............................................................................................................66 11.2 Rotating panel(s) ...........................................................................................................68 11.3 Moving Panel(s).............................................................................................................71 11.4 Align Panel(s) ................................................................................................................72 11.5 Copying Panel(s) ...........................................................................................................74 11.5.1 Copy panels to floor object ......................................................................................75 11.5.1 Copy panels from source point to destination point .................................................77 455 Fénelon Blvd., Suite 200, Dorval, QC, Canada, H9S 5T8 T: 514-538-6862 F: 514-538-6864 StrucSoftSolutions.com 4 12. Panel Members Operation Tools .........................................................................................78 12.1 Add Extra Member .........................................................................................................78 12.2 Delete Generated ..........................................................................................................80 12.3 Move Generated ............................................................................................................82 11.4 Align Generated.............................................................................................................84 12.5 Extend Generated .........................................................................................................87 12.6 Modify Generated ..........................................................................................................89 12.7 Add Skid Connector .......................................................................................................91 12.7 Remove Skid Connector ................................................................................................92 12.7 HVAC Notch ..................................................................................................................93 13. Benchmarks ........................................................................................................................94 13.1 Adding a Benchmark Through Panel Properties ............................................................94 13.2 Manually Associate Benchmark to Panel .......................................................................97 14. Creating an Opening ...........................................................................................................98 14.1 Using a Revit Opening Element in a Floor Object ..........................................................98 14.1.1 Opening Manager ...................................................................................................99 14.1.2 Change Opening Type ..........................................................................................102 14.1.3 Changing/Understanding an Opening Type’s Properties .......................................103 14.2 Using Revit Model Lines ..............................................................................................104 14.3 Using MWF’s Floor Clash Detection Tool ....................................................................107 15. Shop Drawings ..................................................................................................................110 15.1 Creating Shop Drawings ..............................................................................................110 15.2 Drawing Sheets ...........................................................................................................112 15.2.1 Sheet Layout Template .........................................................................................112 15.2.2 Modifying the Sheet Layout Template ...................................................................112 16. Quick Reference...........................................................................................................114 455 Fénelon Blvd., Suite 200, Dorval, QC, Canada, H9S 5T8 T: 514-538-6862 F: 514-538-6864 StrucSoftSolutions.com 5 1. Introduction Focus on specific areas of MWF functionality, this manual highlights powerful features that are integral to the most common framing workflows. Each topic demonstrates tools that you can use to complete tasks that are common to an overall workflow. You will learn some of the practices that can help you efficiently design and develop a framing project. You can create a simple model with basic walls and floors to follow the steps in the tutorial. 1.1 Things You Should Know Before Starting When starting a project and using MWF Pro Floor, there are a few basic things one should know to better utilize the software. 1.1.1 Floor Structure Orientation When an MWF floor Panel is in a plan view is selected, there will be two arrows indicating the direction of the joist and the span. Additionally, nodes will be placed at every domain and range limits of the panel boundaries. The start side is always where the arrow begins, and the end side is always where the arrow points. Framing members will be labeled in an ascending order from the start of the panel. 455 Fénelon Blvd., Suite 200, Dorval, QC, Canada, H9S 5T8 T: 514-538-6862 F: 514-538-6864 StrucSoftSolutions.com 6 1.1.2 Member Selection When changes or modifications need to be applied to a panel you have the option of selecting either the panel label, any member of the panel, or the datum. 1.1.3 Panel Regenerate The Regenerate command is used when changes are made to a panel and the framing members must compensate for the modifications. For example, the floor below is panelized but the opening was created after that. Once the opening is in its new location we can see the existing framing members passing through the opening. A regenerate will fix the framing automatically. Regenerate will also remove structural members that have not been added to the panel properly. Any command used in Revit to relocate, duplicate or change existing members will be ignored by the regenerate command and it will move the member back to its original position or delete it unless member were moved by the edits operations which pins members to a panel. Multiple panels may be regenerated at once by selecting numerous panels. When a command is done to a panel and nothing has visibly changed, a regenerate will usually help you see your modifications. 455 Fénelon Blvd., Suite 200, Dorval, QC, Canada, H9S 5T8 T: 514-538-6862 F: 514-538-6864 StrucSoftSolutions.com 7 1.1.4 Revit Detail Levels Revit's detail level must be set to at least medium or fine. If set to coarse, framing members and datum will appear solely as thin straight lines. Changing the level after framing the walls in your project is a suitable approach to keeping your project light. 1.2 Family Types MWF uses a BIMSF-SSMA (Steel Stud Manufacturers Association) catalogue as a reference. Before creating panels, load the floor families that will be used for your project. Users can also duplicate original floor families from MWF installation folders and create new joist/track types or rename the families' folders according to their needs. However, when creating new member types, users must maintain the same parameters used in the original MWF floor families. These parameters are needed for running all functions in MWF properly. The "About" option is found in the MWF Floors Help drop down. By clicking "Home Dir" in the dialog box, you will be directed to the MWF installation folder: 455 Fénelon Blvd., Suite 200, Dorval, QC, Canada, H9S 5T8 T: 514-538-6862 F: 514-538-6864 StrucSoftSolutions.com 8 You will find the BIMSF-SSMA families in: >> C:\Program Files (x86)\Revit Tools 2012\Commands\2012\MWFFloors\config\Families\Imperial. You can load the families needed from the Revit Insert menu, load families. 1.3 Loading Families Loading MWF stud families is important to do before creating your own templates. This is also the location that other framing members such as connectors will be located in near future. Using Revit's Insert tab and Load Family button locate the MWF installation folder and open it. You can then choose between the Imperial or Metric folder depending on your project units. Open your desired folder and select the family that you need. For example, in the Imperial folder you select the BIMSF-SSMA-S, you can then select the desired sizes that you need for your templates. 455 Fénelon Blvd., Suite 200, Dorval, QC, Canada, H9S 5T8 T: 514-538-6862 F: 514-538-6864 StrucSoftSolutions.com 9 1.4 Creating New Family Members Properly MWF provides you with a wide variety of families and sizes. If the specific size you need is not in the list you can simply add it in manually. To properly create new family size that is not in the given list of sizes you must first locate the family’s .txt file. In this instance we will be creating a new BIMSF-SSMA-T. Open the corresponding .txt file and notice the comma separated code along the top and the list of available framing members. You will simply need to insert the desired measurements of the track and name it according to the order in which MWF reads the txt file. bf##length##inches: flange length d##length##inches: web depth tf##length##inches: material thickness. 455 Fénelon Blvd., Suite 200, Dorval, QC, Canada, H9S 5T8 T: 514-538-6862 F: 514-538-6864 StrucSoftSolutions.com 10 For example, if you have a track that is 6 ½” deep with a 2 ½” flange and a thickness of 3/64”, you’d give it the code name: 650T250-43. Then at the bottom of 43,2.5,6.5,0.045,1.25,0.04526 the txt file you would insert: 650T250- Save the txt file and upon reloading that family, your new track size will be available. 2. Creating a Floor Panel In this section we will create a LGS floor panel using the default template. There are two ways to create a floor panel; using Revit floor object or using model lines (ceiling objects work as well). Later on in the tutorial we will learn how to modify and understand the panels’ properties. 2.1 Creating a Panel Using Revit Floor Element In the 'Project Browser' of the drawing select a plan view. Select a floor and under the Add-Ins – MWF Floor menu select the Create command: 455 Fénelon Blvd., Suite 200, Dorval, QC, Canada, H9S 5T8 T: 514-538-6862 F: 514-538-6864 StrucSoftSolutions.com 11 This dialogue box will pop up. Choose a default template. Click 'Frame it now' if you want to see your members right away. This will give you this result: The floor members, Datum and label will appear. Make sure the visual style is “shaded” so the colors of the direction arrows are visible. The green arrow indicates the orientation of the framing members (joists beams) 455 Fénelon Blvd., Suite 200, Dorval, QC, Canada, H9S 5T8 T: 514-538-6862 F: 514-538-6864 StrucSoftSolutions.com 12 The red arrow indicates the proposed beginning and direction of the panel span. 2.2 Creating a Panel Using Model Lines You can also create a panel using model lines. First sketch model lines, highlight them, go into the “Add-ins” tab, under MWF Floors, and click create. The same concept as before, choose your template, frame it now, and click Create: 455 Fénelon Blvd., Suite 200, Dorval, QC, Canada, H9S 5T8 T: 514-538-6862 F: 514-538-6864 StrucSoftSolutions.com 13 This will be the result: 3. Splitting Panels In this section you will see how to split panels to make multiple ones. Splitting panels allows you to have more than one panel per floor object. Each panel can use different templates, and frame in different directions. There are two ways of splitting a panel: 3.1 Spitting Panels Using Nodes You can split a panel by using two existing nodes, or adding a node using the split Profile line and then using the split Panel command. Select any member of the panel. In the “Add-Ins” tab under MWF floor, click the “panel” menu and split profile line command. This command adds an extra node which will divide the panel in sections. Nodes are placed when members do not continue or you want to split the panel. 3.1.1 Placing a Node Select the panel datum, go into the “Add-ins” tab, panel Split profile line. Then place a node in reference with another node to which you want your panel to split. Here for example: 455 Fénelon Blvd., Suite 200, Dorval, QC, Canada, H9S 5T8 T: 514-538-6862 F: 514-538-6864 StrucSoftSolutions.com 14 You can now place a node at the end of the extension line. You must click near the end condition member or the end joist. Place the node in the location that will determine a new boundary. 455 Fénelon Blvd., Suite 200, Dorval, QC, Canada, H9S 5T8 T: 514-538-6862 F: 514-538-6864 StrucSoftSolutions.com 15 Once your nodes have been placed, you can use the “Split Panel” command. First select your direction arrows, into the add-ins menu Panel Split panel. You must now select the two nodes where you want your panel to split. 455 Fénelon Blvd., Suite 200, Dorval, QC, Canada, H9S 5T8 T: 514-538-6862 F: 514-538-6864 StrucSoftSolutions.com 16 Here is the result: Then select both panels, and click regenerate: 455 Fénelon Blvd., Suite 200, Dorval, QC, Canada, H9S 5T8 T: 514-538-6862 F: 514-538-6864 StrucSoftSolutions.com 17 3.2 Spitting Panels Using Model Lines Another way of splitting a panel is by drawing model lines with two nodes at each end. Select your direction arrows, go into Add-ins, Panel Split profile line: Place two nodes, or you can use an existing nodes. 455 Fénelon Blvd., Suite 200, Dorval, QC, Canada, H9S 5T8 T: 514-538-6862 F: 514-538-6864 StrucSoftSolutions.com 18 Then using Model lines, trace the path you want your split to another node. Highlight the two pertinent nodes and the models lines, Go into add-ins, panel split panel. You can drag the node location after it has been placed to insure accurate alignment. 455 Fénelon Blvd., Suite 200, Dorval, QC, Canada, H9S 5T8 T: 514-538-6862 F: 514-538-6864 StrucSoftSolutions.com 19 Select the new nodes “Panel” menu, click Split Panel command. This will be the result: 455 Fénelon Blvd., Suite 200, Dorval, QC, Canada, H9S 5T8 T: 514-538-6862 F: 514-538-6864 StrucSoftSolutions.com 20 Now regenerate both panels: Final result: 455 Fénelon Blvd., Suite 200, Dorval, QC, Canada, H9S 5T8 T: 514-538-6862 F: 514-538-6864 StrucSoftSolutions.com 21 4. Merging Panels In this section you will see how to unite panels together. Merging panels allows the user to combine multiple panels to make as one. 4.1 Merging Panels To merge panels you must select the direction arrows of which you want, click the “profile” menu, and click merge panels command. This will give you this result: 455 Fénelon Blvd., Suite 200, Dorval, QC, Canada, H9S 5T8 T: 514-538-6862 F: 514-538-6864 StrucSoftSolutions.com 22 Select the Direction arrow again and click “Regenerate” under the MWF floors. You can now also delete the extra nodes using the Delete Command. *Components of the floor panel can only be deleted using the delete command in the MWF floors add-on floors tab.* 5. Changing Joist Direction In this section we will see how to set our beam direction. MWF joist members will match the same angle as the green arrow of the panel datum. By rotating the datum is how you would change your joist direction. You can rotate the datum using MWF set beam direction tool or by using Revit’s rotate command. 5.1 Changing Joist Direction Using MWF Set Beam Direction Tool Select the panel direction arrows, click the “add-ins” tab, and click the Set Beam Direction command. 455 Fénelon Blvd., Suite 200, Dorval, QC, Canada, H9S 5T8 T: 514-538-6862 F: 514-538-6864 StrucSoftSolutions.com 23 The green arrow indicates the direction of the beam, so select a line direction you want. Then select any line you want to match the green arrow This will give you this result: 455 Fénelon Blvd., Suite 200, Dorval, QC, Canada, H9S 5T8 T: 514-538-6862 F: 514-538-6864 StrucSoftSolutions.com 24 Regenerate: 5.2 Changing Joist Direction Using Revit’s Rotate Tool You can also change your joist direction by rotating the directions arrows using Revit’s rotate tool. You can change the direction to any angle you want. Once you rotate the direction arrows, click the Regenerate command to have the changes applied to the panel. 455 Fénelon Blvd., Suite 200, Dorval, QC, Canada, H9S 5T8 T: 514-538-6862 F: 514-538-6864 StrucSoftSolutions.com 25 6. Deleting a Panel In this section we will see how to delete panels or members from panels correctly. When deleting a panel, nodes, and openings you must use the MWF delete panel command. By using this tool, you can delete the entire panel, or only the members. Members added through the Member operations tools, must be deleted through the edits tab in the properties. (See properties). 6.1 Deleting panels 6.1.1 Delete only members of a panel Select the panel direction arrows, click the “add-ins” tab, and click the Delete command. It will ask you to ether “Delete members only” or “Delete panel(s)” Delete members only: Model lines, nodes, and direction arrows will remain 455 Fénelon Blvd., Suite 200, Dorval, QC, Canada, H9S 5T8 T: 514-538-6862 F: 514-538-6864 StrucSoftSolutions.com 26 6.1.2 Delete only members of a panel Delete panels: Everything including datum, nodes, and model lines get deleted 455 Fénelon Blvd., Suite 200, Dorval, QC, Canada, H9S 5T8 T: 514-538-6862 F: 514-538-6864 StrucSoftSolutions.com 27 7. Properties of a Panel In this section we will explore how to use and understand the features and active parameter settings that the panel properties dialog box displays. You will notice that the Properties are broken up into three tabs. The General tab, Member properties tab, and the Edits tab. Select any member of the panel OR the panel direction arrows, go under the “Add-ins” tab, click the properties command. 7.1. General Tab This is where the user would change or edit the panel name, the position of the panel according to floor layer or elevation, the position of the panels label and datum, spacing benchmarks, and the type of opening that panel will use. 7.1.1 Name Changes the heading of the panel label 455 Fénelon Blvd., Suite 200, Dorval, QC, Canada, H9S 5T8 T: 514-538-6862 F: 514-538-6864 StrucSoftSolutions.com 28 7.1.2 Position User defines the work plane where the members will align too. Additionally, the user can also give an offset from that plane. **The Label elevation offset and datum elevation offset is most commonly used for cases where users have view ranges that these elements can conform to and be visible. Spacing benchmark applies a marker that propagates joist placement. 7.1.3 Type User chooses an opening type (from opening types manager): 455 Fénelon Blvd., Suite 200, Dorval, QC, Canada, H9S 5T8 T: 514-538-6862 F: 514-538-6864 StrucSoftSolutions.com 29 7.2 Member Properties Tab This tab allows the user to modify the panel components such as tracks, end joists, joists, side joists, bridging, connectors, punchouts, Triforce configurations and cutbacks E.g: Family members, joist spacing, double joists, face to face, triple rim joists. 455 Fénelon Blvd., Suite 200, Dorval, QC, Canada, H9S 5T8 T: 514-538-6862 F: 514-538-6864 StrucSoftSolutions.com 30 7.2.1 Tracks For this example, we will place single tracks, single rim joists on both ends, double joists, and joist spacing of 2’-0”. First double click on tracks icon from the Member Properties tab: Then select your family and the type. In the configuration (Config) menu you select if you want tracks, double tracks, etc. Once you’ve selected everything correctly, click ok. NOTE: Start extensions and End extension is directly linked with the orientation of direction arrows. For the tracks is referenced with the Red arrow (span direction). So if the red arrow is pointing from east to west, your start extension is the east side, end extension is the west side: The offset option offsets your track member to given value. 455 Fénelon Blvd., Suite 200, Dorval, QC, Canada, H9S 5T8 T: 514-538-6862 F: 514-538-6864 StrucSoftSolutions.com 31 7.2.2 Start/End joists Repeat the same procedure for the rim joists: NOTE: Notice you can apply the same configurations for both ends, or you can choose different member for the start side rim joist, and the end side rim joist. The start side depends on the panels’ red arrow (span) direction. You can also flip your joists by clicking the Flipped checkbox. Start extensions and End extension is associated with the Green arrow for Rim Joists 7.2.3 Joist Click on the Joist icon. Change your joist spacing to 2’-4” and apply joists face to face. 455 Fénelon Blvd., Suite 200, Dorval, QC, Canada, H9S 5T8 T: 514-538-6862 F: 514-538-6864 StrucSoftSolutions.com 32 Once complete click Ok. This will bring you back to the Properties dialogue box. Click Ok and view the changes. If you notice your cutbacks are not correct, simply go back into the properties tab. 455 Fénelon Blvd., Suite 200, Dorval, QC, Canada, H9S 5T8 T: 514-538-6862 F: 514-538-6864 StrucSoftSolutions.com 33 7.2.4 Cutbacks Click on the Joist icon. Adjust your properties in here: You can pick the Profile that your joist member is connecting to. Then you pick the plane. Plane 2 for this example is inner web of the track. If you have angles in your panel, you adjust the end attachment to ether: Shortest (A), Centered (B), and Longest (C). Here in this example the angle was changed to Shortest so you can see the different results. 455 Fénelon Blvd., Suite 200, Dorval, QC, Canada, H9S 5T8 T: 514-538-6862 F: 514-538-6864 StrucSoftSolutions.com 34 BEFORE: AFTER: 455 Fénelon Blvd., Suite 200, Dorval, QC, Canada, H9S 5T8 T: 514-538-6862 F: 514-538-6864 StrucSoftSolutions.com 35 7.2.5 Side Tracks Click on the Side tracks icon. If you select the “Same as Track” option, your side tracks will match the configurations you set in the tracks properties: (For this example single LVL lumber is placed) If you select the “Same as Joist” option, your side tracks will match the configurations you set in the Joist properties: (For this example, double I-Nordic joist is placed) 455 Fénelon Blvd., Suite 200, Dorval, QC, Canada, H9S 5T8 T: 514-538-6862 F: 514-538-6864 StrucSoftSolutions.com 36 If you select “Custom”, you can select different configurations which is not relative to your track or joist properties. 455 Fénelon Blvd., Suite 200, Dorval, QC, Canada, H9S 5T8 T: 514-538-6862 F: 514-538-6864 StrucSoftSolutions.com 37 The “Extend to Rimtrack” will extend the side track to the other side of the panel. 7.2.6 Bridging Click on the Bridging icon. 7.2.7 Punchouts To activate the command 455 Fénelon Blvd., Suite 200, Dorval, QC, Canada, H9S 5T8 T: 514-538-6862 F: 514-538-6864 StrucSoftSolutions.com 38 Load the BIMSF-S-Joist-Holes family *NOTE: To use the punchouts tool with a different family, you must have parametric holes in your joists with the same parameters as the one supplied. Duplicate the existing one and work from there. Apply the joist family in your panel properties: Notice the holes are not ligned up. We need to activate the punchouts and set rules: Now click on the Punchouts icon. Click on “Activate Basic Punchouts” 455 Fénelon Blvd., Suite 200, Dorval, QC, Canada, H9S 5T8 T: 514-538-6862 F: 514-538-6864 StrucSoftSolutions.com 39 This will allow you to control the punchouts location. On the rules side, you set up your joist family typical rules. For this example, Minimum first/last punchout offset (A): 1’-6”. This means on the Basic parameters side “First punchout offset (A)” value can be no less that 1’-6”. If you input a value less than, a message will prompt you. Set up your values, click “Ok”. 455 Fénelon Blvd., Suite 200, Dorval, QC, Canada, H9S 5T8 T: 514-538-6862 F: 514-538-6864 StrucSoftSolutions.com 40 455 Fénelon Blvd., Suite 200, Dorval, QC, Canada, H9S 5T8 T: 514-538-6862 F: 514-538-6864 StrucSoftSolutions.com 41 7.2.8 Punchouts Using A Benchmark Insert two Revit grid lines at destination where you want punchouts to be referenced to Select Gridlines, Click on the StrucSoft tabBenchmarkInsert Benchmark Name the benchmark : Open up Panel properties->Punchouts-> Select Created benchmark: 455 Fénelon Blvd., Suite 200, Dorval, QC, Canada, H9S 5T8 T: 514-538-6862 F: 514-538-6864 StrucSoftSolutions.com 42 Click Ok. Punchouts will be aligned with that benchmark, and taking in your Basic parameters and rules set. 455 Fénelon Blvd., Suite 200, Dorval, QC, Canada, H9S 5T8 T: 514-538-6862 F: 514-538-6864 StrucSoftSolutions.com 43 7.2.8 Skid Connectors From the Families folder in MWF Floors installation, load in Squash plate and Carriage Bolt Connector families to your project. 455 Fénelon Blvd., Suite 200, Dorval, QC, Canada, H9S 5T8 T: 514-538-6862 F: 514-538-6864 StrucSoftSolutions.com 44 For this example we need a Squash Plate for Double 2X10 Start/End Joist, and 2X10 Carriage bolt for joists. Squash Plate: Carriage Bolt Now click on the Skid Connectors icon and click on the “Put Connectors” option to activate. 455 Fénelon Blvd., Suite 200, Dorval, QC, Canada, H9S 5T8 T: 514-538-6862 F: 514-538-6864 StrucSoftSolutions.com 45 *Note in order for Skid connectors to work: [1] Beams must be placed below Panel [2] Beams Parallel with tracks Inside Panel Boundary [3] Beam end/Start extensions exceeding Boundaries. View image for example: Select your 'Squash Bracket Plate' family and type. Select 'Whole' size. Repeat for 'Carriage bolt'. Insert 'Pattern' value. 455 Fénelon Blvd., Suite 200, Dorval, QC, Canada, H9S 5T8 T: 514-538-6862 F: 514-538-6864 StrucSoftSolutions.com 46 Description of parameters: Squash Plate Description of parameters: Carriage bolt 455 Fénelon Blvd., Suite 200, Dorval, QC, Canada, H9S 5T8 T: 514-538-6862 F: 514-538-6864 StrucSoftSolutions.com 47 7.2.9 Config Selector Load in Triforce families Load sizes needed. This example is a 11 7/8” Depth 455 Fénelon Blvd., Suite 200, Dorval, QC, Canada, H9S 5T8 T: 514-538-6862 F: 514-538-6864 StrucSoftSolutions.com 48 Open properties of panel and click on the Config selector icon: Select Triforce Triforce 11 7/8” Click Ok. The appropriate family type will be placed according to the span. If the span table doesn’t match the panel length, joists from basic property parameters are applied. You can always override the joist if needed. 20’-0 11 7/8”- OJ415-20 455 Fénelon Blvd., Suite 200, Dorval, QC, Canada, H9S 5T8 T: 514-538-6862 F: 514-538-6864 StrucSoftSolutions.com 49 8’-0” Span 11 7/8”-OJ314-8 These span tables were taken from the Triforce joists manufacturing catalogue. 455 Fénelon Blvd., Suite 200, Dorval, QC, Canada, H9S 5T8 T: 514-538-6862 F: 514-538-6864 StrucSoftSolutions.com 50 455 Fénelon Blvd., Suite 200, Dorval, QC, Canada, H9S 5T8 T: 514-538-6862 F: 514-538-6864 StrucSoftSolutions.com 51 7.3 Edits tab Deletes or undo operations tools (Delete generated, Move generated, Align generated, extend generated, or modify generated). Once you have successfully modified the properties of your floor panel, you can proceed to save them as a template. (EXCLUSION: ANYTHING CREATED WITH EDITS TOOLS WILL NOT BE SAVED IN A TEMPLATE) 8. Saving / Using Floor Templates In this section we will save a new template. *Note: MWF templates can be stored into the installation folder or directly into the project you’re working on. 8.1 Saving panel templates Once you have a panel properties set up to your project standards, you can save the configurations as a template to reuse them for other panels. First select the direction arrows or any members of the panel you want to template save; go into the “Add-ins tab” properties templatesave as. 455 Fénelon Blvd., Suite 200, Dorval, QC, Canada, H9S 5T8 T: 514-538-6862 F: 514-538-6864 StrucSoftSolutions.com 52 The template manager dialogue box will pop up. You can pick a default folder, or a user created folder to save your new template in. 455 Fénelon Blvd., Suite 200, Dorval, QC, Canada, H9S 5T8 T: 514-538-6862 F: 514-538-6864 StrucSoftSolutions.com 53 Then save as: 'Name of your template'. In this example it was called: Template save Now it will appear in the templates folder. 455 Fénelon Blvd., Suite 200, Dorval, QC, Canada, H9S 5T8 T: 514-538-6862 F: 514-538-6864 StrucSoftSolutions.com 54 8.1.1 Export/Import Templates You can import or export your templates from other drawings to your current one, or vice versa. Simply use the Import/Export tools found here in properties, or through the Template Manager. Click the export button from the templates manager and then select the templates you want to export. You will be prompted to save your file. 9. End Condition / Side Rimtrack In this section, we will look over how to apply specific framing conditions on particular sides of a panel. Additionally, subsections will describe the difference between End condition, Side rim track, panel end and panel joins. The end condition and side rim track tools are used for various reasons. The first reason is so the user can customize different end connections through types, so he doesn’t have to create a template for each and every different condition. The end condition/ Side Rimtrack override the panel properties by stamping a framing type to the model line. 455 Fénelon Blvd., Suite 200, Dorval, QC, Canada, H9S 5T8 T: 514-538-6862 F: 514-538-6864 StrucSoftSolutions.com 55 9.1 Applying an End Condition For example in the properties of the panel is using a template with double tracks. Then the user comes across an instance where it is a single track. Without having to create another template, he would override the properties of that particular instance by using the end condition tool, which creates a framing type which could be re-using on other instances. Additionally, this tool can also align members according to the layers of supporting walls, or the planes of a supporting beam/Girder. The user can choose either custom framing, where MWF doesn’t need a structural member below, Balloon framing & Platform framing where as MWF needs either a bearing wall/beam/Girder. Here are steps to how it works: The side where joists intersect a rim track go into the add-ins-tab, End condition End condition Select the model line this panel is using. If you cannot select a model line, make sure your visibly settings are on. Additionally, if you are using “edit end condition” you can only select model lines where Joist meets rim tracks. If you want to edit a condition of a rim joist, you use the same procedure except using the “Side Rim track” tool. 455 Fénelon Blvd., Suite 200, Dorval, QC, Canada, H9S 5T8 T: 514-538-6862 F: 514-538-6864 StrucSoftSolutions.com 56 Select the model line: **Note: If you want to edit more than one end condition at once, you must select all the appropriate model lines first, and then click “Edit end condition command”. This dialogue box will pop up: 455 Fénelon Blvd., Suite 200, Dorval, QC, Canada, H9S 5T8 T: 514-538-6862 F: 514-538-6864 StrucSoftSolutions.com 57 In this example, the joists and tracks will align to the far side of the structural layer. Without editing the properties, the user can create a type condition for platform framing and stamp the profile line with the condition type. Select the platform check box. These configurations will show up: 455 Fénelon Blvd., Suite 200, Dorval, QC, Canada, H9S 5T8 T: 514-538-6862 F: 514-538-6864 StrucSoftSolutions.com 58 Duplicate the default type and rename it. Then edit the configurations: 455 Fénelon Blvd., Suite 200, Dorval, QC, Canada, H9S 5T8 T: 514-538-6862 F: 514-538-6864 StrucSoftSolutions.com 59 Here is the result: **Must regenerate panel to view. 9.1.1 End condition/ Side rim track & panel end VS panel join Panel ends from end conditions or side rim track are model lines that aren’t shared with other panels. E.G: 455 Fénelon Blvd., Suite 200, Dorval, QC, Canada, H9S 5T8 T: 514-538-6862 F: 514-538-6864 StrucSoftSolutions.com 60 Panel joins from end conditions or side rim track are model lines that are shared with other panels. E.G: Diagram: 455 Fénelon Blvd., Suite 200, Dorval, QC, Canada, H9S 5T8 T: 514-538-6862 F: 514-538-6864 StrucSoftSolutions.com 61 9.1.2 End Condition Diagram of Layer Alignment to Wall E.G: Structural layer, near side: E.G: Structural layer, far side: 455 Fénelon Blvd., Suite 200, Dorval, QC, Canada, H9S 5T8 T: 514-538-6862 F: 514-538-6864 StrucSoftSolutions.com 62 **Diagram of layer alignment to Wall: 9.1.3 End Condition Diagram of Layer Alignment to Beam Near side: 455 Fénelon Blvd., Suite 200, Dorval, QC, Canada, H9S 5T8 T: 514-538-6862 F: 514-538-6864 StrucSoftSolutions.com 63 Center: Far side: 10. Switch End Condition In this section you will see how to switch the conditions between a panel join of two panels. This tool “Switch end condition” switches the ending conditions or side rim tracks between two adjacent panels sharing a model line. 10.1 Switch End Condition/ Side Rim Track Between Two Panels Here for example: Panel 27 has double 2X6 Rim joist, and Panel 24 has a single track. If the user wants panel 24 to have double 2x6 rim joist and panel 27 to have single track he would use MWF “Switch end Condition command” 455 Fénelon Blvd., Suite 200, Dorval, QC, Canada, H9S 5T8 T: 514-538-6862 F: 514-538-6864 StrucSoftSolutions.com 64 First go into the add-ins tab; click End condition pull down menu Switch End Condition: Select the model line Regenerate. Here are the results: 455 Fénelon Blvd., Suite 200, Dorval, QC, Canada, H9S 5T8 T: 514-538-6862 F: 514-538-6864 StrucSoftSolutions.com 65 Panel 24 conditions now are the double 2x6, and Panel 27 is now the Single track. The purpose of this tool is so the user doesn’t have to create multiple condition types for Model line joined panels. He can simply apply the condition, and if the condition is on the wrong side, they can simply apply the switch. 11. Panel Operation Tools In this section we will see how to Copy’s, mirrors, moves, rotates, and aligns already generated panels. 455 Fénelon Blvd., Suite 200, Dorval, QC, Canada, H9S 5T8 T: 514-538-6862 F: 514-538-6864 StrucSoftSolutions.com 66 11.1 Mirror panel(s) To mirror a panel(s) you must select the direction arrows, and use MWF mirror panel tool. Select the panel datum, click the “add-ins” tab, and click the Panel menu, click the Mirror Panels command. It will prompt you to pick a mirror axis 455 Fénelon Blvd., Suite 200, Dorval, QC, Canada, H9S 5T8 T: 514-538-6862 F: 514-538-6864 StrucSoftSolutions.com 67 Select your directions arrows and regenerate 455 Fénelon Blvd., Suite 200, Dorval, QC, Canada, H9S 5T8 T: 514-538-6862 F: 514-538-6864 StrucSoftSolutions.com 68 This will be your result: 11.2 Rotating panel(s) You can rotate panels by using MWF rotate panels tool. This tool rotates panels using angles and a rotate axis. Select the panel datum, click the “add-ins” tab, panel menu, and click the rotate panels command. 455 Fénelon Blvd., Suite 200, Dorval, QC, Canada, H9S 5T8 T: 514-538-6862 F: 514-538-6864 StrucSoftSolutions.com 69 Then select the angle you want to rotate and pick your axis: Select rotate axis: 455 Fénelon Blvd., Suite 200, Dorval, QC, Canada, H9S 5T8 T: 514-538-6862 F: 514-538-6864 StrucSoftSolutions.com 70 Result: Then Regenerate: 455 Fénelon Blvd., Suite 200, Dorval, QC, Canada, H9S 5T8 T: 514-538-6862 F: 514-538-6864 StrucSoftSolutions.com 71 11.3 Moving Panel(s) You can move panels by using MWF move panels’ tool. This tool works by selecting source point to destination point. Select the panel datum, click the “add-ins” tab, panel menu, and click the move panels command. Select your source point, and then your destination point. Regenerate the panel to see the results. 455 Fénelon Blvd., Suite 200, Dorval, QC, Canada, H9S 5T8 T: 514-538-6862 F: 514-538-6864 StrucSoftSolutions.com 72 11.4 Align Panel(s) You can align panels by using MWF align panels tool. This tool allows the user to align panels by choosing first source point, to first destination point, to second source point to second destination point. Select the panel datum, click the “add-ins” tab, panel menu, and click the align panels command. 455 Fénelon Blvd., Suite 200, Dorval, QC, Canada, H9S 5T8 T: 514-538-6862 F: 514-538-6864 StrucSoftSolutions.com 73 Then select your first source point first destination point, and then second source point to second destination point. This will give you this result: 455 Fénelon Blvd., Suite 200, Dorval, QC, Canada, H9S 5T8 T: 514-538-6862 F: 514-538-6864 StrucSoftSolutions.com 74 Regenerate: 11.5 Copying Panel(s) You can copy panels by using MWF copy panel’s tool. This tool gives you the choice to copy panels to floor object, copy panels with floor object, copy end conditions, copy openings, or copying from source points to destination points. 455 Fénelon Blvd., Suite 200, Dorval, QC, Canada, H9S 5T8 T: 514-538-6862 F: 514-538-6864 StrucSoftSolutions.com 75 11.5.1 Copy panels to floor object Select the panel datum, click the “add-ins” tab, panel menu, and click the copy panels command. Under destination, select Floor or Ceiling object, and then pick the floor object you want your panels to be copied too. 455 Fénelon Blvd., Suite 200, Dorval, QC, Canada, H9S 5T8 T: 514-538-6862 F: 514-538-6864 StrucSoftSolutions.com 76 Your panel datum will appear. Click regenerate to see the result. 455 Fénelon Blvd., Suite 200, Dorval, QC, Canada, H9S 5T8 T: 514-538-6862 F: 514-538-6864 StrucSoftSolutions.com 77 11.5.1 Copy panels from source point to destination point Select the panel datum, go into the “add-ins” tab, panel menu, and click the copy panels command. Under destination, select point, and then first select your reference point, and then your destination point. 455 Fénelon Blvd., Suite 200, Dorval, QC, Canada, H9S 5T8 T: 514-538-6862 F: 514-538-6864 StrucSoftSolutions.com 78 Once you have copied your panel, you ether change your properties or you can regenerate. 12. Panel Members Operation Tools In this section you will see how to modify panel members so they stay through regeneration. Panel member operation tools allow the user to add, delete, move, align, extend, or modify members. These modifications show up in the “edits” tab of the panel's properties (except add member). 12.1 Add Extra Member Add a member to a panel so it stays through the regeneration. Place any member to your panel you want to add using any of Revit’s tools. 455 Fénelon Blvd., Suite 200, Dorval, QC, Canada, H9S 5T8 T: 514-538-6862 F: 514-538-6864 StrucSoftSolutions.com 79 For example copy an extra joist, rim track or whichever you like. Then select your inserted member, go into the add-ins tab, edits Add Member. Now select any member from the panel. Then a new dialogue box will pop up. Select what kind of member you are adding: Click add: 455 Fénelon Blvd., Suite 200, Dorval, QC, Canada, H9S 5T8 T: 514-538-6862 F: 514-538-6864 StrucSoftSolutions.com 80 Now your member is pinned to the panel, and will stay through regeneration. 12.2 Delete Generated Delete a member from a panel so it stays through the regeneration. Select any generated member from the panel, go into the “add-ins” tab,Edits Delete generated. 455 Fénelon Blvd., Suite 200, Dorval, QC, Canada, H9S 5T8 T: 514-538-6862 F: 514-538-6864 StrucSoftSolutions.com 81 The member is now deleted, and it appears in the “edits” tab of the panel properties: If you want to discard this change, and return to the original settings, you can simply delete the “Edit type” from the panel properties in the previous dialogue box, and your member will return. 455 Fénelon Blvd., Suite 200, Dorval, QC, Canada, H9S 5T8 T: 514-538-6862 F: 514-538-6864 StrucSoftSolutions.com 82 Result: Deleted Generated member comes back: 12.3 Move Generated Move a generated member of a panel so it stays through the regeneration. Select any member of a panel you want to move. Then go into the “add-ins” tab,editsmove generated 455 Fénelon Blvd., Suite 200, Dorval, QC, Canada, H9S 5T8 T: 514-538-6862 F: 514-538-6864 StrucSoftSolutions.com 83 A dialogue box will pop up where you need to enter your new running distance, lateral distance and elevation distance. The running offset follows the Span direction (Red arrow) of the panel Lateral offset follows the Beam direction (Green arrow) of the panel The elevation offset follows the elevation (Blue arrow) of the panel This will give this result: 455 Fénelon Blvd., Suite 200, Dorval, QC, Canada, H9S 5T8 T: 514-538-6862 F: 514-538-6864 StrucSoftSolutions.com 84 Again, the user can also remove these configurations in the panels propertiesedits ‘delete’ 11.4 Align Generated Aligns a member from a panel to a reference plane so it stays attached its location through the regeneration. Select any member of a panel you want to align. Then go into the “add-ins” tab,editsalign generated. Select Reference plane 455 Fénelon Blvd., Suite 200, Dorval, QC, Canada, H9S 5T8 T: 514-538-6862 F: 514-538-6864 StrucSoftSolutions.com 85 A dialogue box will ask you which side you want to align to. (Opposite side, Facing side, Centerline). 455 Fénelon Blvd., Suite 200, Dorval, QC, Canada, H9S 5T8 T: 514-538-6862 F: 514-538-6864 StrucSoftSolutions.com 86 Side Position Reference with direction of Arrows (Start side, End side) Facing side: Opposite side: Centerline: 455 Fénelon Blvd., Suite 200, Dorval, QC, Canada, H9S 5T8 T: 514-538-6862 F: 514-538-6864 StrucSoftSolutions.com 87 If the user moves the reference plane that a member has been aligned to, the member will follow after regeneration. Result: 12.5 Extend Generated Extends members from a panel extended through the regeneration. This tool becomes very useful for Lap framing. 455 Fénelon Blvd., Suite 200, Dorval, QC, Canada, H9S 5T8 T: 514-538-6862 F: 514-538-6864 StrucSoftSolutions.com 88 Select any member(s) of a panel you want to extend. Then go into the “add-ins” tab,editsExtend generated. Select members to extend. A dialogue box will pop ask “Start Extension—End extension”. Depending which direction your arrows are pointing, the user places his offset distance here. The end side of a panel is where the arrow is pointing to. In this example both panels end sides are pointing to each other with an end extension 0’-3”. 455 Fénelon Blvd., Suite 200, Dorval, QC, Canada, H9S 5T8 T: 514-538-6862 F: 514-538-6864 StrucSoftSolutions.com 89 Result: 12.6 Modify Generated Modifies or reconfigures a generated member from a panel to another configuration which stays through the regeneration. Select any member (s) of a panel you want to modify, then go into the “add-ins” tab,editsModify generated. Select members to reconfigure. 455 Fénelon Blvd., Suite 200, Dorval, QC, Canada, H9S 5T8 T: 514-538-6862 F: 514-538-6864 StrucSoftSolutions.com 90 Then select your new member configuration, family, and family type. Click Ok. Results for reconfigure single joist to Triple Joist: 455 Fénelon Blvd., Suite 200, Dorval, QC, Canada, H9S 5T8 T: 514-538-6862 F: 514-538-6864 StrucSoftSolutions.com 91 12.7 Add Skid Connector Add a skid connector to selected joist. *To use this tool, you must have a supporting beam underneath and skid families loaded. Click on the StrucSoft tab Edits ‘Add skid connector’ Then click on the joist you want to add a connector Then click on the Beam beneath 455 Fénelon Blvd., Suite 200, Dorval, QC, Canada, H9S 5T8 T: 514-538-6862 F: 514-538-6864 StrucSoftSolutions.com 92 Automatically a skid connector is added. 12.7 Remove Skid Connector Remove a skid connector from selected joist. Highlight skid connector and then click on StrucSoft tabedits ‘Delete Skid Connector’ 455 Fénelon Blvd., Suite 200, Dorval, QC, Canada, H9S 5T8 T: 514-538-6862 F: 514-538-6864 StrucSoftSolutions.com 93 12.7 HVAC Notch Adds a notch in selected joist for HVAC members Click on the StrucSoft tab Edits ‘HVAC notch’. Then it will prompt you to select the intersecting member. Then select any member of the panel. 455 Fénelon Blvd., Suite 200, Dorval, QC, Canada, H9S 5T8 T: 514-538-6862 F: 514-538-6864 StrucSoftSolutions.com 94 Then a width and height dialogue box will pop up. You can then plot in your values. Now the joists are notched 18”x 3” 13. Benchmarks In this section we will see hot to associate benchmarks to floor panels which allows you to control the placement/adjustment of joist members. You insert benchmarks on two intersecting gridlines in which joist location will associate to. There are two ways of associated a panel to a Benchmark: 13.1 Adding a Benchmark Through Panel Properties Place two intersecting gridlines where the joist will line up with. 455 Fénelon Blvd., Suite 200, Dorval, QC, Canada, H9S 5T8 T: 514-538-6862 F: 514-538-6864 StrucSoftSolutions.com 95 Then go into the StrucSoft tab,Benchmark ‘Insert Benchmark’. Name the benchmark. This Case it will be called BENCHMARK TUTORIAL 455 Fénelon Blvd., Suite 200, Dorval, QC, Canada, H9S 5T8 T: 514-538-6862 F: 514-538-6864 StrucSoftSolutions.com 96 Now a Benchmark is inserted. Click into the panel properties that are in line with the grid lines. In the General tabPositionSpacing BenchmarkSelect ‘BENCHMARK TUTORIAL’. *Note: You can save these configurations in a template if needed. Click okay. The joist will now line up with the benchmark placement. 455 Fénelon Blvd., Suite 200, Dorval, QC, Canada, H9S 5T8 T: 514-538-6862 F: 514-538-6864 StrucSoftSolutions.com 97 Before: After: 13.2 Manually Associate Benchmark to Panel Once a bench mark has been placed, select a member from the panel, or the directions arrows of the panel you want to initialize, then go into the “add-ins” tab,BenchmarkAssociate Benchmark. Select the necessary Benchmark, press escape twice. Nothing will happen. Then select a member from the panel and regenerate Benchmarks could be used for lap frapping propagation, aligning to wall studs. A benchmark can also be used for multiple panels. 455 Fénelon Blvd., Suite 200, Dorval, QC, Canada, H9S 5T8 T: 514-538-6862 F: 514-538-6864 StrucSoftSolutions.com 98 14. Creating an Opening In this section we will see how to frame around openings and stamp openings with a framing type. By default, MWF supports Rim supported and Joist supported opening. MWF reads three types of floor openings: 14.1 Using a Revit Opening Element in a Floor Object Select the floor object, click create. An opening marker will appear. View image below: 455 Fénelon Blvd., Suite 200, Dorval, QC, Canada, H9S 5T8 T: 514-538-6862 F: 514-538-6864 StrucSoftSolutions.com 99 14.1.1 Opening Manager Select the opening marker, go in the StrucSoft tabOpening ‘Manage opening’: The dialogue box that pops us is the opening manager. MWF comes with two default opening types: Rim supported and Joist supported. Duplicate ether one, and then click modify. The general tab: Type Name ( Changes name ) Framing style (Rim supported VS Joist supported) Tolerance around an opening Minimum partial joist length: (Minimum lengths for joists meeting headers around opening) 455 Fénelon Blvd., Suite 200, Dorval, QC, Canada, H9S 5T8 T: 514-538-6862 F: 514-538-6864 StrucSoftSolutions.com 100 In the Headers-Trimmer tab, the user can modify the configurations the same way as done for the properties of the panel. In the Supporting Joist tab, the user can modify the configurations the same way as done for the properties of the panel. The supporting joist is where the header connects to the joist. For the Cutbacks, if the user chooses Rim supported framing style, he will only be able to configure Partial Joist to rim track, and header to trimmer. If user chooses Joist supported style, he will only be able to configure cutbacks Header to supporting joist and Trimmer to header. 455 Fénelon Blvd., Suite 200, Dorval, QC, Canada, H9S 5T8 T: 514-538-6862 F: 514-538-6864 StrucSoftSolutions.com 101 Example Rim supported: Once the opening type configurations are complete click OK. User will return back to the opening manager, click Close. 455 Fénelon Blvd., Suite 200, Dorval, QC, Canada, H9S 5T8 T: 514-538-6862 F: 514-538-6864 StrucSoftSolutions.com 102 14.1.2 Change Opening Type Select the opening marker; go into the StrucSoft tabOpening ‘Change opening type’ Pick the new opening type created. Click Select: 455 Fénelon Blvd., Suite 200, Dorval, QC, Canada, H9S 5T8 T: 514-538-6862 F: 514-538-6864 StrucSoftSolutions.com 103 Then click ‘Regenerate’: *Note: The advantage of creating openings with this method is if the opening element is modified or moved, the panel will recognize and frame around new configurations when regenerated. 14.1.3 Changing/Understanding an Opening Type’s Properties Once you have opened the floor opening manager, and duplicated either the joist supported or rim supported type framing condition, rename it, and modify its properties. Example for Joist supported: Make sure the Joist supported is activated. This is how MWF knows which style to frame. View example below: 455 Fénelon Blvd., Suite 200, Dorval, QC, Canada, H9S 5T8 T: 514-538-6862 F: 514-538-6864 StrucSoftSolutions.com 104 The header/Trimmer tab: Select the header configuration you need. If you have double headers, make sure to select a family and type for both Member A family and Member B family. Supporting Joist tab: *Note: The repeats spacing option places a space in between member A and member B, and, B and C. 14.2 Using Revit Model Lines Create closed loop model lines on work plane of panel: 455 Fénelon Blvd., Suite 200, Dorval, QC, Canada, H9S 5T8 T: 514-538-6862 F: 514-538-6864 StrucSoftSolutions.com 105 Select model lines, go into the StrucSoft tab Opening ‘Create Opening’: MWF will then ask if you want to create an opening in the floor object as well. Click Yes. Now user will have an opening marker. 455 Fénelon Blvd., Suite 200, Dorval, QC, Canada, H9S 5T8 T: 514-538-6862 F: 514-538-6864 StrucSoftSolutions.com 106 Select the opening marker go into the Strucsoft tabOpening ‘Change opening type’ Select the opening type. For this example select the default joist supported opening type. Click Select. 455 Fénelon Blvd., Suite 200, Dorval, QC, Canada, H9S 5T8 T: 514-538-6862 F: 514-538-6864 StrucSoftSolutions.com 107 Select the datum arrows, opening marker, or any member of the panel and click ‘Regenerate’. 14.3 Using MWF’s Floor Clash Detection Tool Select the intersecting member(s) and floor object. Go into MWF Walls StrucSoft tab InterferenceFloor-Opening at intersect: 455 Fénelon Blvd., Suite 200, Dorval, QC, Canada, H9S 5T8 T: 514-538-6862 F: 514-538-6864 StrucSoftSolutions.com 108 Un-check structural framing, and beams in the intersecting categories list. Click the Blue check mark at bottom when done. Tolerance box will pop up. For this instance, the gap around the opening will be 4”. Click ok. An opening element will be placed in the floor. 455 Fénelon Blvd., Suite 200, Dorval, QC, Canada, H9S 5T8 T: 514-538-6862 F: 514-538-6864 StrucSoftSolutions.com 109 Select the opening element, go into the “add-ins” tab Openingcreate opening: An opening marker will be placed. You can change/modify your opening type or regenerate. 455 Fénelon Blvd., Suite 200, Dorval, QC, Canada, H9S 5T8 T: 514-538-6862 F: 514-538-6864 StrucSoftSolutions.com 110 Here is the result: 15. Shop Drawings This section shows how to create shop drawings. This tool allows users to automatically create and place viewports of different panel views, bill of material and 3d views of a panel. User can select location of the viewports as well as scales, dimension styles and sheet in which the viewports will be organized. 15.1 Creating Shop Drawings Select the datum arrows; go into the “Add-ins” tab Drawing Floor Panel Drawing 455 Fénelon Blvd., Suite 200, Dorval, QC, Canada, H9S 5T8 T: 514-538-6862 F: 514-538-6864 StrucSoftSolutions.com 111 Select the Floor Drawing Options and click generate The shop drawing will be located in the project browser under sheets: 455 Fénelon Blvd., Suite 200, Dorval, QC, Canada, H9S 5T8 T: 514-538-6862 F: 514-538-6864 StrucSoftSolutions.com 112 Your shop drawing will be produced: 15.2 Drawing Sheets 15.2.1 Sheet Layout Template It's possible to use a customized sheet that will be used for the creation of shop drawings. The sheet layout template is composed by zones, which are used for the placement of viewports. You can modify the quantity, positioning and size of the zones. 15.2.2 Modifying the Sheet Layout Template From the Drawings menu, select "Option File Manager". A dialog box will appear displaying the available View Option files. Select "MWF_Default_A4_Landscape" and click "Edit". 455 Fénelon Blvd., Suite 200, Dorval, QC, Canada, H9S 5T8 T: 514-538-6862 F: 514-538-6864 StrucSoftSolutions.com 113 Select "Sheet Layout Directory" to open the folder in which the sheet layout template file is saved. Open the template MWF-Sheet_A4-Landscape.rvt. You can have different layout template files by duplicating this original file and creating a customized one. Note: You might need to close the current drawing that you are working with to open the Sheet Layout file. You can modify the sheet layout and change the position of the "zones" in this template file. To modify the size of the zones, select it and on Revit properties dialog box change the dimensions "w" for width and "h" for height. 455 Fénelon Blvd., Suite 200, Dorval, QC, Canada, H9S 5T8 T: 514-538-6862 F: 514-538-6864 StrucSoftSolutions.com 114 16. Quick Reference Panel: The panel menu is split up into 8 parts. Split Profile Line, Split Panel, and Merge Panel, Copy Panels, Mirror Panels, Move Panels, Rotate Panels, and Align Panels. Split Profile Line: Allows you to place a node where you can create a new boundary line for your floor panel. You must place your nodes on an existing line. Split Panel: Splits a panel between two nodes. Merge Panel: Combines selected individual panels to make one. Copy Panel: Copies panels, end conditions and openings. Either by floor object or reference/ destination points. Mirror Panel: Mirrors panels by Planes. Panels can be mirrored with or without shared end condition lines. Move Panel: Moves panel by choosing reference points and destination points. Rotate Panel: Rotates a panel by rotation axis and angles. Align Panel: Aligns panel to selected destination points. Openings: The opening menu is split up into 3 parts. Change Opening Type, Manage opening types, and Create Opening. Change opening type: Changes the type of opening you want for the specific panel. Manage opening types: Duplicates, Modifies, and deletes opening types. (More details below) Create Opening: Creates a framed floor opening in reference to Revit model lines, or openings in Revit floor objects. End Condition: The End condition menu is split up into 3 parts. Switch End Condition, Edit End Condition Side Rimtrack. End Condition: End condition menu is set up into three parts. Switch end condition, end condition, side rim track. Stamps a condition onto a model which overrides properties. Ending conditions are always chosen from a model line of the rim joist/rim track.* Switch End condition: Switches the ending condition of two panels sharing the same model line. Edit End condition: (Track meets joist side) Duplicate, Modify, custom ending conditions, balloon framing, or platform. Lap framing condition to come. (More details below) Side Rimtrack: (Start/End joists) Duplicate, Modify, custom ending conditions, balloon, or platform. (More details below) Templates/Template Manager: Floor Panel Template manager; to delete, manage, rename, and import/export other templates from other files. 455 Fénelon Blvd., Suite 200, Dorval, QC, Canada, H9S 5T8 T: 514-538-6862 F: 514-538-6864 StrucSoftSolutions.com 115 Create: The create command creates a new floor panel with either existing floors or model lines. Set Beam Direction: The Set Beam Direction command allows you to set your Beam Direction by either using Revit's rotate command, or with a reference line. Properties: The properties command allows you to edit and change the specific panels member properties (Tracks, end joists, joists, and cutbacks). You can also select the panel and save it as a template, or use an already existing template and apply it to that panel. Regenerate: Restores the new properties applied to the panel, or opening. It is very important that when you do modifications that you click the marker and click regenerate. Or else you may not see the adjustments. Edits: Benchmark: Add Member: Adds an extra member to the panel. Delete Member: Deletes generated member. Move Member: Moves generated member. Align Member: Aligns generated member. Extend Member: Extends generated members. Modify Member: Reconfigures generated member. Insert Benchmark: Inserts a Benchmark on two intersecting grids. This tool overrides first joist offset for controlled positioning of members. A bench marker will align the members of a panel when framing. Associate Benchmark: Associates Benchmark to panel. Interference: (MWF WALLS)/Floor – Opening at Intersect: With both the floor and penetrating object selected this command creates an opening around the component in the floor. Used with the Clash Detection function. Drawings/Floor Panel Drawing: Creates a shop drawing of the selected panel. Help/About: Displays information about the version of MWF currently installed. Warnings/Show Warnings: Displays the warnings in that panel. 455 Fénelon Blvd., Suite 200, Dorval, QC, Canada, H9S 5T8 T: 514-538-6862 F: 514-538-6864 StrucSoftSolutions.com