1
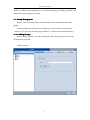
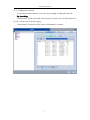
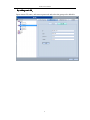
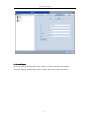
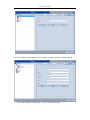
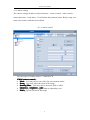
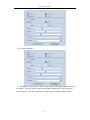
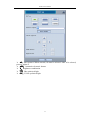
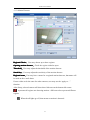
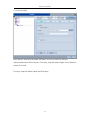
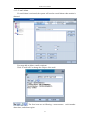
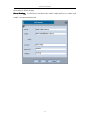
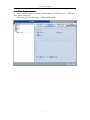
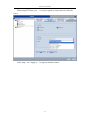
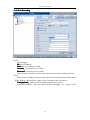
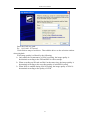
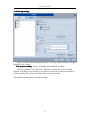
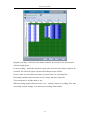
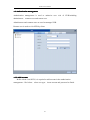
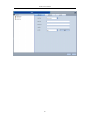
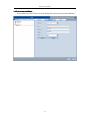
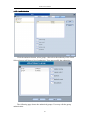
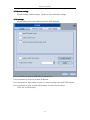
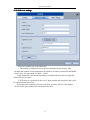
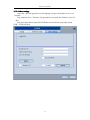
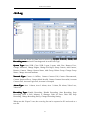
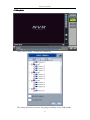
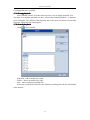
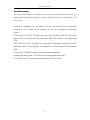
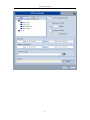
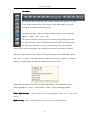
NVR - 10
User’s Manual
20
2011104 Revised Version
NVR-10 user manual
Contents
<1> Group Management.............................................................................................................................................2
<1.1> Adding Groups......................................................................................................................................... 2
<1.4>Attributes...................................................................................................................................................6
<2.6> Time Synchronization............................................................................................................................ 17
<2.7>NAS Recording....................................................................................................................................... 20
<3>Recording settings..............................................................................................................................................22
<3.1>Basic Settings.......................................................................................................................................... 22
<3.2>Group settings......................................................................................................................................... 23
<4>Authorization management................................................................................................................................ 25
<4.1>Add account............................................................................................................................................ 25
<4.2>Account attributes................................................................................................................................... 27
<4.3> Authorization..........................................................................................................................................28
<5>System settings...................................................................................................................................................29
<5.1>startup......................................................................................................................................................29
<5.2>M-Server settings.................................................................................................................................... 30
<5.3> Other settings......................................................................................................................................... 31
<6>Log..................................................................................................................................................................... 32
<7>Playback.............................................................................................................................................................33
<7.1>Group playback....................................................................................................................................... 34
<7.2>Search playback...................................................................................................................................... 34
<8>AVI conversion.................................................................................................................................................. 36
<9>Other.................................................................................................................................................................. 38
Snapshot........................................................................................................................................................... 42
<9>Icon definition:................................................................................................................................................ 43
1
NVR-10 user manual
NVR -10 includes group management, real time monitoring, recording, playback, and
authorized remote playback viewing.
<1> Group Management
Before using NVR functions, user must add cameras and manage them into
groups.
Group management allows users to add groups, local cameras, and network
cameras. User may also modify group attributes. (Camera and account attributes)
<1.1> Adding Groups
Before adding cameras, you must add a group first. Put group name into name
column, then click add.
Adding Groups
2
NVR-10 user manual
<1.2> Adding local cameras
Local camera can be added in two ways, by searching or adding the static IP.
By Search
ing
Searching
ing::
Click Search,NVR will search for all cameras in LAN, user can add camera one
by one or all at once to specific group.
Camera may be sorted by its IP, name, serial number, or model.
3
NVR-10 user manual
By adding static IP
IP:
Input camera IP, name, and camera password and select the group to be added in.
4
NVR-10 user manual
<1.3>Adding network camera
Network camera can be added in two ways,by account or IP(Port).
Account
Account:
Select the desired group, then input name,account,password,and server to add.
Groups added by account can not be mixed with groups added by IP.
IP
Port
IP(Port
Port):
To add a network camera through IP(port), it is required to add a group first.
Input remote router or camera IP(router or camera is directly connected to public
network),Port number (default as 3478), name, and camera password.
5
NVR-10 user manual
<1.4>Attributes
User may modify local groups, local cameras, account, and network cameras.
User may modify group names, delete groups, and clear camera operations.
6
NVR-10 user manual
User may modify camera name, delete camera, or move camera to another group.
User may modify account name,server, or delete account.
7
NVR-10 user manual
User may modify camera name
8
NVR-10 user manual
<2>Camera settings
The camera settings include six major functions:camera control,other controls,
motion detection,local alarm,E-mail alarm and synchronization. Before setup, user
must select camera wished to be modified.
<2.1>Camera control
The two types of camera control:CMOS和CCD
CMOS camera controls
controls:
� Mode
Mode:User may choose out of the four environment modes.
� Zoom
Zoom:User may adjust the zoom of the image
� Banding Filter
Filter:User may choose between 50Hz or 60Hz.
brightness
gain: May be adjusted by user.
� Sharpness
Sharpness,brightness
brightness,gain:
Effect
� Effect:Special effects for the image
9
NVR-10 user manual
CCD camera controls:
� Backlight Compensation: There are six regional backlight compensation set
as default,user may also customize backlight compensation. After choosing
desired region,user may adjust the strength of the backlight compensation.
10
NVR-10 user manual
� AI
AI:Auto aperture. When external, AI must be selected. After AI is selected,
you may adjust it.
� AES
AES:Automatic electronic shutter
� Y:Brightness combination
� CB
CB:Blue polarized light
� CY
CY:Yellow polarized light
11
NVR-10 user manual
<2.2>Other Controls
User may switch on or switch off the timer on the camera screen.
Video input source:User may choose between Composite or S-Video.
System control: User may reboot camera.
Vertical and Horizontal mirror:User may adjust image.
12
NVR-10 user manual
<2.3>Motion Detector
Regional Choice
Choice:User may choose up to three regions.
Opening motion detector
detector:Check the region wished to open.
Threshold
hreshold:User may adjust the threshold of the motion detector.
Sensitivity
Sensitivity:User may adjust the sensitivity of the motion detector.
Regional name
name:User may have a name for a regional motion detector, that name will
be used on the e-mail alarm.
If user wishes to do the same for other cameras, user may use the “apply to…”
function.
After Setup, selected camera will show three little men at the bottom-left corner.
:represents all regions are detecting motion,different colors represent different
regions.
:When the all lights go off, that means no motion is detected.
13
NVR-10 user manual
<2.4>Local Alarm
Once alarm is activated, the alarm will notice user once motion is detected
Alarm sound can be chosen by user. User may setup the alarm length, if not, default is
around 5 seconds.
User may setup the alarm output after DO input.
14
NVR-10 user manual
<2.5> E-mail Alarm
If e-mail alarm is activated, the system will send an e-mail alarm when motion is
detected.
User may add or delete e-mail recipients.
Click “E-mail edit” to change the subject of the mail.
The four icons are as following:camera name,serial number,
alarm time, and alarm region.
15
NVR-10 user manual
System has a default setting:
Server Settings
Settings:Verification is needed for the sender. Input mail server, sender, and
sender’s account and password.
16
NVR-10 user manual
<2.6> Time Synchronization
There are three ways to set time synchronization:NVR time sync.,NTP time
sync., and no time sync.
When it is set as no time sync.,nothing will change.
17
NVR-10 user manual
When using NVR time sync.,NVR automatically reads the clock displayed on
the computer. If the time is still not correct, modify the time on the computer.
18
NVR-10 user manual
When using NTP time sync.,it is only required to setup time zone and time
server.
After setup,use “Apply to…”to apply to another camera.
19
NVR-10 user manual
<2.7>NAS Recording
When launched NAS recording,the recorded file will be saved to the NAS
device.
NAS settings:
IP: NAS IP address
Path: NAS recording save path.
Account
Account:Username of save folder.
Password
Password:Password of save folder.
When normal recording is selected, directly starts real-time recording on NAS
device.
When event recording, you must set the regions for motion detection before hand.
When motion is detected, the image will be recorded on the NAS device.
NAS playback
playback:Makes NAS save path mapped to local drive
Open“My computer”, and select “Network device mapping(N)” under “tools”
20
NVR-10 user manual
Insert the NAS save path.
Ex:\\192.168.1.253\record
Click finish to map to local drive. Then add the driver on the selection window
when playback.
NAS image quality is affected by the following:
1> Only under the circumstances of NAS recording, the image quality is
determined according to the FPS and RES in video settings.
2> When recording on SD card and NAS at the same time, the image quality is
determined according to the recording quality of miniDVR in setup.
3> When NVR is enabled during NAS recording, the image quality of NAS is
determined according to the quality of NVR.
21
NVR-10 user manual
<3>Recording settings
The recording settings are for group operation, not for the operation of a single
camera. Thus, you may not have two different camera recording mode in a same
group.
The recording settings are split into two parts: basic settings and group settings.
<3.1>Basic Settings
Including recording path, retention time, storage policy and holiday setup.
The local drive is directly used for local save path. the recording order will be
decided by capacity when there is an extra drive.
Retention time:The days of recording retention.
Storage policy:User may choose between to overwrite or to stop when
maximum capacity is reached.
Holiday setup: choose holiday ,then setting event recording.
Click “apply” to finish and move on the group settings.
22
NVR-10 user manual
<3.2>Group settings
Choose a camera group from the group list. User may adjust the audio, FPS, RES,
and BPS of the camera.
Two ways to enable
enable:Always recording and scheduled recording.
Always record have two functions:Regular recording and event recording.
Regular recording is set as default. It is required for users to set motion detection for
event recording. The camera will record once motion is detected.
Scheduled recording requires schedule settings.
23
NVR-10 user manual
Regular recording:Select the time-frame wished to be recorded. The selected ones
will turn bright green.
Event recording:Select the detection region, then select the time-frame wished to be
recorded. The selected region will turn into different colors of blue.
If user wishes to cancel the time-frame, user must select no recording first.
Recording schedule chart shows the week (7 days) and time (24 hours).
User can choose to include audio or not.
When recording quality and screen size is set,and the camera is recording, User may
not modify camera settings. You must stop recording, then modify.
24
NVR-10 user manual
<4>Authorization management
Authorization management is used to authorize user visit of NVR.including
administrator,common user and remote user.
Administrator and common user are used to manager NVR.
Remote user is used to visit NVR by client.
<4.1>Add account
Before client visits NVR, it is required to add account in the authorization
management,like below,select user type,insert account and password to finish.
25
NVR-10 user manual
26
NVR-10 user manual
<4.2>Account attributes
Select added account. Then user may change the password in account attributes.
27
NVR-10 user manual
<4.3> Authorization
Click the authorize button, select group,then select the authority of the client.
Selected group will show a list of authorities. User may modify the authorities.
The following page shows the authorized groups. User may edit the group
authorization.
28
NVR-10 user manual
<5>System settings
System settings include startup,M-Server setup and other settings
<5.
<5.11>startup
startup setting selects the default each time NVR launches.
User can choose to autorun NVR when windows start.
User can choose to set preview mode as default.
User can choose to allow utility to preserve custom settings each time NVR reboots.
User can choose to open joystick when startup to control speed camera.
Click “ok” to finish setup.
29
NVR-10 user manual
<5.
<5.22>M-Server settings
M-Server include two of the following:
1. The number of authorized users may be controlled by the system. This
includes the number of login limitation, the number of camera connection and Media
Server port – the port range is 10000~11000.
Login limitation is the maximum number of authorized users that can login the
client and view at a time.
2. NVR may be registered on the server. Input a name and password, and it will
be registered onto the server.
If selected name inputted is already used, then you may still use it for another
NVR, but the password must be the same as the first.
30
NVR-10 user manual
<5.
<5.33> Other settings
Auto-flip:the time gap between the flipping of pages, the default is set as 10
seconds.
Log retention time:The time of log retention of system, the default is set as 30
days.
Auto lock time:choose auto lock NVR,after auto lock time,no people option
NVR,NVR will lock.
31
NVR-10 user manual
<6>Log
Users can use the Event Log data base to retrieve the System
ystem,, Network, Alarm, and
Recording status and each event happened in each Event Type.
System Type: Start NVR, Close NVR, Logon, Logout, Add User, Remove User,
Change Password, Change Rights, Change Privileges, Setup Camera, Add Camera,
Remove Camera, Change Camera Name, Add Group, Delete Group, Change Group
Name, Change Account Attribute
Network Type: Camera is Offline, Camera Connect Fail, Camera Disconnected,
Camera Password Error, Camera Mode Invalid, Camera Connect Successful, Account
Connect Fail, Account Login Fail, Account is Occupied
Alarm Type: Area 1 Alarm, Area 2 Alarm, Area 3 Alarm, DI Alarm, Video Loss,
Video On,
Recording Type: Enable Recording, Disable Recording, Start Recording, Stop
Recording, Disk is Full, Memory is Shortage, Disk IO Error, Disk Full, Stop
Recording, Change Recording Policy, Change Recording Setting
When uses hit “Export” icon, the event log list can be exported to PC and saved as a
text file.
32
NVR-10 user manual
<7>Playback
Click “select camera” to obtain the camera list.
The camera list has two sources: the group recordings set by NVR and the
33
NVR-10 user manual
recordings that were searched.
<7.1>Group playback
After selected camera, click the camera icon to view its single playback. You
may also view multiple playbacks at once, select multi-channel playback – it supports
up to 4 channels. The default of the playback date is the most recent date of recording.
User may adjust the time and progress.
<7.2>Search playback
Click
icon, to search.
Add path:add recording save path.
Delete:delete recording save path.
start:start searching recording files.
Select save path,then click start,after finding recording files,the list will display
at the bottom.
34
NVR-10 user manual
The following functions are also included during playback:
Play Motion Sequence
Sequence: The camera will record once it detects motion, this
function is to only play the recording when motion is detected.
Local Motion Detector
Detector:This function is only for single playback. User may
draw a region with the cursor and detect motion.
Switchable playback speed: Standard, 2xSpeed, 3xSpeed, 4xSpeed, 6xSpeed,
8xSpeed, 12xSpeed, 16xSpeed.
� Blue bar states broadcast time
�
Green bar states the motion detection
�
Yellow bar states normal recording
Drag in the blue bar to adjust the time
35
NVR-10 user manual
<8>AVI conversion
AVI Conversion feature is to allow users to convert the recorded video into .avi
format. Select the camera group or cameras in the “Camera List” column for AVI
conversion.
“Convert to standard avi file” � When you select, the video will be converted into
standard .avi file, which can be displayed by any H.264-supported multimedia
players.
“Time Limit of AVI File” � When you select the time limit of the AVI conversion
video, the AVI conversion files are in the same folder if the File size is not larger than
2GB.
“Size limit of AVI file” � When you select the size limitation, when the AVI final
destination folder is exceeding the size limitation, it creates another final destination
folder.
“Time-Frame” � Recorded video starting time and ending time.
“Starting and ending time” � AVI conversion starting and ending time.
“AVI file save path” � Storage destination of the AVI conversion.
36
NVR-10 user manual
37
NVR-10 user manual
<9>Other
The right list shows all groups and account,double click group or account
to see all the camera icons of this group. At the same time, the left side
will show all cameras within the group.
For normal groups,when you right click the group icon, four shortcuts
appear,replace,add,close,info.
The replace shortcut is used replace the camera group playing now with
the selected camera group. The add shortcut is to add selected group into
list. The close shortcut is to close selected group. The info shortcut is
allows user to check group name, type, number of cameras, and status of cameras.
When user right clicks account group, five shortcuts appear as the following,replace,
add,close,reconnect,info. Reconnect is used when account is snatched,it connects
directly to account group without the requirement to reboot NVR.
Right click any camera icon to show camera information. The information shows
camera IP address,series,serial number,status,group, and image quality.
Video Split Screens : User can chose any format anytime. Press “esc” to quit full
screen.
Split screens
screens:User can choose up to 28, 36, 49 or even 64 split screens.
38
NVR-10 user manual
Page/Group flip
flip:This function includes flipping upwards, downwards, or auto-flip.
Mode switch
switch:Click icon to switch
preview mode or play mode. Preview mode
displays one image per a few seconds,to save PC performance.
Volume Adjustment
Adjustment:User can adjust volume or mute.
Color Adjustments:User can adjust image effects by
adjusting
the color adjustment.
1.
Brightness:Brightness adjustment of image
2.
Contrast:Contrast adjustment of image.
3.
Color:Color adjustment of image
4.
Saturation:Saturation adjustment of image.
39
NVR-10 user manual
PTZ control:when selected camera have PTZ functions
included,then “PTZ controls” can be used.
Click “PTZ” to maximize PTZ interface.
Click “PTZ” located in the center of the circle to access
advanced PTZ control.
40
NVR-10 user manual
PTZ controls
Zoom in
Zoom out
Focus near
Focus far
Widen iris
Narrow iris
Preset selection
Preset point management :
User can add preset points,
delete preset points, or
clear all preset points.
41
NVR-10 user manual
Screen lock:Unlocking requires NVR password. If there is
no password, system will remind you to set one.
Stop recording:When setting image quality, user can stop
recording, then modify.
Snapshot
User can use cameras to take pictures
Click the snapshot icon to take a photo of the current screen of selected camera.
The picture can be either printed or be saved on the hard disk of the computer.
42
NVR-10 user manual
<9>Icon definition
definition:
From left to right
1.
Camera is recording
2.
Scheduled recording, not now.
3.
Recording error
4.
Unknown status
5.
Offline
6.
Password error
7.
Connecting
8.
Connection failure
9.
Connection error
10. Connected, awaiting data
11. Normal status
12. Account snatched
13. Camera deleted
From left to right
1. Account group
2. Regular group
3. Cameras in account
4. Cameras added by IP (Port)
5. Local cameras (added by IP and search)
From left to right
1. This is an account group
2. Account snatched
3. Connection failure
4. Camera error in group (connection error or recording error.)
1,2,3 are specialized for group accounts, 4 is for all accounts.
43
NVR-10 user manual
44