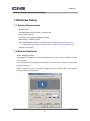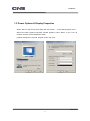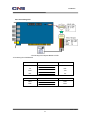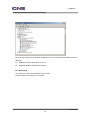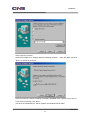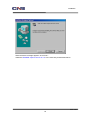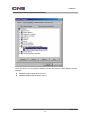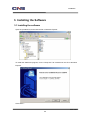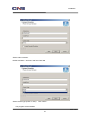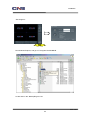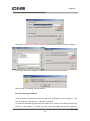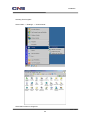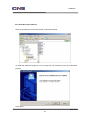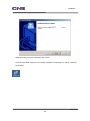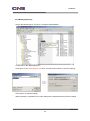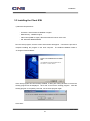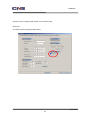
1
MiniDVR (v1.1) Installation Manual CNBTECH CNBTECH CNBTECH CNBTECH Installation This product is made by advanced technology of C&B Technology and passed reliability and compatibility test. Product quality can be guaranteed. This is an operation guide for Mini_DVR user. This guide gives you BDx-Series’s external specification, name, PAN/TILT control, the way of attaching peripheral devices and configuration of system program. If you are first user of Mini_DVR, even though you are experienced with similar products like this, we recommend you to read this manual carefully and follow the instructions inside before using this product. CAUTION The copyright of this manual belongs to C&B technology. It is prohibited to copy this manual without permission. We do not guarantee, if your system is damaged by your mis-using disapproval components or mis-operation. If you have any problems or questions with our product, please contact the dealer you bought from or C&B Technology. If you need to open the system for modification or repairing, it is recommended that you have to request an engineer’s assistance by contacting the dealer you bought it from or C&B Technology. BDx-Series is a registered trademark of C&B Technology DVR system. This product has certification for domestic and industrial use. Also, it has taken CE for Europe, FCC for the U.S. BDF-0303 2 Installation Warning This is a Class A product. In a domestic environment this product may cause radio interference in which case the user may be required to take adequate measures. BDF-0303 3 Installation WARNING You should pay attention to following information before installing DVR. ▪ Do not expose the product to rain, extremely humid or dirty environment. It may cause malfunction of system. Install dehumidifier and use compressed air for cleaning filter, fan every 3 month. ▪ Do not expose the product directly to the sun or a heating apparatus. ▪ Do not install the product where extreme electronic waves or magnetism exit. ▪ Do not install the product to extremely cold or hot area.(Recommended temperature is 5 ~ 35 C) ▪ Be careful not to drop any conducting material into the ventilation hole. ▪ Before Installation, be sure to turn off the power of system. ▪ Ensure enough space for the cables at the rear of the system. ▪ Do Install the product to a well-ventilated area. ▪ Be careful, it is approached to eletric machines, Radio,TV etc that cause a problem. ▪ Do not put heavy material on the system. BDF-0303 4 Installation Table of Contents 1.Windows Setup .......................................................................................................................... 6 1.1 System Requirements ...................................................................................................... 6 1.2 Monitor Resolution ........................................................................................................... 6 1.3 Power Options & Display Properties ................................................................................ 7 2. Hardware Installation ................................................................................................................. 8 2.1 Hardware Configuration ................................................................................................... 8 2.2 Connecting Hardware .................................................................................................... 10 2.2.1 Connecting Network............................................................................................. 10 2.2.2 Connecting PTZ ................................................................................................... 11 2.2.3 Connecting Sensor Input ........................................ Erro! Indicador não definido. 2.2.4 Digital Output Connection ....................................... Erro! Indicador não definido. 2.2.5 Watch Dog Connector ............................................. Erro! Indicador não definido. 2.3 Installing Device Driver .................................................................................................. 12 2.3.1 Windows98 .......................................................................................................... 15 2.3.2 Windows XP/2000 ................................................................................................ 12 3. Installing the Software ............................................................................................................. 20 3.1 Installing the software .................................................................................................... 20 3.2 Reinstalling the software ................................................................................................ 22 3.2.1 Saving the Settings .............................................................................................. 22 3.2.2 Uninstalling the Software ..................................................................................... 24 3.2.3 Reinstalling the Software ..................................................................................... 27 3.2.4 Modifying Settings................................................................................................ 30 3.3 Installing the Client S/W ................................................................................................. 31 3.4 Installing the Web server S/W (Option) .......................................................................... 33 BDF-0303 5 Installation 1.Windows Setup 1.1 System Requirements • Supported OS: Windows 98SE, Windows 2000, or Windows XP • System Requirements Processor: Intel Pentium III 800MHz or higher Main Memory: 128MB or higher Video Card (32MB or higher): ATI Radeon 7000 or higher.(We recommend you to update driver to the latest version because a old driver may not properly run.) DirectX 7.0a or higher 1.2 Monitor Resolution Select “Display Properties”. All programs of CNBTECH have been designed to be run at the screen resolution of 1024 ×768 or higher. If the monitor does not support this resolution or has not been configured, the program may not properly run. Select “Highest (32 bit)” in the Color quality field, and “1024 by 768” in the Screen resolution area as shown below: BDF-0303 6 Installation 1.3 Power Options & Display Properties Select “None” in the Screen saver field, and click “Power…” in the “Monitor power” area. When the Power Options Properties window appears, select “Never” in the “Turn off monitor” and the “Turnoff hard disks” fields. If above settings are not made, program errors may occur. BDF-0303 7 Installation 2. Hardware Installation 2.1 Hardware Configuration Layout 5 6 4 3 1 2 <Capture Board> ① BNC : Video Inputs( Total 4Channel : ② RCA : Audio Input ③ RS422/RS485 Interface : PTZ CAM IN 1~4) BDF-0303 8 Installation ④ Watch-Dog Connector ⑤ Sensor Input Connector ( needs option Board ) ⑥ Alarm Output Connector ( needs option Board ) BDF-0303 9 Installation 2.2 Connecting Hardware 2.2.1 Connecting Network LAN/ xDSL Port Internet Client PC BDF-0303 10 Installation 2.2.2 Connecting PTZ <Connecting from Capture Board to PTZ> <Connecting from DIO Board> Camera PTZ RS-422 Capture Board TX+ RX+ TX- RX- RX+ TX+ RX- TX- Camera PTZ RS-485 Capture Board TRX+ TRX+ TRX- TRX- BDF-0303 11 Installation 2.3 Installing Device Driver The driver is installed by INF file. Install the board in the PC, and boot the PC. Then, the PC will automatically detect the board (by PNP) and will be ready to install the driver. The user can easily install the driver file saved in the installation diskette or HDD by designating the folder classified according to the OS type. After the driver file is installed, the IRQ of the installed card must not conflict or be shared with another card or equipment. However, if the IRQ of the installed card is shared by another card or equipment, insert the card into a different PCI slot or manually specify the IRQ through CMOS setup of the main board. Operating systems supporting the driver include Windows98SE, Windows 2000, and windows XP. CNBTECH guarantees the compatibility only with ATI-series video cards, not other video cards. Install the driver as described below: 2.3.1 Windows XP/2000 Installing the driver in Windows XP/2000 is more complicated than in Windows98 and differs a little bit depending on the model. Turn off the PC, and insert the board in the PCI slot. Turn on the PC, and run the system. Windows 2000 will automatically detect the new hardware device and recognize it as a multimedia video controller. BDF-0303 12 Installation Select “Install from a list or specific location (Advanced)”, and click "Next>". Insert the provided CD or a floppy diskette containing the driver, and click “Next>” to search for the driver. BDF-0303 13 Installation Click “Yes”. Click “Finish”. Install the “MINIDSR AUDIO Capture Device Ver1.0” driver in the same way as described above. BDF-0303 14 Installation Once the two drivers are successfully installed, the two new devices will be added to Device Manager: “MINIDVR Video Capture Device Ver1.0” “MINIDSR AUDIO Capture Device Ver1.0” 2.3.2 Windows98 Turn off the PC, and install the board in the PCI slot. Run the system by turning on the computer. BDF-0303 15 Installation The OS will automatically start to search for PCI Multimedia Video Device. Select “Search for the best driver for your device (Recommended)”, and click “Next>”. BDF-0303 16 Installation Select “Specify a location”. Insert the provided CD or a floppy diskette containing the driver. Open the folder, and click “Next>” to search for the driver. If the correct driver is found, the dialog will display “MINIDVR Video Capture Device Ver1.0”. If you see this message, click “Next>”. The driver file “MINDVR9.sys” will be copied to the Windows Driver folder. BDF-0303 17 Installation When the above message appears, click “Finish”. Install the “MINIDSR Capture Device Ver1.0” in the same way as described above. BDF-0303 18 Installation Once the drivers are successfully installed, the two new devices will be added to Device Manager: “MINIDVR Video Capture Device Ver1.0” “MINIDSR AUDIO Capture Device Ver1.0” BDF-0303 19 Installation 3. Installing the Software 3.1 Installing the software Open the provided CD, and locate the file in Windows Explorer. To install the CNB DVR program, run the “Setup.exe” file contained in the CD in Windows Explorer. Click “Next>”. BDF-0303 20 Installation Select video resolution. Default resolution : 320*240 / 640*240 / 640*480 Select camera type (NTSC or PAL). Click “Next>”. The program will be installed. BDF-0303 21 Installation When the setup process is completed, click “Finish”. Once the CNB DVR program is successfully installed, the system will be automatically rebooted, and the following icon will be created on the Desktop: 3.2 Reinstalling the software 3.2.1 Saving the Settings Before installing a new-version of the software, the user needs to save the current settings of the system. To install a new program while maintaining the existing settings, do the following: If the DVR program is running, click the “LOG ON” button and exit the system by selecting BDF-0303 22 Installation “Exit Program”. Click Run Windows Explorer, and go to C:\Program Files\CnBDVR. Locate and run the “BackupReg.exe” file. BDF-0303 23 Installation Click “Open” in the Export Registry File area, and specify the location to save the settings. Click Export to save the settings to a file with the current time as its file name. When saving is completed, exit the software. 3.2.2 Uninstalling the Software Upon re-powering up Windows, hold down the LEFT CTRL button on the keyboard. will not enable the IDR software. This It will stay in Windows. To install the CNB DVR program while the system is on, remove the existing program first. However, if the program is running, click the “LOG ON” button and exit the system by BDF-0303 24 Installation selecting “Exit Program”. Select “Start" → "Settings" → "Control Panel”. Select Add or Remove Programs. BDF-0303 25 Installation Select the CNB DVR Program, and click Change/Remove. Click “OK” to remove the existing program. The program will be removed. BDF-0303 26 Installation 3.2.3 Reinstalling the Software Open the provided CD, and locate the file in Windows Explorer. To install the CNB DVR program, run the “Setup.exe” file contained in the CD in Windows Explorer. Click “Next>”. BDF-0303 27 Installation Select video resolution. Default resolution : 320*240 / 640*240 / 640*480 Select camera type (NTSC or PAL). Click “Next>”. The program will be installed. BDF-0303 28 Installation When the setup process is completed, click “Finish”. Once the CNB DVR program is successfully installed, the following icon will be created on the Desktop: BDF-0303 29 Installation 3.2.4 Modifying Settings Launch Windows Explorer, and go to C:\Program Files\CnBDVR. Locate and run the “BackupReg.exe”. Click “Open” in the Import Registry File area, and specify the location to save the settings. Click “Import” to load the settings. When importing is completed, the current setting will be replaced with the previous settings. BDF-0303 30 Installation 3.3 Installing the Client S/W 1) Minimum Requirements - Processor: Intel Pentium III 800MHz or higher - Main Memory: 128MB or higher - Video Card (32MB or higher): Recommended ATI series video card - OS: Windows 98/ME/2000/XP Run the client program, and the screen shown below will appear. complete installing the program in the local computer. Continue the process to The default installation folder is “C:\Program Files\CnBDVR”. If the client program has been already installed, a dialog box asking whether to remove the existing program will be displayed. Click “OK” to remove the existing program. After the existing program is completely removed, run the client program again. Click “Next”. BDF-0303 31 Installation Data files and executable files necessary for the client program will be installed. When the installation is completed, the following screen will appear: Click “Finish” to finish the installation. Then, the following icon will be created on the Desktop. BDF-0303 32 Installation 3.4 Installing the Web server S/W (Option) First of all, close the DVR program to install the Web server program. Secondly, open the provided CD, and locate the file in Windows Explorer. To install the Web server program, run the “Setup.exe” file contained in the CD in Windows Explorer. And the screen shown below will appear. program in the local computer. Continue the process to complete installing the The default installation folder is “C:\CnBWeb”. If the program installed correctly, run the DVR program. BDF-0303 33 Installation And then, select “Support Web Viewer” from network setup. Click save. The DVR system will support Web viewer. √ BDF-0303 34 Installation WARRANTY This product is produced through strict quality management and testing process. We warrant that will be free from defects under normal operating conditions. Please contact the distributor in case you have a trouble within one year from the date the customer acquires the product. Warranty Guide Confirm this warranty sheet first. Please contact the distributor after checking out any defect in the product. The standard for repairing, replacement follows Customer. Warranty Content Any defect under normal use within the warranty service period we give you free repair service according to the warranty sheet. Following cases are that we charge you with the fee of parts and service. ① Breaking down made by careless handling, natural disaster, fire, wrong power voltage and unpermitted power . ② Breaking down made by improper repairing or reconstruction. ③ Breaking down made by careless dealing in the middle of delivery after the customer purchasing the product. ④ Breaking down made by using out of order in this manual. Product Model Name Product Serial Number Warranty Period 1 year from the purchasing date Purchase Time 200 - - . Name Customer Address TEL. BDF-0303 35 Installation BDF-0303 36