1
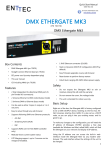
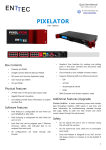
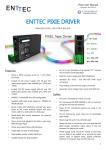
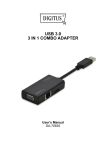
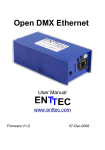
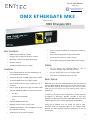
Quick Start Manual
50687 (NC)
for more information visit:
www.enttec.com/e3
DMX ETHERGATE MK3
(PN 70070)
Box Contents
•
Static or Dynamic (DHCP) IP configuration (DHCP by
default)
•
DMX Ethergate Mk3 (pn: 70070)
•
Easy firmware upgrades via any web browser
•
Straight connect Ethernet lead (pn: 79102)
•
Reset button to perform factory restore
•
IEC power cord (country dependent plug)
•
Inbuilt Auto ranging (90-260V) Mains power supply
•
This user manual
•
1RU Mount Bracket Kit (pn: 79105)
Features
•
2 fully independent bi-directional DMX ports (5
pin Female XLR connectors).
•
2 Universe Ethernet to DMX node (Output mode)
•
2 Universe DMX to Ethernet (Input mode)
•
Can be used as either 2 input, 2 output or 1 in 1
out ports.
•
Easy to setup & update through any web browser
•
Supports following DMX over Ethernet protocols:
◦
Art-Net
◦
Streaming ACN (sACN)
◦
ESP
•
Supports RDM over Art-Net
•
RGB LED shows current system status
•
HTP Merging support : up-to 2 DMX sources can
be merged (if enabled).
•
1 RJ45 Ethercon connector (10/100)
Safety
•
Do not expose the Ethergate Mk3 to rain or
moisture, doing this will void the warranty
•
Do not remove the cover, live voltage inside
•
This unit is intended for indoor use only
Basic Setup
Right out of the box, the Ethergate Mk3 is factory configured
to be a DMX OUTPUT device, listening to the first two ArtNet Universes (starting from 0x00). It is also set as a DHCP
node, so you can plug it into your existing router, and it's
good to go.
To make any changes to the configuration, you will need the
IP address of Ethergate. ENTTEC provides a free App
(available for Windows and Mac) called NMU, which will find
the Ethergate on your network and display its IP address.
Using the IP address one can access the built-in webinterface inside the Ethergate Mk3 via any modern webbrowser. The web-interface allows the settings of the unit to
be changed.
1
Quick Start Manual
50687 (NC)
for more information visit:
www.enttec.com/e3
Once setup, any Art-Net/sACN/ESP enabled software/app
or a lighting control/desk can be used to send DMX out
of the Ethergate Mk3. For a list of recommended apps,
please check the website www.enttec.com/e3
Status LEDs
The Ethergate Mk3 comes with one RGB status LED and
two green network LED indicators located on the right
side of the front panel
RGB Status LED:
•
WHITE: idle, signifies that Ethergate is operating
normally.
•
NMU
NMU (Node Management Utility) is a free Windows and
Mac application that is used to manage compatible
ENTTEC DMX over Ethernet nodes.
NMU will help you find your unit's IP address and then
open a browser window to access the web-interface.
Please Follow these steps:
1. Download NMU from www.enttec.com/nmu
2.
Ensure that your Ethergate Mk3
physically by Ethernet cable.
is hooked up
3.
And connected to the same physical network (or
router) as the computer on which you will run NMU.
4.
Open NMU. If prompted with multiple networks,
select the correct network. (identified by the IP
address of your computer on that network)
5.
Press the Discovery button, and wait till NMU finds
all supported ENTTEC devices on your network.
6.
Once found, select Ethergate Mk3 and use the IP
address to access the web-interface via your web
browser.
GREEN: DMX Output or Input on Port1. The led
will fade from white to green. Please disable the
Port1 if you don't want it to function. Flashing
Green indicates RDM.
•
YELLOW: DMX Output or Input on Port2. The led
will fade from white to yellow. Please disable the
Port2 if you don't want it to function. Flashing
Yellow indicates RDM.
•
RED: (Blinking)Error State. No DMX will be input
or output in this state. Requires a firmware
update or needs to be rebooted. A reset might be
required, if it stays in error-mode on reboot.
•
PURPLE: (Blinking) IP Address Conflict. Please
change the IP address manually or enable DHCP.
•
CYAN: (Blinking) Merging conflict. Multiple DMX
Sources detected, either Merging is disabled or
number of sources exceed 2 (for the same
universe). User action is required to allow proper
DMX output.
Ethernet Link Speed: is ON when there is an active
Ethernet Link @ 100 mbps. It will stay OFF @ 10 mbps.
Web Configuration
The Ethergate Mk3 is configured and controlled through a
web browser running on a computer system located on the
same Local Area Network. Any modern web browser, such as
Chrome, Firefox, Internet Explorer, Safari or Opera, running
under any operating system, including Windows 7/8, Mac OS
X or Linux can be used.
Ethernet Activity: This LED blinks when there is activity
on the Ethernet network.
2
Quick Start Manual
50687 (NC)
for more information visit:
www.enttec.com/e3
In the DMX Buffer table, you can hover the mouse
over any value, and the channel number (1 to 512),
for that value will be shown.
To change any of the settings, you must use the Settings
page.
Network Settings
Either click on the underlined url displayed, or type the IP
address (as detected by NMU) into your web browser to
access the Ethergate Web Interface. The left side menu
allows all the Ethergate web pages to be accessed.
•
System Information: Name, Firmware Version
and Serial No. of the unit. The Serial No. is
unique to this unit and can be used to identify
this unit.
•
•
Current Port Settings: Configured Port Type,
DHCP is enabled by default. When enabled, the router on
your network is expected to automatically provide the IP
address to the Ethergate Mk3. If no DHCP router/server is
present on the network, the manual IP address will be used.
If for some reason, your unit does not get an IP address via
DHCP, please restart the Ethergate Mk3 with the ethernet
cable connected. It will listen for DHCP on startup and wait
for a few seconds, before giving up.
Protocol and Universe for each DMX Port. This
serves as a quick place to check all the Port
related settings.
IP Address and Netmask are only used if DHCP is disabled or
is unavailable on your network. Ethergate Mk3 will warn you,
if non-standard IP address or netmask is used.
Current Network Settings: Configured IP
If ever you manage to use an IP Address that can't be
connected to later, please perform the reset procedure (as
described later). The reset will re-enable DHCP on the
Ethergate Mk3.
address and Link speed for the unit.
•
Node name is used to identify the Ethergate node on the
network. Any meaningful name can be used.
Current DMX buffer: allows you to see the
current DMX values for each Port. The buffer is a
snapshot only, but can be refreshed manually.
Input Send Mode : allows you to pick either broadcasting or
a specified unicast IP address (per port). Broadcast address
is based on the subnet mask shown.
Both ports share the broadcast options selected here, but
the unicast address can be specified as needed for each port
separately.
Art-Net Address: Net and Subnet can be selected here, and
comply to Art-Net 3 protocol. These address are applicable
to both ports, whereas the universe can be selected for each
port separately.
sACN CID: The current CID for Ethergate Mk3 is displayed
here, and will be use in all sACN communication.
3
Quick Start Manual
50687 (NC)
for more information visit:
www.enttec.com/e3
set on the output. Merging is limited to two sources,
any additional sources will be ignored by Ethergate
Mk3. If either one of the 2 sources of DMX stop, the
failed source is held in the merge buffer for 4
seconds. If, during the 4 second timeout, the failed
source returns, Merging continues.
Port Settings
•
Merging conflict: A warning will be displayed on the
home-page, if more than two sources are sending
data to Ethergate Mk3 on the same universe. Status
LED will blink CYAN to indicate merging conflict.
Unicast option
Port Types:
•
Output: Ethernet to DMX Output, based on the
selected protocol.
•
Send DMX to a single IP address rather than broadcast.
Unicast is only available when port is set to Input. Any valid
IP address can be used to Unicast DMX. You must select
Unicast under Network Settings to use Unicast per port.
Save or Reset
Input: DMX Input to Ethernet, sends the
selected protocol on the network.
•
Disabled: Does not process any DMX (input or
output).
support on the port. Only available when ArtNet is selected and Port Type is output.
To save all the changes made, please click on Save Settings
and wait for Ethergate to confirm (takes up-to 5 seconds).
Once confirmed you will be taken to the home-page.
Protocol and Universe must be selected to match the
settings of the remote sender or receiver connected to
the LAN.
Reset to defaults, will put all the settings back to their
default values (network & port settings). Ethergate Mk3 will
be reset to Factory condition.
Refresh Rate
Reboot – will restart the Ethergate.
•
RDM Enabled: Enables RDM over Art-Net
The rate at which Ethergate Mk3 will output the Data
from DMX port (40 Frames per second is default). It will
repeat the last received LAN frame to comply with DMX
standard. However, if you do not want to repeat the last
frame use 0 as the refresh rate, at 0 – it will match the rate
at which the source sends at.
Update Firmware
Merging Support
Merging option is only available when port is set to
Output. Any incoming DMX on the same universe, but
from different IP addresses is treated as a separate DMX
source. Available Merging options :
•
•
disabled: (by default) only one source should be
sending to the DMX output. Using multiple
sources will cause a conflict and the output
might have unexpected data.
From this page you can update the latest firmware of the
Ethergate Mk3 (firmware file
is available at
www.enttec.com/e3).
HTP Merge: Highest Takes Precedence. Channels
are compared one to one and the highest value is
4
Quick Start Manual
50687 (NC)
for more information visit:
www.enttec.com/e3
Choose or browse the firmware file (as per your browser)
and click on Update firmware to start the process.
The Status led will blink red during firmware mode.
The update progress is shown in real-time, and will take a
few seconds for the update to complete
When the update is complete, the page will refresh and
you will be taken to the home page – where you can
verify the firmware version. If the update fails for any
reason, please try the same process again.
Since, Ethergate Mk3 will reboot after a firmware update,
please allow a few seconds for it to be refreshed in the
browser. Please wait until the update process is complete.
Reset button
The reset button restores the network configuration of
the Ethergate Mk3 to factory defaults:
•
DHCP is set to enabled
•
Static IP address is mapped to the Serial number
of the unit (used if DHCP is unavailable).
For example, a Serial No. of 2176541 will have a
default Static IP address at 10.17.65.41
•
Netmask is set to 255.0.0.0
To successfully reset to factory defaults the Ethergate
Mk3, the following procedure must be performed:
Art-Net Send Test
NMU can also be used to troubleshoot the DMX output on
your Ethergate Mk3. Art-Net Test can be accessed from the
top menu: Art-net → Art-net Test
When first opened, the Art-Net is set to Disabled, please set
it to Enabled, and then you can use either the DMX faders to
test one or more DMX channels, or use the test-patterns
from the options available. Please set the Ethergate Mk3 to
be output and on the same universe as being used to send
Art-Net from NMU.
DMX Connector pin out
5pin DMX OUT/ DMX IN:
•
Pin 1: Ground
Press and hold the Reset button.
•
Pin 2: Data -
•
While holding the Reset button, power up the
unit, and keep holding the button for 3 seconds.
•
Pin 3: Data +
•
Release the Reset button once the status led
starts blinking red.
•
Pin 4: NC
•
Wait 3 seconds and cycle power
•
Pin 5: NC
•
Power off the unit
•
Any suitable 3 to 5pin DMX adaptor can be used to connect
to 3pin DMX cables or fixtures. Please note the pinout,
before connecting to any non-standard DMX connector.
5
Quick Start Manual
50687 (NC)
for more information visit:
www.enttec.com/e3
Specifications
Ordering Information
Due to continuous improvements and innovations of all
ENTTEC products, specifications and features are subject
to change without notice.
Ethergate Mk3 and related products can be ordered from
our website or through your local ENTTEC dealer using the
following part numbers.
Item
Value
Input Voltage
90 – 260V AC
Input Frequency
50/60Hz
Weight
1.65 lbs / 0.75 kg
Shipped weight
3.19 lbs / 1.45 kg
Length
7.53” / 191mm
Width
4.14” / 105mm
Height
1.75” / 44.45mm
Op Environment
0°-50°C in non-condensing environment
Connectors
2x 5-Pin Female XLR (bi-directional DMX)
1x RJ45 Ethercon connector (10/100)
1x IEC power connector
Part Number
Description
70070
DMX Ethergate Mk3
70023
5-pin Male to Male DMX Adapterr
70029
5-pin to 3-pin DM X Adapter
70006
2U 19” Rack Mount Kit
70035
1U 19” Rack Mount Kit
79122
5pin DMX Terminator
79134
5M 5-pin DMX Cable
ENTTEC PTY LTD
17/5 Samantha Court
Knoxfield Victoria 3180
Australia
Tel: +61 3 9763 5755
Fax: +61 3 9763 5688
ENTTEC AMERICAS
604A Cornerstone Ct.
Hillsborough NC 27278
USA
Tel-Fax: (888) 454-5922
email [email protected]
www.enttec.com
6