1
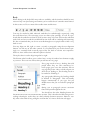
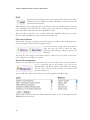
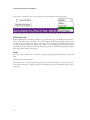
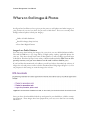
Asbury College CMS
User Documentation
Asbury College Web Team
[email protected]
version 1.2 • April 28th, 2008
Table of Contents
1. Introduction to the CMS ................................................................................................... 2
2. User Permissions................................................................................................................ 2
3. Editing Pages...................................................................................................................... 2
4. Images and You.................................................................................................................. 2
5. Where to find Images & Photos ........................................................................................ 2
6. Preparing your Images for the Web.................................................................................. 2
7. Images and the CMS: A Closer Look .............................................................................. 2
2
Asbury College Information Services Department
3
Content Management User Manual
Chapter 1
Introduction to the CMS
The goal of the Content Management System (CMS) is that each individual or department
will be responsible for their particular part of the website, and that they will also have the
tools and authority to make changes when they need to make them.
The CMS is an entirely web-based tool. This means that any authorized person can make
changes to the website from any Internet-connected computer, anywhere in the world, at
any time.
The sole requirement is that you use the Firefox web browser, which you can obtain for
free from http://getfirefox.com/. The content produced can be viewed in any browser - the
requirement for Firefox applies only to those persons editing the content.
User Permissions
To register for an account on our website, go to http://my.asbury.edu/ and fill out the form.
You need to provide your name and email address, at a minimum, in order to be granted
permissions to the system.
There are three levels of user permissions available in the CMS - Drafters, Publishers, and
Administrators.
4
Asbury College Information Services Department
Drafters
Drafters are permitted to create new pages, and edit existing pages, but may only create
draft copies of these edits. Their changes will not be visible on the live website until a Publisher has approved their changes and published them.
We recommend that most of your editors are designated Drafters, and only one person is
designated a Publisher. Ideally, everyone in your department will be at least a Drafter, and
produce content.
When a Drafter saves changes, it will always be saved as a draft, which can then be reviewed by the Publisher prior to publication.
Publishers
The Publisher has final say on what content goes live on the site. It is their responsibility to
review change and determine whether content is ready for publication.
A Publisher has access to a page which lists the documents which are in draft, awaiting
their approval.
We recommend that you appoint one Publisher per section of the website. This will help to
have a consistent quality control, as well as ensuring that nothing slips through the cracks
without accountability.
Administrators
The Administrator’s role is to delegate. They will have control over who is in each of the
other two categories. It is their job to ensure that there is always someone in the role of
Publisher, and that things are getting done. They will also be the primary point of contact
when we, the web team, send information to your department.
We recommend that you have only one Administrator per department.
5
Content Management User Manual
Chapter 2
Editing Pages
Editing should be reasonably easy for folks who have some experience with word processors. The editor tools bar will appear at the top of every page on which you have sufficient
privileges to edit.
Exactly which tools appear in this toolbar will vary from one page to another, depending
on your privilege level.
Edit
Clicking on the Edit icon will bring you to a form on which you can make changes to an
existing page. You have access to modify a number of fields. What follows is a description
of what each of these fields means.
Title
The Title is what will appear at the top
of the browser window, identifying the
page. It is also what will appear in
search engines, such as Google, when
someone searches for content on the
website. It is important that it be meaningful and descriptive, so that someone searching
for content will know that it is the page that they are looking for.
6
Asbury College Information Services Department
Perhaps most importantly, this is also the text that appears in
the navigation menu on each page of your site.
You should select a word or phrase which is as brief as
possible, while being as descriptive as possible. Notice that
titles which are too long will wrap onto multiple lines, and this
may cause it to look awkward in the menu.
Although the current web site style renders your titles in all
upper-case characters, please use proper capitalization on
your title, as this is not guaranteed to be the case in the future.
Web Address
The web address is the address (or URL) which the website user will visit to see your content. You will notice that most of the address is already provided for you, and you need
only fill in the last bit of it. This should be some variant of your title, but probably briefer.
Use a single word, if possible. The goal is to provide an address that is logical and easy to
remember. Another important metric is the ability to read the address over the phone to
someone looking for your content, and have them successfully type it in.
You are limited to certain characters. You must use lower-case letters, or numbers, or hy-
phens. No other characters are permitted, and, if used, will be converted to hyphens. This
is in an attempt to make all of our URLs look similar, and prevent confusion generated by
mixed-case URLs.
Do not use extensions like .html or .htm, as they are neither necessary nor useful.
Tags (Keywords)
Tags, or Keywords, serve two primary purposes, and you should keep these in mind when
filling in this field.
First, keywords assist searching. Thus, you should provide keywords that describe your
content, even if they don’t actually appear in your content. What you should keep in mind
while filling in these keywords is what someone might search for, when looking for your
content.
For example, the Clinic website might have a keyword of “hospital”, so that someone
searching for the Asbury College Hospital will find the clinic website, even though the
word Hospital does not appear on that part of the website.
7
Content Management User Manual
Second, keywords help us identify parts of the website which are related. This will allow
us, for example, to provide links from your page to a news story about a related topic. This
gives a web site user more incentive to explore our entire website, and thus get a broader
vision of what Asbury is about.
Tags should be separated either by commas or spaces. If one of your tags is a multi-word
tag, such as “church music”, you should join those words together using hyphens. There is
no limit on the number of tags and you are encouraged to provide as many as you can
think of that fit the content of your page.
Type
When creating a new sub-page, or editing an existing one, you can choose to either create
a new page in your part of the website, or to link to a page on another part of the website,
or on some other website.
You will create a link to some other page when you do not want to duplicate content that
someone else is already maintaining. It is greatly preferred that you do not duplicate content, which tends to increase the probability that one of the copies will be out of date.
When you create a “Menu link” it will appear in the navigation menu, with the title that
you specified above, and users clicking on it will be sent to that page. If you choose “Menu
link”, then you need to address of that page in the Link field.
Most of the time, you will be creating pages. That is, you’ll be creating a document which
will be displayed on your website.
8
Asbury College Information Services Department
Page visibility
There are three settings which govern the ability of users to access your pages.
First, you can designate a page as either hidden or visible. A page will be hidden when it is
first created. This means that nobody will see it, unless they are an authorized editor on
that particular page.
You may want to hide a page if the content on the page has expired. For example, if your
page is about an annual event, you may wish to hide the page once the event is over, and
then update it and unhide it a month or so prior to the event the next year.
You will also want to hide a page if the information on the page is discovered to be grossly
inaccurate, and you need to remove it from view while corrections are being made.
The second option governs whether your new page will be listed in the navigation for your
site. This could be useful if you wish to have a page that is only accessible from another
page, and not from the menu of your site.
The last option allows you to designate pages as on-campus only. This will allow access to
the pages only when the viewer is either physically on campus, or connected in via a VPN.
Note that since we have a very open campus, this doesn’t provide any kind of real security,
but it does allow you to tailor your content to your audience a little more carefully.
9
Content Management User Manual
Body
When editing in the body field, many tools are available, and the interface should be reminiscent of any word processing environment you’ve used before, if somewhat more limited.
In this section, we’ll cover most of the toolbar items and their use.
Text may be marked as bold, italicized, underlined, or strikethrough, respectively, using
the tools shown here. We encourage you to use these styles sparingly, if at all. It is preferred that the underline tool not be used, because many web users associate the underline
with a link, and so text which is underlined but not a link will be confusing and frustrating.
We also recommend that you do not use strikethrough text, as people tend to find it very
hard to read.
You may align text left, right, or center, or justify a paragraph, using the text alignment
buttons. As with any of the other controls, it is requested that you use this feature sparingly, as a consistent look across all pages of the site leads to a better user experience.
However, there will be times when this option is desired.
The styles select is used to align images left or right.
The Format select list allows you to select from a variety of standard text formats to apply
to your text. There are two of these that you will use on every page.
Every page needs to have a heading that tells
people where they are. This consistency between pages gives users the assurance that on
any page they know where to look to figure out
what the are looking at. This heading needs to
be marked as “Heading 2”.
Any paragraphs following the heading should
be marked as “Paragraph.” This will usually
happen automatically as you type, but you
should ensure that you are indeed in paragraph
mode.
Setting text as paragraph ensures consistent
fonts and layout throughout the site.
You should use the other Heading formats for
documents that need to be subdivided into sections. This is beneficial to folks using screenreading technologies, so that they can clearly identify document structure. However, usually when a document is long enough to warrant that, it’s time to divide into sub-pages.
10
Asbury College Information Services Department
If you have created text in another application, these tools provide a way to paste into the
CMS from those applications.
The first of these two buttons, marked with a T, is for pasting from a plaintext document, such as something created in WordPad or NotePad.
The second, with the W, is for pasting from Microsoft Word, or other Office documents.
Each of these will preserve formatting that you have created in that other application.
However, having pasted from these applications, you will usually have to do some more
work to make that formatting work within the different page layout requirements of the
CMS. The content that you wrote on Word, for example, was optimized for a printed 8.5 x
11 page, while the CMS has a rather different idea of how large a page is.
Bulleted or numbered lists should be used when you have itemized
information that should be presented in a list form. The second set of
buttons let you increase or decrease the indentation level of a particular item
or sublist, for multi-level hierarchical listings.
Creating links
If you have text, or an image, selected, the link buttons will appear in the toolbar, allowing
you to create, or remove, hypertext links within your document. That is, it causes the selected text or image to be a link which, when clicked on, will load another web page.
When you click on the link button (the one on the left that looks like a link of
chain) a dialog will appear allowing you to manage where the link will go,
and other details.
On this dialog, there are two required fields Link URL and Title.
11
Content Management User Manual
First, you must provide the URL1 of the page that you wish to link to.
There are several ways that you may obtain the URL of the site you want to link to. Most
commonly, you will navigate to that page in another browser window or tab, and then
copy and paste the URL from the address bar to the link form.
To open a new tab, press control-T on Windows, or Apple-T on a Mac. This opens a new
tab in your current browser window, and you can look at multiple websites at the same
time. You can switch between the different websites by clicking on the tab that you wish to
view.
Next, you must provide a title for this link. The purpose of the title is to give some description of the page to which you are linking. By putting the mouse over a link and waiting for
about a second, you will get a “tool-tip” popup that tells you this title. The description
should be a brief explanation of what you’re linking to, and what you might expect to find
there.
Also, those looking at the site with assistive technology, such as screen-readers for the
blind, will receive some information that they might not get from the link text itself.
Thus, the description, or title, is a required element when you create a link.
When creating a link, you should select more than one word to make the link. For example, if you were creating a link to the library website, you may wish to have a sentence
such as:
Visit the Kinlaw Library website to find out more about our collection.
In this instance, the words “Visit the Kinlaw Library website” should be the link. Choosing
a larger phrase gives the visitor more “real estate” on which to click, so that they don’t
miss. It also makes it more obvious that it is a link, whereas a single word is easier to miss.
You do not need to use the words “Click here.” Website users know that they need to click
on stuff. That’s how they got to your website. In most cases, “Click here” insults the intelligence of the user, and, as importantly, breaks up the conversational flow of your text.
An exception to this is when you are providing a link to a downloadable version of a file,
such as a PDF or DOC file. In this case, it is courteous to explicitly tell the user that it is a
PDF or DOC file, so that they are expecting something other than a page transition.
Images
Images will be discussed in detail in the next few chapters.
1
URL, or Uniform Resource Locator, is the fancy name for a web address. For example,
“http://www.asbury.edu/majors/chemistry/” is a URL. It includes the protocol (http://), the domain name of the web site
(www.asbury.edu) and the path to the resource on that server (/majors/chemistry/). Itʼs the thing that appears in the
address bar when you are looking at a particular web site.
12
Asbury College Information Services Department
Draft
The draft icon will appear at the top of a page when a draft exists, and is
different from the published version. Clicking on the draft icon will
preview this draft version.
When editing, the text will appear above the edit area “There is a draft in process. Use that
text?” Clicking on this will cause the contents of the body edit area to change to the contents of the draft, rather than that of the published version.
Make sure that you click on “save as draft” rather than “publish”, unless you are certain
that you want to publish the version currently in that edit area.
Move up and down
At the top of any page, except for your top-level page, you will see arrows allowing you to
move that page up or down in the navigation menu.
You may not move a page above the top-level
page, nor may you move it below the autogenerated pages (Faculty, Majors, Contact, and
Sitemap).
You may also move pages up and down within a subtree, but you cannot, at this time,
move a page from one subtree to another.
Access list management
ACLs, or Access Control Lists, determine who can access what. If you are the administrator of a particular part of the website, you will see the
“Manage ACL” link in your tool bar. This will let you manage
who can edit your part of the website, and what level of
permission they have.
You can add and remove users from your access list using the tool shown here:
Select a user on the left and click ADD to add them. Select a user on the right and click
REMOVE to remove them.
13
Content Management User Manual
Once a user is in the list, you can set their level of permission next to their name:
If you set a particular user to be an admin, this lets them also add people to the access list.
What links here
When modifying the contents, or address, of a particular page, you should pay close attention to what other web sites link to you. At the bottom of the left navigation column there
is a list of the web pages that link to your page. You should pay attention to these links,
and make sure that when you change your content or your address, you notify the persons
responsible for those links, to tell them that your content or address has changed and that
they may need to update their pages.
News
You may insert related news items into any page by putting the following text into the
page:
@news(keyword1,keyword2)
You may list one or more keywords, separated by commas (no spaces!). The five most recent news items that are tagged with any of the listed tags will be displayed in the body of
your page.
14
Asbury College Information Services Department
Chapter 3
Images and You
The Content Management System (CMS) allows you to manage the content on your particular portion of the website without intervention of the web team. This class covers the
use of imagery on your portion of the website. We will touch on the following:
• Resources for finding imagery to use on your sites
• License concerns when using imagery not acquired from Public Relations
• Editing imagery for use on the web using Microsoft Paint, Microsoft Manager and
Apple iPhoto to edit and prepare imagery
• Working with imagery in the CMS
With that introduction let’s move onto our first topic: Where to find imagery for your sites.
15
Content Management User Manual
Where to find Images & Photos
Its all good and well that we have given you the power to add photos and other imagery to
your portions of our site, but where do you turn to find them? There are currently three
College endorsed places to find your imagery:
• Office of Public Relations
• Stock Exchange (http://sxc.hu)
• Your Own Digital Camera
Images from Public Relations
Your first stop when looking for imagery for your site is our own Public Relations Office.
The staff of OPR have a very large library of high quality, Asbury applicable photos for
your use. They have already made some of those photos, as well as College approved logos
available for download at http://www.asbury.edu/aboutus/downloads/ (This is an on campus only resource, so if you are at home or on the road it will not load for you.)
If you load the aforementioned web address you will see links to download zip archives of
images for web and print as well as a link to download the College logos (Figure 2-1). For
our purposes in this setting we want the images for web use.
Figure 3-1 The downloads available from OPR, for site content you should choose the second link for web.
Once you have downloaded the linked zip and opened it you should have a folder containing 49 images. These images have been prepared for your use, so we don’t have to actually
edit them.
16
Asbury College Information Services Department
Images from Stock Exchange
A second alternative for obtaining images for use on our site is from the website Stock Exchange (http://sxc.hu). Stock Exchange is a stock photography site where the majority of
the imagery is license free and open for unrestricted use.
This is an important point to consider. All imagery that is used on the Asbury College
website must be clear and free for us to use. That means that we must either own the
copyright, or have documentation on hand that states the terms of use for the imagery.
For legal reasons there can be no exceptions.
Note: If you are unsure of the license of imagery you would like to use on the
College Website, please contact the Web Team or the Learning Resources Manager.
Getting back to Stock Exchange, the imagery is divided into categories such as Architecture, Computers and Food. Each one of these categories contains hundreds if not thousands of images that might be suitable for your site. Simply find the one that you would
like to use, check if there are any usage restrictions and download the image to your site.
If you are unsure about an image from Stock Exchange, feel free to email the Web Team
([email protected]) and give us the URL to the image.
Images from your own camera
If you, or your department, own a digital camera you can supply images yourself. We encourage you to think about what types of photos would accurately represent your department, and by extension Asbury College.
Once you have taken all of the photos you would like to use for your site, and have moved
them from the camera to your computer, you need to process them for the web. This process will be different depending on your operating system. In the next section we will cover
the process for those working on Windows XP, and for those working on Mac OS X 10.4.
Let’s take a look at those of you who will be using Windows XP.
17
Content Management User Manual
Chapter 4
Preparing your Images for the Web
There are a number of avenues for preparing your images for the web. We will be covering 3 applications in this training:
• Microsoft Photo Editor
• Microsoft Paint
• Apple iPhoto
Microsoft Photo Editor
Microsoft Photo Editor (Also labeled as Microsoft Office Picture Manager) ships as part
of Office 2003 and up, and is the most fully featured Photo editing tool that is installed on
most of your machines.
This piece of software is fairly feature-full which can make it overwhelming in some circumstances. We will be assuming that you are working with an image that you retrieved
either from OPR or from another 3rd party location. First we need to launch the application which can be found by selecting Start -> All Programs -> Microsoft Office -> Microsoft Office Tools -> Microsoft Office Picture Manager. Once the application has loaded you need to
locate the image you wish to prepare for the web, and drag and drop it into the edit area.
You can see an example of this in Figure 4-1.
18
Asbury College Information Services Department
Next we need to select the image that we want to prepare, luckily in our case there is only
one. When an image is selected it is highlighted by an orange border (the color might vary
depending on your settings). First let’s crop the image a bit.
With the image selected, right click and select Edit Pictures
from the menu that pops up. This should give you access to
the edit tools. On the right hand side of the interface you
should now see a number of selections (see Figure 4-2), we
want Crop which the third selection.
Once you have selected the Crop Tool, click and drag one of
the corners of the box that is overlaid over your image. You
should see something similar to Figure 4-3 when you are
done.
When you have the correct crop, simply click the OK button on the right side where it
says “Picture Dimensions” and you should see the image cropped to your specifications.
Okay, so now lets resize this image we just cropped. You will notice that we are still in
Crop mode; to get out of this mode we simply need to click on Edit Pictures either in the
tool bar located above the editing area, or on Back to Edit Pictures on the right hand side
near the bottom. First we need to select the Resize tool, located below the Crop tool (you
can see its location in Figure 4-2).
Once you have selected the Resize tool, the right menu will change, giving you a number
of options for resizing. We will choose the Percentage of original width x height radio button.
In the percentage drop down place 50 to decrease the size by 50%.
All that is left is to save this image. Select File -> Save As and give you edited image a
unique name and your finished.
19
Content Management User Manual
Microsoft Paint
In the event that you are in one the labs, or on a computer that does not have Microsoft
Photo Editor, we will now cover that oldie, but goody Microsoft Paint. While very simple
paint has the capabilities, if coaxed a little, to get the job done. Follow these easy steps to
fame and fortune:
As with all things in Windows, we first click the Start Button, then select All Programs, then
Accessories, and finally we reach our old friend Paint, which is listed just below Notepad.
Once we select Paint go ahead and maximize the application by clicking on the Maximize
icon located next to the red close box in the top right corner of the window.
Now that we have Paint open and ready to go, lets open a photo and start editing. Go to
File -> Open and locate the image you want to edit, select it and click Open. You should
now see the image in your Paint window. We are now ready to prep this image for web
use. The first thing we are going to do is resize the image. To resize an image in Paint, we
have to access the Stretch/Skew menu item. To access this feature, click on Image ->
Stretch/Skew, this will launch a dialog box where we can manipulate certain aspects of the
image.
You will notice that the first group of boxes
dictates the Stretch of the image. What this
means in a nutshell, is that we can increase
the proportions or decrease the proportions
of the image by changing the percentages in
those boxes. So if you wanted to decrease
the size of the image by 20%, then you
would decrease it by 20%. It is a wonderful
thing when stuff just works the way you
want it to.
To make sure that you are seeing your image
at full size, select View -> Zoom -> Normal size.
Note: It is usually not a good idea to increase the size of an image, since it tends
to make it fuzzy and pixelated.
So now that we know how to resize an image, what if we need to crop it? Cropping is a
little odd in Paint; there really isn’t a cropping tool per se, but with a little creative application of the tools at hand we can easily approximate cropping.
First lets return our image to its original format by selecting Edit -> Undo. Now that we
have our image back in shape, we need to decide how we want to crop this photo. In the
far left of Paint’s interface is the tool bar. You will see an option that looks like a box
20
Asbury College Information Services Department
made of dashed or dotted lines, this is the Select tool; select it. Once you have selected the
tool we can click and drag a box around portions of our image.
The
area
of
the
photo that we have selected is what we want to keep when we crop, all the other image
area is what will be thrown away after the crop. Next we need to copy the area that we
have selected. This is accomplished by selecting Edit -> Copy. Once we have copied the
selected area we need to resize the canvas (the area that our image is sitting on) to be
smaller than our cropped image.
To resize the canvas you need to click somewhere on the image outside of the selected area
to deselect it. You will notice that there are
twelve small boxes on our image now, one on
each corner and on at the half way point of
each side. Simply click and drag the bottom
right box up and to the left until it is smaller
than the area you had previously selected.
Once you have accomplished this select Edit ->
Paste.
Now that we have learned how to crop and
resize our images with Paint, we need to save
our finished product for use on our sites.
To do that we simply select File -> Save As, which will give us a dialog box asking for a
File Name and a File Type to save as. Images should be saved as either GIF or JPEG for
21
Content Management User Manual
use with the CMS. Images that use a lot of color should usually be saved as JPEG. Once
you have settled on a name and the file type you need click Save and you are done.
Apple iPhoto
Finally we have Apple’s photo application iPhoto. iPhoto is extremely easy to use, and
fairly powerful once you get used to its eccentricities. iPhoto is located in the Applications
Folder, located at YourHD -> Applications. Double click the iPhoto icon, and wait for the
app to load.
First we need to determine if the image you want to prepare for web use is already in your
iPhoto Library or not. If it is we can move right onto editing it. If not, then we need to
import it into the Library before we can begin.
Select File -> Import to Library, which will display an import dialog. Find the file you
want to prepare, and click import. The image will be added to your Library, and you can
easily find it by clicking the “Last Roll” film canister in the left column. This view shows
you all the images you just imported... hence the clever name.
Double click the image you wish to prepare for the web; doing this invokes iPhoto’s editing interface. Once the image loads you now have some new tools along the bottom of the
screen.
Now
that
we
are in
22
Asbury College Information Services Department
edit mode, we have a couple of tools to note. The most important three are: Rotate, Crop
and Red Eye. Rotate allows you to rotate the image to the correct orientation, crop allows
us to crop the photo and of course we use Red Eye to remove the dreaded red eye effect
from photos that used a flash.
We will only touch on cropping at this time, since the other two are less useful and fairly
easy to grasp. To crop a picture in iPhoto, simply click the Crop tool in the bottom bar.
You will notice that you get a thick grey border on your image, this is the default crop box.
Simply click once in the grey area to remove it.
Now you can drag a selection around the area you want to save, much in the same way we
did with Paint.
To crop the image, you simply need to
hit return or enter. That is all there is
to it, you have now cropped your
image, and all that is left is to resize it if
necessary and save it for the web.
To resize your image, simply click on it
once, to select it (you should see a blue
border around an image that is cur-
23
Content Management User Manual
rently selected) and then select File -> Export which will give you a dialog box as seen in
Figure 4-9.
In the Size area click the “Scale images no larger than” radio button and set the width to
550px (this is the max width for any imagery that appears on the CMS).
Make sure that under Name that you have “Use extension” checked and then click Export.
Save the file where you would like it to be, and you are done. All that is left is to upload
the image to the website, which we will cover in more detail in the next section.
24
Asbury College Information Services Department
Chapter 5
Images and the CMS: A Closer Look
Now that we have prepared our images for use in the College’s CMS, its time to actually
upload them and place them in our pages.
With this in mind, we will be focusing on more advanced use of the image tools in the
CMS. Once you have uploaded your image to the web server and dropped it into the editing are of your page, it is time to decide how we want to position the image, and where.
Aligning Images
There are currently two options for aligning your images, left align and right align (although you can select center align, it is not recommended). Left align places the image on
the left of the text, with your text wrapping around it, while right alignment places your
image on the right, with the text flowing around it.
25
Content Management User Manual
One important fact to note; To properly float an image you need a certain amount of text
to float in conjunction with. Additionally if you want to have more than one image on a
given page, you need to make sure that there is enough text between them. If there isn’t
enough text between the images you can have unsightly overlap behavior.
Unfortunately there is no stock answer for how much text is needed, it changes depending
on the number of images in use and their relative size. Trial and error are you most valuable allies in this case.
Moving images around in the edit area
The edit area of the CMS gives you a lot of options and power when laying out your pages.
Unfortunately there are some limitations on what you can do in the web environment.
One of the biggest gotchas is image handling within the CMS.
Those of you familiar with Microsoft Word know that you can drag and drop an image
arbitrarily in your document, and even nudge it along with the arrow keys. While that is
true for MS Word, it is not true for the CMS. There are fairly strictly defined methods for
moving your images around.
Once you are ready to move your image to where you want it to “live” on your page, here
are the bits of information you need to know. To begin with, if you click and drag the image you will notice you don’t see the image itself moving. This is the first of the “eccentricities” of the CMS.
What you will actually see if you look closely, is that the cursor is actually moving, not the
image.
If you look closely at the image above, you can see the cursor is just before the word “of”.
If you were to drop the image now, it would place it just before the word of, in the middle
of our sentence.
So if you were wanting to have the above image at the beginning of the sentence, you
would simply click and drag the image until the cursor is before the first letter of the sentence/paragraph of text.
26
Asbury College Information Services Department
Lastly we need to talk a little about resizing within the CMS itself. The system gives you
the ability to resize the images once you have placed them in the page. There are two
items to note here.
The first deals with upload size. While we encourage you to use large, engaging imagery
on your pages there is a size limit. Currently your imagery shouldn’t be any wider than
550 pixels. A 550 pixel image stretches across the entire width of the page, such as the image on the admissions page.
As you can see the image covers the same area as the text above it. The height of your imagery isn’t as much of a concern... of course it is not recommended to have images that are
half the height of you page. We are looking for a good balance of images and text to make
our pages informative and engaging.
So now that we have spoken a bit about the size of your imagery, lets talk about resizing
those images. The CMS gives you the option of increasing as well as decreasing the size of
images. Resizing an image up is only useful if you are trying to get it back to its original
size (say you have resized it smaller). You shouldn’t try to resize an image larger than its
original size. Doing so results in a badly pixelated and fuzzy image.
Generally the accepted wisdom is to resize down, and not up when dealing with images on
the web. There just isn’t enough image data to work with.
Best Practices
Lastly we should discuss some of the “best practices” that have been established for using
imagery on the College’s site.
27
Content Management User Manual
All imagery must be clearly owned by the College, or documentation stating that we
can use said imagery must be on file in the Information Services Department.
When in doubt, contact the Web Team ([email protected]) or Bill Hall (Learning
Resources Manager [email protected]) as to the legality of the imagery you would like
to use on the College Site.
All imagery for use on the College’s website should be prepared for web use.
This means it should be cropped and resized appropriately. The maximum width for an
image to be used on the College website is 550 pixels.
The recommended practice for including imagery on a page is as follows:
• Page Heading (marked as H2)
• Introductory block of text (marked as paragraph)
• Image (when possible it is more desirable to use wide imagery rather than smaller, as
in Figure 4-3).
All imagery used on the College website should reflect the faith, mission and history of
Asbury College.
When choosing imagery try to reflect on how this will speak about your department, and
by extension the College as a whole. When possible it is preferable to make use of imagery
that is Asbury specific, either obtained from The Office of Public Relations or by capturing the images yourself.
And with that, we are done. Hopefully by now you are much more comfortable when
working with images in the CMS; it is our most ardent hope that you now have the tools to
make your pages content rich and engaging.
As always should you run into any problems along the way, or have any questions not covered in this document or the accompanying class you can contact the Web Team or Bill
Hall for more help.
28