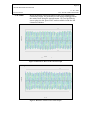
1
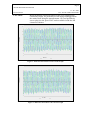
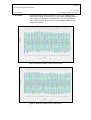
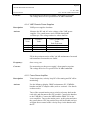
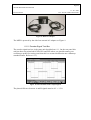
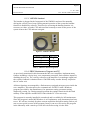
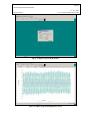
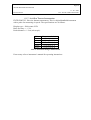
E U R O P E A N S O U T H E R N O B S E R V A T ORY
Organisation Européenne pour des Recherches Astronomiques dans l'Hémisphère Austral
Europäische Organisation für astronomische Forschung in der südlichen Hemisphäre
LA SILLA-PARANAL OBSERVATORY
3P6 M2 MAINTENANCE PLAN
Doc. No.: 3P6-PLA-ESO-60100-0001
Issue: 1.0
Date: 17 – August - 2005
Prepared: J. Alonso
Name
Date
Signature
Date
Signature
Approved: R. Parra
Name
Released: G. Ihle
Name
Date
Signature
Page 2
3P6 M2 MAINTENANCE PLAN
17 - 08 - 2005
Doc. 3P6-PLA-ESO-60100-0001
Plan Document
CHANGE RECORD
Revision
Date
Section/Paragraph
Remarks
Issue 1
17/08/2005
All
First Issue
Page 3
3P6 M2 MAINTENANCE PLAN
17 - 08 - 2005
Doc. 3P6-PLA-ESO-60100-0001
Plan Document
INDEX OF CONTENTS
1.
INTRODUCTION .............................................................................................................................5
1.1.
1.2.
1.3.
1.4.
2.
M2 OVERVIEW................................................................................................................................7
2.1.
2.2.
3.
PURPOSE AND SCOPE.............................................................................................................5
REFERENCE DOCUMENTS.....................................................................................................5
APPLICABLE DOCUMENTS ...................................................................................................5
ACRONYMS & ABBREVIATIONS..........................................................................................6
HISTORY.......................................................................................................................................7
SYSTEM ........................................................................................................................................7
M2 ELECTROMECHANICAL MAINTENANCE TASKS .........................................................8
3.1. FOCUS DRIVE ...............................................................................................................................8
3.1.1.
AC Servo Motor...................................................................................................................8
3.1.2.
Rotary Encoder..................................................................................................................10
3.1.3.
Mitutoyo Linear Encoder...................................................................................................10
3.1.4.
Baumer Init/Limit Sensors .................................................................................................11
3.1.5.
Catastrophic Limit Sensors ...............................................................................................11
3.2. X DRIVE ....................................................................................................................................12
3.2.1.
AC Servo Motor.................................................................................................................12
3.2.2.
Rotary Encoder..................................................................................................................14
3.2.3.
Baumer Init/Limit Sensors .................................................................................................14
3.2.4.
Catastrophic Limit Sensors ...............................................................................................15
3.3. Y DRIVE .....................................................................................................................................15
3.3.1.
AC Servo Motor.................................................................................................................15
3.3.2.
Rotary Encoder..................................................................................................................17
3.3.3.
Baumer Init/Limit Sensors .................................................................................................17
3.3.4.
Catastrophic Limit Sensors ...............................................................................................17
4.
M2 ELECTRONICS MAINTENANCE TASKS..........................................................................18
4.1. ELECTRONICS CABINET ..............................................................................................................18
4.1.1.
Cabinet ..............................................................................................................................18
4.1.2.
VME - LCU........................................................................................................................18
4.1.3.
VME4SA Voltage Rails Supply ..........................................................................................19
4.1.4.
VME Chassis Power Supplies............................................................................................20
4.1.5.
Focus Servo Amplifier .......................................................................................................20
4.1.6.
X Servo Amplifier ..............................................................................................................21
4.1.7.
Y Servo Amplifier...............................................................................................................22
4.2. RACK COOLING ..........................................................................................................................22
4.2.1.
VLT Electronic Cabinet Cooling System ...........................................................................22
4.2.2.
Safety Thermostat ..............................................................................................................23
5.
GLOBAL MAINTENANCE TASKS ............................................................................................24
5.1.
5.2.
6.
EXTERNAL INSPECTION ..............................................................................................................24
INTERNAL INSPECTION ...............................................................................................................24
APPENDIX ......................................................................................................................................25
6.1. TOOLS ........................................................................................................................................25
6.1.1.
Mitutoyo Encoder Display (MED).....................................................................................25
6.1.2.
Encoder Signal Test Box ...................................................................................................26
6.1.3.
VME4SA Handset ..............................................................................................................27
6.1.4.
DBSC Maintenance Program and PC...............................................................................27
6.1.5.
Oscilloscope ......................................................................................................................29
Page 4
3P6 M2 MAINTENANCE PLAN
17 - 08 - 2005
Doc. 3P6-PLA-ESO-60100-0001
Plan Document
6.1.6.
Multi-Meter........................................................................................................................29
6.1.7.
Hot Wire Thermo-Anemometer .........................................................................................30
6.1.8.
X6 and X7 Cables ..............................................................................................................31
6.2. NON STANDARD SPARE PARTS ...................................................................................................32
6.3. 3P6 M2 MAINTENANCE TASKS UNDER REMEDY AND/OR MAXIMO ............................................32
6.4. 3P6 M2 MAINTENANCE FORM ....................................................................................................32
6.5. PICTURES....................................................................................................................................33
INDEX OF FIGURES AND TABLES
FIGURE 1 : REFERENCE FOCUS DRIVE CCW CURRENT GRAPH ....................................................................9
FIGURE 2 : REFERENCE FOCUS DRIVE CW CURRENT GRAPH .......................................................................9
FIGURE 3: REFERENCE X DRIVE CCW CURRENT GRAPH ...........................................................................13
FIGURE 4: REFERENCE X DRIVE CW CURRENT GRAPH .............................................................................13
FIGURE 5: REFERENCE Y DRIVE CCW CURRENT GRAPH ...........................................................................16
FIGURE 6: REFERENCE Y DRIVE CW CURRENT GRAPH .............................................................................16
FIGURE 7: MED FRONT PANEL ..................................................................................................................25
FIGURE 8: MED REAR PANEL ....................................................................................................................25
FIGURE 9: MED AC ADAPTER ...................................................................................................................26
FIGURE 10: INCREMENTAL ENCODER OUTPUT SIGNALS.............................................................................26
FIGURE 11: VME4SA HANDSET ................................................................................................................27
FIGURE 12: DBSC PROGRAM MAIN WINDOW............................................................................................28
FIGURE 13: DBSC PROGRAM PLOTTING PHASE CURRENT .........................................................................28
FIGURE 14: DBSC PROGRAM DOING OFFSET TUNING .................................................................................29
FIGURE 15: X6 CABLE ................................................................................................................................31
FIGURE 16 : X7 CABLE ...............................................................................................................................31
FIGURE 17: FOCUS LINEAR ENCODER CONNECTOR ....................................................................................33
FIGURE 18: FOCUS CATASTROPHIC LIMIT SWITCHES .................................................................................33
TABLE 1: VME AUXILIARY POWER SUPPLY TOLERANCE ............................................................................19
TABLE 2: VME POWER SUPPLY TOLERANCE...............................................................................................20
TABLE 3: VME4SA CHANNEL ASSIGNMENT ..............................................................................................27
TABLE 4: ANEMOMETER RANGES AND RESOLUTION ..................................................................................30
TABLE 5 : NON STANDARD SPARE PARTS...................................................................................................32
Page 5
3P6 M2 MAINTENANCE PLAN
17 - 08 - 2005
Doc. 3P6-PLA-ESO-60100-0001
Plan Document
1.
INTRODUCTION
1.1. PURPOSE AND SCOPE
This document is intended to serve as a maintenance guide-plan for the 3p6 telescope
M2 control system, focused on the electronics, electro-optical and electro-mechanical
components of the system.
The mechanics is briefly covered where relevant and shall be covered somewhere else
in detail.
Appended to the document you could find useful information for servicing and
diagnosing the system together with references to the technical documentation and the
newly defined maintenance tasks to be incorporated under Remedy and/or Maximo.
1.2.
[RE1]
REFERENCE DOCUMENTS
3p6 M2 Control Electronics Doc. No.: 3P6-DSD-ESO-60400-0001
Issue: 2.0 J. Alonso 24 – January - 2005.
[RE2]
1.3.
APPLICABLE DOCUMENTS
[AP1] ESO VME4SA-X1 4-Channel DC Servo Amplifier Technical Manual VLTMAN-ESO-17130-0273 Issue 3.0.
[AP2] ESO VME4SA BACKPLANE Technical Manual VLT-MAN-ESO-171300274 Issue 3.0.
[AP3] VLT Electronic Cabinet Cooling System User Manual VLT-MAN-ESO17130-1603 Issue 1.0 F. Biancat Marchet April 27, 1998.
[AP4] USER-Manual MACCONTROLLER MAC4-INC Version 4.2.
[AP5] Harmonic Drive Operations Manual AC-Servo Amplifier SC-500/510.
[AP6]
Page 6
3P6 M2 MAINTENANCE PLAN
17 - 08 - 2005
Doc. 3P6-PLA-ESO-60100-0001
Plan Document
1.4.
AC
DC
DBSC
VME
LCU
PPR
PC
UL
LL
HARPS
BW
TBD
ELC
MED
N/A
N/U
ACRONYMS & ABBREVIATIONS
Alternating Current
Direct Current
Digital Brushless Servo Control software
Versa Module Europe
Local Control Unit
Pulse Per Revolution
Personal Computer
Upper Limit
Lower Limit
High Accuracy Radial Velocity Planetary Search
Band Width
To Be Defined
Electronics
Mitutoyo Encoder Display
Not Available
Not Used
Page 7
3P6 M2 MAINTENANCE PLAN
Plan Document
2.
17 - 08 - 2005
Doc. 3P6-PLA-ESO-60100-0001
M2 OVERVIEW
2.1. History
Since ever the 3.6 telescope f/8 secondary unit has suffered from considerable
mechanical instabilities. This together with the inability to introduce online corrections
to the decentring comma has severely limited the optical performance of the telescope.
Considering that the new generation of instruments (e.g. HARPS) need to exploit the
maximum possible optical image quality attainable with the telescope, a new
mechanical design based on the NTT secondary unit concept was designed and built.
The new M2 unit is equipped with VLT complaint computer controlled servo drives for
the focus, X and Y motions of the secondary mirror unit.
The unit was commissioned during September/August 2004 and is successfully
operating since them. This zero failure 1 year period was the base criteria for defining
the frequency of the various maintenance tasks.
2.2. System
The motion control electronic components used for the M2 are:
¾ MACC4/INC [AP4] and VME-4SA [AP1] VME VLT standard modules.
¾ Harmonic Drive AC-Servo Amplifier SC500/510 [AP5]
Three Harmonic Drive Systems servo actuators type FHA-25B-3015E-E150 are used
for rotating the focus, X and Y driving screws. These actuators integrate a brushless
AC motor together with a harmonic reduction gear and an incremental 1500 PPR
optical shaft encoder coupled to the motor axis. Each linear drive is complemented by
end of stroke high precision limit/init switches together with coarse catastrophic-limit
switches.
Every actuator is accompanied by three screw terminals group. All the connections
from the actuator and limit/init switches are routed trough these terminals to the control
LCU-power amplifiers cabinet. The signal groups correspond to; AC motor drive,
incremental encoder and limit/init switches.
The control electronics is mounted on top of the M2 unit inside a hermetically sealed
Knürr cabinet equipped with an active heat exchanger unit. The cabinet houses a VME
LCU, three AC servo amplifiers and support circuitry.
Externally the control cabinet receives only; the mains 220VAC power supply, the
Ethernet connection, one inlet and one outlet coolant hoses. By opening the rear door
an external PC could be connected via RS232 to each AC servo amplifier and to the
LCU console port. This is for setup and engineering monitoring and maintenance of the
servo amplifiers and VME CPU configuration.
From the control cabinet three identical groups of signals are routed to its close
neighbour the M2 drive.
Page 8
3P6 M2 MAINTENANCE PLAN
17 - 08 - 2005
Doc. 3P6-PLA-ESO-60100-0001
Plan Document
3.
M2 ELECTROMECHANICAL MAINTENANCE TASKS
3.1.
Focus Drive
3.1.1. AC Servo Motor
Description:
Acoustical and visual servomotor inspection and phase current
consumption measurement.
Actions:
Bring the telescope to the platform position, do the inspections
and measurements at the platform.
Visual inspection; check for external deterioration of the motor
housing and specially the cables passing into the motor via the
two metallic cable feed-troughs.
Acoustical inspection; Drive the servo motor by using the VME4SA handset (refer to 6.1.3 for details) and closely listen to the
sound produced by the whole focus drive mechanism. Under
normal circumstances the sound is low level and, most
important, single pitched.
Connect the laptop PC to the focus servo amplifier serial port
connector X6 and perform the phase current measurement. Drive
the servo motor by using the DBSC Harmonic Drive program
(refer to 6.1.4 for details). Acquire CCW and CW graphs and
compare them with the reference graphs shown below. Be sure
that the peak currents are within the ranges marked on the
reference graphs.
Fill in the pertinent section of the 3p6 M2 maintenance form and
add comments if anomalies are found.
Frequency:
Once every year.
Caveats:
You should acquire graphs similar to the reference ones shown
below. The peak current value of both phases shall be within the
margins marked on the reference graphs as upper and lower
limit. Note that the envelope in the curve represents the
instantaneous current fluctuations due to the mechanical
eccentricities of the motor/screw combination. Therefore the
amplitude of the envelope shall normally lie within 0.2 Amperes
peak-peak, and by itself is a powerful tool for diagnosing and/or
predicting mechanical problems.
Page 9
3P6 M2 MAINTENANCE PLAN
Plan Document
CAUTION:
17 - 08 - 2005
Doc. 3P6-PLA-ESO-60100-0001
Be aware that the serial port buffers at the servo amplifier are
electrically fragile. So preferably use the laptop unplugged from
the mains when doing the measurements. Or if not possible be
sure to plug it to the spare 220V outlet available inside the M2
electronics cabinet.
Figure 1 : Reference Focus Drive CCW Current Graph
Figure 2 : Reference Focus Drive CW Current Graph
Page 10
3P6 M2 MAINTENANCE PLAN
17 - 08 - 2005
Doc. 3P6-PLA-ESO-60100-0001
Plan Document
3.1.2. Rotary Encoder
Description:
Encoder signals test/inspection.
Actions:
Use the encoder signal test box (refer to 6.1.2 for test box usage
details) and the X7 adapter cable (refer to 6.1.8 for X7 cable
details).
Connect the test box to the X7 connector of the focus servo
amplifier and inspect the signal outputs with an oscilloscope
(settings: channels 1 & 2 at 2V/div, time base 5µS, normal
trigger channel 1 at 1.8V triggering level).
With the aid of the VME4SA handset (refer to 6.1.3 for handset
details) drive the axis at the highest possible speed. While
moving measure the amplitude and 90º phase difference of the
signals and compare them with the reference in Figure 10 section
6.1.2.
Fill in the pertinent section of the 3p6 M2 maintenance form and
add comments if anomalies are found.
Frequency:
Once every year.
Caveats:
The focus drive utilizes the rotary encoder signals only for
velocity feedback. Therefore the X7 connector at the focus servo
amplifier remains unused during normal operation. X7 output is
used only during this particular test/inspection. Position feedback
in this axis is provided by an independent linear encoder.
3.1.3. Mitutoyo Linear Encoder
Description:
Linear encoder functionality test/inspection.
Actions:
Using the encoder signal test box (refer to 6.1.2 for the test box
details) and the VME4SA handset (refer to 6.1.3 for the handset
details) test the encoder functionality.
Disconnect the linear encoder from the system (at the patch box
labelled “FOCUS” see Figure 17 ) and connect it to the encoder
test box.
With the aid of the VME4SA handset drive the axis at the
highest possible speed. While moving measure with an
oscilloscope (settings: channels 1 & 2 at 2V/div, time base 2mS,
normal trigger channel 1 at 1.8V triggering level) the amplitude
and 90º phase difference of the signals and compare them with
the reference in Figure 10 section 6.1.2.
Page 11
3P6 M2 MAINTENANCE PLAN
17 - 08 - 2005
Doc. 3P6-PLA-ESO-60100-0001
Plan Document
Fill in the pertinent section of the 3p6 M2 maintenance form and
add comments if anomalies are found.
Frequency:
Once every year.
Caveats:
After removing the display box reconnect everything properly
adjusting in place the bayonet fixation of the connector.
3.1.4. Baumer Init/Limit Sensors
Description:
Check the functionality and repeatability of the Init/Limit
sensors.
Actions:
Using the VME4SA handset (refer to 6.1.3 for the handset
details) and the MED (refer to 6.1.1 for MED details) test the
Init/Limit sensors.
Disconnect the linear encoder from the system (at the patch box
labelled “FOCUS”) and connect it to the MED. With the handset
move the axis toward each limit (UL and LL) and, once reaching
the particular limit, press the zero button of the display box. Go
out of the limit and come back, this time don’t zero the display
box. When back on limit the readout must be ideally 0 in practice
shall be within ~ +/-2 counts.
Fill in the pertinent section of the 3p6 M2 maintenance form and
add comments if anomalies are found.
Frequency:
Once every year.
Caveats:
For the focus drive 1 count of the MED corresponds to 1µm of
axis displacement. (1 count is the unitary increment or decrement
of the right most display digit).
After removing the display box reconnect everything properly
adjusting in place the bayonet fixation of the connector.
3.1.5. Catastrophic Limit Sensors
Description:
Check the functionality of the catastrophic Limit sensors.
Actions:
Using the VME4SA handset (refer to 6.1.3 for the handset
details) drive the axis to the UL and LL.
Page 12
3P6 M2 MAINTENANCE PLAN
17 - 08 - 2005
Doc. 3P6-PLA-ESO-60100-0001
Plan Document
Once on each limit insert a 0.5mm thickness blade in between
the Omron D4D-1532N limit switch actuation wheel and the
carriage itself.
The complete rack shall be de-energized at the 220V mains
supply level when the blade is inserted. Wait ten seconds and
remove the blade the power must be re-established.
Fill in the pertinent section of the 3p6 M2 maintenance form and
add comments if anomalies are found.
Frequency:
Once every two years.
Caveats:
Be aware that this test de-energize the whole rack and is intended
for ultimate protection only. During normal operation this limit
will never be activated, therefore when doing the test try to insert
and remove the blade effectively avoiding multiple on and offs
of the system, this is to minimize possible harmful transients.
3.2.
X Drive
3.2.1. AC Servo Motor
Description:
Acoustical and visual servomotor inspection and phase current
consumption measurement.
Actions:
For X drive, follow the same steps as on 3.1.1. Of course this
time connect the laptop to the X servo amplifier serial port
connector X6.
Frequency:
Once every year.
Caveats:
You should acquire graphs similar to the reference ones shown
below. The peak current value of both phases shall be within the
margins marked on the reference graphs as upper and lower
limit. Note that the envelope in the curve represents the
instantaneous current fluctuations due to the mechanical
eccentricities of the motor/screw combination. Therefore the
amplitude of the envelope shall normally lie within 0.5 Amperes
peak-peak, and by itself is a powerful tool for diagnosing
mechanical problems.
Note that for the X drive the current consumption is significantly
higher than for the focus drive. This is mainly due to the fact that
the X mechanism is not counter balanced, very heavily preloaded
and no flexion couplings are used between the motor and the
screw.
Page 13
3P6 M2 MAINTENANCE PLAN
Plan Document
CAUTION:
17 - 08 - 2005
Doc. 3P6-PLA-ESO-60100-0001
Be aware that the serial port buffers at the servo amplifier are
electrically fragile. So preferably use the laptop unplugged from
the mains when doing the measurements. Or if not possible be
sure to plug it to the spare 220V outlet available inside the M2
electronics cabinet.
Figure 3: Reference X Drive CCW Current Graph
Figure 4: Reference X Drive CW Current Graph
Page 14
3P6 M2 MAINTENANCE PLAN
17 - 08 - 2005
Doc. 3P6-PLA-ESO-60100-0001
Plan Document
3.2.2. Rotary Encoder
Description:
Encoder signals test/inspection.
Actions:
Follow the same procedure as on 3.1.2 and fill in the pertinent
section of the 3p6 M2 maintenance form, additionally add
comments if anomalies are found.
Frequency:
Once every year.
Caveats:
The X drive utilizes the rotary encoder signals both for velocity
and position feedback. Therefore the X7 connector at the X servo
amplifier must be unplugged for performing the test. This is to
allow the X7 cable to be plugged. To resume normal operation
be sure to reconnect the original cable at X7. Be sure to secure
the connector properly in place without over tightening the screw
fixations.
3.2.3. Baumer Init/Limit Sensors
Description:
Check the functionality and repeatability of the Init/Limit
sensors.
Actions:
Using the VME4SA handset (refer to 6.1.3 for the handset
details) and the MED Display (refer to 6.1.1 for the MED
details) test the Init/Limit sensors.
Disconnect the X7 encoder connector at the X servo amplifier
and by the aid of the X7 cable connect the MED to the X7
connector of the X amplifier. Move the axis toward each limit
(UL and LL).
When performing this test due to the extremely high resolution
(resolution not precision and stability) of the axis you should
bias the axis momentarily using the DBSC program. This is to
allow a stable readout. When doing the LL use +20mV offset and
for the UL use -20mV offset. Be sure to re-establish the original
value when finishing.
For testing, after setting the proper bias, move the axis toward
the limit, while stop on limit press the zero button of the display
box. Go out of the limit and come back to the limit, this time
don’t zero the display box. When back on limit the readout must
be ideally 0 in practice shall be within ~ +/-1200 counts.
Fill in the pertinent section of the 3p6 M2 maintenance form and
add comments if anomalies are found.
Frequency:
Once every year.
Page 15
3P6 M2 MAINTENANCE PLAN
17 - 08 - 2005
Doc. 3P6-PLA-ESO-60100-0001
Plan Document
Caveats:
For the X drive 1 count of the MED corresponds to 0.0016µm
resolution (not precision). One count is the unitary increment or
decrement of the right most display digit.
To resume normal operation be sure to reconnect the original
cable at X7 and do not forget to re-establish the proper offset.
Secure the connector properly in place without over tightening
the screw fixations.
3.2.4. Catastrophic Limit Sensors
Description:
Check the functionality of the catastrophic Limit sensors.
Actions:
Same as on 3.1.5.
Frequency:
Once every two years.
Caveats:
Same as on 3.1.5.
3.3.
Y Drive
3.3.1. AC Servo Motor
Description:
Acoustical and visual servomotor inspection and phase current
consumption measurement.
Actions:
For Y drive, follow the same steps as on 3.1.1. Of course this
time connect the laptop to the Y servo amplifier serial port
connector X6.
Frequency:
Once every year.
Caveats:
You should acquire graphs similar to the reference ones shown
below. The peak current value of both phases shall be within the
margins marked on the reference graphs as upper and lower
limit. Note that the envelope in the curve represents the
instantaneous current fluctuations due to the mechanical
eccentricities of the motor/screw combination. Therefore the
amplitude of the envelope shall normally lie within 0.5 Amperes
peak-peak, and by itself is a powerful tool for diagnosing
mechanical problems.
Note that for the Y drive the current consumption is significantly
higher than for the focus drive. This is mainly due to the fact that
the Y mechanism is not counter balanced, very heavily preloaded
and no flexion couplings are used between the motor and the
screw.
Page 16
3P6 M2 MAINTENANCE PLAN
Plan Document
CAUTION:
17 - 08 - 2005
Doc. 3P6-PLA-ESO-60100-0001
Be aware that the serial port buffers at the servo amplifier are
electrically fragile. So preferably use the laptop unplugged from
the mains when doing the measurements. Or if not possible be
sure to plug it to the spare 220V outlet available inside the M2
electronics cabinet.
Figure 5: Reference Y Drive CCW Current Graph
Figure 6: Reference Y Drive CW Current Graph
Page 17
3P6 M2 MAINTENANCE PLAN
17 - 08 - 2005
Doc. 3P6-PLA-ESO-60100-0001
Plan Document
3.3.2. Rotary Encoder
Description:
Encoder signals test/inspection.
Actions:
Follow the same procedure as on 3.1.2 and fill in the pertinent
section of the 3p6 M2 maintenance form additionally add
comments if anomalies are found.
Frequency:
Once every year.
Caveats:
Same as on 3.2.2 if X is replaced by Y.
3.3.3. Baumer Init/Limit Sensors
Description:
Check the functionality and repeatability of the Init/Limit
sensors.
Actions:
Same as on 3.2.3 if X is replaced by Y. Fill in the pertinent
section of the 3p6 M2 maintenance form and add comments if
anomalies are found.
Frequency:
Once every year.
Caveats:
Same as on 3.2.3.
3.3.4. Catastrophic Limit Sensors
Description:
Check the functionality of the catastrophic Limit sensors.
Actions:
Same as on 3.1.5.
Frequency:
Once every two years.
Caveats:
Same as on 3.1.5.
Page 18
3P6 M2 MAINTENANCE PLAN
17 - 08 - 2005
Doc. 3P6-PLA-ESO-60100-0001
Plan Document
4.
M2 ELECTRONICS MAINTENANCE TASKS
4.1.
Electronics Cabinet
4.1.1. Cabinet
Description:
Cabinet tightness inspection and general mechanical condition.
Actions:
1- Inspect for proper adjustment and sealing of the front and
back doors.
2- Check the condition of the doors gaskets, both the rubber and
metallic ones.
3- Check the cables feed-trough for proper tightness, with the aid
of a flashlight illuminate from the opposite side you are looking.
4- Check for condensation inside the cabinet.
Fill in the pertinent section of the 3p6 M2 maintenance form and
add comments if anomalies are found.
Frequency:
Once every year.
Caveats:
The cabinet is a KNÜRR “Pro-Rack” type. These cabinets are
hermetically sealed mechanically, thermally and electrically.
When opening and closing be sure that the door’s gaskets are
properly seated, if necessary push the door not only from the
lock.
4.1.2. VME - LCU
Description:
VME bus contact cleaning, VME boards dust off, fans checkout,
air ducts and/or internal surfaces dust off.
Actions:
1- Remove the VME modules and dust off the modules by
blowing air onto them.
2- Clean the contacts of connectors P1 and P2 with oil free
contact cleaner.
3- Inspect for bended or loose pins.
4- Dust off the fans and check them acoustically, normally they
should produce a single pitched sound.
5- Dust off the air ducts and/or internal surfaces.
6- Measure the air flow by the aid of a “Hot Wire ThermoAnemometer” (refer to 6.1.7 for the usage of the anemometer).
For inserting the anemometers prove temporarily remove the
Page 19
3P6 M2 MAINTENANCE PLAN
17 - 08 - 2005
Doc. 3P6-PLA-ESO-60100-0001
Plan Document
blind plates of the front panel. Ideally the air flow measurement
shall be made near the VME board component side. The air
speed shall be 0.5m/sec -10% maximum.
Fill in the pertinent section of the 3p6 M2 maintenance form and
add comments if anomalies are found.
Frequency:
Once every year.
Caveats:
From left to right the VME modules and power supplies are:
1) MVME 2604 Power PC 604 32MB RAM - CPU.
2) MAC-INC Servo control module.
3) VME4SA-I DC Servo amplifier module.
4) VME Multi-voltage DC power supply.
5) Stacked 15 volts power supplies.
Exercise special care when unplugging and plugging back the
VME modules. Always be sure that the modules are sliding
properly over the insertion rails and after, for insertion, apply
and even force at the top and bottom of the module’s front panel.
Fail to observe these precautions could result in malfunction
and/or connector’s pin damage.
4.1.3. VME4SA Voltage Rails Supply
Description:
VME auxiliary power supplies checkout.
Actions:
Measure the DC and AC noise voltage of the VME power
supplies. Use a multi-meter and a 20 Mhz bandwidth
oscilloscope. The voltage and noise values shall be:
Nominal
Volts
Tolerance
Volts
+15
-15
+0.750 / -0.450
-0.750 / +0.450
Noise (20Mhz BW)
Volts
Peak-Peak max.
0.1
0.1
Table 1: VME auxiliary power supply tolerance
Fill in the pertinent section of the 3p6 M2 maintenance form and
add comments if anomalies are found.
Frequency:
Once every year.
Page 20
3P6 M2 MAINTENANCE PLAN
17 - 08 - 2005
Doc. 3P6-PLA-ESO-60100-0001
Plan Document
Caveats:
For measuring use the power supply’s front panel test points.
The voltage noise level is specified for 20 Mhz bandwidth.
4.1.4. VME Chassis Power Supplies
Description:
VME power supplies checkout.
Actions:
Measure the DC and AC noise voltage of the VME power
supplies. Use a multi-meter and a 20 Mhz bandwidth
oscilloscope. The voltage and noise values shall be:
Nominal
Volts
Tolerance
Volts
+5
+12
-12
+0.250 / -0.125
+0.600 / -0.360
-0.600 / +0.360
Noise (20Mhz BW)
Volts
Peak-Peak max.
0.1
0.1
0.1
Table 2: VME power supply tolerance
Fill in the pertinent section of the 3p6 M2 maintenance form and
add comments if anomalies are found.
Frequency:
Once every year.
Caveats:
For measuring use the power supply’s front panel test points.
The voltage noise level is specified for 20 Mhz bandwidth.
4.1.5. Focus Servo Amplifier
Description:
Visual inspection, velocity loop DC offset tuning and DC offset
monitoring.
Actions:
Use the Mitutoyo display, DBSC maintenance PC, VME4SA
handset and the X7 adapter cable (refer to section 6.1 for details
on these tools).
Turn of the external mains power switch (red rotary knob at the
rack side) and disconnect the CPU module. Connect the handset
to the VME4SA. Connect the MED and the DBSC PC to the
servo amplifier. Turn on the mains power, at this point and since
the system has no CPU the position loop will be disable and you
will gain direct control of the velocity loop via the handset and
the PC.
Page 21
3P6 M2 MAINTENANCE PLAN
17 - 08 - 2005
Doc. 3P6-PLA-ESO-60100-0001
Plan Document
Monitoring the DC offset stability. Connect the display to the
servo amplifier and with the handset move the axis in both
directions at low speed several times. Once you release the
handset switch the display readout must stop moving in a couple
of seconds and remain with slight right most digit variations.
If when releasing the switch the axis continues drifting
appreciably (>10 counts per second), adjust the offset (refer to
6.1.4 for detailed procedure).
Visually inspect the amplifier checking all the screw terminal
connections to be adequately tightened and the cables coming to
the amplifier not stressed.
Fill in the pertinent section of the 3p6 M2 maintenance form and
add comments if anomalies are found.
Frequency:
Once every two years.
Caveats:
The velocity loop of each axis (Focus, X, Y) is closed inside the
servo amplifier itself and the command signal is an analogue
voltage coming from the VME4SA-1. Since the velocity loop is
nested inside a digital position loop the drift due to voltage offset
is compensated by the “outer” position loop and during normal
operation is invisible. However, a minimized and stable DC
offset is important to maximize the dynamic range of the control
system, and by itself is and indication of the health of the
amplifier. A voltage offset lurking around like a drunken sailor
does not inspire confidence and shall be investigated.
CAUTION:
Potentially hazardous voltages are present at some servo
amplifier’s screw terminals.
4.1.6. X Servo Amplifier
Description:
Visual inspection, velocity loop DC offset tuning and DC offset
monitoring.
Actions:
Same as on 4.1.5.
Frequency:
Once every two years.
Caveats:
Same as on 4.1.5.
CAUTION:
Potentially hazardous voltages are present at some servo
amplifier’s screw terminals.
Page 22
3P6 M2 MAINTENANCE PLAN
17 - 08 - 2005
Doc. 3P6-PLA-ESO-60100-0001
Plan Document
4.1.7. Y Servo Amplifier
Description:
Visual inspection, velocity loop DC offset tuning and DC offset
monitoring.
Actions:
Same as on 4.1.5.
Frequency:
Once every two years.
Caveats:
Same as on 4.1.5.
CAUTION:
Potentially hazardous voltages are present at some servo
amplifier’s screw terminals.
4.2.
Rack Cooling
4.2.1. VLT Electronic Cabinet Cooling System
Description:
Check the cooling system functionality, measure the air velocity
at the fans.
Actions:
Repeatedly press the downward arrow labelled pushbutton at the
unit’s front panel. You will step trough 4 indications:
1- Mode: local
2- Controller Status: active
3- Tinlet: 0.9ºC - Toutlet: 6.4ºC
4- Ambient temp: 8.6ºC - Cabinet temp 8.4ºC
Measure the air velocity at each of the four fan outlets. Use the
thermo-anemometer. Air velocity reference value = 0.5m/Sec 10% maximum.
Acoustically inspect the fans they should produce an even single
pitched sound.
Fill in the pertinent section of the 3p6 M2 maintenance form and
add comments if anomalies are found.
Frequency:
Once every six month.
Page 23
3P6 M2 MAINTENANCE PLAN
17 - 08 - 2005
Doc. 3P6-PLA-ESO-60100-0001
Plan Document
Caveats:
The main function of the Electronic cabinet cooling system is to
extract the heat of the rack but, at the same time, keep the
internal temperature almost identical to the ambient. This is
important to avoid thermal gradients that could deteriorate the
seeing of the telescope. The temperature values above presented
are only a reference and of course will vary accordingly with the
ambient temperature.
4.2.2. Safety Thermostat
Description:
Check the thermostat setting and functionality.
Actions:
Dial setting 30ºC.
Aim a hot air gun from a distance of ~50 cm and put a handheld
thermometer prove touching the thermostat case. Heat up the
thermostat using the minimum power setting of the gun until it
trips of. Monitor the hot air temperature while testing.
Fill in the pertinent section of the 3p6 M2 maintenance form and
add comments if anomalies are found.
Frequency:
Once every two years.
Caveats:
Be aware that this test de-energize the whole rack and is intended
for ultimate protection only. During normal operation this
thermostat will never be activated, therefore when doing the test
try to be effective and avoid multiple on and offs of the system,
this is to minimize possible harmful transients.
Page 24
3P6 M2 MAINTENANCE PLAN
17 - 08 - 2005
Doc. 3P6-PLA-ESO-60100-0001
Plan Document
5.
GLOBAL MAINTENANCE TASKS
5.1. External Inspection
Description:
Inspection of the overall system externally (electronic rack and
mechanism itself).
Actions:
Check:
1- Rack mechanical fixations to the M2 structure.
2- Cable fixations and layout.
3- Forgotten tools or loose components.
4- Water leaks from the coolant hoses.
5- Loose gaskets and/or below protections.
Fill in the pertinent section of the 3p6 M2 maintenance form and
add comments if anomalies are found.
Frequency:
Once every six months.
Caveats:
N/A
5.2. Internal Inspection
Description:
Inspection of the overall system internally (Components inside
the rack such as amplifiers, VME chassis, DIN rail mounted
components, etc).
Actions:
Check:
1- Loose components inside the rack.
2- Loose screw terminals.
3- Cable fixations and layout.
4- Forgotten tools.
5- Water leaks from the coolant hoses.
Fill in the pertinent section of the 3p6 M2 maintenance form and
add comments if anomalies are found.
Frequency:
Once every six months.
Caveats:
N/A
Page 25
3P6 M2 MAINTENANCE PLAN
17 - 08 - 2005
Doc. 3P6-PLA-ESO-60100-0001
Plan Document
6.
APPENDIX
6.1.
Tools
6.1.1. Mitutoyo Encoder Display (MED)
The MED is an encoder counter box specifically designed for Mitutoyo linear encoders.
When used with Mitutoyo linear encoders the least significant digit value corresponds
to 1µm (right most digit) provided that the “units” and “diameter” switches at the rear
panel are set to “mm” and “off” respectively. The direction switch affects the counting
direction only and can be set as desire. The only relevant front panel buttons for our test
are; the green power switch and the yellow zero push button.
In our test application we will use the MED with two encoder types; the linear
Mitutoyo and the rotary encoders inside the M2 servo-motors or harmonic drives. The
count to M2 axis linear displacement equivalence is; for the linear encoder 1µm and for
the rotary encoder 0.0016µm resolution (for both cases the precision is around 2µm).
The MED was modified for monitoring with a single ended oscilloscope probe
differential encoder signals. Two banana receptacles named PH1 and PH2 carry the
encoder phases referenced to the binding post ground, see Figure 8.
Figure 7: MED Front Panel
Figure 8: MED Rear Panel
Page 26
3P6 M2 MAINTENANCE PLAN
17 - 08 - 2005
Doc. 3P6-PLA-ESO-60100-0001
Plan Document
Figure 9: MED AC Adapter
The MED is powered by the aid of an external AC adapter see Figure 9.
6.1.2. Encoder Signal Test Box
The encoder signal test box is the same unit described on 6.1.1. On the rear panel this
unit has three test points label GND, PH1 and PH2 where you should connect your
oscilloscope probes for testing (note that this is a custom modification not a Mitutoyo
standard feature. Refer to 6.1.1).
Figure 10: Incremental Encoder Output Signals
The phase difference between A and B signals must be 90º +/- 15%.
Page 27
3P6 M2 MAINTENANCE PLAN
17 - 08 - 2005
Doc. 3P6-PLA-ESO-60100-0001
Plan Document
6.1.3. VME4SA Handset
The handset is plugged in the front panel of the VME4SA and used for manually
driving the velocity servo loops. During normal operation of the system the handset
function is disabled by software. Therefore for activating the handset function it is
necessary to either; reset the CPU and not allow bootstrap or turn off the power of the
system remove the CPU and turn on again.
Figure 11: VME4SA Handset
VME4SA Channel
I
II
III
IV
M2 Axis
Y
X
FOCUS
N/U
Table 3: VME4SA channel assignment
6.1.4. DBSC Maintenance Program and PC
As previously mentioned in this document the M2 servo amplifiers implement many
features including; velocity loop, over temperature protection, limit switches inputs for
disabling the axis etc. The velocity reference to the amplifier is an analogue signal and
the velocity feedback is obtained from a 1500 PPR rotary encoder directly coupled to
the AC motor axis.
All these functions are managed by a flash memory equipped microprocessor inside the
servo amplifier. This microprocessor communicates via RS232 with a Windows
program (provided by the manufacturer) for parameter setting, parameter tuning,
diagnosing, testing, etc. During normal operation the settings remain inside the flash
memory of the amplifier and the RS232 link with the PC is not necessary.
This program is currently installed in a notebook and is available for M2 maintenance.
Since the program is under MS Windows is self-explanatory well documented and easy
to use. We will use it mainly for phase current acquisition and offset tuning. Below you
can see two typical screens of the program. In any event we will exercise the program
in the laboratory with a mock-up of one M2 axis before using it in the field.
Page 28
3P6 M2 MAINTENANCE PLAN
Plan Document
17 - 08 - 2005
Doc. 3P6-PLA-ESO-60100-0001
Figure 12: DBSC Program Main Window
Figure 13: DBSC Program Plotting Phase Current
Page 29
3P6 M2 MAINTENANCE PLAN
Plan Document
17 - 08 - 2005
Doc. 3P6-PLA-ESO-60100-0001
Figure 14: DBSC Program doing offset tuning
6.1.5. Oscilloscope
Fluke type 199C “Scope-meter Colour” or equivalent. (This particular oscilloscope
includes multi-meter). If necessary refer to instrument’s manual for operating
instructions.
6.1.6. Multi-Meter
Fluke 85 III True RMS multi-meter or equivalent. If necessary refer to instrument’s
manual for operating instructions.
Page 30
3P6 M2 MAINTENANCE PLAN
17 - 08 - 2005
Doc. 3P6-PLA-ESO-60100-0001
Plan Document
6.1.7. Hot Wire Thermo-Anemometer
EXTECH407123. Hot wire thermo-anemometer. This is a digital handheld instrument
with a probe for measuring air speed. The specifications are as follows:
Display type = 2000 counts LCD.
Basic accuracy = +/-3%.
Probe diameter = 1.3cm (telescopic).
Units
Ft/min
m/sec
Km/hr
MPH
Knots
Range (resolution)
40 to 3940 (10)
0.2 to 20 (0.1)
0.7 to 72.0 (0.1)
0.5 to 45.0 (0.1)
1.0 to 31.0 (0.1)
Table 4: Anemometer Ranges and Resolution
If necessary refer to instrument’s manual for operating instructions.
Page 31
3P6 M2 MAINTENANCE PLAN
17 - 08 - 2005
Doc. 3P6-PLA-ESO-60100-0001
Plan Document
6.1.8. X6 and X7 Cables
The X6 cable is a standard RS232 null modem (pins 2 and 3 crossed) Dsub9 male to
Dsub9 female 4 meters length. The cable is used for connecting the DBSC PC to the
servo amplifier under test.
Figure 15: X6 Cable
The X7 cable is a special, two meter length, twisted pair cable equipped with Dsub9
male connector on one side and on the other a 6 pin Hirose connector (Mitutoyo
standard). The cable is used for monitoring the rotary encoder signals with the
Mitutoyo encoder display.
Figure 16 : X7 Cable
Page 32
3P6 M2 MAINTENANCE PLAN
17 - 08 - 2005
Doc. 3P6-PLA-ESO-60100-0001
Plan Document
6.2. Non Standard Spare Parts
Most of the spare parts needed for the M2 system are standard VLT components. The
list below includes mostly non standard special parts.
Item
1
2
3
4
5
6
Description
Harmonic Drive Servo Amplifier SC-510
MVME712 VME CPU transition module (standard item)
KNIEL TYP> CP 15.1,6 power supply
AC Servo Armonic Drive Actuator FHA-25B (with brake)
Line Filter Schaffner FN350-8-29
3.6 M2 Limit Switches Signal Conditioner Module
Qty
1
1
1
1
2
1
Table 5 : Non Standard Spare Parts
6.3. 3p6 M2 Maintenance Tasks Under Remedy and/or Maximo
TBD and agreed by the ELC team.
6.4. 3p6 M2 Maintenance Form
TBD and agreed by the ELC team.
Page 33
3P6 M2 MAINTENANCE PLAN
17 - 08 - 2005
Doc. 3P6-PLA-ESO-60100-0001
Plan Document
6.5.
Pictures
Figure 17: Focus Linear Encoder Connector
Figure 18: Focus Catastrophic Limit Switches