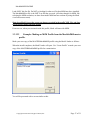
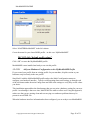
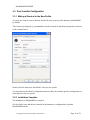
1
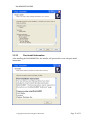
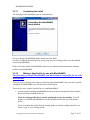
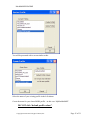
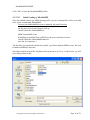
MachStdMill README
README file for MachStdMill Calypso Ventures, Inc.
June 16th, 2015 Copyright © 2010-2015 Calypso Ventures, Inc.
All Rights Reserved.
Copyright © 2010-2015 Calypso Ventures, Inc.
Page 1 of 21
MachStdMill README
Table of Contents 1
2
3
Introduction ................................................................................................................................4
MachStdMill Licensing..............................................................................................................5
Installing MachStdMill ..............................................................................................................6
3.1
Update Mach ......................................................................................................................6
3.2
Installing MachStdMill ......................................................................................................6
3.2.1
Turn off anti-virus programs......................................................................................6
3.2.2
Start the install ...........................................................................................................7
3.2.3
Review License Terms...............................................................................................8
3.2.4
Pre-Install Information ...............................................................................................8
3.2.5
Install Location ..........................................................................................................9
3.2.6
Select Components...................................................................................................10
3.2.6.1 Real Draw Base Components Source Files..........................................................10
3.2.7
MachStdMill Folder Name ......................................................................................11
3.2.8
Install the MachStdMill Package .............................................................................11
3.2.9
Post-install Information............................................................................................12
3.2.10
Completing the Install ..............................................................................................13
3.2.11
Making a New Profile for use with MachStdMill....................................................13
3.2.11.1
Example: Cloning an existing hardware profile to run MachStdMill..............14
3.2.11.1.1 Initial Loading of MachStdMill ...................................................................16
3.2.11.2
Example: Making an MSM Profile from the MachStdMill master profile......17
3.2.11.2.1 Add your Hardware Configuration to the MyMachStdMill Profile.............18
3.3
Post Installer Configuration .............................................................................................19
3.3.1
Making a Shortcut to the New Profile......................................................................19
3.3.2
Installation Complete ...............................................................................................19
4
MachStdMill Installation vs. Activation ..................................................................................20
4.1
Installation........................................................................................................................20
4.2
Activation.........................................................................................................................20
5
MachStdMill Support and Feedback........................................................................................21
Copyright © 2010-2015 Calypso Ventures, Inc.
Page 2 of 21
MachStdMill README
Copyright © 2010-2015 Calypso Ventures, Inc.
Page 3 of 21
MachStdMill README
1 Introduction
Welcome to README file for the MachStdMill screen set. We trust you will find this a
significant update from the stock Mach3 screen set.
This file contains information you need BEFORE installing the MachStdMill screen set.
Once installation is complete, the full documentation package will be available including Release
Notes, User manuals and Reference Manuals.
Copyright © 2010-2015 Calypso Ventures, Inc.
Page 4 of 21
MachStdMill README
2 MachStdMill Licensing
The MachStdMill package which includes the MachStdMill software (binaries and sources) and
documentation are available only subject to specific license terms. The license terms allow use
and/or modification of the software free of charge as long as the license terms conditions are met.
The MachStdMill license terms are displayed by the installer.
Agreement to the license terms is required before MachStdMill can be installed.
After installation, the license terms can be found in Documentation\MachStdMill\MachStdMill
License.pdf.
Copyright © 2010-2015 Calypso Ventures, Inc.
Page 5 of 21
MachStdMill README
3 Installing MachStdMill
3.1 Update Mach
The minimum Mach version for MSM Mill use is Mach3 3.043.022 or newer.
The minimum Mach version for MSM Turn or Mill-Turn use is Mach3 3.043.038 or
newer.
(Note: Some OEM versions of MSM may require newer mach versions than the MSM minimums
listed above.)
Check the CVI web site for current recommendation of Mach versions to use for MSM.
MachStdMill requires these as a minimum version of Mach3.
(FYI, the Mach About box displays version numbers using leading zeros (e.g. 3.0.43.022) while
many users (my self included sometimes) will simply write 3.43.22 leaving out the leading zeros)
It is best to do any needed Mach3 install/update before the MachStdMill install.
While MachStdMill will install on an earlier version of Mach3, it will refuse to run until it finds an
minimal revision level of Mach3 during initialization 1.
Attempting the MachStdMill install with an older version of Mach3 can cause complications with
the install instructions given below. To avoid that, please install an appropriate revision level of
Mach3 prior to installing MachStdMill.
3.2 Installing MachStdMill
Installing MachStdMill is accomplished by running the MachStdMill installer.
This section illustrates the MachStdMill install procedure. The details of these screen shots will
change slightly with revisions of the MachStdMill package,
PLEASE DO NOT SKIP READING THE INSTALL INSTRUCTIONS.
At least make sure you read section 3.2.12 about making a profile to use with MSM. It is
important: Doing the install correctly will save you trouble later on!
3.2.1 Set Windows Regional Settings to US English
Mach3 does not support operation windows regional settings. A;; of Mach3 internally assumes
that windows is set for US English regional settings. While much of Mach (and hence MSM) will
operate with non-US settings, some portions will fail. The only way to avoid these problems is to
run mach with US regional (international settings).
1
Mach3 versions before 3.42.30 will simply throw an unexplained syntax error when MachStdMill goes to initialize.
With Mach3 versions after 3.42.30, MachStdMill can check the Mach3 version information and tell you if the Mach3
version is too old.
Copyright © 2010-2015 Calypso Ventures, Inc.
Page 6 of 21
MachStdMill README
3.2.2 Turn off anti-virus programs.
Before installing MachStdMill, turn off all anti-virus programs.
All MachStdMill files are scanned regularly during development, scanned before an installer is
built and released, and the installer exe is scanned before being uploaded to the CVI web site.
Unfortunately, anti-virus programs these days don’t really know if a program has a virus or Trojan
or not – instead they “guess”! Once upon a time scanned programs were checked against known,
verified virus signatures. Apparently that has become too much work for the AV programmers….
they now rely on various heuristics and rather questionable algorithms.
Consider this example: Norton File Insight apparently uses a file “reputation” to decide if it should
block execution of a file or not. I understand that this “reputation” depends on multiple factors,
including whether the file name has been reported as trusted by other Norton users. Effectively,
only programs which are well known and widely used will be considered as trusted. A niche CNC
program like MachStdMill is never likely to be common enough out in the world to pass that type
of test.
A sad fact is that some AV programs create false positive alerts about MachStdMill.
To avoid false positive results from AV programs, and to avoid failed installs (due to an AV
program blocking execution of part of the MachStdMill install sequence), turn all AV programs
OFF before installing MachStdMill.
Finally, if you intend to use on-line activation for MSM, during the activation process you will
need to either turn off any firewalls you are running or grant permission for MSM to access the
net. Since MSM runs as part of Mach3, the actual program name you will need to authorize for net
access is Mach3.exe.
3.2.3 Start the install
Before starting the installation of MachStdMill, CLOSE MACH IF IT IS RUNNING.
You want Mach (and MachStdMIll) to NOT be running. If they are running, you may receive
installer messages about files that the installer can not install or can not replace.
Note: If you have an early pre-release version of MachStdMill installed (any MSM version before
v1.0.0), you must manually uninstall the pre-release version before continuing. The pre-release
alpha and beta versions are not compatible and need to be removed before installing a production
release.
Start the install by running the MachStdMill setup program. You will get the initial install screen:
Copyright © 2010-2015 Calypso Ventures, Inc.
Page 7 of 21
MachStdMill README
3.2.4 Review License Terms
Read and agree to the license agreement in order to install MachStdMill.
If you do not agree with the license terms, do not continue with the installation.
3.2.5 Pre-Install Information
The installer will then display any information that you should know before commencing the
installation. The information presented may differ from the example screen show below.
Copyright © 2010-2015 Calypso Ventures, Inc.
Page 8 of 21
MachStdMill README
3.2.6 Install Location
Select the default location to install MachStdMill. The installer defaults to the normal install
directory for Mach3. Except for unusual circumstances, go ahead and use the default location.
This folder MUST be the same as the Mach3 install folder – change this IF AND ONLY IF
Mach3 is installed into a non-standard location.
Copyright © 2010-2015 Calypso Ventures, Inc.
Page 9 of 21
MachStdMill README
3.2.7 Select Components
This screen allows you to select the set of MachStdMill components that you want to install.
There are several prepackaged combinations: Full install, Mill only, Lathe only and custom.
A Full installation will install the components needed to run any/all of MSM’s features.
A Mill only installation will install the components necessary to run a mill.
A Lathe only installation will install the components necessary to run a (XZ) lathe.
A Custom installation will allow you to pick and choose the available components.
The listed available optional components may differ from the screen shot shown above as
components are made available.
3.2.7.1 Real Draw Base Components Source Files
This option will install the Read Draw source files which can be useful if you are customizing
MSM. These files are not required to run MSM as shipped.
Note that if you want to install the Real-Draw source files, they are installed via a custom install.
Copyright © 2010-2015 Calypso Ventures, Inc.
Page 10 of 21
MachStdMill README
3.2.8 MachStdMill Folder Name
The installer will give you the opportunity to pick the start menu folder name that MachStdMill
creates – it is recommended that you use the default name. By default, MachStdMill puts it’s
folder in the Mach3 start menu folder.
3.2.9 Install the MachStdMill Package
Click the install button to perform the installation.
The exact contents of this screen will vary depending on the optional components selected for the
installation.
Copyright © 2010-2015 Calypso Ventures, Inc.
Page 11 of 21
MachStdMill README
3.2.10
Post-install Information
After installing the MachStdMill files, the installer will present this screen with post install
instructions.
Copyright © 2010-2015 Calypso Ventures, Inc.
Page 12 of 21
MachStdMill README
3.2.11
Completing the Install
The final page of the installation process is shown below.
If you are doing a MachStdMill update install, just click finish.
You have completed the install process and you can use your existing profile to run the updated
version of MachStdMill.
If this is first time install of MachStdMill, please keep reading for instructions about making a
profile to run MachStdMill.
3.2.12
Making a New Profile for use with MachStdMill.
The first time you install MachStdMill, you must create a new profile for use with
MachStdMill.
This only needs to be done once when you first start using MachStdMill. Once you have a profile
configured for MachStdMill, you will not need to do this again.
There are two ways to make a profile for use with MachStdMill:
1. As most people installing MachStdMill already have Mach configured for their machine,
the most common method used is to:
Clone an existing profile that is already configured to run your machine. You will
then have to load the MachStdMill.set set file by hand the first time you load the new
profile.
If you are making the profile from an existing, hardware already configured profile, you
create a copy of your existing profile.
Copyright © 2010-2015 Calypso Ventures, Inc.
Page 13 of 21
MachStdMill README
2. If you do not already have a working Mach profile for you machine, the alternative method
is to:
Clone the MASTERMachStdMill master profile and add your hardware
configuration settings to the new profile you create. With this method, you will not have
to hand load MachStdMill.set the first time as the master profile already has it set as the
current screen set.
If you are making the profile from the MASTERMachStdMill master profile, you create a
copy of the MASTERMachStdMill master profile.
If you do not make a separate MSM profile, and you attempt to use the
MASTERMachStdMill profile directly, YOU WILL GET A WARNING when you start
MSM. (Honest, trust me, you don’t want to do that – it will cause your configuration
settings to get erased when you next update MSM and the master profile gets overwritten
by the MSM installer.)
You must do one of the above two choices.
MSM Lathe support users:
Do not try to use your existing MSM profiles to also run MSM Lathe extensions. MSM
Turn and MSM Mill-Turn run mach in lathe mode and thus they have to be separate
profiles from the ones you use for mill operation. Also, Mill and lathe modes use different
M3/4/5/6 macros and so have to be separate mach profiles to avoid Mcode conficlits.
It is Ok to clone an existing MSM Mill profile using mach loader and then use the copy for
MSM Mill-Turn (as the copy will be a different profile name). This gets you all the
existing Mill hardware configuration information, but creates a separate profile to run MillTurn with.
3.2.12.1
Example: Cloning an existing hardware profile to run
MachStdMill.
Make a copy of your existing, working, Mach profile using the Mach loader as follows:
When the MSM install completes, the Mach3 loader will open. Use “Create Profile” to make a
copy of you existing profile. IN the example below the existing profile To be copied is called
“Smithy-1240-w-ppd”.
Copyright © 2010-2015 Calypso Ventures, Inc.
Page 14 of 21
MachStdMill README
You will be presented with a screen similar to this:
Select the name of your existing profile in the left column.
Create the name for your cloned MSM profile – in this case “MyMachStdMill”.
DO NOT click “default profile values”.
Copyright © 2010-2015 Calypso Ventures, Inc.
Page 15 of 21
MachStdMill README
Click “OK” to create the MyMachStdMill profile.
3.2.12.1.1
Initial Loading of MachStdMill
Since this method cloned a pre-MSM existing profile, your new cloned profile will be set to load
some screen set other than MachStdMill.
You must load MachStdMill screen set manually the (only) first time.
Use the menu View\Load Screens to load up
<Mach3 install dir>\MachStdMill.set
MSM Turn and Mill-Turn:
If installing to run MSM Turn or Mill-Turn, the screen set name to load is:
<Mach3 install dir>\MachStdMillLathe.lset
(note the .lset extension...)
The first time you start mach with this new profile, you will not load the MSM screens. We need
to hand load MSM the first time.
Start Mach with the new profile, and then use the menu bar to do View – Load Screens, you will
get a dialog similar to this:
Copyright © 2010-2015 Calypso Ventures, Inc.
Page 16 of 21
MachStdMill README
Load ONLY this Set file. Do NOT go looking for other set files that MSM may have installed.
The MachStdMill.set file is the ONLY set file that you need. (All other changes for MSM, like
selecting the MSM resolution, are done from inside MSM and are not done by using the Mach
view/load screens menu).
Shut down Mach3 (to get the screen set change recorded in the profile XML file) and then
restart Mach3 using your new profile.
From now on, when you start mach with this profile, Mach will start with MSM.
3.2.12.2
Example: Making an MSM Profile from the MachStdMill master
profile.
Make your own copy of the MASTERMachStdMill profile using the Mach3 loader as follows:
When the install completes, the Mach3 loader will open. Use “Create Profile” to make your own
copy of the MASTERMachStdMill profile for customization.
You will be presented with a screen similar to this:
Copyright © 2010-2015 Calypso Ventures, Inc.
Page 17 of 21
MachStdMill README
Select “MASTERMachStdMill” in the left column.
Create the name for your cloned MSM profile – in this case “MyMachStdMill”.
DO NOT click “default profile values”.
Click “OK” to create the MyMachStdMill profile.
MachStdMill is now installed and ready to run via this profile.
3.2.12.2.1
Add your Hardware Configuration to the MyMachStdMill Profile.
If you created your profile from an existing profile for your machine, skip this section as your
hardware setup is already in the new profile.
Start Mach3 with the MyMachStdMill profile and use the Mach3 configuration menus to
configure your hardware interface. To help avoid forgetting about some setting, go through each
of the sub-menus under the main Config menu and look at the settings to verify they are the values
you desire.
This installation approach has the disadvantage that you may miss a hardware setting for your new
profile. An advantage is that over time, Mach XML files tend to collect crud. Using this approach,
makes sure that you are starting clean and not carrying over unknown problems that may be
present in an old XML file.
When the hardware interface information has been configured, you are ready to run MachStdMill.
Copyright © 2010-2015 Calypso Ventures, Inc.
Page 18 of 21
MachStdMill README
3.3 Post Installer Configuration
3.3.1 Making a Shortcut to the New Profile.
You may also want to create a shortcut which will run your new profile and hence MachStdMill
by default.
This is done my setting the /p command line switch for mach3 in the shortcut properties as shown
in the example below:
Double click the shortcut to start Mach3 with your new profile.
You may then use the Mach3 configuration menus to add your machine specific configuration (ex:
ports & pins) to the new profile.
3.3.2 Installation Complete
The installation of MachStdMill is complete.
See the release notes and the user manual for information re configuration of optional
MachStdMill features.
Copyright © 2010-2015 Calypso Ventures, Inc.
Page 19 of 21
MachStdMill README
4 MachStdMill Installation vs. Activation
The reader should be aware that The following three terms are NOT synonyms:
“installation”, “Activation” and “Operation”.
The README file covers “installation” (as this information is helpful to know prior to
installing the software). Please see the User Manual for more information re “activation”
and “Operation” (which are only mentioned briefly in this document).
4.1 Installation
Installation is the process of installing the MachStdMill software on to PC that is already
running Mach3. independently, a MachStdMill installation may or may not be “activated”.
(For example: A trial version of MachStdMill is “installed” (i.e. it is on the PC can be run
for the trial period), but it is not “activated” (i.e. is it not a licensed copy of the software
which does not time out).
4.2 Activation
Activation is the process by which a trial installation is converted into a licensed installation
or a deactivated installation is restored to licensed service after a move from one PC to
another, or after changes to a system’s hardware configuration have performed on a
deactivated installation’s PC.
Activation or deactivation requires interaction with the 24/7 online license service. This
interaction can either be direct (“Online activation”) or indirect via another PC (“Proxy
Activation”).
Activation and deactivation of a licensed copy of MachStdMill is documented in the User
Manual.
Copyright © 2010-2015 Calypso Ventures, Inc.
Page 20 of 21
MachStdMill README
5 MachStdMill Support and Feedback
The MachStdMill user community forum at the
CVI MachStdMill User Forums Which is the primary method for end user support for MachStdMill.
Please direct any support issues, including installation questions to that forum.
Please report any bugs or errata discovered.
Copyright © 2010-2015 Calypso Ventures, Inc.
Page 21 of 21