1
Model No. 831.297640
Serial No.
The serial number can be found in the
location shown below. Write the serial
number in the space above.
I
EXERCISE:
EQUIPMENT
HELPLINE!
1-800-736-6879
USER'S MANUAL
this manual
•
!
i
SEARS, ROEBUCK AND CO., HOFFMAN ESTATES, IL 60179
FULL 90 DAY WARRANTY
For 90 days from the date of purchase, if failure occurs due to defect in material or workmanship in this
SEARS TREADMILL EXERCISER, contact the nearest SEARS service center throughout the United
States and SEARS wilt repair or replace the TREADMILL EXERCISER, free of charge.
This warranty does not apply when the TREADMILL EXERCISER is used commercially or for rental purposes.
This warranty gives you specific legal rights, and you may also have other rights which vary from state
to state.
SEARS, ROEBUCK AND CO., DEPT. 617WA, HOFFMAN ESTATES, IL 60179
2
TABLE OF CONTENTS
IMPORTANT PRECAUTIONS ..............................................
BEFORE YOU BEGIN ........................................................................
ASSEMBLY ...............................................................................
_ ..................
4
5
6
OPERATION AND ADJUSTMENT
.............................................................
HOW TO FOLD AND MOVE THE TREADMILL ..................................................
TROUBLE-SHOOTING AND STORAGE ........................................................
CONDITIONING GUIDELINES ...............................................................
ORDERING REPLACEMENT PARTS ..................................................
7
10
12
14
Back Cover
Note: An EXPLODED DRAWING and a PART LIST are attached to the center of this manual. Save the
EXPLODED DRAWING and PART LIST for future reference.
3
IMPORTANT
: W/ NN]NG"
PRECAUTIONS
• To reduc=- the risk c_ burns, fir_, _-_-,
.c,,_:^,_shcck c,- ,_, _ -., _,_,, ........
.....
1_: It Isthe responsibility ofthe owner to ensure
thata]l users of thistreadmill
are adequately ,_:!i
_::!!nfi_t_med of all watrJlngs:and.precsutiona.
12. Wear appropriate exercise attire when using
:: • the treadmill. Do notwear loose clothing that
:2_::::i_i;i.Use
the treadmill 0nly =iSdescribed In this
:,:_
with bare feeti wearing On!y stock!ngs,or
In
::":_;:
mended forb0th men and women;
3._ Place the treadmill on a level surface, with at
least 8 feat of clearance behind It;To protect:13. Never start the treadmill while you are slandi_,_
;._;the.ifloor O_"carpet from damage, place a mat - ,.:: :.:'lng on the walking belt. Alwayslhold the
::.?_.:_:_uncler
thetreadmlll,
handrails while using the treadmill.
4;
D0hot place the treadm
near water outdoors, or on asurface that b ocks any a r
_:_: .o_nlngs_
14. The treadmi I Is capable of high speeds.
Adjust the speed n Sma ncrementsto
..... avoid Sudden jumps In speed._;
5_.i Do' not operate the treadmill where aeroso
!5 To reduce the poss bil ty of overheating, do:
ii_iiI _:.:pr_duCts _r_ used or wi_rb:_xyger_ is being.: i;:!_.. not operate tile treadmill €0ntinuous y for
'ii:i':::_:_;_;t_dminlstered_;
.....
-.....
longer than i hbUr_
treadmill at all tlmes_
:::
; _'_The treadmi I should be used only by per-.
SO_ weigl_ing 250 pounds0r I_s_:
:_::;:itreadmlll
::;
Various factors, including the user's movement, may affect the accuracy Of heart rate
readings:The pulse Sensor is intended only
as an exercise aid in determining heart rate
trends in _:genei'al
_:
at a time_ ...........
17_ Never leave the treadmill unattended White.lt
=:_.
::.:: Is running. Always remove the SAFEKEY
9_.: Wl_en connecting the power cord (see HOW. : ::: _. when the treadmii iS:_0_ in u_ .;: i.
TO PLUG IN THE. POWER CORD.on pag e 7),;
plug the power Cord directly into a grounded
circuit capable 0f carrying"12 o_more amps..:
No other appliance shoulcl be on the same
18. You must be able to Safe y I ft 45 pounds (20
.
kg) to raise, iowe_-,_r move the treadm
circuit. Keep the power cord away from
heated surfaces,
19. When storing the treadmill, make sure that
the storage latch s ful y closed.
10_ If anextenslon cord is needed, use a 14gauge general-purpose cord of f ve feet or
less In length with a three-wire conductor.
1".
Never move the walking belt While the power
Is turned off. Do not operate the treadmill if
the power cord or plug Is damaged, Or If the "
treadmill iS not working ptoperiy_ (See BEFORE YOU BEGIN on page 5 if the treadmill
is not working properly. )
20. Never Insert iany object nt0ariy open ng
21. Always unplug the power cord before perfOrming the maintenance and adjustment
procedures described in this manual. Never
remove the motor hood unless instructed to
" do so by an authorized service representatlve. Servicing other than the procedures in
this manual should be performed by an authorlzed service representative only.
SAVE THESE INSTRUCTIONS
4
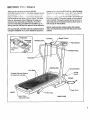
BEFORE YOU 3EGIN
Thank you for selecting the unique SEARS
PROFORM a 580si treadmill. The 580si treadmill blends
advanced iechr:s'-_ .'', i_ : _'_c,_':i,_ s_}".in_t_ '.atyo_._
enjoy an excel en_ form c_ ,:._diovascular exercise in
the convenience and privacy of your home, The 580si
offers an impressive array of features to make your
workouts more enjoyable and effective. And when
you're not exercising, the 580si can be folded up, requiring less than half the floor space of other treadmills.
For your benefit, read this manual carefully before
using the treadmill. If you have additional questions,
please call our toll-free HELPLtNE at 1-800-736-6879,
Monday through Saturday, 7 a.m. until 7 p.m. Central
Ti:-.,.--_." : '^_
: <-_s), T.s he',p u _ essls_ you,
please r:o.s (he _'rcduct model number and serial number before calling. The model number of the treadmill
is 831.297640. The serial number can be found on a
decal attached to the treadmill (see the front cover of
this manual for the location).
Before reading further, please review the drawing
below and familiarize yourself with the parts that are
labeled.
Console
Storage
Sensor
Tray
Circuit Breaker
Foot Rails
On/Off
Switch
Padded Walking Platform
for maximum comfort
FRONT
Cord
BACK
Rear Roller
Adjustment Bolt
RIGHT SIDE
: $SEMBLY
Two people are required for assembly. Set the treadmill in a cleared area and remove all packing materiaTe.
De no! dispose of the packing materials until assemb!y is cem_!_t,
.._.'_.r-'b!y r_.quir_s the i,':.:!ud_d 7!:_,....
;.'i ._i1wrench
_
aild your owil ph]i]i;_s -_','-_,..,:" ,,,-
- -. - : *
.
1. Firmly hold one of the Uprights (6, 88) with both hands.
Raise the Uprights until the Front Wheels (58) are resting
on the floor. The inset drawing shows how the treadmill
should appear when this step is completed.
88
2. Pivot the Console (10) to the angle shown. You should
feel the Console lock into position.
,--,,
2
i
i
," I
D
Jl
I
i
i
i
10
I1
.
If you do not feel the Console lock into position, use the
7/32" Allen Wrench (89) to tighten the two Crossbar Bolts
(1) two complete turns. Pivot the Console (10) up and
down slightly until you feel it lock into position. When the
Console is locked in position, tighten the Crossbar Bolts.
Look under the Left and Right Console Brackets (3, 36)
and find the two small holes in each end of the Console
Crossbar (9). Tighten Crossbar Screws (99) into all four
holes in the Crossbar.
"
3
99¸
9.'
6
4. ,._em_,e _ne paper bac;4ing _,orn _;'= _c;_-:ve L;hp(26}.
P_ess the Adhesive Clip onto the Fre _a (49) in the indicated location. Press the 3/16" Allen W:ench (83) into
the Adhesive Clip. The use of the 3/16" Allen Wrench is
described on pages 12 and 13.
4
treadmill, i'tote: Cover the floor beneath the treadmill to
protect the floor or carpet,
83
49
OPERATION AND ADJUSTMENT
THE PERFORMANT
LUBE TM WALKING BELT
1
Grounded
Your treadmill features a walking belt coated with
PERFORMANT LUBE _, a high-performance lubricant.
Dudng the first few hours of use, a small amount of
white powder may accumulate on the foot rails and the
walking platform. The white powder is high-pedormance lubricantfrom the walking belt. Never apply silicone spray or other substances to the walking belt
or the walking platform. They will deteriorate the
walking belt and cause excessive wear.
Grounding Plug
HOW TO PLUG IN THE POWER CORD
This product must be grounded. If it should malfunction or break down, grounding provides a path of least
resistance for electric current to reduce the risk of elec-
Grounded Outlet
2
Grounded
tric shock. This product is equipped with a cord having
an equipment-grounding conductor and a grounding
plug, Plug the power cord into an appropriate outlet that Is properly Installed and grounded in accordance with all local codes and ordinances.
Grounding Pin
Grounding
Plug
Lug
with a qualified electriciart Or serv|ceman If you
are in doubt as to whether the product Is prop
erly gr0Unded; Do not mOdif7 the plug provided with the product--if it will not fit the outlet, have a proper outlet installed by a qualified
electrician.
This product is for use on a nominal 120welt circuit,and
has a grounding plug that looks like the plug illustratedin
drawing 1 on this page. A temporary adapter that looks
like the adapter illustratedin drawing 2 may be used to
connect this plug to a 2-pole receptacle as shown in
drawing 2 if a properly grounded outlet is not available.
"'_
Metal Screw
The temporary adapter should be used only until a properly grounded outlet (drawing 1) can be installed by a
qualified electrician.
The green-colored rigidear, lug, or the like extending
from the adapter must be connected to a permanent
ground such as a properly grounded outlet box cover.
Whenever the adapter is used it must be held in place
by a metal screw. Some 2-pole receptacle outlet box
covers are not grounded. Contact a qualified electrician to determine if the outlet box cover is
grounded before using an adapter.
7
',
.....
I'='_-
_r_!
L_L_,',-.-..'-.. '--..
:! !U_L_
L
I
I
!
_
_.JL-_ += ,_
i̧
.
--
,
f
;:'7;,-7
Y..aq
Fit Bum
z%
Wan_.Up _l
C_oN_
rrfreri'i'e 'ee" '
O
T_4_WO
ZOI_L_--
\=,oo.oo..o,
\
V
Q713
\
'Note: If there is a thin sheet
of clear plastic on the face of
the console, remove it.
TO PLUG IN THE POWER CORD on page 7.)
Next, step onto the foot rails of the treadmill. Find the
clip attached to the SAFEKEY (see the drawing above),
and slide the clip onto the waistband of your clothing.
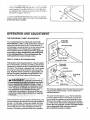
Follow the steps below to operate the console:
B
Insert the SAFEKEY fully into the power switch,
The four displays
and the green MANUAL mode indicator
will light.
B
STEP BY STEP CONSOLE OPERATION
The treadmill console features a manual mode and six
preset workout programs. In the manual mode, the
speed of the walking belt can be changed with the electronic speed control. When one of the workout programs
is selected, the console will automatically control the
speed as it guides you through a n effective workout.
Before operating the
console, make sure
that the on/off switch
near the power cord
is in the "on" position.
8
Position
"On"
I
If the SAFEKEY is in the console, remove it. Make sure
that the power cord is properly plugged in. (See HOW
I-
/
I_
_]
Reset the speed control and select a speed
setting.
Slide the speed controldown to
the "RESET" position.
Each time the walkino belt Is
stoooed, the soeed control
must be moved to the
"RESET" oosltlon before the
walklna belt can be restarted.
-J
II I-
'1/!
Next, slide the speed control
upward to select a speed setting. Note: If the SAFEKEY
was just inserted, or if the
RE$_q'I
2$="TSP_EO
walking belt was stopped
with the START/STOP button,
the walking belt will not begin to move yet,
_
,_,_;_.sih_
S_LECT ="JOD-- ..utton to s_.;;:
desired mode.
;,': ;
play--Displays the
approximate nu,,mbers of Calories
and Fat Calories
i; you want to select
one of the six preset
programs, press the
SELECT MODE button. The red PROGRAM A indicator
will light. To select PROGRAM B, C, D, E, or F, repeatedly press the SELECT MODE button.
seconds, the disptay will cha,qge from one number
to the other (an "F" will appear when the number
of Fat Calodes is shown). Note: The actual number of Calories you have burned may differ slightly
from the number shown if the speed or incline is
near the lowest or highest setting.
Press the START/STOP button.
After the
START/STOP button
is pressed, the walking belt will begin to
move. Hold the
handrails and carefully begin walking on the walking belt.
I
li _"-"
___--'_._=__._...J
_ll-I
i
Note: PROGRAMS A, B, and C are twenty-minute
programs; PROGRAMS D, E, and F are thirtyminute programs. The speed profiles in the center
of the console show how the speed of the walking
belt will change during the programs. During PROGRAM A, for example, the speed will gradually increase dudng the first ten minutes, and then gradually decrease during the last ten minutes. Each program will begin with a two-minute warm-up pedod,
and end with a two-minute cool-down period.
I
If the console is in the manual mode, change the
speed of the walking belt as desired by sliding
the speed control. To stop the walking belt, slide the
speed control to the "RESET" position.
If one of the preset programs is selected, the speed
setting you selected will be the minimum speed setting for the program. The speed of the walking belt
will then change automatically dudng the program as
shown by the speed profiles in the center of the console. When the program is completed, the walking
belt will automatically slow to a stop. Note: If the intensity level of the program is too easy or too difficult,
adjust the speed control to select a new minimum
speed setting. To stop the program temporarily, slide
the speed control to the "RESET" position. To restart
the program, slide the speed control up to the desired
position. To terminate the program before the program is completed, press the START/STOP button.
I_
F
_,.,_
_=nthe SAFEKEY is inserted, the console wiii be
in t;qe MANUAL mode.
o it
D
_ _ ......... _-''_ , ,- ¢3_, _ ,.
Follow your progress with the monitor displays.
The four monitor displays provide instant feedback:
• TIME display-When the console
is in the manual
mode, the elapsed
time will be shown.
When one of the
preset programs is
selected, the time remaining in the program will be
displayed.
• SPEED display-Displays the speed
of the walking belt,
in miles per hour
(MPH) or kilometers per hour
(KPH).
Note: To change
the unit of measurement, hold
down the
I-'-"
E_
[3
l
START/STOP button while inserting
the SAFEKEY into
the console. An "E" (for English system-miles per
hour) or "M" (for Metric system--kilometers per
hour) will appear in the DISTANCE display. Press
the SELECT MODE button to select the desired
setting. Remove and then reinsert the SAFEKEY.
An MPH or a KPH will appear in the SPEED display to show which unit of measurement you have
selected.
• DISTANCE/
PULSE display-Displays the distance that you
have walked or
run. It an MPH appears in the SPEED display, the distance will be
displayed in miles. If a KPH appears, the distance
will be displayed in kilometers. This display also
shows your pulse when the pulse sensor is used
(see step 6).
9
pressure to the pu;se se_sor. Tr,j the sensor se. e,'ai
times until you become familiar with it. Remember to
stand still while measuring your pulse.
J
To use the pulse
Sensor,
stand
o_
the foot rails and
Ct£c,e yOL.' t- *_b
_
sot as shown. The
pulse sensor is
pressure-activated.
Fully press down
the pulse sensor. Do not press too hard, or the
circulation In your thumb will be restricted, and
your pulse will not be detected. Next, slightly
raise your thumb until the colon in the
DISTANCE/PULSE display flashes steadily. Hold
your thumb at this level. After 5 to 10 seconds, your
pulse will be displayed. If the displayed pulse appears to be too high or too low, or if your pulse is
not displayed, lift your thumb off the sensor and
allow the display to reset. Press down again on the
sensor as described above.
Make sure that your thumb is positionedas shown,
and that you are applying the proper amount of
Change the incline of the treadmill, if dssfred.
I
To vat',/the intensibj
I
of your exercise, the
A
V
incline of the tread.o
mill can be changed,
INCLINE
To change the incline, hold down one
of the incline buttons
until the desired incline is reached.
QC)
When you are finished, remove the SAFEKEYo
When you are finished exercising,
step onto the foot
roils and remove the
SAFEKEY from the
console. Store the
SAFEKEY in a seo
cure location.
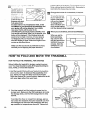
HOW TO FOLD AND MOVE THE TREADMILL
HOW TO FOLD THE TREADMILL FOR STORAGE
Before folding the treadmill for storage, unplug the power
cord. You must be able to safely lift 45 pounds (20 kg) to
raise, lower, or move the treadmill.
1. Hold the treadmill firmly with your hands in the locations
shown at the right. To decrease the possibility of injury, bend your legs and keep your back straight.
Raise the treadmill to a vertical position. Make sure to lift
with your legs rather than your back.
2. Pivot the treadmill until the locking pin snaps into the
storage latch. Make sure that the locking pin Is Inside
the storage latch, and that the storage latch is fully
closed.
Storag e_"
To protect the floor or carpet from damage, place a
mat under the treadmill. Keep the treadmill out of direct sunlight. Do not leave the treadmill in the storage position in temperatures above 85 ° Fahrenheit.
10
Latch '_
Pin
HOW TO MOVE THE TREA._.?,!iLL
Before moving the treadmill, convert the treadmill to the storage position as described on page 10.
1. Hold one console bracket v,!:h each h_nd. Plac-_ on_ foot
on the base crossbar as shown.
2. Tilt the treadmill back until it rolls freely on the front
wheels. Carefully move the treadmill to the desired location To reduce the risk of Injury, use extreme caution
while moving the treadmill Do not attempt to move
the treadmill over an uneven surface
Base
ZCrossbar
3. Place one foot on the base crossbar, and carefully lower
the treadmill until it is resting in the storage position.
HOW TO FOLD THE TREADMILL
DOWN FOR USE
1. Hold the upper end of the treadmill with your right hand
as shown. Using your left hand, lift the storage latch.
Pivot the treadmill slightly until the locking pin is out of
the storage latch. Release the storage latch.
Storage Latch _,_
.
.
king
2. Hold the treadmill firmly with both hands, and lower the
treadmill to the floor.
11
i
SEE SHOOTt!'
,--,"
,,,ln:
,..,STORAGE
Most treadmill problems can be solved by fo1!owing the simple steps below. Find the symptom that ap,_i'.:_, and follow the steps listed, if fu_h_r _ssis_nce
is needed, call our toll-free HELPLINE at 1-800-736,:.....
.,.,. ........ o,
,, _,.4 , 7_-_"'-'-_;'-"! "fi:';_ (e:,';h.tding holidays).
1. SYMPTOM: THE POWER DO_S NOT TURN O;"I
a. Make sure that the power cord is plugged into a properly grounded outlet. (See HOW TO PLUG IN THE
POWER CORD on page 7.) If an extension cord is needed, use only a 14-gauge general-purpose cord of
five feet or less in length.
b. After the power cord has been plugged in, make sure that the SAFEKEY is fully inserted into the console.
Vadous indicators on the console should light. (See step 1 page 8.)
C.
Check the cimuit breaker located on the treadmill near the
power cord. If the switch protrudes as shown, the circuit
breaker has tripped. To reset the circuit breaker, wait for five
minutes and then press the switch back in.
Tdpped
Reset
_,
d. Check the on/off switch located at the front of the treadmill
near the power cord• The switch must be in the "on" position.
Position
"On"
2. SYMPTOM: THE POWER TURNS OFF DURING USE
a. Check the circuit breaker located on the treadmill frame near the power cord. If the circuit breaker has
tripped (see the drawing above), wait for five minutes and then press the switch back in.
b. Make sure that the power cord is plugged in.
c. Remove the SAFEKEY from the console. Reinsert the SAFEKEY fully into the console. (See step I on page
8.)
d. Check to make sure that the on/off switch is in the "on" position. (See 1. d. above•)
e. If the treadmill still will not run, please call our toll-free HELPLINE.
3. SYMPTOM: THE WALKING BELT SLOWS WHEN WALKED ON
a. If an extension cord is needed, use only a 14-gauge general-purpose cord of five feet or less in length.
b. If the walking belt still slows when walked on, please call our toll-free HELPLINE.
4. SYMPTOM: THE WALKING BELT IS OFF-CENTER OR SLIPS WHEN WALKED ON
a. If the walking belt has shifted to the left, first remove the
SAFEKEY and UNPLUG THE POWER CORD• Using the 3/16"
alien wrench, turn the left rear roller adjustment bolt clockwise
1/4 of a turn. Plug in the power cord, insert the SAFEKEY and
run the treadmill for a few minutes. Repeat until the walking belt
is centered.
12
a
_ . :_c ;';_=,_:_gc,_',_n&s sniffed to the righi, first remove the
S._FEKEY and UNPLUG THE POWER CORD. Using the 3/16"
€,'.l_nwrench, turn the left rear roller adjustment bolt counterclockwise 1/4 of a turn. Plug in the power cord, insert the
SAFEKEY and run the treadmill for a few minutes. Repeat until
b
13
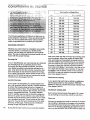
CONDITIONING
"' L,:,
....L)=LIN=S
""
Training
Zone (Beats/Min.)
:
Conditioned
20
138-i 87
133-162
25
136-166
132-160
30
135-164
130-158
35
134-162
129-156
40
132-161
127-155
45
131-15£
125453
50
129-156
124-160
The following guidelines will help you to plan your exercise program. Remember--these are general guidelines. For more detailed information about exercise,
obtain a reputable book or consult your physician.
55
127-155
122-149
60
126-153
121-147
65
125-151
119-145
EXERCISE
70
123-150
118-144
75
122-147
117-142
80
120-146
115-140
85
118-144
114-139
INTENSITY
Whether you want to bum fat, strengthen your cardiovascular system, or increase your athletic performance, you can tailor your exercise to your specific
goals. The key to achieving the desired results is to exercise with the proper intensity.
Burning Fat
To burn fat effectively, you must exercise at a relatively
low intensity level for a sustained period of time.
During the first few minutes of exercise, your body
uses easily accessible carbohydrate calories for energy. Only after the first few minutes of exercise does
your body beg(n to use stored fat ca/ories for energy.
If your goal is to bum fat, set the speed control on the
console to FAT BURN to help you maintain the proper
intensity level. (See pages 8 and 9.)
keep your pulse near the low end of your training zone
as you exercise. After a few months of regular exercise, your pulse can be gradually increased until it is
near the middle of your training zone as you exercise.
You can measure your pulse using the pulse sensor.
Exercise for about four minutes, and then measure
your pulse immediately. If your pulse is too high or too
low, adjust the intensity of your exercise. It may also
be helpful to set the speed control on the console to
AEROBIC to help you maintain the proper intensity
level. (See pages 8 and 9.)
Performance Training
Aerobic Exercise
If your goal is to strengthen your cardiovascular system, your exercise must be "aerobic." Aerobic exercise
is activity that requires large amounts of oxygen for
prolonged periods of time. This increases the demand
on the heart to pump blood to the muscles, and on the
lungs to oxygenate the blood. The proper intensity
level for aerobic exercise can be found by using your
pulse as a guide. As you exercise, your pulse should
be kept at a level between 70% and 85% of your maximum possible heart rate. This is known as your training zone. You can find your training zone in the table
at the top of this page. Training zones are listed according to age and physical condition.
14
During the first few months of your exercise program,
If your goal is high performance athletic conditioning,
set the speed control on the console to PERFORMANCE to help you maintain the proper intensity level.
(See pages 8 and 9.)
WORKOUT GUIDELINES
Each workout should include three parts: (1) a warmup, (2) training zone exercise, and (3) a cool-down.
Warm-up
Warming up prepares the body for exercise by increasing circulation, delivering more oxygen to the muscles
and raising the body temperature. Begin each workout
with 5 to 10 minutes of stretching and light exercise to
warm up (see SUGGESTED STRETCHES on page 15).
Train_r,g
L;:._
z:._a_:: -
._ ,;c..*_d_,,m , _-.._,_(ii
_ncrease the flexibiliq oi ,,..;u,,,,_= , :,....... 1,,_.,pto preven_ post-exercise p,-obiems.
After ,,';armir: _
cise until your pulse is in your tr_i,'_!_ zone for 20 t._
60 minutes. (During th-'- I r-..tfe.
..... o; _.o,., exe,'"up,
C_Se C, "F7_,--zone
aRc(N
.......:
_,3_
_)_
_{_
:
TO," io:" )" _;]9.,q
..;
....
#,_
-
':
£
:
-'
:_:O
.
,,
_,
_1
J',
b.
]_
CPU
e;(_)
::_R
+-
]
:1._ r£-.L:L;':arly
and d-aeply _s you exs:s!se--n a,'s,- hold your breath.
E.xercise Frequency
,;
....
:. : ,
_
.,,_,_
,3urc._,q.lt(oR,
COt:2
'',_...._
' .....
._._,,',,=.,<,
,,;uLaLl=_e onedeyofF_,s;between workouts. A_er a few months, you may complete up to five workouts each week if desired.
Cool-down
Finish each workout with 5 to 10 minutes of stretching
The key to success is to make exercise a regular and
enjoyable part of your everyday life.
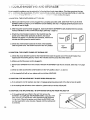
SUGGESTED STRETCHES
The correct form for several basic stretches is shown in the
drawings below. Move slowly as you stretch--never bounce.
1.Toe Touch Stretch
Stand with your knees bent slightly and slowly bend forward
from your hips. Allow your back and shoulders to relax as you
reach down toward your toes as far as possible. Hold for 15
counts, then relax. Repeat 3 times. Stretches: Hamstrings,
back of knees and back.
2. Hamstring Stretch
Sit with one leg extended. Bring the sole of the opposite foot
toward you and rest it against the inner thigh of your extended
leg. Reach toward your toes as far as possible. Hold for 15
counts, then relax. Repeat 3 times for both legs. Stretches:
Hamstrings, lower back and groin.
3
3. Calf/Achilles Stretch
With one leg in front of the other, reach forward and place your
hands against a wall. Keep your back leg straight and your
back foot flat on the floor. Bend your front leg, lean forward and
move your hips toward the wall. Hold for 15 counts, then relax.
Repeat 3 times for both legs. To cause further stretching of the
achilles tendons, bend your back leg as we!l. Stretches:
Calves, achilles tendons and ankles.
4. Quadriceps Stretch
With one hand against a wall for balance, reach back and
grasp one foot with your other hand. Bring your heel as close
to your buttocks as possible. Hold for 15 counts, then relax.
Repeat 3 times for both legs, Stretches: Quadriceps and hip
muscles.
5. Inner Thigh Stretch
Sit with the soles of your feet together and your knees outward.
Pull your feet toward your groin area as far as possible. Hold
for 15 counts, then relax. Repeat 3 times. Stretches:
Quadriceps and hip muscles.
15
Th3 m :':'.-'J :"
b.-'.,-_rj
3:_.,"a! number
of yo:.;r..::,:_-:.-..
.
.....
,%1od3]l_Jo.831.297640
front cover of this manual to find the location of the decal.
QUESTIONS?
If you find that:
• you need help assembling or
operating the SEARS PROFORM = 580si treedmlll
All replacement parts are available for immediate purchase or
special order when you visit your nearest SEARS Service Center.
To request service or to order parts by telephone, call the toll-free
numbers listed at the left.
When requesting help or service, or ordering parts, please be prepared to provide the following information:
• The NAME OFTHE PRODUCT (SEARS PROFORIVP 580si
treadmill) "
• a part Is missing
• or you need to schedule repair
service
call our toll-free HELPLINE
1-800-736-6879
Monday-Saturday,
7 am--7 pm
Central Time (excluding holidays)
• The MODEL NUMBER OF THE PRODUCT (831.297640)
• The PART NUMBER OF THE PART (see the EXPLODED
DRAWING and PART LIST attached to the center of this manual)
• The DESCRIPTION OF THE PART (see the EXPLODED DRAWING and PART LIST attached to the center of this manual)
REPLACEMENT
PARTS
If parts become worn and need
to be replaced, call the following
toll-free number
1-800-FON-PART
(1-800-366-7278)
SEARS, ROEBUCK AND CO,, HOFFMAN ESTATES, IL 60179 USA
Part No. 126749 R995B Printed in USA
© 1995 Sears, Roebuck and Co.