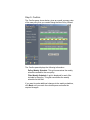
1
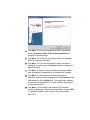
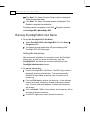
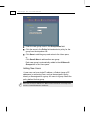
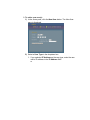
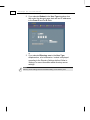
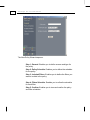
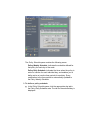
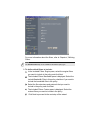
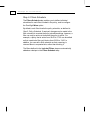
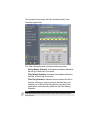
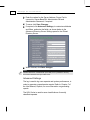
PureSight BCC GUI Demo Manual October, 2002 1-2 PureSight BCC GUI Demo Manual Copyright Notice Copyright 2001 iCognito Technologies Ltd. All rights reserved. Any technical documentation that is made available by iCognito is the copyrighted work of iCognito and is owned by iCognito. NO WARRANTY: This technical documentation is delivered to you as-is, and iCognito makes no warranty as to its accuracy or use. Any use of the technical documentation, or the information contained therein, is at the user's risk. Technical or other inaccuracies, as well as typographical errors, may occur in this document. iCognito reserves the right to make changes without prior notice. No part of this publication may be copied without the express written permission of iCognito, 7 Imber St., Petach Tikva 49130, Israel. Trademark The iCognito logo is a trademark of iCognito Technologies Ltd. All rights reserved. Other company and brand products, as well as service names, are trademarks or registered trademarks of their respective holders. Technical Support If you require technical support services, contact us at [email protected]. About This Manual This manual provides instructions for installing and demonstrating the capabilities of PureSight via the PureSight BCC GUI Demo. It contains the following chapters: Chapter 1, Installation, provides step-by-step instructions for the PureSight BCC GUI Demo installation procedure and describes basic configuration features. Chapter 2, Step-by-Step guide, provides instructions for adding users and groups of users, setting up policies, configuring PureSight filters and generating reports. 1-4 PureSight BCC GUI Demo Manual Table of Contents Chapter 1.....................................................................................1-1 Installation .............................................................................................................. 1-1 System Requirements.......................................................................................... 1-1 Before You Begin ................................................................................................. 1-1 Installing PureSight BCC GUI Demo ................................................................... 1-2 Running PureSight BCC GUI Demo .................................................................... 1-4 Chapter 2.....................................................................................2-6 Step-by-Step Configuration .................................................................................. 2-6 Users and Groups ................................................................................................ 2-6 Policies................................................................................................................. 2-5 Filters ................................................................................................................. 2-16 Reports............................................................................................................... 2-16 Settings .............................................................................................................. 2-19 Chapter 1 Installation This chapter describes the PureSight BCC GUI Demo installation procedure and how to check if the installation was successful. It also details the system requirements and introduces the basic configuration policies. System Requirements The following minimum system requirements must be met in order to run PureSight BCC GUI Demo: The equivalent of Pentium ||| processor or higher 64 MB RAM (minimum) 15 MB of free disk space Microsoft Windows NT 4.0 or Microsoft Windows 2000, or Microsoft Windows XP Pro Microsoft Internet Explorer (IE) 5 or higher Before You Begin It is recommended that you remove any previous installations of PureSight client and PureSight server products before installing new versions of PureSight. Refer to the appropriate installation guide for instructions on how to remove PureSight. 1-2 PureSight BCC GUI Demo Manual Installing PureSight BCC GUI Demo The PureSight BCC GUI Demo is installed via a self-extracting installation file, PureSight_GUI_EN.exe. The installation process installs an Apache web server, which is used to activate the PureSight GUI, the PureSight GUI files, and optionally, an open LDAP server from which to retrieve users, in order to present the directory user functionality. The application files are placed by default in the directory C:\Program Files\iCognito LTD\PureSight BCC To install PureSight BCC GUI Demo: 1 Log in with administrator privileges. 2 Close all open applications and windows. 3 Double-click PureSight_GUI_EN.exe to run the PureSight installation program. The Welcome window of the PureSight BCC GUI Demo Setup wizard is displayed. 4 Click Next. The License Agreement window is displayed. Select I accept the terms of the license agreement to accept the licensing terms. 5 Click Next. The Customer Information window is displayed. Enter the required information. 6 Click Next. The Choose Destination Location window is displayed. If required, use the Browse button to change the default directory. 7 Click Next. The Select Options window is displayed. Make sure the required components to be installed are checked. 8 Click Next. The Administration Password window is displayed. Enter the required password in the Password field and reenter it in the Confirm field. This password is needed to access the PureSight BCC, in order to define PureSight's configuration options. 9 Click Next. The PureSight User Interface Port Number window is displayed, containing the default port number 7008. To change the default value, enter a new value greater than 1024. 1-4 PureSight BCC GUI Demo Manual 10 Click Next. The Select Program Folder window is displayed. Select the required folder. 11 Click Next. The Setup Complete window is displayed. Click Finish to complete the installation. PureSight should now appear in the Start→Programs submenu as PureSight BCC→PureSight BCC. Running PureSight BCC GUI Demo To run the PureSight BCC GUI Demo: 1 Select PureSight BCC->PureSight BCC from the Start Programs menu. 2 The default browser application will open displaying the PureSight BCC GUI login page. Setting the license key After successful installation it is required to enter the PureSight license key. In order to receive a license key, open the PureSight BCC and follow the onscreen instructions in the PureSight Administration screen. To set the license key: 1 Run the PureSight BCC GUI Demo. The BCC login screen is displayed, requiring a license key. The machine specific Network ID is provided, as well as a link to receive a trial license key. 2 Click on Click here to receive a license key. A new browser window is opened, directed to iCognito trial license request form. Enter a valid email address, to which the license key will be sent. 3 Click on Submit. Within a few minutes, the license key will be received in the given mail box. 4 In the BCC login screen enter the new license key. NOTE: Both the Network ID and the license key are case sensitive, therefore it is recommended to copy and paste them rather than writing them down. 2-6 PureSight BCC GUI Demo Manual Chapter 2 Step-by-Step Configuration Users and Groups PureSight enables you to define users or groups of users within your organization, and to then assign specific filtering policies to those users and groups. Users are identified by an IP address or subnet, or by directory username. The policies available are all policies defined in PureSight. All users that are not specifically defined in the Users pane are automatically filtered according to the defined default policy. Adding New Groups To create a new group, you first define the group name and assign a policy to that group. You can then assign as many users as you want to the group. To add a new group: 1 In the Users pane, click the New Group button. The New Group pane is displayed. 2-2 PureSight BCC GUI Demo Manual 2 Enter the new group name in the Group Name field. 3 Click the arrow in the Policy field and select a policy for the group from the dropdown list. 4 Click Save to add the group and return to the Users pane, or Click Save & New to add another new group. Each new group is automatically added to the All Users & Groups tree in the Users pane. Adding New Users A new user can be a single IP address, a Subnet (range of IP addresses) or a directory user, and can be assigned a policy directly or be assigned to a group. All users in a group inherit the policy defined for that group. NOTE: Each user can only be defined once. Make sure that subnets do not overlap other subnets or individual defined IP addresses. To add a new user(s): 1) In the Users pane, click the New User button. The New User pane is displayed. 2) Select a User Type in the dropdown box. 1. If you selected IP Address as the user type, enter the new user's IP address in the IP Address field. or 2-4 PureSight BCC GUI Demo Manual 2. If you selected Subnet in the User Type dropdown box then enter the relevant range start and end IP addresses in the From IP and To IP fields. or 3. If you selected Directory user in the User Type dropdown box, a list of domains / context is displayed according to the Directory Settings defined. Refer to Settings, for more information about directory server settings. NOTE: Directory Server settings must be set before adding a new directory user. Policies A policy defines when and what to filter. It consists of a group of one or more filters, with a defined operating schedule for the policy. The filters in a policy are active according to the policy schedule, and their active status can be defined as allow, block or warn. There are three main types of policies: Allow all except: Permits access to all sites apart from those defined in the filters included in the policy. For example, the policy may permit access to all sites except gambling sites. Block all except: Denies access to all sites apart from those defined in the filters included in the policy. For example, the policy may deny access to all sites except the Intranet. Monitor: Monitors activity on all filters according to the policy schedule, without blocking any access, for reporting purposes. If you want to include your own customized filters in a policy, or additional bandwidth filters beyond those currently defined in PureSight, you must first define these filters. Refer to Filters for more information. Once a policy has been created, it is automatically added to the lists of available policies for assigning to users and groups, and for use as the default policy. Defining a New Policy New policies are created using the New Policy Wizard. To access the New Policy Wizard, click the New Policy button in the Policies pane. The New Policy Wizard is displayed in a new browser page. The left side menu displays five steps that guide you logically through the process of creating a new policy and the color scheme used for the policy schedules. The workspace displays the step that is currently selected. 2-6 PureSight BCC GUI Demo Manual The New Policy Wizard steps are: Step 1: General: Enables you to define a name and type for the policy. Step 2: Policy Schedule: Enables you to define the schedule for the policy. Step 3: Included Filters: Enables you to define the filters you want to include in the policy. Step 4: Filters Schedule: Enables you to refine the schedule for each filter. Step 5: Confirm: Enables you to view and confirm the policy and filter schedules. Some of the steps are divided into substeps. Clicking Next at the bottom of each pane takes you on to the next step or substep. You can click Back at any stage of the process to return to previous steps. The currently open step or substep is highlighted in the side menu. Step 1: General The General pane, shown on the previous page, requires you to enter a name for the new policy. You can either select the type of policy you want to create or create a new policy based on an existing one. The policy type options are Allow all except (the default setting), Block all except and Monitor. To define general policy data: 1 Enter the name for the policy in the Policy name field. The name must be unique. 2 In the Policy type field, select the required option from the dropdown list. or 3 In the Based on Policy field, select the required policy from the dropdown list. 4 Click Next to proceed to the next step of the wizard. Step 2: Policy Schedule A policy schedule defines the working days and hours of the policy. The Policy Schedule pane, shown on the following page, enables you to define a separate schedule for each day of the week. When defining a new policy, the schedule for the policy is Off at all times. You must add a schedule in order for the policy to be activated. 2-8 PureSight BCC GUI Demo Manual For each day, you can define time periods during which the policy will be On, meaning that the filters are active, or Off, meaning that the filters are inactive. The filters included in a policy can be active only when the policy itself is On. Once a daily schedule is set for one of the days, it can be copied to rest of the days in the week. The Policy Schedule pane contains the following areas: Policy Weekly Schedule: Indicates the schedule defined for that policy for each day of the week. Policy Daily Schedule: Indicates the times when the policy is active or inactive for each individual day, and enables you to define active or inactive time periods for each day. Every modification to the time periods is automatically updated to the Policy Weekly Schedule. To define a policy schedule: 1 In the Policy Schedule pane, click the appropriate day tab in the Policy Daily Schedule area. The tab for the selected day is displayed. 2-10 PureSight BCC GUI Demo Manual 2 To select the times when you want the policy to be active or inactive, click the arrows in the To and From fields and select the times from the dropdown lists. 3 To define the status of the policy during the selected time period, click the arrow in the Status field and select On (policy active) or Off (policy inactive) from the dropdown list. 4 Click Add to add the time period to the schedule for that day. The selected times and status are displayed in the table below the fields, and are indicated by colored blocks in the weekly and daily schedule grids. The color of the blocks represents the different activation modes (On and Off). 5 Repeat steps 2 through 4 for each time period you want to add to the schedule for that day. 6 To remove a defined time period, select the checkbox next to the time period in the table and click Delete checked segments. The time period is deleted from the table and the schedule grids. 7 Repeat the entire procedure described above for each day, or use the “Copy this schedule to all days button”. 8 Click Next to proceed to the next step of the wizard. Step 3: Included Filters The Included Filters step of the New Policy Wizard enables you to define the filters to be included in the policy. The included filters automatically inherit the policy schedule: in an Allow all except policy, the filters are set to block, and in a Block all except policy, the filters are set to allow. Only filters that are relevant to the type of policy are displayed and available for selection. The Included Filters step is divided into three substeps: Engine Filters, Bandwidth Filters and Custom Filters. The following example displays the Included Filters: Engine pane. For more information about the filters, refer to Chapter 4, Defining Filters. NOTE: The Included Filters step is not available for the Monitor policy type. To define which filters to include: 1 In the Included Filters: Engine pane, select the engine filters you want to include in the policy and click Next. 2 The Included Filters: Bandwidth pane is displayed. Select the Include Bandwidth Filter in this policy checkbox if you want to include the bandwidth filter in the policy. 3 Select the file extensions and protocols that you want to include in the policy and click Next. 4 The Included Filters: Custom pane is displayed. Select the custom filters you want to include in the policy. 5 Click Next to proceed to the next step of the wizard. 2-12 PureSight BCC GUI Demo Manual Step 4: Filters Schedule The Filters Schedule step enables you to define individual schedules for each filter included in the policy, and to configure the PureSight Warn option. By default, each filter inherits the policy schedule, as defined in Step 2: Policy Schedule. If required, changes can be made in the filter schedule to override the policy schedule settings; however, a filter can only be active at times that the policy is active. For example, a policy that is active from 09:00 to 17:00 can be edited so that a particular filter only blocks from 09:00 to 13:00. In addition, you can edit a filter schedule so that a warning is returned about a requested site, rather than blocking it. The filters defined in the Included Filters step are automatically added as substeps in the Filters Schedule step. The example below shows the Filter Schedule pane for the Gambling engine filter: The Filters Schedule pane contains the following areas: Policy Weekly Schedule: Indicates the schedule defined for the policy for each day of the week. Filter Weekly Schedule: Indicates the schedule defined for that filter for each day of the week. Filter Daily Schedule: Indicates the times when the filter is blocking, allowing or warning on each individual day, and enables you to edit the filter schedule for each day. Each modification is automatically updated to the Filter Weekly Schedule. NOTE: Time periods defined in the filters schedule must be within the periods that the policy is active. 2-14 PureSight BCC GUI Demo Manual The following procedure should be repeated as necessary for each Filters Schedule substep. To edit the filters schedule: 1 In the Filters Schedule pane, click the appropriate day tab in the Filter Daily Schedule area. The tab for the selected day is displayed. 2 Click the arrows in the To and From fields and select the required times from the dropdown lists. 3 To define the status of the filter during the selected time period, click the arrow in the Status field and select Allow, Block or Warn from the dropdown list. 4 Click Add to add the change to the schedule for that day. The selected times and status are displayed in the table below the fields and are indicated by colored blocks in the filter weekly and daily schedule grids. 5 Repeat steps 2 through 4 for each change to the filter schedule for that day. 6 To remove a defined time period, select the checkbox next to the time period in the table and click Delete checked segments. The time period is deleted from the table and the schedule grids. 7 Repeat the entire procedure described above for each day, or use the Copy this schedule to all days button. 8 Click Next to proceed to the next step of the wizard. Step 5: Confirm The Confirm pane, shown below, gives an overall summary view of the new policy that you created using the New Policy Wizard. The Confirm pane displays the following information: Policy Weekly Schedule: This grid summarizes the weekly schedule created for the new policy. Filter Weekly Schedule: A grid is displayed for each filter included in the policy. This grid summarizes the weekly schedule for the filter. If you want to make additional changes to the weekly schedules, click Back until you reach the relevant pane and make the required changes. 2-16 PureSight BCC GUI Demo Manual To confirm the new policy: 1 Click Next to confirm the new policy. The Confirm pane displays a message confirming that the new policy was successfully created. 2 Close the New Policy Wizard. The new policy now appears in the Policies tree in the main Policies pane. Assigning users to the policies is done from the Users pane. Refer to Users and Groups for more details. Filters PureSight filters define the type of information that can be blocked, allowed or warned against in the different filtering policies. PureSight contains three different types of filters: Engine Filters: Internet categories that the PureSight engine can identify, and handle accordingly. Bandwidth Filters: Bandwidth consuming files that can be prevented. Custom Filters: User-defined lists of sites to be blocked, allowed or warned against. These lists are independent of PureSight's categorization process. The main Filters pane containing the Engine, Bandwidth and Custom Filters tabs is accessed from the menu in the BCC side bar by clicking Filters. Reports PureSight monitors general Internet usage in your organization, as well as activity of the filters. This information is automatically saved in a defined log file, and can be used to generate up-todate reports at any time. PureSight provides a number of different types of reports. The definable parameters for each report enable you to generate and view data according to your specific requirements. For example, you can generate reports for a specific user or for a defined time period. Generating a Report For each report, you can specify parameters to focus the report on your particular area of interest. You can also define the format of the generated report data. There are default settings for all report parameters. The following procedure describes the configuration process for one report example. Other possible report parameters that are not included in the example are listed at the end of the procedure on page Error! Bookmark not defined. To generate a report: 1 Click the required report in the main Reports pane. The parameters for the selected report are displayed in the workspace. The example below displays parameters for Top sites requested by a given user, for a directory user. 2-18 PureSight BCC GUI Demo Manual 2 From the drop down list, select All Users to include all users in the report, or Select IP Address and enter the relevant IP address to focus the report, or Select Directory User and enter the relevant directory username to generate a report on a specific user. 3 In the From and To fields, define the time range of the report by selecting the required time (in hours and minutes), day, month and year from the dropdown lists. In order to present all data available in the PureSight logs, select the All Dates button. 4 In the Number of Top Sites to Show field, select a value from the dropdown list to limit the number of sites included in the report. 5 In the Sort results by field, select from the dropdown list the parameter on which the report is to be based. The options available depend on the report. 6 In the Sort Order field, select Ascending or Descending from the dropdown list to specify the order in which data is displayed in the report. 7 Select the Draw graph checkbox to include a graphical display of the report data, and select a graph type (Bar or Pie) from the dropdown list. 8 Click the Run Query button to generate the report. In the example below, the Top Sites Requested by User report is displayed as a bar graph and table. Settings Blocking and Warning Messages When a user requests a site that is either blocked or warned against, an appropriate message is returned to the user's workstation. This may be a redirection to a URL or a text message displayed in the browser. PureSight can be configured to use an internal URL for your organization, or to use your own text for the message. Default URL and message options are supplied with PureSight. Directory Server Settings The Directory Server tab enables you to define Directory Server settings. Configuring directory server settings enables PureSight to retrieve Directory users and apply policies and generate reports based on these Directory user names. PureSight support the following Directory Servers: LDAP Directory Servers: iPlanet, Novell, and other custom LDAP servers. Windows Active Directory Windows Domain To set Directory Server settings 1 In the Settings pane, click the Directory Server tab. The Directory Server tab is displayed. 2 Select the appropriate directory server in the dropdown list box. According to the type of the Directory Server selected, the appropriate settings for each selection are displayed. 2-20 PureSight BCC GUI Demo Manual 3 Enter the values for the Server Address, Server Port to connect to, Server Base DN, Administrator DN and Administrator Password, if required. 4 To save, click Save Changes. 5 If required, click Advanced Settings, to customize attributes and filters, and enter the fields, as shown below in the Advanced Directory Server Settings pane for the iPlanet Directory Server. 6 When finished, click Save changes. NOTE: The BCC GUI Demo, if installed with open LDAP, then by default the directory server that is defined is the open LDAP server. Advanced Settings The log is used to log user requests and system performance, in order to generate comprehensive reports. Refer to Chapter 7 of the User Manual, Reports, for more information on generating reports. The URL Cache is used to save classifications of recently classified requests. PureSight BCC enables you to configure the size and storage location for both the cache and the log. You may want to limit file size due to disk space considerations; however, it is advisable to define the largest cache size your system can support to facilitate better performance. In addition, you can configure the expiration of classifications in the URL Cache. After the specified time passes, a request for the same page will be reclassified to support content changes in the requested page. System Settings The System tab enables you to set a new PureSight Administrator password and to enter a new PureSight license key. The PureSight Administrator password is used to access the BCC. The PureSight license key defines the license type of the PureSight software - trial license limited for a trial period or permanent license. To change a license type, it is necessary to change the license key.