1
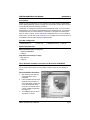
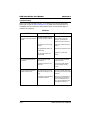
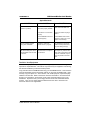
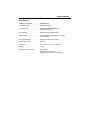
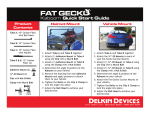
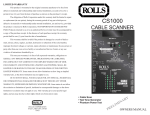
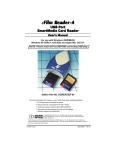
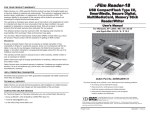
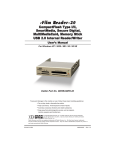
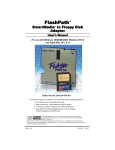
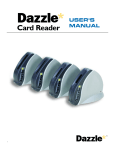
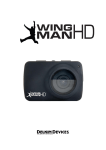
eFilm
Film Reader-14
USB P
or
Por
ortt
Smar
tMedia R
eader
SmartMedia
Reader
User’
s Man
ual
User’s
Manual
For use with Windows 2000/ME/98/98 SE
and Apple Mac OS 8.5.1+
Delkin Part No. DDREADER-14
To prevent damage to the module or user, follow these basic handling guidelines
• Do not drop, bend or dismantle the module.
• Keep cool and dry. Avoid exposure to heat or liquids.
• Avoid dust, excessive vibrations and volatile substances.
• Keep away from electromagnetic sources, such as magnets,
monitors, speakers and transformers.
© Copyright Delkin Devices, Inc., All rights reserved. No part of this publication
may be reproduced in any form, or by any means without prior written permission
of Delkin Devices, Inc.
Delkin Devices, and eFilm are registered trademarks of Delkin Devices, Inc. All other brand names, trademarks
and part numbers are the property of their respective owners. They are used for identification purposes only, andin no
way imply ownership by Delkin Devices.
Printed in USA
MNCA0020 • Rev 1.0
Table of Contents
Introduction
○
○
○
○
○
○
Included Components
○
○
○
○
○
○
○
○
○
○
○
○
○
○
○
○
○
○
○
○
○
○
○
○
○
○
○
○
○
○
○
○
○
○
1
○
○
○
○
○
○
○
○
○
○
○
○
○
○
○
○
○
○
○
○
○
○
1
○
○
○
○
○
○
○
1
○
○
○
Driver Software Installation for Windows 2000/ME/98/98 SE
Driver Software Installation for Apple Macintosh
Hardware Installation
○
○
○
○
○
Inserting a SmartMedia Card
Basic Operation
○
○
○
○
○
○
○
○
○
○
○
○
○
○
○
○
Macintosh Troublshooting
○
○
○
○
○
○
○
○
○
○
○
○
○
○
○
○
○
○
○
2
○
○
○
○
○
○
○
○
2
○
○
○
2
○
○
○
○
○
○
○
○
○
○
○
○
○
○
○
○
○
○
○
○
○
○
○
○
○
○
○
○
○
○
○
○
○
○
○
○
○
○
○
○
○
○
○
○
○
○
○
○
○
○
3
○
○
○
○
○
○
○
○
○
○
○
○
○
○
○
○
○
○
○
○
○
○
3
○
○
○
○
○
○
○
○
○
○
○
○
○
4
○
○
○
○
○
○
○
○
○
○
○
○
4
○
○
○
○
○
○
○
○
○
○
○
○
○
○
○
○
○
○
○
○
○
○
○
○
○
○
○
○
○
Network - Windows Drive Letter Assignment
Windows Troublshooting
○
○
○
○
Formatting a SmartMedia Card
○
○
○
○
Removing a SmartMedia Card
Operational Notes
○
○
○
○
○
○
○
○
○
○
○
○
○
○
○
○
○
○
○
○
○
○
○
○
○
○
○
○
○
○
○
○
○
○
○
○
○
○
○
○
○
○
○
○
○
○
○
○
○
5
○
○
○
○
○
○
○
○
○
○
○
○
○
○
○
○
○
○
6
○
○
○
○
○
○
○
○
○
○
○
○
○
○
○
○
○
○
7
The eFilm Reader-14 will accept
SmartMedia Cards up to 128MB.
It’s ‘hot swappable’ - You can insert
and remove SmartMedia Cards
without the need to shut down the
computer.
Connect to
USB socket
of computer
Note the shape of the
connectors. Be sure to
properly align these shapes
when attaching caples.
NEVER force a connection,
as this may damage either of
the connecting devices.
SmartMedia Card
socket
USB SmartMedia Card Reader
DDREADER-14
Introduction
Thank you and congratulations on your purchase of the eFilm Reader-14 SmartMedia
Card to USB reader/writer. Before you begin use of this product, please take some time
to read all instructions and warranty information.
The Reader-14 is designed to read and write to SmartMedia Cards. It is a convenient
bridge between your computer and SmartMedia Card compliant devices. The media is
accessed the same as a removable drive; in Windows, it will appear as a Removable
Disk icon in My Computer, and on a Macintosh it will appear as an icon on the desktop.
Please look to our web site at http://www.delkin.com for FAQs and current information on
compatibility issues as well as the latest software drivers.
Included Components
❏ eFilm Reader-14
❏ Driver CD
❏ Registration Card
❏ Manual
System Requirements
IBM compatible desktop or laptop PC
• Windows 2000/ME/98
• USB port
Apple Macintosh desktop or laptop
• MAC OS 8.5+
• USB port
Driver Software Installation Procedure for Windows® 2000/ME/98
Before connecting the eFilm Reader-14, you must install the device drivers located on
the accompanying CD-ROM. To avoid possible conflicts, install only the Reader-14
drivers.
Driver Installation Procedure
1.
Start Windows and close any
other applications during
installation.
2.
Insert the Delkin Devices driver
CD-ROM. If the CD does not
start automatically, double click
on the CD-ROM drive in My
Computer. The CD will open in
a driver installation application.
(See Figure 1)
3.
Click Reader-14 from the list
of products on the left.
Figure 1: Windows Installation Program
Delkin Devices User’s Manual
Page 1
USB SmartMedia Card Reader
DDREADER-14
4.
Verify that your product matches the one pictured on the screen.
5.
Click the button labeled Click Here to Begin Installation and follow the on-screen
instructions. For best results, allow the drivers to be installed into the default
locations.
6. When the Setup Complete screen appears, click the Finish button.
7. Connect the Reader-14 to the USB port or hub.
8. You may now insert a SmartMedia Card and access it like other drives by clicking
the Removable Disk drive icon in My Computer or Explorer.
Driver Software Installation Procedure for Apple Macintosh
Before connecting the eFilm Reader-14, you must install the device drivers located on
the accompanying CD-ROM. To avoid compatibility issues, install only the Reader-14
driver. Slot or front loading CD-ROMs may not function correctly with a 3” CD disk. For
these systems it is recommended that you download the driver from www.delkin.com
Prior to any software installation always
ensure you have backed up your hard drive
and prepared a recovery disk.
1.
Insert the Driver CD-ROM, then doubleclick on the CD icon when it appears.
2.
Select Reader-14 from the product list.
(See Figure 2)
3.
Click the button labeled Install and
follow the on screen instruction. Select
Restart Computer after installation is
complete.
Hardware Installation
After you have installed the drivers, insert the USB plug of the Reader-14 into the USB
port of your computer or hub. See inside front cover for illustration.
When using a hub, an external power source may be required when connecting multiple
devices, such as printers, scanners, and CD writers.
Inserting a SmartMediaCard
Position the card with the arrow-side up
and toward the reader and the gold contact
side down. Insert it gently but firmly into
the slot. Be careful to insert the card in
the proper direction. Inserting a card upside down or forcing it may result in
damage to the card and/or reader.
(See Figure 3)
Page 2
Delkin Devices User’s Manual
DDREADER-14
USB SmartMedia Card Reader
Basic Operation
Windows
The Reader-14 will appear as a Removable Disk icon in My Computer or Explorer, and
the SmartMedia Card can be accessed the same as a removable hard disk.
To copy files from your card to your hard disk or vice versa, perform the following steps:
1. Double-click on My Computer or open Explorer.
2. Double-click on the Removable Disk icon.
3. Simply “drag and drop” folders or individual files to a desired location.
Macintosh
The SmartMedia Card will appear as a Untitled disk icon on the desktop. It can be
accessed the same as a removable hard disk.
To copy files from your card to your hard disk or vice versa, perform the following steps:
1. Double-click on the icon that appears on the desktop.
2. While holding the Option key down, simply “drag and drop” folders or individual files
to a desired location.
Windows and Macintosh users please note the following:
•
In order to access file formats such as JPEG, TIFF or MP3, you will need a software
program that can open these files. Most digital devices that use specific or proprietary formats will include software to access the files. Refer to your device manual
for more information.
•
When transferring files to a common location on your computer, it is recommended
that you re-name the files to avoid overwriting previous files. Most cameras simply
number the picture files and begin at 001 when a blank card is inserted. This can
result in two or more files on your computer having the same name, prompting you
to overwrite.
•
Windows: you can choose to move files to your hard drive, thus clearing the card for
reuse. Or, you can copy the files (drag and drop, cut and paste) to the hard drive
and then delete the files on the card to clear it for reuse. Avoid formatting to clear
files.
Mac: holding down the Option key while dragging and dropping files will copy the
files to your hard drive. If the Option key is not used, only the file icon will be
moved, leaving the picture file on the card (the icon will disappear when the card is
removed). Always use the Option key when copying files.
•
Removing a SmartMedia Card
First, close any files residing on the card that are open. This will prevent errors from a
program trying to access data on a card no longer in the Reader. On a Macintosh, drag
the card icon to Trash before removing the card.
•
DO NOT remove the SmartMedia Card while files are being accessed or transferred. This could result in loss of data and/or damage to the card.
To remove a SmartMedia Card, simply pull it from the Reader.
Delkin Devices User’s Manual
Page 3
USB SmartMedia Card Reader
DDREADER-14
Formatting a SmartMedia Card
Although most cards are factory formatted, some cameras and digital devices may
require the card to be formatted before initial use. Some devices, such as MP3 players,
use a proprietary format that will make the card unrecognizable to the computer or
camera. Refer to the device manual for more information.
Macintosh users: It is strongly recommended that you DO NOT format or initialize cards
with the computer, as the Mac file system is not recognized by most devices and could
make the card unreadable by your device. If prompted to initialize, select cancel.
•
Formatting a SmartMedia Card will erase all pictures or files on the card.
•
Formatting should be performed in the camera or SmartMedia Card device to insure
compatibility.
•
Formatting should not be used to clear unwanted files from the card.
If you do wish to format a card with a computer, perform the following steps:.
1.
2.
In My Computer, right-click on the appropriate Removable Disk.
Select Format and follow on-screen instructions.
Note: a corrupt or malfunctioning SmartMedia Card can be reformatted using the
SMPREP program located in the Start/Programs/Reader-14 menu.
Operational Notes
Your new Reader is part of a system of components that must function correctly and
compatibly in order to complete the simple process of moving files from your device to
your computer. The components involved are the Reader, SmartMedia Device, Camera,
Storage Card, Computer (and its numerous components), USB Interface, Software
Drivers, and Operating System. The Reader-14 is compatible with all SmartMedia
Cards that comply with specifications set forth by the SSFDC Forum.
•
A corrupt file on your SmartMedia Card can cause a device failure or system crash
when transferring files to your computer. Recovery programs such as Scandisk can
be used to detect and repair most disk errors. It may also be necessary to re-format
the card, which will erase all files stored on the card. Some of the causes of file
corruption are:
> Unsteady power supply while transferring files, such as a low camera battery or
improperly connected reader.
> Card removed from reader or camera, or any other type of interruption while
transfering or accessing files.
> Improperly formatted card.
•
A SmartMedia Card that cannot be accessed by the Reader-14 can be placed back
in the camera, where the cameras picture viewing option can be used to determine
if the card is functioning normally. If the card no longer functions in the camera, this
may indicate a file corruption or other problem with the card.
•
Minor malfunctions while using the Reader-14, such as system hangs, can usually
be resolved by simply re-booting the computer. Serious or recurring malfunctions
may require a re-installation of the Reader-14 drivers.
Page 4
Delkin Devices User’s Manual
DDREADER-14
USB SmartMedia Card Reader
Uninstalling Drivers
Windows: Run the driver uninstall feature located in Start/Programs/Reader-14/
Uninstall. Or, use the Add/Remove Programs feature found in Control Panel.
Mac: Insert the driver CD and choose Uninstall from the Install dropdown button. Select
Reader-14 from the product list and click the Uninstall button.
Network Conflicts - Windows® 2000, ME, 98 Drive Letter Assignment
The following procedure may be necessary when installing the e-Film Reader-14 onto a
computer connected to a network. In some cases, the computer may assign the
Reader-14 a drive letter that has already been assigned to another drive, such as a
network drive. This usually occurs after re-booting the computer with the Reader-14
connected. To avoid this conflict, the Reader-14 can be assigned an available drive
letter after you connect it to the computer but before re-booting. For more information,
contact your network administrator. If your computer is not connected to a network, or
there is no conflict with drive letter assignment, this procedure is not required.
Windows ME and 98
1.
With the power ON, connect the Reader-14 to the computers USB port or hub. The
Reader-14 will show up as a removable disk icon in My Computer. Also, take note
of the drive letters assigned to any network drives.
2.
Right click the My Computer icon on the desktop.
3.
Select Properties from the menu.
4.
Click the Device Manager tab.
5.
Click the plus sign (+) next to Disk Drives.
6.
From drives list, double click eUSB SmartMedia to bring up a properties window.
7.
Click the Settings tab.
8.
In the section labeled Reserved drive letters; use the arrow to select and assign a
Start drive letter (the End drive letter will change as well). Select a letter that does
not conflict with any other drives. This is best accomplished by selecting a letter
that is farther down the alphabet than any of your network drives. You will need to
re-boot for the changes to take effect.
Windows 2000
The drive letter assigned to the Reader-14 can be manually assigned through Disk
Management, located under Administrative Tools. You must be logged on as System
Administrator and a SmartMedia card must be inserted in the reader before you can
make these changes.
Delkin Devices User’s Manual
Page 5
USB SmartMedia Card Reader
DDREADER-14
Troubleshooting
This is a very basic troubleshooting list. If your problem isn’t solved by those listed,
please visit our web site http://www.delkin.com for FAQs and current information on
compatibility issues as well as the latest software drivers. Or see the back page for
contacting Tech Support.
Windows
SYMPTOM
CAUSE
SOLUTION
The Removable Disk icon does The driver software may not
not appear in the My Computer have been properly installed .
window.
The reader doesn’t appear to
be powered.
I’ve just received the dreaded
Windows “Blue Screen”.
Page 6
Reinstall from CD or update
driver software in Device
Manager - specifying the
Reader-14 folder on drive C:\
The reader is not connected
properly.
Unplug the reader and plug it
back in.
The SmartMedia Card is not
inserted fully.
Remove and reinsert the card.
This OS version does not
support USB.
Upgrade to a newer OS
version.
Loose or improper cable
connections.
Check all cable connections
and power cords.
Insufficient power from the
computer.
Connect the reader directly
into the computer’s USB
socket.
The card has been removed
while a file is still open on the
card.
Recover if possible. But more
than likely you’ll need to restart
Windows.
The card was removed during
a read/write operation.
Wait 5 to 10 seconds after any
activity before removing the
card. To avoid problems, you
can copy the data to the hard
drive before accessing it.
Delkin Devices User’s Manual
USB SmartMedia Card Reader
DDREADER-14
Apple Macintosh
CAUSE
SYMPTOM
SOLUTION
The driver software may not
have been properly installed .
Reinstall from CD or download
driver from www.delkin.com
The reader is not connected
properly.
Unplug the reader and plug it
back in.
The SmartiMedia Card is not
inserted properly.
A SmartMedia Card must be
inserted in order for an icon to
appear on the desktop.
An error message appears
during driver installation.
Possibly a conflict with
another driver or program.
Try installing the drivers with
extensions off (hold the shift
key down during boot-up).
After downloading files, the file
icons dissapear when the card
is removed.
The files where not copied to
the hard drive.
The Option key must be held
down while copying files to the
computer. Otherwise, only the
icons are placed on the hard
drive.
The Untitled disk icon does not
appearon my destop.
Test Drive Your Equipment
We advise that you put all of your equipment through a dry run before transferring
important or irreplacable files. This will not only insure that your equipment is functioning,
but will also familliarize you with the transfer process.
Copy a few files to the SmartMedia Card using your SmartMedia Device. Then insert the
card into the Reader and use the transfer method you are most comfortalble with – drag
and drop, copy and paste, etc. Some devices, such as MP3 players, require third party
software to access files. Refer to the device manual for information. Once the files are
stored on your hard drive, access them one at a time and check that they are to your
satisfaction. Experiment until you are happy with the results and comfortable with the
process. Then you can simply delete the test files from the card or reformat in the
camera to return it to its original state.
Delkin Devices User’s Manual
Page 7
Specifications
Specifications
DD MFG Part Number:
○
○
○
○
○
○
DDREADER-14
Compatible Cards:
○
○
○
○
○
○
SmartMedia cards
○
○
Compatible OS:
○
○
○
○
○
○
○
○
○
○
Host Interface:
○
○
○
○
○
○
○
○
○
○
Transfer Rate:
○
○
○
○
○
○
○
○
○
○
Power Consumption:
EMI/RFI Rad Limits:
Dimensions:
Weight:
○
○
○
○
○
○
○
○
○
○
○
○
○
○
○
○
○
○
○
○
○
○
○
○
Operational Environment:
○
○
○
○
○
USB (Universal Serial Bus) port
Up to 900 KB/s sustained Read, 470 KB/s
sustained Write
○
90mA typical (30mA w/o media)
○
○
Class B
○
○
○
67mm (W) x 73mm (L) x 26mm (H)
○
○
○
○
○
○
○
Windows 2000/ME/98/98 SE and
Apple Mac OS 8.5.1+
○
○
○
~113g
Temp: 0-60°C
Shock: 2000 Gs maximum
Humidity: 5% to 96% (non-condensing)
FIVE YEAR PRODUCT WARRANTY
Delkin Devices, Inc. (DDI) warrants that this product has been thoroughly tested and is
free from defects in material and workmanship. This warranty is expressly limited to
product repair, modification, or replacement, at the sole discretion of DDI. The maximum
liability for any aspect of this warranty will be limited to an amount not exceeding the
original product purchase price.
This warranty is contingent upon proper use of the product in the application for which it
is intended and does not cover any product that has been modified, mis-used, neglected
or subjected to unusual physical stress. DDI will not repair or replace products that fail
solely because their estimated ‘life’ has expired.
The defective product must be returned to DDI. All shipping costs/ shall be the responsibility of the purchaser. State and local laws may apply.
You will need a Return Merchandise Authorization (RMA) number before you return the
product. Please contact DDI for assistance in getting an RMA number.
Disclaimer
Except as provided herein, there are no express or implied warranties of mer-chantability
or fitness for a particular purpose. Under no circumstances will DDI be liable in any way
for any damages, including but not limited to lost revenue, lost wages, or any other
incidental or consequential damages arising from the use of or inability to use this
product.
The warranty set forth above is exclusive and no other warranty, whether written or oral,
is expressed or implied.
Delkin reserves the right to change specifications of hardware, software and instructions
without notice.
Delkin Devices does not extend warranty to batteries. If batteries are supplied with the
product, it is as a convenience only, and as such, are covered by the battery
manufacturer’s warranty.
100% COMPATIBLE GUARANTEE
All Delkin Devices products are 100% guaranteed compatible with OEM machines for
which they are designed.
TECHNICAL SUPPORT
Delkin Devices can provide technical assistance with installation of a Delkin Devices
product. Any phone/e-mail charges are the responsibility of the purchaser.
CONTACTING DELKIN DEVICES
For Technical Support or Warranty information you can contact Delkin Devices by:
• phone at 858-391-1234 (9:00AM to 5:00PM PST Mon-Fri)
• e-mail at [email protected].
• on the web at http://www.delkin.com