1
CLC2006 Support Package
Preparing the work
and using
InterPrepare 2.0
User Manual
for the national central team
Copyright MLOG Instruments Ltd. – Hungary
www.mlog.hu/CLC2006/, fax: 36–1 416 56 50
––––––––––––––––––––––––––––––––––
Program development and text: Gábor Taracsák
English translation: Barbara Kosztra
January 2007
CLC2006 Support Package
Preparing the work and using InterPrepare
Content
Content...................................................................................................................................................................................... 2
1. CLC2006 Support Package.................................................................................................................................................. 3
1.1. CLC2006 Support Package ............................................................................................................................................ 3
1.2. New features in version 2.0 ............................................................................................................................................ 4
1.3. Installation....................................................................................................................................................................... 5
2. Data preparation................................................................................................................................................................... 6
2.1. General advice................................................................................................................................................................ 6
2.2. Preparing raster data ...................................................................................................................................................... 6
2.3. Preparing vector data...................................................................................................................................................... 7
2.4. Preparation for interpretation .......................................................................................................................................... 8
2.5. Preparation for thematic control...................................................................................................................................... 9
3. InterPrepare program......................................................................................................................................................... 11
3.1. Using InterPrepare........................................................................................................................................................ 11
3.2. Creating working directories ......................................................................................................................................... 12
3.3. Modifying CORINE code table ...................................................................................................................................... 14
3.4. Converting LUCAS data................................................................................................................................................ 15
4. Special information ............................................................................................................................................................ 16
4.1. CLC2000 source database ........................................................................................................................................... 16
4.2. LUCAS database .......................................................................................................................................................... 16
5. License ................................................................................................................................................................................ 17
5.1. End user license agreement ......................................................................................................................................... 17
Index ........................................................................................................................................................................................ 18
2
CLC2006 Support Package
Preparing the work and using InterPrepare
1. CLC2006 Support Package
1.1. CLC2006 Support Package
Background
CLC2006 Support Package is a significantly modified and improved version of CLC2000 Support
Package. The CLC2000 software has been developed for Remote Sensing Centre of Hungarian
Institute of Geodesy, Cartography and Remote Sensing (FÖMI), and aimed to help the implementation
of the European CLC2000 project managed jointly by the European Environment Agency (EEA) and
Joint Research Centre (JRC). The CLC2000 software was also used by many national teams, 15 out
of 30 participating countries used it for interpreting changes in CLC2000 project. CLC2006 Support
Package is distributed by MLOG Instruments Ltd., Budapest, Hungary (www.mlog.hu/CLC2006/,
fax: 36–1 416 56 50).
Main features
CLC2006 Support Package operates under ArcView environment. ArcView software is designed
primarily for viewing GIS databases with tools for creating maps, menus for handling databases and
graphical editing tools. At the same time, ArcView includes only limited and less effective tools for
creating and filling new polygon databases or modifying existing polygon databases. As a solution,
CLC2006 Support Package under ArcView provides a cheap tool for quick and comfortable editing
and handling of CORINE Land Cover databases. CLC2006 Support Package is a macro package
written in Avenue, ArcView’s own macro language. The software is a supplement to ArcView 3.2/3.3
GIS. Working with CLC2006 Support Package requires a basic knowledge of using ArcView GIS. The
use of the CLC2006 Support Package significantly facilitates updating, change detection, quality
control and correction of land cover databases by means of computer-assisted visual
photointerpretation.
Minimum system requirements
• IBM PC compatible computer,
• 2 GHz processor,
• 512 MB RAM,
• 17" monitor, at least 1024x768 pixel resolution,
• Windows 95/98 or Windows NT/2000/XP operation system,
• ArcView GIS 3.2/3.3 software.
CLC2006 Support Package consists of three interrelated programs, all which can be used
independently.
InterPrepare for the national central team
InterPrepare can be used for the preparation of source files and work directories for change
detection to be carried out with InterChange. When interpreting changes with InterChange program, a
pre-described directory structure has to be built for the interpreters. The directory structure should
contain all files needed for change detection. The source data must have a pre-set record structure.
All the above tasks can be simply solved with InterPrepare. CLC code table editor allows substitution
of standard English CLC nomenclature category names and descriptions with national language
nomenclature in InterChange program. Nomenclature can be edited and can also be extended with
fourth and fifth level categories if required.
InterChange for interpreters of land cover changes
InterChange program provides a tool for the revision of CLC2000 land cover database and
supports the interpretation of land cover changes in order to create the CLC2006 database. The
program provides a convenient and easy-to-use interface for editing and creating polygons in
CLC2000 and CLC-Change databases, for viewing and modification of polygons’ data and for finding
and correction of errors generated during interpretation and editing. InterChange program was
designed specially for revision of existing land cover databases and interpretation of land cover
changes. It is unsuitable for primary interpretation of satellite images and for building up an
independent land cover database. For these purposes was developed a separate program called
InterView, which has been used in the production of national CLC2000 databases in Croatia, Hungary
and Serbia-Montenegro.
3
CLC2006 Support Package
Preparing the work and using InterPrepare
InterCheck for checking final databases
InterCheck program serves the checking of revised CLC2000 and CLC-Change map sheets
(working units). InterCheck program has been prepared primarily for supporting the CLC2006
Technical Team, although national central teams might apply it as a tool for final checking of the
completed CLC2006 and CLC-Change databases. InterCheck can be used for checking CLC2006 and
CLC-Change databases in any file format that can be added to ArcView program as a theme (ArcView
shapefile, ARC/INFO coverage, AutoCAD drawing etc.), i.e. not only those that has been prepared
with InterChange.
1.2. New features in version 2.0
InterPrepare
• Converts LUCAS point databases (if available) for use with CLC2006 Support Package.
InterChange
• Interpreter can modify also CLC2000 code of change polygons;
• can add technical change attribute to change polygons;
• can search for polygons also according to area, change probability or technical change.
• New principle and advanced features are available for importing, searching and fulfilling supervisor's
remarks.
• LUCAS land cover and land use data and field photos can be viewed with a single click (if data
available on computer).
• Advanced code, polygon area and code change probability statistics available.
• Thicker polygon outlines as well as larger code labels can be switched on befor creating screen
shots for documents and reports.
InterControl (obsolete)
• This part of CLC2000 Support Package has proved to be unnecessary in the actual practice, thus
CLC2006 Support Package does not include it. In this new version InterCheck program can be
used also for national level thematic control instead of InterControl.
InterCheck
• New principle and advanced features are available for creating, editing and searching supervisor's
remarks: short remarks can be added in both databases not only to polygons but to any point within
the working unit.
• Quality supervisor can search for polygons according to area, change probability or technical
change.
• LUCAS land cover and land use data and field photos can be viewed with a single click (if data
available on computer).
• Advanced code, polygon area and code change probability statistics available.
• Thicker polygon outlines as well as larger code labels can be switched on before creating screen
shots for documents and reports.
Copyright MLOG Instruments Ltd. – Hungary
www.mlog.hu/CLC2006/, fax: 36–1 416 56 50
––––––––––––––––––––––––––––––––––
Program development and text: Gábor Taracsák
English translation: Barbara Kosztra
January 2007
4
CLC2006 Support Package
Preparing the work and using InterPrepare
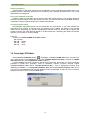
1.3. Installation
• Download the purchased CLC2006 Support Package CD-image file from CLC2006 homepage.
• Burn install CD from this CD-image.
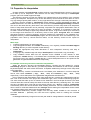
You should find five subdirectories and two additional files on the CD:
Change
(directory)
Check
(directory)
Doc
(directory)
LUCAS
(directory)
Prepare
(directory)
Program
(directory)
_inst.___
install.exe
readme.txt
• Open the pdf format documentation (manuals) in Doc directory and print – if possible using a colour
printer –, then study them carefully.
• Install ESRI ArcView software (if not installed yet) on your computer.
• If you have previously installed any programs of CLC2000 Support Package, please delete Doc and
Program directories of this version before installing CLC2006 Support Package.
• Create a new directory at any location on your computer for the preparation of source files and work
directories for CLC change detection. The directory name is optional, but it must not exceed 8
characters. Suggested names are e.g.: clc, clc2006 or corine. Be careful that you use short
directory and file names (8+3 usable characters: A-Z, 0-9 and $ _ ~ ^ ! # % & { } ( )
' @ only) on all directory levels of paths referred to in InterPrepare and other CLC2006 Support
Package programs. It is important to note that ArcView 3.2 does not support in all cases the long
Windows file names, so give short names (8+3 characters) to the images and directories on all
directory levels of their paths.
• Start install.exe program, which is found in root directory of source CD. The program allows
you to select the source and destination directory. The program automatically specifies the source
directory, so normally you do not need to modify it. As destination directory select the directory
created on the basis of the previous paragraph. On clicking the Install button the program copies the
needed directories and files to the specified destination directory and deletes their read-only
attribute. (The read-only attribute of files on a CD is always set and it does not change after
copying.) The CLC2006 Support Package programs do not need any further installation. However,
you have to prepare working units using InterPrepare before starting InterChange.
• According to the amount of purchased software licences, create the working directory structure for
each photointerpreter. Following the instructions found in the manual of InterPrepare, copy these
directories to the appropriate computer or to an install CD for each interpreter as proposed in part
Preparation for interpretation.
5
CLC2006 Support Package
Preparing the work and using InterPrepare
2. Data preparation
2.1. General advice
The following guidelines include recommendations for the National Team's GIS expert, who
prepares data for the photointerpreters. For detailed information read CLC2006 Technical Guide.
Data used for CLC2006 program
Obligatory data
• CLC vector database of the previous CLC inventory (CLC2000),
• Landsat TM satellite image used for the creation of CLC2000 database (IMAGE2000),
• SPOT-4 and / or IRS P6 satellite image for the new inventory (IMAGE2006),
• Topographic maps (hardcopy or digital)
Ancillary data
• Additional satellite images taken in different seasons for both years (2000 and 2006),
• Digital orthophotos,
• Other databases, maps.
During computer-assisted photointerpretation the work is easier if all spatial information is
integrated into a single GIS, have common geographical reference (co-ordinates) and similar
geometric precision. For CORINE Land Cover database the 100 meter minimum geometric precision
requires 25-meter precision of the source satellite images. For ancillary data 25--50 meter precision is
highly recommended.
Filenames and formats
As the date (year and month) of the image acquisition is important for the photointerpreter, it is
recommended to use a file name, that refers to the image acquisition date (eg. 75_oct90: working unit
75 and image taken in October 1990). Be careful that you use short directory and file names (8+3
usable characters: A-Z, 0-9 and $ _ ~ ^ ! # % & { } ( ) ' @ only) on all directory
levels of paths referred to in InterPrepare and other CLC2006 Support Package programs.
Theoretically any image formats supported by ArcView can be used. In the practice ERDAS LAN,
ERDAS IMG and GeoTiff formats have been tested.
2.2. Preparing raster data
Geometry
IMAGE2000 data (Landsat--7 ETM+ satellite images taken in 2000±1 year) and IMAGE2006 data
(SPOT-4 and IRS P6 satellite images taken in 2006±1 year) have been orthocorrected centrally.
Any other satellite images taken in other season than IMAGE2000 or IMAGE2006 could be useful
for the photointerpreters. Due to the significant overlap between neighbour paths of Landsat satellites,
IMAGE2000 data themself can yield multitemporal coverages for significant regions. It is
recommended to use as many as possible available satellite imagery. CLC2006 project aims to
provide a double SPOT-4 and/or IRS P6 satellite data coverage for the area to be mapped in order to
help high quality photointerpretation. As the priority lies in the full (and double) coverage of the
participating countries, and because of financial reasons, panchromatic bands will not be available.
For the purposes of working with the CLC2006 Support Package it is recommended to cut
(subset) all satellite images (IMAGE2000, IMAGE2006 and ancillary) into working units with an
overlap of one km between neighbouring working units.
Colour composites
Landsat TM images (IMAGE2000) include seven multispectral bands (channels), resampled to 30
meter pixel size, and Landsat--7 ETM+ includes an additional panchromatic band with 15 meter pixel
size. Pixel size of SPOT–4 and IRS P6 images is 20 m and 23 m, respectively.
Multi-band satellite images are prepared for the interpreters covering each working unit. Usually
red, near-infrared and middle-infrared parts of the spectrum are used for CLC interpretation with the
following colour rendition:
6
CLC2006 Support Package
Sensor
Preparing the work and using InterPrepare
Landsat TM/ETM
SPOT-4
IRS P6 LISS III
Spectral range
Red (R)
band 4
band 3
band 3
Near-infrared (NIR)
Green (G)
band 5
band 4
band 4
Middle-infrared (SWIR)
Blue (B)
band 3
band 2
band 2
Red (VIS)
Colour
If images contain the above channels in the above order, using the CLC2006 Support Package the
interpreter does not have to manually set the colour composite when loading the image. In some
cases however, other than the above standard colour composite is useful to interpret some features
(decision of the project manager). In such a case, images with more than three channels are prepared
and the interpreter should select the necessary colour composite using standard facilities of ArcView.
Be aware however, that more image channels mean more data, which might slow down your
computer.
Contrast
Satellite images should be suitably contrast stretched by the Central Teams's GIS expert in order
to produce optimal colours for the interpretation. It should be done under an image processing system
(e.g. ERDAS). Please note, that ArcView has no proper functionality for this purpose, and interpreters
are asked not to change the colour tables (LUT), as improper colours might confuse the
photointerpretation.
An advice to make a good contrast stretch: Compute a histogram for the image or the working unit
or for any larger area of interest, which contains land cover elements more or less evenly distributed.
Areas covered by clouds, shadows, large water surface or zero values (no data) should be excluded
from calculation.
Resolution enhancement of IMAGE2000 images
An additional way of image enhancement is the resolution merge which means an optimal
combination of multispectral and panchromatic data of the Landsat–7 ETM+ sensor. If a proper
method is used (e.g. Chavez et. al, 1993), the result is a higher resolution multispectral image, with
the same colours as the Landsat TM composites. It is especially useful to interpret artifical features.
On request FÖMI can provide the national teams with the ERDAS GSD to implement Chavez's HPF
method. Please note that a resolution-merged image is four times larger than a similar image with the
same number of multispectral bands.
2.3. Preparing vector data
The ArcView-based CLC2006 Support Package operates at sufficient speed on maximum few
hundreds square-kilometer area databases. It does not render possible either several interpreters to
work simultaneously on a single database. However, it provides all necessary features to allow quick,
comfortable and effective change detection and successfully helps preventing, finding and correcting
mistakes.
Cut national CLC2000 vector database into working units with a 1 km overlap, similarly to the
satellite images and convert data to ArcView .shp format. Upon finishing change interpretation, the
produced change databases (and the derived CLC2006) have to be matched along working unit
borders. If your computer is too slow for handling data covering a full working unit, specify and use a
smaller unit (e.g. cutting one unit into two). The CLC2000 database should contain the 3-digit CLC
code as attribute.
Display CLC2000 data on the top of the geometrically correct IMAGE2000 (or IMAGE2006). If the
geometric precision is insufficient, improve it before starting photointerpretation. In some cases an
affine transformation based on at least 4 points per working unit will work, but in most cases rubber
sheeting with several (sometimes very large number of) control points is needed to achieve a proper
result. Do not leave too much manual geometric correction work for the photointerpretation phase!
7
CLC2006 Support Package
Preparing the work and using InterPrepare
2.4. Preparation for interpretation
Change detection with InterChange program requires a pre-defined directory structure, which has
to be built up for all interpreters. This structure can be easily created with help of InterPrepare
program, part of CLC2006 Support Package.
This directory structure can then be copied to any optional place on the hard disc of the computer
used by the interpreter. Interpreters may receive the directory structure built for them either on CD or
any high storage capacity data medium, or they might download it through a sufficiently fast network.
Directory structure needed by InterChange change detection contains Program and Doc and
LUCAS directories in the same form as they can be found on CLC2006 Support Package installation
disc and on the same directory level there is one more directory for each map sheet to be interpreted.
Name of map sheet directories can be practically composed from topographic identification name of
the map sheet (working unit) used, but it must not exceed 7 characters. It is important to note that
ArcView 3.2 does not always support long Windows file names, so give short names (8+3 characters)
to the images and directories on all directory levels of their paths. Program, Doc and LUCAS
directories should be copied to directory structure compiled for interpreters in an unaltered form.
Prepare directory contains InterPrepare program and its accessories, which are needed only in the
preparation work done by central technical teams, so this directory should not be copied for
interpreters!
Main steps
• Create a base directory for each interpreter.
• Copy Program and Doc and LUCAS subdirectory from originally installed CLC2006 Support
Package directory to each interpreter's base directory.
• Create the appropriate map sheet directories in each interpreter's directory with help of
InterPrepare.
• If copying of any satellite image with help of InterPrepare is unsuccessful, copy it manually.
• Copy available LUCAS data from the separate source CD/DVD or from internet to each
interpreter's LUCAS directory. LUCAS2000 and LUCAS2006 point databases in ArcView shape
file format have to be copied to LUCAS directory. LUCAS field photos have to be copied into the
photo00 and photo06 subdirectories respectively.
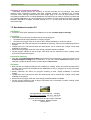
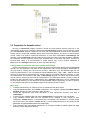
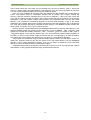
An example of directory structure created for interpretation:
Within the directory structure the Program directory contains the files needed for running
InterChange program. In Doc directory you will find printable documentation in PDF format, printable
keyboard template and other written information. A separate subdirectory belongs to each map sheet
to be interpreted.
LUCAS directory contains LUCAS2000 and LUCAS2006 point databases in ArcView shape file
format, with names LUCAS00 (.shp, .dbf, .shx) and LUCAS06 (.shp, .dbf, .shx)
respectively. LUCAS field photos are in photo00 and photo06 subdirectories.
Prior to beginning the interpretation, each map sheet directory contains two subdirectories and four
files. One of the four files is the project file interch2.apr, which contains InterChange program.
The other three files make up the CLC2000 source database in ArcView shape file format. The name
of these three files must be exactly the same as the map sheet directory containing them. The record
structure, the fields' name, size and type are strictly bound in the .dbf file. However, InterPrepare
automatically forms this record structure while creating directories. The two subdirectories bear the
same names for all sheets: Revision and Change. Before starting the interpretation these contain
only satellite images to be used in the corresponding tasks.
Revision subdirectory includes images from the early 2000's needed for the correction of
CLC2000 database – practically the ones that were originally used for creating the CLC2000
database.
In Change subdirectory images from around year 2006 for change detection should be placed.
8
CLC2006 Support Package
Preparing the work and using InterPrepare
2.5. Preparation for thematic control
Running of InterCheck program requires a simple but fixed relative directory structure. If the
interpretation of land cover changes is performed with InterChange program, and for thematic control
you use InterCheck program, supervisor can work with same directories and files as the interpreter.
Simply copy the project file check2.apr to each map sheet directory and open it to start thematic
control. There is no need to create new directories, or move files. Interpretation (InterChange) and
thematic control (InterCheck) mutually reads but not writes over data of the other operation. Naturally
the interpreter and the supervisor cannot work simultaneously on the same map sheet. However for
maximal data safety it is recommended to create backup copy of the ArcView databases in
Revision and Change subdirectory of each map sheet directory.
If interpretation is performed with other tool than InterChange
Create a new directory for each map sheet to be checked on the same directory level as Program
directory for the supervisor. The name of this subdirectory refers to the topographic identification of
the map sheet or working unit, but must not exceed 7 characters. Copy the check2.apr file into
each map sheet directory. The CLC2000 and Change database files (.shp, .dbf, .shx) of the map
sheet to be checked can be placed to any location within the computer's directory structure. In case
the interpretation was carried out with help of InterChange program, the same map sheet directory
can be used for checking as was used for interpretation or for subsequent thematic control. In order to
simplify the EU supervisor's work, a Revision and a Change subdirectory can be created within
the map sheet directory for the 2000 and the 2006 satellite images respectively, but this is optional.
I.e. the program first looks for the satellite images to be loaded in these locations.
Main steps
• Create a base directory for checking for the CLC2006 technical team expert.
• Copy Program and Doc and LUCAS subdirectory from originally installed CLC2006 Support
Package directory to each supervisor's base directory.
• Create the appropriate map sheet directories in each supervisor's directory with help of
InterPrepare.
• If copying of any satellite image with help of InterPrepare is unsuccessful, copy it manually.
• Copy available LUCAS data from the separate source CD/DVD or from internet to each
interpreter's LUCAS directory. LUCAS2000 and LUCAS2006 point databases in ArcView shape
file format have to be copied to LUCAS directory. LUCAS field photos have to be copied into the
photo00 and photo06 subdirectories respectively.
• Copy check2.apr from Check subdirectory of originally installed CLC2006 Support Package
directory to each map sheet directory.
9
CLC2006 Support Package
•
Preparing the work and using InterPrepare
The databases to be checked can – though not needed to – be collected in the relevant map sheet
directory for the supervisor. This case it is recommended to place the CLC2000 database in the
Revision subdirectory and Change database in the Change subdirectory.
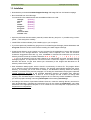
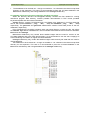
An example of directory structure created for checking procedure:
Within the directory structure the Program directory contains the files needed for running
InterCheck program, Doc directory contains printable documentation in PDF format, printable
keyboard template and other written information.
LUCAS directory contains LUCAS2000 and LUCAS2006 point databases in ArcView shape file
format, with names LUCAS00 (.shp, .dbf, .shx) and LUCAS06 (.shp, .dbf, .shx)
respectively. The photo00 and photo06 subdirectories cantain LUCAS field photos of the two
databases, respectively.
Prior to beginning the checking procedure each map sheet directory contains one file, the project
file check2.apr and two subdirectories. The two subdirectories bear the same names for all sheets:
Revision and Change.
Revision subdirectory may contain those satellite images that are used for revision of the
CLC2000 database and were made around 2000. It is recommended to use the same image(s) as
were used during the creation of original CLC2000 database.
Change subdirectory may contain the satellite images made around year 2006 that are used for
change detection.
The databases to be checked can – though not needed to – be collected in the relevant map sheet
directory for the supervisor. This case it is recommended to place the CLC2000 database in the
Revision subdirectory and Change database in the Change subdirectory.
10
CLC2006 Support Package
Preparing the work and using InterPrepare
3. InterPrepare program
3.1. Using InterPrepare
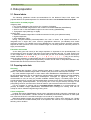
Start ArcView, then open prepare2.apr project file found in Prepare directory. This contains
InterPrepare program. If the InterPrepare project window is active, five buttons are available on the
button bar.
With Create directory button or Project – Create directory menu command you can open the
Preparing InterChange working directory window.
With Edit code table button or Project – Edit code table menu command you can open the
CORINE code table editor window.
With Convert LUCAS data button or Project – Convert LUCAS data menu command you can
convert original LUCAS databases (if available) for use with CLC2006 Support Package.
On clicking >>What is this?<< help button in the button bar the cursor changes its shape. Click
on any button or menu command with this question marked cursor and the general help window opens
with information on the selected control element. The cursor then assumes its former shape so you
have to click >>What is this?<< help button again on order to ask information again.
With InterPrepare help button or Help – InterPrepare help menu command you can open the
InterPrepare help window.
In Preparing InterChange working directory window you can collect all files and information
needed for interpreting a single map sheet (working unit), and you can create a working directory:
• you can specify the base directory where the above-mentioned directory structure for each
interpreter will be built up;
• you can select the CLC2000 database, the source database for change detection;
• you can give the identification name of map sheets (working units), which will serve as map sheet
directory name as well;
• you can select from a list the field that contains CORINE code 2000 in the source database;
• you can list all satellite images that will be used for revising the CLC2000 database and for creating
the change database.
• Upon completing the above, the map sheet directory is created and compiled with a single click on a
button.
In CORINE code table editor window
• you can substitute standard English CORINE nomenclature category names and descriptions with
national language nomenclature
• you can extend nomenclature with fourth and fifth level categories if required.
With Convert LUCAS data command
• you can create \Program\LUCAS00.dat and/or \Program\LUCAS06.dat files – required
by LUCAS data viewer window and LUCAS photo viewer program – from
\LUCAS\LUCAS00.dbf and/or \LUCAS\LUCAS06.dbf – part of appropriate ArcView point
database (if available).
11
CLC2006 Support Package
Preparing the work and using InterPrepare
3.2. Creating working directories
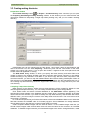
Preparation window
With Create directory button
or Project – Create directory menu command you can open
the Preparing InterChange working directory window. In this window you can collect all files and
information needed for interpreting a single map sheet (working unit), and you can create a working
directory.
InterPrepare help can be opened with the Help button. Clear button clears all specifications and
lists in the window. You can close Preparing... window any time with the Close button or the close
widget in the upper right corner. If you re-open the window, it appears at the same place and with
similar content as appeared on closing.
The Add theme dialog window, in which you specify the base directory and select files to be
copied is similar to the window ArcView uses when executing Add Theme command. In this dialog
window browsing is only allowed in local disks. If you wish to copy files from other computers in the
local area network, you have to map the needed network drive before starting InterPrepare. Name of
files selected in the Add theme window will automatically be written into the appropriate text box or
list. Creating map sheet directory leaves the original files untouched; only a copy of them is put in the
new directory.
Compiling a map sheet directory
Base directory is the directory where the map sheet directory will be created. By default it is the
InterChange/InterPrepare directory. You can modify the base directory with Change button.
Click Select button and select CLC2000 database in the Add theme window appearing. The
selected file's name appears in the Database text box. Name (first 7 characters) appears in the Map
sheet name text box as well. If you want to identify the map sheet directory and the base files with a
different name, you can modify the content of the Map sheet name text box. The name must not be
longer than 7 characters.
In Code field drop-down list you find the field names of the source database data record. Select the
field that contains the CORINE code of CLC2000 polygons. Source database for change detection
inherits data only from this field; the content of other fields is not used.
Collect required satellite images with the Add file button. In the Satellite images 2000 list you
should include images made around 2000, these will serve as base for the correction of CLC2000
database. To Satellite images 2006 list you should add images to be used in change detection, made
12
CLC2006 Support Package
Preparing the work and using InterPrepare
around 2006. More than one image can be selected from the source directory (Shift + clicking file
names). A single image cannot be added to a list more than once and cannot be added to both lists.
You can remove selected images from the list with Delete file button.
Once you have collected all necessary files and specified all data needed click Create directory
button. The program poses a confirmation question and on clicking Yes it begins creating the
directory. Data are checked, messages show if any error is detected – if this is the case correct the
error, then try creating the directory again. The program creates the map sheet directory if all data are
appropriate. Then the program copies starting project file interch2.apr into the map sheet
directory. This contains the InterChange program. In the map sheet directory a copy of the source
database is also created, although this contains only data from the field specified in the Code field text
box. Area and perimeter data are re-calculated for each polygon. The database will also contain new
fields named: Comment, Error, E (error code) and Done.
Next the program creates Revision and Change subdirectories in the map sheet directory. The
selected satellite images are copied to these directories. In case of ERDAS .lan, .img and .tif
(geotiff) file formats the ancillary data files (.sta, .rrd and .pro) are copied as well. (Files in
.img format appear in the selection window only if you have previously loaded Imagine extension in
ArcView.) In case of those special image file formats that are not supported by ArcView as default,
files might have to be copied to the right directory "by hand" (e.g. with Windows Explorer).
The program checks whether copying was successful and the result of the checking is shown in a
dialog box. Program writes log file with the name of the map sheet directory into the Prepare
directory. Then it resets Preparation window. Thus you can begin to prepare the next map sheet
directory or close the window and the InterPrepare program.
Interpreters might receive the directory structure built for them on CD or any high storage capacity
data medium, or they might download it through a sufficient fast network.
13
CLC2006 Support Package
Preparing the work and using InterPrepare
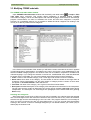
3.3. Modifying CORINE code table
The CORINE code table editor window
Open CORINE code table editor window with the Modify code table button
or Project – Edit
code table menu command. This window allows substitution of standard English CORINE
nomenclature category names and descriptions with national language nomenclature in InterChange
program. Nomenclature can also be extended with fourth and fifth level categories if required.
However, for compatibility reasons it is not possible to delete third level categories not existing in the
country or to add any new third level categories.
In the list box on the left side of the window you will find the recent code table in the form it appears
in InterChange during interpretation. On selecting any lines in the list box, more detailed data on the
selected CORINE category appear in the window. Texts can be modified, completed or translated into
national language. If you change the selection in the list box, modified data of the code last edited will
be written into the code table. You can move between text boxes and the list with Tab button.
• Code: number of the CORINE category code. Three-digit code numbers cannot be modified.
• Short name: short name of the category. The text written in this box should not be longer than 35
characters. During interpretation only the code number of category and the content of short name
box appear in CLC data window's code selection list.
• Full name: full name of the category, as it is given in the official nomenclature.
• Description: detailed description of the category with examples and instructions for the interpreters.
The full name and the content of description box can be read in the CLC code help window during
interpretation. The description can be arranged into paragraphs with inserted blank lines (pushing
Enter twice).
Inserting new categories
With Insert button a new fourth or fifth level code can be inserted in the code list below the selected
line. First three digits of the new code will be similar to that of the line above, they cannot be modified.
Add the last digit and the texts belonging to the new code. The program sends an error message in
case you exit the Code text box with only three digits given or you give a fourth (fifth) digit already
existing in the code list. In the error message dialog box you can decide whether you correct (Yes) or
delete (No) the inserted code.
14
CLC2006 Support Package
Preparing the work and using InterPrepare
Deleting categories
Inserted fourth or fifth level categories can be deleted from the code table with Delete button. The
program poses an affirmative question and on answering Yes it deletes the selected line. You cannot
delete third level categories.
Saving the modified code table
Present content of code table can be saved to disc with the Save button. The program poses an
affirmative question before saving. Be careful to choose Yes, because the earlier code table file will be
overwritten. Program creates backup of the earlier code table file.
Closing the edit window
Edit CORINE code table window can be closed with the Close button. If you have modified the
code table since opening or the last save, the program gives a dialog box asking: Close window
without save? Answering Yes discards modifications and the window is closed. When opening the
window next time the code table will appear in its last saved form. Answering No leaves the window
opened; you can save or continue editing.
Hot keys
Hot keys in the Edit CORINE code table window:
Alt + I Insert
Alt + D
Delete
Alt + S
Save
Alt + C
Close
3.4. Converting LUCAS data
With Convert LUCAS data button
or Project – Convert LUCAS data menu command you
can create special LUCAS databases for use with CLC2006 Support Package, required by LUCAS
data viewer window and LUCAS photo viewer program.
LUCAS database converter requires a special record structure, and works only with source files
prepared by FÖMI KTO (Hungary). After an affirmative question program converts original
\LUCAS\LUCAS00.dbf and/or \LUCAS\LUCAS06.dbf – part of appropriate ArcView point
database (if available) – to \Program\LUCAS00.dat and/or \Program\LUCAS06.dat files. If
any of the source databases fails, program displays a warning message. At the end of the conversion
program lists names of the converted databases.
15
CLC2006 Support Package
Preparing the work and using InterPrepare
4. Special information
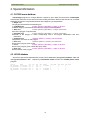
4.1. CLC2000 source database
InterChange program for change detection requires a given data record structure. InterPrepare
automatically forms this record structure while creating directories. Data record structure of CLC2000
databases as found in map sheet directories at the beginning of interpretation:
• Shape field:
The polygon that the data record belongs to.
• Code2000 field:
numeric (#FIELD_DECIMAL), 5 digits, 0 decimal.
CORINE category code data inherited from the original CLC90 database.
• Area field:
numeric (#FIELD_DECIMAL), 12 digits, 2 decimals.
Area of the polygon in square metre.
• Perimeter field:
numeric (#FIELD_DECIMAL), 12 digits, 2 decimals.
Perimeter of the polygon in metre. InterChange uses it for polygon identification and error
prevention.
• Comment field:
character (#FIELD_VCHAR), 255 characters.
Interpreter's comments on the polygon.
• Error field:
character (#FIELD_VCHAR), 50 characters.
Errors of the polygon given as text.
• E field:
numeric (#FIELD_DECIMAL), 2 digits, 0 decimal.
Errors of the polygon given numerically (as a code).
• Done field:
numeric (#FIELD_DECIMAL), 1 digits, 0 decimal.
Revised status of the polygon.
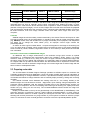
4.2. LUCAS database
Structure of special tab separated text format LUCAS databases \Program\LUCAS00.dat and
\Program\LUCAS06.dat, required by LUCAS data viewer window and LUCAS photo viewer
program.
SSU_ID
HU_47902658
HU_47942662
HU_47962668
HU_47982666
...
DATE
10.04.2006
10.04.2006
22.05.2006
10.04.2006
LC1
C13
C11
B23
C12
LC2
8
8
8
8
LU1
U12
U12
U11
U12
LU2
8
8
8
8
PHOTO
47902658
47962668
47982666
16
GPS_PREC
7
6
4
6
OBS_TYPE
1
2
1
1
OBS_DIST
1
1
3
1
CLC2006 Support Package
Preparing the work and using InterPrepare
5. License
5.1. End user license agreement
This end user license agreement (Agreement) is a legal agreement between MLOG Instruments
Ltd. (MLOG) and customer of the software license (User). By installing and using the CLC2006
Support Package software (Software) User agree to be bound by the terms of this Agreement.
Subject to the terms and conditions of this Agreement and User's acceptance thereof, MLOG
hereby grants to User and User accept a personal, non-transferable, non-exclusive license (which
shall be revocable pursuant to the terms of this Agreement) to installing the Software thus much
computer as many corresponds to the number of purchased Software licences.
The Software is owned by MLOG and the software authors. The structure, organisation and code
of the Software are valuable trade secrets of MLOG and the authors. This agreement does not grant
for the User any commercial or intellectual property rights in the Software. The Software is protected
by copyright law of Hungary and international treaty provisions, as well as other intellectual property
laws and treaties. All trademarks and service marks mentioned in Software or documentation are the
property of their respective owners.
The Software is licensed, not sold and not received as a present by the User. The User may not
commercially distribute, sublicense, resell, or otherwise transfer for any consideration, or reproduce for
any such purposes, the Software or any modification or derivation thereof, either alone or in
conjunction with any other product or program. Further, the User may not modify the Software. User
agrees not to adapt, translate, reverse engineer, decompile, disassemble, decrypt or otherwise
attempt to discover the source code of the Software or any subset of the Software. Any such
unauthorised use shall result in immediate and automatic termination of this license and may result in
criminal and/or civil prosecution.
The Software is being delivered to the User as is. MLOG and the authors of the Software disclaim
all warranties, expressed or implied, including, without limitation, the warranties of merchantability and
of fitness for any purpose; assume no liability for damages, direct or consequential, which may result
from the use of the Software. Entire risk arising out of use or performance of the Software remains
with the User.
17
CLC2006 Support Package
Preparing the work and using InterPrepare
Index
Add file button, 12
Add theme dialog, 12
ArcInfo, 7
ArcView, 3
Avenue, 3
base directory, 12
Change button, 12
CLC2000 record structure, 16
CLC2006 Support Package, 3
Clear button, 12
Close button, 12, 14
Code, 14
Code field, 12
code table editor, 11, 14
connecting network drive, 12
Convert LUCAS data button, 11,
15
Create directory, 12
Create directory button, 11, 12
Database, 12
Delete button, 14
Delete file, 12
Description, 14
directory structure, 8, 9
Edit code table button, 11
file formats, 6
filenames, 6
Full name, 14
Help button, 12
hot keys, 14
Insert button, 14
installation, 5, 11
interch2.apr, 12
InterChange, 3
InterCheck, 3
InterPrepare, 3
InterPrepare help button, 11
interpretation, 8
license, 17
long file name, 8
LUCAS, 4
LUCAS data, 11, 15
LUCAS database, 16
LUCAS photo viewer, 15
map sheet directory, 12
Mapsheet name, 12
18
MLOG, 3, 17
new features, 4
Preparation window, 12
raster data, 6
colours, 6
contrast, 6
geometry, 6
resolution, 6
remark, 4
satellite images, 12
Save button, 14
Select button, 12
Short name, 14
starting, 11
statistics, 4
system requirements, 3
thematic control, 9
vector data, 7
version 2.0, 4
What is this? help button, 11
working directory, 11, 12
working unit, 7