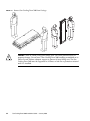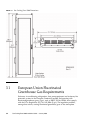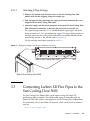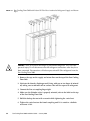
1
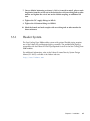
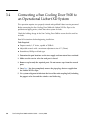
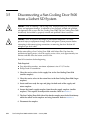
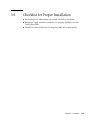
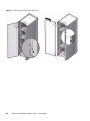
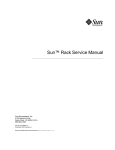
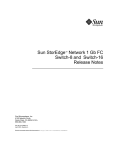
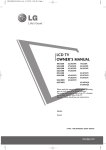
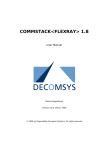
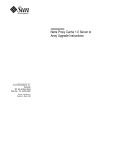
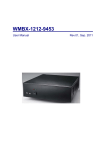
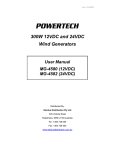
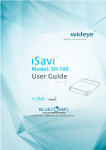
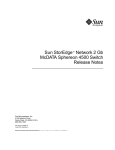
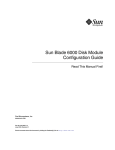
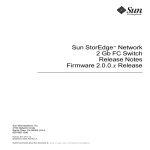
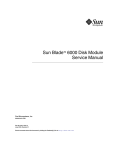
Sun™ Cooling Door 5600
Installation Guide
Sun Microsystems, Inc.
www.sun.com
Part No. 820-7186-10
January 2009, Revision A
Submit comments about this document at: http://www.sun.com/hwdocs/feedback
Copyright 2009 Sun Microsystems, Inc., 4150 Network Circle, Santa Clara, California 95054, U.S.A. All rights reserved.
Sun Microsystems, Inc. has intellectual property rights relating to technology that is described in this document. In particular, and without
limitation, these intellectual property rights may include one or more of the U.S. patents listed at http://www.sun.com/patents and one or
more additional patents or pending patent applications in the U.S. and in other countries.
This document and the product to which it pertains are distributed under licenses restricting their use, copying, distribution, and
decompilation. No part of the product or of this document may be reproduced in any form by any means without prior written authorization of
Sun and its licensors, if any.
Third-party software, including font technology, is copyrighted and licensed from Sun suppliers.
Parts of the product may be derived from Berkeley BSD systems, licensed from the University of California. UNIX is a registered trademark in
the U.S. and in other countries, exclusively licensed through X/Open Company, Ltd.
Sun, Sun Microsystems, the Sun logo, Java, AnswerBook2, docs.sun.com, and Solaris are trademarks or registered trademarks of Sun
Microsystems, Inc. in the U.S. and in other countries.
All SPARC trademarks are used under license and are trademarks or registered trademarks of SPARC International, Inc. in the U.S. and in other
countries. Products bearing SPARC trademarks are based upon an architecture developed by Sun Microsystems, Inc. Liebert is a registered
trademark of Liebert Corporation.
The OPEN LOOK and Sun™ Graphical User Interface was developed by Sun Microsystems, Inc. for its users and licensees. Sun acknowledges
the pioneering efforts of Xerox in researching and developing the concept of visual or graphical user interfaces for the computer industry. Sun
holds a non-exclusive license from Xerox to the Xerox Graphical User Interface, which license also covers Sun’s licensees who implement OPEN
LOOK GUIs and otherwise comply with Sun’s written license agreements.
U.S. Government Rights—Commercial use. Government users are subject to the Sun Microsystems, Inc. standard license agreement and
applicable provisions of the FAR and its supplements.
DOCUMENTATION IS PROVIDED "AS IS" AND ALL EXPRESS OR IMPLIED CONDITIONS, REPRESENTATIONS AND WARRANTIES,
INCLUDING ANY IMPLIED WARRANTY OF MERCHANTABILITY, FITNESS FOR A PARTICULAR PURPOSE OR NON-INFRINGEMENT,
ARE DISCLAIMED, EXCEPT TO THE EXTENT THAT SUCH DISCLAIMERS ARE HELD TO BE LEGALLY INVALID.
Copyright 2009 Sun Microsystems, Inc., 4150 Network Circle, Santa Clara, Californie 95054, États-Unis. Tous droits réservés.
Sun Microsystems, Inc. possède les droits de propriété intellectuels relatifs à la technologie décrite dans ce document. En particulier, et sans
limitation, ces droits de propriété intellectuels peuvent inclure un ou plusieurs des brevets américains listés sur le site
http://www.sun.com/patents, un ou les plusieurs brevets supplémentaires ainsi que les demandes de brevet en attente aux les États-Unis et
dans d’autres pays.
Ce document et le produit auquel il se rapporte sont protégés par un copyright et distribués sous licences, celles-ci en restreignent l’utilisation,
la copie, la distribution, et la décompilation. Aucune partie de ce produit ou document ne peut être reproduite sous aucune forme, par quelque
moyen que ce soit, sans l’autorisation préalable et écrite de Sun et de ses bailleurs de licence, s’il y en a.
Tout logiciel tiers, sa technologie relative aux polices de caractères, comprise, est protégé par un copyright et licencié par des fournisseurs de
Sun.
Des parties de ce produit peuvent dériver des systèmes Berkeley BSD licenciés par l’Université de Californie. UNIX est une marque déposée
aux États-Unis et dans d’autres pays, licenciée exclusivement par X/Open Company, Ltd.
Sun, Sun Microsystems, le logo Sun, Java, AnswerBook2, docs.sun.com, et Solaris sont des marques de fabrique ou des marques déposées de
Sun Microsystems, Inc. aux États-Unis et dans d’autres pays.
Toutes les marques SPARC sont utilisées sous licence et sont des marques de fabrique ou des marques déposées de SPARC International, Inc.
aux États-Unis et dans d’autres pays. Les produits portant les marques SPARC sont basés sur une architecture développée par Sun
Microsystems, Inc. Liebert est une marque déposée de Liebert Corporation.
L’interface utilisateur graphique OPEN LOOK et Sun™ a été développée par Sun Microsystems, Inc. pour ses utilisateurs et licenciés. Sun
reconnaît les efforts de pionniers de Xerox dans la recherche et le développement du concept des interfaces utilisateur visuelles ou graphiques
pour l’industrie informatique. Sun détient une license non exclusive de Xerox sur l’interface utilisateur graphique Xerox, cette licence couvrant
également les licenciés de Sun implémentant les interfaces utilisateur graphiques OPEN LOOK et se conforment en outre aux licences écrites de
Sun.
LA DOCUMENTATION EST FOURNIE "EN L’ÉTAT" ET TOUTES AUTRES CONDITIONS, DÉCLARATIONS ET GARANTIES EXPRESSES
OU TACITES SONT FORMELLEMENT EXCLUES DANS LA LIMITE DE LA LOI APPLICABLE, Y COMPRIS NOTAMMENT TOUTE
GARANTIE IMPLICITE RELATIVE À LA QUALITÉ MARCHANDE, À L’APTITUDE À UNE UTILISATION PARTICULIÈRE OU À
L’ABSENCE DE CONTREFAÇON.
Please
Recycle
Contents
1.
Introduction
1.1
2.
Product / System Description
Preparing for Installation
2.1
Unit Handling
2.1.1
3.
1–1
Installation
2–1
2–1
Unpacking the Sun Cooling Door 5600
2–2
3–1
3.1
European Union Fluorinated Greenhouse Gas Requirements
3.2
Mounting the Sun Cooling Door 5600 on a Sun Rack or Chassis
3.2.1
Refrigerant Connection Methods and Points
3.2.1.1
3.3
Attaching F-Pipe Fittings
3–2
Header System
3–3
3–4
3–5
Connecting Liebert XD Flex Pipes to the Sun Cooling Door 5600
3.3.1
4.
1–1
3–6
3–8
3.4
Connecting a Sun Cooling Door 5600 to an Operational Liebert XD
System 3–9
3.5
Disconnecting a Sun Cooling Door 5600 from a Liebert XD System
3.6
Checklist for Proper Installation
Maintenance
4.1
3–13
3–16
4–1
Fluorinated Greenhouse Gas Requirements
4–1
iii
A. Removing an Existing Door
▼
iv
A–1
To Remove the Rear Door on the Sun Blade 6048 Modular System
Chassis 1
Sun Glacier Installation Guide • January 2009
CHAPTER
1
Introduction
The Sun Cooling Door 5600 is a 35kW cooling system for high-density heat loads
that mounts on the rear of a Sun product and allows access to the back of the server
rack or chassis.
Room air is drawn in through the front of the rack, picks up heat from the servers,
transfers the heat to the Sun Cooling Door 5600’s coil and is expelled through the
rear of the rack or chassis. When entering air temperature is 77˚F (25˚C) or fewer, the
Sun Cooling Door 5600 removes up to 35kW of heat generated by the components
without raising the temperature of the air leaving the rack or chassis.
The Sun Cooling Door 5600 is a passive system and requires no electricity. It relies
on the server fans to move air across the micro-channel coil. Captured heat is carried
away through Liebert XD pumped refrigerant technology.
Pumped R-134a refrigerant is supplied by either a Liebert XDP™ or Liebert XDC™.
Either Liebert unit will support up to four Sun Cooling Door 5600 units. Room
cooling must be provided by a computer room air conditioner. For further
information, refer to the Liebert XD System Design Manual, Liebert XDP User
Manual or the Liebert XDC User Manual, available in the product pages at the
Liebert web site:
http://www.liebert.com
1.1
Product / System Description
Each Sun Cooling Door 5600, when attached to a fully loaded Sun rack or chassis,
has a nominal cooling capacity of 35kW (10 tons; 120,000 BTUh).
The complete system consists of Sun Cooling Door 5600 modules, piping, and a
Liebert XDP or Liebert XDC.
1-1
1-2
Sun Cooling Door 5600 Installation Guide • January 2009
CHAPTER
2
Preparing for Installation
Upon arrival of the unit, and before unpacking it, verify that the labeled equipment
matches the bill of lading. Inspect all items for visible and concealed damage.
Damage should be immediately reported to the carrier and a damage claim filed
with a copy sent to Sun or to your sales representative. If concealed damage is found
later, report it to the shipping company and your local Sun representative.
Check to be sure all required assemblies and parts have been received by comparing
the delivered items to the shipping manifest.
Note – If the Sun product has an existing door, see Appendix A, Removing an
Existing Door.
2.1
Unit Handling
Caution – Risk of sharp edges, splinters, and exposed fasteners. Can cause personal
injury. Only properly trained and qualified Liebert personnel wearing appropriate
headgear, gloves, shoes, and glasses should attempt to move, lift, unpack, or prepare
the unit for installation.
Caution – Risk of handling a 130 lb (59kg) unit. Improper lifting can cause personal
injury and equipment damage. A minimum of two properly trained and qualified
are required to lift or move the Sun Cooling Door 5600. The Sun Cooling Door 5600
should only be installed by properly trained and qualified Liebert associates.
2-1
When unpacking and handling the unit, exercise extra care to prevent damage.
Sun recommends using a forklift or pallet jack to move the Sun Cooling Door 5600
while it is packaged. If multiple Sun Cooling Door 5600 units are delivered, they will
be shipped on a pallet with up to four units. A pallet jack will be required to move
these units to the installation location.
2.1.1
■
If using a forklift or pallet jack, ensure that the fork tine length is suitable to safely
move the packaged unit.
■
Sun recommends keeping the unit in the protective packaging until it has been
moved to the installation site.
■
When handling and unpacking the unit, exercise great care to prevent damage.
■
Do not lift the unit any higher than 6" (152mm) while moving it. If it must be
lifted higher than 6" (152mm), exercise great care and keep all personnel who are
not helping move the unit at least 20 feet (5m) away from the unit.
■
Do not use unit piping to lift or move the Sun Cooling Door 5600.
Unpacking the Sun Cooling Door 5600
Do not unpack the Sun Cooling Door 5600 units before moving them to their
installation location. Refer to FIGURE 2-1 for the steps below. Once at the installation
point:
1. Cut the banding and place all packaged Sun Cooling Door 5600s on the floor
for unpacking.
2. Straighten all metal tabs as shown in FIGURE 2-1.
Sun recommends using any of these tools to straighten the tabs: flat-blade
screwdriver, claw hammer, pliers or crowbar.
3. Remove the top cover from the package.
4. Remove and set aside the hardware and key package.
5. Remove and set aside the Supply/Return kits from the end of package.
6. Remove the center top brace.
7. Remove the side panels from the package.
8. Remove the top protective foam from the package.
9. Cut the bag to permit removing the Sun Cooling Door 5600.
10. A two-person crew of properly trained and qualified Liebert personnel can now
lift the Sun Cooling Door 5600 from the package and install it (see FIGURE 2-2).
2-2
Sun Cooling Door 5600 Installation Guide • January 2009
FIGURE 2-1
Uncrating the Sun Cooling Door 5600
1
2
4
5
3
6
8
7
196617
Page 1, Rev. 0
Chapter 2
Preparing for Installation
2-3
FIGURE 2-2
Remove Sun Cooling Door 5600 from Package
Caution – Risk of 130 lb (59 Kg) unit falling over. Can cause personal injury or
property damage. Do not leave a Sun Cooling Door 5600 standing unattended on its
side or its end without adequate support to prevent it from falling over. The Sun
Cooling Door 5600 must be supported at all times or laid flat on protective material
until it is installed.
2-4
Sun Cooling Door 5600 Installation Guide • January 2009
CHAPTER
3
Installation
Sun Cooling Door 5600 modules must be securely mounted on the rear of the Sun
cabinet. No cutting or drilling is required to attach the modules; all mounting
features required are fabricated at the factory.
The module’s dimensions are listed in TABLE 3-1 and shown in FIGURE 3-1.
TABLE 3-1
Sun Cooling Door 5600 Dimensions
Dimension
Measurement
Height (without hardware)
78.5 inches (1994 mm)
Height (with hardware)
80.2 inches (2038 mm)
Width (without hardware)
23.5 inches (597 mm)
Width (with hardware)
27.4 inches (697 mm)
Depth
5.9 inches (150 mm)
3-1
FIGURE 3-1
3.1
Sun Cooling Door 5600 Dimensions
European Union Fluorinated
Greenhouse Gas Requirements
Stationary air conditioning, refrigeration, heat pump equipment and stationary fire
protection systems in the European Community market and operating with
fluorinated greenhouse gases (f-gas), such as R407C, R134a, R410A, must comply
with the F-Gas Regulation: (EC) No. 842/2006 (F-gas). The regulation prohibits,
among other actions, venting fluorinated greenhouse gases to the atmosphere.
3-2
Sun Cooling Door 5600 Installation Guide • January 2009
The F-Gas Regulation requires operators to use all measures that are technically
feasible and do not entail disproportionate cost to prevent leakage of these gases, to
test for leakage regularly and to recover f-gas as part of regular, scheduled
maintenance or decommission.
Refer to the full regulation for additional details.
Note – Only properly trained and qualified personnel should service, charge or
repair the system.
3.2
Mounting the Sun Cooling Door 5600 on
a Sun Rack or Chassis
The Sun Cooling Door 5600 module mounts on the rear of a Sun rack or chassis with
14 M6 x 12mm bolts that secure the Sun Cooling Door 5600’s frame to the rack or
chassis. This operation will require two persons to lift the Sun Cooling Door 5600
and hang it on bolt heads on the Sun rack or chassis.
Note – Risk of improper installation. Can cause equipment damage. The Sun
Cooling Door 5600 must be installed by properly trained and qualified Liebert
service personnel.
Before beginning to attach the Sun Cooling Door 5600 module on the Sun rack or
chassis, remove the rear door from the rack or chassis. Refer to Appendix A for
details.
1. Find the M6 x 12mm bolts that were shipped with the Sun Cooling Door 5600
and insert one in the top hole on each side of the rack.
2. Tighten the two bolts with a 10mm wrench, leaving enough space between the
bolts’ flanged head to accept the thickness of the Sun Cooling Door 5600’s
frame (2-3mm).
3. Lift the Sun Cooling Door 5600 by the handles on the side, match the keyhole
slots to the bolts in the Sun rack or chassis and hang the Sun Cooling Door
5600 on the protruding bolt heads.
4. Insert the remaining bolts and tighten snugly with a 10mm wrench.
5. Tighten the bolts in the keyhole slots snugly with a 10mm wrench.
Chapter 3
Installation
3-3
6. Remove the four handles (two on each side).
Each is attached with two socket head bolts with 6mm Allen key heads. Use a
6mm Allen wrench to remove the handles; store the handles for use in case the
Sun Cooling Door 5600 must be removed from the Sun rack or chassis.
FIGURE 3-2
3.2.1
Mounting Hole Locations on Sun Cooling Door 5600’s Inner Surface—Seven on Each Side
Refrigerant Connection Methods and Points
The piping assembly and connection means used for piping in the Sun Cooling Door
5600 system are similar to those used in conventional refrigeration systems. Observe
all standard practices during installation and startup to prevent damage and
contamination.
The Sun Cooling Door 5600 has supply and return connection points on the top of
each module. The supply piping connection is 1/2" outside diameter copper pipe,
and the return connection is 5/8" outside diameter copper pipe. The supply fitting is
equipped with a Schrader valve. The door contains a shipping charge of dry
nitrogen that should be purged before installation.
3-4
Sun Cooling Door 5600 Installation Guide • January 2009
3.2.1.1
Attaching F-Pipe Fittings
1. Remove the cap from each Schrader valve on the Sun Cooling Door 5600
module and vent the shipping charge of nitrogen gas.
2. Find and open the bag containing the supply and return connectors that were
shipped with the Sun Cooling Door 5600.
3. Attach the supply and the return connectors to the top of the Sun Cooling Door
5600. Position the connectors so that they do not interfere with rack use.
The supply fitting connection is 7/8" outside diameter copper pipe, and return
fitting connection is 1-1/4" outside diameter copper. The supply fitting attaches to
the right side of the Sun Cooling Door 5600 when viewed from behind and the
return fitting attaches to the left side (refer to FIGURE 3-3).
Use the wrenches and torques specified in TABLE 3-2.
FIGURE 3-3
Refrigerant Supply and Return Attachment Locations
1
Back of Sun Cooling Door 5600
2
Back of Sun Cooling Door 5600
3.3
Connecting Liebert XD Flex Pipes to the
Sun Cooling Door 5600
The Sun Cooling Door 5600 module system requires using the Liebert XD
prefabricated piping assembly. The prefabricated piping is compatible with the
Liebert XD Flex Pipe, which is also required to use Sun Cooling Door 5600 modules.
For information, refer to the Liebert XD manuals, which can be found on Liebert’s
web site:
http://www.liebert.com
Chapter 3
Installation
3-5
FIGURE 3-4
Sun Cooling Door 5600 with Liebert XD Flex Hose Attached to Refrigerant Supply and Return
Pipes
Caution – Risk of explosive discharge of pressurized refrigerant. This can cause
personal injury. Do not disconnect one-shot refrigerant connections after they have
been connected. Disconnection will release pressurized R-134a refrigerant from the
Sun Cooling Door 5600.
1. Remove the caps on the supply and return lines on the top of the Sun Cooling
Door 5600.
2. Lubricate the threads, diaphragm and O-ring with one or two drops of mineral
oil, taking care to minimize oil on surfaces that will be exposed to refrigerant.
3. Connect the line-set coupling finger-tight.
4. Make sure the Schrader valve is properly oriented; refer to the label on the top
of the Sun Cooling Door 5600.
5. Hold the backup hex nut with a wrench while tightening the swivel nut.
6. Tighten the swivel nut on the female coupling until it is seated or a definite
resistance is felt.
3-6
Sun Cooling Door 5600 Installation Guide • January 2009
7. Once a definite bottoming resistance is felt (as in metal to metal), place a mark
lengthwise from the swivel nut to the backup hex with an etching tool or other
marker and tighten the swivel nut on the female coupling an additional 1/4
turn.
8. Tighten the 7/8" supply fittings to 94lb-ft.
9. Tighten the 1-1/4return fittings to 150lb-ft.
10. Mark the female and male coupler with an etching tool or other marker for
future reference.
3.3.1
Header System
The Sun Cooling Door 5600 module system with optional flexible piping requires
use of the Liebert XD prefabricated piping assembly. The prefabricated piping is
compatible with the Liebert XD Flex Pipe required to attach to the Sun Cooling Door
5600 modules.
For additional information, refer to the Liebert X-treme Density System Design
Manual, SL-16655, available at the Liebert web site:
http://www.liebert.com
Chapter 3
Installation
3-7
3.4
Connecting a Sun Cooling Door 5600 to
an Operational Liebert XD System
This operation requires two properly trained and qualified Liebert service personnel.
Before connecting the Sun Cooling Door 5600 with Liebert XD Flex Pipe to the
prefabricated piping mains, check the entire system for leaks.
Check the holding charge in the Sun Cooling Door 5600 to ensure that the unit has
no leaks.
Read all instructions before beginning installation.
Tools Required
■
Torque wrench, 1/2" drive, capable of 150lb-ft.
■
Adjustable wrench with a maximum adjustment size of 2" (51mm)
■
Screwdriver, Phillips or blade type
1. Determine the port locations on the two supply and two return lines overhead.
2. Make sure the service valve for each port is closed.
3. Remove cap for only the required ports. Do not remove caps from the unused
ports.
4. Once Step 3 has been completed, remove the pipe plugs that are supplied on
the Liebert XD Flex Pipe.
5. Use system refrigerant to lubricate the face of the male coupling half, including
the poppet valve face and the stainless steel delta ring.
3-8
Sun Cooling Door 5600 Installation Guide • January 2009
FIGURE 3-5
Liebert XD Prefabricated Piping Assembly
1
4
2
3
Figure Legend
1
Return Main
2
Supply Main
3
Threaded Cap (typical)
4
Service Valve, Typical, all ports
Notice - Risk of overtightening of couplers. Can cause equipment damage. See
FIGURE 3-6 and the related Figure Legend for correct coupler tightening
specifications.
6. Thread the return couplers together. The return couplers are the larger of the
couplers.
7. Use the adjustable wrench to hold the fixed side of the female coupler on the
Sun Cooling Door 5600 stationary. Use the torque wrench to tighten the collar
onto the coupler to the values below.
■
Supply fittings: 22.1-25.8 lb-ft (30-35Nm)
■
Return fittings: 59-62.7 lb-ft (74-88Nm)
8. Mark the female and male coupler with an etching tool or other marker for
future reference.
Chapter 3
Installation
3-9
FIGURE 3-6
Detail View of Liebert XD Flex Pipe and Prefabricated Piping Port
2
1
3
4
9. Repeat Step 6 and Step 7 for the smaller couplers (supply line).
10. Once the supply and return connections are completed, open the return service
valves, then open the supply service valves.
3-10
Sun Cooling Door 5600 Installation Guide • January 2009
FIGURE 3-7
Sun Cooling Door 5600 Piping System with Prefabricated Piping Assembly and Liebert XD Flex
Pipe
3
4
1
5
2
6
Figure Legend
1
Return Main
2
Return Liebert Flex Pipe
3
Return Service Valve (After system leak check, make sure valve is open)
4
Supply Service Valve (After system leak check, make sure valve is open)
5
Supply Main
6
Supply Liebert Flex Pipe
Chapter 3
Installation
3-11
3.5
Disconnecting a Sun Cooling Door 5600
from a Liebert XD System
Caution – Risk of handling a 130 lb (59kg) unit. Improper lifting can cause personal
injury and equipment damage. A minimum of two properly trained and qualified
are required to lift or move the Sun Cooling Door 5600. The Sun Cooling Door 5600
should only be installed by properly trained and qualified Liebert associates.
Caution – Risk of explosive discharge of pressurized refrigerant. Can cause
personal injury or equipment damage. Relieve refrigerant system pressure before
attempting to disconnect piping connections or removing the door. Reclaim all
refrigerant per local codes.
Before uninstalling a Sun Cooling Door 5600 with Liebert Flex Pipe from the
prefabricated piping mains, close the supply service valve, wait approximately two
minutes and then close the return service valve.
Read all instructions before beginning.
Tools Required
■
Two adjustable wrenches, maximum adjustment size of 2-1/2 inches
■
Phillips head #2 screwdriver
1. Close the service valves in the supply line to the Sun Cooling Door 5600
(smaller couplers).
2. Close the service valves in the return lines to the Sun Cooling Door 5600 (larger
couplers).
3. Locate and have ready the caps and plugs for both ends of the supply and
return couplers.
4. Loosen the female supply couplers from the male supply couplers (smaller
couplers). This requires two adjustable wrenches. Refer to FIGURE 3-6.
5. The Sun Cooling Door 5600 side of the female couplers must be held stationary
while the collars on the couplers are being loosened. Refer to FIGURE 3-6.
6. Disconnect the couplers.
3-12
Sun Cooling Door 5600 Installation Guide • January 2009
FIGURE 3-8
Profile View of the Sun Cooling Door 5600 Piping System
Service
Valve
Return
Line
Supply
Line
Chapter 3
Installation
3-13
FIGURE 3-9
Piping Mains Without Sun Cooling Door 5600 or Liebert XD Flex Pipe
7. Place the protective dust cap and plug back onto both ends of the couplers on
the Sun Cooling Door 5600 and the port pipe.
8. Repeat Step 5 through Step 7 for the return couplers (larger couplers).
9. Carefully lay the Liebert XD Flex Pipe aside.
Notice - The Liebert XD Flex Pipe might kink if improperly handled. This can cause
permanent damage to the pipe.
3-14
Sun Cooling Door 5600 Installation Guide • January 2009
3.6
Checklist for Proper Installation
■
Sun Cooling Door 5600 modules are securely attached to the cabinet.
■
Refrigerant supply and return connectors are properly attached to the Sun
Cooling Door 5600.
■
Handles are removed from Sun Cooling Door 5600 and stored properly.
Chapter 3
Installation
3-15
3-16
Sun Cooling Door 5600 Installation Guide • January 2009
CHAPTER
4
Maintenance
Minimal maintenance is required to keep the Sun Cooling Door 5600 operating at
optimal levels. The unit should be cleaned and checked for damage. Suggested
maintenance includes:
■
4.1
Cooling fins—Clean any dust and debris from the cooling fins, taking care not to
bend them.
Fluorinated Greenhouse Gas
Requirements
Stationary air conditioning, refrigeration, heat pump equipment and stationary fire
protection systems in the European Community market and operating with
fluorinated greenhouse gases (f-gas), such as R407C, R134a, R410A, must comply
with the F-Gas Regulation: (EC) No. 842/2006 (F-gas). The regulation prohibits,
among other actions, venting fluorinated greenhouse gases to the atmosphere.
The F-Gas Regulation requires operators to use all measures that are technically
feasible and do not entail disproportionate cost to prevent leakage of these gases, to
test for leakage regularly and to recover f-gas during equipment service and
maintenance and before disposing of equipment.
Refer to the full regulation for additional details.
4-1
4-2
Sun Cooling Door 5600 Installation Guide • January 2009
APPENDIX
A
Removing an Existing Door
To install the Sun Cooling Door 5600, you first need to remove the existing door that
is installed with the rack or chassis.
▼ To Remove the Rear Door on the Sun Blade 6048
Modular System Chassis
Note – The Sun Cooling Door 5600 does not fit on the early Sun Blade 6048 chassis.
It fits on the newer Sun Blade 6048 chassis (manufacturing part number 594-597101). You can distinguish the newer Sun Blade 6048 chassis by looking for the rear top
and bottom cover for greater air flow control.
1. If necessary, unlock the rear door and open.
Locate the door keys that were shipped with the rack and unlock the rear door.
2. Detach the grounding straps connected to the door.
Press down on the tabs on the grounding strap’s quick-release connectors. Pull
the straps away from the frame.
3. Lift the door up and off of its hinges. See FIGURE A-1.
A-1
FIGURE A-1
A-2
Removing the Sun Blade 6048 Door
Sun Cooling Door 5600 Installation Guide • January 2009