1
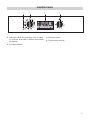
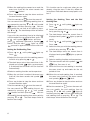
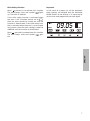
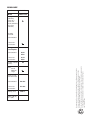
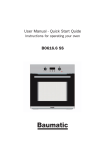
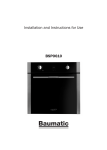
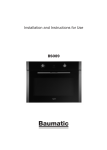
User Manual
Feature
List
Instructions for operating your oven
BO638.6 SS
Note: Please refer to the Installation and Maintenance
manual which accompanies this user manual for important
instructions regarding the correct installation and
maintenance of your oven and important safety instructions.
CONTROL PANEL
1
2
1 Door lock. When this pilot light is on, it indicates that the oven door is locked and cannot
be opened.
3
4
3 Electronic clock.
4 Temperature selector.
2 Function selector.
3
Oven Functions
Switch off oven
Conventional
It is used for sponges and cakes where the heat
received must be uniform to achieve a spongy
texture.
Conventional with fan
Appropriate for roasts and cakes. The fan spreads the heat uniformly inside the oven.
Grill
For preparing dishes with superficial roasting. It
allows the outer layer to be browned without
affecting the inside of the food. Ideal for flat
food, such as steaks, ribs, fish, toast.
MaxiGrill
Allows greater surfaces to be prepared, than
with the grill, together with higher power reducing the time required for browning of the food.
MaxiGrill with fan
Allows uniform roasting at the same time as surface browning. Ideal for grills. Special for large
volume pieces, such as poultry, game, etc. It is
recommended to put the item on a rack with a
tray beneath to collect the stock and juices.
Caution
While using the Grill, MaxiGrill or MaxiGrill with
fan, the door must be kept closed.
4
Turbo
The fan distributes the heat coming from an element located at the back of the oven. As a result
of the evenly distributed temperature, food can
be cooked on two levels at the same time.
Lower Element with Turbo
Ideal for baking pizzas, pies, and fruit tarts or
sponges.
Lower element
Heats only from beneath. Suitable for heating
dishes and raising pastry and similar.
Defrosting
This cooking mode is suitable for gently defrosting of food. In special food to be consumed
unwarmed, e.g.: cream, custard, pastry, tarts,
cakes, fruit, etc.
Pyrolytic Function
This programme allows you to carry out a pyrolytic cleaning cycle which involves the oxidisation
and carbonisation of grease accumulated during
cooking, through the high temperatures that are
reached inside the oven. During the cleaning
cycle the light inside the oven will remain off.
NB
The light remains on through all cooking functions except the pyrolytic function.
Use of the Oven
When the oven is connected to the power supply, the word
and the indication 00:00
flash on the display. Press
or
to set the
time on the clock. The clock beeps twice to confirm the selected time.
If you wish to modify the time, press
or
until the word
and the current time flash
on the screen. Press
. Then press
or
to modify the time. The clock beeps twice to
confirm the modification.
Manual Operation
The oven is ready to be used when the clock has
been set. Select a cooking function and a temperature.
When you begin cooking, symbol
lights up
gradually until the oven heats up 100% to the
selected temperature.
Set the controls to
to turn the oven off.
Symbol
gradually goes out as the temperature inside the oven drops.
Functions of the Electronic Clock
Alarm: Creates an alarm signal when the period
of time finishes; the oven does not need to be in
use in order to use this function.
Cooking Time: To cook for a selected length of
time; the oven turns itself off automatically
when the time finishes.
Child Safety Function. This function blocks the
oven to prevent small children from interfering
with the controls.
Programming the Pyrolytic function
Programming the Alarm
1 Press
.
until symbol
lights up. Press
2 Set the period of time after which you wish
the alarm to sound by pressing
or
.
3 The clock beeps twice, the current time is
displayed and symbol
lights up permanently to indicate that the alarm has been
set.
4 When the set period of time comes to an end,
the alarm sounds and symbol
starts to
flash.
5 Press any button to stop the alarm; symbol
goes out.
You can consult the remaining time at any
moment by pressing
or
until symbol
flashes and then pressing
. You can
also modify the set time at this point by pressing
or
. The clock beeps twice to confirm
the change.
If you wish the remaining time to be displayed
until the end of the set period of time, press
or
until symbol
flashes and then
press
and keep it pressed in. Symbol
flashes and the word
lights up. Keep
pressed in again to return to the real time.
End Cooking Time: To cook until a set time; the
oven turns itself off automatically when the time
finishes.
Setting the Cooking Time
Cooking time and End Cooking Time: To cook
for a selected length of time and end at a set
time. When this function is set, the oven comes
on automatically at the time required in order to
cook for the set length of time (Cooking time)
and end automatically at the indicated time
(End Cooking Time)
2 Select the period of time you wish to cook for
by pressing
or
.
1 Press
Press
or
.
until symbol
lights up.
3 The clock beeps twice, the current time is displayed and symbol
lights up permanently to indicate that the oven will turn itself off
automatically.
4 Select a cooking function and temperature.
5
ENGLISH
Setting the time on the Electronic Clock
5 When the cooking time comes to an end, the
oven turns itself off, the alarm sounds and
symbol
flashes.
6 Press any button to stop the alarm and turn
the oven back on again.
7 Set the controls to
to turn the oven off.
You can consult the remaining cooking time at
any moment by pressing
or
until symbol
flashes and then pressing
. You can
also modify the set time at this point by pressing
or
. The clock beeps twice to confirm
the change.
If you wish the remaining time to be displayed
until the end of the set period of time, press
or
until symbol
flashes and then
press
and keep it pressed in. Symbol
flashes and the word
lights up. Keep
pressed in again to return to the real time.
Setting the End Cooking Time
1 Press
Press
or
.
until symbol
lights up.
2 Select the time you wish the cooking process
to finish at by pressing
or
.
3 The clock beeps twice, the current time is displayed and symbol
lights up permanently to indicate that the oven will turn itself off
automatically.
This function can be used even when you are
already using the oven. To do this, follow the
instructions indicated above except point number 4.
Setting the Cooking Time and the End
Cooking Time
1 Press
Press
or
.
until symbol
lights up.
2 Select the period of time you wish to cook
for by pressing
or
.
3 The clock beeps twice, the current time is
displayed and symbol
lights up permanently.
4 Press
Press
or
.
until symbol
lights up.
5 Select the time you wish the cooking process
to finish at by pressing
or
.
6 The clock beeps twice, the current time is
displayed and symbol
lights up permanently.
7 Select a cooking function and temperature.
8 The oven remains off with symbols
lit up. Your oven is set.
and
4 Select a cooking function and temperature.
9 When the time to start cooking is reached,
the oven starts up and cooks for the set
period of time.
5 When the set time is reached, the oven turns
itself off, the alarm sounds and symbol
flashes.
10 When the set end cooking time is reached,
the oven turns itself off, the alarm sounds
and symbols
and
flash.
6 Press any button to stop the alarm and turn
the oven back on again.
11 Press any button to stop the alarm and turn
the oven back on again.
7 Set the controls to
12 Set the controls to
to turn the oven off.
You can consult the end cooking time at any
moment by pressing
or
until symbol
flashes and then pressing
. You can
also modify the end cooking time at this point by
pressing
or
. The clock beeps twice to
confirm the change.
6
to turn the oven off.
You can modify the end cooking time by
pressing
or
until symbol
lights up
and then pressing
. You can now modify the
end cooking time by pressing
or
. The
clock beeps twice to confirm the change.
Child Safety Function.
Important
Keep
pressed in to activate this function.
The clock beeps twice and symbol
lights
up. The clock is blocked.
In the event of a power cut, all the electronic
clock settings are deleted and the indication
00:00 flashes on the display. It is necessary to
set the time and programme the clock again.
If the child safety function is activated when
the oven is off (function control set to
),
then the oven cannot be turned on until the
function is deactivated. If the child safety function is activated when the oven is set to a cooking function, then the clock settings cannot be
modified until the function is deactivated.
ENGLISH
Keep
pressed in to deactivate this function.
The oven beeps twice and symbol
goes
out.
7
PROGRAMMING AND OPERATING THE PYROLYTIC FUNCTION
Follow the instructions below to carry out a
pyrolytic cleaning cycle:
1 IMPORTANT: Remove all accessories (shelves, grids, side supports to hold up the
shelves, telescopic guide rails) from inside
the oven.
2 Turn the cooking control dial to Pyrolysis
position
.
3 Next, press the PIRO key, the word PIRO
should appear on the timer display.
4 After a few seconds, P2 (pyrolysis programme 2) will appear on the timer display, the
BACK symbol will also remain lit up.
5 You can now change the pyrolysis programme to P1, P2 or P3 by pressing the + or –
keys:
P1: Minimum programme. Duration 1 hour
P2: Standard programme. Duration 1 hour
and 30 minutes
P3: Maximum programme. Duration 2 hours
6 You will hear 2 consecutive beeps after several seconds or by pressing the PIRO key confirming the chosen programme.
7 You can still change the pyrolysis programme by pressing the PIRO key and the + or –
keys.
8 After a short time, you will see the time
remaining for the selected programme to
end and the symbols
and BACK lit up
on the timer display. The pilot light
will
turn on and the oven door cannot be opened, as the heating will have begun.
IMPORTANT: At this point, the oven is programmed and the pyrolytic cleaning cycle is underway. During the cycle, none of the timer functions can be selected, except the child lock. Do
not try to open the oven door as it may interrupt
the cleaning process.
8
9 When the pyrolytic cleaning cycle has finished, an alarm will sound, the symbol
will
flash and you will see the correct time on the
display.
10 Press any of the timer’s keys to disable the
alarm.
11 Set the cooking control dial to position
.
12 The oven’s heating process has ended,
however the oven is extremely hot and cannot be used. The cooling motor will operate
until the oven cools down, pilot light will
remain on and the symbol
will
flash on the timer display.
IMPORTANT
The cooling process may last up to 2 hours owing
to the high temperatures inside the oven.
13 Once the oven has cooled down, pilot light
will automatically turn off.
14 Press the PIRO key to stop symbol 9 flashing.
.
IMPORTANT
To open the door (pilot light on), the control dial
must be in position
. If you did not follow
instruction 11 set the control dial to position
and wait a few minutes until the door unlocks
and the pilot light switches off.
15 Open the oven door and wipe the inside with
a damp cloth, cleaning up the ash from the
cleaning cycle. Areas in the oven that are difficult to access will need to be cleaned with
a non-metallic fibre scourer.
16 Once the oven is clean, do not forget to
replace the supports and accessories.
17 The oven is now ready to be used.
IMPORTANT: If any incidents are detected in
the programming and operating of this function, consult the section “Incidents while
Operating the Pyrolytic Function”.
CANCELLING THE PYROLYTIC CYCLE
1 Set the control dial to position
.
2 Unlock the oven door.
3 Cancel the pyrolysis programme.
b) Unlocking the door in the first 30 minutes (at a low temperature). Within the
first 30 minutes the oven door will unlock
automatically. Follow the instructions
below:
1 Turn the control dial to position
2 Wait for approximately 1 minute.
3 Turn the control dial to position
1 Set the control dial to position
. The
oven will no longer heat up. Wait a few minutes before continuing with the instructions to
unlock the door.
2 Unlock the oven door. To cancel the cleaning cycle, the oven door must be unlocked.
To do so, consider the following:
a) Unlocking the door 30 minutes after the
cleaning cycle. If the oven has been operating for more than 30 minutes, the door
will unlock automatically once the oven
has cooled down to the safe temperature.
Then, pilot light will switch off.
.
.
4 Approximately, 1 minute later pilot
light will turn off and the oven door
can be opened.
3 Cancel the pyrolysis programme. To cancel
the programme you must:
1 Turn the control dial to position
then to position
.
and
2 Press the PIRO key for 3 seconds.
3 Next, the timer display will show the
correct time and symbol
will disappear.
9
ENGLISH
Pyrolysis is an automatic function and therefore
can only be activated from the timer programme.
To cancel a cleaning cycle it is necessary to reset
the oven, following the instructions below:
INCIDENTS WHEN OPERATING THE PYROLYTIC FUNCTION
INCIDENT
CAUSE
SOLUTION
My accessories and shelf
supports are damaged.
You have not removed the acces- You must replace them and
sories and supports during the
remove them in later cleaning
pyrolytic cleaning cycle.
cycles.
The enamel colour has
changed and stains have
appeared.
The chemical composition of
some foodstuffs may cause
changes in the enamel.
This is normal and does not
damage the properties of the
enamel.
The oven door is locked, pilot
light is lit up but the oven is
not hot.
You have turned the control
dial to position
and no
other additional operation has
been performed.
Switch off the oven and follow
the instructions to unlock the
door in the first 30 minutes at a
low temperature.
Next, select the pyrolytic
function, carefully following the
instructions.
I have turned the control dial
The oven door is not closed
to position
, pressed the
properly, so the door cannot
PIRO key, I can see the P1, P2 be locked.
or P3 on the display but the
pilot light is not lit up and
the oven is not heating up.
Check the door and make sure
that it is closed properly.
I have turned the control dial
The door switch is not working
to position
, pressed the
even though the door is
PIRO key, I can see the P1, P2 properly closed.
or P3 on the display but the
pilot light is not lit up and
the oven is not heating up.
Call Technical Assistance
Service as there is a fault in
the door switch.
I have programmed the
pyrolysis function, the oven is
working properly but pilot light
is not lit up.
Pilot light
properly.
Call the Technical Assistance
Service.
The pyrolysis programme has
ended and the oven is cold,
but the door is locked and
symbol
is flashing.
You did not turn the control
dial to position
when the
pyrolysis programme ended.
10
does not work
1. Turn the control dial to
position
and wait for 1
minute.
2. Turn the control dial to position
and wait for 1
minute.
3. Turn the control dial to position
again and wait until
pilot light turns off.
4. Press the PIRO key for 3
seconds.
INCIDENT
CAUSE
SOLUTION
Wait until the temperature
lowers and pilot light turns
off. Then, cancel the pyrolysis
programme.
The control dial is in position
, the oven is cold and the
door is still locked.
You have not followed the
instructions to cancel the
operation correctly.
1. Turn the control dial to
position
and wait for 1
minute.
2. Turn the control dial to
position
and wait for 1
minute.
3. Turn the control dial to position
again and wait until
pilot light turns off.
I have put the control dial in
position
and the door is
unlocked, however symbol
is still lit up and the remaining
time of the cleaning cycle can
be seen on the
display.
You have not followed the
instructions to cancel the
operation correctly.
Follow the instructions to
cancel the pyrolysis
programme.
ENGLISH
The control dial is in position
The oven has not cooled down
and the door is still locked. to the safe temperature.
11
Tray Handle
The tray handle is used when you need to remove the tray to check the food. See figures. To lift the
tray out of the oven, you need to use gloves to protect yourself.
Short hook
Cake tray handle position. You must put the
short hook over the tray.
12
Long hook
Roasting tray handle position. You must put the
long hook over the tray.
Model
Energy
efficiency
class on a
scale of A
(more efficient)
to G (less
efficient).
Conventional.
0,88
Kwh
Forced air
convection.
0,79
Kwh
Usable volume
(litres).
Size:
Small
Medium
Large
Time to cook
standard load.
Conventional.
46 min.
Forced air
convection.
47 min.
Baking area.
1250 cm2
Noise (dB (A)
re 1 pW).
Nuestra aportación a la protección del medio-ambiente: utilizamos papel reciclado.
A nossa contribução para a protecção do ambiente: utilizamos papel reciclado.
Our contribution to enviromental protection: we use recycled paper.
Notre contribution à la protection de l’environnement : nous utilisons du papier recyclé.
Unser Beitrag zum Umweltschutz: wir verwenden umweltfreundliches Papier.
Cod.: 3172677-000
BROCHURE
Manufacturer BAUMATIC
BO638.6 SS
A
Heating
function.
Conventional.
Forced air
convection.
Energy
consumption.
59
United Kingdom
Baumatic Ltd.,
Baumatic Buildings,
6 Bennet Road,
Reading, Berkshire
RG2 0QX
United Kingdom
Czech Republic
Baumatic CR spol s.r.o.
Lípovà 665
460 01 Liberec 4
Czech Republic
+420 483 577 200
www.baumatic.cz
Sales Telephone
(0118) 933 6900
Sales Fax
(0118) 931 0035
Customer Care Telephone
(0118) 933 6911
Customer Care Fax
(0118) 986 9124
Spares Telephone
(01235) 437244
Advice Line Telephone
(0118) 933 6933
Slovakia
Baumatic Slovakia, s.r.o.
Panenská 34
811 03 Bratislava - Staré Mesto
Slovakia
+421 255 640 618
www.baumatic.sk
Germany
Baumatic Gmbh
Bachstr.10-12
D-32 257 Bünde
Deutschland
E-mail:
[email protected]
[email protected]
[email protected]
[email protected]
+49 (0) 5223 99408 0
www.baumatic.de
Website:
www.baumatic.co.uk
Italy
Baumatic Italia S.R.L.
Via Galvani N.3
35011 Campodarsego (PD)
Facebook:
www.facebook.com/baumatic.uk
+3904 9920 2297
www.baumatic.it
Republic of Ireland
Service Telephone
1-890 812 724
Holland
Baumatic Benelux B.V.
Dukdalfweg 15d
1332 BH ALMERE
Nederland
Spares Telephone
091 756 771
+31(0)36 549 1553
www.baumatic.nl
1