1
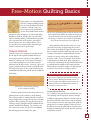
Easy and Fun
Free-Motion Quilting
Frames, Fillers,
Hundreds of Ideas
Eva A. Larkin
Easy and Fun Free-Motion Quilting: Frames, Fillers,
Hundreds of Ideas
© 2012 by Eva A. Larkin
Martingale®
19021 120th Ave. NE, Ste. 102
Bothell, WA 98011-9511 USA
ShopMartingale.com
eBook Edition: 2013
No part of this product may be reproduced in any form,
unless otherwise stated, in which case reproduction
is limited to the use of the purchaser. The written
instructions, photographs, designs, projects, and patterns
are intended for the personal, noncommercial use of the
retail purchaser and are under federal copyright laws; they
are not to be reproduced by any electronic, mechanical, or
other means, including informational storage or retrieval
systems, for commercial use. Permission is granted to
photocopy patterns for the personal use of the retail
purchaser. Attention teachers: Martingale encourages you
to use this book for teaching, subject to the restrictions
stated above.
The information in this book is presented in good
faith, but no warranty is given nor results guaranteed.
Since Martingale has no control over choice of materials or
procedures, the company assumes no responsibility for the
use of this information.
Library of Congress Cataloging-in-Publication Data is
available upon request.
eISBN: 978-1-60468-185-7
Original Source ISBN: 978-1-60468-184-0
Dedication
To God, who promises to never leave
us and never forsake us, and to my dad,
whose love constantly amazes me.
Acknowledgments
I can’t begin to thank my dad enough. His support and encouragement have been endless over
the past couple of years. Like so many others, one day I found myself abandoned and bewildered
after many years of marriage. I couldn’t imagine any kind of future for myself and quite frankly
didn’t want one. But God, Dad, and Martingale gave me hope. God helped me hold on to the idea
that I wasn’t worthless and blessed my first book with Martingale. It seemed like every letter and
call from Martingale came at just the right moment to give me the strength and courage to keep
moving.
God also filled my heart with the dream of writing another free-motion quilting book, and
my dad refused to let me give up on this dream, even on the days when I felt like I had only half a
mind left. Every baby step I took to rebuild my life and work on “the book” was met with love and
encouragement. Now I know that each day brings new hope, and dreams really do come true!
Contents
8
•
Introduction
9
•
Getting Started
11
•
Free-Motion Quilting Basics
15
•
Stippling Simplified
19
•
The Design Mechanics
26
•
Combining Elements for
Fantastic Designs
82
•
What and Where to Quilt
84
•
Gallery
96
•
About the Author
Introduction
Hello Quilters,
Deciding how to quilt a completed quilt top
has frustrated many quilters. It often seems like
the only easy options available are stitching in the
ditch, cross-hatching, or allover stippling. The
other quilting possibilities are interesting, but
they either have to be resized and traced or they were designed
to be stitched on a long-arm quilting machine and are just too
complicated for the everyday quilter.
Easy and Fun Free-Motion Quilting: Frames, Fillers, Hundreds
of Ideas provides the everyday quilter with a fantastic variety of
quilting designs created by combining stippling and short lines—
and they can all be confidently stitched on a home sewing machine
without hours of practice. The simple designs consist of two parts:
base frames and fillers. The frames and fillers are made up of
stippling and can be outlined with either straight or curved lines.
The easy method of combining the base frames and fillers produces
hundreds of exciting quilting designs that you can use on any size
quilt block without resizing and tracing. Plus, each design comes
with step-by-step instructions and detailed illustrations that clearly
walk you through the process from start to finish.
I also have included a section on my free-motion quilting basics
and an overview of my “wiggle” style of stippling. This will help
those who feel uncomfortable with their stippling techniques to
gain confidence and skill without hours of practice. You won’t
believe how easy it will be to get into the stippling groove and
achieve and maintain consistent results, not only with the design
but also with the thread tension and stitch length.
My hope for you is that this book will inspire you to finish those
waiting quilt tops. I want you filled with excitement to select one of
the beautiful designs and know you can stitch it with confidence.
You’ll discover that deciding how to “quilt as desired” can actually
be a fun and rewarding process. So enjoy, and happy quilting!
—Eva
6
Getting Started
The following information
outlines the supplies and preparations needed for free-motion
quilting. Please take a moment to
prepare your sewing machine and
make sure you have everything
you need before beginning.
glove that helps you grip and move the fabric
with less physical effort. I like Grabaroo’s and
Machingers. Both brands are made of nylon, so
they’re breathable while still form fitting. I think
I’m starting to favor the Grabaroo’s because I like
to say their name and I love the bright purple
color. It makes them easy to find!
• Paper and pencil (or pen) for drawing designs
SUPPLIES CHECKLIST
• Recently cleaned and serviced sewing machine
and user’s manual (see “Service Your Sewing
Machine” at right)
• Sewing-machine extension table (optional, but
highly recommended)
• Free-motion quilting foot
• Machine-quilting thread. You’ll have fewer
problems with thread breakage and a lot less lint
in the bobbin, which can cause skipped stitches,
if you use a high-quality thread. One of my
personal favorites is Presencia machine-quilting
thread, a three-ply, 100% mercerized long-staple
Egyptian cotton thread. I use either a 40- or
50-weight thread, for both the top thread and
the bobbin.
• New quilting needle. Quilting needles are
stronger than normal sewing needles, and you’ll
be less likely to break one of these when freemotion quilting. I recommend Schmetz quilting
needles, size 90/14.
• 1" x 12" clear acrylic ruler
• Fabric-marking pencils or pens in two colors.
I love Pilot FriXion Ball Erasable Gel Pens. The
ink is heat sensitive and can be removed with an
iron. Wonderful!
• Quilting gloves (optional, but highly recommended). Quilting gloves can be any type of
Service Your Sewing Machine
Most quilters hate to spend money on stuff other
than fabric, but getting your sewing machine
serviced should be the exception to the rule. No
matter how skilled you are in free-motion quilting,
a machine in need of service will give you nothing
but trouble. Treat yourself and have your machine
serviced at least once a year.
PREPARE YOUR MACHINE
Running through the following checklist will
ensure that your sewing machine is ready for a
session of machine quilting.
• Attach the free-motion quilting foot in place of
the regular presser foot.
• Thread the sewing machine with the same quilting thread in both the top and the bobbin.
• Drop the feed dogs. (If you’re not sure how to do
this, consult the user’s manual for your sewing
machine.)
• Put in a new quilting needle.
• Engage the needle-down function, if available.
(Check your manual to find out whether your
sewing machine has this option.)
7
THREAD BASICS
Thread is obviously an important part of the quilting process. Choosing the right color and type can
spell the difference between success and disappointment.
Choosing a Thread Color
I like to decide how I’m going to quilt a finished
top before I purchase my quilting thread. This way
I know what color fabric I’ll actually be quilting on
and can get the best thread color to blend with it.
It’s simply a matter of auditioning the thread on
the finished quilt top. I do this by unwinding about
an arm’s length of thread and laying it across the
section I’m going to quilt. This shows me the true
amount of contrast between the thread and the
fabric. Free-motion quilting is never going to be
absolutely perfect, and I don’t want any “imperfect”
spots to be overly obvious. The greater the contrast
between the fabric and the thread, the more the
stitching shows up. In most situations I want the
texture of the design to be more noticeable than
the thread color.
8
Introduction
Matching the Top and Bobbin Threads
Thread tension can be a bit finicky for even the
most experienced quilter. It’s also natural for the
tension to pop in and out of alignment while quilting (this even happens to long-arm quilters). Using
the same weight and fiber content for both the top
thread and the bobbin thread will make the tension easier to regulate and stabilize. Also, using
the same color in the top and bobbin threads will
better hide any variances in the thread-tension
alignment.
Monofilament Thread
Many quilters like to use monofilament thread,
which is semitransparent, to help hide imperfections in thread tension. However, I always caution
new quilters about using it when they first start
quilting. It’s much harder to keep the tension balanced with monofilament because of its tendency
to stretch. I highly recommend staying with a good
cotton thread in both the top and the bobbin,
and simply choosing a color that blends well with
the fabric until you’re comfortable adjusting your
thread tension.
Free-Motion Quilting Basics
Many quilters are uncomfortable
with free-motion quilting because
they feel out of control with their
technique. I felt the same way
when I started. The problem for
me was that I didn’t know what to
practice in order to improve. I needed something
tangible to work on. Finally, after years of teaching free-motion quilting, I identified three specific
areas you can focus on to improve your skills. I
refer to them as the “free-motion basics.” They
are thread tension, stitch length, and quilting in
smaller sections with frequent stops.
THREAD TENSION
Thread tension is the amount of strength needed
for the top thread to pull the bobbin thread up
to its proper position, which is in the middle of
whatever is being sewn. You’ll know the tension is
correct when quilting because the thread will be
indented into the fabric and a “pillowing” effect will
appear around the thread stitches on both the front
and back of the quilt. It’s the result of both the top
and bobbin threads being pulled into the middle of
the batting.
The first row of stitching shows where the tension is too
loose and the black bobbin thread has been left lying
on the back of the quilt instead of being pulled into
the batting, as shown in the second row of stitching,
where the thread tension has been tightened.
Most problems with thread tension are easily
solved by increasing (or tightening) the tension.
This is done by turning the upper-thread tension
dial to a higher number in half-step increments. For
example, if a machine’s standard thread-tension
setting is 4, start by setting the tension halfway
between 4 and 5. Sew a test sample. If the thread
is still lying on the back of the quilt, continue to
increase the tension by half steps until both threads
are pulled into the middle of the batting and the
fabric pillows around the stitches. It’s not unusual
to increase the tension to as high as 6.5 or 7.
Where Is the Thread-Tension Dial?
Check your sewing-machine manual to make sure
you are, in fact, adjusting the thread tension. For
years I thought I was adjusting my thread tension,
and it turned out I was adjusting the amount of
The tension is correct when pillowing
occurs around the stitches.
Problems with thread tension occur when we’re
quilting because of the thickness of the batting.
The sewing machine’s standard thread-tension setting is designed for sewing only two layers of fabric
together. When quilting, the top thread tension is
no longer strong enough to pull the bobbin thread
into the middle of the batting. The tension is too
loose and is the reason why you’ll see the bobbin
thread lying across the back of the quilt.
pressure for my presser foot!
Testing Thread Tension
It’s essential to test your thread tension before you
start quilting each new project, because changes
in fabric weight, batting thickness, and the type of
thread used all affect the tension. I like to actually
do my tension test on the side edge of the quilt I’m
going to be free-motion quilting. I take a piece of
the fabric I used in the quilt top, lay it on the extra
backing and batting that extends past the quilt top,
and practice on that.
9
An easy way to accurately test thread tension
is by using the extra backing and batting
on the side of the quilt with a piece of
scrap fabric from the quilt top.
Exercise:
How to Test Thread Tension
1. Thread the machine with the actual
quilting thread to be used in the quilt.
2. Place the test section of the actual
quilt under the needle and sew a line of
stitches 3" to 4" long. If the stitches are
too small to see clearly, sew another line
of stitches with the machine running at a
slower speed.
3. Remove the quilt from under the needle,
clip the threads, and look at the thread
tension on both the front and back of the
sample area.
• Is the fabric pillowing around the stitches?
If it’s not, the tension needs to be tightened (turned to a higher number).
• Is the bobbin thread still lying on the
back of the quilt? If it is, the tension
needs to be increased quite a bit.
You might need to make three to four
changes in half-step increments before
the tension is correct.
4. Continue testing and adjusting the tension settings in this manner until the
tension is correct.
Monitoring the Tension
The thread tension on a sewing machine is fairly
sensitive. It’s easy to pull it out of alignment by
moving the quilt too quickly as you’re stitching.
This usually happens when we start to relax and
become more comfortable with our stippling
design. That’s why it’s important to develop the
habit of regularly looking at the back of the quilt
about every 15 to 30 minutes to check the thread
tension. I don’t cut the threads or take the quilt
out from under the machine; I just flip it over and
look at the area closest to the needle to make sure
the bobbin thread is being pulled into the batting
to create the pillow effect, and that it’s not pulling
around the corners of the design. If you notice a
problem and it’s not too bad, tighten up the tension and resume quilting. Check it again after a
few minutes to make sure the problem has been
corrected. Keep in mind that it takes a lot longer
to remove stitches than it does to quilt them. Trust
me, I’m speaking from experience!
Tighten the tension to eliminate the
bobbin thread from pulling around
curves and corners of the design.
Variations among Machines
On some machines you need to raise the presser
foot in order for a new tension setting to take
effect. Check your user’s manual to see if this
pertains to your machine. If so, leave the needle
down in the quilt, and then lift the presser foot to
engage the new settings.
10
Free-Motion Quilting Basics