1
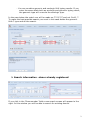
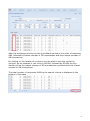
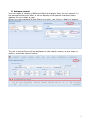
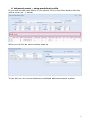
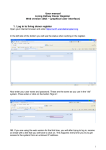
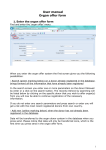
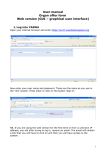
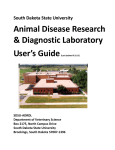
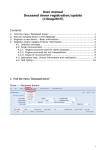
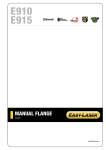
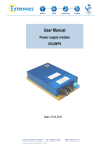
User manual
search for suitable kidney recipient
1. Enter the menu ‘search for suitable kidney recipient’
Waiting list -> search for suitable kidney recipient
2. Search information – donor not already registered
1. Choose for which center you wish to make the search
- If you leave the field empty, you search on all recipients in
Scandiatransplant. Exchange obligations will always be displayed.
2. Enter date of birth on the deceased donor (ex. 01-Jan-1960)
3. Select/register deceased donor blood group
4. Select/register the deceased donor HLA – serologic typing
5. Select/register the deceased donor HLA – genomic typing
1
- You can combine genomic and serologic HLA typing results. If you
enter the same allele both as serologic and genomic typing result,
the genomic type will overrule the serologic type.
In the case below the match run will be made on C*03,*07 and not Cw10, 7.
To make the best possible search you must in this case delete the genomic
HLA-C type and do the search.
3. Search information –donor already registered
If you click in the ‘Donornumber’ field a new search screen will appear to the
right. In this window you will be able to search for existing donors.
2
When you have found the specific donor you were looking for, you click on the
line and donor birth, AB0 and HLA will be transferred to the search screen to
the left.
If you wish to search on recipients belonging to a specific center you must
enter/chose ‘Recipient center’ before searching.
4. Searching
When you have entered the desired donor search information you press
‘search’
The search result list always lists possible exchange obligations in the top
sorted after exchange priorities, which are listed to the left. Priority 1-5 is the
official kidney exchange obligation. Priority 6 is LAMP and priority 7 is all the
rest of the patients on the waiting list. If you have chosen a specific ‘Recipient
center’
3
After the exchange priority the list is as default sorted in the order of matching
AB0, followed by lowest number of DR mismatches and then lowest number of
AB mismatches.
By clicking on the header of a column you are able to sort the results by
yourself. As an example if you click on AB.MM, followed by DR.MM the top
results will be the lowest number of DR mismatches combined with the lowest
number of AB mismatches.
The total number of recipients fulfilling the search criteria is displayed in the
bottom of the page
4
5. Advance search
You can make a variety of different filters and apply them to your search. In
the example below the filter is set to display all recipients that have been
waiting for more than a year.
When you have applied all the filters you wish, you click on ‘Apply to search’.
The list of extra filters will be displayed in the search screen, to use them in
search, press the search button.
5
6. Advanced search – using predefined profile
If you wish to add extra filters to you search click on the filter-button with the
yellow cross (no. 1. below)
When you do this an extra window pops-up
To the left you can choose between predefined advanced search profiles.
6
1. Start by clicking on the profile
2. The parameters will automatically be transferred to the right screen, press
‘apply to search’
3. The parameters that you have chosen to apply will now be displayed
4. Click on ‘Search’ to use the advance search filter
If you wish to have more predefined search profiles available to more users,
not editable, please contact the Scandiatransplant office.
7. Advanced search – creating own predefined profile(s)
You can created a variety of saved profiles by selecting between the different
variables
In this example a search profile for children below 18 years is created. If you
press the ‘save’ button the profile will be saved and it will be available to you
as a ‘saved query’ in the future.
7
You can make as many personally advance search profiles as you would like
and you have the possibility to alter them and save the changes.
8