1
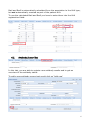
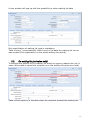
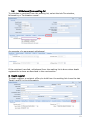
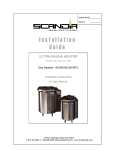
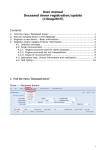
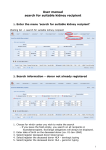
User manual
All recipients
Recipient and waiting list administration
Contents
1. Find the menu ‘All Recipients’ ................................................................ 1
2. Find an existing patient in the database ................................................. 2
3. Register a new patient – Basic information ............................................ 4
4. Register and/or update of patient information ...................................... 5
4.1. HLA typing ............................................................................................ 5
4.2. Antibody Screen Test ............................................................................ 6
4.3. Acceptable antibodies .......................................................................... 8
4.4. Previous Mismatches ............................................................................ 9
5. Waiting list............................................................................................. 10
5.1. Waiting list history.............................................................................. 10
5.2. Preparation for new waiting list entry ................................................ 10
5.3. On waiting list (active/on hold) .......................................................... 11
5.4. Withdrawal from waiting list.............................................................. 12
6. Death register........................................................................................ 12
STAMP/LAMP is described in a separate manual
1. Find the menu ‘All Recipients’
Recipient -> All recipients
1
2. Find an existing patient in the database
When you enter the menu ‘All recipients’ you get a variety of possibilities for
entering search parameters. You can search on one parameter or combine
more parameters to limited the number of recipients.
Example of a search based on a combination of three parameters:
2
At the bottom of the page the total number of recipients fulfilling the search
parameters are displayed (No. 1).
Furthermore, the order of the list is displayed (No. 2), if you wish to change
the order click on the column headers (No. 3).
Below is an example of changed sorting, if you wish to go back to the default
sorting click on the ‘Order by:’ button.
3
3. Register a new patient – Basic information
Click on ‘Add new’
Start entering information.
Mandatory data to fill in before getting a Scandia number is; Date of birth,
Sex, Surname, First name and AB0 blood group.
The person number will be validated according to the registered nationality and
national rules. Furthermore, it will be checked if the patient has been
registered previously in the database.
4
4. Register and/or update of patient information
4.1.
HLA typing
Enter the HLA type or select between HLA types by pressing the drop down
menu. To select a specific type on the list, click on it.
If you start typing, the list will narrow down
5
Bw4 and Bw6 is automatically calculated from the association to the HLA type,
but not automatically counted as part of the patient HLA.
To use the calculated Bw4 and Bw6 you have to enter them into the HLA
registration fields.
4.2.
Antibody Screen Test
In this tab, you are able to register new antibody results and to get an
overview of the antibody status.
To add a new antibody screen test result click on ‘Add new’
6
Fill in date, PRA and technic used
If you wish to fill in antibody specificities you can click on the arrow down and
list of value will appear. Now you can click on the specificities on the list that
you wish to add.
When you save and go back the newly added screen test result will appear on
the list.
If you wish to alter/add information to an already registered result, you click
on the specific line and a pop up window will appear.
7
4.3.
Acceptable antibodies
Previously determined antibodies which are no longer clinical relevant, can be
specified in this tab.
In list of value you can chose between all antibodies determined. The
antibodies that you select as no longer relevant will be displayed in brackets
after saving data.
8
4.4.
Previous Mismatches
This tab contains information on HLA mismatches from previous
transplantations and allows registration of missing previous mismatches.
If the previous transplantation(s) has been registered in the database and
donor HLA has been filled in HLA mismatches will automatically be calculated
and displayed. In the column ‘Tx. Registration in SCTP’ these will be listed as
Yes.
If the transplantation is not registered in the database (mainly kidney
transplantations before 1st of January 1995) you can register previous
mismatches manually.
A previous mismatch is a default set to not acceptable, which means that it will
appear on the kidney search result list as a repeated mismatch if the donor
type includes the specific HLA type. If the value in the ‘Acceptable mismatch’
column is changed to yes, it will not appear as a repeated mismatch on the
search result list.
9
5. Waiting list
5.1.
Waiting list history
When you click on the waiting list tab you will get an overview of the waiting
list history, sorted with the newest entry in top.
You can click on terminated waiting list records to view read only data or you
can enter a not yet terminated record to view and/or alter data.
5.2.
Preparation for new waiting list entry
Click on ‘Add new’ to create a new waiting list entry.
10
A new window will pop up with the possibility to enter waiting list data
Only specification of waiting list type is mandatory.
‘Date of entry’ is automatically filled in and is the date the waiting list record
was created (first registration on the actual waiting list record).
5.3.
On waiting list (active/on hold)
To activate the patient on the waiting list select an urgency status from list of
value. When data is saved the recipient is on the waiting list (active/on hold).
‘Date of first urgency’ is the date when the recipient entered the waiting list.
11
5.4.
Withdrawal from waiting list
To withdraw a recipient from the waiting list, select the tab Termination,
followed by a ‘Termination cause’.
An example of a permanent withdrawal
If the recipient has died, withdrawal from the waiting list is done when death
registration is done as described in the next section.
6. Death register
To death register a recipient off/on/on hold from the waiting list chose the tab
‘Death’ and fill in the information.
12