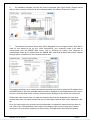
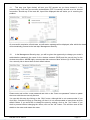
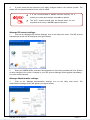
1
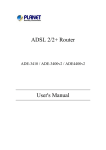
Quick Start Guide Package Contents..................................................................................................................................................................... 3 The Front LEDs.......................................................................................................................................................................... 4 The Rear Ports........................................................................................................................................................................... 5 Getting Started:........................................................................................................................................................................ 6 Setting up your MWEB W40: ............................................................................................................................................... 7 Using the Management Utility:.......................................................................................................................................... 14 Use & Management of the Wireless Connection: .................................................................................................................... 15 Manage ISP account settings: ........................................................................................................................................... 17 Manage Administrative settings: ..................................................................................................................................................17 Running a Diagnostics Test: .............................................................................................................................................. 18 Troubleshooting: .................................................................................................................................................................... 19 Product Support and Contact Information .................................................................................................................... 20 MW/W40 V4.0A-090115 Page 2 MWEB ADSL Wi-Fi Router Package Contents Do not use this router in high humidity or high temperatures. Do not use the same power source for the MWEB W40 as other equipment. Warning Attention Do not open the casing or try to repair the MWEB W40 yourself. Avoid using this product and all accessories outdoors. Place the MWEB W40 on a stable surface. Only use the power adapter that comes with the package. Using a different voltage rating power adaptor may damage this router. For advanced users: The default IP for the MWEB W40 is: 192.168.1.254 For advanced users: The default administrative username and password are: admin and admin. The serial Ethernet adapter cannot be used as a substitute for a network card. This adapter should only be installed if requested to do so by an MWEB Technical Support Agent. MW/W40 V4.0A-090115 Page 3 Quick Start Guide The Front LEDs LED Meaning 1 Internet Lit steady when there is a PPPoE connection. 2 DSL Lit when successfully connected to an ADSL DSLAM (“linesync”). 3 Mail 4 WLAN 5 LAN Port 1-4 6 Lit and flashing periodically when there is mail in your inbox. Lit green when the wireless connection is established. Flashes when sending/receiving data. (RJ-45 connector) Lit when connected to an Ethernet device. Green for 100Mbps; Orange for 10Mbps. Blinking when data is Transmitted / Received. PWR Lit when power is ON. MW/W40 V4.0A-090115 Page 4 MWEB ADSL Wi-Fi Router The Rear Ports The Ethernet Port # 4 can be used as a console port. You need the special console adapter, included in this package, to connect the LAN cable of Port 4 when connecting to a PC’s RS-232 port (9-pin serial port). Note that the console port is for emergency use only, and should not be used by default. Port Meaning 1 Power Switch Power ON/OFF switch 2 Power Connect the supplied power adapter to this jack. After the device is powered on, press it to reset the device or restore to factory default settings. 1-3 seconds: reset the device 3 RESET 6 – 8 seconds: restore to factory default settings (this is useful when you have forgotten the router’s administrative password). Note: If the reset button is pressed for more than 10 seconds the device will need to be power cycled before normal operation can be resumed. 4 WPS LAN (YELLOW) Push WPS button to trigger Wi-Fi Protected Setup function. Connect a UTP Ethernet cable (Cat-5 or Cat-5e) to one of the 5 1—4 (RJ-45 connector) LAN ports when connecting to a PC or an office/home network of 10Mbps, 100Mbps. 6 DSL (RED) Connect the red RJ-11 cable to this port when connecting to the phone-line jack on the wall via the red “DSL” port on the splitter. 7 Antenna Connect the detachable antenna to this port. MW/W40 V4.0A-090115 Page 5 Quick Start Guide Getting Started: Advanced users may access the router’s graphical user interface on the following IP address: 192.168.1.254 The default administration username is “admin” and the password is “admin”. Important Note: It is a security risk to leave your administration password as default – we strongly urge you to change it. Please refer to the installation process or the user manual on your installation CD for assistance. Attention This Quick Start Guide only applies to users running Microsoft Vista, Windows XP and Windows 2000 operating systems. If you are running Windows 98 or Windows NT, please refer to chapter 3 of the user manual for the installation process. To view the manual, insert the CD and click on “Read User’s Manual” when the MWEB W40 Control Panel is displayed. Linux and MAC OS users please refer to page 30 of the user manual for details on Wireless Security. MWEB strongly recommends that their users change the Wireless Network ID and the Wireless Security Key. The software for the W40 makes provision for the use of WPA as the security key. If you would like to make use of WPA2 or WEP for the security key, please refer to page 32 of the user manual. If you are running an operating system from a different vendor such as Linux or MAC OS, please refer to the online user manual for assistance in installing the W40. Before you continue, please make sure you are logged onto your PC or laptop using a Windows user account with administrative rights, the Easy Setup Wizard might require making changes on your system setup. An Easy Setup Wizard has been developed to simplify the setup and maintenance of your MWEB W40. The enclosed CD includes: MWEB W40 Easy Setup Wizard (a Step-by-Step Wizard for initial setup) MWEB W40 Utility (to assist you with post-installation maintenance and diagnostics) MWEB W40 User’s Manual MWEB W40 Diagnostics MW/W40 V4.0A-090115 Page 6 MWEB ADSL Wi-Fi Router Please refer to the section below “Setting up your MWEB W40” to complete a basic initial installation. Setting up your MWEB W40: This section will guide you in setting up your MWEB W40 to connect to the Internet, using your ADSL ISP account. The hardware & cables installation form part of the setup procedure below. Please do not perform any hardware setup now. If nothing happens when you insert the CD, refer to the troubleshooting section at the end of this guide. 1. Insert the enclosed MWEB W40 CD into your CD drive. The MWEB W40 software, including an Easy Setup Wizard (Step-by-Step), management utility and user manual will now automatically be installed to your hard drive. Please follow the on-screen instruction - see figure below. 2. Once the software installation is complete, the easy setup wizard will run automatically. Follow the step-by-step instructions to complete a basic installation. See figure below. MW/W40 V4.0A-090115 Page 7 Quick Start Guide 3. You may use the “Next” and “Previous” buttons to navigate the installation steps. Click the “Next” button on the welcome screen now. 4. The package content screen will now be displayed (See figure below). Move your mouse cursor over each item label in the list to view a picture of the specific item, or click the “Play Video” icon in the bottom-right corner of the screen to view an animated video of the package content. Please ensure that your package is complete and then click “Next” to proceed to the next step. 5. The hardware installation step will now be displayed (See figure below). This screen will display animated videos that will assist you in connecting your MWEB W40 hardware and enclosed cables. There are four sub-steps (videos) to view on this form. Please click on each “Play Video” icon and follow the displayed instruction closely. Then click “Next”. While a video is being displayed, you may click the “Pause” button to temporarily pause the video. Clicking the same button again will resume the video. Clicking the “Stop” button will return you to the hardware installation menu screen. MW/W40 V4.0A-090115 Page 8 MWEB ADSL Wi-Fi Router 6. An installation diagram overview will now be displayed (see figure below). Please ensure that you have correctly connected all the related hardware and cables. Please click “Next”. 7. The Network Connection Setup step will be displayed next (see figure below). Note that in order for this wizard to set up your router successfully, your computer needs to be able to communicate with the MWEB W40 router. This is achieved by setting your computer to automatically obtain an IP address from the MWEB W40. Note that all static and custom network settings will be overwritten for the selected network card. This screen will allow you to choose the network card and to set it up to receive an IP address from the MWEB W40. A list of the available network cards is displayed in the dropdown box at the top of the form, while the detail of the currently selected card is displayed in the centre part of the form. Please select the network card you want the wizard to alter from the dropdown box. Note that wireless and other non-cable connections are not valid options and will thus not be displayed in the list. Once you have made your selection and confirmed that it is indeed the network card you want to use, click on the “Setup Network Card” button in the bottom-right corner to setup your network connection. On successful completion of this process, the Diagnostics test screen will appear. MW/W40 V4.0A-090115 Page 9 Quick Start Guide If your network connection was already setup to obtain its IP address automatically, you computer might have already established communications with the MWEB W40 router and the wizard might have skipped directly to the Diagnostics step. For advanced users: If you do not wish to use the automatic network card setup step and you want to use a static IP scheme, please make sure that your network connection is setup in the correct IP range. Note that the MWEB W40 has a default IP address of 192.168.1.254, so your computer needs to be setup in the following range 192.168.1.x. Also setup your default gateway and DNS server to point to the IP address of the W40. 8. On the Diagnostics test screen (see figure below), four tests will be performed to determine the current status of your MWEB W40 router. These tests include: Testing the network connection to your MWEB W40 Testing ADSL Synchronization Testing a PPP connection Testing a limited Internet connection using the MWEB guest account Click on the “Diagnose” button to start the test. Should any of the four tests fail, you will be notified of the specific failure and assisted in correcting the fault. Please follow the instructions carefully in order to rectify any possible problems. On passing all four tests, the wizard will proceed to the next step: Telkom Line Verification. 9. If your line is verified, the easy setup wizard will continue to the next step. If not, the Telkom Line Verification step will help you verify your ADSL service on the live Telkom ADSL verification webpage. Please follow the instructions on the webpage as opened in the frame on the right hand side of the form. See figure below – the red block indicates the Telkom webpage frame. On MW/W40 V4.0A-090115 Page 10 MWEB ADSL Wi-Fi Router completion of all the steps, the Telkom webpage will notify you that the verification is complete. Click “Next” to proceed to the next step: ISP Account Setup. 10. In this step (see figure below) you will replace the MWEB guest account that is distributed on the MWEB W40 by default with your own individual Internet username and password. Ensure that you have your ADSL ISP username and password as provided to you by MWEB before you continue with this step. Note that the MWEB W40 is for exclusive use on the MWEB ISP network and that you can only use an MWEB ISP account. Please enter your ADSL username in the space provided (note that you should only type in the part preceding the @ sign), and select the correct suffix to your username from the dropdown box to complete your individual MWEB ISP username. Enter your ISP password exactly as supplied to you by MWEB in the space provided and click on the “Submit” button to save your ADSL login details to the MWEB W40. On the successful update of your ADSL login details, a confirmation message will be displayed, after which the wizard will proceed to the next step: Testing your own ISP account. MW/W40 V4.0A-090115 Page 11 Quick Start Guide 11. This step (see figure below) will test your ISP account as you have entered it in the previous step. It will test your account authentication (PPP Connection) as well as a live Internet connection. Should any of the tests fail, tips will be displayed that will assist you in resolving the problem. On successful completion of both tests, a confirmation message will be displayed, after which the wizard will automatically proceed to the last step: Management Security. 12. In the Management Security step, you will be given the opportunity to change your router’s administrative password, the name for the wireless network (SSID) and the security key for the wireless connection. MWEB highly recommends that customers alter all three (3) of these fields, as it is a security risk to leave them as their default values. Please enter and confirm a new password and click on the “Save new password” button to update the router with the new security account. You can skip this step by clicking on the “Skip” button, although this is not recommended. If you click Skip, a window will pop up informing you that it is not recommended to leave these as their default values. If you would like to change the security settings, click on the “Yes” button. If you wish to proceed without changing the values, click on the “No” button. This will then save all the details to the router and restart the router. MW/W40 V4.0A-090115 Page 12 MWEB ADSL Wi-Fi Router We recommend that you change the WPA shared-key for the wireless network to a user-defined value. This key must be no shorter than eight (8) alphanumeric characters. We recommended that the Wireless Access point name be changed to a new name. This is the name that will be displayed for your wireless network when you scan for networks in range. You should change the admin password on your router to prevent unauthorised access. Please memorize or keep this password in a safe place, as you’ll be prompted for it when using the management utility. Warning 13. After all the information has been saved, you will be notified that the wizard is now complete and that the router will be restarted (see figure below). The restart will take approximately 1 to 2 minutes, after which you will be able to browse the internet. Click on the “Ok” button to complete the wizard. You have now completed the basic setup for the W40 that allows you to connect to the Internet only. The following steps in the Quick Start Guide focus on the management utility and how it can be used to set up and manage other features such as wireless and the diagnostic tool. The utility also enables you to manage your ISP and administration accounts. In addition, the utility can be used to diagnose your current W40 configuration and assist in troubleshooting when problems occur. This diagnostic test will also be the starting point in the faultfinding process when you log a fault report with MWEB Technical Support. The following steps are optional. If you do not wish to set up advanced features, do not proceed to the following steps. MW/W40 V4.0A-090115 Page 13 Quick Start Guide Using the Management Utility: 1. Run the Utility software by launching it from the “Start>All programs>MWEB W40” menu. See figure below: 2. The MWEB W40 management utility will launch and immediately prompt you for a router IP address and password (see figure below): This information is used to access the router. If you have not intentionally altered the IP address of the router, it will still be 192.168.1.254, which is the factory default. The password is the administration password that you might have changed during the final step of the Easy Setup Wizard. (Please refer to step 12 on page 12). If you have not changed it intentionally, it should still be “admin”. Once you have entered/confirmed the correct IP address and password, click the “OK” button. The utility will now attempt to set up communications to the MWEB W40 using the information provided. MW/W40 V4.0A-090115 Page 14 MWEB ADSL Wi-Fi Router 3. On successfully contacting the router, the management utility main menu will appear (see figure below). 4. From here you will be able to manage various aspects of your MWEB W40. Please see the sections below for more information on each feature/section. Use & Management of the Wireless Connection: MW/W40 V4.0A-090115 The MWEB W40’s default wireless access point name (SSID) is ‘wlan-ap’. This might have been changed in the final step of the Easy Setup Wizard. When you scan for wireless networks using your wireless client, this is the name that will be displayed. To ensure wireless security “out-of-the-box”, the MWEB W40 is distributed with a unique WPA1 preshared security key already set up on your router. This pre-shared key secures your wireless connection from unauthorized use and is printed on a sticker on the underside of the router. This pre-shared key might have been changed in the final step of the Easy Setup Wizard. If this pre-shared key has not been changed, then it should be changed as soon as possible to a user defined value. You should not attempt to edit the wireless settings while you are connected to your router via the wireless interface, as any changes that are made to the wireless network will result in the connection being disconnected. Page 15 Quick Start Guide Use the MWEB W40 Wireless connection: 1. Please review the notes above. 2. In order to establish a wireless connection to the MWEB W40, you will need to set up your wireless client (i.e. laptop with built-in wireless module, wireless PCI card or wireless USB stick) with the default WPA1 pre-shared key exactly as it is printed on the sticker. Please consult the security section in the manual for your wireless client device for instructions on how to do this. 3. For further assistance on setting up a wireless network, please consult your specific wireless client’s manual or Windows Help. Management of the MWEB W40 Wireless connection: 1. Using the management utility, you can adjust various options to tailor the wireless connection for your specific needs. Click on the “Manage Wireless Settings” icon on the utility main menu. The wireless management screen will appear (see figure below). 2. Here you may enable/disable the wireless function, alter the name for your wireless footprint (SSID), enable/disable the WPA1 security, change the WPA1 pass-phrase to a custom value and also change the channel on which your wireless network operates. 3. After you have altered the wireless setup, click on “Submit” to apply the alterations. MW/W40 V4.0A-090115 Page 16 MWEB ADSL Wi-Fi Router 4. A router restart will be required to fully apply changes made to the wireless module. The restart will only be performed when the utility is exited. It is not recommended to disable wireless security, as it makes your router and network vulnerable to attacks. The Wi-Fi channel should only be altered when you are requested to do so by a MWEB support technician. Manage ISP account settings: 1. Click on the “Manage ISP account Settings” icon on the utility main menu. The ISP account management screen will be displayed (see figure below). 2. Enter your MWEB ADSL username and password in the boxes provided and click ‘Submit’ to save changes to the router. Changes to your ISP account settings will be applied immediately no router restart required. Manage Administrative settings: 1. Click on the “Manage Administrative settings” icon on the utility main menu. The administrative settings screen will appear (see figure below): MW/W40 V4.0A-090115 Page 17 Quick Start Guide 2. Enter and confirm your new administration password in the boxes provided and click “Save New Password” to save it to the router. 3. The change will be applied immediately - no router restart required. Running a Diagnostics Test: 1. The diagnostics test will perform several checks on the current status of your MWEB W40 setup. It is a very useful tool that will enable you to troubleshoot your setup yourself. 2. Click on the “Diagnostics Test” icon on the utility main menu (refer to the “Using the Management Utility” section). The following screen will be displayed: 3. Click the “Run Diagnostics” button to start the test. The items will be tested one by one. Should one of the checks fail, a help screen will appear that will assist you in rectifying the problem. 4. All checks are critical to your Internet connectivity and will cause the diagnostics test to halt in order for you to rectify the problem. An exception to this is the Wireless check, as you might have opted to disable the wireless feature. 5. test. Some checks will display useful information on successful completion of the Diagnostics MW/W40 V4.0A-090115 Page 18 MWEB ADSL Wi-Fi Router Troubleshooting: Problem Description 1: My MWEB W40 router does not successfully sync with my ADSL line. (The ADSL LED keeps flashing). Solution: 1) Make sure that you have correctly connected the router’s “DSL” port to the red DSL port of your filter using the supplied red RJ-11 telephone cable. Please refer to the hardware installation overview diagram on page 7. 2) Confirm that your ADSL service has been activated on your telephone line. 3) If the problem persists, report the line fault to your telephone company (Telkom - 0800 375 375). Problem Description 2: Nothing happens when I insert my CD into my CD drive. Solution: Your computer may not be set to auto-run CDs you insert. To manually start the Easy Setup Wizard, click on “Start” and then “Run”. When the screen below opens, click “Browse”. Navigate to the CD drive containing the installation CD for the MWEB W40 and double-click the file “autorun.exe” and then click “OK”. This will start the Management control panel from where you may proceed with the installation or management. Problem Description 3: After I have completed the installation process, I still cannot browse the Internet / my old connection pops up asking me to establish the connection. Solution: Your Internet Explorer browser is still set up to connect to the Internet using a dial-up account such as traditional analogue or ISDN. Please change this setting to “Never Dial a Connection”. You will find this setting on the browser's "Internet Options" window. Click on Start> Control Panel> Internet Options, then click on the Connections tab. Now check the “Never Dial a Connection” option, then click "OK". MW/W40 V4.0A-090115 Page 19 Quick Start Guide If the problem persists, click the “Setup” button in the top-right corner of the Connections tab. Select “Connect to the Internet”, “Set up my Connection Manually”, “Connect using a broadband connection that is always on”, then click "Finish". Problem Description 4: The Easy Setup Wizard doesn’t seem to respond or doesn’t seem to successfully complete the setup procedure. Solution: 1) Please temporarily disable all software firewall applications. Norton Internet Security, Bit Defender, or Trend-Micro’s PC-Cillin are all examples of firewall applications that may block the Easy Setup Wizard from performing its function successfully. (Also remember to re-enable the application when the Easy Setup Wizard has completed.) 2) If the problem persists, please close the Easy Setup Wizard and launch it again in order to retry the installation process. Product Support and Contact Information Most problems can be solved by referring to the Troubleshooting section in the User Manual on your installation CD. If you cannot resolve the problem, please contact MWEB’s Technical Support team on 0860 11 22 52 or 082 161 00, or e-mail [email protected]. Our Technical Support call centre is open from 8 AM to 10 PM on weekdays/Saturdays, and from 10 AM to 10 PM on Sundays and public holidays. Windows 98, Windows NT, Windows 2000, Windows Me, Windows XP and Windows Vista are registered Trademarks of Microsoft. MW/W40 V4.0A-090115 Page 20