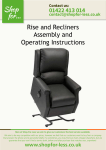
1
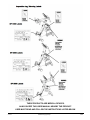
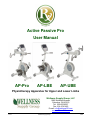
Active Passive Pro
User Manual AP-Pro
AP-LBE
AP-UBE
Physiotherapy Apparatus for Upper and Lower Limbs
1 of 18
Wellness Supply Group, LLC
1685 Woodland Avenue,
Columbus, OH 43219
Tel: 800-653-8037
Fax: 614-474-1483
E-mail: [email protected]
www.wellnessSG.com
Wellness Supply Group
V007
Table of Contents
1.
Important Safety Information
2.
Intended Use, Product Introduction …………………………………………………… 5
i. Product and Model
ii. Intended Use
iii. Introduction
iv. Product Features
v. Specifications
3.
Name of Components & Installation …………………………………………………… 6
i. Name of Components
ii. Installation
iii. Instructions for Using
4.
Monitor
…………………………………………………… 8
5.
Spasm Control
…………………………………………………… 9
6.
How to Use
i. Upper Limbs Exercise
ii. Lower Limbs Exercise
…………………………………………………… 9
7.
Exercise Mode Set-up
i. P Mode: Passive Mode
ii. Program Setting Mode
iii. A Mode: Active Mode
iv. TV Mode
v. Exercise Results
…………………………………………………… 10
8.
Maintenance
i. General Items
ii. Preventive Maintenance
…………………………………………………… 15
9.
Storage and Moving
…………………………………………………… 17
10.
Product Warranty
…………………………………………………… 17
11.
Breakdown and Diagnosis
…………………………………………………… 17
12.
Product Identification
…………………………………………………… 18
2 of 18
…………………………………………………… 3
Wellness Supply Group
V007
1.
Important Safety Information
Please read this manual carefully from beginning to end before using the equipment for the first
time.
This exercise equipment is designed and built for optimum safety. However, certain precautions
are applied whenever you operate a set of exercise equipment. Make sure to read the entire
manual before assembling and operating this machine. Also, please note the following safety
precautions:
The symbols used in this instruction manual and on the exerciser are intended to
point out potential dangers when using the exerciser.
WARNING: If you do not follow these precautions, it may cause death or serious
injury.
CAUTION: If you do not follow these precautions, it may cause serious injury. WARNING
1.
2.
3.
4.
5.
6.
7.
8.
9.
10.
Potential shock hazard.
Do not modify this equipment without authorization of the manufacturer.
Intended for supervised use only.
Patients must not use without being supervised by an assistant.
Leave standing at least one hour at room temperature after transporting or before first use.
Always place on a level and non-slip surface so as to ensure maximum stability.
Always wear snug fitting clothing when using the exerciser.
Designed to be used in a sitting position only.
Operate the equipment correctly in order to utilize the most functions of the equipment.
Close supervision is necessary when used by, with, or near children, invalids, or physically
challenged persons.
CAUTION
1.
2.
3.
4.
5.
6.
7.
8.
3 of 18
If using a wheelchair with the exerciser, please engage the wheelchair’s brake and secure
its stability before exercising.
The crank length must not be adjusted when the motor is running.
Never reach into, or attempt to take hold of, moving parts of the exerciser when it is
running.
Never use the exerciser with a damaged power cord. Use only the original power cord
supplied with the exerciser.
Use the rated voltage.
To prevent electric shock, never use in wet, damp, or very hot conditions.
If the exerciser is damaged/faulty or if it produces abnormal noises or smells, stop the
exercising session immediately, unplug the power cord, and contact your service engineer.
To avoid risk of insufficient suppression of electrical disturbance, this equipment must be
used in a protective area.
Wellness Supply Group
V007
THESE PRODUCTS ARE MEDICAL DEVICES.
ALWAYS KEEP THIS USER MANUAL NEARBY THE PRODUCT.
USER MUST READ AND FOLLOW THE INSTRUCTIONS LISTED BELOW.
4 of 18
Wellness Supply Group
V007
2.
Intended Use, Product Information
i)
Product and Model
1.
2.
Product: Physiotherapy Apparatus for Upper and Lower Limbs
Model: AP-Pro (SP-1000), AP-LBE (SP-2000) and AP-UBE (SP-3000)
ii)
Intended Use
1.
Reconstruction of the muscles and joints and facilitation of motion for enhanced user
recovery.
iii)
Introduction
1.
Motor-driven rehabilitation exerciser for elderly persons, wheelchair users, apoplexy
(paralytic) and remedial exercise.
This product is developed for exercise therapy. Rehabilitation is accomplished by providing
motorized passive assistance and active resistance when appropriate.
2.
iv)
Product Features
1.
2.
3.
4.
5.
6.
7.
8.
9.
Speed, resistance, time, direction of rotation display on screen.
Spasm control.
Speed and resistance can be adjusted to fit the user’s functional capacity.
Forward and reverse movement of both upper and lower body pedals.
Users can specify the desired amount of exercise time.
Biofeedback with the movement.
Touch screen monitor.
Displays exercise amount by % at active exercise (lower pedals/limbs only).
Easy to use, adjustable pedal positions.
v)
Specification
1.
Product Size:
AP-Pro (L x W x H) – 59 x 71 x 108cm / 23” x 28” x 43”
AP-LBE (L x W x H) – 59 x 63 x 108cm / 23” x 25” x 43”
AP-UBE (L x W x H) – 59 x 71 x 108cm / 23” x 28” x 43”
Product Weight:
AP-Pro - 50kg / 110#
AP-LBE - 40kg / 88#
AP-UBE - 53kg / 117#
Rated Voltage: 110V~, 60Hz
Condition for operation:
+10°C ≤ t ≤ +40°C; 30% ≤ rH ≤ 75%; 70kPa ≤ p ≤ 106kPa
Condition for transport and storage:
-40°C ≤ t ≤ +70°C; 10%≤ rH ≤ 100%; 50kPa ≤ p ≤ 106kPa
1 year limited warranty.
Circuit diagrams, component part lists, descriptions, calibration instructions, or other
information available upon request.
2.
3.
4.
5.
6.
7.
5 of 18
Wellness Supply Group
V007
3.
Name of Components & Installation
i) Name of Components
AP-Pro uses upper limbs, or lower limbs
AP-LBE uses only lower limbs
1. Exercising handles
2. Control pad inclination adjuster of
handlebar/upper body exerciser
3. Locking screw with knurled knob for
adjusting height
4. Power switch
5. Footrest
6. Transport wheels
7. Exercise stand
8. Transmission casing
9. Calf support
10. Handlebar
11. Monitor
AP- UBE uses only upper limbs
6 of 18
Wellness Supply Group
V007
ii)
Installation
WARNING:
1. Take care to minimize impact when moving this product.
2. Never use the exerciser with a damaged power cord.
3. This product should be connected to a properly grounded socket.
4. To prevent electrical shock, this product must never be used in moist or humid
environments.
5. To avoid risk of electrical shock, this equipment must only be connected to a
supply mains and properly grounded.
1.
2.
3.
4.
This product should be placed on a horizontally flat floor in accordance with safety and
cautions in use.
Please keep a minimum of 15 inches side distance between this product and other things.
The power has to connect to a properly grounded power outlet.
Turn on the main switch.
iii)
Instructions for Using
1.
7.
8.
This product is intended for supervised use only. Therefore, patients must not use without
being supervised by an assistant.
Do not use for any other purpose.
Begin exercise sessions slowly and then increase the level of intensity gradually according
to the user’s physical capabilities.
Leave standing at least one hour at room temperature after transporting or before first use.
Children must be constantly supervised when exercising on this product.
Never reach into, or attempt to take hold of, moving parts of the exerciser (e.g. cranks,
crank length adjuster, footrests, etc.) when it is running.
Do not disassemble during use or while plugged in.
If this product is damaged, please contact your dealer or authorized service center.
4.
Monitor
2.
3.
4.
5.
6.
Please see the table below for the control pad functions:
7 of 18
Passive Mode
Setting Mode
Active Mode
TV Mode
Wellness Supply Group
Stop Button
Start Button
V007
5.
Pedal Position Control Button:
Pedal and turning knob are
positioned
Volume Button:
Set volume in TV Mode
Menu Button:
Use to return to initial screen
after action
Earphone Jack
Spasm Control
If spasm occurs during exercise, the device will pause and change direction (See Set-up, Page
10) to control and relieve spasm.
A patient who has symptoms of spontaneous muscle spasm while using the unit may cause
damage to muscles if the spasm is not controlled, as well as, not being able to realize the
desired training effect.
Spasm Control Sequence
1.
Spasm Control acts only in Passive Mode.
2.
Start exercise after choosing Spam Control in
Passive Mode (See Set-up, Page 10).
3.
If spasm occurs while patient exercises, the
number of spasm occurrences is registered on the
screen.
4.
If spasm occurs, unit rotates in desired direction
(See Set-up, Page 10) after pausing
approximately 3 seconds.
5.
If the Spasm Control is initiated three (3) times
during a single exercise session, the unit will end
the exercise session and report “System Stopped”.
6.
If session is ended by the Spasm Control function,
turn off main power switch to reset. Turn on again
after waiting at least 30 seconds.
CAUTION:
Patients with predisposition to the occurrence of spasm phenomenon should be
supervised throughout exercise.
8 of 18
Wellness Supply Group
V007
6.
How to Use
CAUTION:
2. Confirm that the power cable is properly connected prior to each use.
3. When using this unit device for exercise, patient must always maintain a
straight, upright position.
4. Patient must use the device with a chair or wheelchair in the proper,
comfortable position. Improper positioning can cause discomfort in the knee,
hip, elbow, or shoulder.
i)
Upper Limbs Exercise
1.
4.
5.
6.
7.
8
Twist the two horizontal knobs (counter-clockwise) and rotate the upper body exercise
handles into the proper position for upper body exercise. Twist knobs clockwise to lock into
position.
Use the device while sitting in chair or wheelchair.
Adjust height using the height control knob on vertical mast to a proper exercise position.
Do NOT let the mast descend uncontrolled into the lowest position - lower with care!
Twist knob clockwise until fully tightened to maintain selected vertical height.
Do not use the device while standing.
Ensure that chair or wheelchair is stable and locked and does not move.
Turn on main switch.
Begin exercise after completing set-up (See Set-up, Page 10).
ii)
Lower Limbs Exercise
1.
Twist the two horizontal knobs (counter-clockwise) and rotate the upper body exercise
handles away from the display and user. Twist knobs clockwise to lock into position.
Control height using height control knob.
Turn on main switch.
Use device while sitting on chair or wheelchair.
Ensure that chair or wheelchair is stable and locked and does not move.
Control pedal position by selecting PEDAL positioning button. User’s foot can be easily put
into pedal.
Fix foot on pedal of device utilizing the Velcro pedal straps.
Begin exercise after completing set-up (See Set-up, Page 10).
2.
3.
2.
3.
4.
5.
6.
7.
8.
CAUTION:
1. Close supervision is necessary when used by, with, or near children, invalids,
or physically challenge persons.
2. Confirm that all adjustment knobs and straps are tightened prior to starting
exercise.
9 of 18
Wellness Supply Group
V007
7.
Exercise Mode Set-up
i)
P Mode: Passive Mode
1.
2.
Mode which uses force of unit to provide joint movement and muscle rehabilitation
exercise for patients who do not move naturally because of arm or leg disability.
During P Mode exercise, if user increases the speed through active assistance (pedaling
faster than set rpm), the device will transition to Active Mode (A Mode). If user decreases
speed to below the set rpm, the device transitions back to P Mode.
a)
Function
Resistance:
•
Set resistance value in case exercise is converted from P Mode to A Mode.
•
Available to set from 1 to 15 levels (initial setting: level 1).
•
Increase/decrease 1 level by pressing +/- button once. Increase to maximum value or
reduce to smallest value by pressing continuously. Touch the number for a keypad for
direct input.
•
Resistance setting can be changed during exercise.
•
Set resistance is applied to all speeds.
•
Resistance value is applied when exercise is changed to A Mode without being applied in P
Mode.
Speed:
•
Available to set from 4 to 60 rpm (initial setting: 4 rpm).
•
Increase/decrease 2 steps by pressing +/- button once. Increase to maximum value or
reduce to smallest value by pressing continuously. Touch the number for a keypad for
direct input.
•
Speed setting can be changed during exercise.
Time:
•
Available to set from 1 to 99 minutes (initial setting: 15 min).
•
Increase/decrease 1 minute by pressing +/- button once. Increase to maximum value or
reduce to smallest value by pressing continuously. Touch the number for a keypad for
direct input.
•
Time setting can be changed during exercise.
Direction of Rotation:
•
Set direction of rotation of arm and leg exercise.
•
Press icon until the desired direction arrow mark lights up.
•
Available to select Forward direction or Backward direction.
•
Direction can be changed during exercise.
Spasm Control:
•
Set Spasm Control availability in case spasm happens while patient exercises (See Spasm
Control Set-up, Page 8).
•
Spasm Control setting CANNOT be changed during exercise.
Arm and Leg Exercise:
•
Select and set exercise region.
•
Upper limb and lower limb exercise CANNOT be accomplished at the same time.
•
Exercise region (upper limb or lower limb) CANNOT be changed during exercise.
10 of 18
Wellness Supply Group
V007
b)
How to Set
1)
Select P exercise mode in initial screen
on monitor.
2)
Select SPEED button. Set desired speed
by pressing + or - button (4-60 rpm).
3)
Select POWER button. Set desired
resistance value by pressing + or - button
(Level 1-15).
4)
Select DURATION button. Set desired
time by pressing + or - button (1-99 min).
5)
Select FORW/BACKW button to set
direction of rotation. Pressing the button
again changes direction.
6)
Select SPASTIC AUTOMATION button to
set spasm control function (circle will light
up).
7)
Select arm training or leg training. Both
exercise regions CANNOT be selected at
the same time. The circle next to the
selected region / button will light up.
8)
Press START button on control panel and
begin exercise.
11 of 18
Wellness Supply Group
V007
9)
When the exercise session ends,
exercise results will be displayed on
monitor.
ii)
S - Program Setting Mode
10) Press MENU button on control panel to
return to initial screen.
Allows the user or therapist to define the parameters of an individual exercise program: time,
spasm settings and setting suitable sensitivity control systems according to the patient’s state.
a)
Function
Spasm Sensitivity:
•
It consists of 3 steps of Fine, Medium, and Rough. Sensitivity is set according to patient’s
spasm degree. During exercise, the spasm control function acts according to set
sensitivity.
Spasm Control:
•
Select direction of rotation after spasm control according to exercise direction.
↑ : After spasm control, regardless of present direction, it rotates unconditionally
only to forward direction.
↓ : After spasm control, regardless of present direction, it rotates unconditionally
only to backward direction.
↕ : After spasm control, it rotates to opposite direction of present direction.
Motor Power:
•
Used to maintain the amount of power (torque) to correspond to the strength of the upper
or lower limbs.
•
It consists of 3 steps of Fine, Medium, and Rough.
Exercise Time:
•
Set exercise time.
•
Control from 1 to 99 minutes (initial setting: 15 min).
b)
How to Set
1)
Select S Program in initial screen on
monitor.
12 of 18
2)
Set desired exercise time in next screen
by pressing + or - button (Max 99 min)
Wellness Supply Group
V007
3)
Select SPASM DETECTOR button. Set
desired sensitivity by pressing Fine,
Medium, or Rough.
4)
Select SPASTIC AUTO button. Set
desired direction by pressing forward,
backward, or reverse-direction arrow.
5)
Select MOTOR POWER button. Set
desired power by pressing Fine, Medium,
or Rough.
6)
Press MENU button on control panel to
store settings. Pressing “P” will also store
settings.
7)
Press START button on control panel and
begin exercise.
8)
Press P button on monitor screen to
confirm exercise settings. Setting of
resistance, speed, and time while
exercising is the same with Passive Mode
set-up (See Set-up, Page 10).
9)
When the exercise session ends,
exercise results will be displayed on
monitor.
10) Press MENU button on control panel to
return to initial screen.
13 of 18
Wellness Supply Group
V007
iii)
A Mode: Active Mode
Mode for exercise using patient’s force. Helps increase muscular power by providing resistance
against activity.
a)
Function
1.
2.
Resistance: turning load amount during exercise.
Balance (Biofeedback): During exercise, displays force that is imposed by left and right by
% (lower limbs exercise only).
b)
How to Set
1)
Select P Mode in initial screen on
monitor.
2)
In next screen, set desired resistance by
pressing + or - button. Then select A
Mode.
3)
Press START button on control panel.
Start exercise by patient’s force.
4)
Monitor screen displays present speed,
exercise time, resistance, and left/right
balance (for lower limbs only) during
exercise.
5)
Press STOP button to end exercise
session. Exercise results will be
displayed on monitor.
6)
Press MENU button on control panel to
return to initial screen.
14 of 18
Wellness Supply Group
V007
iv)
TV Mode
A function that allows the user to watch TV while exercising in either P or A Mode. TV cable or
DVD player must be connected.
How to Watch
1.
8.
Initiate TV Mode after beginning
exercise session.
Select TV button during exercise.
Channel selection window and exercise
information are displayed on screen.
Touching the screen with hand causes
channel selection window and exercise
information to disappear from screen.
Touching the screen causes the
exercise information and channel
selection window to reappear.
Change channel by pressing channel
button on screen. Control volume by
VOL buttons of control panel.
Touch program or exercise mode to
change display to program window and
exercise mode window.
Press TV icon to return to TV Mode.
v)
Exercise Results
1.
Exercise Time (minutes, seconds)
• Displays total exercise time.
Exercise Distance (km)
• Displays total exercise distance.
Spasm (number of times)
• Displays number of spasm control
episodes during exercise session.
Active Exercise Ratio (%)
• Displays total active exercise
amount.
Active Exercise (left) (%) - for lower limb exercise only
• Displays active exercise grade of left side.
Active Exercise (right) (%)- for lower limb exercise only
• Displays active exercise grade of right side.
2.
3.
4.
5.
6.
7.
2.
3.
4.
5.
6.
8.
Maintenance
WARNING:
1. When initiating repair process, turn off main power switch. User may suffer
injury from malfunction of the product.
2. Do not repair the device outside of manufacturers recommendations.
Manufacturer assumes no responsibility for any alterations or repairs.
15 of 18
Wellness Supply Group
V007
i)
General Items
1.
2.
Inspect regularly for any damage and normal operation to use the device safely.
Replace worn or damaged parts, particularly high-wear parts, discovered through routine
inspection.
When checking or replacing consumable parts, be sure to turn off main power switch and
remove power cord from the power outlet.
Repair and readjustment of product must be done by certified technician or manufacturing
company.
3.
4.
ii)
Preventive Maintenance
a)
Daily Inspection Items
1.
2.
4.
5.
6.
Always shut off power before checking.
Please polish monitor and outside of unit. Use soft cotton material. Do not use abrasive
cleaners. Do not use cleaners that contain ammonia or acids.
Inspect and remove any foreign substances in and around turning parts (knobs, pedal
bearings, etc).
Inspect cleanliness of foot pedals and handles.
Inspect power plug and all cables for visible damage.
Maintain a clean environment around the exercise device.
b)
Weekly Inspection Items
1.
2.
Check monitor.
Check pedals and handles for proper tightness and eliminate any unusual play.
c)
Main Component Routine Inspection Schedule
3.
Part / Item
Daily
Weekly
Power plug / cord
I
Monitor
C
Frame
C
Pedals
C
I
Turning knobs
C
I
Fixed knobs
C
I
I = Inspect
Twice a Year
I
I
C = Clean
d)
Prohibited Random Alteration and Reconstruction
1.
2.
Product cannot be altered outside of manufacturer’s original product specifications.
Product alterations or changes are not warranted so that all the losses that might occur are
not compensated.
The product warranty shall not apply if there is any modification to the product or
accessories or if there is a failure to provide maintenance as outlined in the manual.
3.
16 of 18
Wellness Supply Group
V007
4.
5.
6.
The product warranty does not cover damage or equipment failure resulting from misuse,
abuse, or failure to comply with electrical codes.
The buyer’s remedy for breach of the expressed warranties contained herein shall be
limited to the return of the product and accessories and repayment of the original purchase
price. Provided, however, at manufacturer selection, it may repair and replace the nonconforming goods or parts.
Manufacturer shall not be liable for any incidental or consequential damages.
Note.
The owner of the product is responsible for proper disposal of used or discarded product in
compliance with all applicable federal, state and local waste disposal laws and regulations.
9.
Storage and Moving
i)
Storage Method
1.
2.
3.
Keep product in clean, dry environment.
Keep product in sealed packing to eliminate dirt, dust, and moisture.
Keep separate power supply cord detached while in storage.
ii)
Moving Method
1.
2.
3.
4.
Move product using transfer wheels.
Requires more than 2 persons to transfer product over steps or up stairs.
Do not transfer device with power supply cord attached.
Transfer after tightening all adjustment knobs.
10. Product Warranty
1.
2.
3.
1 year limited warranty.
Product warranty does not cover damage or equipment failure resulting from mis-use,
abuse, or external impact.
Product warranty will not apply if there is any modification to the product outside the
manufacturers recommendations.
11. Breakdown and Diagnosis
Symptoms
Diagnostic
Solution
No power.
Be sure power cord is properly Insert correctly in outlet and
connected.
main body connector.
Pedal not positioned properly.
Press PEDAL position control
button.
Turn power off and on again to
reset. If there is no change,
request factory assistance.
Spasm Control function does
not work.
Confirm exercise is in Passive
Mode. Make sure Spasm
Control is selected.
Choose ROUGH spasm
control setting in Passive
Mode.
Upper limb cranks do not
rotate.
Make sure arm exercise is
selected.
Choose arm exercise in
Passive Mode.
17 of 18
Wellness Supply Group
V007
Symptoms
Diagnostic
Solution
Lower limb cranks do not
rotate.
Make sure leg exercise is
selected.
Choose leg exercise in
Passive Mode.
TV does not turn on.
Be sure cable wire is
connected.
Insert cable into the
connection on frame.
If you are still experiencing problems please contact your dealer or authorized service center.
12. Product Identification
1.
2.
3.
4.
5.
6.
Name of item: Physiotherapy Apparatus for Upper and Lower Limbs
Type: AP-Pro (SP-1000), AP-LBE (SP-2000) and AP-UBE (SP-3000)
Protection against electrical shock: Class I
Protection against harmful ingress of water: Ordinary (IP20)
Methods of sterilization: Not applicable
Stability of use in an Oxygen Rich Environment: Not suitable for use in an Oxygen Rich
Environment
7. Mode of operation: Continuous operation
8. Serial number: Marked separately
9. Date of manufacture: Marked separately
10. Packing unit: One (1) unit
11. Manufacturer: Sungdo MC Co. Ltd.
18 of 18
Wellness Supply Group
V007