1
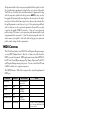
®
M5 Stompbox Modeler
Pilot’s Handbook
Manuel de pilotage
Pilotenhandbuch
Pilotenhandboek
Manual del Piloto
取扱説明書
40-00-0292
Also available @ www.line6.com/manuals
Rev A
Important Safety Instructions
C AU T IO N
RISK OF ELECTRIC
SHOCK DO NOT OPEN
WARNING : TO REDUCE THE RISK OF FIRE OR ELECTRIC SHOCK, DO NOT REMOVE SCREWS. NO USER-SERVICEABLE PARTS INSIDE.
REFER SERVICING TO QUALIFIED SERVICE PERSONNEL.
WARNING : TO REDUCE THE RISK OF FIRE OR ELECTRIC SHOCK, DO NOT EXPOSE THE APPLIANCE TO RAIN OR MOISTURE.
CAUTION: This equipment has been tested and found to comply with the limits for a Class B digital device pursuant to Part 15 of FCC Rules. Operation is subject to the
following two conditions: (1) This device may not cause harmful interference, and (2) this device must accept any interference received, including interference that may
cause undesired operation.
The lightning symbol within a triangle means “electrical caution!” It indicates the presence of information about operating voltage and potential
risks of electrical shock.
The exclamation point within a triangle means “caution!” Please read the
information next to all caution signs.
Please Note:
Line 6 and M5 are trademarks of Line 6, Inc. All other product names, trademarks, and artists’ names are the property of their respective owners,
which are in no way associated or affiliated with Line 6. Product names, images, and artists’ names are used solely to identify the products whose tones
and sounds were studied during Line 6’s sound model development for this product.The use of these products, trademarks, images, and artists’ names
does not imply any cooperation or endorsement.
SERIAL NO:
You should read these Important Safety Instructions. Keep these instructions in a safe place
•
•
•
•
•
•
•
•
•
•
•
•
•
•
•
•
•
•
•
•
•
Read these instructions.
Keep these instructions. Heed all warnings.
Follow all instructions. Do not use this apparatus near water. Clean only with dry cloth.
Do not block any ventilation openings. Install in accordance with the manufacturer’s instructions.
Do not install near any heat sources such as radiators, heat registers, stoves, or other apparatus (including amplifiers) that produce heat.
This apparatus shall be connected to a MAINS socket outlet with a protective earthing connection.
Do not defeat the safety purpose of the polarized or grounding-type plug. A polarized plug has two blades with one wider than the other. A grounding type plug has
two blades and a third grounding prong. The wide blade or the third prong are provided for your safety. If the provided plug does not fit into your outlet, consult an
electrician for replacement of the obsolete outlet.
Protect the power cord from being walked on or pinched particularly at plugs, convenience receptacles, and the point where they exit from the apparatus.
Only use attachments/accessories specified by the manufacturer.
Use only with the cart, stand, tripod, bracket, or table specified by the manufacturer, or sold with the apparatus. When a cart is used, use caution when moving the
cart/apparatus combination to avoid injury from tip-over.
Unplug this apparatus during lightning storms or when unused for long periods of time.
Refer all servicing to qualified service personnel. Servicing is required when the apparatus has been damaged in any way, such as power-supply cord or plug is damaged,
liquid has been spilled or objects have fallen into the apparatus, the apparatus has been exposed to rain or moisture, does not operate normally, or has been dropped.
The apparatus shall not be exposed to dripping or splashing and that no objects filled with liquids, such as vases, shall be placed on the apparatus.
WARNING: To reduce the risk of fire or electric shock do not expose this apparatus to rain or moisture.
The appliance coupler is used as the disconnect device, the disconnect device shall remain readily operable.
Connect only to AC power outlets rated: 100/120V 220/240V 50/60Hz (depending on the voltage range of the included power supply).
Prolonged listening at high volume levels may cause irreparable hearing loss and/or damage. Always be sure to practice “safe listening.”
Service is required when the apparatus has been damaged in any way, such as:
• power-supply cord or plug is damaged. • liquid has been spilled or objects have fallen into the apparatus.
• the unit has been exposed to rain or moisture. • the unit is dropped or the enclosure is damaged.
• the unit does not operate normally or changes in performance in a significant way.
Rear Connections
Basic Operation
Growler
FILTER
FREQ
Q
0.84HZ
PITCH
MIX
EL SELE
OD
E
YP
PR
ES
CT
M
1A
S FOR T
STOMPBOX
1. Power - Connect the included 9VDC 500mA Power Supply here to
power the unit.
2. Expression Pedal - Compatible with standard
expression pedals,
including the Line 6 EX-1. Control effects parameters in real time by
assigning them to this expression pedal input. The Line 6 expression
pedal is a passive 10K ohm mono linear taper pot, using a standard 1/4
inch mono instrument cable.
3. Stereo Input - When connecting your guitar or other mono source use
the L(MONO) input.
4. Stereo Output - For mono output, use the L(MONO) output.
1. Model Select - Press in the knob to select an effect type (Delay,
MIDI
IN
OUT
SETUP - HOLD TAP AND
PRESS MODEL SELECT
SAVE PRESET - PRESS
AND HOLD MODEL SELECT
5. MIDI In/Out - Allows you to remote control preset changes, expression
pedals, and tap tempo plus dump and receive preset data via MIDI
System Exclusive messages.
Modulation, Distortion, Filter or Reverb) you want. Then turn the knob
to scroll through available effect models.
2. Parameter Knobs - Use these knobs to edit current effect settings shown
in your display. These knobs control the setting locations as shown in
the diagram above. NOTE: For fine control of an edit parameter, press
and hold TAP while turning the PARAMETER KNOB. 3. Display - Your display will show all the settings for the selected effect. The
display illuminates the color of current effect type (Distortion–yellow,
Delay–green, Modulation–blue, Filter–purple & Reverb–orange).
4.TAP - Tap tempo is available for all Delay effects, most Modulation
effects, and some Filter effects. For Delay and Modulation effects turn
the middle top row PARAMETER KNOB or for Filters turn the left
bottom row PARAMETER KNOB all the way to max, and you’ll switch
between tap tempo and regular control modes. Once you’re in tap tempo
control mode, turn the knob to select one of the available note values.
Tap two or more times on the TAP switch, and all the effects set to tap
tempo control will change their time/speed/tempo to match the tempo
you tapped. To end tap tempo operation for an effect, turn the knob to
max again. NOTE: Parameters set to tap tempo control are not affected
by expression pedal operation.
TUNING - Press and hold TAP to enter Tuner Mode. All effects processing will be bypassed. Use your lower left parameter knob to set your
reference frequency. Use the lower right parameter knob to select either
“BYPASS AUDIO” or “MUTE AUDIO” for silent operation. Press ON/
OFF or TAP to exit the tuner.
50
50
b
#
440
REF
E
MUTE
AUDIO
5. ON / OFF - Turns your effect on or off. When enabled the footswitch
will be brightly lit.
6. Presets - Press both ON/OFF and TAP simultaneously to enter Preset
Mode. M5 comes preloaded from the factory with 24 presets. The
DISPLAY will show three presets at a time with the currently selected
preset always in the middle.
01 Slap Back Delay
02 Analog Chorus
03 Particle Verb
Press TAP “ ” to advance down to the next preset or press ON/OFF
“ ” to advance up to the previous preset. Press both ON/OFF and TAP
to load the selected preset and return to “Performance Mode”. When
in Presets Mode you can also turn the MODEL SELECT knob to scroll
through presets - press down on the MODEL SELECT knob to commit
the highlighted preset and return to Performance Mode.
Saving, Naming & Arranging Presets
You can customize and save your own presets or easily rename any of
the factory presets. To initiate the save procedure, press and hold the
MODEL SELECT knob for approximately 2 seconds. Your display should
now look similar to this:
SAVE PRESET:
02 Analog Chorus
CHAR
HOLD MODEL SELECT TO SAVE
<>
DEST
Turn the top right PARAMETER KNOB to select the preset location
(01-24) to save your new preset. If you would like to rename your
preset, use the top center PARAMETER KNOB to move the cursor to
the character segment you would like to change. Press MODEL SELECT
to choose through four character sets (all caps, lower-case, numerical,
and symbols), then turn the MODEL SELECT knob to scroll through
the character set. Once you have renamed the preset, press and hold
MODEL SELECT for approximately 2 seconds to save the preset and
return to Performance Mode. You can abort a save by pressing the TAP
footswitch. Note: The M5 allows two different modes for saving presets,
which can be changed in the set-up pages (See “Manual/Auto Save
(Presets) below). AUTOSAVE allows every adjustment you make in a
given effect to be retained without going thru the above saving routine.
Use this mode when you don’t want to have to rename your preset every
time you make a tweak. When PRESETS are set to MANUAL, your
adjustments are not recalled unless you go through the save routine.
Setup
You can set this to “INSTANT PRESET” by turning the bottom center
To access the setup pages, press and hold the TAP footswitch then press
the MODEL SELECT knob. The DISPLAY should look similar to this:
Prefs
Presets
Display
DSP BYP
AUTOSAVE
CONTRST
REL
POTS
LOAD
PRESET
V. 1.0
You can exit the setup pages at anytime by pressing the TAP button.
True Bypass / DSP Bypass
Choose True Bypass when you want to remove the M5 Stomp Modeler
from your signal path when the FX Unit or Tuner is not in use. When
choosing DSP Bypass you’ll get the benefit of hearing delay and reverb
trails smoothly decay when disengaging those effects.
PARAMETER KNOB. In this setting, once you enter Preset Mode,
presets will load instantaneously as you use the
turn the MODEL SELECT knob.
Firmware Version
The bottom right corner of the Setup page 1 displays your current firmware version. You can use the free Line 6 Monkey software application
available at www.line6.com to check for updates to your M5.
Additional Setup (Page 2)
To access page 2 of the Setup screens press the MODEL SELECT knob
once. The DISPLAY should now look similar to this:
Manual / Auto Save (Presets)
As you adjust an effect those adjustments are retained as you switch
away to a different preset and back again—no save function is required.
It’s just as if you were adjusting different physical stompboxes, each of
which would still have the last knob settings you made to it.
If you prefer that presets not remember new adjustments, use the top
center PARAMETER KNOB to change the setting to “MANUAL”. To
save any new adjustments you will now need to follow the steps described
in the [Save, Renaming & Arranging Presets] section of this manual.
Contrast This sets the brightness of display.
Relative / Absolute Pots
In REL mode when you turn a knob the parameters will not jump to the
position of the knob but change proportionally to the amount of your
parameter knob movement up or down. When set to ABS it is not possible to make incremental edits of an effect parameter. The parameter
value always adjusts from the current pot position.
Load / Instant Preset
Your M5 factory defaults this setting to “LOAD”. When you enter Preset
Mode a new preset selection will not initiate until you press both ON/
OFF and TAP or by pressing the MODEL SELECT knob.
footswitches or
MIDI
Tempo
Gate
DUMP ALL?
120.0BPM
THRESH
CH1
PRESET
TAP
DECAY
MIDI
With a MIDI interface and a sysex application, you can back up all your
M5 presets to your computer. This makes it easy to build a custom preset
library, or exchange presets with others. To backup your presets, or to
dump the current preset, follow these steps:
•Turn bottom left PARAMETER KNOB to set your MIDI
Channel (Ch. 1-16 or Omni - the default is Ch. 1).
•Turn the Model Select knob to select “DUMP ALL?” (to back
up all 24 presets) or “DUMP PRE?” (to back up your current
preset).
•With your computer set up to record sysex, press and hold TAP
while you press down on the MODEL SELECT knob.
The M5 will immediately transmit the sysex file to your computer, creating a backup of your presets that you can store and recall at any time.
To load presets back into your M5, simply transmit the sysex file from
your computer into the M5 via MIDI. A single preset will be loaded into
M5’s current location.
FACTORY RESET: There may be times when you’d like to reset your
M5 to its Factory settings. You may want to recall a particular Factory
preset, for example, or just get back to square one.
To do a Factory Reset, first back up any presets you’d like to keep (as
described above), then follow these steps.
•Turn the MODEL SELECT knob until “RST FACT?” is
displayed.
•Press and hold ON/OFF while you press down on the MODEL
SELECT knob - “Reset To Factory? Are You Sure” will be
displayed.
•To initiate the Factory Reset, hold ON/OFF and press down on
the MODEL SELECT knob again.
All Factory defaults will be reset, including presets and global settings.
FIRMWARE UPDATE INSTRUCTIONS: Here are some instructions on
how to update your M5’s Firmware using your computer. Visit www.
Line6.com to keep up-to-date on the latest M5 news - that’s the best
place to get information about any new firmware update that may be
released. You will need the following items:
•A MIDI interface that connects to your computer (most
commonly via USB). Be sure and download the current Driver
for it if you don’t already have it installed.
•2 MIDI cables (or a MIDI interface that comes with MIDI cables
attached).
•The latest Line 6 Monkey application installed on your
computer.
Now follow this procedure to update:
•Connect your M5 to your computer via your MIDI interface and
MIDI cables.
•Select the Flash Memory line item.
•Click the blue button and follow the on-screen instructions.
Line 6 Monkey will install the latest firmware into your M5.
Tempo
Use TEMPO to manually adjust your TAP tempo from 30 to 240 BPM
instead of using the TAP footswitch. You can assign TAP / BPM as a global
or per preset setting by turning the bottom row center PARAMETER
KNOB. Note: For fine control when adjusting BPM, continue holding
the TAP footswitch after entering the setup pages. While TAP is pressed,
BPM will now move in .1 increments as you turn the PARAMETER
KNOB .
Gate
Think of the Gate as a special additional pedal that applies to each
preset. There is no footswitch control for this effect so only use it when
you always want the gate engaged. This is handy for taming some of the
wilder distortion and fuzz effects or use it to eliminate the hum you get
from a guitar equipped with single coils. Your top right PARAMETER
KNOB sets the THRESHOLD and your bottom right PARAMETER
KNOB sets the DECAY of this effect.
Using
an
Expression Pedal
You can adjust any or all of the effect parameters with real time control
via an external expression pedal. Expression pedal parameter assignments are stored individually per preset.
Connect an expression pedal to your M5 Stompbox modeler. Start with
the pedal in the toe position. Once you have your effect parameters settings as desired rock the expression pedal to its heel position. Now set
your parameters to your desired settings. Now as you move your expression pedal from heel to toe you’ll see all of the adjusted parameters move
between these settings.
•Make sure your MIDI interface Driver is installed and working.
•Launch the Line 6 Monkey application.
•You should see your M5 as a connected device.
DRIVE
All parameters affected by an expression pedal will show a pixel notch at
the top indicating a parameter’s setting for the toe position of the pedal.
You’ll also see a notch at the bottom that indicates a parameter’s setting with the expression pedal in the heel position. NOTE: In any case, the
bar graph will automatically never display in the areas above the rightmost pixel or below the left-most pixel, since these are the extremes that
the pedal’s parameter control are set to go to. If no expression pedal heel
and toe values are set for a particular parameter, there will be no pixel
cutout in the graphic. TIP: If you want to “clear out” your expression
pedal settings: Disconnect your expression pedal momentarily, tweak
any parameters that you want to “clear” the expression pedal control of,
and reconnect your pedal to start fresh with setting up your expression
pedal control settings for those parameters.
MIDI Control
The M5 will send and receive MIDI CC and Program Change messages
on any MIDI Channel from 1 thru 16 or Omni, selectable from the
MIDI screen in Setup mode. MIDI implementation includes MIDI CCs
for FX Unit On and Bypass messages, Tap Tempo, Expression Pedal CCs
and Program Change messages for presets. You can control the M5 from
a MIDI controller or a computer sequencer.
The MIDI Reference Tables below represent the currently implemented
MIDI spec.
FUNCTION
MESSAGE
VALUE RANGE
Preset Change
PC
0-23 (Corresponds to
Presets 01-24)
Tap Tempo
CC#64
64-127
FX on/off
CC#11
0-63 (Bypass)
64-127 (On)
Expression Pedal
CC#01
0-127
Tuner Mode on/off
CC#69
0-63 (Exit)
64-127 (Enter)
Sync to MIDI clock
MIDI Beat Clock
NOTES
Tap Tempo - enabled FX automatically
sync to incoming MIDI Beat Clock
when it is received
80
82
84
86
88
90
92
94
96
98
100
102
104
106
108
110
112
114
116
118
120
122
124
126
128
130
132
BPM
750
732
714
698
682
667
652
638
625
612
600
588
577
566
555
545
536
526
517
508
500
492
484
476
469
462
455
1/4 Note
BPM To Milliseconds Conversions
375
366
357
348
341
333
326
319
312
306
300
294
288
283
277
272
268
263
259
254
250
246
242
238
234
231
227
1/8 Note
1/16 Note
187.5
183
178
174
170
167
163
159
156
153
150
147
144
142
139
136
134
132
129
127
125
123
121
119
117
115
113
500
488
476
465
455
444
435
426
417
408
400
392
385
377
370
364
357
351
345
339
333
328
323
317
312
308
303
1/4 Triplet
1/8 Triplet
250
244
238
233
227
222
217
213
208
204
200
196
192
189
185
182
179
175
172
169
167
164
161
159
156
154
152
1/32 Note
94
91
89
87
85
83
82
80
78
77
75
74
72
71
69
68
67
66
65
64
63
61
60
60
59
58
57