1
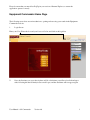
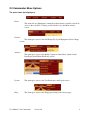
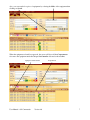
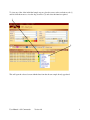
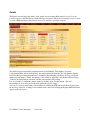
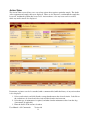
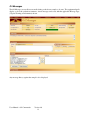
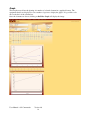
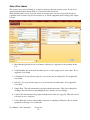
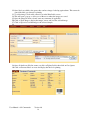
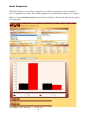
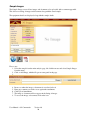
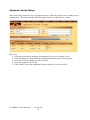
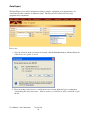
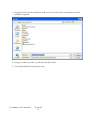
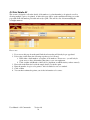
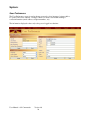
Date
Reason for change(s)
Author(s)
19/10/2008
First Draft
Tracy Benedetti
22/6/2009
Additional Changes
Tracy Benedetti
Equipment Commander
Oil Commander Module
Customer User Guide
User Manual – Oil Commander
Version 4.6
1
Table of Contents:
Equipment Commander Home Page .............................................................................. 3
Oil Commander Menu Options....................................................................................... 4
Oil Analysis Screen .......................................................................................................... 5
Details ..................................................................................................................................................9
Full History ........................................................................................................................................10
Action Taken ......................................................................................................................................11
Oil Messages ......................................................................................................................................13
Graph .................................................................................................................................................14
Print Details........................................................................................................................................15
Select Print Labels ..............................................................................................................................16
Model Comparison .............................................................................................................................19
Sample Images ...................................................................................................................................20
General: .......................................................................................................................... 21
Oil Change/Top Up ............................................................................................................................21
Equipment Jobsite Change..................................................................................................................22
Analysis: ......................................................................................................................... 23
Model Comparison .............................................................................................................................23
Print Labels ........................................................................................................................................24
Quick Search ......................................................................................................................................25
Data Export ........................................................................................................................................26
Oil Print Details All ............................................................................................................................28
System:............................................................................................................................ 29
User Preferences.................................................................................................................................29
Logout ................................................................................................................................................30
User Manual – Oil Commander
Version 4.6
2
Please be aware that you must allow PopUps in your version of Internet Explorer, to ensure the
application operates correctly.
Equipment Commander Home Page
The following screen shots are an introduction to opening and accessing your results in the Equipment
Commander web site.
1.
Login Screen
Enter your User ID into the box and your Password below and click on the login bar.
2.
Note: the first time you access the site there will be a disclaimer you will need to click and agree
with, following this the Oil Analysis Screen will open, and the disclaimer will not appear again.
User Manual – Oil Commander
Version 4.6
3
Oil Commander Menu Options
The menu items that display are:
Home
This menu lists any Equipment Commander modules that are available, and allows
access to these modules. Clicking on Oil will take you to the Main Analysis
screen.
General
This menu gives access to the Oil Change/Top Up and Equipment Jobsite Change
screens.
Analysis
This menu gives access to the Model Comparison, Print Labels, Quick Search,
Data Export and Oil Print Details All screens.
System
This menu gives access to the User Preferences and Logout screens.
Help
This menu gives access to the Help pages relating to the various pages.
User Manual – Oil Commander
Version 4.6
4
Oil Analysis Screen
When the screen opens your user ID will appear in the top right hand header and your company name will
appear in the customer box.
To view all the machines detailed against your login click on the Search button.
User Manual – Oil Commander
Version 4.6
5
To view an individual piece of equipment, enter the first two or three numbers or letters of the serial, unit,
or reg. # of the equipment in the Equip No box, and then click on the Search button.
Alternatively, having accessed the entire fleet, you can view an individual piece of equipment by
clicking on the number in the Serial No column.
User Manual – Oil Commander
Version 4.6
6
Also, you can search for a piece of equipment by selecting the Make of the equipment then
clicking on Search.
When the equipment selected has appeared, the screen will show all the Compartments
relevant to the equipment under the unique Serial number allocated to the machine.
Equipment Serial Number
User Manual – Oil Commander
Version 4.6
Compartments
7
To view any of the of the individual sample reports, place the curser on the evaluation code (1)
and left click the mouse to view the drop down box (2) and select the function required.
1
2
This will open the selected screen with the data from the chosen sample already populated.
User Manual – Oil Commander
Version 4.6
8
Details
The Details screen displays the details of the sample chosen from the Main Analysis screen. It is also
possible to move to the Full History, Graph, Messages and Action Taken screens from this screen, as well
as create a PDF attachment of the Details screen to be emailed to specified recipients.
The details displayed include the equipment details (Serial Number, Unit Number, Customer,
Compartment, Make, Model and Location), the sample details (Evaluation Code, Lab Number, Sample
Date, Date Received, Interpretation Date, Job Number, Meter Reading, Oil Hours, Oil Type, Oil Grade,
whether an Oil Change occurred, the quantity of Oil Added (if applicable), and whether a Filter Change
occurred), the interpretation comments, and the element names and readings.
It is also possible to confirm the sample details, by clicking on the Confirm button. This will
automatically be recorded as an action taken against the specific sample.
You can also create an email with a pdf attachment by clicking the PDF button and either selecting from
the user drop down list, or adding a non-standard email contact, and clicking the Request PDF button that
appears in the pop up box.
User Manual – Oil Commander
Version 4.6
9
Full History
The Full History screen displays the historical details of the particular Model, Serial Number, Unit
Number, Compartment, and Compartment Serial Number.
By hovering the mouse over a column, the details of that particular reading appear in a popup box.
User Manual – Oil Commander
Version 4.6
10
Action Taken
The Action Taken screen allows you to record any actions taken against a particular sample. The details
of the equipment and sample chosen are displayed. There are also buttons to confirm that the sample has
been seen, and that the problem has been solved. Actions taken to solve any issues can be recorded,
while any emails sent are also displayed.
Documents or pictures can also be attached, with a comment added, while the history of any actions taken
is also displayed.
1. Select search criteria, and click Search to return data that meets the selected criteria. Left click on
the evaluation to be viewed and select Action Taken from the Actions menu.
2. Select the type of maintenance is required, and what form the maintenance takes from the drop
down menus (if applicable).
3. Enter the details of the action to be taken.
User Manual – Oil Commander
Version 4.6
11
4. Enter an action cost.
5. Tick Warranty Claim (if applicable), and enter the warranty claim number (if applicable).
6. Upload an attachment (if applicable). Browse to where the attachment is stored, select the
relevant attachment, enter any comments required, and click on Upload Attachment.
7. Click Save.
8. The Action Taken will appear in the Action Taken History section of the screen (only the latest
two actions taken will display automatically.
How to view/export Action Taken history:
1. Click on Show All to view all actions taken.
2. Click on Expand History to expand all Action Taken History, to view all actions taken.
3. Click on Export to Excel to send all actions taken to Excel. This will allow the excel file to be
opened for viewing, or saved for later use.
How to view Images:
1. Click on the View Images link on the Image History header.
2. This will open the Oil Images screen, where you can access and view all images associated with
the sample.
3. Click the red cross in the top right hand corner of the Oil Images screen to return to the Action
Taken screen.
User Manual – Oil Commander
Version 4.6
12
Oil Messages
The Oil Messages screen allows an email relating to the chosen sample to be sent. The equipment details
display, as does the evaluation comment. A new message can be sent, with the applicable Message Type
(Urgent, Warning or Information) chosen.
Any message history against the sample is also displayed.
User Manual – Oil Commander
Version 4.6
13
Graph
The Graph screen allows the plotting of a number of selected elements in a graphical format. The
equipment details are displayed, as are a number of options to display the graph. It is possible to also
choose the basis of the calculations.
Once the elements are chosen, clicking on Build the Graph will display the image.
User Manual – Oil Commander
Version 4.6
14
Print Details
The Print Details screen allows details of the chosen sample to be printed out. The details of the
equipment, and the relevant readings are displayed. The Print box will automatically display, allowing a
choice of printer to send the print job to. Clicking on Print will print the details out.
User Manual – Oil Commander
Version 4.6
15
Select Print Labels
This screen is accessed via clicking on a sample evaluation in the main analysis screen. It can also be
opened from the Analysis menu, which is covered later in this document.
When the Print Labels screen opens, the details of customer name you have selected will already be
populated in the Customer drop down selection box, as will the equipment details relating to the sample
selected.
1. Meter Reading: Enter the hours or kilometres (which ever is applicable to the machine) in this
box.
2. Total Fuel Burn: If you know the fuel burn rate for a for the sample period, enter it here. If not
applicable, leave blank.
3. Job Number: For your reference purposes you can enter the job number here. If not applicable,
leave blank.
4. Order No: For your reference purposes you can enter the job number here. If not applicable,
leave blank.
5. Sample Date: This will automatically populate with the current date. This can be changed by
clicking in the relevant boxes and changing the day, month or year accordingly.
6. Contact: This will automatically populate with the name of the user logged in. This will assist in
follow up, in cases of urgency.
7. Jobsite: Enter the location of the machine at the time of sampling, if different to the job site the
equipment is showing as associated with.
User Manual – Oil Commander
Version 4.6
16
8. Include Details with Labels: Selecting this will attach the previous three sample details for the
same compartment to the printed label.
9. If the compartment required is not displayed for the machine, select “Other” from the
Compartments Sampled area. Select the unlisted compartment from the drop down selection box.
Click on the green cross to add the compartment to the label. The added compartment will now be
displayed in the listing of available compartments.
10. Place ticks against the compartments to be sampled. The selected compartment details will appear
in the right hand side of the screen. Please note that Fluid and Component hours will
automatically calculate and display.
11. Enter Fluid Added against the relevant compartment.
12. Click Yes/No against Fluid Changed.
13. Click Yes/No against Filter Changed.
14. Select the Oil Type that applies to the compartment being sampled (if applicable). If there is
history against the compartment, this will display. To change, select another Oil Type from the
drop down selection box.
15. Select the Oil Grade that applies to the compartment being sampled (if applicable). If there is
history against the compartment, this will display. To change, select another Oil Grade from the
drop down selection box.
16. Select the Coolant that applies to the compartment being sampled (if applicable). If there is
history against the compartment, this will display. To change, select another Coolant from the
drop down selection box.
17. Select the Fuel Type that applies to the compartment being sampled (if applicable). If there is
history against the compartment, this will display. To change, select another Fuel Type from the
drop down selection box.
18. Add repair or customer notes, if applicable.
19. Add an action taken, if applicable. This will be added to the Action Taken for the relevant
sample.
20. Click on Print Labels. This will take you to the label printing screen immediately.
OR
21. Click on Add Labels to the Queue. This will add the labels to the queue for printing when all
equipment labels are completed.
User Manual – Oil Commander
Version 4.6
17
22. Once labels are added to the queue, they can have images loaded up against them. This cannot be
done if the label goes directly to printing.
23. To add an image, click on the camera icon on the Print Labels screen.
24. This will open a pop-up, to allow you to Browse to where the images are stored.
25. Once the image has been selected, enter any comments (if applicable).
26. Click on View Image to display the images screen, and view the selected image.
27. Click on Upload to load the image to the selected sample.
28.
29. Once all details are filled in, ensure you click on Update Labels, then click on Goto Queue.
30. Click on Generate Labels to create and display the labels for printing.
User Manual – Oil Commander
Version 4.6
18
Model Comparison
The Model Comparison screen allows comparisons to be made of performance between a number of
pieces of equipment at one time. The available equipment is selected, then the elements to be compared.
When you click on Build the Graph, the representation is displayed. The relevant data table also displays
below the graph.
User Manual – Oil Commander
Version 4.6
19
Sample Images
The Sample Images screen allows images and documents to be uploaded, with a comment appended.
This allows recording of images and documents along with the actual sample.
The equipment details are displayed, along with the sample details.
How to use:
1. Select the sample from the main analysis page, left click the mouse and select Sample Images
from the menu.
2. Click on Add Image, which will open an extra panel in the page.
3.
4.
5.
6.
7.
8.
Browse to where the image or document is stored and select it.
Enter any comment you wish to store against the attachment.
Click Upload Attachment.
The image or document will now appear in the listing of images.
To access the image or document, click on the icon.
User Manual – Oil Commander
Version 4.6
20
General:
Oil Change/Top Up
How to use:
1. Select the customer, job site and serial or unit number.
2. Click on New or, if editing an existing change/top up, click on Get Existing.
3. Enter the service person’s name, and select the date the change or top up occurred.
4. Enter the SMU, whether the oil was changed (yes/no), any top up volume, and select the unit of
measure used.
5. If the oil type and grade have changed, make selections as required.
6. The manual selection box will be defaulted to Yes – leave this as defaulted.
7. Enter any comment related to the oil change or top up.
8. A tick will be placed automatically in the Save tick box.
9. Continue entering data as required.
10. Click on Save to save changes made.
The history of any oil changes or top ups can also be accessed, by clicking on the Show History link at
the top of the screen. You have the option in this screen of searching by date range for any saved changes
or top ups.
User Manual – Oil Commander
Version 4.6
21
Equipment Jobsite Change
This screen allows customers to move equipment from one of their allocated job sites to another, prior to
printing labels. This ensures that the data being supplied against a sample taken is accurate.
How to use:
1. Select the relevant details relating to the equipment to be moved to another job site.
2. Click Get Equipment, which will display all equipment that meets the selection criteria.
3. Select the job site the equipment is to be moved to.
4. Select the equipment to be moved.
5. Click on Move to move the equipment from the original site to the selected site.
User Manual – Oil Commander
Version 4.6
22
Analysis:
Model Comparison
Refer to the instructions on Model Comparison in the Main Analysis section.
User Manual – Oil Commander
Version 4.6
23
Print Labels
Refer to the instructions on Print Labels in the Main Analysis section.
User Manual – Oil Commander
Version 4.6
24
Quick Search
This screen is used to view samples that have been processed through the laboratory, and identify how
many of each evaluation have been completed. You can also see how many samples are still pending,
which means that they are still travelling through the laboratory.
How to use:
1. Select the criteria you wish to view data about – the more information you enter, the more the data
returned will be filtered, to provide the most relevant information.
2. Click on Get Details to display the data that meets the criteria.
3. Left clicking on an evaluation displays the same mini menu as on the main analysis page.
4. This allows you to make the same selections from within this screen.
5. Filter the samples you wish to see by clicking on the evaluation key
6. This will display the selected evaluated samples only.
7. The pending selection will display how many samples are awaiting interpretation, but details are
not available until the samples are released.
User Manual – Oil Commander
Version 4.6
25
Data Export
The Data Export screen allows information relating to samples, equipment, and compartments to be
downloaded in either a number of different formats. The data can also be filtered by date range,
equipment and compartment.
How to use:
1. Once the selections in the screen have been made, click the Download button, which will then ask
if the file is to be opened, or saved.
2. Please note that you may have to override the browser security which will give a warning that
downloading files may cause issues – if this is not done, you will not be able to download or open
the file.
User Manual – Oil Commander
Version 4.6
26
3. If opened is chosen, the file will display on the screen. If saved is chosen, a destination for the file
will then be requested.
4. Navigate to where you wish to save the file, then click on Save.
5. You can then utilize the data exported to suit.
User Manual – Oil Commander
Version 4.6
27
Oil Print Details All
This screen is designed to allow the details of lab numbers (or a batch number) to be printed, as well as
allowing multiple copies to be printed. A link to this page will be on the email that will bring you to this
page with all the lab numbers preloaded and ready to print. This will be a list of items matching the
overnight summary
How to use:
1. If you access this page from the email link, the relevant data will already be pre-populated.
2. If accessing via the menu, the following steps have to be followed:
a. Enter either a batch number or sequence of lab numbers. Please note – you will only be
given access to those lab numbers that relate to your own equipment.
b. Click on either Add Batch or Add Lab No (dependant on which criteria you have entered).
3. Place ticks in the Print box beside the sample details you wish to print.
4. Enter the number of copies to be printed – this is defaulted to one as a standard.
5. Click on Print.
6. You can then nominate the printer you wish to information to be sent to.
User Manual – Oil Commander
Version 4.6
28
System:
User Preferences
The User Preferences screen is used to change passwords, select language, login module to
be opened, and colour schemes. Changes can also be made to user details relating to
contact information (email address, telephone numbers, etc).
The information displayed relates only to the person logged in at the time.
User Manual – Oil Commander
Version 4.6
29
Logout
Closes down the Equipment Commander system, and returns to the login screen.
User Manual – Oil Commander
Version 4.6
30