1
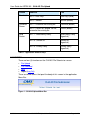
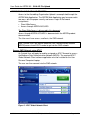
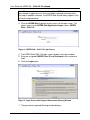
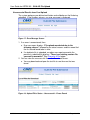
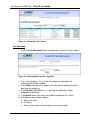
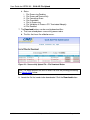
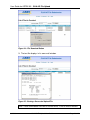
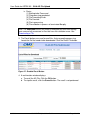
User Guide
for
ASPEN 9.5 - CLIA AO Upload
IFMC
1776 West Lakes Parkway
West Des Moines, IA 50266
User Guide for ASPEN 9.5 - CLIA AO File Upload
Page left blank intentionally
08/2009
CLIA AO File Upload User Guide
Page 2 of 28
User Guide for ASPEN 9.5 - CLIA AO File Upload
Table of Contents
INTRODUCTION ...................................................................................................... 5
OVERVIEW AND PURPOSE ..................................................................................... 5
SHORTCUT KEYS ................................................................................................... 5
NAVIGATION ........................................................................................................... 6
HELP........................................................................................................................ 7
CONTACT US - HELP DESK .................................................................................... 7
CLIA AO UPLOAD USER MANUAL .......................................................................... 7
ACCESSIBILITY POLICY.......................................................................................... 8
PRIVACY POLICY .................................................................................................. 8
ACCESS THE AO FILE UPLOAD PROCESS .......................................................... 9
ACCESS CMS NETWORK USING AT&T................................................................... 9
ACCESS THE ASPEN W EB APPLICATION ............................................................. 10
UTILIZE THE AO FILE UPLOAD APPLICATION.................................................... 13
FILE UPLOAD ...................................................................................................... 13
OVERWRITE A FILE ............................................................................................. 17
FILE DOWNLOAD................................................................................................. 18
RECALL A FILE ................................................................................................... 21
LOG OUT............................................................................................................ 24
TERMINOLOGY ..................................................................................................... 25
08/2009
CLIA AO File Upload User Guide
Page 3 of 28
User Guide for ASPEN 9.5 - CLIA AO File Upload
Figures
Figure 1 - CLIA AO Upload Menu Bar............................................................. 6
Figure 2 - CLIA AO Upload Help Screen – Contact Us ................................... 7
Figure 3 - CLIA AO Upload Help Screen – Accessibility Policy....................... 8
Figure 4 - CLIA AO Upload Help Screen – Privacy Policy............................... 8
Figure 5 - AT&T Global Network Client ........................................................... 9
Figure 6 - QIES to Success........................................................................... 10
Figure 7 - ASPEN Access Web Page ........................................................... 10
Figure 8 - ASPEN Web - CLIA 116 Login Screen ......................................... 11
Figure 9 - Login Screen with Required Government Warning Window ......... 11
Figure 10 - CLIA 116 Search Screen ............................................................ 12
Figure 11 - CLIA AO File Submission File Upload Screen ............................ 12
Figure 12 - CLIA AO File Submission File Upload Screen with Menu Bar .... 13
Figure 13 - File Upload Function / Hyperlink ................................................. 14
Figure 14 – Choose a File for Upload ........................................................... 14
Figure 15 - Upload File Located & Selected.................................................. 15
Figure 16 – Uploaded File's Status - Successful........................................... 15
Figure 17 - Error Message Screen ................................................................ 16
Figure 18 - Upload File's Status – Unsuccessful – Errors Found .................. 16
Figure 19 – Overwrite an Existing Pending File ............................................ 17
Figure 20 - Successful Upload Message Screen .......................................... 17
Figure 21 - Overwritten File's Status ............................................................. 18
Figure 22 - File Download Function / Hyperlink............................................. 18
Figure 23 – Successfully Upload File – File Download Button ...................... 19
Figure 24 – File Download Button ................................................................. 20
Figure 25 - Viewing a Successful Upload File ............................................... 20
Figure 26 - Downloaded an Unsuccessful Upload File.................................. 21
Figure 27 - Enabled Recall Button ................................................................ 22
Figure 28 - Recall Warning Window.............................................................. 23
Figure 29 - Recalled File's Status.................................................................. 23
Figure 30 - Logout Function / Hyperlink ........................................................ 24
Figure 31 – Completed Logged Out with Hyperlink back to the Login........... 24
Tables
Table 1 – Application Shortcut Keys ............................................................... 6
Table 2 - Terminology Table ......................................................................... 27
08/2009
CLIA AO File Upload User Guide
Page 4 of 28
User Guide for ASPEN 9.5 - CLIA AO File Upload
INTRODUCTION
Overview and Purpose
A Certification of Accreditation is issued to a laboratory once the accrediting
organization (AO) verifies to CMS the accreditation status of the laboratory.
Accreditation by an AO is voluntary and is not required for Medicare
certification.
The AO must find a provider where all the applicable conditions are met or
exceeded, before the AO may verify that those requirements to be met by the
provider or supplier.
To accomplish this, the laboratory must request the AO’s services. The AO
must accept and confirm their participation for the laboratory. The AO
performs a survey and submits the survey data into the CLIA system.
The AOs use the CMS software, ASPEN Web [CLIA CMS-116] Application, to
record their participation and results. The AO Upload Process is a portion of
that application.
This document provides the step-by-step instructions how to utilize the AO
Upload Process as an Accrediting Organization ONLY. AOs are assigned
access with the AO Role security.
Note: Central Office SuperUsers may also use the AO Upload Process.
However, they do not have the same security and the screens they see are
somewhat different.
SHORTCUT KEYS
To skip the header functions use the following Shortcut Keys:
•
ALT-N (Skip Headers…go on to first field)
The following table lists the shortcut keys, which can be used within the AO
Upload Process.
Screen
Shortcut
File Upload Alt-2 – File Name
File
08/2009
Title
File Name (field)
Alt-3 – Upload button
Upload (button)
Alt-1 – Home
Upload Home Page
Alt-2 – To Date
To Date (field)
CLIA AO File Upload User Guide
Page 5 of 28
User Guide for ASPEN 9.5 - CLIA AO File Upload
Screen
Shortcut
Title
Download
Alt-3 – Prior Days
Prior Days (field)
Alt-S – Refresh
Refresh (button)
Alt-2 – Overwrite the existing file.
Overwrite (button)
Alt-3 – Cancel this upload. Do not
overwrite the existing file.
Cancel (button)
ALT-7 - Accessibility Policy
Accessibility Policy
(hyperlink)
ALT-8 - Contact Us
Contact us
(hyperlink)
ALT-9 - Privacy Policy
Privacy Policy
(hyperlink)
Overwrite
Screen
Help
Screen
Table 1 - Application Shortcut Keys
NAVIGATION
There are four (4) functions on the CLIA AO File Submission screen.
•
•
•
•
File Upload
File Download
Help
Logout (Log Out)
These are found across the top of the body of this screen in the application
Menu Bar.
Figure 1 - CLIA AO Upload Menu Bar
08/2009
CLIA AO File Upload User Guide
Page 6 of 28
User Guide for ASPEN 9.5 - CLIA AO File Upload
HELP
Contact Us - Help Desk
The Help screen contains a hyperlink labeled Contact Us, which will put the
User in contact with the QTSO Help Desk via e-mail or telephone.
Figure 2 - CLIA AO Upload Help Screen – Contact Us
If you have any questions concerning this information, please contact the
QTSO Help Desk at [email protected] or call 1 (888) 477-7876.
CLIA AO Upload User Manual
Not available as yet.
08/2009
CLIA AO File Upload User Guide
Page 7 of 28
User Guide for ASPEN 9.5 - CLIA AO File Upload
Accessibility Policy
The Help screen contains a hyperlink labeled Accessibility Policy, which
explains the 508 Compliant status of the AO Upload process and web pages.
It also contains the QTSO Help Desk e-mail address and telephone number.
Figure 3 - CLIA AO Upload Help Screen – Accessibility Policy
Privacy Policy
The Help screen contains a hyperlink labeled Privacy Policy, which explains
the government policy concerning privacy.
Figure 4 - CLIA AO Upload Help Screen – Privacy Policy
08/2009
CLIA AO File Upload User Guide
Page 8 of 28
User Guide for ASPEN 9.5 - CLIA AO File Upload
ACCESS THE AO FILE UPLOAD PROCESS
Access to the Accrediting Organization Upload is accomplished through the
ASPEN Web Application. The ASPEN Web Application may be accessed in
two ways, with the proper security and access Login ID/Password
assignments.
•
•
Direct Web Access
Access through ASPEN ACO/ARO
The Direct Web Access is discussed in this document.
Access through ASPEN ACO/ARO is documented in the ASPEN product
documentation.
The User must have access, and be in, the CMS network.
Note: Outside Users will require Medicare Data Communication Network
(MDCN) access from AT&T in order to get into the CMS network.
Access CMS Network using AT&T
An Outside User will apply for and be assigned an AT&T Account to access
the Medicare Data Communication Network (MDCN). The required AT&T
Global Network Client software application must be installed on the User
Personal Computer/Laptop.
The user can then connect into the CMS network.
Figure 5 - AT&T Global Network Client
08/2009
CLIA AO File Upload User Guide
Page 9 of 28
User Guide for ASPEN 9.5 - CLIA AO File Upload
Use the following URL to access a QTSO web site. https://www.qtso.com/
This web site has all the information about the AT&T/MDCN account required.
Access the ASPEN Web Application
Once the User is inside the CMS Network, they must follow the follow steps to
access the AO Upload Process.
1. The User will access QIES for Success: https://web.qiesnet.org/aspen/
Figure 6 - QIES to Success
2. Locate the ASPEN Web selection from the navigation panel on the left.
Figure 7 - ASPEN Access Web Page
08/2009
CLIA AO File Upload User Guide
Page 10 of 28
User Guide for ASPEN 9.5 - CLIA AO File Upload
Note: This screen shot is a representation of the ASPEN Access screen. It
may change in appearance as items are added, replaced and removed as
this page is updated. However, the ASPEN Web should always appear in the
left-hand navigation panel.
3. Click the ASPEN Web hyperlink to gain access to the login screen. This
allows access to the ASPEN Web Application Login screen, ASPEN
Web – CLIA 116.
Figure 8 - ASPEN Web - CLIA 116 Login Screen
4. The ASPEN Web CMS-116 Login screen displays the Login window.
5. Enter pre-assigned CASPER User ID and Password in their respective
fields.
6. Click the Login button.
Figure 9 - Login Screen with Required Government Warning Window
7. The government-required Warning window displays.
08/2009
CLIA AO File Upload User Guide
Page 11 of 28
User Guide for ASPEN 9.5 - CLIA AO File Upload
8. Click the OK button.
9. The ASPEN Web - CMS-116 Search Screen displays.
Figure 10 - CLIA 116 Search Screen
10. Locate and click the AO Upload button in the Header, upper right. This is
the means of accessing the AO Upload process.
Figure 11 - CLIA AO File Submission File Upload Screen
11. The File Upload screen is the first screen displayed.
08/2009
CLIA AO File Upload User Guide
Page 12 of 28
User Guide for ASPEN 9.5 - CLIA AO File Upload
UTILIZE THE AO FILE UPLOAD APPLICATION
Once the AO Upload button is clicked, the AO Upload CLIA AO File
Submission system displays the File Upload screen.
Figure 12 - CLIA AO File Submission File Upload Screen with Menu Bar
Note: If you do not have the proper AO User Role security, the Upload button
will be disabled.
There are four (4) function selections available to the AO User.
•
•
•
•
File Upload
File Download
Logout
Help
The following subsections describe how to perform these functions.
File Upload
An AO may create a text file containing their AO information and then upload
that file to the CLIA System. The system will process the data using the
same logic that is used when this information is input directly into the system
via the CMS-116 application.
Once the file is created, the upload process must be initiated.
If the User is not already on the File Upload screen, they can use the File
Upload function / hyperlink from the Menu bar to navigate to the File Upload
screen.
08/2009
CLIA AO File Upload User Guide
Page 13 of 28
User Guide for ASPEN 9.5 - CLIA AO File Upload
Figure 13 - File Upload Function / Hyperlink
1.
2.
3.
4.
Select the Browse button.
Windows opens a window to manipulate in locating the file to be uploaded.
Highlight the file to upload.
Click the Open button.
Figure 14 – Choose a File for Upload
08/2009
CLIA AO File Upload User Guide
Page 14 of 28
User Guide for ASPEN 9.5 - CLIA AO File Upload
5. The file that was located and selected appears in the File Name field.
Figure 15 - Upload File Located & Selected
6. Click the Upload button.
7. The upload is successfully, the system displays a confirmation message.
8. The File Download screen displays the status of the file successfully
uploaded.
Figure 16 - Uploaded File's Status - Successful
08/2009
CLIA AO File Upload User Guide
Page 15 of 28
User Guide for ASPEN 9.5 - CLIA AO File Upload
Unsuccessful Results from Your Upload
The system performs pre-defined verification and validation on the file being
uploaded. If the file does not pass, an error message is displayed.
Figure 17 - Error Message Screen
1. If an error is encountered, then:
a. Error messages displays. “File upload was denied due to the
following reason:” followed by the actual reasons and the record # of
the first record found to be in error.
b. If a duplicate file is uploaded, an option message to overwrite the
previously submitted file displays, “There is an existing version. Do
you want to overwrite?” See Overwrite A File below.
2. You can view the unsuccessful file on the Download Screen.
a. You may download and open the text file to see the error that was
found.
Figure 18 - Upload File's Status – Unsuccessful – Errors Found
08/2009
CLIA AO File Upload User Guide
Page 16 of 28
User Guide for ASPEN 9.5 - CLIA AO File Upload
Overwrite A File
The system will allow overwrites of file. That is, if there is a file in a “pending”
state waiting to be processed, a new file can be uploaded and made to
overwrite the existing file.
Note: Only one pending file can exist in the system at one time.
Figure 19 – Overwrite an Existing Pending File
CAUTION: Review the original download screen to find the actual file that is
there before selecting OK. Make sure you know exactly what file it is you are
about to overwrite.
1. If the current file must be overwritten, click the OK button. The system will
process the Overwrite.
a. The system removes the old file, which was overwritten. It is no longer
available.
b. The system returns the message that the new file was uploaded
successfully.
Figure 20 - Successful Upload Message Screen
2. If an overwrite is not what is needed, click the Cancel button. The system
returns to the File Download screen.
08/2009
CLIA AO File Upload User Guide
Page 17 of 28
User Guide for ASPEN 9.5 - CLIA AO File Upload
Figure 21 - Overwritten File's Status
File Download
1. Select the File Download button located directly under the screen header.
Figure 22 - File Download Function / Hyperlink
2. The system displays a list of all the files previously uploaded. The
following fields will be included.
3. The To Date field defaults to Today’s date, but can be modified using the
date format mm/dd/yyyy.
4. The Prior Days field defaults to ‘1’, but may be modified using the
dropdown list provided.
5. The Refresh button may always be used to re-populate this screen.
6. The following data columns display:
a. Submission Date
b. File Name
c. Process Date (blank if processing has not yet occurred).
08/2009
CLIA AO File Upload User Guide
Page 18 of 28
User Guide for ASPEN 9.5 - CLIA AO File Upload
d. Status
i. File Processing Pending
ii. File Processed Successfully
iii. File Formatting Errors
iv. File Overridden
v. File In Processing
vi. File Validation In Process OR Terminated Abruptly
vii. File Recalled
7. The Download buttons can be used to download files:
a. That have already been successfully processed or
b. The files that have file validation errors.
Figure 23 – Successfully Upload File – File Download Button
Note: The Recall buttons are used to recall files that are pending processing.
See Recall A File below.
8. Locate the file that needs to be downloaded. Click the Download button.
08/2009
CLIA AO File Upload User Guide
Page 19 of 28
User Guide for ASPEN 9.5 - CLIA AO File Upload
Figure 24 – File Download Button
9. The text file displays in its own small window.
Figure 25 - Viewing a Successful Upload File
Note: These downloaded files can be saved offline, if that is what is needed.
08/2009
CLIA AO File Upload User Guide
Page 20 of 28
User Guide for ASPEN 9.5 - CLIA AO File Upload
10. A file that was found to contain errors may be downloaded as well.
However, these are “results” files and contain only the first error that was
encountered.
Figure 26 - Downloaded an Unsuccessful Upload File
Recall A File
Once an AO File has been successfully uploaded AND has NOT yet been
processed, it may be recalled.
1. Select the File Download button located directly under the screen header.
2. The system displays a list of all the files previously uploaded. The
following fields will be included.
a. The To Date field defaults to Today’s date, but can be modified using
the date format mm/dd/yyyy.
b. The Prior Days field defaults to ‘1’, but may be modified using the
dropdown list provided.
c. The Refresh button may always be used to re-populate this screen.
d. The data columns displayed will be:
i. Submission Date
ii. File Name
iii. Process Date (blank if processing has not yet occurred).
08/2009
CLIA AO File Upload User Guide
Page 21 of 28
User Guide for ASPEN 9.5 - CLIA AO File Upload
iv. Status
(1) Waiting to be Processed
(2) File processing completed
(3) File Formatting Errors
(4) File Override
(5) File in processing
(6) File validation in process of terminated Abruptly
Note: The Download buttons are used to download files that have already
been successfully processed or files that have file validation errors. See
Downloading a File.
3. The Recall buttons are used to recall files that are pending processing.
Locate the file that needs to be downloaded. Click the Recall File button.
Figure 27 - Enabled Recall Button
4. A confirmation window displays.
a. To recall the AO File, Click the OK button.
b. To stop the recall, click the Cancel button. The recall is not performed.
08/2009
CLIA AO File Upload User Guide
Page 22 of 28
User Guide for ASPEN 9.5 - CLIA AO File Upload
Figure 28 - Recall Warning Window
5. The system displays the refreshed Download screen. The message, “The
recall operation has been successfully completed,” will be display across
the top of body of the screen.
6. The new updated Status field has been updated to “File Recalled.” The
system recalled the file. It will not longer be available.
Figure 29 - Recalled File's Status
08/2009
CLIA AO File Upload User Guide
Page 23 of 28
User Guide for ASPEN 9.5 - CLIA AO File Upload
Log Out
The User uses the Logout function to leave the system.
Figure 30 - Logout Function / Hyperlink
1. Select the Logout button located in the application Menu Bar.
Figure 31 - Completed Logged Out with Hyperlink back to the Login
2. The system logs the User out of the AO Upload process. and displays the
Logout screen. This screen will allow the User to log into the ASPEN Web
Application anew by providing a link back to the Login screen.
08/2009
CLIA AO File Upload User Guide
Page 24 of 28
User Guide for ASPEN 9.5 - CLIA AO File Upload
TERMINOLOGY
Term
Accrediting
Organization
Acronym
AO
Description / Definition
Many provider or supplier types (such as
hospitals, ambulatory surgery centers,
hospices, and home health agencies), have the
option of becoming Medicare-certified on the
basis of accreditation by a CMS-approved
Accrediting Organization instead of a survey by
CMS or States. In such cases, the applicants
may receive Medicare certification via CMS’
acceptance of the AO’s accreditation.
The following are CMS-Approved Accrediting
Organizations used for CLIA labs:
Joint Commission (JC)
American Osteopathic Association (AOA)
American Society of Histocompatibility and
Immunogenetics (ASHI)
College of American Pathologists (CAP)
Commission on Laboratory Accreditation
(COLA)
American Association of Blood Banks (AABB)
Accredited
Laboratory
Automated
Survey
Processing
Environment
08/2009
A laboratory that has voluntarily applied for and
been accredited by a private, nonprofit
Accrediting Organization approved by CMS.
ASPEN
The ASPEN Automated Survey Processing
Environment system developed by Alpine
Technology Group provides state-level secure
data collection of healthcare provider
demographic, surveillance and certification
information, with timely replication of required
information into the national repository.
CLIA AO File Upload User Guide
Page 25 of 28
User Guide for ASPEN 9.5 - CLIA AO File Upload
Term
Acronym
Description / Definition
ASPEN
Central Office
ACO
This is one of the modules provided in the
ASPEN suite of products.
ASPEN
Regional
Office
ARO
This is one of the modules provided in the
ASPEN suite of products.
ASPEN Web
Application
None
The is a web-based on-line CLIA system. It is
used for inputting and tracking CLIA-116 and
survey data. It can be referred to as ASPEN
Web, ASPEN Web App, or ASPEN Web CLIA-116.
Central Office
CO
CMS Central Office.
Certificate of
Accreditation
COA
A Certification of Accreditation is issued to a
laboratory once the accrediting organization
(AO) verifies to CMS the accreditation status of
the laboratory.
The Certificate Accreditation will reflect the
effective date for each specialty/subspecialty
approved by the accreditation organization.
08/2009
Certification
and Survey
Provider
Enhanced
Reporting
CASPER
This is a database for storing current and
historical Medicare data for CMS. It uses this
data to provide pre-defined and ad hoc
reporting per CMS direction.
Center for
Medicare and
Medicaid
Services
CMS
CMS provides direction and technical guidance
for the administration of the Federal effort to
plan, develop, manage and evaluate health
care financing programs and policies.
CLIA AO File Upload User Guide
Page 26 of 28
User Guide for ASPEN 9.5 - CLIA AO File Upload
Term
Acronym
Description / Definition
Medicare Data
Communicatio
n Network
MDCN
Medicare fiscal intermediaries and carriers shall
use the Government furnished Medicare Data
Communications Network to support all
Medicare operational data connectivity
requirements. Such uses include Common
Working File communications, shared
processing remote operations, remote printing,
shared system maintenance support (testing,
release/fix distribution, remote diagnostics) and
functional subcontracting arrangements
necessitating the transfer of data to remote
sites. AT&T Global Networking Services is the
vendor for MDCN managed network services.
SuperUser
SU
CMS Central Office SuperUser is a
ASPEN/CLIA role that allows the Central Office
CLIA users administrative-type security in order
to maintain unusually circumstances that arise
in the system.
Table 2 - Terminology Table
08/2009
CLIA AO File Upload User Guide
Page 27 of 28
User Guide for ASPEN 9.5 - CLIA AO File Upload
08/2009
CLIA AO File Upload User Guide
Page 28 of 28


![Front End Risk Adjustment System [ FERAS ] User](http://vs1.manualzilla.com/store/data/005730281_1-6f4c2bdb0bfee36132bd7754fa830eb4-150x150.png)