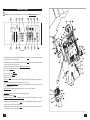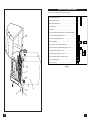
1
??? CARD
WARRANTY
1. KH Trading machines and tools are covered by 6/24 months warranty, starting on the date of
purchase, as described in the Civil Code (proof of purchase or invoice receipt must be
enclosed with the warranty card when making a claim).
2. This warranty does not cover defects caused by unprofessional handling, machine overloads, not
complying with instructions contained in this manual, using accessories that are not approved,
unauthorized repair, regular wear and tear and damages occurred during transport. Further, this
warranty does not cover parts and accessories such as the motor, carbon brushes, seals and
hot-air operated parts and parts that need to be changed regularly.
3. If the repair is to be found as not covered by the warranty policy, all costs including the repair and shipping to and from the repair centre will be paid by the customer, according to valid price list. See www.
4. When making a claim, you must present the warranty card, showing the date of the purchase, the
serial number of the machine, vendor stamp and signature of sales clerk, as well as the proof of
purchase receipt.
5. Warranty claim shall be made at the vendor shop where you bought your machine or you may mail
it to a service centre. The vendor is obligated to fill out the warranty card (date of sale, serial
number, vendor stamp and signature). All these information must be filled in at the time of sale.
6. The warranty period will be extended for the period of time for which the machine has been in the
service centre possession. If the repair or defect is not covered by the warranty policy, all costs including
the repair and shipping will be paid by the owner of the machine / tool. We recommend sending the
machine in its original packaging. Please, also enclose brief description of the defect with the packaging.
7. Before sending the machine for repair, clean it thoroughly. If the received machine is dirty, it may
be rejected by the service shop or you may be charged a cleaning fee.
USER'S MANUAL
TIRE BALANCER
SERVICE
Logistic centre Klecany
Topolová 483
250 67 Klecany
Czech Republic
Claim department phone number: 266 190 156
266 190 111
Fax:
260 190 100
http://www.KHnet.cz
Email: [email protected]
Product:
Type:
TIRE BALANCER
C9901
Date of manufacture:
T-mobile: 603 414 975
O2:
601 218 255
Vodafone: 608 227 255
Serial number (product series):
Repair centre notes:
Date of sale, stamp, signature:
C9901
Without the correctly filled warranty card or without proof of purchase receipt, including
the product type (invoice, purchase receipt) no warranty claim will be processed.
Dear customer. Thank you for purchasing equipment from KH Trading, s.r.o.
Our company is ready to offer you our services - before, during and after you buy our product.
If you have any question, comment or idea, please contact our business centre. We will do our best to address
your comment or question in timely matter.
Before first use, please read this manual carefully. It is your responsibility to study all instructions,
necessary for safe use and operation and to understand all risks that may be involved during the use
of power machines.
WARNING! Do not try to use this machine before reading this entire manual and before you know
how to handle it. Keep this manual for future reference.
Pay special attention to safety instructions. Not complying with safety rules may cause injury to the
operating person or to people standing by or it may cause damage to the machine or to the work
piece.
Pay special attention to safety notes and safety labels on the machine.
Never remove or damage them.
Please, write information such as the invoice number
and the number of the sale receipt here in this box.
WARNING: This machine is not always supplied with the electrical power cable
or power cable plug. Before first use, please have the proper cable
or cable plug installed by qualified electrician.
DESCRIPTION
Compact, microprocessor-controlled tire balancer with user friendly controls, equipped with alloy disk
balancing function. It has been designed for passenger cars and light trucks wheel balancing.
The supplied accessories include 4 fastening cones, speed-fastening nut with plastic cap and rubber washer,
balancing weight pliers and disk width measuring U-gauge.
2
REPAIR AND MAINTENANCE REPORT
Report and maintenance report:
DATE
REPAIR AND MAINTENANCE REPORT
SERVICE SHOP
REVISION REPORT
TECHNICAL SPECIFICATION
???
The user is obligated to perform tests and revisions of electrical equipment of the machine
in accordance with valid rules and regulations. Result report:
DATE
REVISION REPORT
REVISION TECHNICIAN
Number / SIGNATURE
Item
Voltage
Power input
Use
max. tire diameter
max. tire width
max./min. disk diameter
min. disk width max.
disk / tire weight
balancing speed
tire / disk balancing functions
length of one cycle
data entry
self-calibration
automatic start
breaking technique
balancing point
weight / length entry options
balancing precision
Acoustic noise level
operational temperature
Weight
dimensions
net weight
Description
~230V / 50 Hz
370 W
for most passenger cars and light trucks
800 mm (31.5")
508 mm (20")
254 mm - 609.6 mm (10"-22")
38.1 mm - 508 mm (1.5"-20")
max. 65 kg (143 lb)
200 rpm
NORMAL (normal balancing) ALU1, ALU2, ALU3, static balancing
10 second
keyboard with display control indicators
semiautomatic data entry by user
(1. when set or when needed)
automatic start after the safety cover is lowered down
automatic
upper balancing point
ounces, grams / inches and millimetres
1 gram (0,035 ounce)
70 db
0 - 50° C
123 kg
1,320.8 mm (W) × 1,016 mm (L) × 1,651 mm (H)
(52"W×40"L×65"H) (safety cover open)
1,320.8 mm (W) × 965.2 mm (L) × 1,270 mm (H)
(52"W×38"L×50-1/4"H (safety cover closed)
120.2 kg (265 lb)
The accuracy of instructions, graphs and information contained herein, depends on the printing date. Due to
continuous product improvement, the manufacturer reserves the right to change technical parameters of the
product, without prior customer notification.
3
SAFETY INSTRUCTIONS
• This device may be used by a qualified person, 18 years or older who has been
trained in work and environmental safety procedures.
• Any person using this equipment must possess a medical certificate
demonstrating his eligibility to operate this equipment.
This symbol informs you about the risk of personal injury, damage to the machine or other property.
Self-adhesive safety symbols labels used with your machine:
In case of fire do not use water or foam fire
extinguishers
Caution! Electrical equipment
Use protective gloves
Caution! Danger of being caught
by machine moving parts
Read manual before use
Place the self-adhesive safety labels on conspicuous place on your machine.
Symbols used in this manual
Warning!
This symbol informs you about the risk of personal injury or damage to the machine
or materials.
Caution! You are using electrically powered machine!
Risk of injuries by electrical current.
Risk of being caught by spinning machine parts!
Caution! Loose clothing or body parts may get caught by moving machine parts.
General instructions
• Make sure you know how to control your tool or machine and that you are familiar with its operating
procedure. Know the hazards that may occur, if not used correctly.
• If other person is using this machine make sure that he knows how to safely operate this equipment and
that he is familiar with hazards and risk that may occur, if not used correctly.
• Pay special attention to safety notes and safety labels on the machine. Do not remove or damage them.
If the warning label becomes unreadable, please contact your vendor.
• Dirty and disorganized workplace may cause accidents.
• Never work in poorly lit, narrow or too crowded rooms. Always keep stable posture.
• Maintain your tools clean and in safe working conditions.
4
No.
501
502
503
504
505
506
507
508
509
510
511
512
513
514
515
516
517
518
519
520
521
522
523
524
525
526
527
528
529
530
531
532
Code
C0990101
GB/T 5781
GB/T 95
C099010307
GB/T 973
C099010123
C099010120
GB/T 973
GB/T 95
GB/T 5781
GB/T 93
GB/T 95
GB/T 11544
GB/T 41
GB/T 95
GB/T 5781
GB/T 5781
GB/T 95
C0990209
C0990204
C099010110
C099010121
C0990207
GB/T 973
GB/T 41
GB/T 41
C311010122
GB/T 41
GB/T 5781
GB/T 93
GB/T 41
MY7124
A00
A01
A02
A03
A04
C3110102
C3110103
24
C0990105
C3110200
Number of pieces
1
2
2
1
4
1
1
2
2
2
2
2
1
1
1
1
3
3
1
1
3
3
1
4
4
6
1
2
2
4
4
1
Description
body
screw M12x120
washer ϕ12
plastic cover
screw M5x15
upper part with tool desk
desk
screw M5x7
washer ϕ5
screw M10x25
flexible washer ϕ10
washer ϕ10
belt 380J
nut M10
washer ϕ10
screw M10x55
screw M10x30
washer ϕ10
power supply cable
cable distancing safety ring
plastic washer
tool hanger
source switch
screw M4x15
nut M4
nut M6
tensioning device desk with screw
nut M5
screw M5x35
flexible washer ϕ6
nut M6
motor
1
1
1
1
1
driving shaft
wheel cover
measuring device
control panel with processor desk
power desk
•
•
•
•
•
•
•
•
•
•
•
•
•
•
•
•
•
•
•
•
•
•
•
Handles must be kept free of grease and dirt.
Make sure no children, unauthorized persons or animals have access to your workshop.
Use only for purposes for which it has been designed.
Use personal protective gear such as safety goggles, ear protection, respirator, safe working shoes etc.
Do not overreach, use both hands.
Never work under the influence of alcohol or other drugs.
Do not use the machine/tool if you feel dizzy or week.
Any modifications or improvements to the machine are strictly prohibited. DO NOT USE if you discover
bent part, crack or other damage.
Never perform any maintenance during operation.
If you see any unusual sign or hear any strange sound, switch off the machine immediately.
Do not forget to remove all wrenches and screwdrivers from the machine after use.
Before use, make sure all screws are tightened securely.
Perform maintenance regularly. Before use make sure the machine is in good working conditions
and without any damage.
Use only original spare parts during repairs.
Using extension pieces or accessories not approved by the manufacturer may cause injuries to
the operating personnel.
Use suitable tool for particular type of work. Do not overload tools, accessories or the machine. For large
work volume use more powerful machine.
Do not overload your device. Measure the work load in such way, so it could be done with comfortable
speed. Damages due to machine overload are not covered by the warranty policy.
Do not expose to extremely high temperature or direct sunlight.
This machine is not designed for use in humid environments or under water.
If you are not using your machine, store it in a dry and safe place, out of reach of children.
Before use make sure that all safety elements work correctly and efficiently. Make sure all moving parts
are in good working conditions.
Before use make sure that no part is cracked or stuck, Make sure all parts are attached and assembled
as designed. Beware of all other conditions that may have a negative effect on the proper functioning of
your machine.
If not stated otherwise in this manual, all damaged parts and safety elements must be repaired or changed.
Special safety instructions
• Use the machine only on dry, levelled and solid concrete floor, free of dirt and oils. The floor
must be able to support the machine weight plus the weight of the tires and other accessories and tools.
• Before each use, inspect the machine for damages, bent parts, safety and protective cover
completeness and electrical safety. Make sure that no dangerous conditions are present
that may have an effect on safe use of the machine. Never use the your machine if you discover
damage. (see Picture C)
• Your machine has been designed for use with passenger cars and light trucks. Do not try to
work with larger wheel diameters or heavier wheels than shown in the specifications. The maximum allowed
wheel diameter is 800 mm (31-1/2'') and the maximum width is 508 mm (20'').
• Before use make sure that safety cover is in its closed position. Do not open the safety
cover until the wheel comes to a complete stop (see Picture C).
5
• Keep hands, fingers and legs as far as possible from the moving machine parts. Keep safe
distance from the spinning wheel.
• Before starting the machine make sure that all tools, caps, balancing weight and other
accessories are removed from the machine or its close proximity.
• Never stay or let other persons stay close to the spinning wheel.
• If you machine does not come with power cable plug. The machine must be connected to
the electric supply source by grounded 230 V power plug. Because of safety reasons, have the
power plug installed by qualified electrician. Never remove the grounding pin or modify the plug. Do not use
power plug adapter.
• WARNING: People using pacemaker should consult physician before using this machine. Working
closely to electrical voltage may have a negative effect on the pacemaker function or it may cause its
malfunctioning.
Electrical equipment
• Make sure the power supply cable plug is securely connected to the wall outlet. The voltage in the wall
outlet must be the same as the voltage shown on the specification label. Higher voltage may damage the
electrical motor of the machine and too low voltage will not provide the machine with sufficient power.
• Before connecting the power supply cable make sure that the main switch is in the Off position. After you
have finished the work, switch off the main switch and disconnect the power supply cable.
• When carrying electrical power tools, never hold them by their power cable. When disconnecting the
power cable from the wall outlet, do not pull the cable by its cord.
• Do not expose the power cable to high temperatures, grease or paint thinners. Make sure the cable does
not hang over sharp edges.
• Inspect the cable for damages regularly. If you discover cut or damage, have it replaced by qualified
technician. Inspect extension cables regularly. If you discover cut or damage, have it replace by qualified
technician.
• If you have to use an extension cable, use only high quality cable, certified by an appropriate authority.
Extension cables can be used only if completely unwound. Inspect cables regularly. Damaged cable must
be repaired or changed for a new one immediately.
• Before attempting any maintenance or attaching any accessories, switch off the main switch and
disconnect the power supply cable form the wall outlet.
• Make sure the machine is not switched on incidentally. Do not keep you hands close to the main switch
during work.
• If you want to install the machine on a table, switch off the security switch after installing.
• Do not use the machine in explosive environment (e.g. paint shops or environment where explosives are used).
• Do not use in environments with high humidity or if the machine is wet.
Rotary tools
• Wear suitable protective clothing (e.g. do not use loose clothing, ties or jewellery. Tie long hair securely at
the back of your head. Protect you legs and do not use old, worn shoes. Roll up your sleeves or securely
tie them around your wrist). Warning! Risk of being caught by spinning machine parts.
• Do not remove safety covers from the machine. Keep you working environment as safe as possible.
6
No.
108
109
110
111
Code
C3110103
C311010306
C3110205
C099010302
GB/T 70
C311010402
C311010401
GB/T 119
C311010403
C311010405
C311010404
C311010406
Number of pieces
1
1
1
1
1
1
1
1
1
2
2
1
1
201
202
203
204
205
206
207
208
Description
shaft
spring
contact switch
shaft support
screw M6x15
handle pole
rim distance calibre
stud
plastic insert
seal ring
spring
band with scale
301
302
303
304
305
306
307
308
309
310
311
312
313
314
C0990107
C0990201
GB/T 973
GB/T 41
GB/T 819
C099010707
GB/T 973
C0990207
GB/T 819
C099010706
GB/T 973
C099010708
C0990208
C099010709
1
1
3
8
4
1
4
1
4
1
4
1
1
1
control panel holder
cable RVB 300/500
screw M5x16
nut M4
screw M4x28
plastic cover I
screw M5x16
printed circuit board
screw M4x15
display mount
screw M5x16
plastic cover II
control panel
plastic cover III
401
402
403
404
405
406
407
408
409
410
411
412
413
414
415
416
C0990209
C0990211
C0990212
GB/T 973
GB/T 95
GB/T 973
C0990213
GB/T 41
GB/T 95
GB/T 93
GB/T 41
GB/T 41
GB/T 862.2
C0990200
C0990210
C3110208
1
1
1
2
2
2
1
2
2
2
2
1
1
1
2
4
electrical panel
capacitor 30μF
transformer 30W
screw M4x16
washer ϕ4
screw M3x10
resistor 32Ω 50W
nut M4
washer ϕ3
flexible washer ϕ3
nut M3
nut M8
washer ϕ8
electrical panel support
fuse DM5X20-2A
nylon spacer for card
23
MATERIAL CHART???
AND PART LISTING
No.
1
2
3
4
5
6
7
8
9
10
11
12
13
14
15
16
17
18
19
20
21
22
23
24
25
26
27
28
29
30
31
32
33
34
35
Code
GB/T 5781
GB/T93
GB/T93
C311010204
GB/T 973
GB/T 893.1
C311010205
GB/T 276
GB/T 95
GB/T 41
C311010210
C3110203
GB/T 96
GB/T 1972
C311010211
C3110111
GB/T 70
C3110110
C311010212
C311010208
C311010206
C311010207
C311010202
C311010201
GB/T 893.1
C311010203
GB/T 95
GB/T 973
GB/T 973
GB/T 95
C31101020901
C31101020902
C311010213
C3110202
GB/T 95
101
102
103
104
105
106
107
C099010305
GB/T 973
GB/T 95
C311010303
GB/T 973
C311010304
GB/T 73
22
Number of pieces
1
1
1
1
3
1
1
2
4
5
1
2
2
4
1
1
1
1
1
1
1
1
1
1
1
1
2
2
2
2
1
1
1
1
1
1
3
3
2
1
1
1
Description
screw M10x20
flexible washer ϕ10
washer ϕ10
belt pulley
screw M3x5
seal ring ϕ 25
toothed ring
bearing 6005
washer ϕ10
nut M10
through screw (H)
sensor mechanism
washer ϕ10
choking washer ϕ10
bushing
adjusting nut
screw M10x160
cone set
threaded centre
seal ring ϕ145
plastic cap
spring
washer
driving shaft
seal ring ϕ50
shaft arm
washer ϕ4
screw M4x10
screw M3x10
washer ϕ3
support A
support B
cable coupling
scanning desk
washer ϕ3
cover
screw M3x10
washer ϕ3
plastic rim
screw M5x7
casing
screw M5x7
UNPACKING
???
After unpacking make sure that all parts and accessories are present. Use the Part list for check up
(page 22 and 23). If any part is missing or damaged, contact the vendor or distributor immediately.
INSTALLATION AND ASSEMBLY INSTRUCTIONS
Note: More information about the listed parts may be found in the Detailed drawing (page 17 - 21).
Correct machine placement:
1. CAUTION: Use the machine only on dry, levelled and solid concrete floor, free of dirt and
oils. The floor must be able to support the machine weight plus the weight of the tires and other accessories and tools.
2. Your machine is not designed for outside use. Do not install outside or in wet and humid environment.
3. Make sure that there are not obstacles such as low ceiling or electrical power line within close proximity
of the machine. Make sure that the space where the machine is to be installed complies with safety requirements, has adequate access, exits etc. Do not install close to flammable materials and liquids.
Installing to a floor:
1. Using a helper and lifting equipment, lift the machine above the installation spot. Use the three mounting
holes (12 mm (1/2")) in the machine base as a guide to mark the locations for the holes on the floor. Move
the machine aside temporarily.
2. Drill the holes according to the markings. Holes must have minimum diameter of 12 mm (1/2") and must be
at least 100 mm (4") deep.
Note: Do not forget to clean the holes from the concrete dust.
3. Move the machine back over to the installation spot and align it with the three holes drilled in the floor. Use
steel wedges during the alignment if necessary. Steel wedges should not be thicker than 12 mm (1/2").
4. Mount the machine to the floor using three washers, nuts and anchoring bolts (concrete mounting bolts),
diameter 12 mm (1/2"). Use the correct bolt length. Bolts, washers and nuts are not supplied.
Mounting the safety cover to the machine:
1. Slide the shaft opening of the safety cover on the shaft. Make sure that the opening in the safety cover is
aligned with the previously installed casing.
2. Using screw and nut, mount the safety cover to the shaft. The safety cover is now fixed in place. The tire
balancer may be used only with the installed safety cover.
3. Due to transportation reasons your machine is delivered with the control panel arm down. Unscrew the two
screws and lift the arm, turning it upwards so the other set of mounting holes on the box are align with the
arm holes. Use caution when lifting the arm. Do not break the electrical wiring connecting the arm
and the box. Screw the two screws back in and tighten carefully.
7
CONTROL
??? PANEL
Note: More information about the listed parts may be found in the Detailed drawing (page 17 - 21).
PICTURE A
A. Digital display showing the BALANCING INFORMATION for the inner disk rim. Shows the balancing weight
that must be placed on the inner disk rim.
B. Digital display showing the BALANCING INFORMATION for the outer disk rim. Shows the balancing weight
that must be placed on the outer disk rim.
C. Displaying the selected mode for alloy disks balancing procedure (ALU).
D. Key for entering offset information for disk.
E. Key for entering the disk width.
F. Key for entering the disk diameter.
G. Measurement cycle START key.
H. Emergency STOP key.
I. Limit key. Use this key if the machine is not spinning and only if the display shows the value of the balancing
weight for inner and outer disk rims lower than 5 grams (0.2 ounces).
J. Key for optimising unbalanced wheels. Enables to lower the weight that needs to be placed on the disk rim
to balance the wheel.
K. Unit selection key Enables displaying all values in ounces / inches or gram / millimetres.
Self-calibration.
L. Recount key. Enables erasure of all or some previously entered values.
M. Alloy wheel repair function ALU.
N. Displaying the optimising process of unbalanced wheel. Shows that STATIC balancing process has been
chosen.
O. Displaying the balancing information for the outer side. Shows that the balancing weight must be placed on
the upper part of the disk - if all control lights are lit.
P. Displaying the balancing information for the inner side. Shows that the balancing weight must be placed on
the upper part of the disk - if all control lights are lit.
8
21
USING THE CONTROL
PANEL
???
The keyboard may be used to perform the following operations:
Changes the distance (value "a") . . . . . . . . . . . . . . . . . . . . . . . . . . . . . . .
or
Changes the width (value "b") . . . . . . . . . . . . . . . . . . . . . . . . . . . . . . . . .
or
Changes the diameter (value "d") . . . . . . . . . . . . . . . . . . . . . . . . . . . . . . .
or
Value re-calculation . . . . . . . . . . . . . . . . . . . . . . . . . . . . . . . . . . . . . . . .
Limiting values . . . . . . . . . . . . . . . . . . . . . . . . . . . . . . . . . . . . . . . . . . . .
Sets the dynamic and static balancing functions. Sets function ALUx dynam . .
Sets the static and dynamic balancing function . . . . . . . . . . . . . . . . . . . . .
Sets the ALUx dynamic balancing function . . . . . . . . . . . . . . . . . . . . . . . .
Performs self-calibration . . . . . . . . . . . . . . . . . . . . . . . . . . . . . . . . . . . . .
Starts the machine - by closing the protective cover . . . . . . . . . . . . . . . . .
Measures the balancing or imbalanced value in grams or ounces . . . . . . . .
Measures the width in millimeters or inches . . . . . . . . . . . . . . . . . . . . . . .
or
Measures the diameter in millimeters or inches . . . . . . . . . . . . . . . . . . . . .
or
Performs optimizing of balanced or imbalanced values . . . . . . . . . . . . . . . .
Starts the measuring process . . . . . . . . . . . . . . . . . . . . . . . . . . . . . . . . .
Emergency cycle stop . . . . . . . . . . . . . . . . . . . . . . . . . . . . . . . . . . . . . .
PICTURE B
20
9
Note: More information about the listed parts may be found in the Detailed drawing (page 17 - 21).
Fixing the wheel on the machine shaft:
1. Connect the power cable plug (not supplied) to a properly grounded wall outlet with correct voltage (230V).
2. Lift the safety cover to its utmost position. (see PICTURE C)
3. Select the correct cone size, that ensures secure disk fastening (without vibrations) to the shaft. Place the
cone on the transmission shaft. (See PICTURE C and Detailed drawing A).
4. Place the disk centre hole on the transmission shaft. Make sure the inner disk rim is against the cone
(See PICTURE C).
5. Hold the adjusting nut with both hands. Using your thumb, move the safety lever on the adjusting nut to
the right. Hold the safety lever in its correct position and slide the adjusting nut onto the driving shaft and
tighten securely so it fits the outer disk rim. Release the safety lever to secure the disk on the transmission
shaft in its correct position (see PICTURE C).
wheel
driving shaft
safety
clip
adjusting nut
housing
cone
(metal)
fastening cover
(nylon)
PICTURE C
10
19
Wheel measurement:
Note: You can programme the output values and numbers to be shown on the display in ounces / inches
or grams / millimetres. We will be using the grams / millimetres setting throughout this manual,
see PICTURE B.
1.
2.
3.
4.
Clean the wheel to be balanced from dirt and remove all balancing weight.
Turn the switch to the "ON" position (see PICTURE C).
Measure the rim distance (value a). Slide the ruler to the right till its tip touches the upper/inner disk rim.
A calibre is attached to the ruler, showing the value in units (inches or millimetres) according to you what you
have set (see PICTURE D)
5. Do not forget to move the disk rim distance rule back to its original position. Follow the instructions
depicted in PICTURE B and enter the measured value using the keyboard keys.
6. Disk manufactures usually write the disk width (value b) on the upper / inner disk rim. If that is the case,
you should be able to read the value from the disk.
Note: If the manufacturer did not marked the disk width, use the supplied U-measuring gauge to
measure the width.
The measuring is done as follows: Place one end of the gauge on the upper / inner disk rim. Place the
other end on the upper / outer disk rim. Read the measured value on the gauge dial.
7. Enter the obtained value either shown on the disk rim or measured by the gauge according to instructions
depicted in PICTURE B.
8. Manufactures usually specify the tire diameter (value d) on the outer tire side (see PICTURE D).
9. Enter the value according to instructions depicted in PICTURE B.
10.The tire balancer is set and you may start the balancing cycle.
Read the
value
here
PICTURE D
18
11
Balancing procedure:
ASSEMBLY
???DRAWING
1. Close the safety cover (see PICTURE C).
2. The wheel starts turning, reaching the balancing speed automatically and stops within a few seconds.
3. On the A display, you will see the balancing information for the inner disk rim or the required balancing
weight in ounces or grams for the inner disk (see PICTURE A).
4. On the B display, you will see the balancing information for the outer disk rim or the required balancing
weight in ounces or grams for outer disk rim (see PICTURE A).
Note: Value less than 10 - 12 grams (0.4 - 0.5 ounces) is usually small enough to be ignored. If you need
to see more precise value, use the limit key to reduce the value to less than 5 grams (0.2 ounce). When
changing the setting the machine must be stopped (see Picture A and picture B).
5. Display P shows where the balancing weight is to be placed on the inner disk rim. If all control lights are lit
on P display, place the balancing weight on the upper part of the vertical disk axis. If not all control lights
are lit, turn the wheel (left or right) with your hand until all lights are lit. Then place the balancing weight on
the upper part of the vertical disk axis (see PICTURE A).
6. Display O shows where the balancing weight is to be placed on the outer disk rim. If all control lights are lit
on O display, place the balancing weight on the upper part of the vertical disk axis. If not all control lights
are lit, turn the wheel (left or right) with your hand until all lights are lit. Then place the balancing weight on
the upper part of the vertical disk axis (see PICTURE A).
7. Manufactures of balancing weight usually write the weight (in ounces or grams) on the balancing weight
itself. Use the same balancing weight (not supplied) with the same values as shown on the display P and O.
Place the weight in the correct position on the inner or outer disk rim. Use the supplied weight attaching
pliers to fix the weight on the rim.
Self-calibration:
1. Place either balanced or unbalanced wheel of "regular" dimensions on the balancing machine (see
PICTURE C).
2. Measure the rim distance, width and wheel diameter and enter the measured values (see PICTURE B).
3. Press and hold keys "C" and "START". Make sure you keep both keys pressed down (see PICTURE B).
4. The digital display showing the BALANCING INFORMATION for the inner side (part A on the control panel)
will show flashing symbol "CAL", requiring conformation of your request to perform self-calibration.
NOTE: If you want to perform self-calibration, keep both keys described in step 3 pressed down, until the
symbol "CAL" stops flashing (see PICTURE A and PICTURE B).
5. When the symbol "CAL" disappears, release both keys ("C" and "START"). Lower the safety cover down and
start the first cycle of self-calibration (see PICTURE A and PICTURE B).
6. When the first cycle finishes, the digital display, A (on the control panel) showing the BALANCING
INFORMATION for the inner side will show symbol "ADD 100". At the same time the control light of the digital display B (showing the balancing information for the outer side) starts flashing. Now, place 100 grams
(3.5 ounce) balancing weight on the outer side of the wheel.
12
17
DISPOSAL
When the operational life of your device is over, dispose off it in accordance with valid rules and regulations.
Your product is made of metal and plastic parts that may be recycled when separated.
1. Disassemble all parts.
2. Separate all parts according to the material they are made of (e.g. metals, rubber, plastics, etc.).
Take the separated parts to the recycling facility near you.
3. Electrical waste (used electrical power tools, electric motors, recharging equipment, electronics,
accumulators, batteries etc.).
Dear customer. In accordance with the valid regional rules and regulations describing the management of
electrical waste, electrical waste is considered dangerous.
Disposal of electrical waste must be therefore handled as dangerous waste in accordance with waste
management rules valid in the state you are in.
It is prohibited to mix electrical waste with regular household waste.
You may return your used electrical appliance to a recycling facility near you. More information about
electrical and dangerous waste disposal may be obtained from your local authority or from the Internet.
CAUTION
If the machine breaks down, send it back to the vendor for quick repair.
Please, enclose brief description of the defect. That makes repair easier. If the machine is still covered by
warranty, enclose the warranty card and proof of purchase receipt. After the warranty period expires, we
repair your machine for a special price.
To prevent possible damages during shipping, packed the machine carefully or use the original packaging
material. We are not liable for shipping damages due to incorrect packaging of your machine. If making
a claim at the shipping company the level and method of packaging plays a major role during claim evaluation
process.
Note: Pictures and contents in this manual may slightly differ from the actual product or accessories.
It is due to continuous improvement of our products. Such small differences have no effect on the product
functionality.
7. Close the wheel cover. After this cycle is over, the machine is fully calibrated. The digital display A (on the
control panel), showing the BALANCING INFORMATION for the inner side will show flashing symbol
"END CAL". This symbols reminds you that the self-calibration process is over (see PICTURE A and
PICTURE B).
8. NOTE: All information gathered throughout the self-calibration process are saved in the machine memory.
The calibration process may be repeated as many times as necessary or each time when you are not sure
that the machine works properly.
Static balancing, function ALU:
1. NORMAL BALANCING: This function is used for disk
balancing made out of alloy or light steel compositions. Place
balancing weight with a clamp on the disk (see PICTURE E).
2. ALU1: This function is used for disk balancing made out of alloy
or light steel compositions. Place an adhesive balancing weight
on the disk (see PICTURE E).
3. ALU2: This function is used for disk balancing made out of alloy
or light steel compositions. Place hidden external adhesive
weight on the disk (see PICTURE E).
4. ALU3: Used for combined balancing. Place a balancing weight
with a clamp on the outer rim and an adhesive weight on the
inner rim (see PICTURE E).
5. STATIC BALANCING: Used for motorcycle wheel balancing
or if you cannot place the weight on both disk sides
(see PICTURE E).
NOTE: Function ALU may be used each time when you need
to find out the value of the weight for different rim placement
or if function NORMAL cannot be used. Press key "A" and
select required function (ALU1, ALU2, ALU3). For each ALU
function the machine will show the balancing
information (weight) and its placement (see PICTURE A
and PICTURE B).
PICTURE E
16
13
Optimising the unbalanced values:
NOTE: This function enables you to lower the weight required to balance the wheel.
1. Place unbalanced wheel on the balancing machine (see PICTURE C).
2. Measure the rim distance, width and wheel diameter and enter the measured values (see PICTURE B
and PICTURE F).
3. Press the "STATIC" key on the control panel. Digital display A (on the control panel) showing the BALANCING INFORMATION for the inner side will show symbol "r s" (see PICTURE A and PICTURE D).
4. Close the wheel cover so the machine can start the measuring cycle.
5. After the measuring cycle is over the digital display A (on the control panel) showing the BALANCING
INFORMATION for the inner side, will show a message asking you to turn the tire on the disk around. Before doing so, use a chalk to mark the tire-disk position on the machine housing, on the disk and the tire itself.
That way you will place the tire back on the disk exactly as it was before. Take the wheel off the balancer,
take out the air and using a tire changer machine (not supplied) turn the tire on the disk by 180°.
6. Inflate the tire and put the wheel back on the balancing machine. To put the wheel in the same position as
before, use the mark on the machine housing (see PICTURE C).
7. Close the wheel cover so the machine can start the second measuring cycle.
8. After this measuring cycle is over, the digital display B (on the control panel) showing the BALANCING
INFORMATION for the outer side, will display value in (%). This value shows how many percent was the
new value reduced in comparison with the ORIGINAL BALANCING weight. At the same time the digital
display A (on the control panel), showing the BALANCING INFORMATION FOR THE INNER side, will show
the actual static BALANCING INFORMATION. This value may be reduced by the percentage value
displayed on the B display (on the control panel) showing the BALANCING INFORMATION FOR OUTER
side (see PICTURE A).
9. Press the "stop" key. This will stop the optimising process. Repeat the above described step 3 or use the
usual measuring cycle.
MAINTENANCE, CLEANING AND INSPECTIONS
WARNING: Before performing any maintenance or cleaning always turn the switch to the "off" position
and disconnect the power cable form the electrical power source (see Detailed drawing E)
1. BEFORE EACH USE, check the machine conditions. Check if all screws are securely tightened, if moving
parts are adjusted properly, if they move correctly and are in good working condition, inspect the machine
parts for cracks and other damages. Check the power supply cable. Also make sure that there are no other
dangerous conditions present that may prevent the machine from operating properly. Do not use the machine if you hear strange sound or feel unusual vibrations. Disconnect the machine from the electric supply and
have it repaired immediately. Do not use damaged tools or machine.
2. Lubricate all moving parts REGULARLY, using high quality oils.
3. TIGHTEN OR CHANGE THE V-BELT: The belt must be tightened or changed regularly. Unscrew
two screws and adjust or change the belt. Remove all balancing weight and tools from the upper machine
desk and remove the desk. Loose the four nuts so you can move the motor back and forth. If you want
to increase the tension, move the motor back until the belt is properly tightened. Tighten the four nuts to
secure the motor in place. If you want to change the belt, move the motor forward. When the belt is loose
change it for a new one. Move the motor back until the belt is properly tightened. Tighten the four nuts to
14
4.
5.
6.
7.
secure the motor in place. Mount the upper machine desk back and secure it in place with four screws that
you have removed previously.
FUSE EXCHANGE: If you need to change the electrical fuses for both circuits, you have to remove two
screws at the front and two screws at the back of the desk. Remove all balancing weight, tools etc. from the
desk and remove the desk. Change both fuses for new ones.
NOTE: Even if only one fuse is burned, always change both fuses at the same time.
Use vacuum cleaner, soft brush or cloth to remove all dirt and particles from your machine.
If needed, use wet cloth, soft cleaning solution or light paint thinner.
Cover the machine with a protective cloth during storage.
PLEASE PAY ATTENTION TO THE FOLLOWING STATEMENT
DETAILED DRAWING AND PART LISTING SHOULD ONLY BE USED FOR INFORMATIVE PURPOSES. THE
MANUFACTURER AND DISTRIBUTOR ARE NOT OBLIGATED TO PERFORM ANY REPAIRS OR SPARE
PART EXCHANGE. THE MANUFACTURE AND DISTRIBUTOR PROHIBIT THE USER OR BUYER TO
PERFORM ANY REPAIRS OR SPARE PART EXCHANGE. ONLY QUALIFIED TECHNICIAN IS AUTHORIZED
TO DO SO. THE BUYER SHALL BE RESPONSIBLE FOR ANY DAMAGES THAT MY OCCUR DUE TO
REPAIR, SPARE PART CHANGE AND/OR INSTALLATION PERFORMED BY THE BUYER.
EXPLANATION OF ERROR MESSAGES
1. Rotation signal is not working:
Incorrectly set sensor, motor did not start or there is an obstacle that prevents the wheel form turning.
2. During detection cycle the speed of the disk went down below the necessary speed, required for balancing.
3. Error in mathematical calculations, probably caused by incorrect self-calibration process. Repeat the selfcalibration process again. Wheel is not properly balanced.
4. The motor rotates backwards.
5. The safety cover was opened before the rotation could start.
6. Error in the self-calibration data saved in the memory. Repeat the self-calibration process.
7. Error in the self-calibration process:
This error may be happen if you stop the second wheel spin without placing the correct balancing weight
on the rim or the sensor cable is broken.
MAINTENANCE
• Keep your machine clean. Dirt from tools may enter the inner machine mechanism and cause damages to
your or machine.
• Do not use aggressive cleaning solution or paint thinners to clean the machine.
• Clean plastic parts with soft cloth dipped in soap water.
• Clean metal parts with cloth dipped in paraffin oil.
15