1
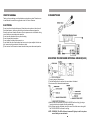
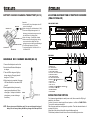
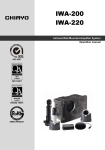
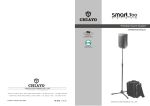
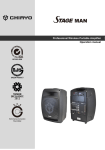
VRA-200/VRA-220
IWH-201/IWM-202/HC-10/HC-20/IS-20
INFRARED WIRELESS MICROPHONE SYSTEM
OPERATION MANUAL
CHIAYO ELECTRONICS CO., LTD.
Web site: http://www.chiayo.com.tw
E-mail: [email protected]
OFFICE: 30, LANE 27, SEC.4. JEN-AL ROAD, TAIPEI, TAIWAN / TEL: 886-2-2741-5741
FACTORY: 88, CHUNG HSIAO STREET 2, CHIAYI, TAIWAN. / TEL: 886-5-271-1000
Printed in Taiwan, Jan 2004
FAX: 886-2-2752-5242
FAX: 886-5-276-7611
12I395
USER'S MANUAL
CONNECTIONS
Thank you for purchasing our infrared wireless microphone system.Please be sure
to read the user's manual thoroughly and retain it for future reference.
CAUTIONS:
Do not cover the infrared emitter area of the wireless microphone or the surface of
the infrared sensor, which may disturb the unit and cause abnormal operation.
Since the unit uses infrared reflectance. Do not expose receiver to the black ceiling
or wall which may cause abnormal operation.
Do not near the speaker which may cause howling.
Do not drop and wet microphone.
Do not replace the battery when power is on.
Do not install the unit a location near heat source or in a place subject to direct sunlight, excessive dust, mechanical vibration or shock.
Do not use two A or B channels at same time which may cause abnormal operation.
MOUNTING THE INFRARED EXTERNAL SENSOR(IS-20)
1.Covering range of infrared rays.
2.Find the best position for sensor to be mounted as illustrated.
3.How to mount the infrared external sensor.
(a)Mount (Refer to illustration) the FIXING HOLDER (wall or ceiling) by using a
screw provided or two pieces of double coated tape.
(b)Find the best position with wide view of the room. Mount the sensor along with
the FIXING HOLDER on the wall or ceiling.
NOTE: POWER UP. The LED of infrared sensor will light up to red if not please
consult with you nearest dealer.
5
BATTERY CHARGER CHARGING THE BATTERY (HC-10)
Operation:
1.connect the DC plug of the adapter to the DC
ADAPTOR
socket of the charger.
CHARGE LCD
2.When charging , the indication lamp is (Red).
3.Press each charge/discharge button for
discharge (yellow)and press one more time
that will be back to charging (Red).
4.When full charge , (Green) and sounded .
DISCHARGING LCD
5.When connect the charging plug to the ring
output socket of the charger, the right
charger's
trough could be an external charge.
CHARGING BATTERY
6.The full charge capacity is 700mAH.
2100mA/1.2V
7.It can be charged with 4 x2100mA/1.2V or
2100mA/2.4V
2 x2100mA/2.4V.
LOCATION AND FUNCTION OF PARTS OF RECEIVER
(VRA-200/VRA-220)
VRA-200 FRONT PANEL
1
2
4
3
5
6
7
8
VRA-220 FRONT PANEL
10
9
12
11
13
14
REAR PANEL
HANDHELD MIC CHARGER HOLDER(HC-20)
R
R
IN
OUT
L
L
DC IN
MAIN SPEAKER OUT
EXTERNAL SENSOR IN
1.Connect the Adapter to a wall outlet.
2.Insert infrared Wireless Microphone
to charger.
3.The red LED of charger will light up
during charging. Charging time will
be approx. 3.5 hours.
4.When charging is completed, the green
LED indicator will turn on and red LED
turn off.
5.Rechargeable battery to be exactly
same type as attached only. When
other type of battery is installed in
microphone, you can not charger
the battery.
NOTE: Be sure to use specified battery only. You can not charge other type of
battery. Do not use any battery and battery charger other than specified.
4
1. POWER ON / OFF
2. IR1 / IR2 INDICATOR
3. AF SIGNAL INDICATOR
4. LINE VOLUME CONTROL
5. AUX IN PUT R/L VOLUME CONTROL
6. TONE BASS CONTROL
7. TONE TREBLE CONTROL
8. IR1 / IR2 VOLUME CONTROL
9. SENSOR IN( 15 TO 9 SENSOR IN PUT )
10. AUX IN PUT
11. LINE IN PUT R/L
12. LINE OUT PUT
13. SPEAKER OUT x2( 16 TO 13 LOAD SPEAKER<8
14. DC IN PUT (12~15 VDC / 3A )
15.EXTEMAL SENSORE
16.LOAD SPEAKER
AUX IN
12-15V
LINE
15
16
>)
OPERATING THE SYSTEM
First, please plugged adaptor in nearby home outlet, then connect the DC plug of
adaptor to your receiver.
Connect the receiver to karaoke amplifier and speaker e.t.c< Refer to CONNECTIONS >
Turn on both receiver and amplifier.
Slide the power switch on microphone to on position. Then the channel indicator of
receiver will light up.
Adjust the volume control of amplifier to comfortable magnitude.
Find the best position with a wide view of the room then setting the receiver.
1
LOCATION AND FUNCTION OF PARTS AND
CONTROL OF MICROPNHONE (IWH-201)
BODYPACK IR TRANSMITTER FOR LAVALIER OR
HEADWORN MICROPHONE(IWM-202)
3
1.battery cover
3
2.battery set
3.lavalier or headset
microphone input
4.power
5.power indicator
6.infrared emission source
1.Grille cover
2.Low battery indicator
The green LED showed the battery in full enough power.
The red LED showed the battery is weakly. Recharge the battery.
3.Power switch
Slide to turn microphone on.
4.Infrared emission source
Transmitting the infrared ray which carrying voice.
5.Power Selector Switch (Lo/Hi)
This switch changes transmitting power of infrared ray. At Lo position transmitting
distance is approx. 20M and at Hi position approx. 30M.
If transmission system may pick up some noise at Lo position.
It means the transmitting distance may be insufficient. Set the switch to Hi position.
Factory setting is Lo position.
At Hi power operation, operating time is approx. 4 hours.
(About half time of Lo power operation.)
REPLACEMENT OF BATTERY(IWH-201)
Turn the battery cover to counterclockwise and pull out. As shown in figure.
Make sure the power switch is in the OFF position when replacement battery.
Make sure the battery polarity is correction when installation the new battery.
5
6
2
1
4
1.Open battery cover and put 2*AA alkaline batteries.
2.Connect with lavalier or headset microphone input.
3.Power on and power indicator turns green, if turn red or remain off it means no
power or power shortage. Please replace with new batteries. Generally two
alkaline batteries can last 5~6 hours in use.
4.Adjust amplifier volume control.
5.Not cover with infrared emission source anytime.
Note
The installation location microphone direction and volume control
need to pay more attention not to result in sharp noise.
CUSTOM MADE RECHARGEABLE Ni-MH BATTERY
1.This battery is exclusively designed for the infrared wireless microphone.
2.Be sure to charge the attached battery before use.
3.For surely you do not repeat recharge the battery before full discharge.
4.Keep clean the terminal of charge, otherwise you may not charge the battery.
5.Do not repeatedly recharge the battery before full discharge, if you repeat above,
battery life will shorter.
6.Battery life about 1 year or 500 recharge cycle under normal operation, when you
feel operating time became shorter even full charging, the battery is exhausted.
7.Replace with new battery.(Be sure to use exactly same type as attached.)
BATTERY OPERATING TIME
Continuous operating time of fully charger Ni-MH 2100mA/2.4v battery is as follows:
Position of Power Selector Switch
Operating time
2
3
Lo position
Hi position
6 hours
4 hours